1. Overview
Magento 2 Order Processing Solution Kit delivers a satisfying user experience and retains them to stay longer with your business by offering a smooth order placement process.
This kit includes 4 main extensions to fasten Magento bulk order processing.

2. How Does It Work?
2.1. Quick Order
2.1.1. Fast Order CMS Page
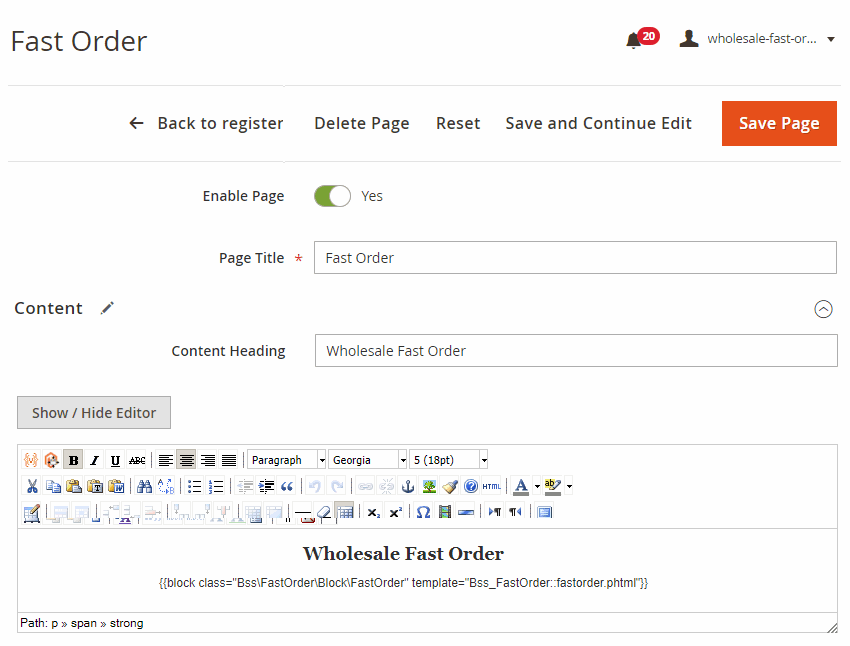
We have already built a Fast Order CMS Page for you.
To check, please go to Content ⇒ Pages ⇒ Fast Order
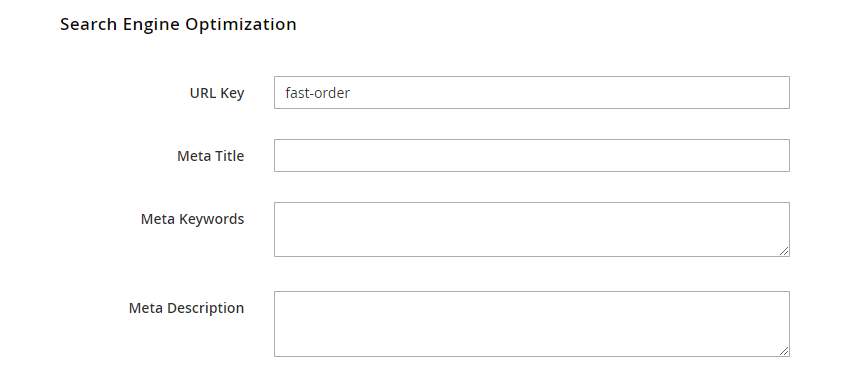
- Expand the Search Engine Optimization section to fill in the meta-information.
In URL Key, there is an auto-generated key. Copy the key to use in the fast order form configuration.
- Remember to Save Page if you make any changes.
2.1.2. Backend configs
In Admin Panel, please go to Stores ⇒ Configuration ⇒ BSS Commerce ⇒ Fast Order.
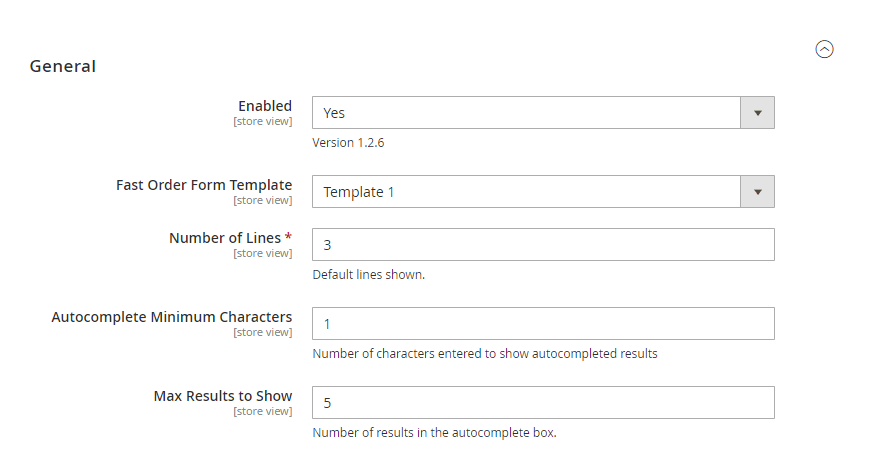
In Enabled: choose Yes to enable the module or No to disable it.
In Fast Order Form Template, choose either Search box in row or Search box out row.
In Number of Lines: set the number of lines of Fast Order auto shown on the CMS page.
In Autocomplete Minimum Characters: set the minimum characters typed in the search box so that the result can appear.
In Max Results to Show: set the number of results displayed in the autocomplete box

In Main Color, pick the color of header and buttons that fits the design of the whole website.
In Shortcut URL Key, enter the URL key of the Fast Order CMS Page. This field is filled in advance, so skip if you do not change anything in the CMS Page.
In Position of Fast Order Shortcut, choose where to display the shortcut link.
- Near mini cart
- In top menu
- In footer
In Enable for customer groups: choose groups to enable Wholesale Fast Order function.
Our extension supports a smart algorithm to pre-load multiple products based on customers’ order history whenever they access the fast order form.
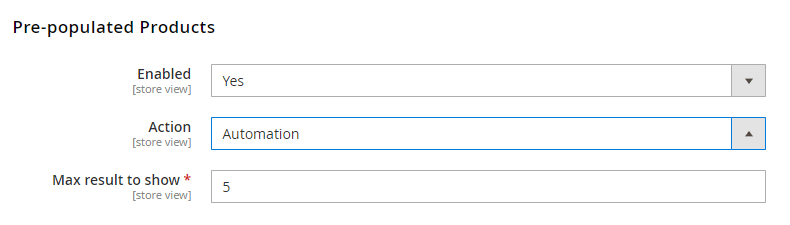
In Enabled, choose Yes to activate this smart feature.
In Action, choose either Automation or Manual.
- If you choose Automation, the pre-populated products are auto-loaded by two criteria:
+ 5 out of the Bestseller list according to default report, or
+ Most frequently ordered products from the customer's account.
+ Enter Max results to show. 5 is recommended.
+ Remember to Reindex data so that the automotive pre-populated products can be shown.
*Note:
+ For Logged-in customers: the module shows products in orders completed during the past 90 days. If orders were completed more than 90 days ago, the module displays best-seller products of the store during the past 90 days.
+ For Not Logged-in customers: the module displays best-seller products of the store during the past 90 days.
- If you choose Manual, you can add a list of products at will
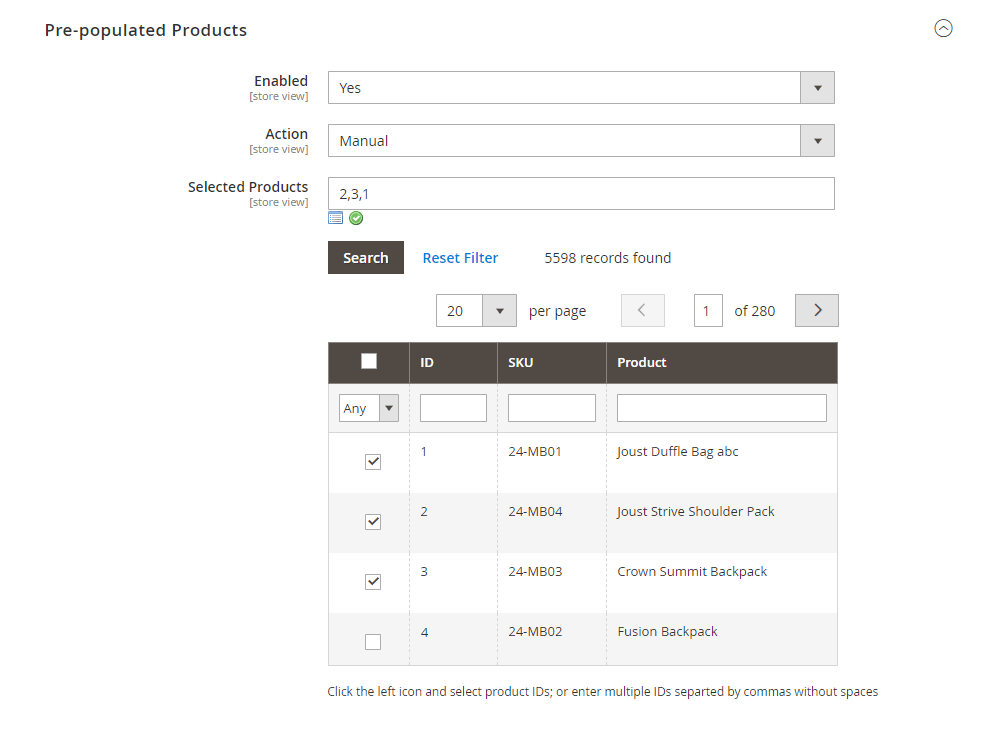
Click the left icon and select products IDs, or enter multiple IDs separated by commas without spaces.
In the end, save and flush the Cache.
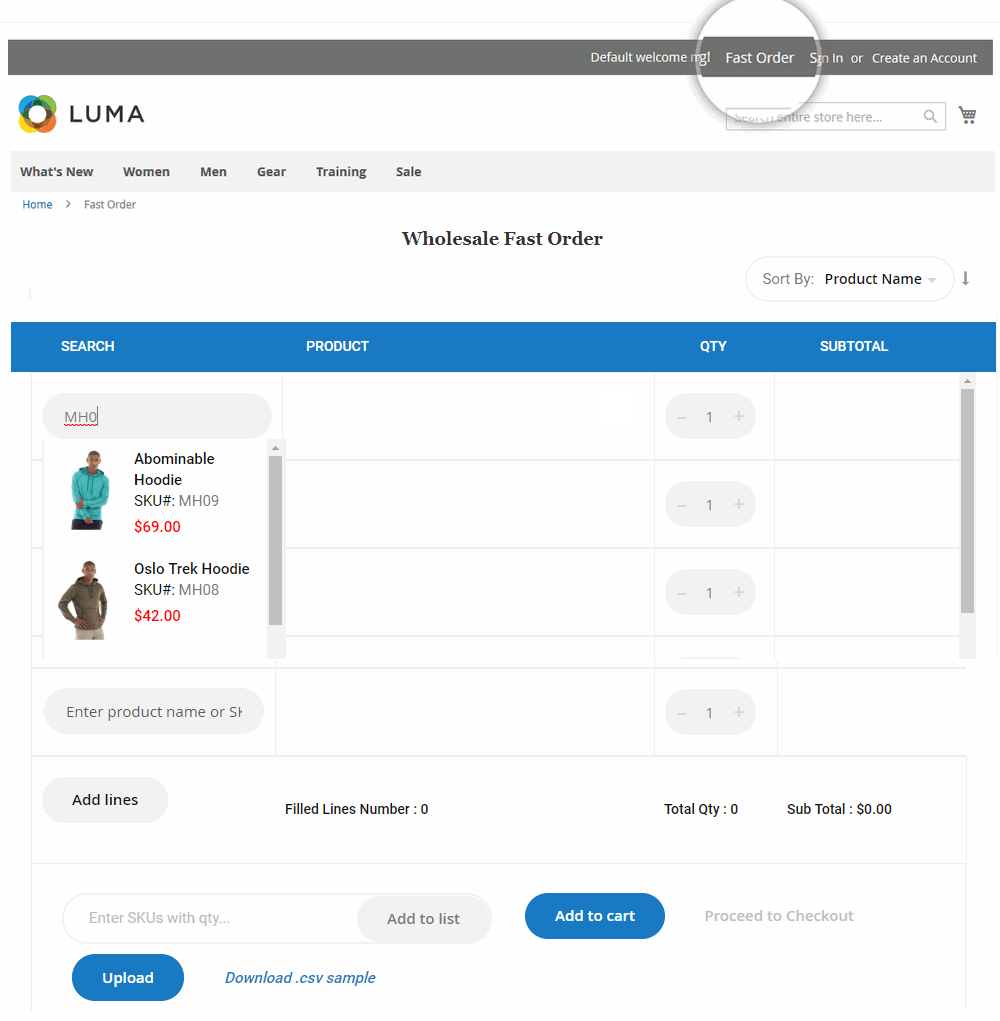
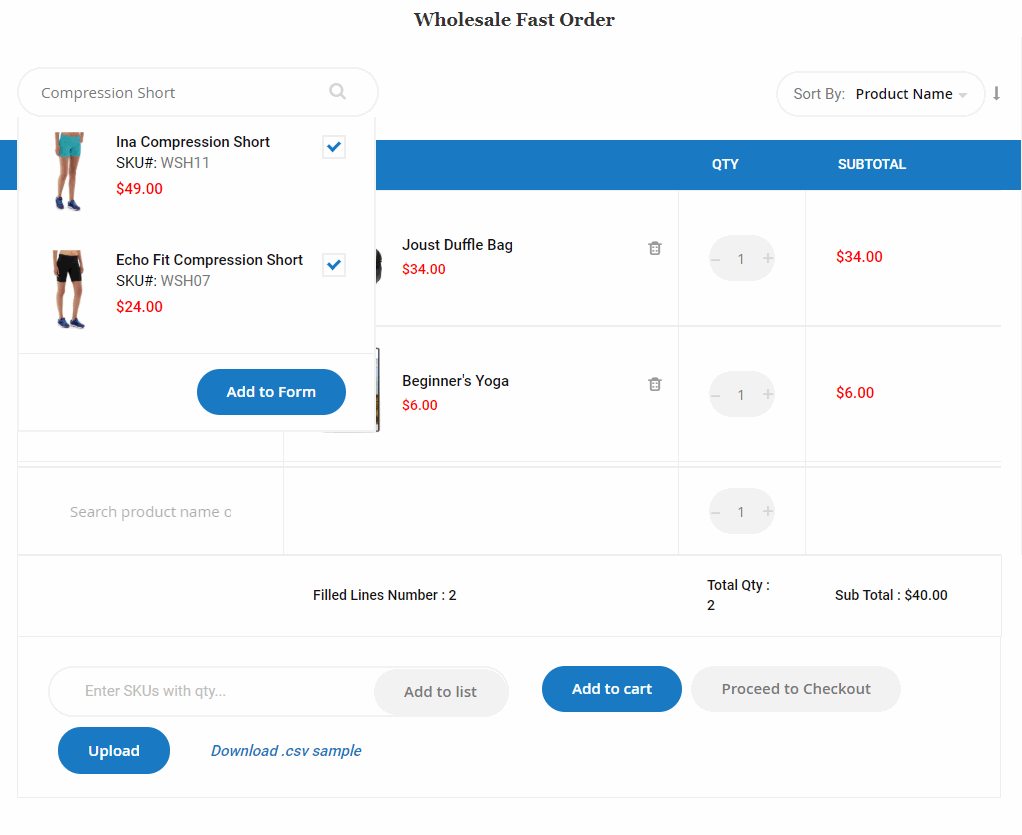
2.1.3. In the Frontend
TEMPLATE 1 - SEARCH BOX IN ROW
TEMPLATE 2 - SEARCH BOX OUT ROW
2.2. Add Multiple Products to Cart
Please go to Stores ⇒ Configuration ⇒ BSSCOMMERCE ⇒ Ajax Add Multiple Products Cart.
2.2.1. General Configs
In Enabled: Choose Yes to enable the module or choose No to disable it.
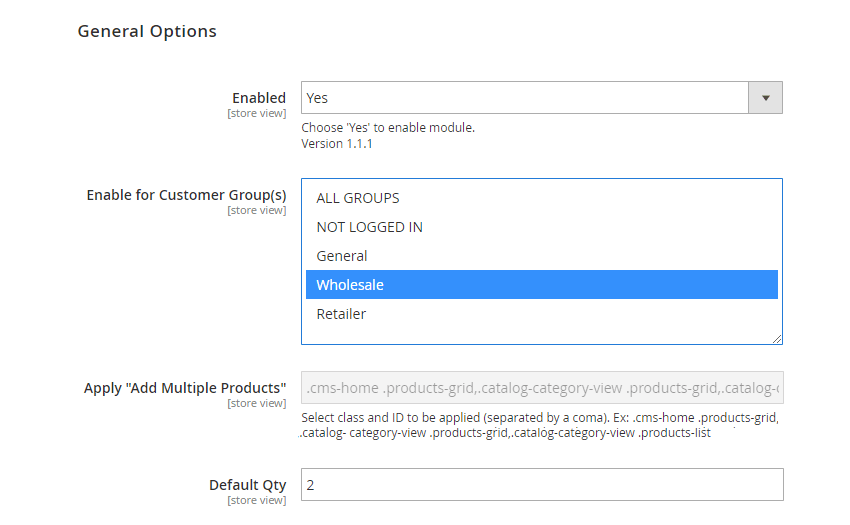
In Enable for Customer Group(s): Only chosen groups are allowed to add multiple products to cart.
In Apply “Add Multiple Products”: Select class and ID to be applied to the module (separated by a comma).
For example: .cms-home .products-grid,.catalog-category-view .productsgrid,.catalogcategory-view .products-list
In Default Qty: Select default quantity displaying in quantity box.
*Note:
- This “Add Multiple Products” configuration only works with the product list having a similar structure to the product list page on the default category page or default widget.
- If you want to apply the functions to other lists, such as Wishlist page or Compare page, you need to fix the HTML structure.
- The extension works well with all product types, except for products having the type of custom options to be File.
2.2.2. Button, Checkbox, Qty Box
- In Position of “Add all products” button: Choose where to display the Add all to cart button, as long as it is convenient for your customers: Top, Bottom, Both (Top and Bottom) or Right (Scroll)
Here is an example of the button in the Top position.
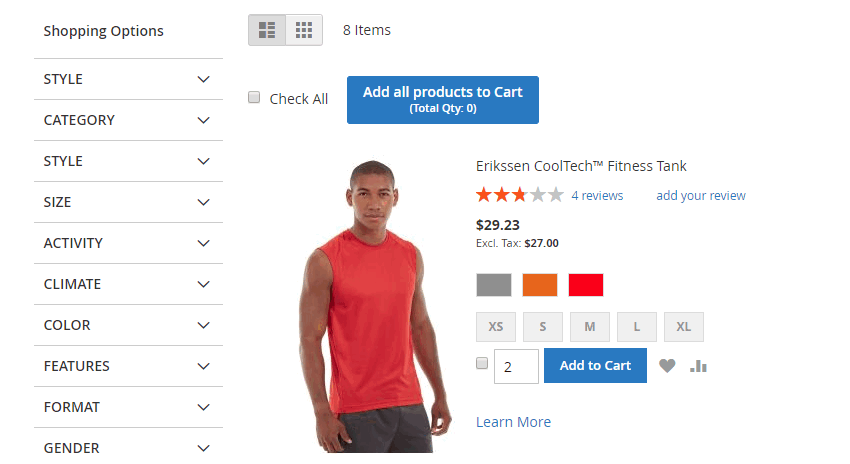
- In Display Total Product or Total Qty: Choose to display the total number of selected products in the Add all to cart button.
- In Show Product checkbox: Choose Yes to show checkbox next to each product.
- In Show Selected Icon: Choose Yes to show an icon to mark selected products.
- In Selected Icon Image: Upload the icon you want to display. The recommended dimension is 30x30px.
2.2.3. Popup Setting
Please define:
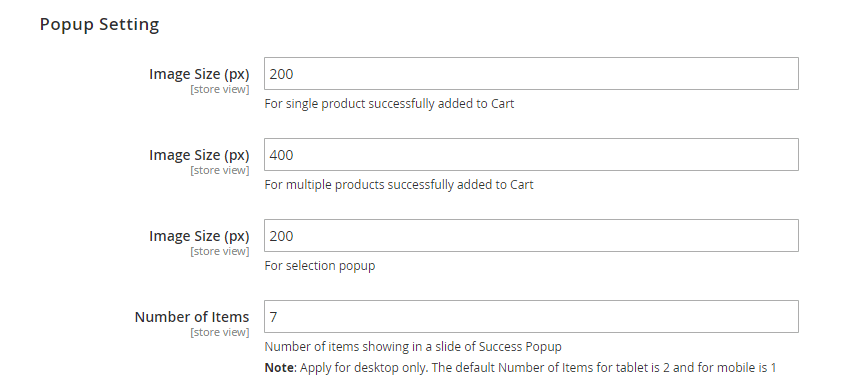
- Image size (px) – For single product successfully added to Cart, shown in the success pop-up in case of adding only one product to cart.
- Image size (px) – For multiple products successfully added to Cart, shown in the success pop-up in case of adding multiple products to cart.
- Image size (px) – For selection popup: Choose the image size of the product in the popup shown to specify options and quantity
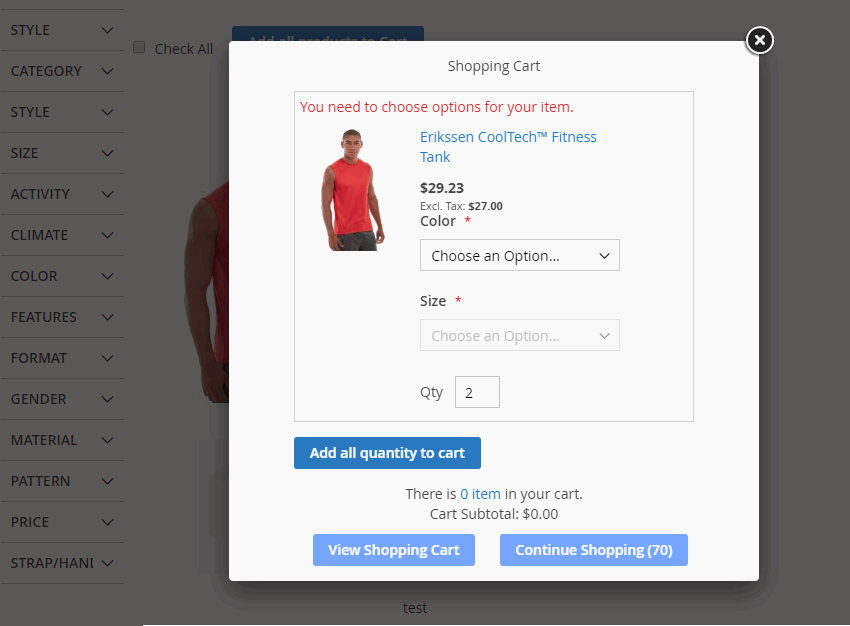
- Number of Items displayed in one success popup for desktop screens. The default Number of Items for the tablet is 2 and for mobile is 1.)
Also, choose the effect of slide in popup:

- Slide Speed: choose the transition duration of the slide in a millisecond.
- Auto Slide: choose Yes for the slide in the success pop-up to be moved automatically.
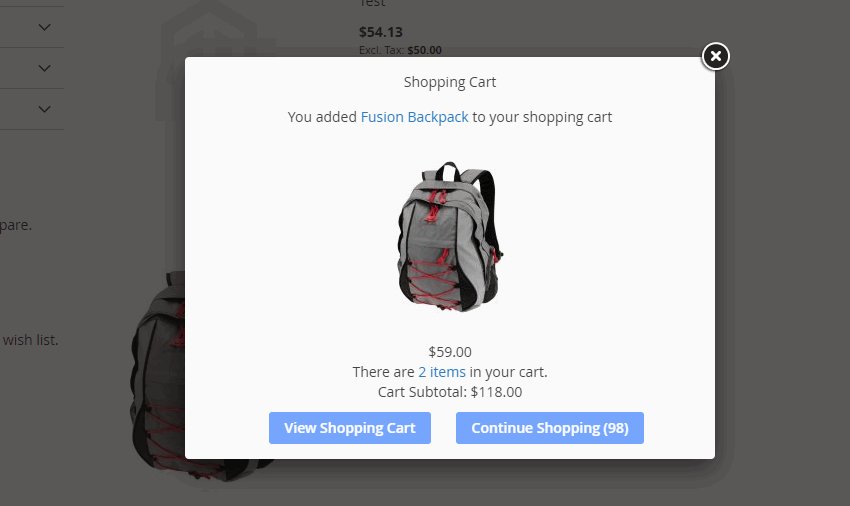
- Show Product Price: choose Yes show product price when adding only one product to cart.
- Show Product Image: choose Yes to show the products’ images in the success popup.
- Show “Continue” Button: choose Yes to show the continue shopping button at the success popup.
- Countdown Time on Button: choose either View cart Button or Continue Button to show the countdown time. Choose No if you do not want to display the countdown time.
- Countdown Time: …(s): Choose the period of time to countdown until redirecting to either View cart or Continue shopping.
- Show Mini Cart: choose Yes to display the mini cart on the success pop-up.
- Checkout Link in Mini Cart: choose Yes to show checkout link in the mini cart.
2.2.4. Popup Design
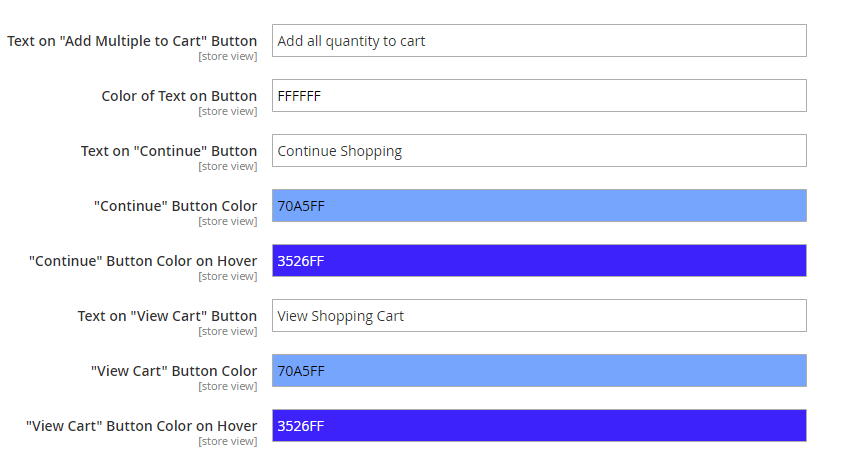
- In Text on “Add Multiple to Cart” Button: Enter the content of the button
- In Color of Text on Button: Pick the color of text in buttons.
- In Text on “Continue” Button: Enter the content of “Continue” button.
- In “Continue” Button Color: Pick the color of “Continue” button.
- In “Continue” Button Color on Hover: Pick the color of “Continue” button when hovering.
- In Text on “View Cart” Button: Enter the content of “View Cart” button.
- In “View Cart” Button Color: Pick the color of “View Cart” button.
- In “View Cart” Button Color on Hover: Pick the color of “View Cart” button when hovering.
2.3. Reorder Product List
2.3.1. In the frontend
This is how the Reorder Product List for Magento 2 is displayed in the frontend:
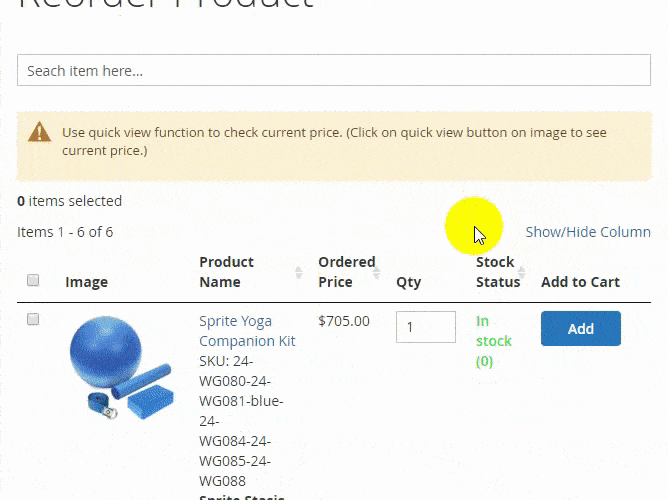
- List all purchased products in one place for fast reordering
- Choose which information to show: SKU, product image, price, ordered quantity, stock status, quantity box to reorder.
- Search items by any piece of information above. The search autocomplete makes it faster.
- Support Quick View to see the current price of items and choose product options in the popup
- Add multiple ordered products to cart and redirect to checkout.
- Support adding multiple purchased items to the wishlist
2.3.2. in the backend
2.3.2.1. General Options
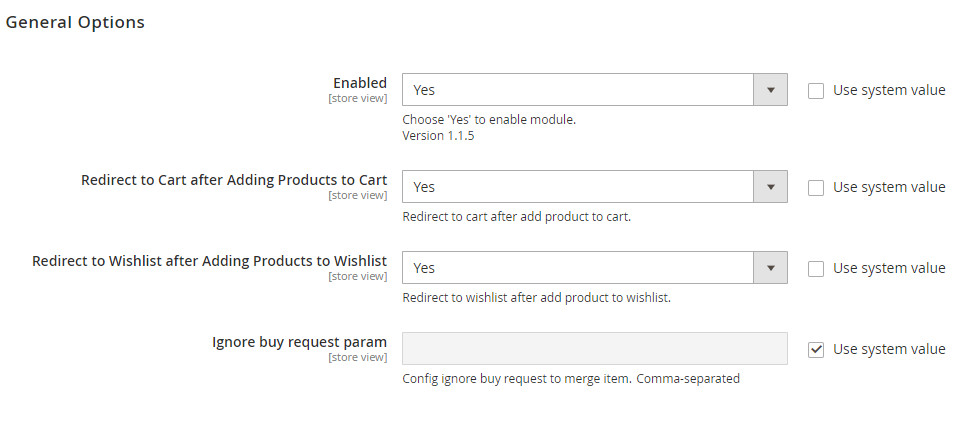
- In Enabled: choose Yes to enable the module
- In Redirect to Cart after Adding Products to Cart: choose Yes to allow customers to redirect to cart after they add products to cart, if not, choose No.
- In Redirect to Wishlist after Adding Products to Wishlist: choose Yes to allow customers to redirect to wishlist after they add products to wishlist, if not, choose No.
- In Ignore Buy Request Param: Tick to ignore the param of items after the checkout.
2.3.2.2. List
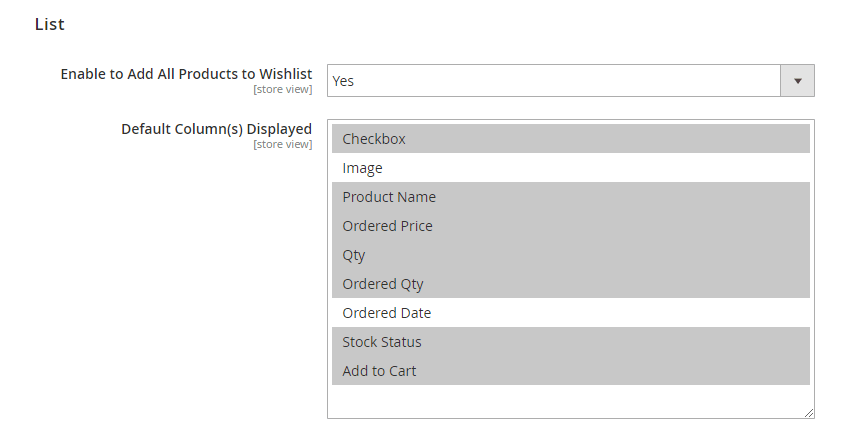
- In Enable to Add All Products to Wishlist: choose Yes so that customers can add all ordered products to the wishlist.
- In Default Column(s) Displayed: choose which columns you want to show as default in the frontend:
+ Checkbox: allow choosing multiple items.
+ Image
+ Product Name
+ Ordered Price: showing price of items at that time they ordered
+ Quantity: this will allow customers to choose the number of products to reorder
+ Ordered Quantity: showing the number of the ordered product
+ Ordered Date: column showing the date customers ordered products
+ Stock Status
+ Add to Cart
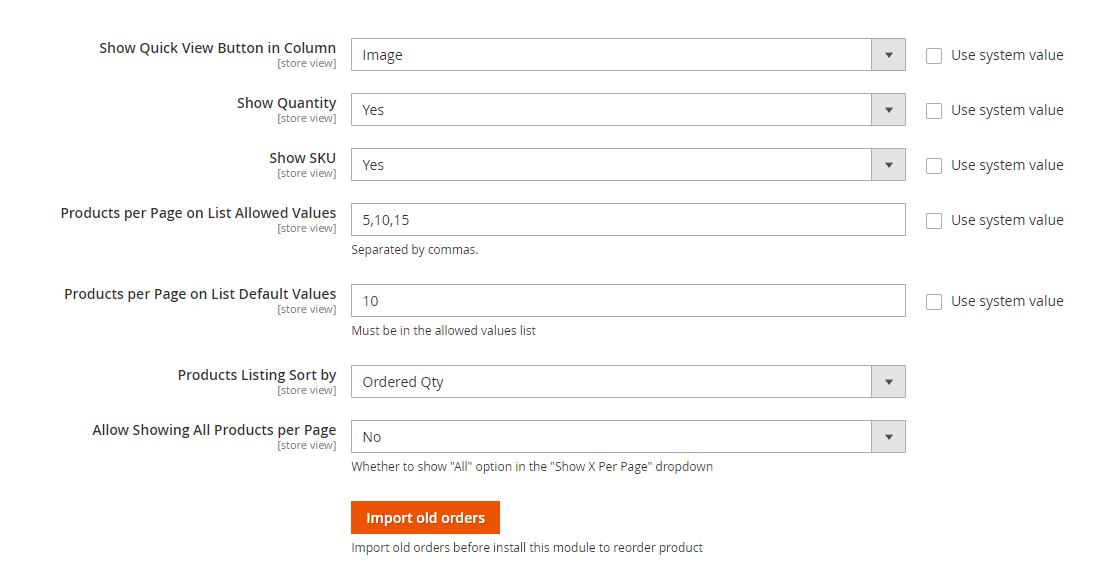
- Show Quick View Button in Column:
+ Image: choose Image if you want to show the Quick View button on the image of items.
+ Name: choose Name if you want that your customers can click into items’ names. Then, when customers click images, they can be zoom in/out.
- Show Quantity: Choose Yes to show the stock number of products, choose No if you want to hide it.
- Show SKU: Choose Yes to show SKU of products.
- Products per Page on List Allowed Values: type numbers separated by commas to set the number of products shown per page.
- Products per Page on List Default Values: choose one of the numbers you set on the above box to set the number of product will be displayed as default.
- Products Listing Sort by: choose one of these below:
+ Name
+ Price
+ Ordered Date
+ Ordered Quantity
- Allow Showing All Products per Page: choose Yes to show "All" option in the "Show X Per Page" dropdown, if not then choose No.
- Click Import Old Orders to update all previous orders placed before installing our extension into the Reorder Product List.
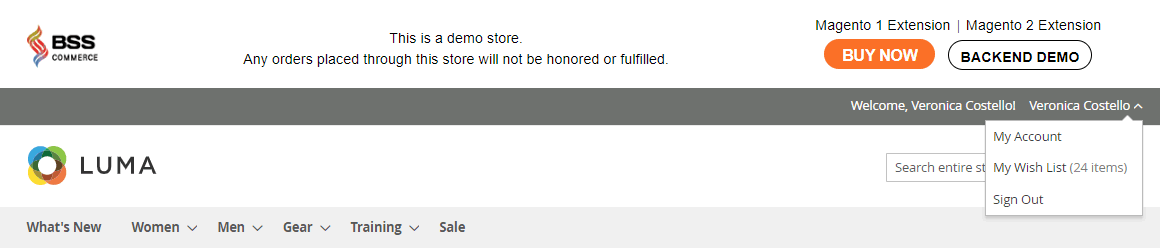
2.4. Multiple Wishlists
Please go to Stores ⇒ Configuration ⇒ BSSCommerce ⇒ Multiple Wishlist.
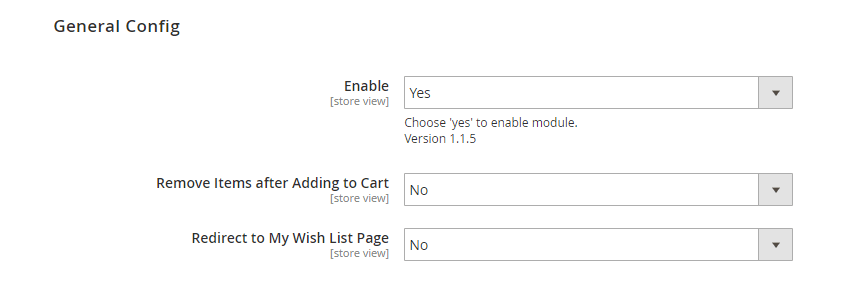
In Enable: Choose Yes to enable the module or choose No to disable it.
In Redirect to My Wish List Page: Choose Yes to redirect customers to My Wish List Page after a product is added to wishlist. Otherwise, choose No.
In Remove Items after Adding to Cart: Choose Yes to keep items in Wish Lists after being added to Cart. Otherwise, choose No.
2.4.1. Create Wishlist/Add to Wishlist
In the frontend, customers can create any wishlist within clicks.
Accordingly, whenever they click on the "wishlist" icon, there is a popup shown accordingly. Customers can choose existing wishlists or create a new wishlist to add products to.
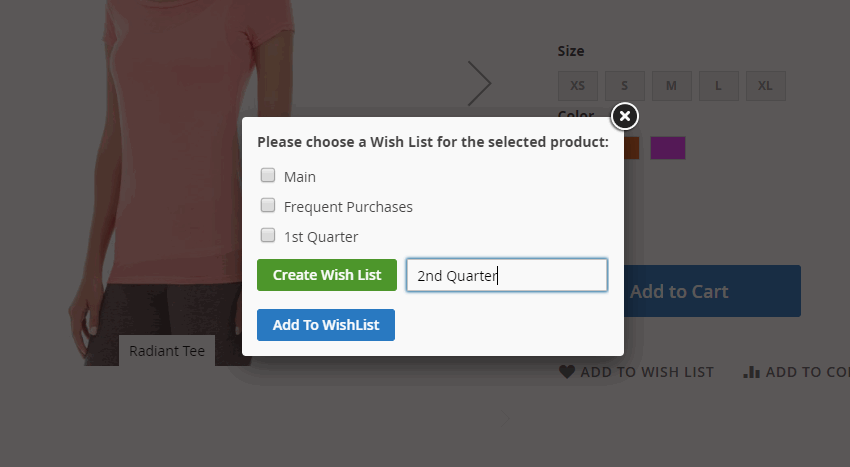
An item can be added to multiple wishlists from the product page, category page, search result page, compare page, the shopping cart page, homepage, CMS page, related product block, and cross-sell product block (in cart.)
*Notes:
- When you add a product that has the custom option in File type, that product will be added directly to the main wishlist and you will be redirected to the Wish List page.
- Also, a success notification will be shown.
2.4.2. Multiple-wishlist page
To check and manage items in wishlists, please go to My Wish List under Account or navigate to My Account ⇒ My Wishlist.
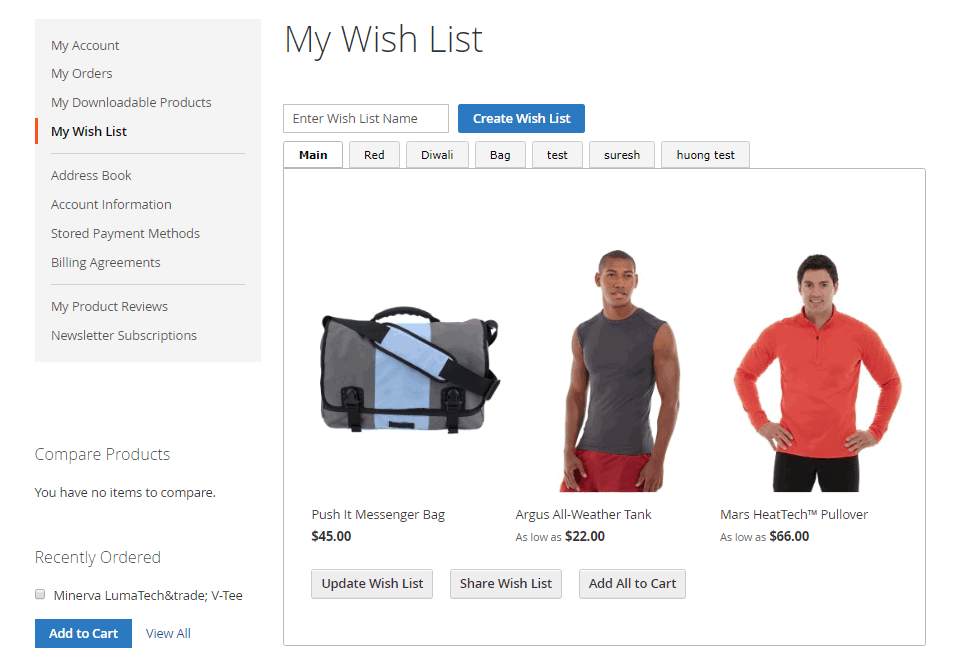
Here you can:
- Create a new wishlist
- Delete any wishlist
- Edit the name of specific wishlist
- Share wishlist with specific emails, along with the message
- Add all items in the wishlist to cart with the defined quantity
2.4.3. Manage Items in Wishlists
To make any changes for specific items in the wishlist, please hover across that product.
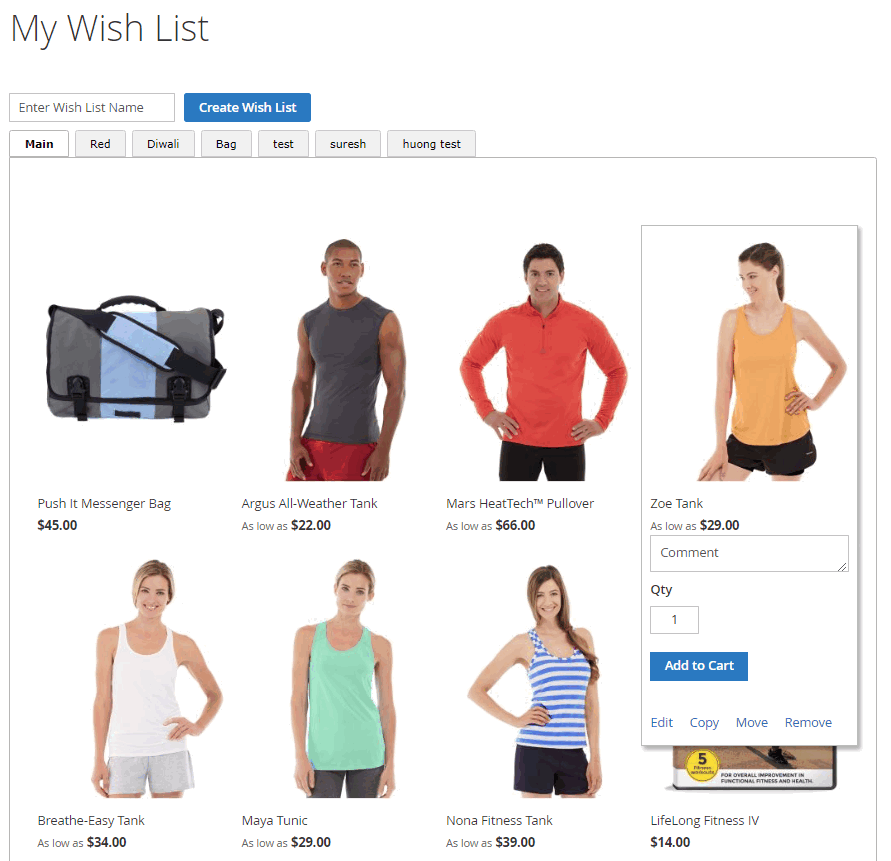
As can be seen, you can:
- Edit the product (quantity, custom options, etc.)
- Add comment to the product
- Change the quantity of the product
- Add the product to cart
- Remove the product from the wishlist
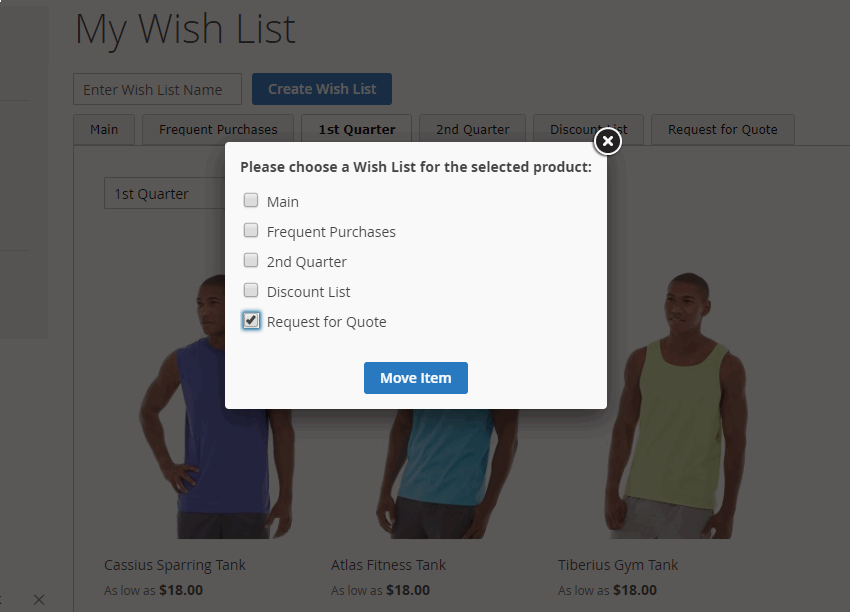
- Copy or Move the product to other wishlists
Accordingly, there is a popup shown to choose where you want to copy or move the product.