
1. Overview
Magento 2 B2B Extensions Package covers the needs of B2B/wholesale customers and sellers from the very login to the reordering process at your fingertips.
BSS Commerce is providing 4 pricing plans for the B2B extension package, including Basic, Professional, Premium and Customized plans.
In this guide, we will present the user guide based on the Professional plan to provide the most detailed information for you. For the 4th plan, you can select picked modules from this guide to make configuration.
Professional Plan
|
+ Force Login + Add Multiple Products to Cart + Configurable Product Grid Table View + Multiple Wishlists + Minimum Order Amount for Customer Group + Store Credit + Reorder Product List + Sales Rep + B2B Company Credit |
+ Catalog Permission + B2B Registration + Customer Attributes + Company Account + Request for Quote + Price Per Customer + Quick Order + Shipping & Payment Method per Customer Group + Hide Price |
The Professional B2B Plan covers every module in the Basic Plan plus additional extensions. Please configure modules in the Basic plan first, then configure other modules in this Professional plan.
2. Force Login
Choose Force Login under BSS COMMERCE tab,
2.1. General Configuration
In Enable: choose Yes to enable the Force Login functions. In Disable Registration: choose Yes to disable the default registration link on the top sidebar and login page. This configuration does not affect the B2B Registration top link. (refer to B2B Registration function below).
2.2. Enable “Force Login” When Users Visit Pages
In Alert Message: edit the message to be shown on the restricted page. Select types of page to force login to access:
|
|
*Notes:
- Other Pages are custom pages created by third-party extensions, for example, the FAQs
- We support specific CMS Page to force login: 404 Not Found; Home Page; Enable Cookies; Privacy Policy; About us; Customer Service.
2.3. Redirect Users After Successful Login
It is important to streamline the experience of users after "force-login" requirement. You can choose among 4 redirect options.
- Default: redirect users to the page after login like default Magento 2
- Home Page: redirect users to Home Page after login
- Previous Url: redirect users to the page they are trying to access when they are forced to login
- Custom Url: Enter the page URL that you want to send your customers to after login
*Notes:
- With custom pages by third-party extensions, if you select this option, you will be redirected to the previous page of the force login page.
For example: You require a login to access the FAQs page. A customer goes to the Home page ⇒ Women (category page) ⇒ FAQs page and login. He/she is redirected to Women (category page).
- Remember to Save Config on completing
2.4. Google reCAPTCHA and 2FA Installation
Magento is adding Google reCAPTCHA and 2FA functionality to all Magento Commerce and Open Source versions 2.1 and above to reduce unauthorized access and spam.
- Google reCAPTCHA technology is to ensure the access attempt by humans only, not bots. Compared with the Magento CAPTCHA module, the reCAPTCHA enhances security with additional benefits includes support for invisible reCAPTCHA.
- 2FA Authentication adds support for software authentication apps and hardware authentication devices provided by Google Authenticator, Authy, U2F devices, and Duo Security, among others.
Hence, BSS Commerce strongly recommends installing these functions for your Magento 2 Website. Please go to the Magento 2 Dev Document for more information.
3. Add Multiple Products to Cart
Choose Ajax Add Multiple Products Cart under BSS COMMERCE tab.
3.1. General Configuration
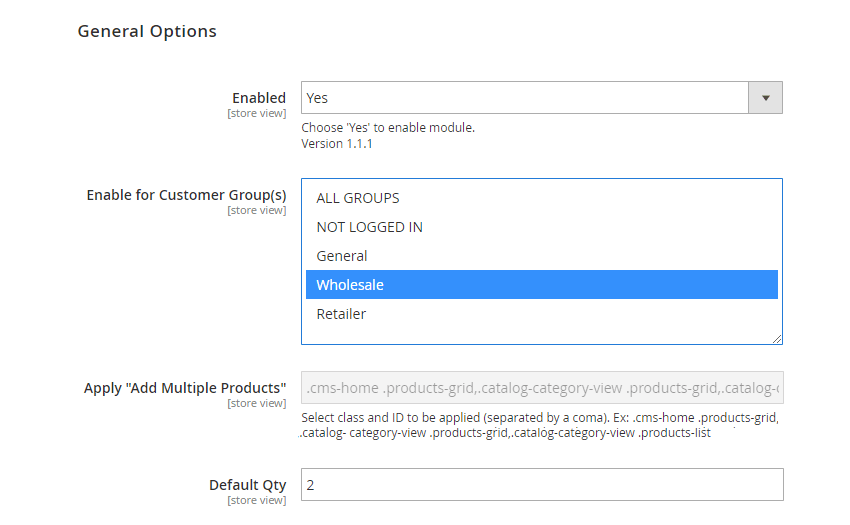 In Enabled: Choose Yes to enable the module or choose No to disable it. In Enable for Customer Group(s): Only chosen groups are allowed to add multiple products to cart. In Apply “Add Multiple Products”: Select class and ID to be applied to the module (separated by a comma). For example: .cms-home .products-grid,.catalog-category-view .productsgrid,.catalogcategory-view .products-list. In Default Qty: Select default quantity displaying in quantity box. *Note:
- This “Add Multiple Products” configuration only works with the product list having a similar structure to the product list page on the default category page or default widget.
- If you want to apply the functions to other lists, such as Wishlist page or Compare page, you need to fix the HTML structure.
- The extension works well with all product types, except for products having the type of custom options to be File.
3.2. In Button, Checkbox, Qty Box
![]() Here is an example of the button in the Top position.
Here is an example of the button in the Top position. 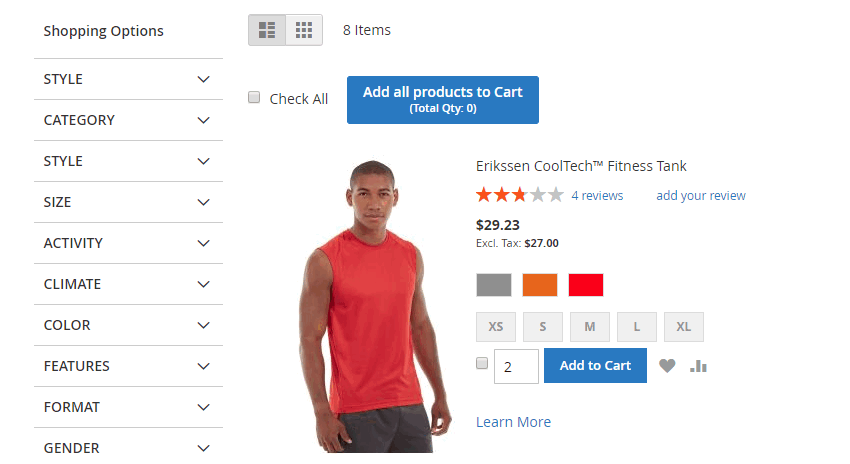
3.3. In Popup Setting
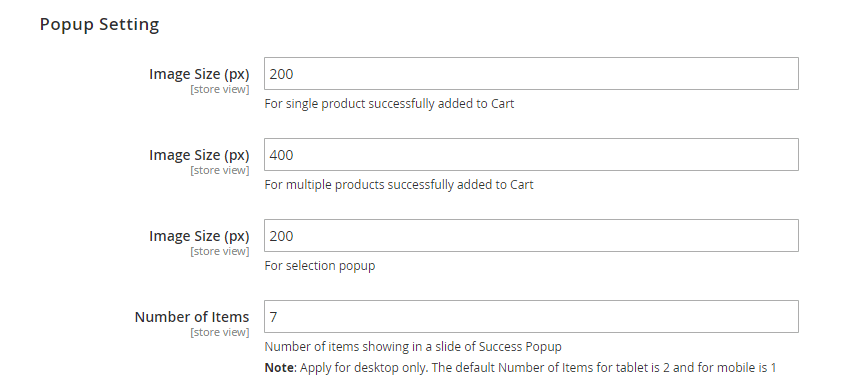 Please define:
- Image size (px) – For single product successfully added to Cart, shown in the success pop-up in case of adding only one product to cart.
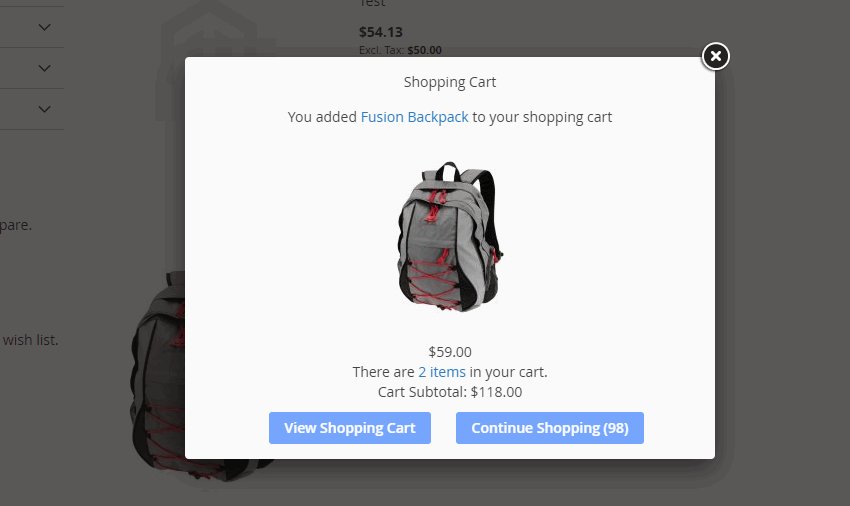
- Image size (px) – For multiple products successfully added to Cart, shown in the success pop-up in case of adding multiple products to cart.
- Image size (px) – For selection popup: Choose the image size of the product in the popup shown to specify options and quantity
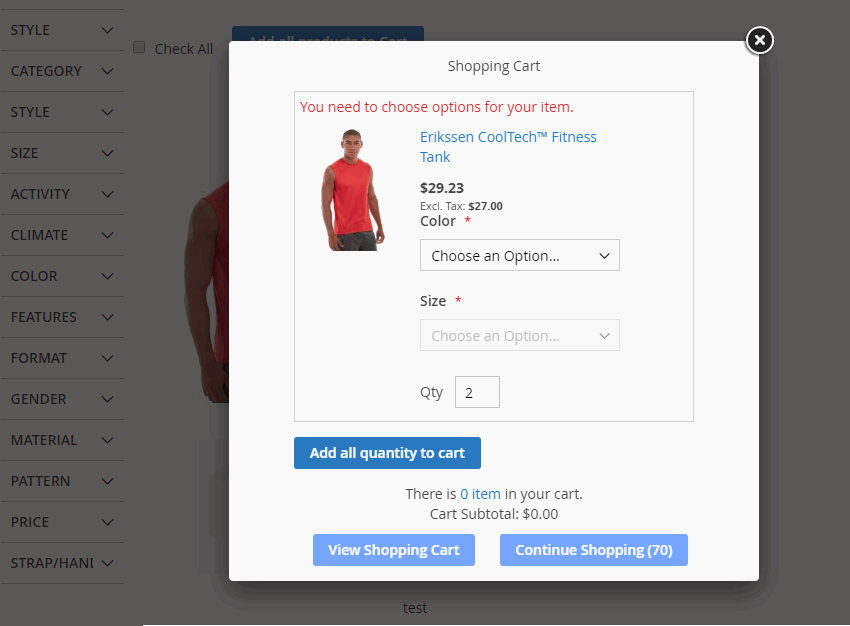
- Number of Items displayed in one success popup for desktop screens. The default Number of Items for the tablet is 2 and for mobile is 1.)
Also, choose the effect of slide in popup: 
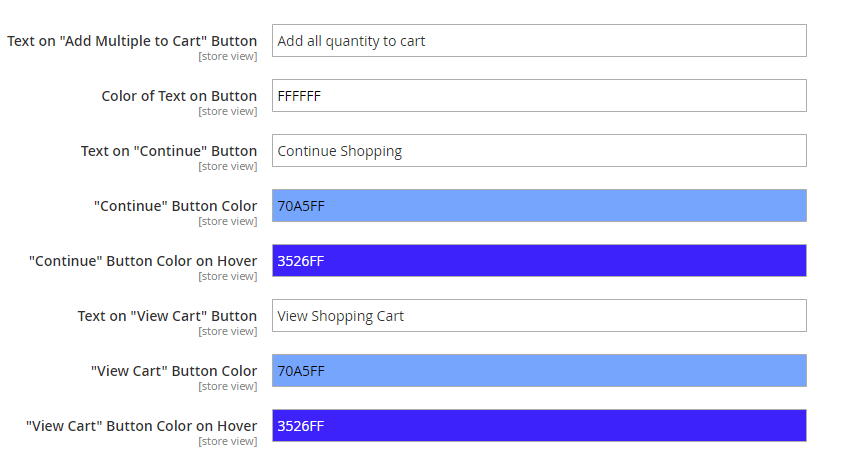
3.4. In Popup Design
4. Configurable Product Grid Table View

In Enabled: Choose Yes to enable the module or choose No to disable it.
4.1. Set up the grid table view
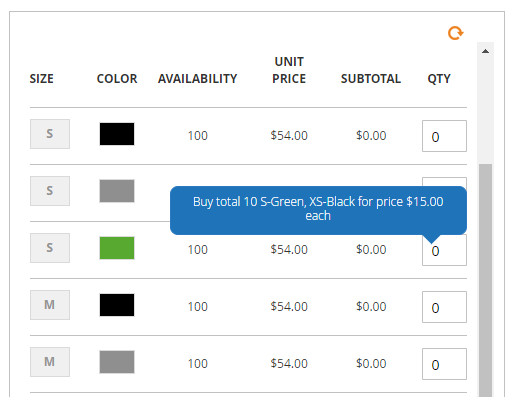
First off, we provide advanced features to improve the display of the Configurable Grid Table View.
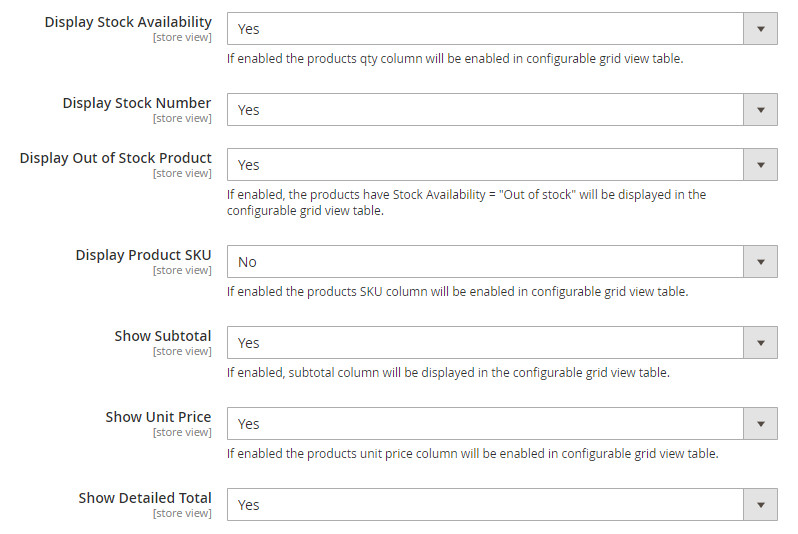
- Choose Only Different Price to show the price of child products having different prices. If all child products of a configurable product have the same price, the unit price column will be hidden.
In Show Detailed Total: Choose Yes to display the total quantity and total price at the bottom of the table in detail. Here is an example of the Configurable Grid Table View product page.
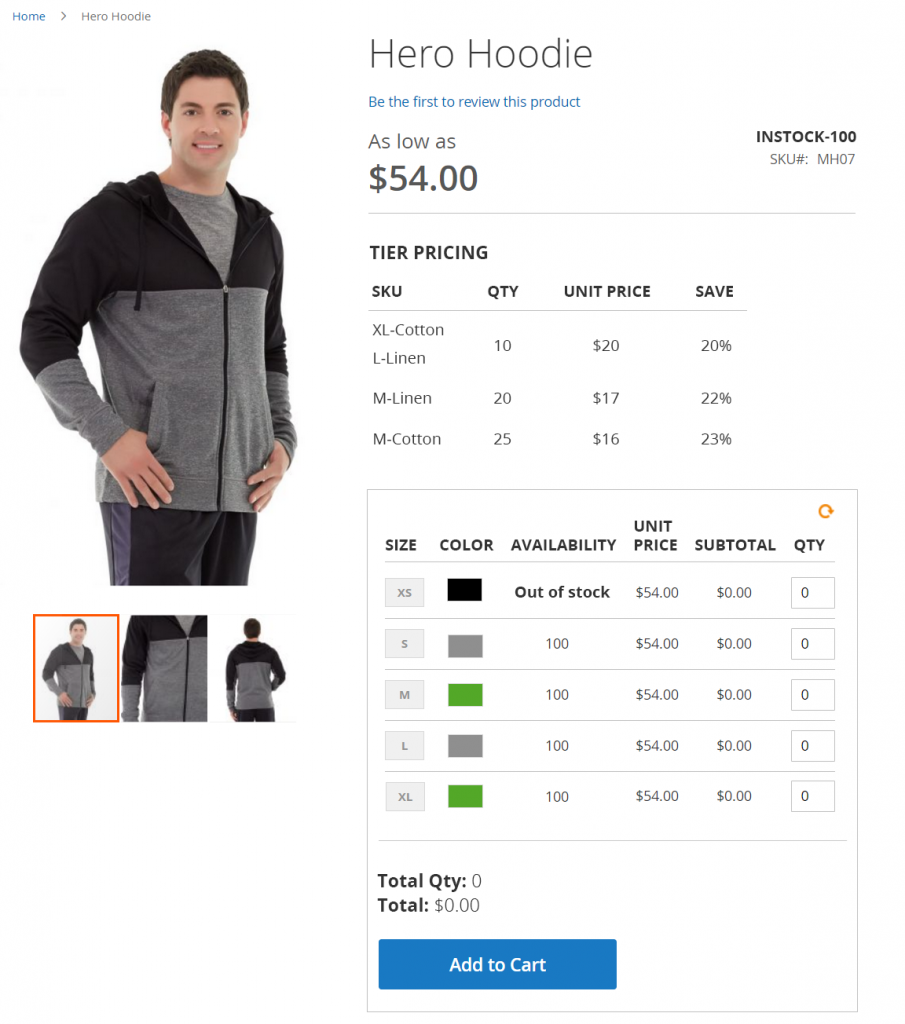
4.2. Set up advanced tier prices
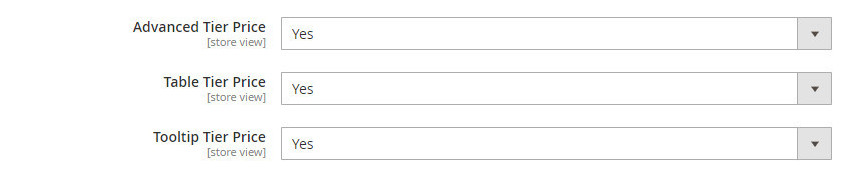
When it comes to tier price, you can:
- Choose Yes to enable Advanced Tier Price on the configurable product pages.
- Choose Yes to enable Table Tier Price so that customers get information about tier prices at a glance.
- Choose Yes to enable Tooltip Tier Price. A note will be shown in the tooltip when customers hover on a specific child product.
READ MORE >>> All you need to know about the prices of Configurable Products.
In the storefront, the tier prices are shown accordingly:
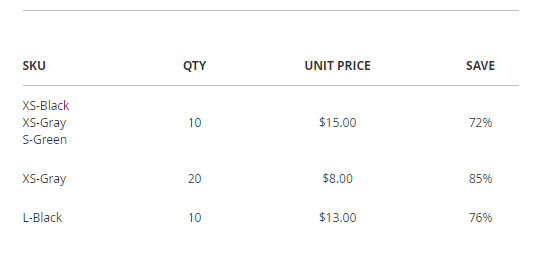
and …
4.3. Set up the table view per group and device

4.4. Enable/disable the grid table view per configurable product
If you want to disable the grid table view for any configurable products, please to Catalogs => Products => Product Edit Page => Grid Table View General tab.
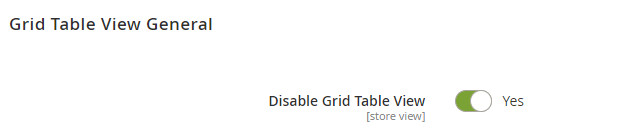
Simply put, set Disable Grid Table View to Yes.
5. Multiple Wishlists
Choose Multiple Wishlists under BSS COMMERCE tab. 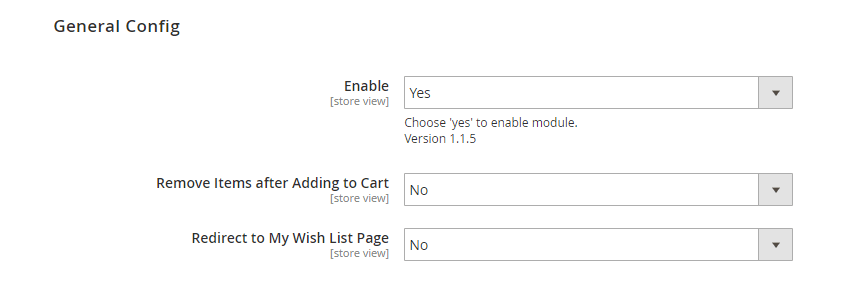 In Enable: Choose Yes to enable the module or choose No to disable it. In Redirect to My Wish List Page: Choose Yes to redirect customers to My Wish List Page after a product is added to wish list. Otherwise, choose No. In Remove Items after Adding to Cart: Choose Yes to keep items in Wish Lists after being added to Cart. Otherwise, choose No.
5.1. Create Wishlist/Add to Wishlist
In the frontend, customers can create any wishlist within clicks. Accordingly, whenever they click on the "wishlist" icon, there is a popup shown accordingly. Customers can choose existing wishlists or create a new wishlist to add products to. 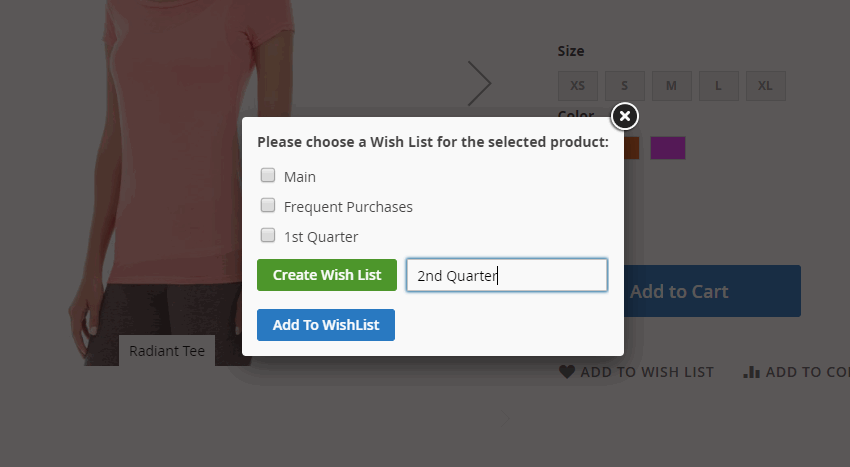 An item can be added to multiple wishlists from the product page, category page, search result page, compare page, the shopping cart page, homepage, CMS page, related product block, and cross-sell product block (in cart.) *Notes:
- When you add a product that has the custom option in File type, that product will be added directly to the main wishlist and you will be redirected to the Wish List page.
- Also, a success notification will be shown.
5.2. Multiple-wishlist page
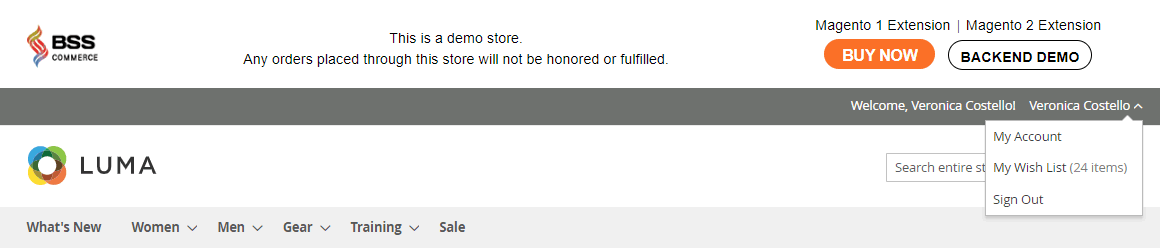 To check and manage items in wishlists, please go to My Wish List under Account or navigate to My Account ⇒ My Wishlist.
 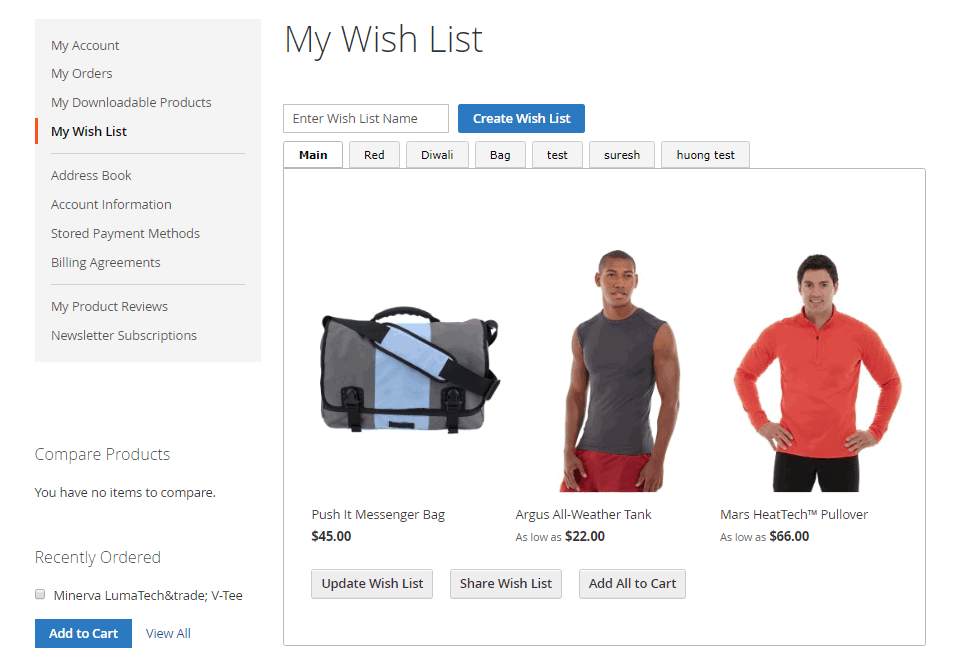 Here you can:
- Create a new wishlist
- Delete any wishlist
- Edit the name of specific wishlist
- Share wishlist with specific emails, along with the message
- Add all items in the wishlist to cart with the defined quantity
5.3. Manage Items in Wishlists
To make any changes for specific items in the wishlist, please hover across that product. 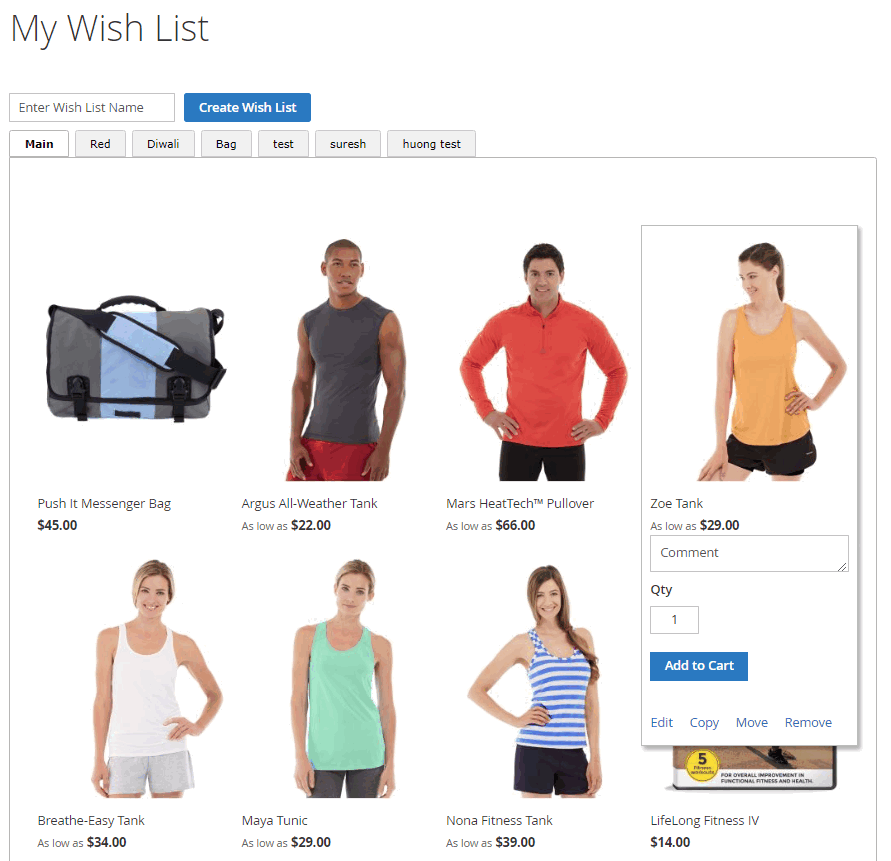 As can be seen, you can:
- Edit the product (quantity, custom options, etc.)
- Add comment to the product
- Change the quantity of the product
- Add the product to cart
- Remove the product from the wishlist
- Copy or Move the product to other wishlists
Accordingly, there is a popup shown to choose where you want to copy or move the product. 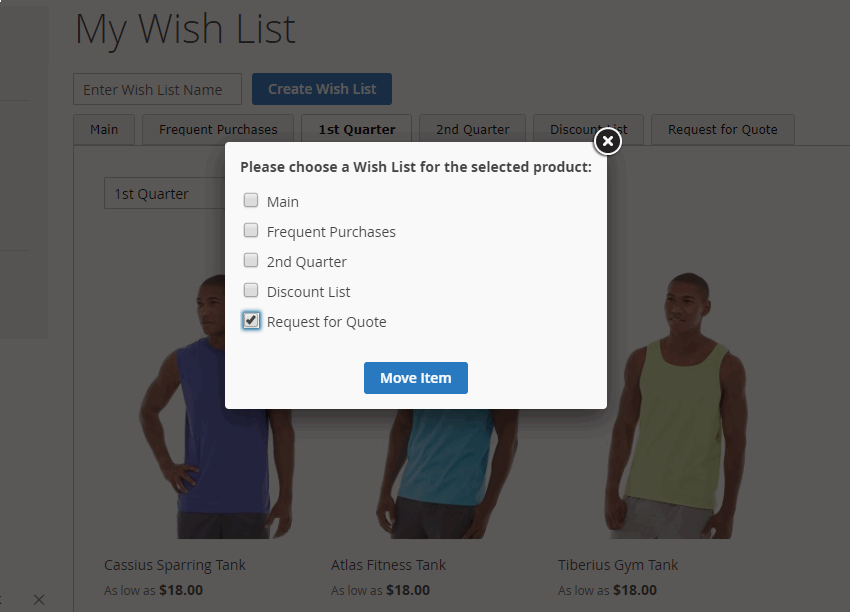
6. Minimum Order Amount per Customer Group
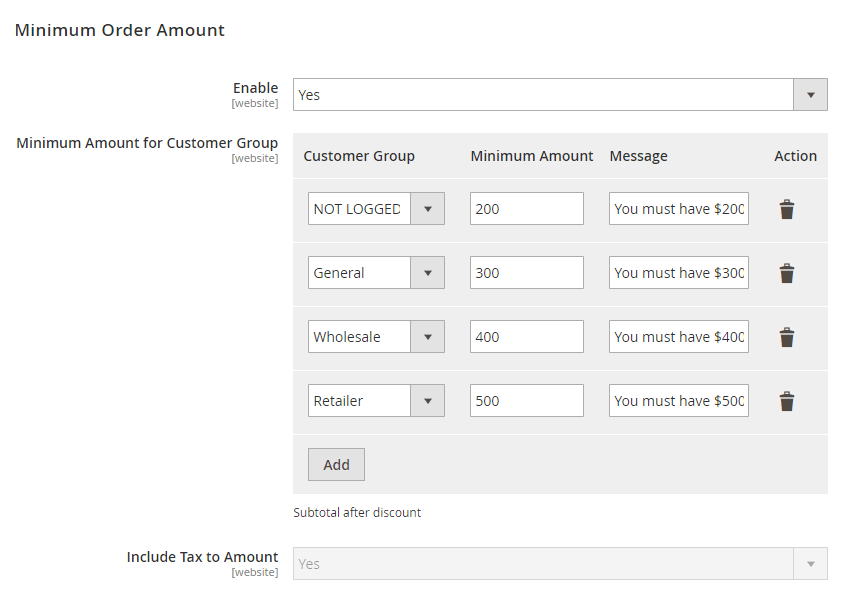 In Enabled, choose Yes to enable the extension or No to disable it. In Minimum Amount for Customer Group, choose customer group and decide the minimum order amount for each group. You can also add more groups or delete any unwanted group if needed. You can tailor different error messages to show per customer group on the shopping cart page in case of under-value orders. For example,
  If you skip these fields, the default message "Minimum order amount is 'the minimum order amount'" is in place.
 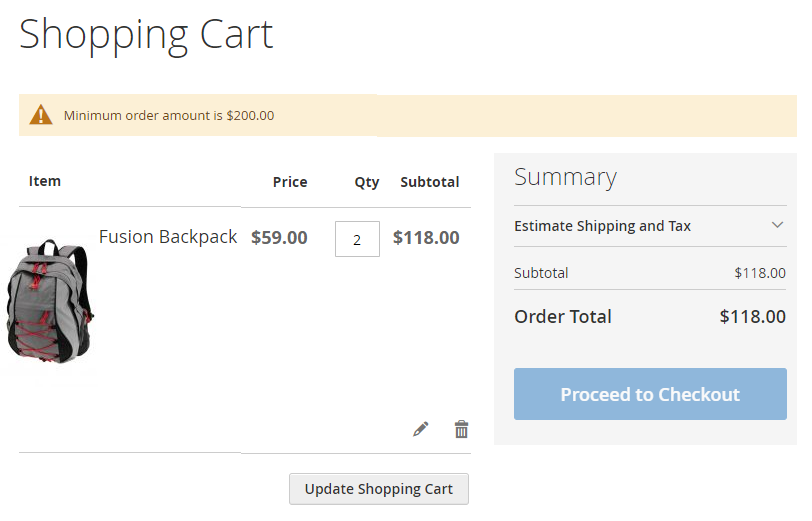 Remember to go to System ⇒ Cache Management and Flush Magento Cache so that the configurations are active.
7. Store Credit
7.1. General settings
Choose Store Credit under BSS COMMERCE tab. 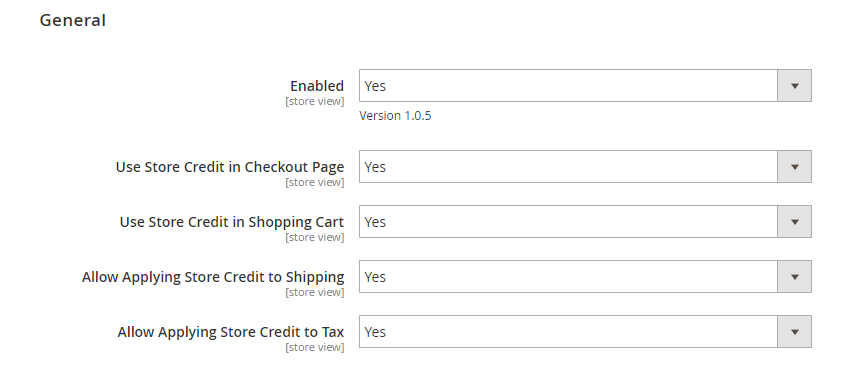 In Enabled: choose Yes to enable the extension. In Use Store Credit in Checkout Page: choose Yes to allow customers to apply store credit to pay for the order in the checkout page, or No to not allow.
 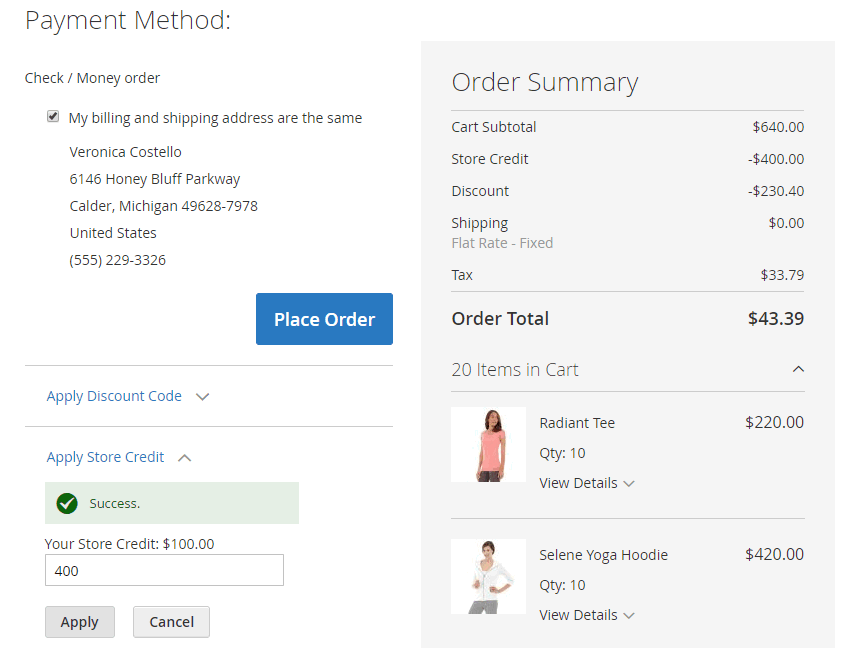 In Use Store Credit in Shopping Cart: choose Yes to allow customers to apply store credit to pay for order in the shopping cart page, or No to not allow.
 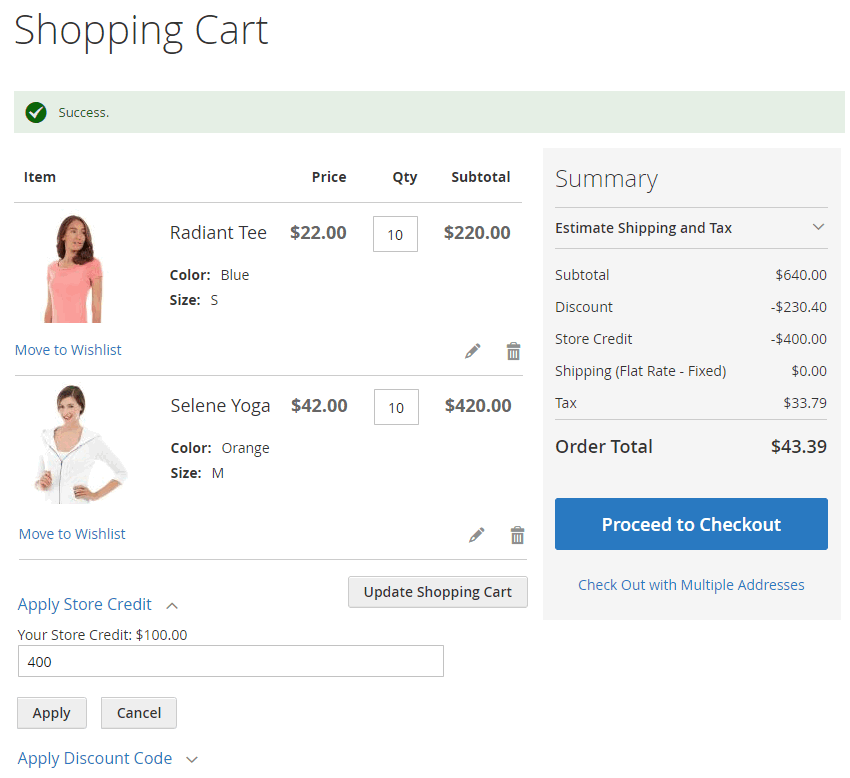 In Allow Applying Store Credit to Shipping:
- Choose Yes to allow applying store credit to pay for shipping fee, if the customer applies a store credit value in the shopping cart or checkout page more than the order total.
- Choose No to not allow using store credit to pay for fee even if the customer applies a store credit value more than the order total.
In Allow Applying Store Credit to Tax: choose Yes to allow applying store credit to pay for tax, or No to not allow. This function operates the same as the "Allow Applying Store Credit to Shipping” function. *Notes: + If you disable both “Use Store Credit in Checkout Page” and “Use Store Credit in Shopping Cart”, there aren’t fields to enter store credit value, shipping fee can’t be paid by store credit even if you enable or disable this config. + If the value entered in Apply Store Credit box is bigger than the order total in the shopping cart or checkout page, the payment method options will be hidden. 
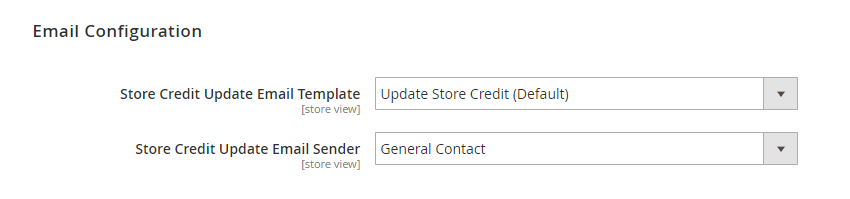
7.2. Email Configurations
7.3 Refund by Store Credit
When creating credit memos, you can choose Refund to Store Credit option to transfer the refund to customer store credit. 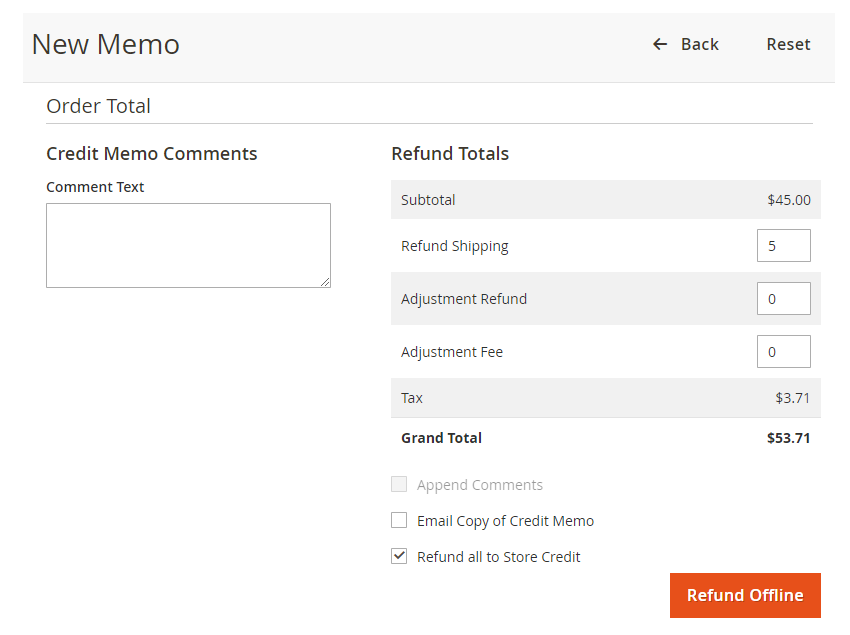
7.4 Apply Store Credit for Backend Orders
When creating orders from the backend, you can also apply the Store Credit. 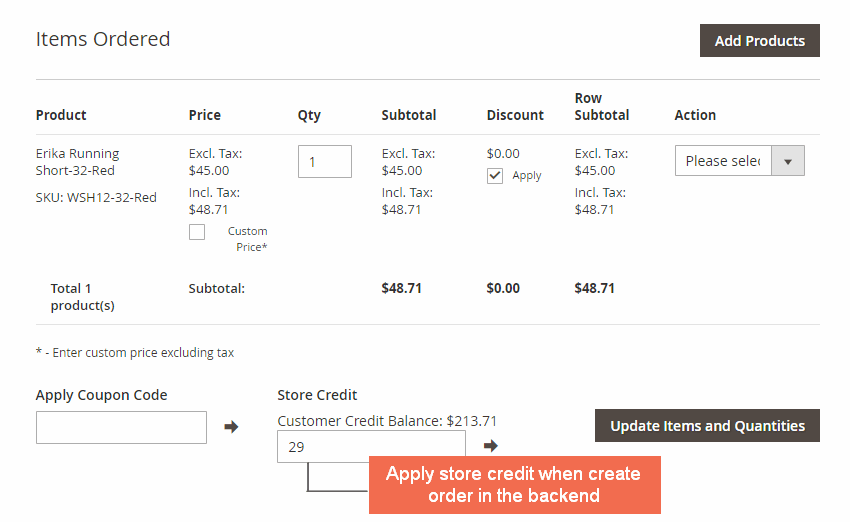
7.5 Manage Store Credit Balances
Choose a specific account under Customers and open Store Credit under that account. In Statistic, you can update track and update the value of store credit and notify customers to come back soon to spend the credit. 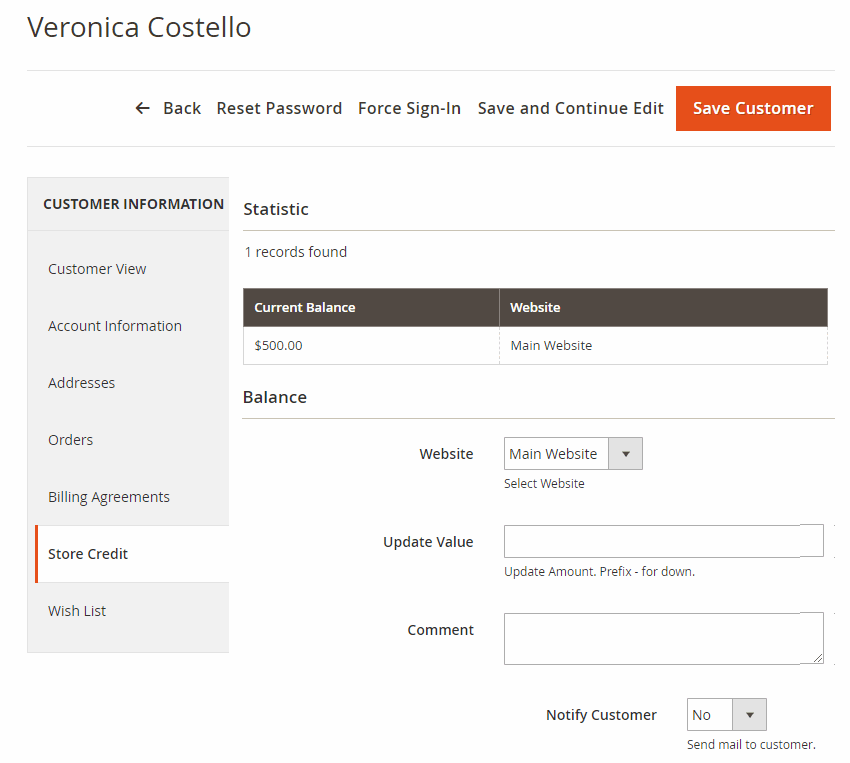
 *Notes: The Statistic and History section are also displayed on the customer information page in the frontend for the customer.
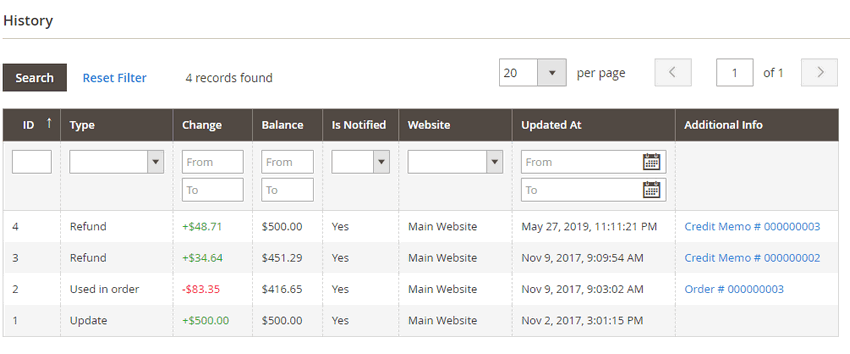
7.6 Track Store Credit Transactions
7.6.1. Store Credit Transaction
Please go to Admin Panel ⇒ BSS STORE CREDIT ⇒ Transactions to view information on all store credit transactions on your site. 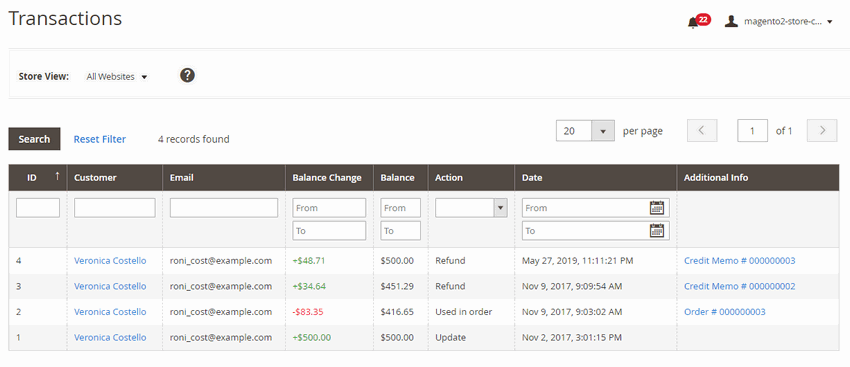
- Transaction ID column: number of transaction.
- Customer column: customer name linked to customer information page in the backend.
- Email column: email of the omer.
- Balance Change column: the amount of store credit was added or subtracted.
- Balance column: store credit balance after the transaction took place
- In Action column: the action makes store credit balance change
- Date column: the specific time and date that the transaction happened.
- Additional Info column: more information about the transaction, you can click on links to view orders or credit memos.
7.6.2. Summary Store Credit Transaction Chart Report
Open Report under BSS STORE CREDIT. 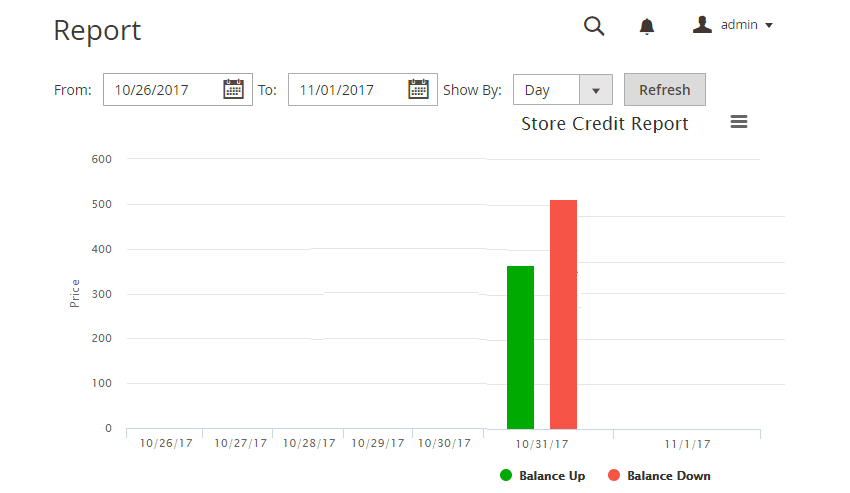 The chart displays the summary store credit increment and decrements in your site, you can set the duration time and select to view the report of store credit by day, month or year. Press the Refresh button to view the chart exported from your settings.
8. Reorder Product List
8.1. For customers
This is how the Reorder Product List for Magento 2 is displayed in the frontend: 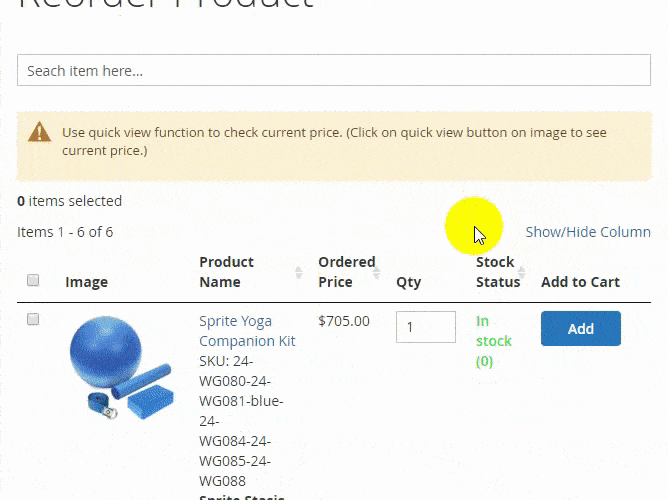
- List all purchased products in one place for fast reordering
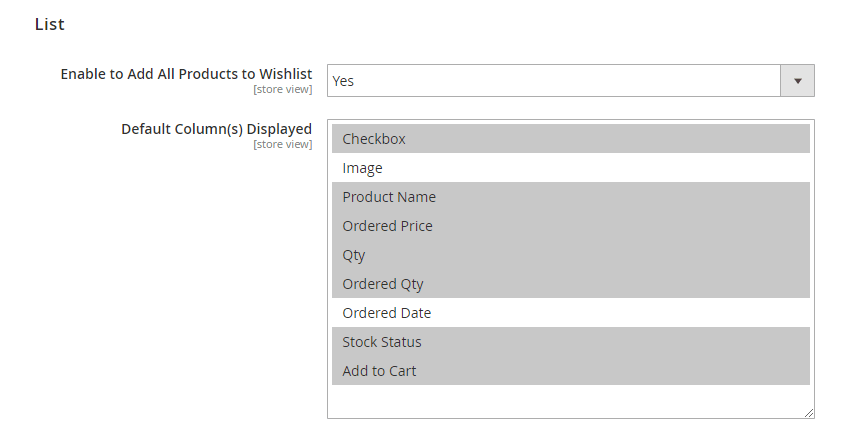
- Choose which information to show: SKU, product image, price, ordered quantity, stock status, quantity box to reorder.
- Search items by any piece of information above. The search autocomplete makes it faster.
- Support Quick View to see the current price of items and choose product options in the popup
- Add multiple ordered products to cart and redirect to checkout.
- Support adding multiple purchased items to the wishlist
8.2. For admins
8.2.1. General Options
8.2.2. List

9. Sales Rep
9.1. Create roles of Sales Rep
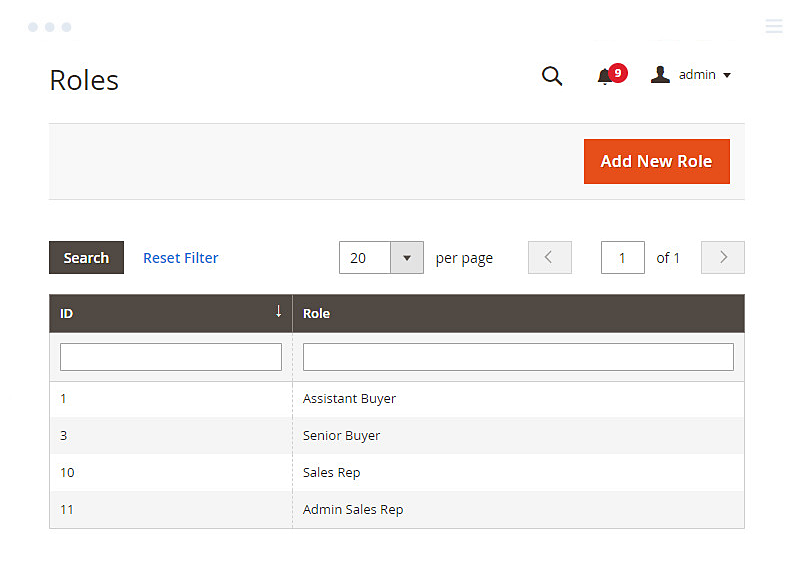
Navigate to Systems => Permissions => User Roles
Before the admin store assigns a user as a sales rep, you need to create the role accordingly.
Simply put, choose Add New Role.
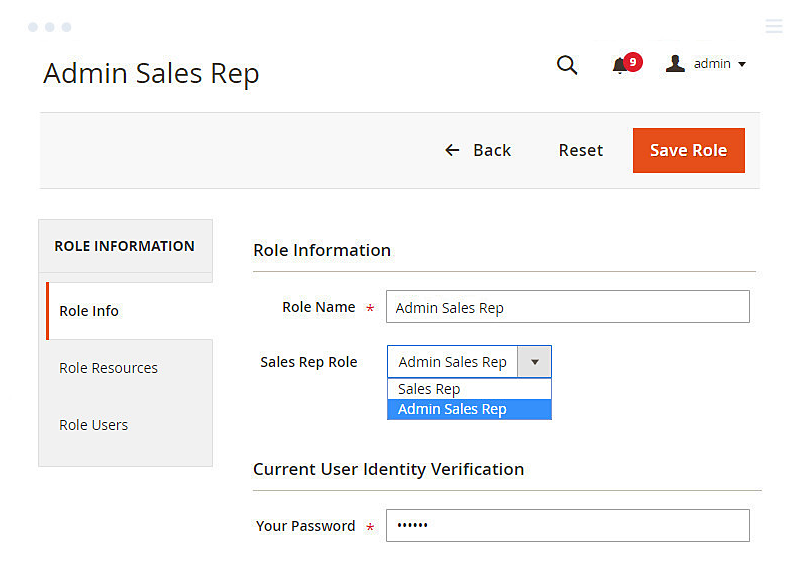
Under Role Information:
- Role Name: Enter a role for easy management
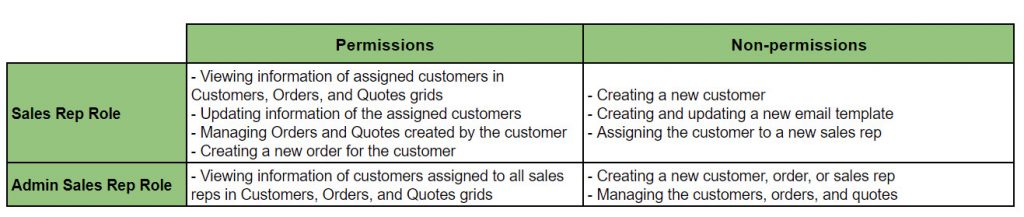
- Sales Rep Role: Choose either Admin Sales Rep or Sales Rep
+ Sales Rep: Users with this role can access a tab in the admin panel to manage customers, orders, and quotes assigned to them.
+ Admin Sales Rep: Users with this role can manage customers, orders, and quotes assigned to all sales representatives.
- Your Password: Enter the login password to confirm the action
Under Role Resources:
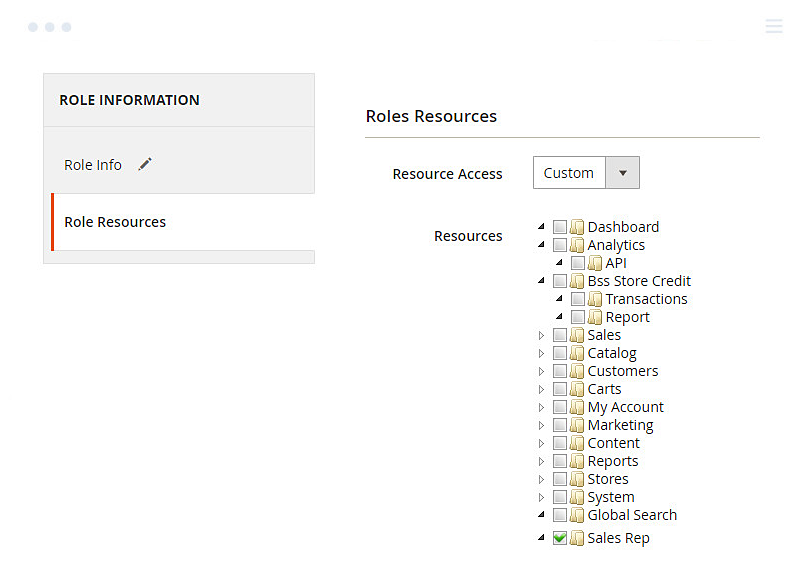
Tick on Sales Rep resource, then users with the role can access the Customers, Orders, and Quotes grids assigned to them.
*Notes:
+ The Quotes resource is only shown if you install the Magento 2 Request for Quote extension. + We have developed the Sales Rep resources with all information required by a sales rep to manage their customers.
+ You can also assign Sales Rep users to other resources. + When a customer is assigned to another sales rep, orders and quotes assigned the former sales rep will remain under the control of that sales rep rather than of the new one.
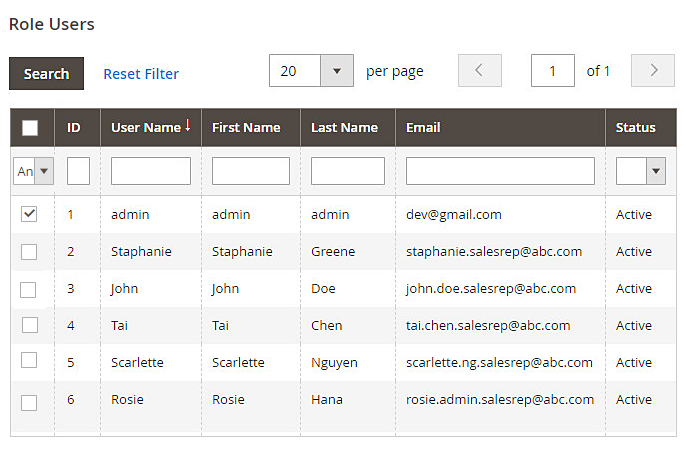
Under Role Users, choose available users or create a new one later.
9.2. Create users of Sales Rep roles
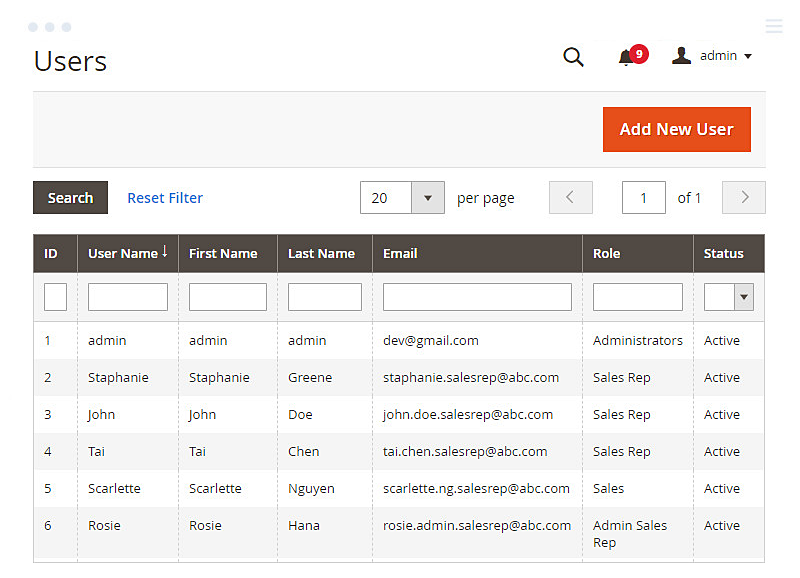
Navigate to Systems => Permissions => All Uses. Choose Add New User.
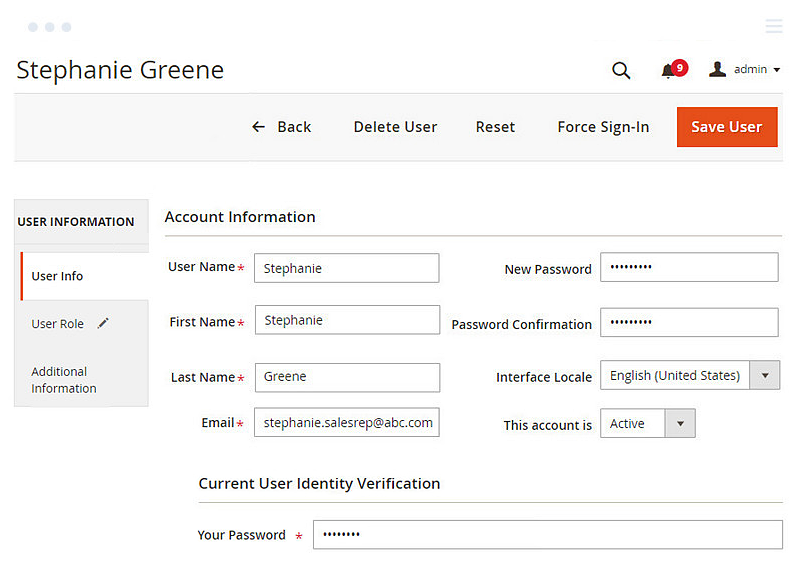
Under User Info, fill in the user's information and enter your password to confirm the action.
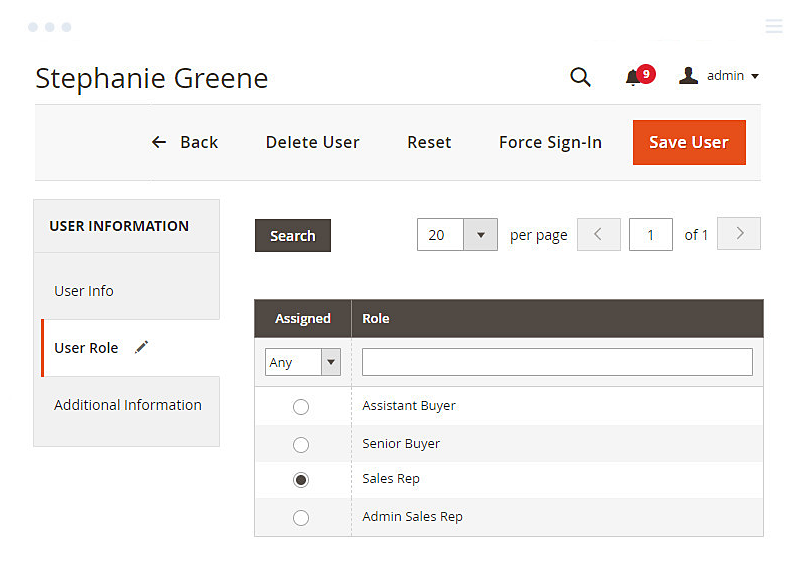
Under User Role, pick up an available role, in this case, either Sales Rep or Admin Sales Rep.
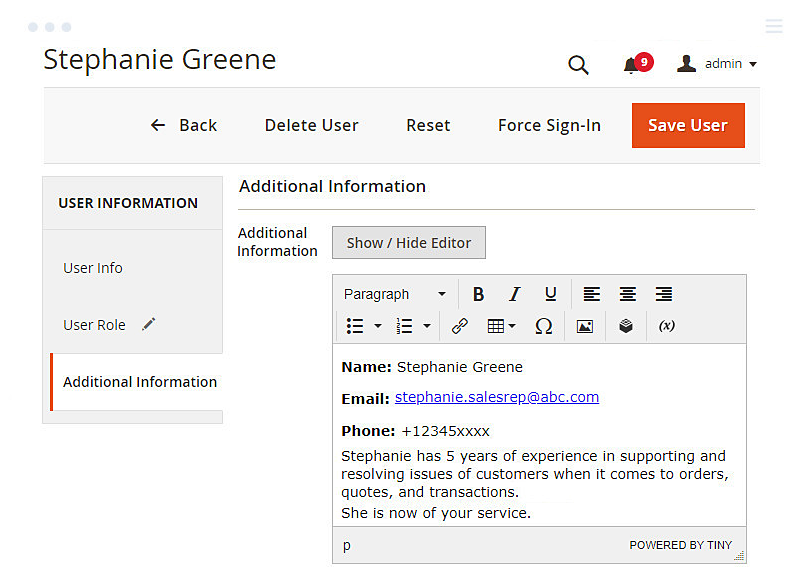
Under Additional Information, you can add information to the sales rep user in WYSIWYG editor. This information will be visible under My Account of the customer.
9.3. Assign customers to sales rep users
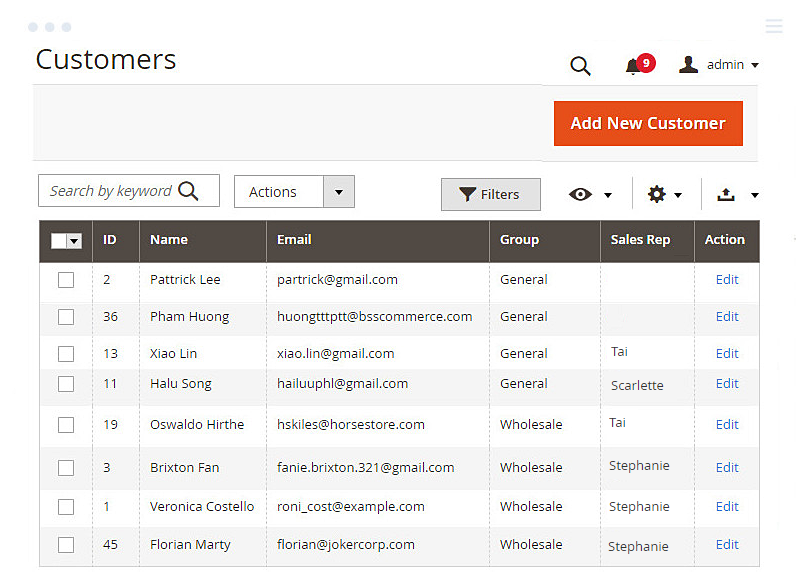
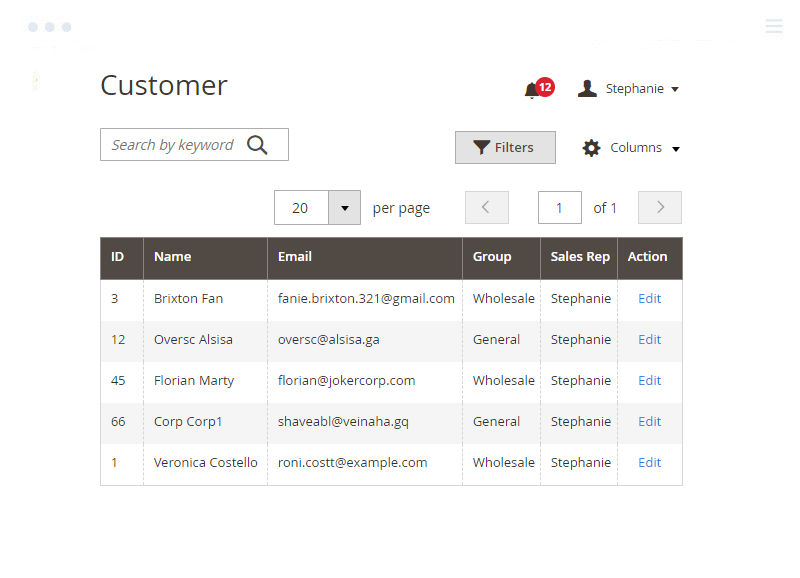
At first, all customers are recorded in the Customer grid and available under the admin store's view.
In this grid, the store admin can assign a customer to a specific Sales Rep user by going to the customer edit page.

Scroll down to the Sales Rep tab to assign the Sales Rep user to the customer. The information of that user is shown accordingly.
9.4. My Account Dashboard, Sales Rep user's view, and Admin Sales Rep user's view
9.4.1 My Account Dashboard
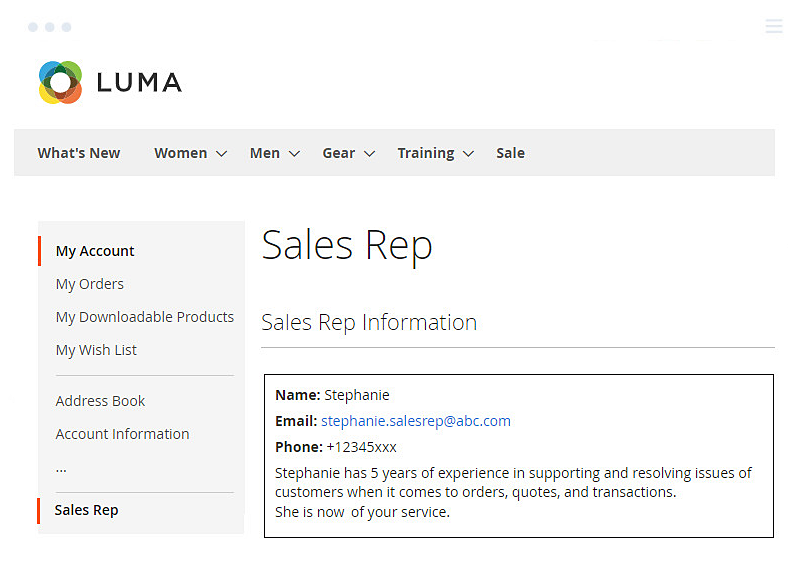
When a sales rep user is successfully assigned to a customer. She/He now can check the information of the sales rep user under My Account.
9.4.2. Sales Rep user's view
As we mentioned, the Sales Rep user now can access the information of assigned customers and take actions accordingly.
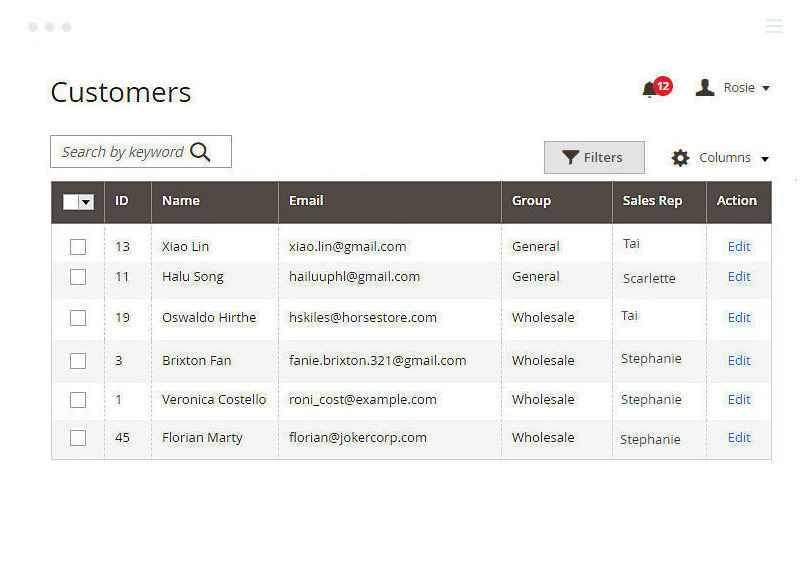
In the Customers grid:
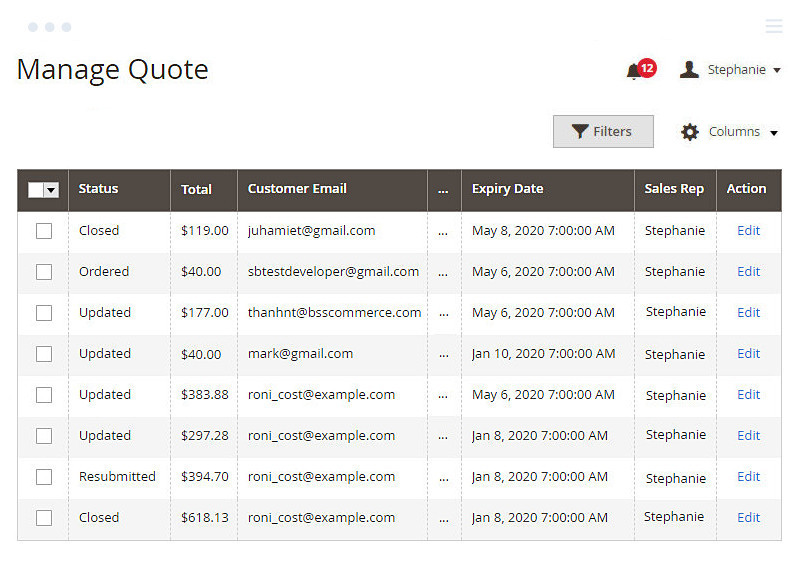
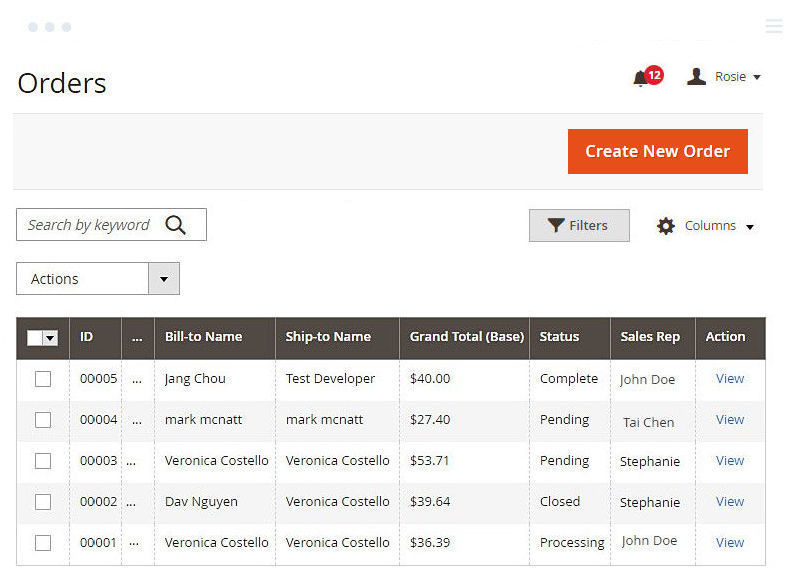
In the Orders grid:

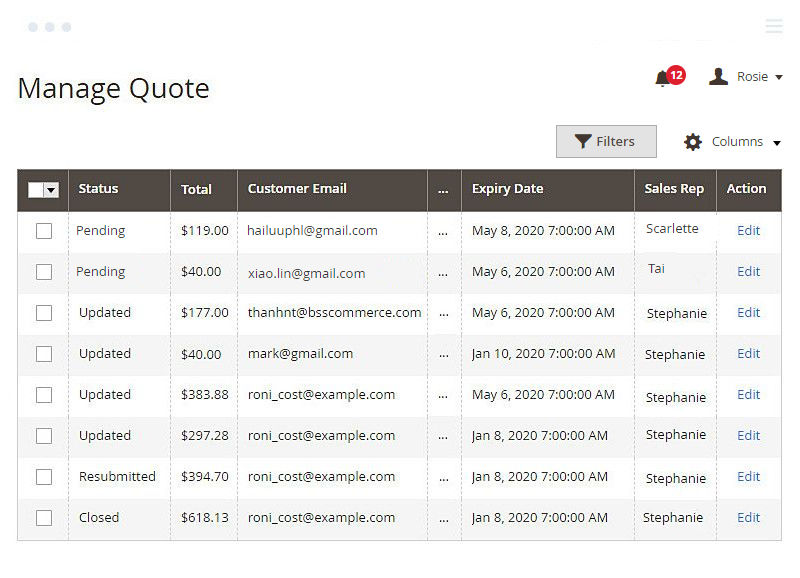
In the Quotes grid:
9.4.3 Admin Sales Rep user's view
The Admin Sales Rep user can also access the information of customers assigned to all sales reps. However, they can only view the information and can't take further action. Please note that the Admin Sales Rep users can not create or view customers, orders, and quotes. When clicking on Create New Order or on action View/Edit, the Admin Sales Rep users are redirected to an error page. 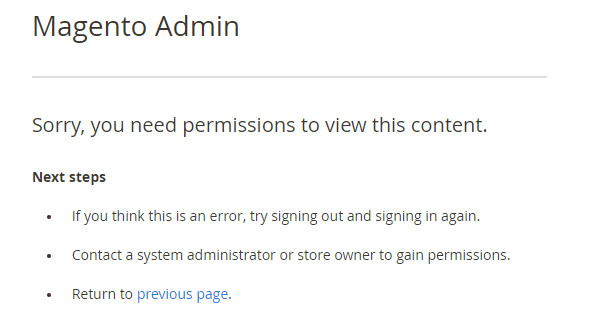
In the Customers grid:
In the Orders grid:
In the Quotes grid:
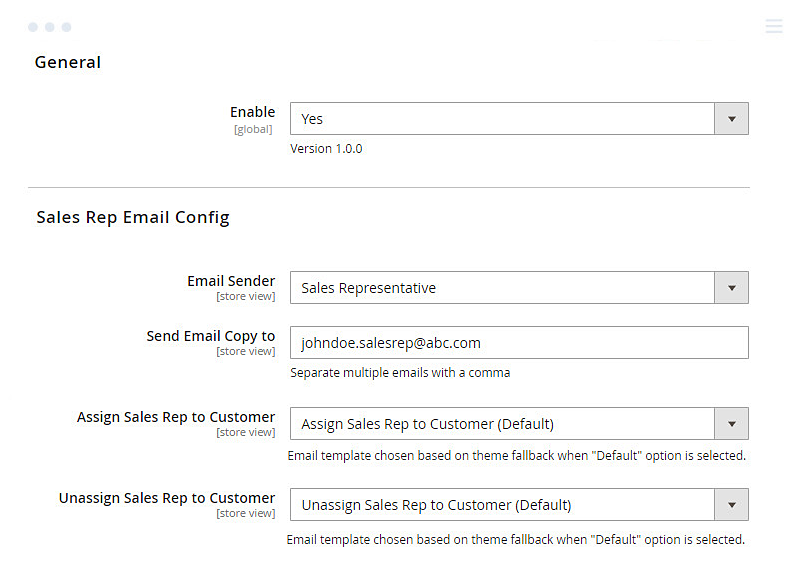
10. B2B Company Credit
10.1. General Configs
Please Go to Admin ⇒ Stores ⇒ Configuration ⇒ BSSCommerce ⇒ Company Credit.

In Enabled: Choose Yes to enable the extension.
* Note: You need to go to Admin ⇒ Stores ⇒ Configuration ⇒ Sales ⇒ Payment Methods ⇒ Purchase Order to enable the Purchase Order Payment Method.
In Email Config, choose the sender and templates.
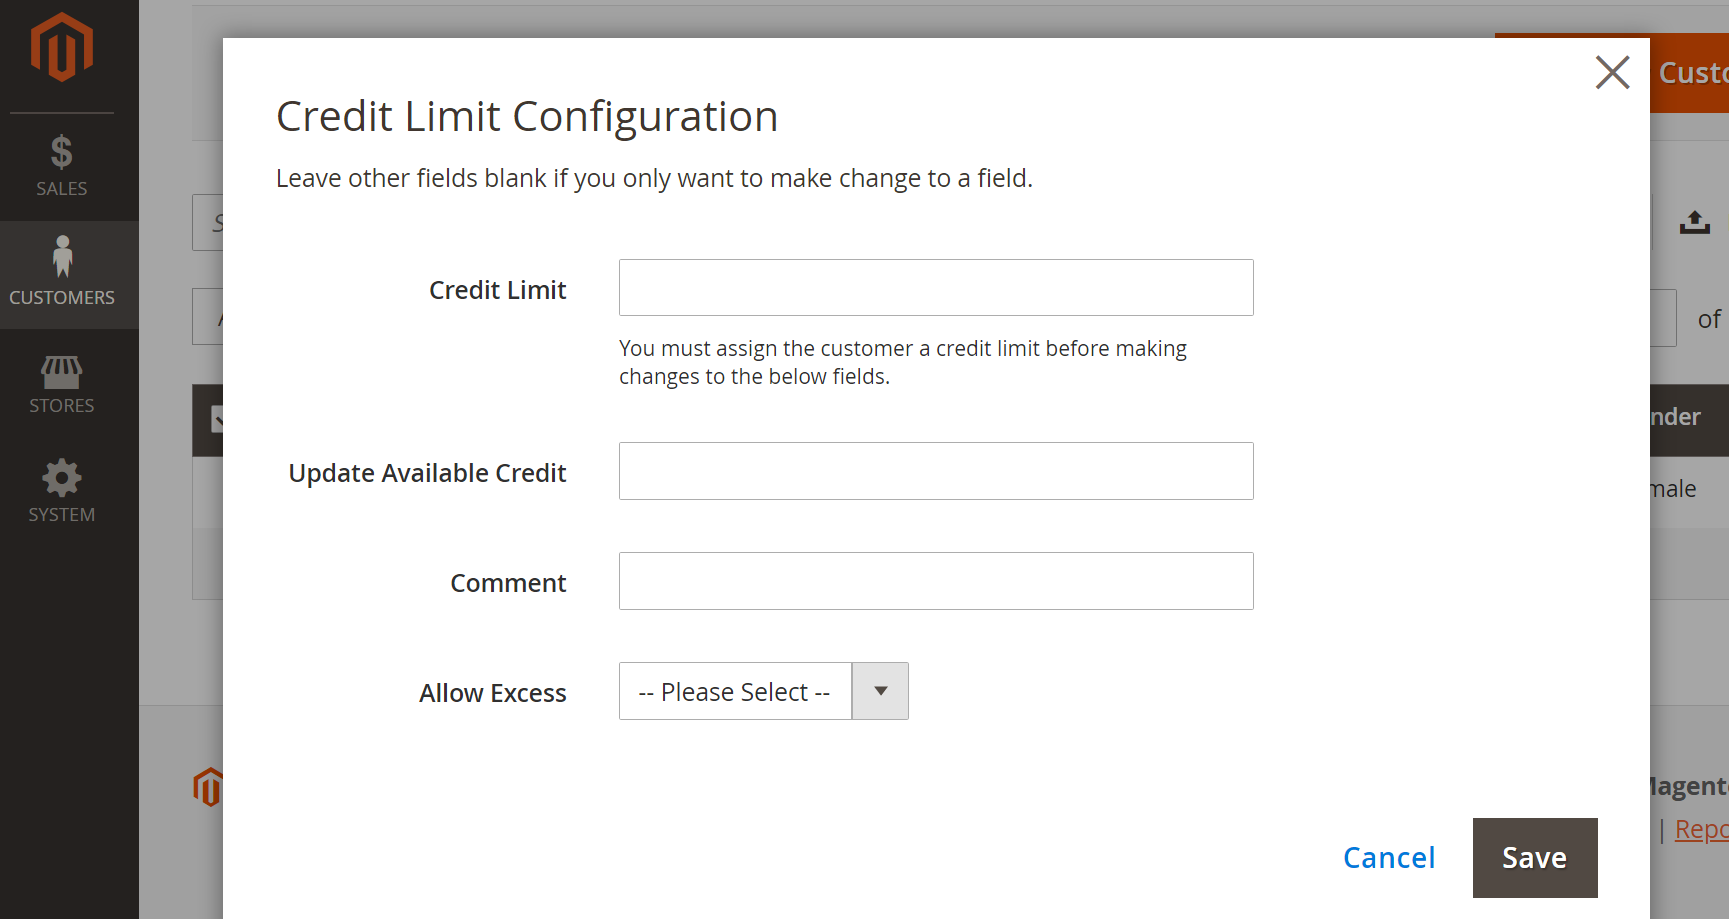
10.2. Credit Limit Configuration
* Note: In the Comment section, you can add some notes for any update in the credit limit configuration, whether you change credit limit, update available credit, or enable/disable credit excess for the customer.
10.2.1. Assign A Credit Limit for Customers
To assign a credit limit for customers, you can either go to the Customer Detail Page or configure right on Customer Grid.
1st way - In Customer Detail Page: Choose tab “Company Credit”: You can assign a credit limit for the customer and choose to allow him/her to exceed the available credit or not. You also can set the payment due date for each customer here.
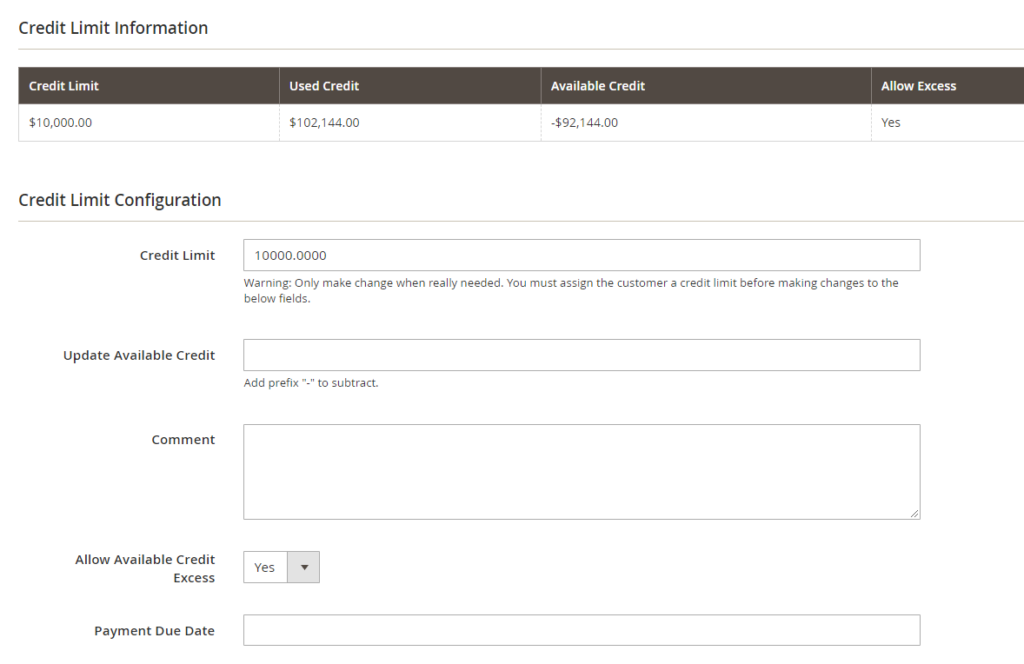
After you have set the values, hit “Save Customer”.
2nd way - In Customer Grid: Choose the customers that you wish to assign a unanimous credit limit:
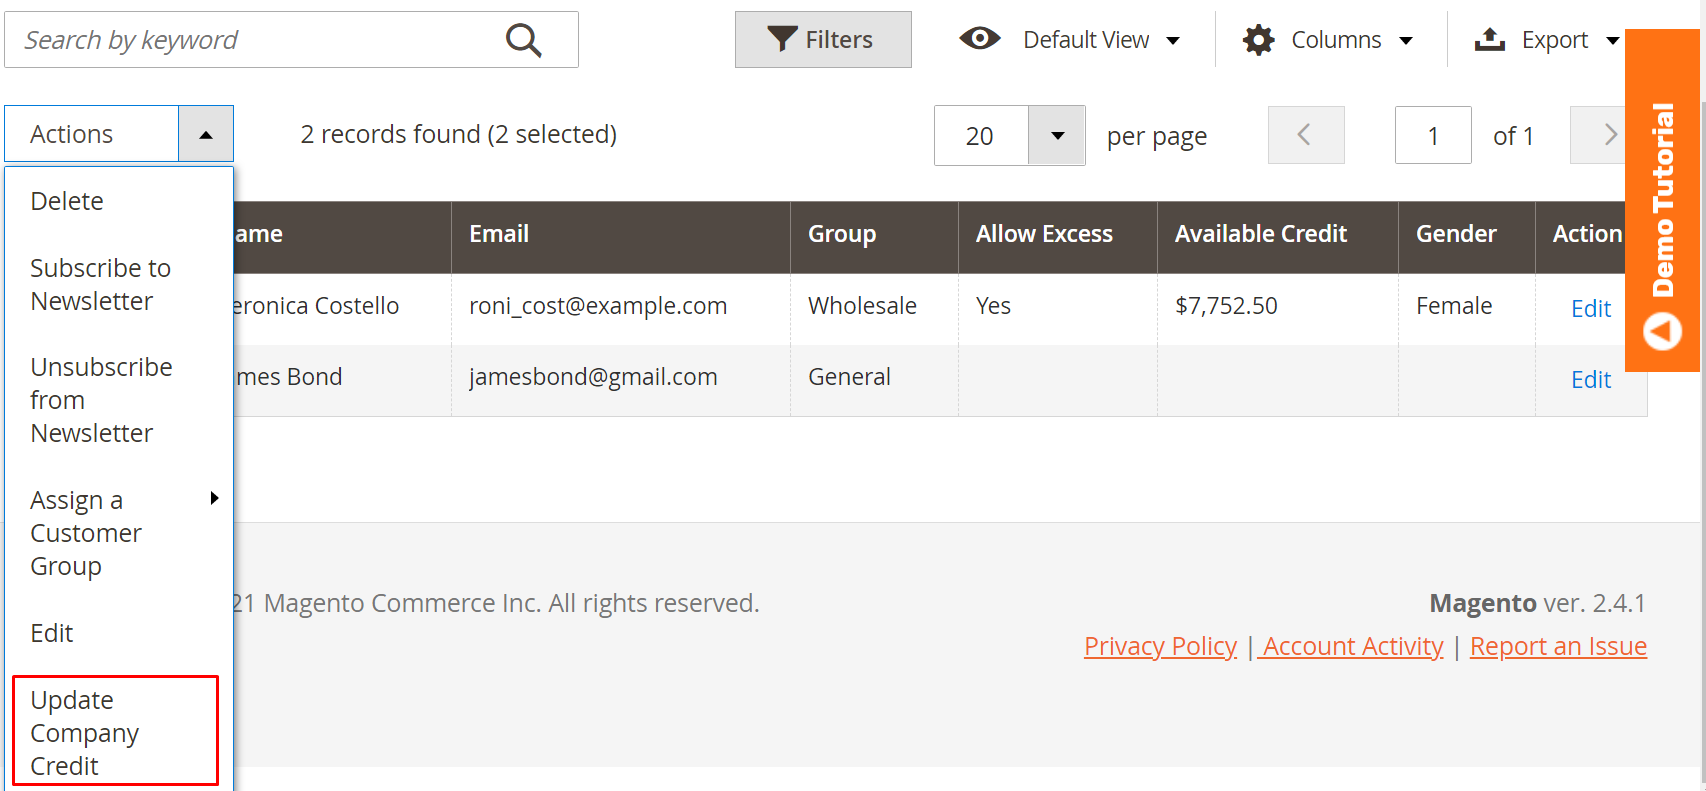
After clicking “Update Company Credit”, you can assign a credit limit and allow credit access just like in the first way:
10.2.2. Update Customers’ Available Credit
There is only one event that affects the customer’s available credit without the admin’s interference, that is when the customer places an order.
To update the customer’s available credit, that is, the credit left after the customer has placed order(s), you can enter a value in the “Update Available Credit” field, either in the Customer Detail Page (or you also enter in Update Credit column) or Customer Grid Action.
The value you entered will be added to the current available credit.
* Note:
- You cannot add an amount to the available credit that makes it greater than the credit limit.
- Please add the prefix “-” if you want to subtract the customer’s available credit.
10.2.3. Change Customer’s Credit Limit
Sometimes while working with customers, you may wish to increase or decrease their credit limit. To do so, you can directly enter a value in the credit limit field.
The updated credit limit will be the value you have just entered, not an added value to the former limit.
10.3. Configure Admin Actions to Company Credit
If you do not want all admin users to be able to view or change the company credit info of customers, then you can configure the setting in Role Resources.
- No tick on View or Save Company Credit:
- Admin users cannot see Allow Exceed & Available Credit info in the customer grid.
- Admin users cannot see the Company Credit tab on the customer detail page, therefore unable to update or create company credit.

- Only tick on View Company Credit:
- Admin users cannot save company credit on the customer detail page.
- Admin users receive the notification “Sorry, you need permissions to save company credit" when trying to change credit info.
- In Mass Actions, admin users still see the “Update Company Credit” option but will be redirected to the permission page when hitting “Save” credit.
- Tick on both View and Save Company Credit: Admin users can both see and edit company credit of customers that he/she has access to.
10.4 In the Frontend
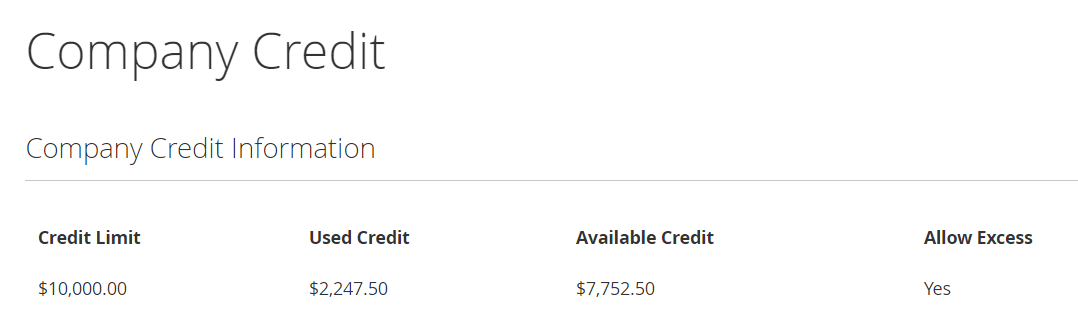
After you have assigned the customer a credit limit, he can see it in My Account → My Company Credit. Available Credit and Credit Excess info are also displayed in the Company Credit Information section.
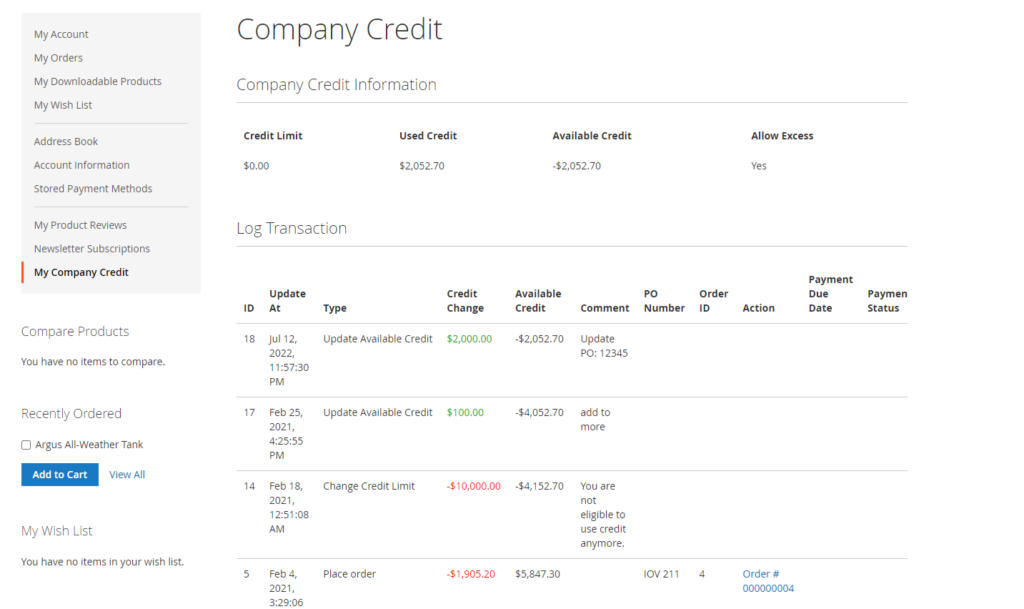
For each action affecting the credit information, the customer can track them in the Log Transaction:
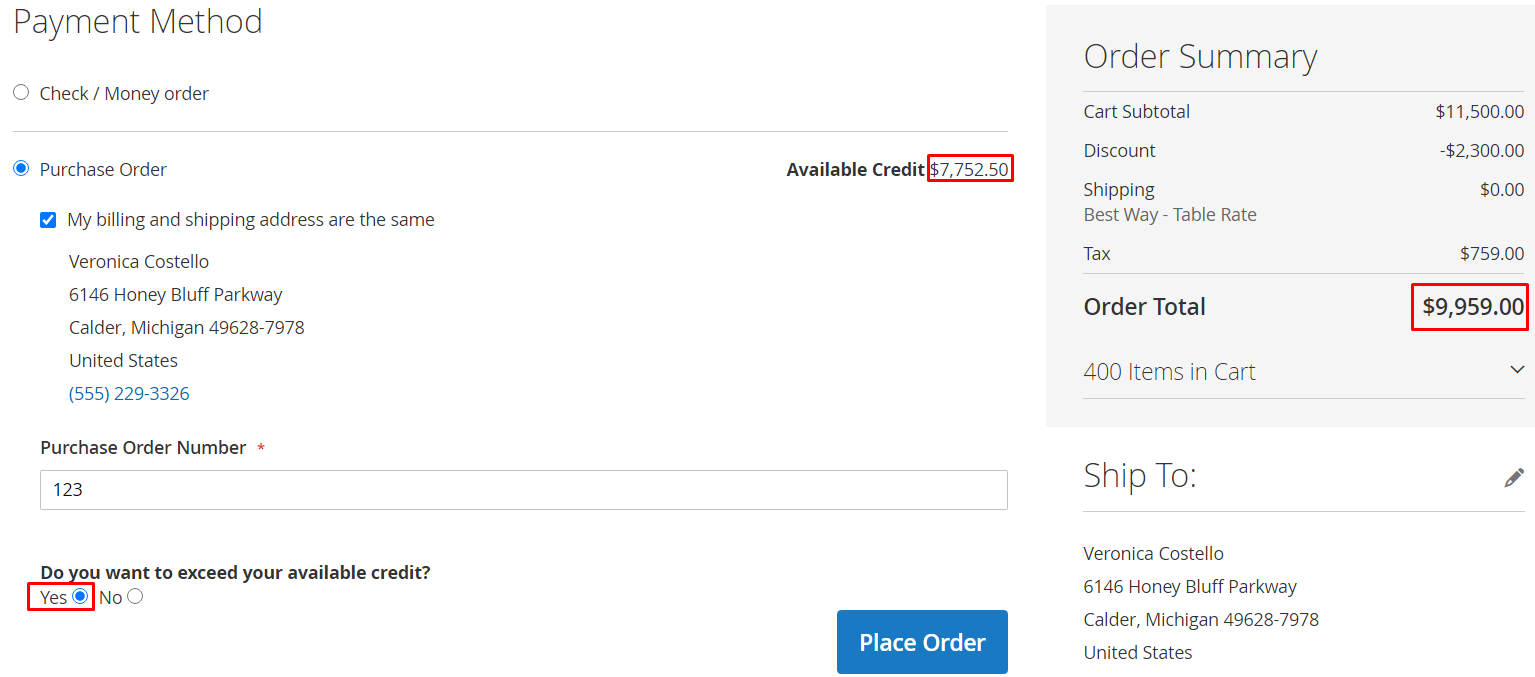
The customer can use his available credit to checkout, even for a sum larger than his available credit, if he is allowed to exceed it:
*Note: This module does not support checkout with multiple addresses