1. Overview
Magento 2 B2B Extensions covers the needs of B2B/wholesale customers and sellers from the very login to the reordering process.
BSS Commerce is providing 4 pricing plans for the B2B extension package, including Basic, Professional, Premium and Customized plans.
In this guide, we will present the user guide based on the Basic plan to provide the most detailed information for you. For the 4th plan, you can select picked modules from this guide to make configuration.
Basic Plan
|
+ Catalog Permission + B2B Registration + Customer Attributes + Company Account + Request for Quote |
+ Price Per Customer + Quick Order + Shipping & Payment Method per Customer Group + Hide Price |
As you can see from the above table, there are 9 extensions included in the Basic plan, regardless of a coming soon module. To start configuration, please go to Stores ⇒ Configuration ⇒ BSS COMMERCE and select extensions from the Basic plan to set up.
2. Catalog Permission
2.1. General settings
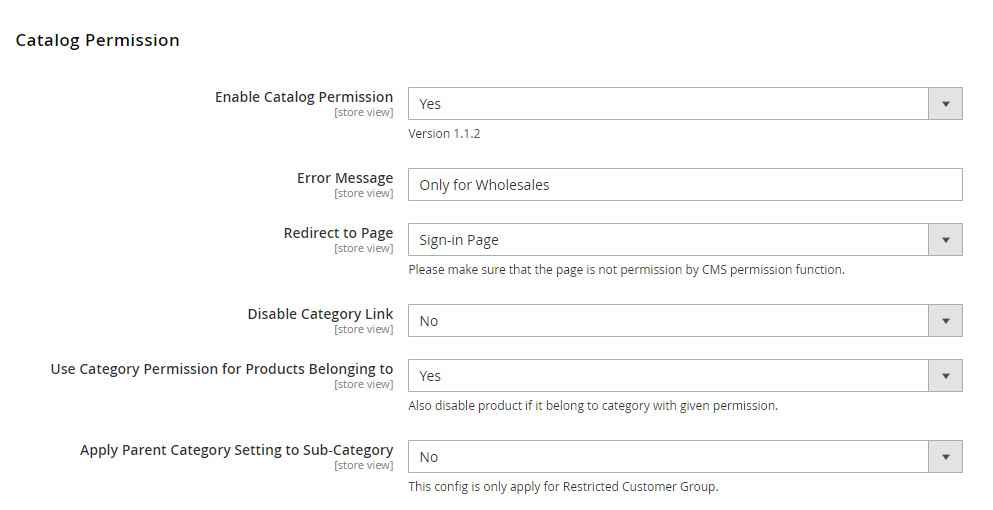
- Enable Catalog Permission: choose Yes to restrict catalog to the chosen customer groups.
- Error Message: tailor the Error Message you want to show on the page to which customers are redirected. You can also set different messages for different categories by going to Catalog => Categories.
- Redirect to Page: choose among these six pages to redirect customers when they access a restricted page.
*Note:
+ If you create a new CMS page, it will be added to "Redirect to Page" options
+ Please make sure that the chosen page is not restricted by CMS permission function.
+ If the redirected page is disabled, customers will be redirected to Home Page.
- Disable Category Link: choose Yes to hide the link of category on the menu and layered navigation.
*Notes:
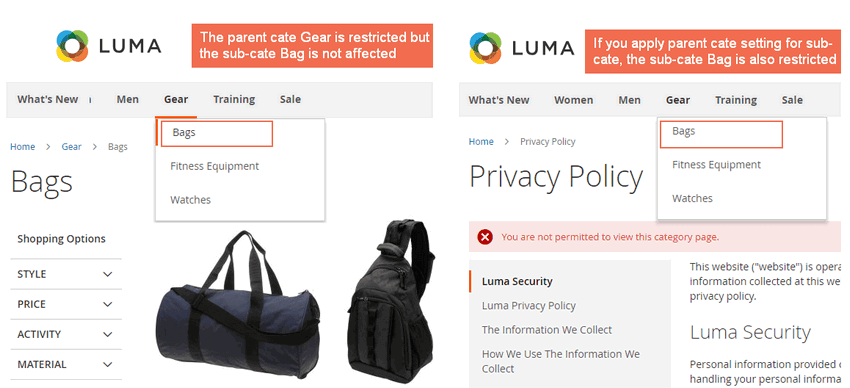
+ If at least one sub-category has different catalog permission from that of the parent category, the parent category link will be shown.
+ In other words, only when all subcategories have the same permission as the parent category will the parent category link be disabled.
- Apply Parent Category Setting to Sub-Category: choose Yes so that the setting of parent category will be applied for its sub-categories.
- Use Category Permission for Products Belonging to: choose Yes to disable products belonging to the restricted categories. For the product belongs to multiple categories: If at least one of those categories is restricted, the product will not be available to access in other categories.
If you choose No, non-permitted customers can still access the products under restricted categories.
2.2. CMS Page Permission
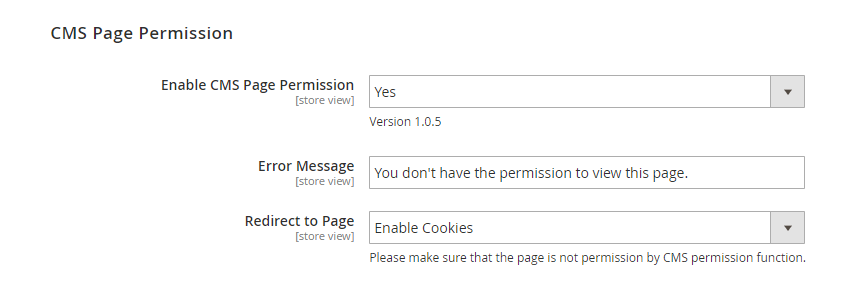
*Note:
+ If you create a new CMS page, it will be added to "Redirect to Page" options.
+ Please make sure that the chosen page is not restricted by CMS permission function.
+ If the redirected page is disabled, customers will be redirected to Home Page.
2.3. Set permission for categories
Go to Catalog ⇒ Categories and navigate to the category you want to set permission. 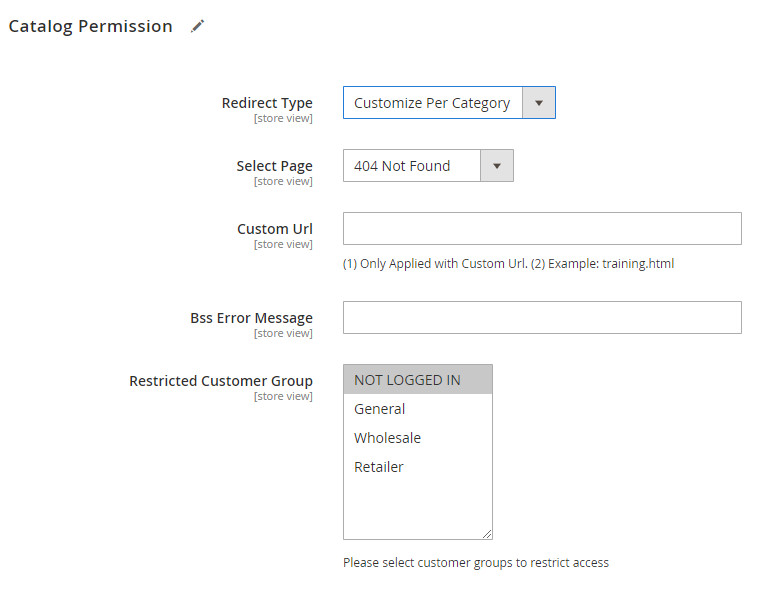 In Redirect Type:
- Use Global Config: apply the error message and redirect to the page as you set above.
- Customize per Category: Tailor message for a specific category and choose how to redirect visitors in Select Page, Custom URL, and BSS Error Message.
In Restricted Customer Group: select customer group(s) you don't want to grant access to the category.
2.4. Set permission for CMS pages
Go to Content ⇒ Pages and navigate to the category you want to set permission. 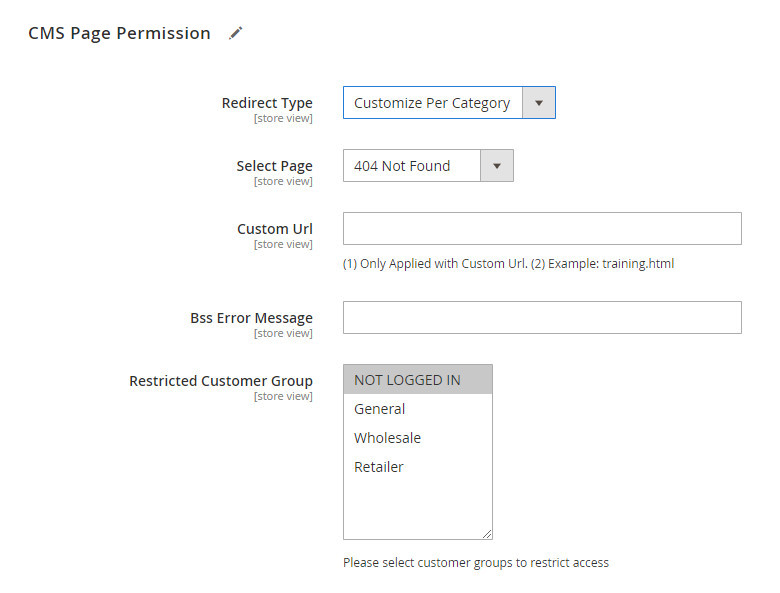
3. B2B Registration
3.1. General Configuration
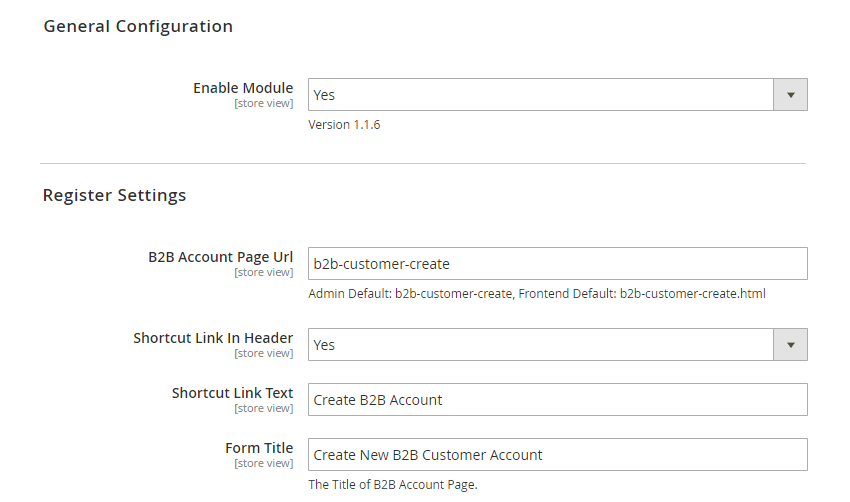
- In Enabled: choose Yes to enable the module.
- In B2B Account Page URL: enter URL of the customer registration page
- In Shortcut Link in Header: select Yes to enable the shortcut link in the header. So customers can click this shortcut link to navigate the registration page.
- In Shortcut Link Text: enter the title of the shortcut link in the header.
- In Form Title: enter the title of the B2B registration form
Choose additional fields in the B2B Registration form. If you do not want any fields to show up, choose No.

In Is Company Account, choose Yes to allow customers to register as a company account in the frontend.
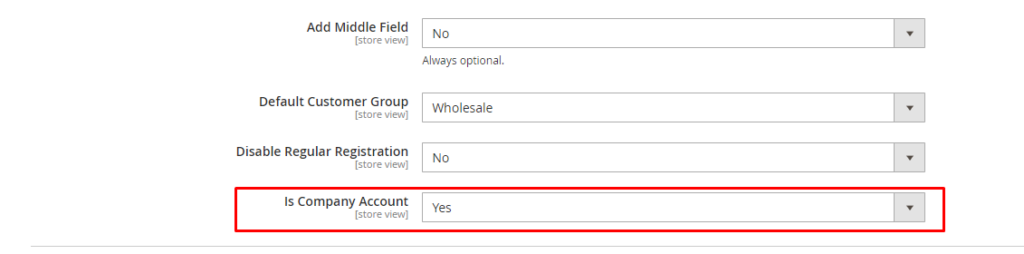
Please ensure that by default, these fields are not required. Go to Configuration ⇒ Customer Configuration ⇒ Name and Address Options to check. 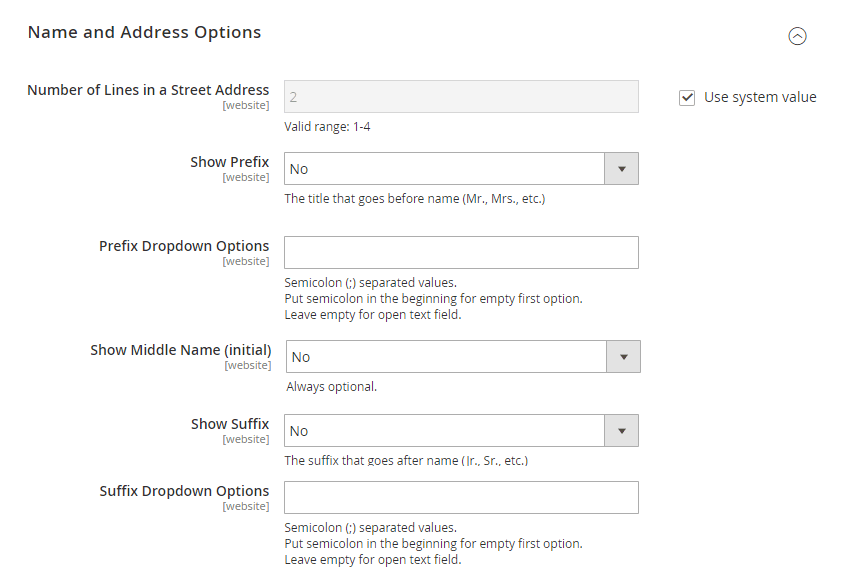 Customer groups
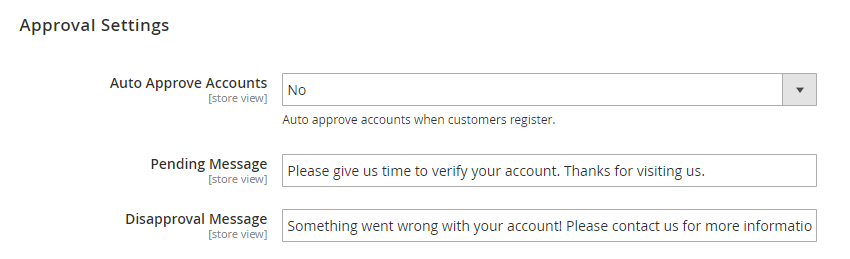
- In Auto Approve Accounts: Choose Yes if you want to accept new B2B accounts automatically or No if you want to approve accounts manually
* Note: Even when you approve the B2B registration requests automatically, you can still change their status in the backend.
Admin email settings 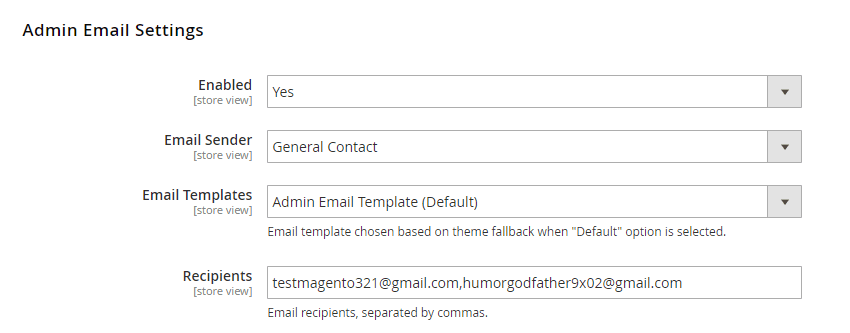
Customer email settings 
3.2. Default CAPTCHA support
To enable Captcha in the B2B Registration form, please follow Stores ⇒ Configurations ⇒ CUSTOMERS ⇒ Customer Configuration ⇒ CAPTCHA 
3.3. Manage B2B registration requests
In Customer Grid: There is an additional Status column in Customer Grid in the backend so that the admin can check the status of B2B accounts and make adjustments accordingly.
The admin can edit the status of single B2B account by double-clicking in any position in the row: 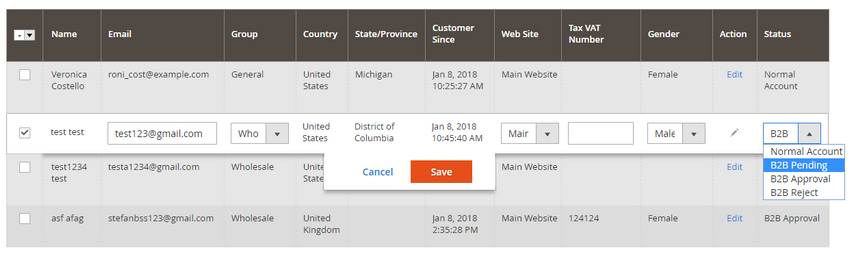 or, multiple B2B accounts:
 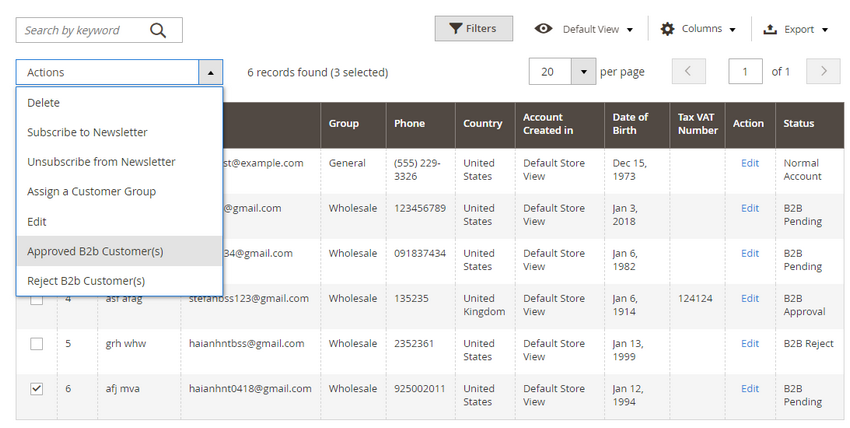 or in Account Information of specific account:
 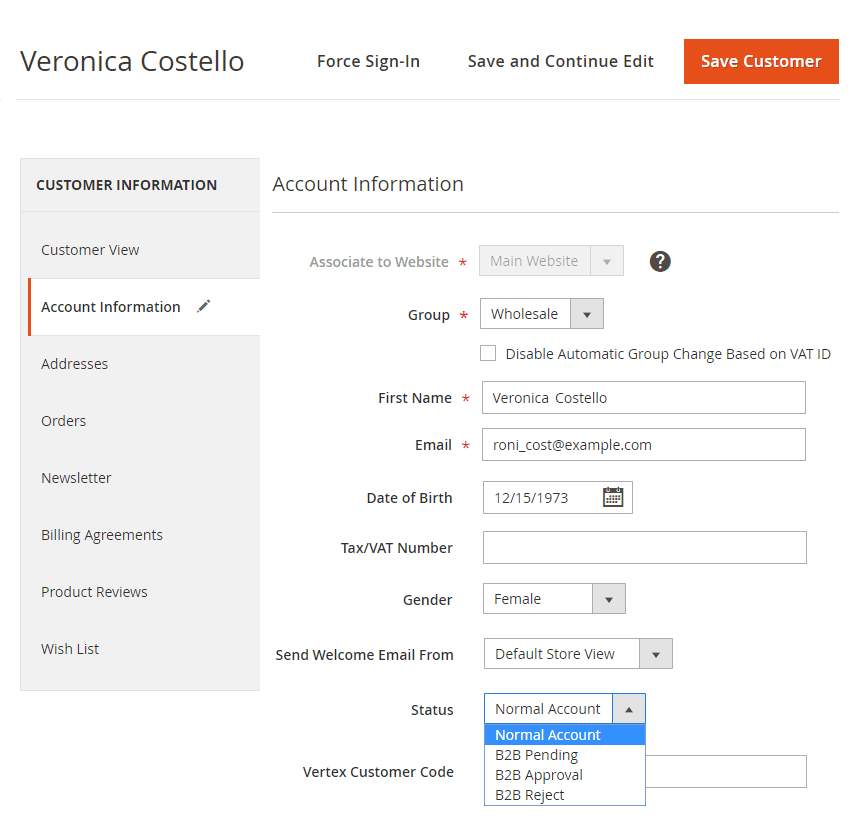 *Note: If the admin creates an account in the backend for a customer, there will be an approval notification email sent to the customer after finish creating this account. However, that account has Normal status, the admin can change into B2B Approval status, there also a notification email sent to that customer.
4. Customer Attributes
4.1. General config
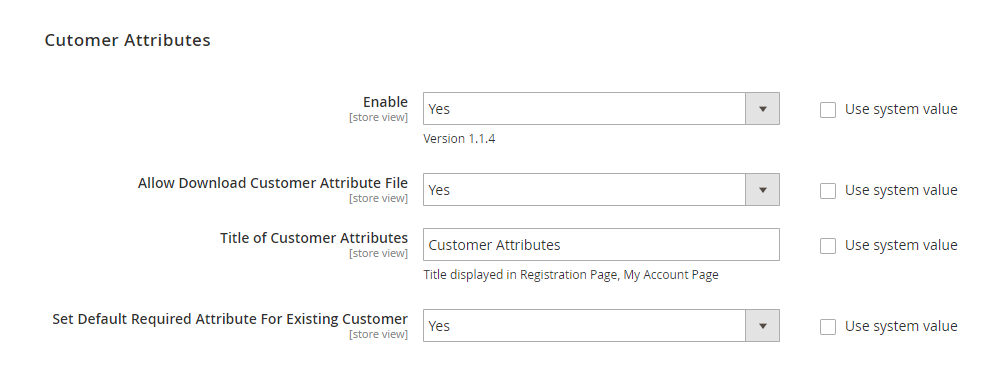
In Enable, choose Yes to enable the extension or No to disable it.
*Note: The Enable config only affects the frontend display. Other backend functions aren’t affected by this config.
In Allow Dowload Customer Attribute File: choose Yes to allow downloading the file uploaded to customer attribute or No to restrict downloads.
In Title of Customer Attributes, enter the name for the customer attributes block. This title will be displayed on the Registration Form and My Account Page.
In Set Default Required Attributes for Existing Customer, choose Yes if you want required attributes to be applied for existing customers. Otherwise, choose No.
4.2. Create new customer attributes
Go to Customers ⇒ BSSCommerce ⇒ Customer Attributes.
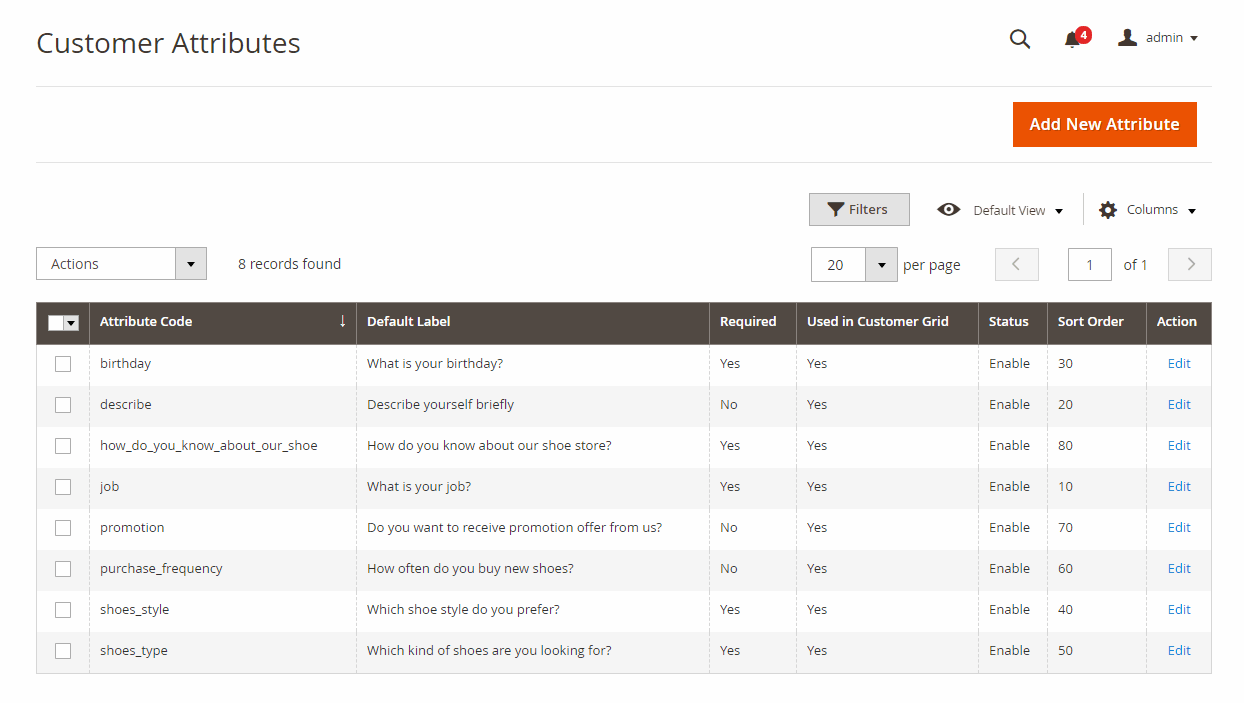
Click Add New Attribute button to create a new customer attribute. Then, you will see 3 tabs: Properties, Manage Labels, and Display Configuration.
4.2.1. Properties
Attribute Properties:
In Default Label, enter a name for the customer attribute.
In Input Type, choose 1 of the 9 input types: Text Field, Text Area, Date, Yes/No, Multiple Select, Dropdown, Checkbox and Radio Button, File (Attachment).
*Note:
- If you choose Multiple Select, Dropdown, Checkbox or Radio Button, add options for the customer attribute in Manage Options.
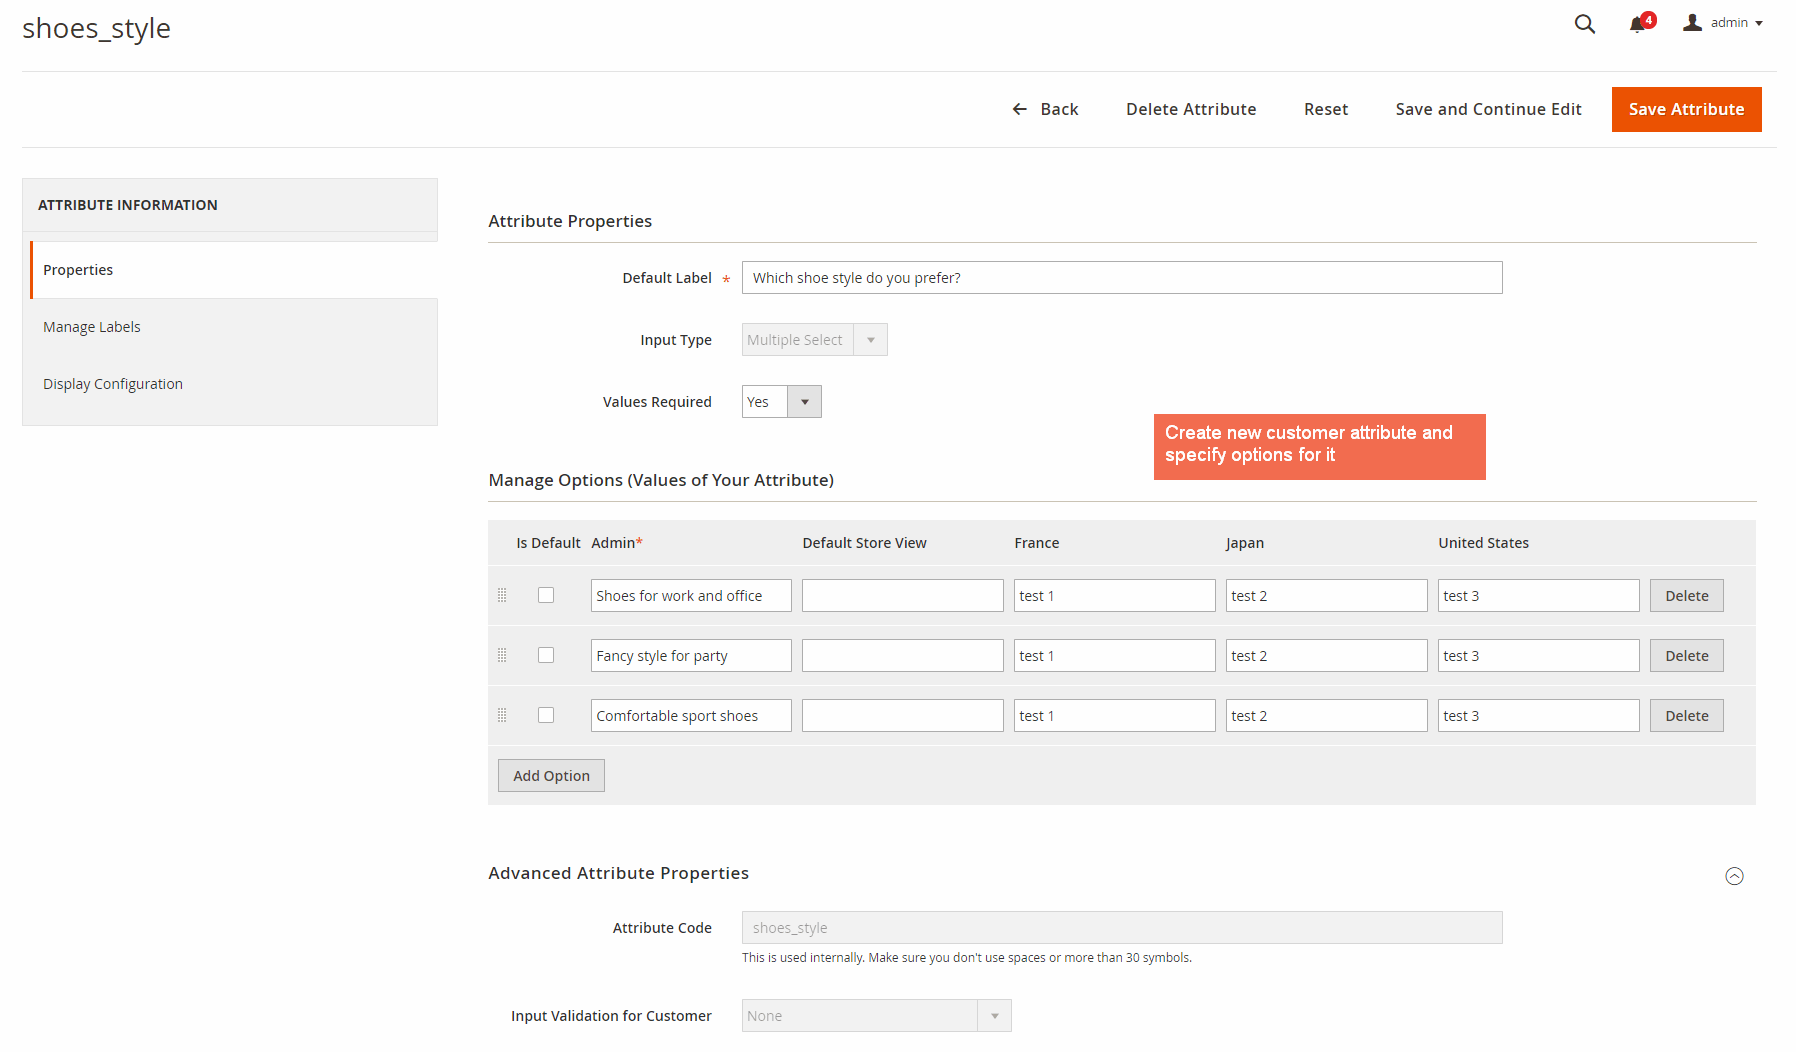
In Values Required, choose Yes to make the customer attribute compulsory to fill in; otherwise, choose No.
Advanced Attribute Properties:
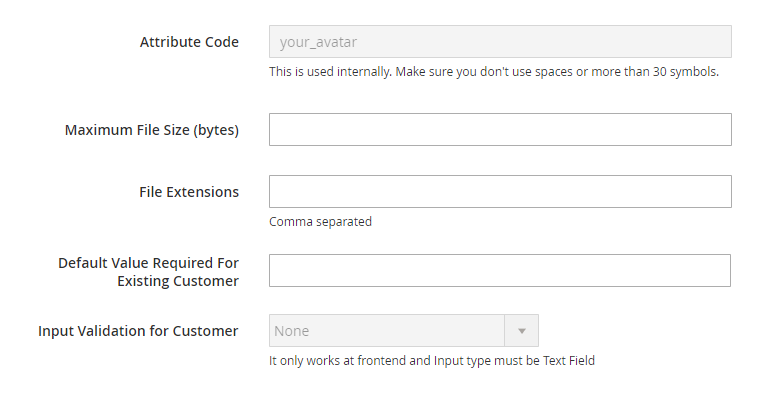
In Attribute Code, enter a code for the customer attribute. No space allowed and no more than 30 symbols.
*Note: In case none value is entered for Attribute Code, the extension will automatically get the value of Default Label as value for this field.
In Maximum File Size (bytes), enter a number to define the largest file size possibly uploaded.
In File Extensions, type allowed file extension that can be uploaded to the customer attribute. Each is separated by a comma.
In Default Value Required for Existing Customer, enter a value if the attribute is set as Required. This field will be only shown when the Values Required is Yes and the Input Type is text field, area, datetime, or file.
In Input Validation for Customer, set a type of data allowed in the field. The available values depend on the Input Type specified.
None—The field has no input validation during data entry.Decimal number—Accepts only decimal number during data entry.Integer Number—Accepts only integer number during data entryEmail—Accepts only an email address during data entry.URL—Accepts only a URL during data entryLetters—Accepts only letters during data entryLetters (a-z, A-Z) or Numbers (0-9)—Accepts any combination of numbers (0-9) and alphabetic characters (a-z, A-Z) during data entry.
4.2.2. Manage labels
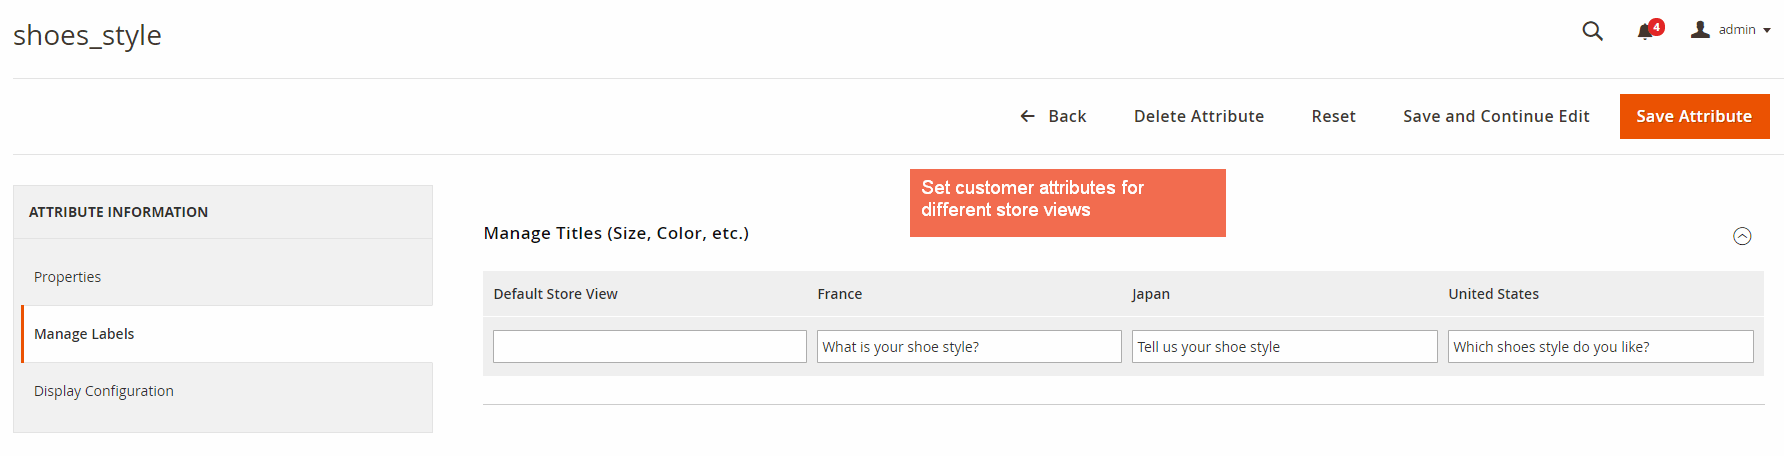
Customer Attributes for Magento 2 extension supports multiple store view, so you can display different customer attribute labels per store view.
4.2.3. Display configuration
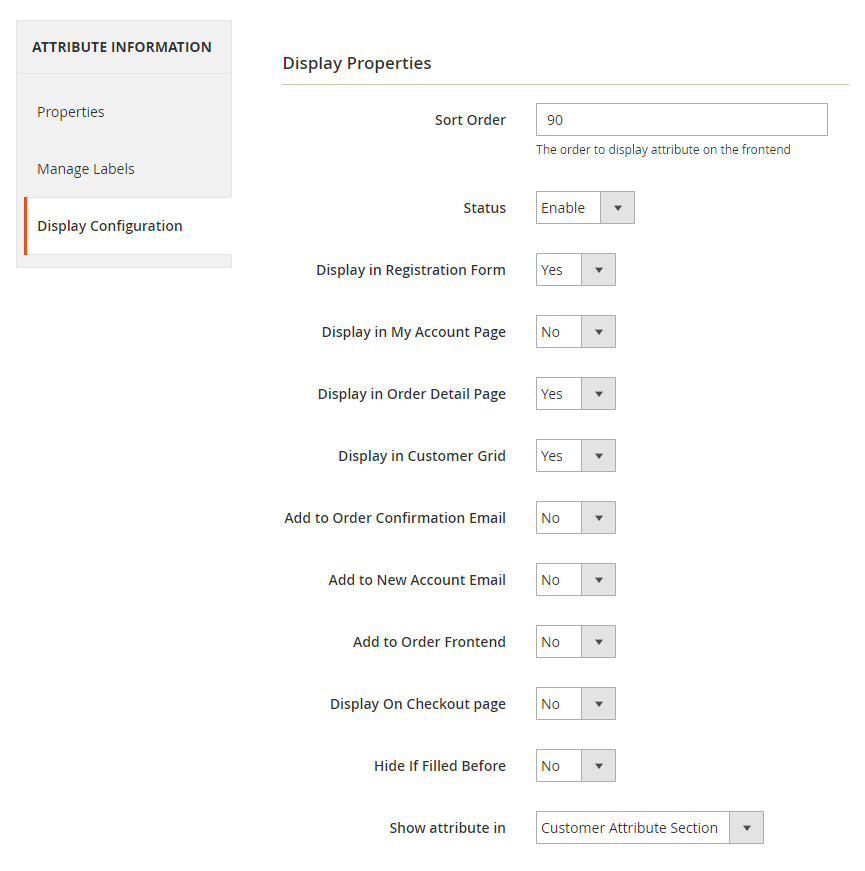
*Note:
- The sort order set here will also decide the order of appearance of the attributes in the backend.
- You need to reindex data of Customer Grid whenever you make any change in Display in Customer Grid config.
- Attributes of all input types, except for "File", are supported at the checkout page.
In Hide If Filled Before, choose Yes to hide the customer attributes at the checkout page if they are filled before.
4.3. Create a new customer address attribute
Go to Customers ⇒ BSSCommerce ⇒ Customer Address Attributes. 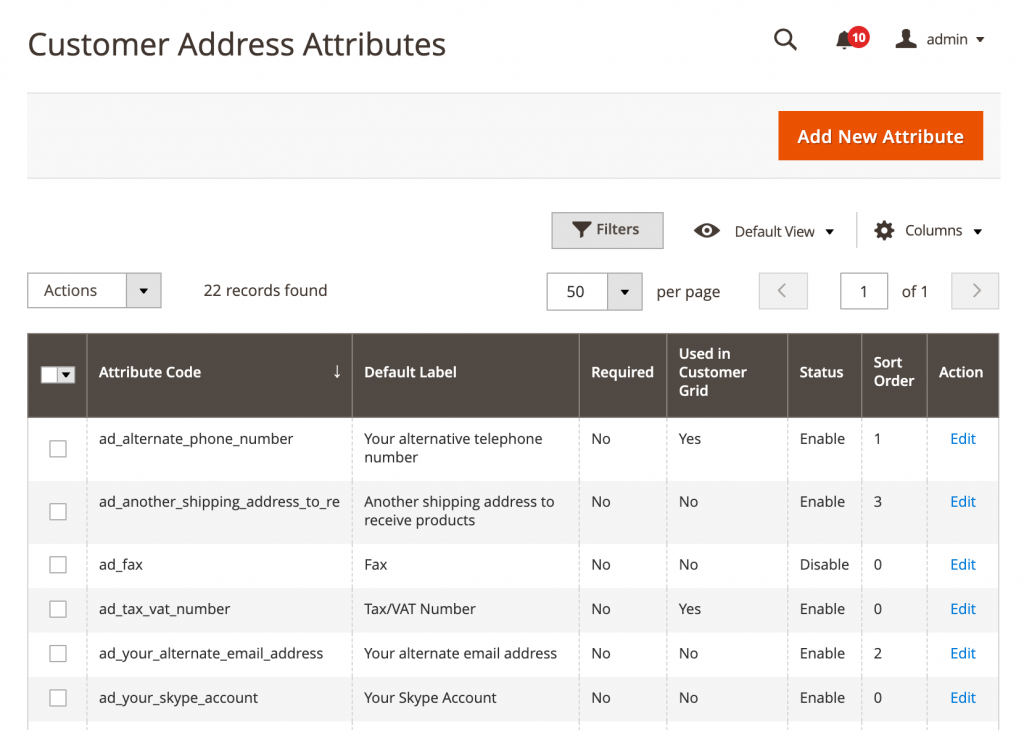
Click Add New Attribute button to create a new customer attribute. Like adding customer attributes in the section 2.2, there are also 3 tabs: Properties, Manage Labels, and Display Configuration. In each tab, you do the same steps as creating customer attributes to fill information in each field.
In Display Configuration tab, you set Yes/No to decide whether to show customer address attributes in these positions or not.
4.4. Create a new email template
As above, customer attributes are possibly set to display on Order Confirmation email and New Account email.
First off, you need to create a new template that includes customer attributes variable. Please follow Marketing Email Templates Add New Template.
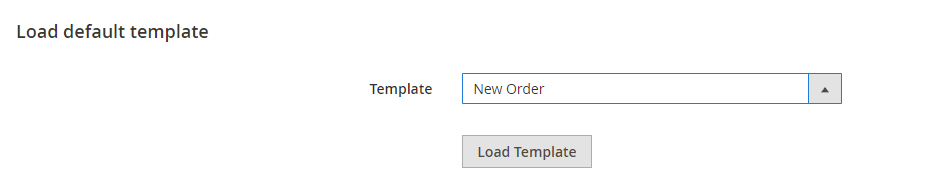
- New Order Confirmation email template
In Template section of Load default template, you can select among various default email templates, for example, New Order. Then, hit on Load template button.
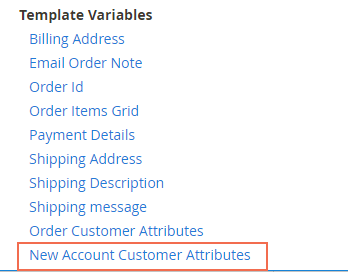
Under Template Information, select Insert Variable… to add customer attributes to the new order confirmation template.
Do not forget to enter Template Name and Save the new template.
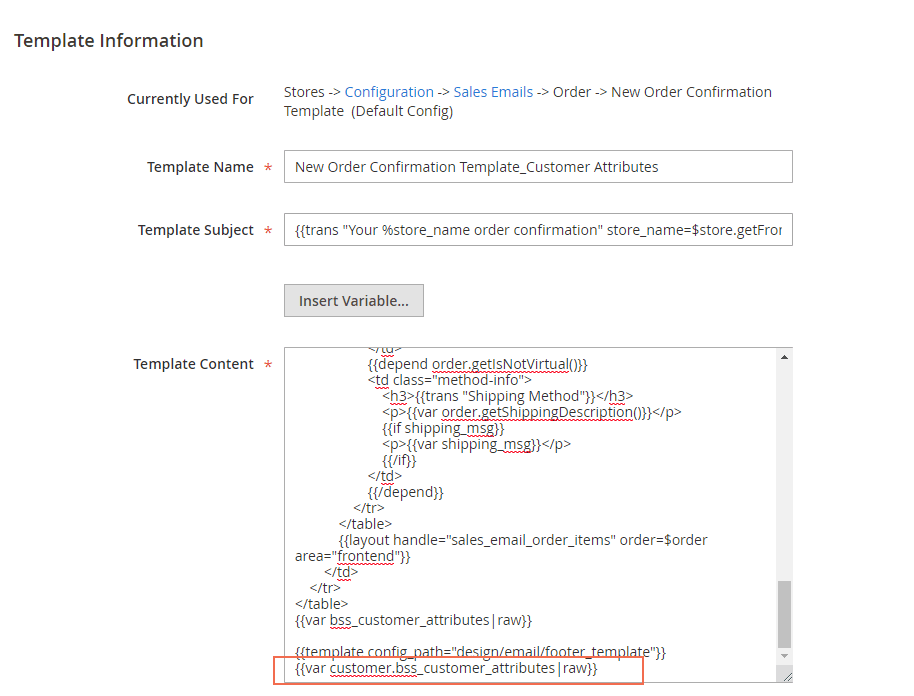
Secondly, set this new template as the Order Confirmation email by going to Stores Configuration Sales Sales Emails Order.
In New Order Confirmation Template, uncheck Use system value box and choose the newly created email template.
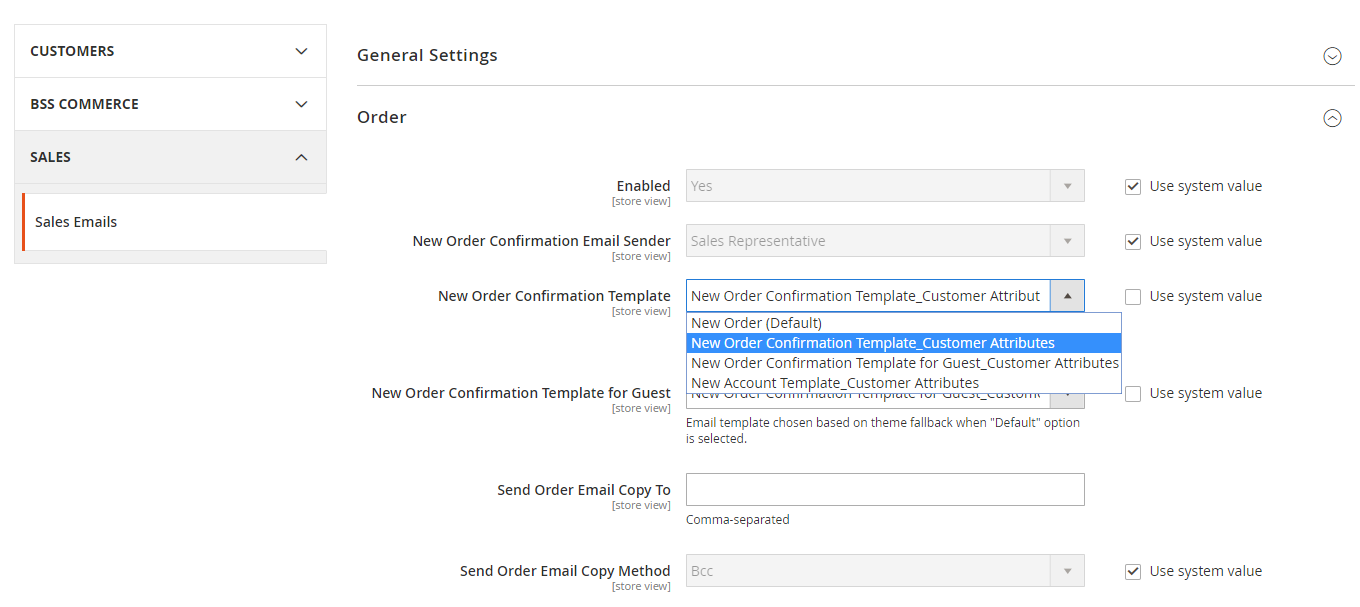
On completing, please Save Config.
- New Account email template
Similarly, you can create a new template with customer attributes for New Account email.
In Template of Load default template section, choose New Account (Default) template and hit Load Template.
Under Template Information, enter Template Name and select Insert Variable… to add customer attributes to New Account template.
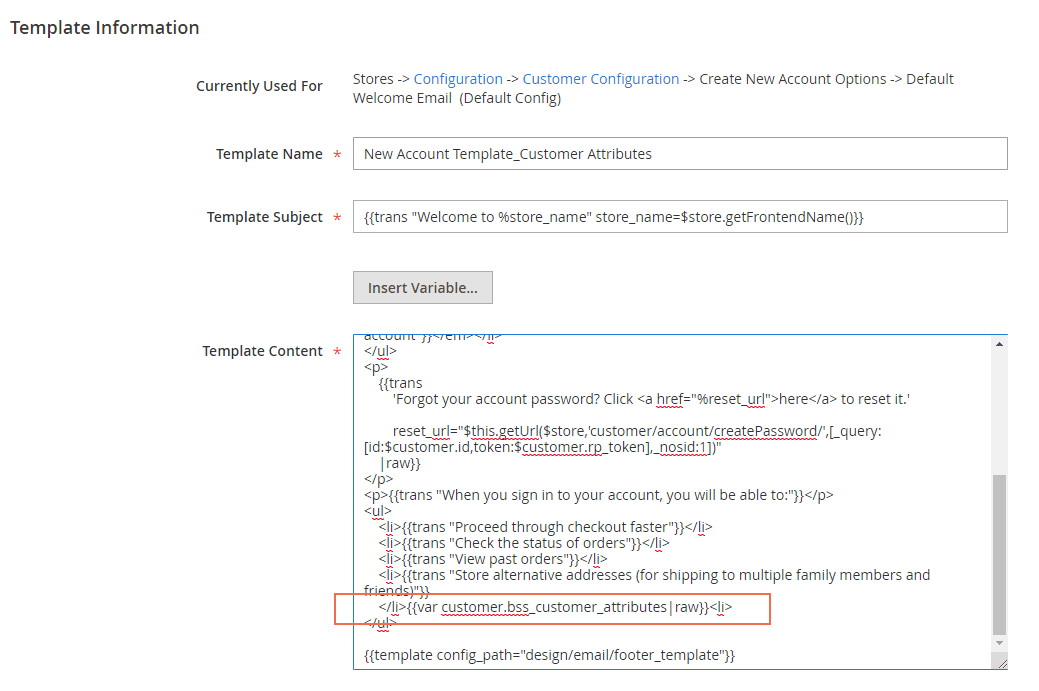
Then, Save Template.
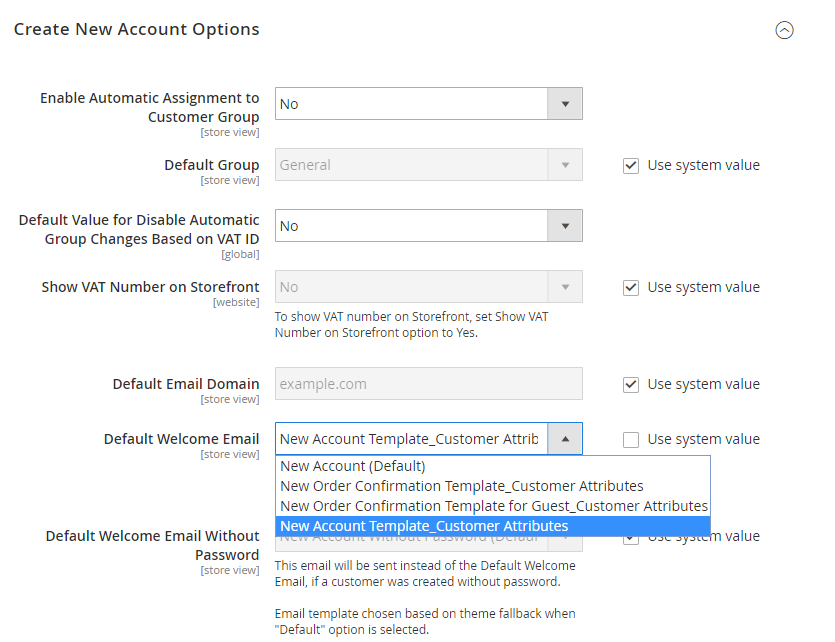
To set this new template as the New Account template, please follow Stores ⇒ Configuration ⇒ Customers ⇒ Customer Configuration and expand Create New Account Options.
In Default Welcome Email, unmark Use system value box. Then choose the newly created template. Save Config to complete the settings.
4.5. Import Customer with Attributes
Customer Attributes for Magento 2 extension allows importing customer with the created customer attributes by using the .csv file.
Firstly, prepare the file of customer information with customer attributes to import. All created customer attributes must be included in the import file with each customer attributes code listed in separate columns. Please make sure that all customer attribute codes are the same as attribute codes of existing customer attributes.
For customer attributes with the input type is a checkbox or radio button, use option's ID instead of options' value. For customer attributes with the input type is a dropdown or multiple select, fill in with correct options' value.

Admins can also download the sample file by following System Import.
In Entity Type, choose Custom Main File to import new customers with customer attributes.
In Import Behavior, select one of the following actions:
- Add/Update complex data: New data is added to the existing attributes in the database.
- Delete Entities: Any existing data of entities in the import file is removed from the database of the stores.
- Custom Action: Admins can also override the import behavior by writing a custom option.
In Select file to Import, upload the file prepared earlier. Make sure that the size of the uploaded file is not more than 3M.
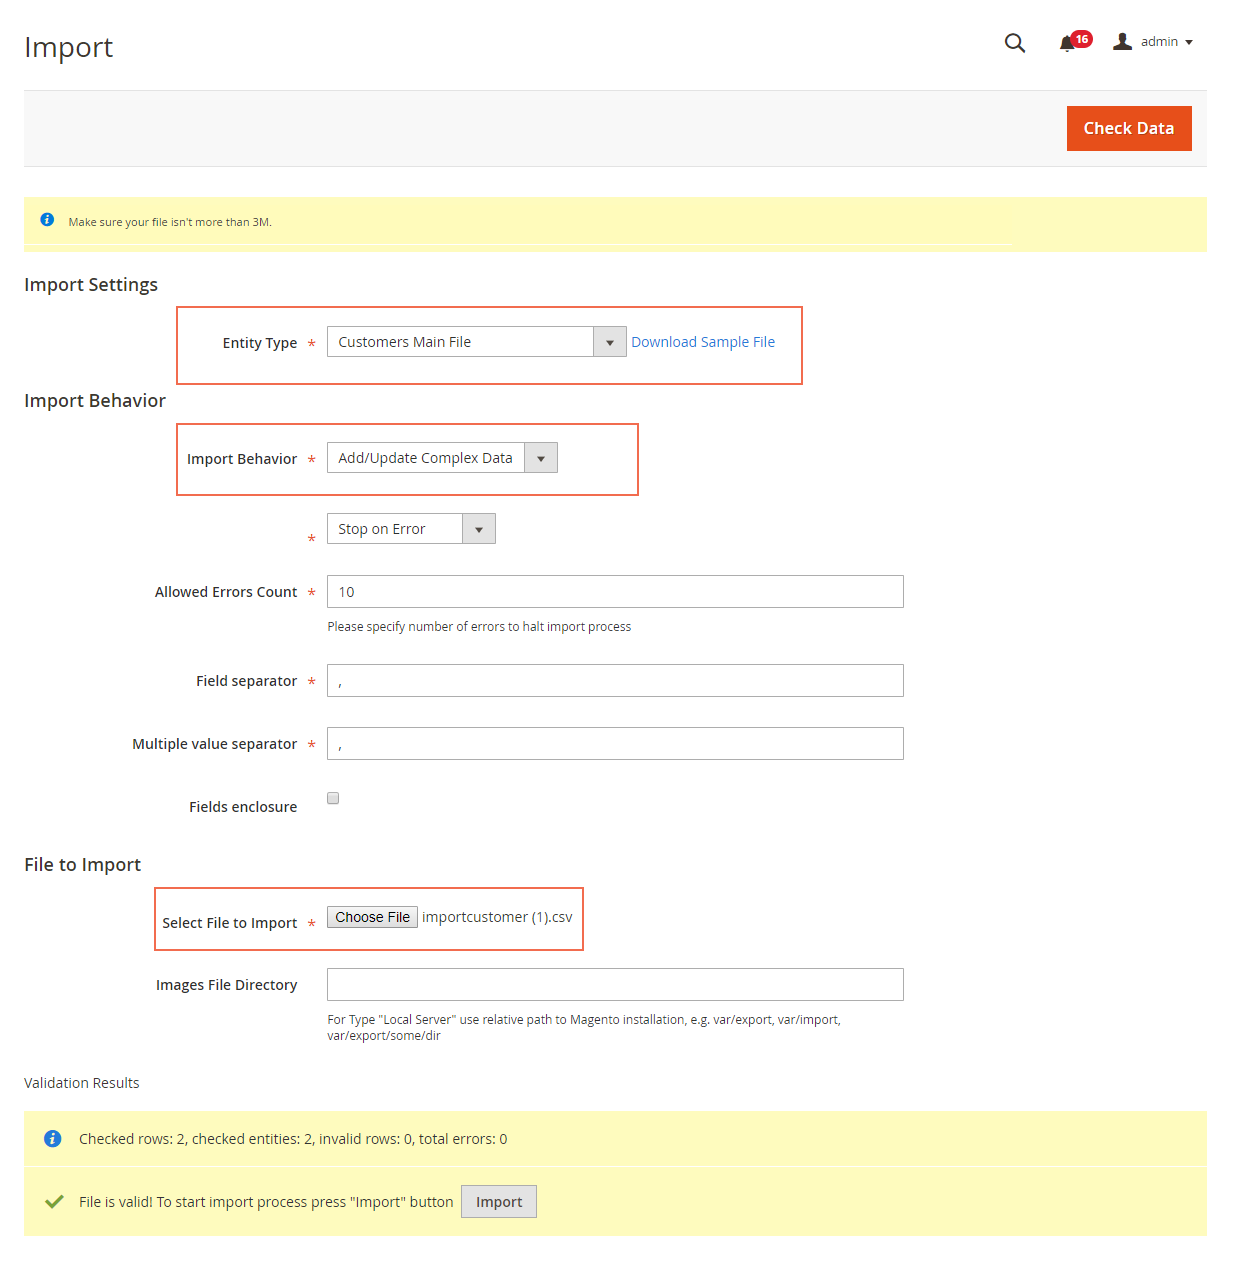
On completing, tap Check Data button in the upper-right corner. Wait for few seconds for the validation to perform.
If the import data is valid, the successful message will be displayed as in the screenshot. Click on Import button to process the import to the end of the data. Otherwise, there is any problem with data, the error message will appear. Just correct the invalid data and re-upload the file.
5. Company Account
5.1. General settings
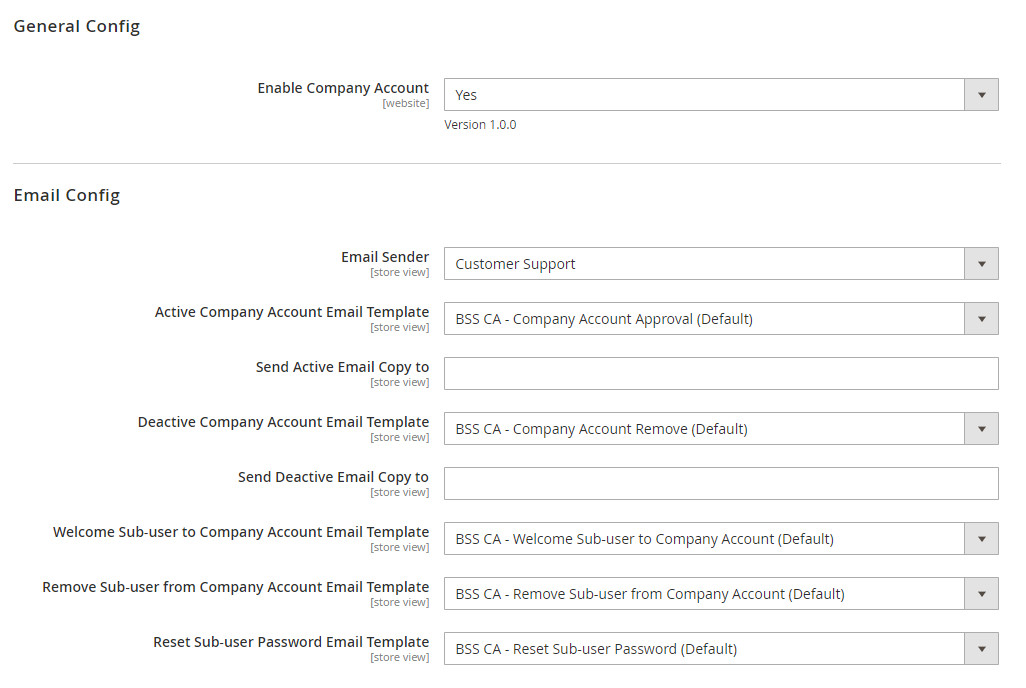
Set Enable Company Account to Yes. In Email Config, choose the sender and templates.
*Note: In "Send Active Email Copy to" and " Send Deactive Email Copy to", input multiple emails separated by commas.
5.2. A customer registers for an account in the storefront.
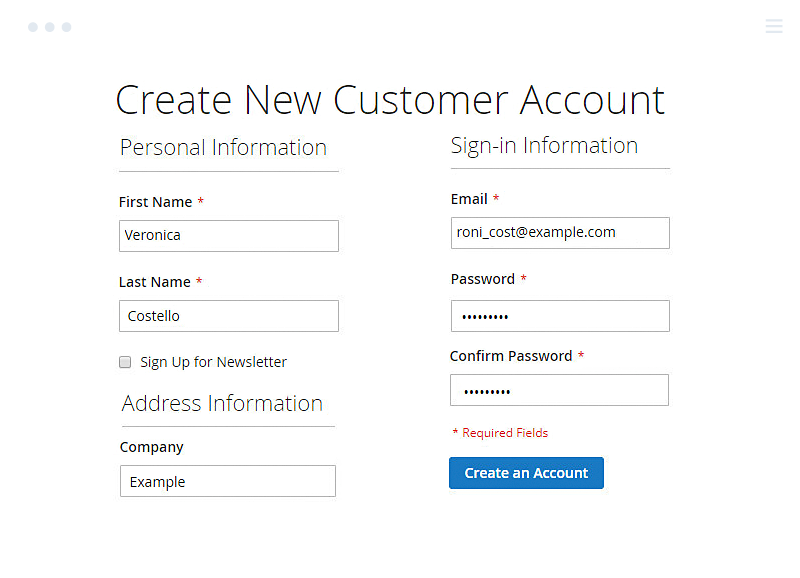
To start with, a customer will sign up for a new account via the default registration form.
Then, he/she needs to contact the store admin to switch the created account to the company account in the backend.
5.3. Approve/Reject company accounts in the backend
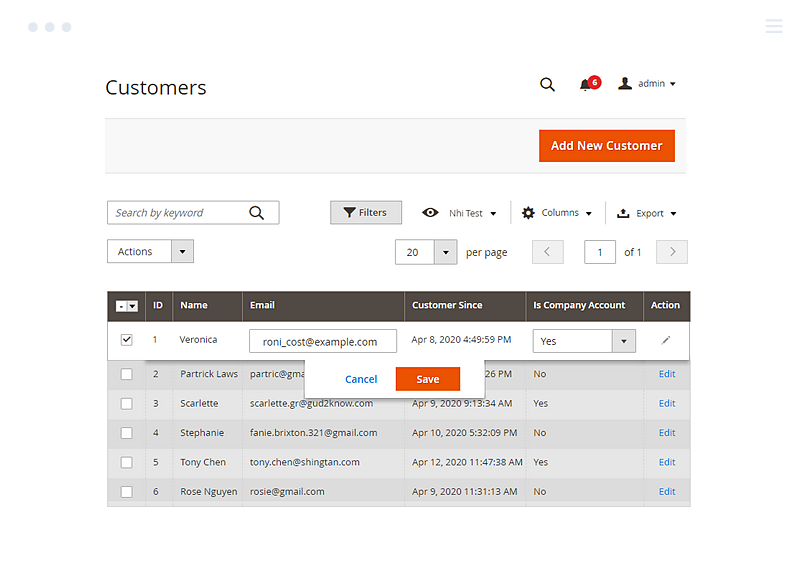
All registered accounts, including company accounts, are reported in the Customers grid. Upon contact with the customer, the admin then switches a normal account to the company account in 2 ways:
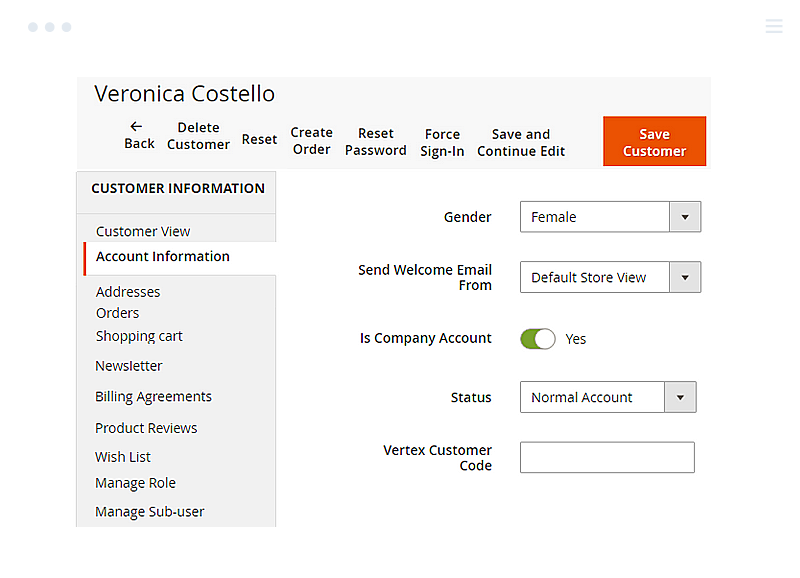
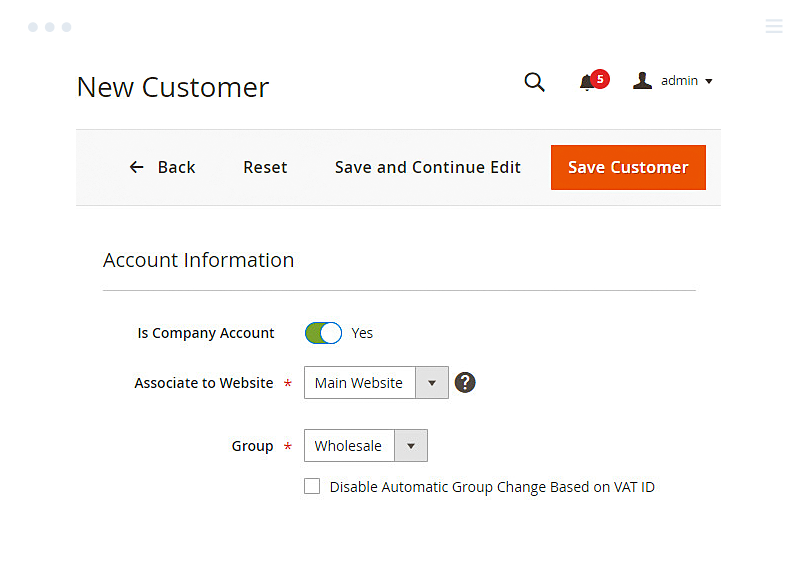
Under Account Information, there is a new field "Is Company Account".
- By setting this field to Yes, a company account is now available.
- Setting it to No means the account is just a normal account.

Otherwise, the store admin can change multiple accounts to company accounts or remove them from company accounts with the mass action.
5.4. Create users, roles and permissions in the storefront
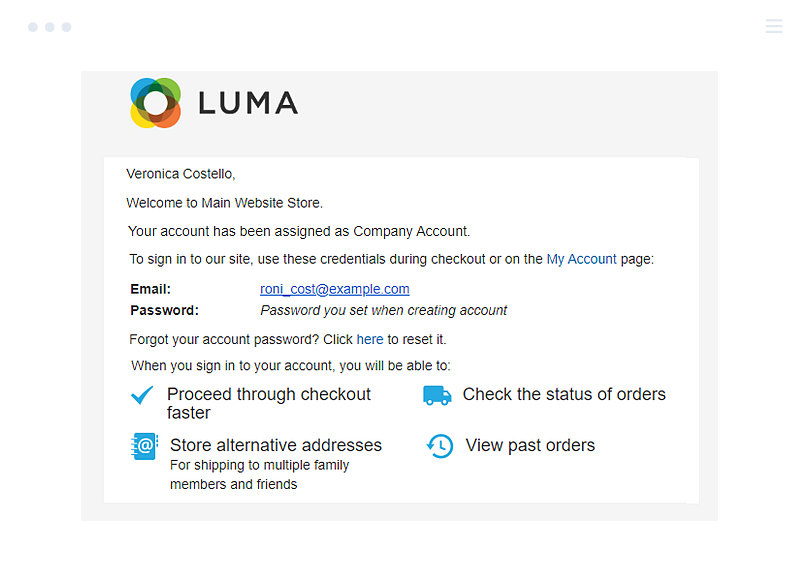
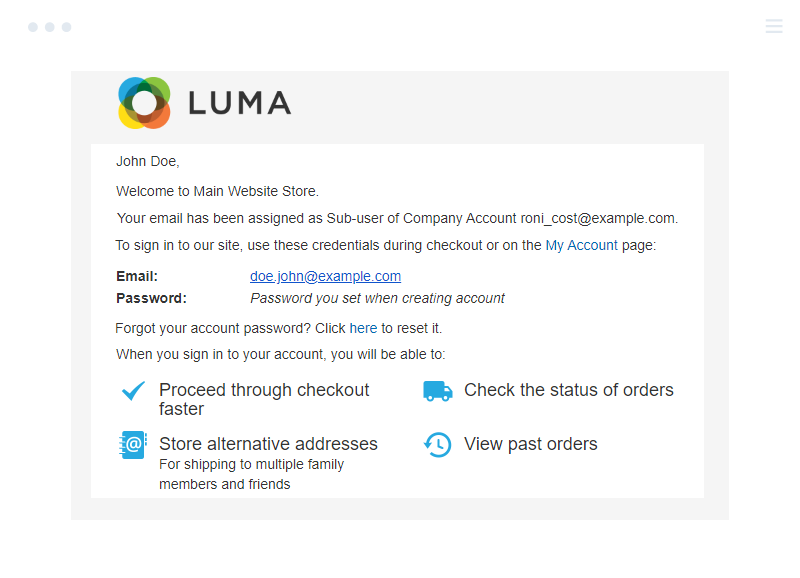
When the store admin switches an account to the company account, a notification email is sent accordingly. Then, the company admin can login to his/her account.
From now on, you must get familiar with three new roles:
- The store admin: It is the person who will review, approve, or disapprove the company account registration
- Company admin: One who registers the company account in the first place and who is assigned the role "Admin."
- Sub-users: Sub-users are created by company admin or store admin under Account management. They have limited roles and permissions.
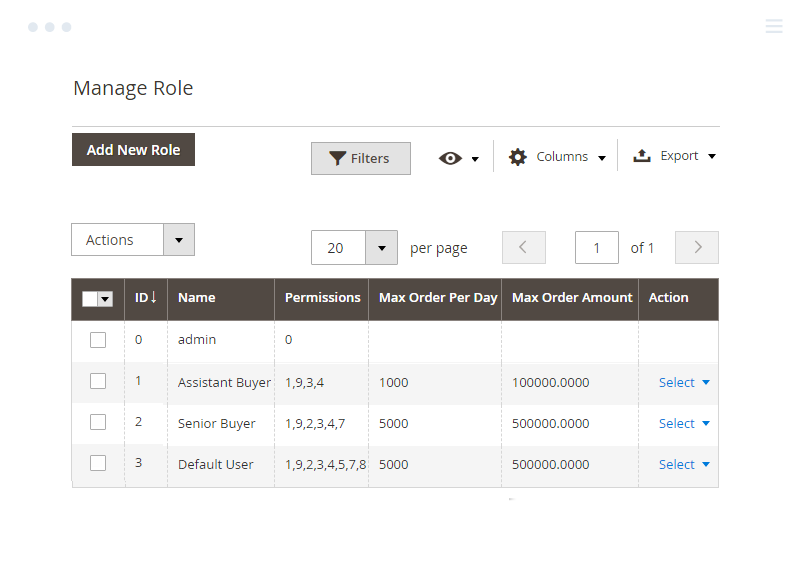
5.4.1. Create and manage new roles
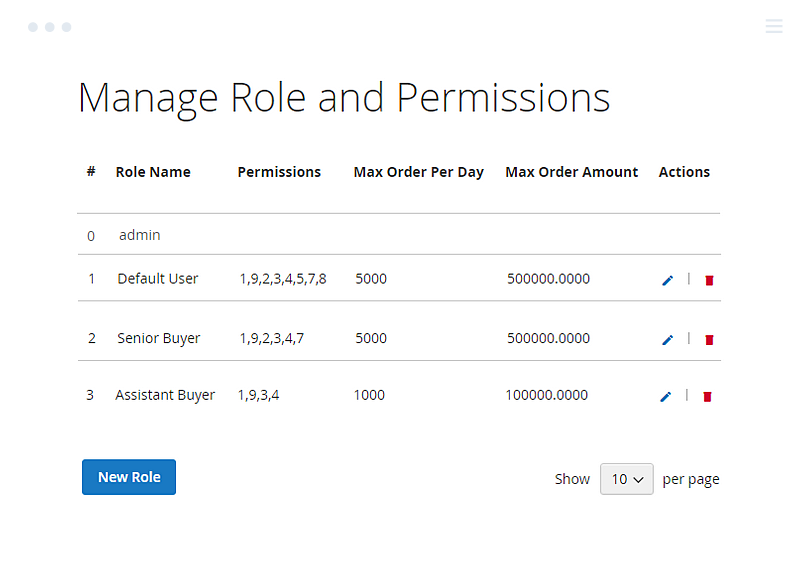
Go to Manage Role under Account Dashboard, the company admin can add new role for users.
Please note that the Admin role is available in advance. Those assigned the Admin role will have permissions as the company admin.
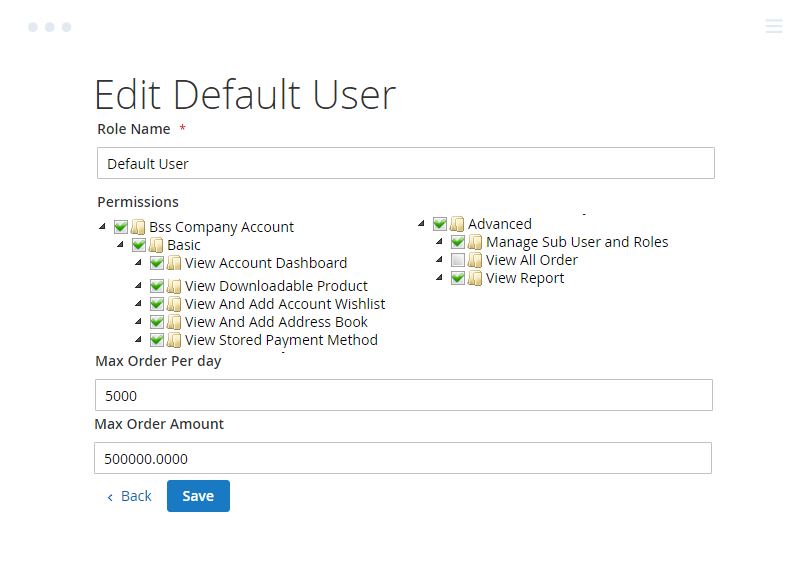
Choose to add New Role and assign built-in permissions to the role.
Remember to Save the settings.
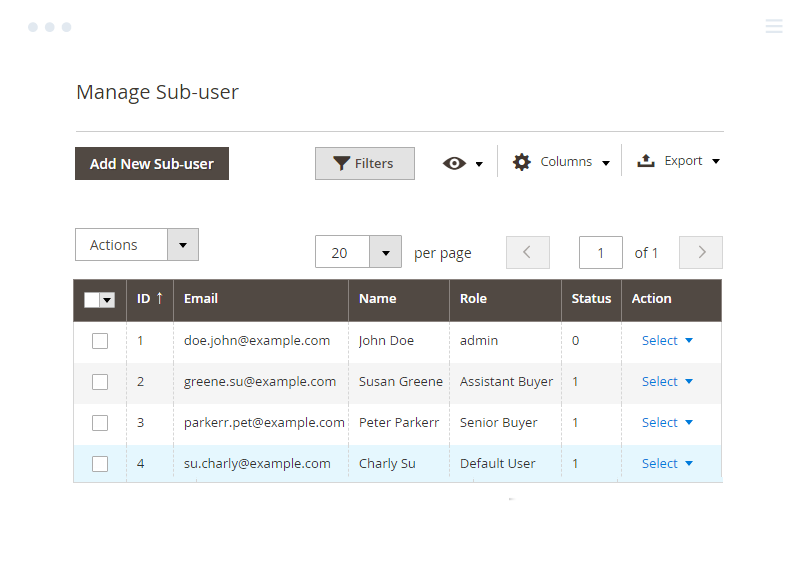
5.4.2. Create and manage new sub-users
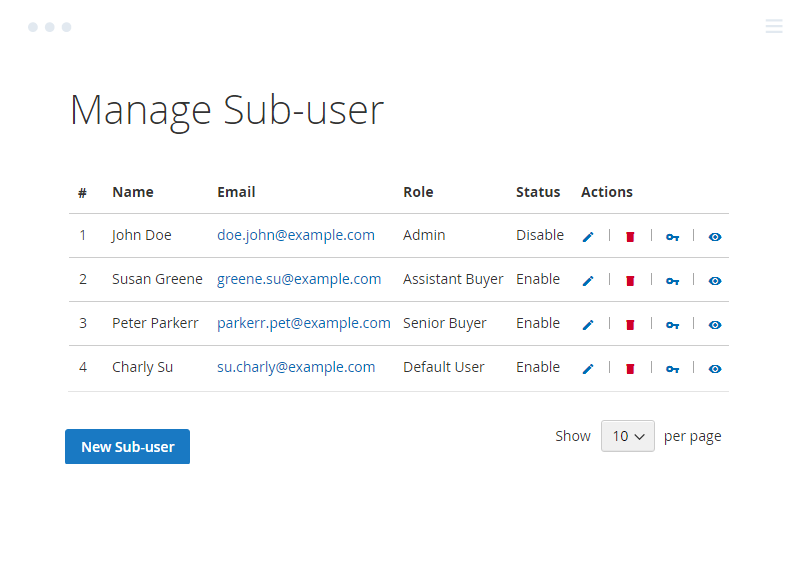
Now, go to Manage Sub-users to create new sub-users.
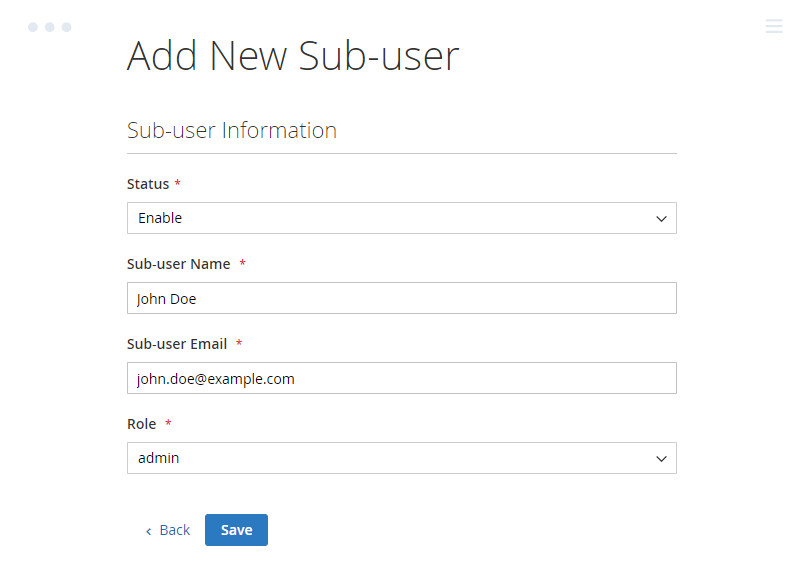
Choose to add New Sub-user and assign a built-in role to the sub-user.
An email will be sent to the sub-user.
5.5. Create a company account, roles and permissions, and sub-users in the backend
The admin can also create a company account, sub-users and assign roles/permissions to the users.
5.5.1. Create a new company account
5.5.2. Create and manage roles
5.5.3. Create and manage sub-users
6. Request for Quote
6.1. Global config
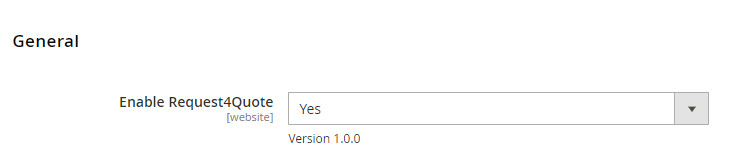 Set Enable Request4Quote to Yes to enable the quote request function.
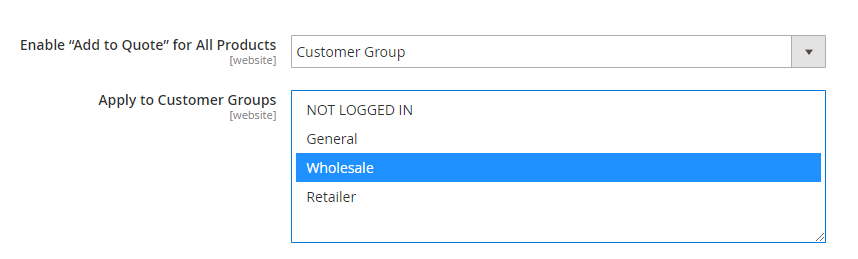
- In Enable “Add to Quote” for All Products, please choose among:
+ Yes: Display “Add to Quote” for all products + No: Disable “Add to Quote” for all products + Customer Group: Choose groups you want to enable the quote request function. Notes:
- Magento 2 Request for Quote extension supports all product types
- Once enabled, “Add to Quote” button will be shown on the Product page; Category page; Search page; Wishlist page; Compare page; and CMS widget.
- You can go to Catalog ⇒ Categories and choose a specific category to enable or disable the “Add to Quote” button.
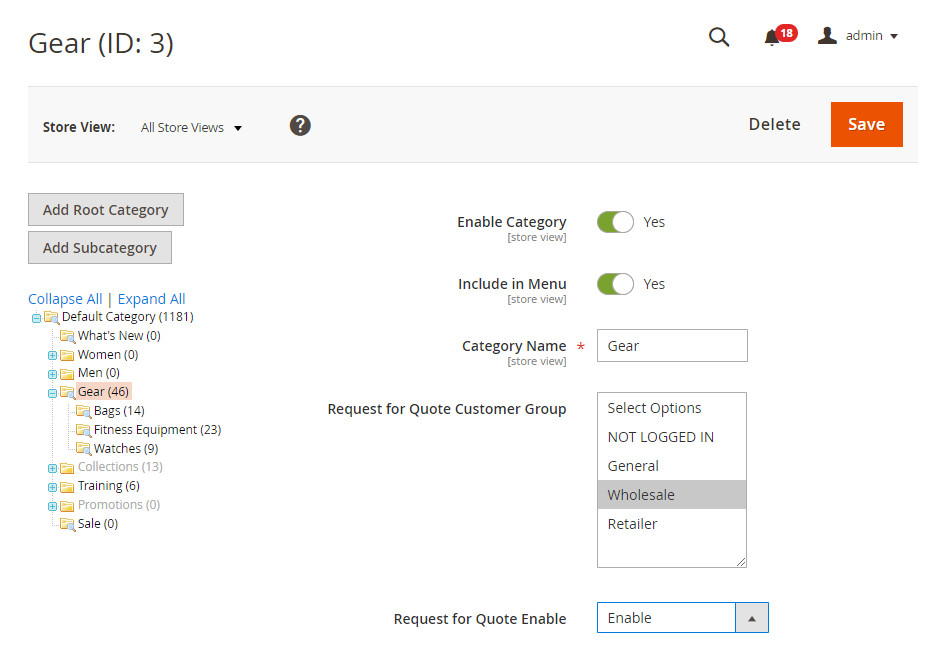 4. Also, go to Catalog ⇒ Products and choose a specific product to enable or disable the “Add to Quote” button.
 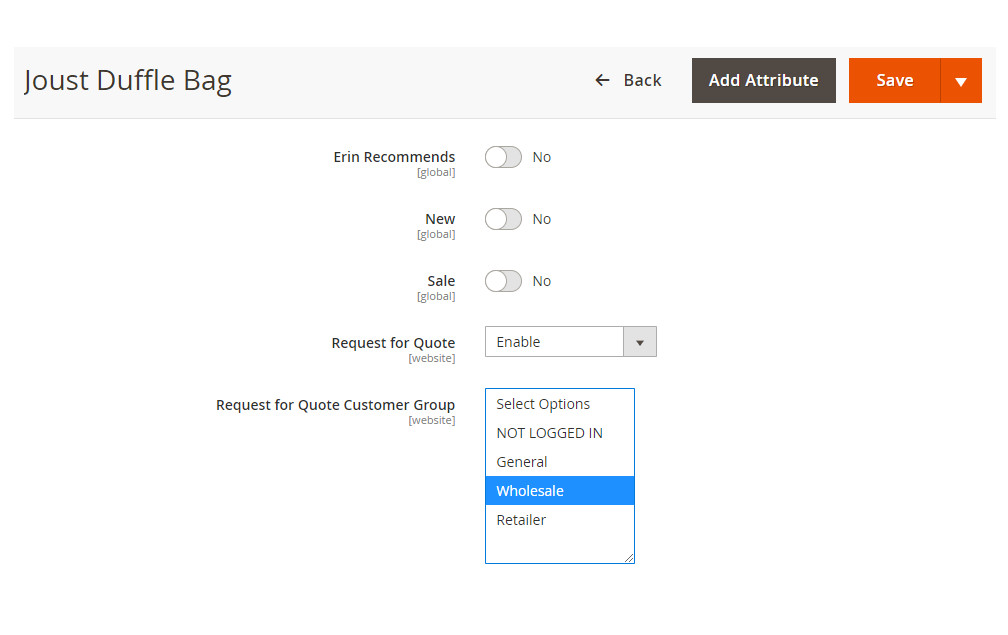 The quote request settings will be applied according to Global Config to Category, and to Product Config.
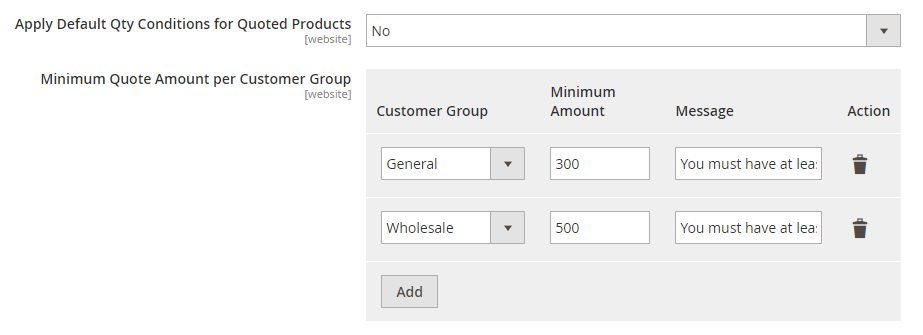
- Set Apply Default Qty Conditions for Quoted Products to No. Customers can add any number of products to the quote cart without concerning the minimum, maximum, or increment quantity set in advance.
- In Minimum Quote Amount per Customer Group, you can define the minimum quote amount allowed in the quote cart.
*Notes: When the quote total is lower than the requirement, the Message will be shown and the Submit Quote Request will be hidden. 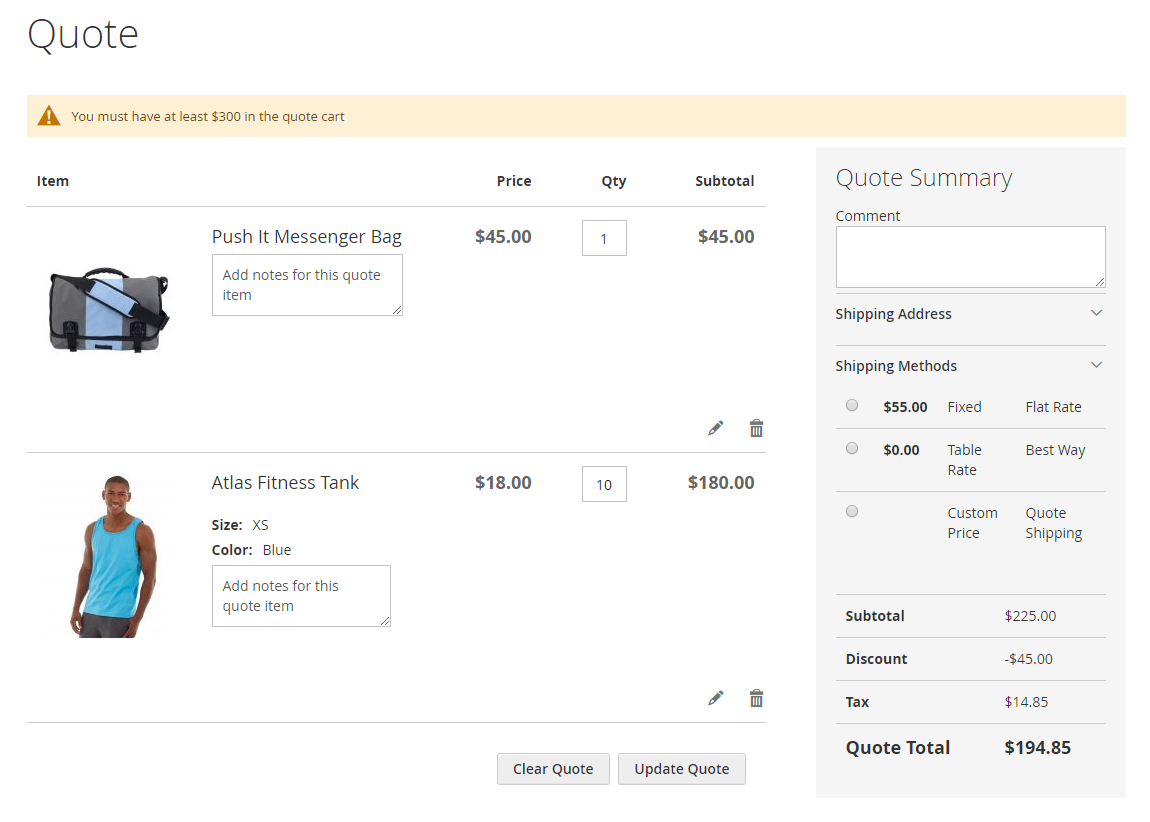 We also equip Magento 2 Request for Quote extension with many thoughtful configurations to help you manage the quote better.
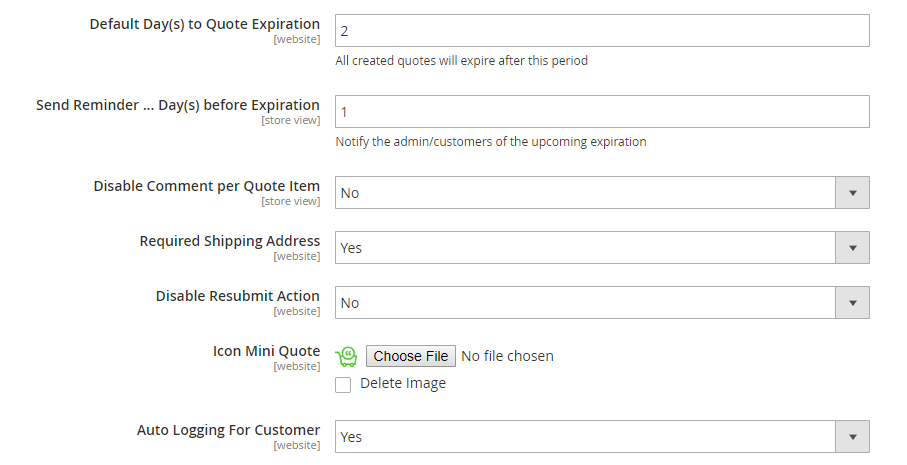

- In Required Shipping Address, set this field to Yes to require customers to enter the shipping address when submitting a new quote request. That way, both you and your customers can choose a suitable shipping method. Otherwise, set it to No.
- In Disable Resubmit Action,
+ Set this field to No if you allow customers to resubmit the expired and rejected. + Set this field to Yes if you only allow customers to resubmit the updated quotes
- In Icon Mini Quote, upload an image.
 In Auto Logging for Customer, set this field to Yes so that customers can login automatically and go to the quote detail page when clicking the quote link in transactional emails. Otherwise, set it to No.
6.2. Email config
Expand the Request4Quote Email Config tab: 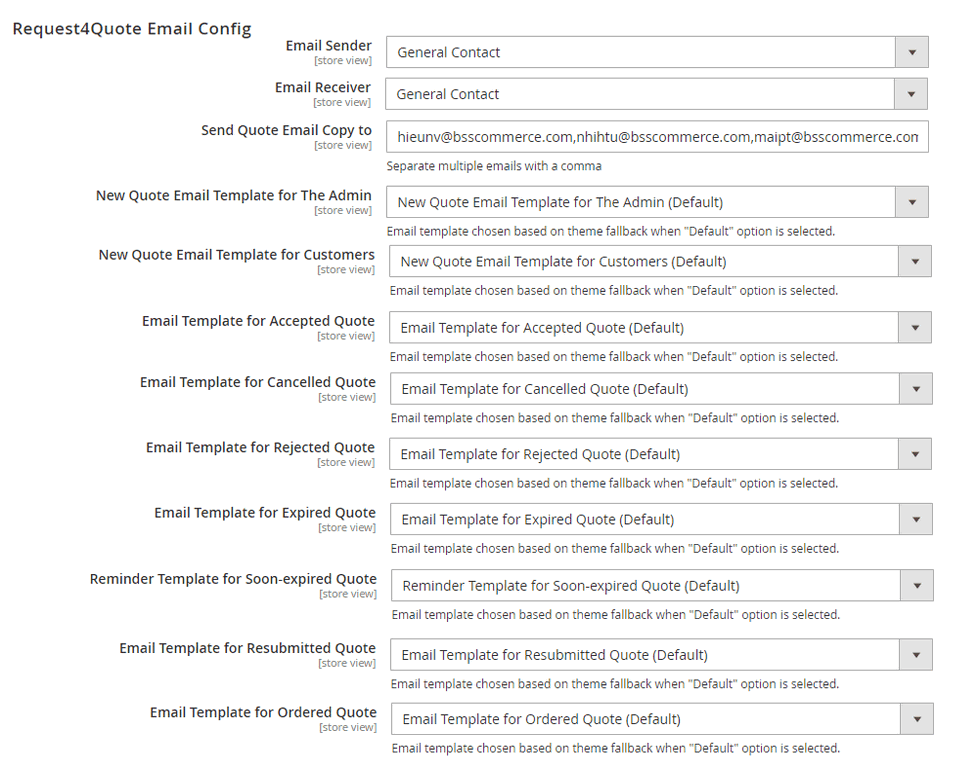 You can choose our built-in email templates or create a new one by going to Marketing ⇒ Communications ⇒ Email Templates. To check the email, enter your email in Send Quote Email Copy to.
6.3. Customize the Quote Button
You can tailor the text and custom style of quote request button to fit your site the most.  On completing all settings, remember to Save Config and go to Cache Management.
6.4. Submit & manage Quotes in storefront
6.4.1 Submit a quote request
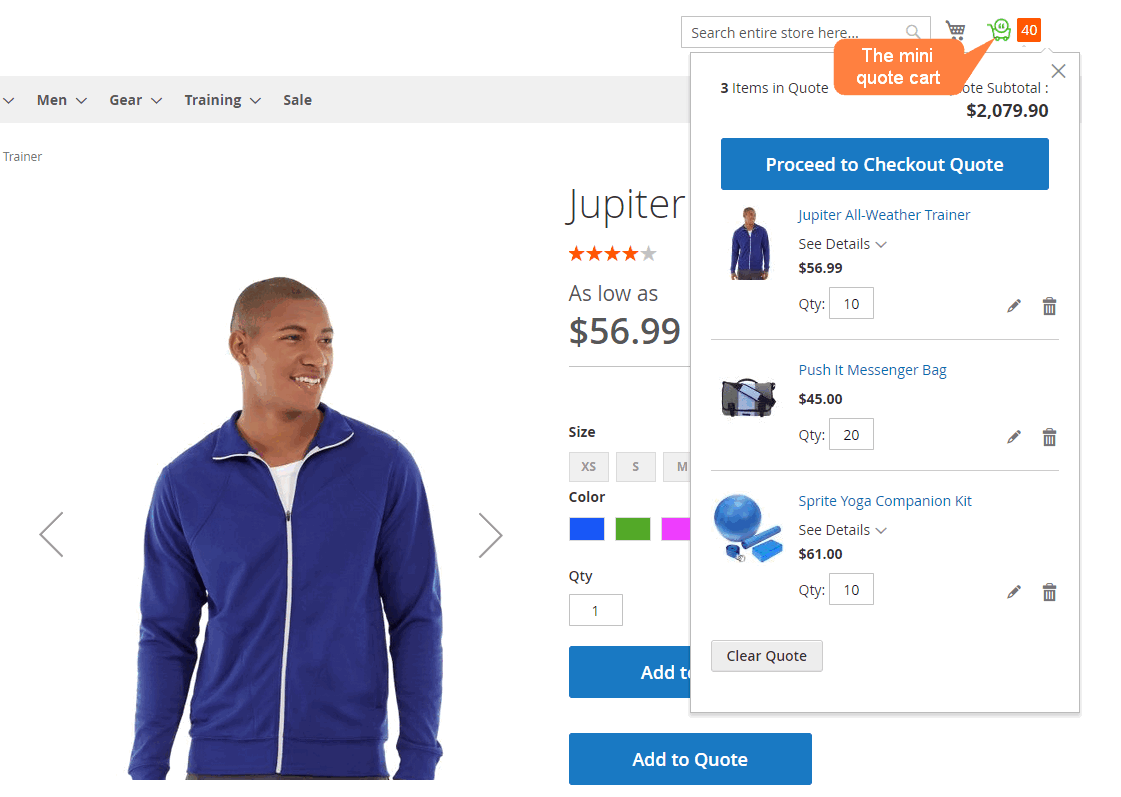
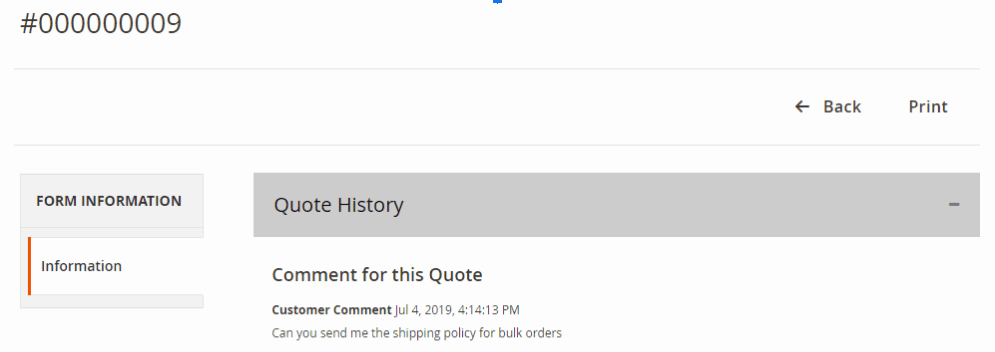
Based on your configuration, the “Add to Quote” button is shown for products, categories, and for customer groups. Customers, then, can add multiple products to the quote cart from Product page; Category page; Search page; Wishlist page; Compare page; and CMS widget.  All quoted products will be listed on the quote cart page for further updates. Click on the mini quote cart icon to go to the Quote Cart. Here, customers can add notes per quote item and a comment for the whole quote request. Customers must login before submitting the quote request.
 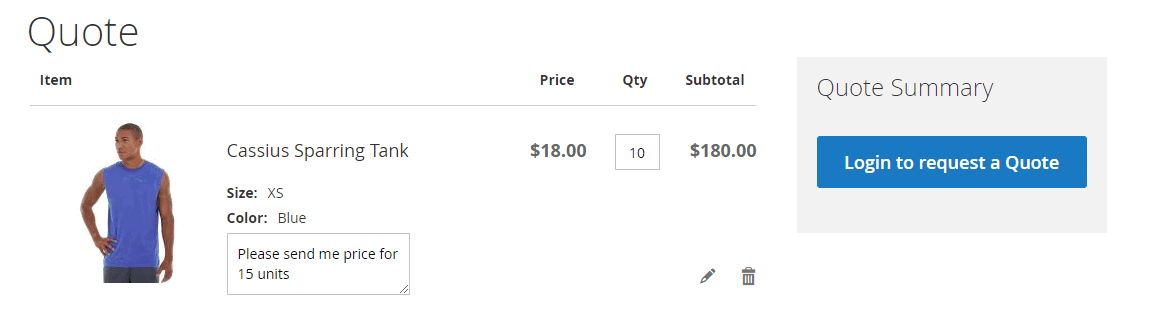 Fill in the required fields and submit the quote request.
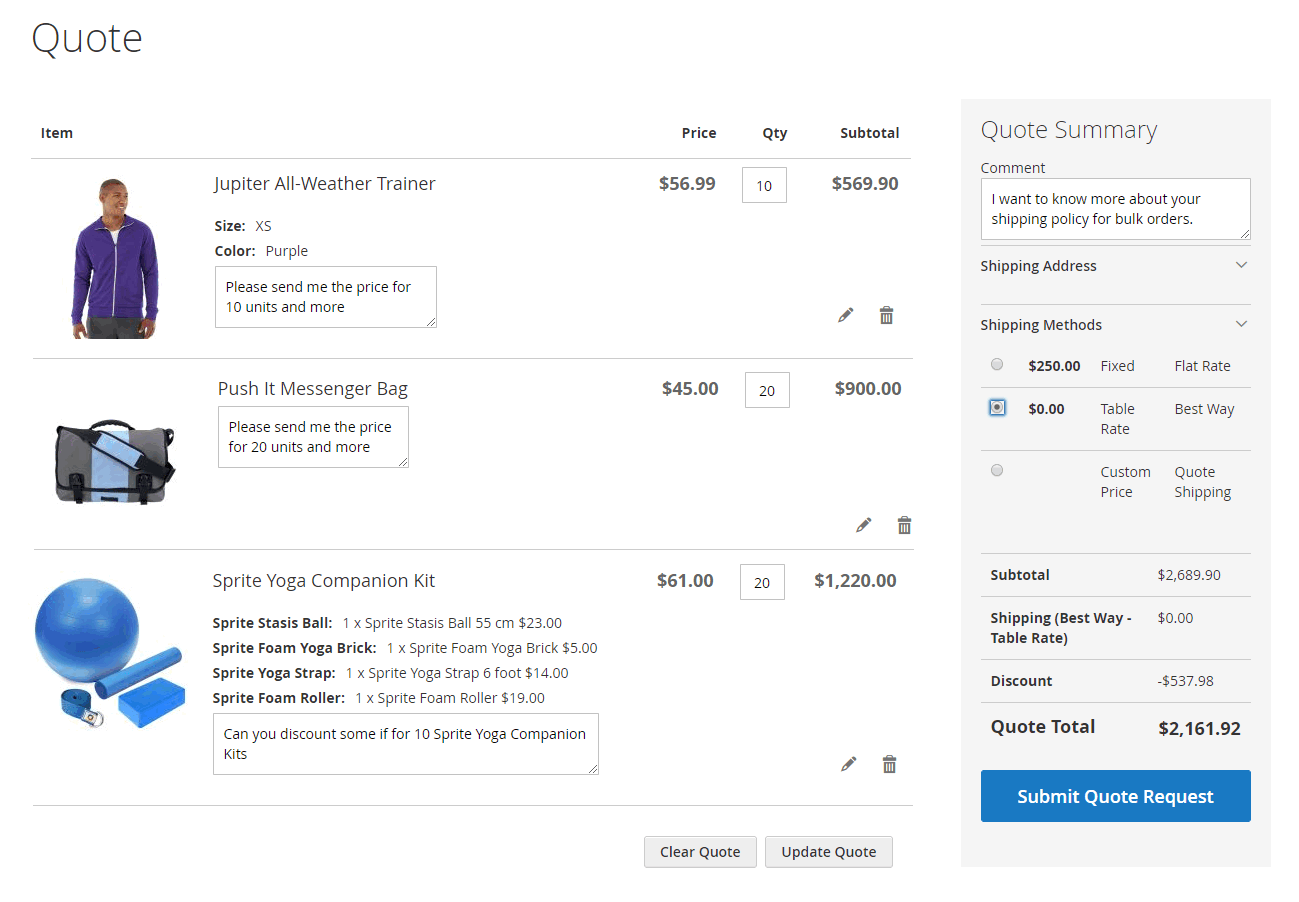
6.4.2 Manage the quotes in My Quotes
All submitted quote requests will be updated in My Quotes under My Account.  If you Enable Resubmit Action, customers can resubmit the rejected/expired/updated quotes so that they can streamline the price quotation process without having to submit a new quote. This saves you from hundreds of spam quote requests a day!
 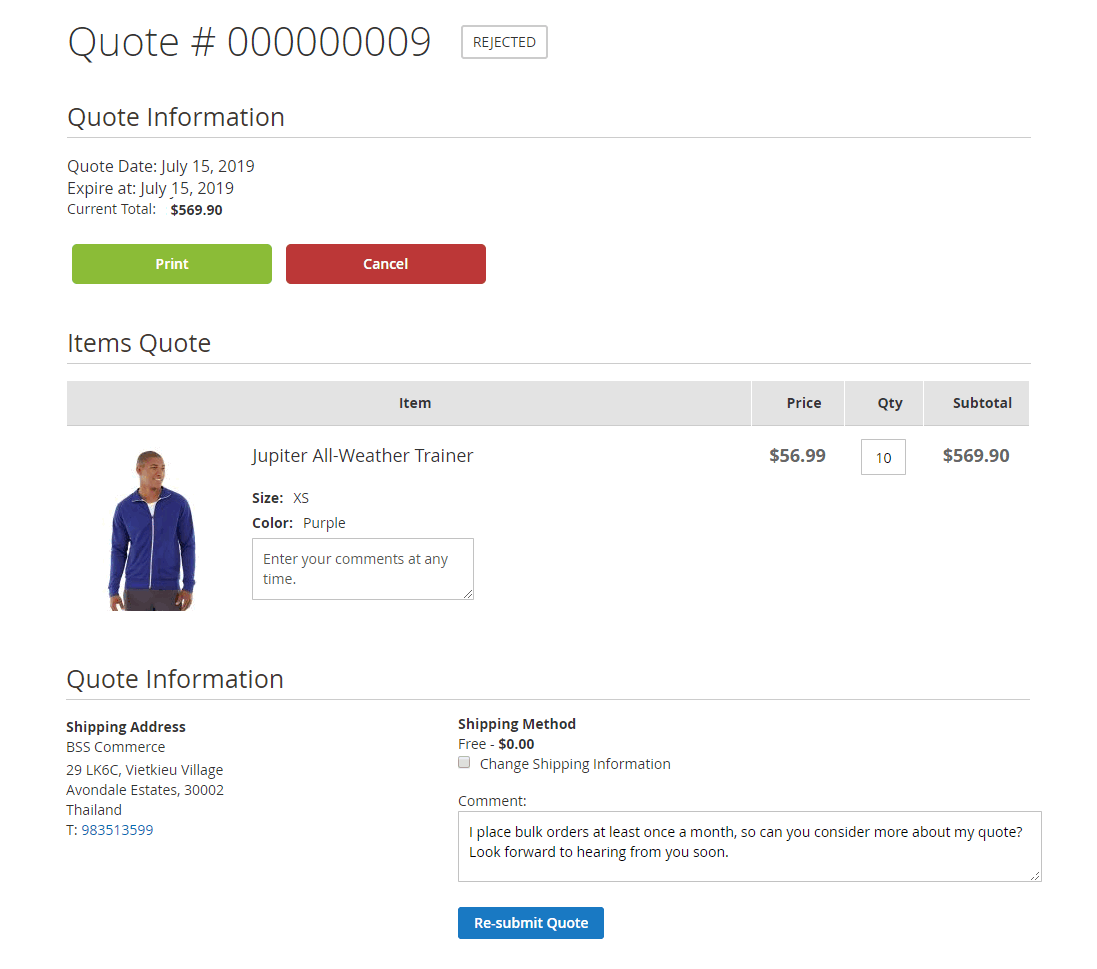 For updated quotes, customers can convert them to order in a click!
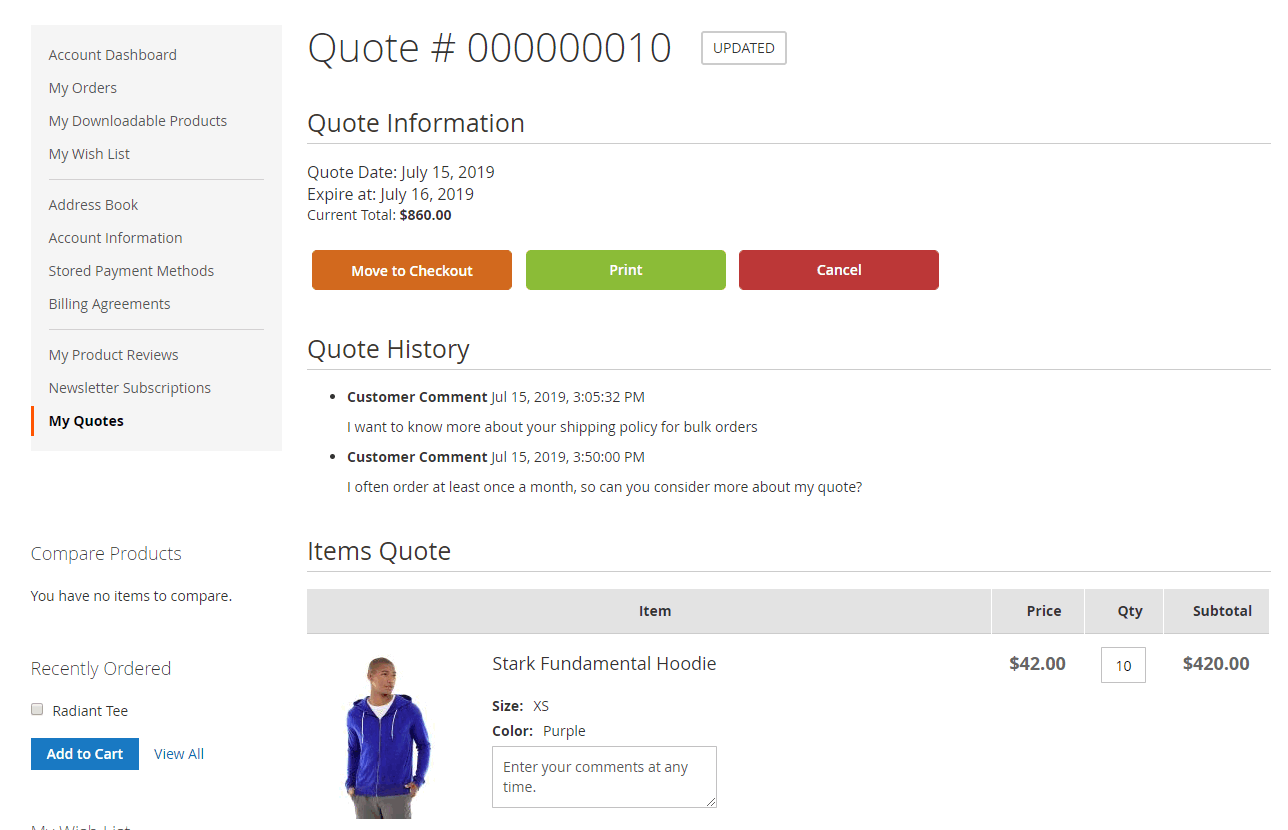
6.5 Manage Quote Requests in the backend
In the Admin Panel, please go to Sales ⇒ BSS Commerce ⇒ Manage Quote Requests
| Quote Status | Explanations |
| Pending | After the customer submits a quote request for the first time |
| Updated | After the admin clicks on "Send to Customer" in the quote edit page. The admin can customize the quote in advance. |
| Rejected | After the admin rejects the quote request |
| Resubmitted | After the customer resubmit a rejected/updated/expired quote |
| Ordered | After the customer moves the quote to cart |
| Closed | After the customer cancels the quote request |
You can accept, reject or customize the quote request as wished by going to the Quote Edit Page. 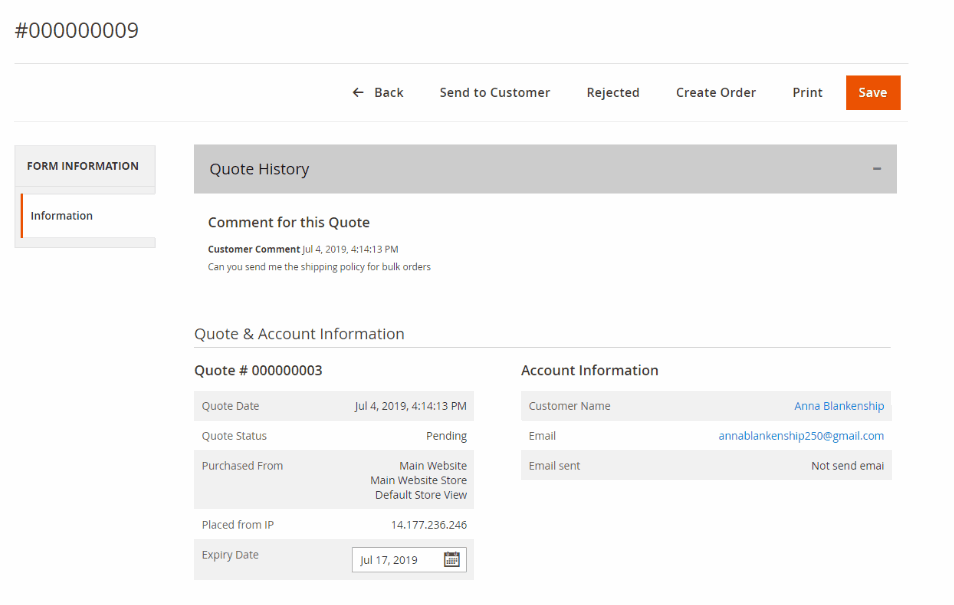
- Click on Rejected to reject the quote request. You can no longer edit the quote.
 In My Quotes, the quote status is changed to Rejected. Whether customers can resubmit the quote or not is based on your configurations.
- Or, you can customize the quote (price, quantity, expiry date, comment, additional products; shipping method) and Send to Customer.
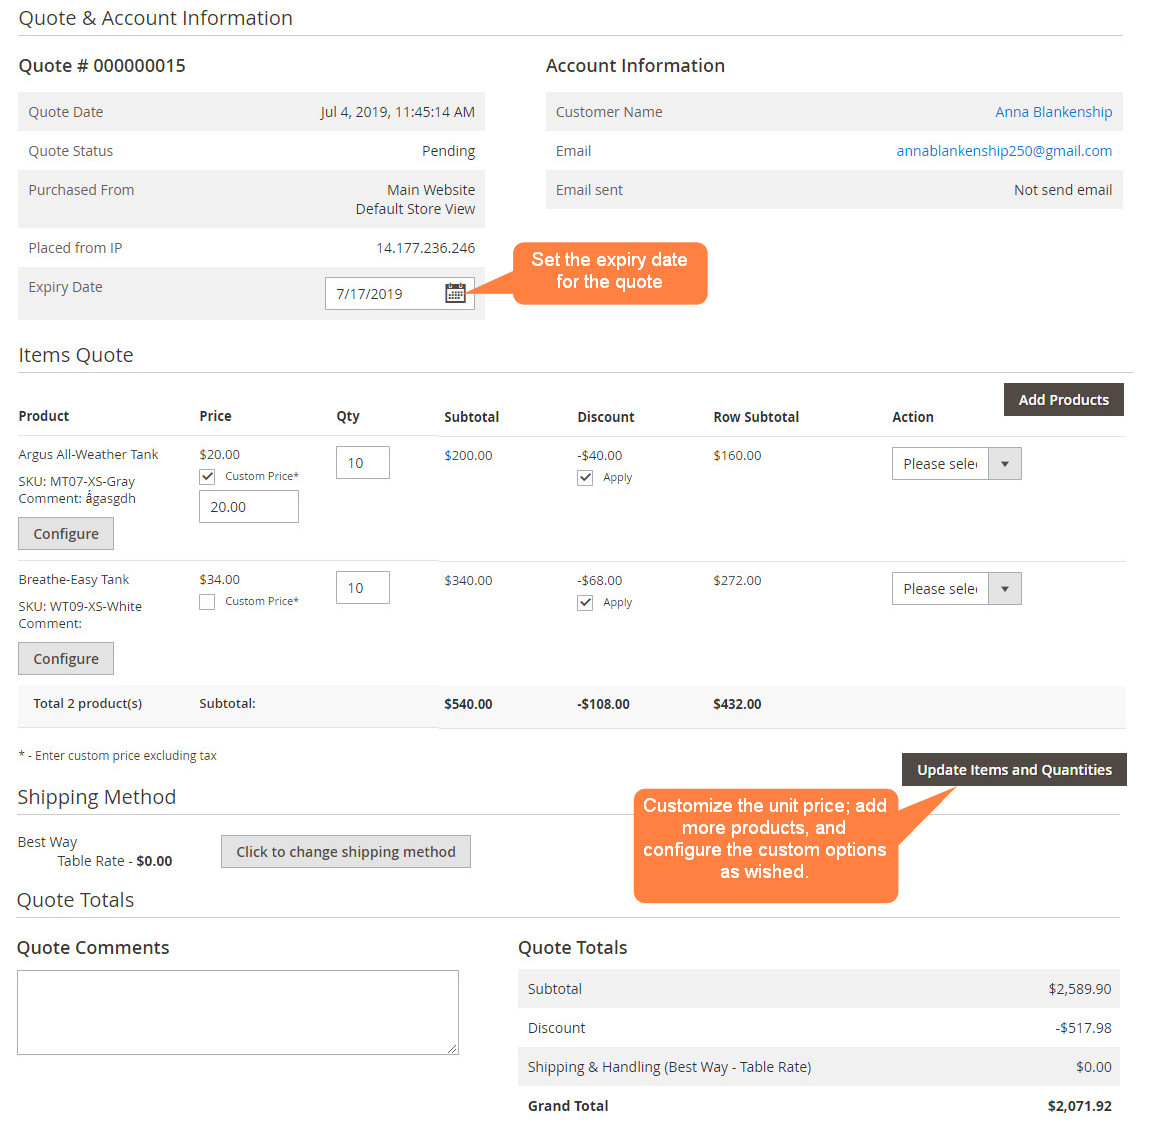 In My Quotes, the quote status is changed to Updated. Customers can either move quote to cart or resubmit the quote. Notification emails are sent whenever the quote status is updated.
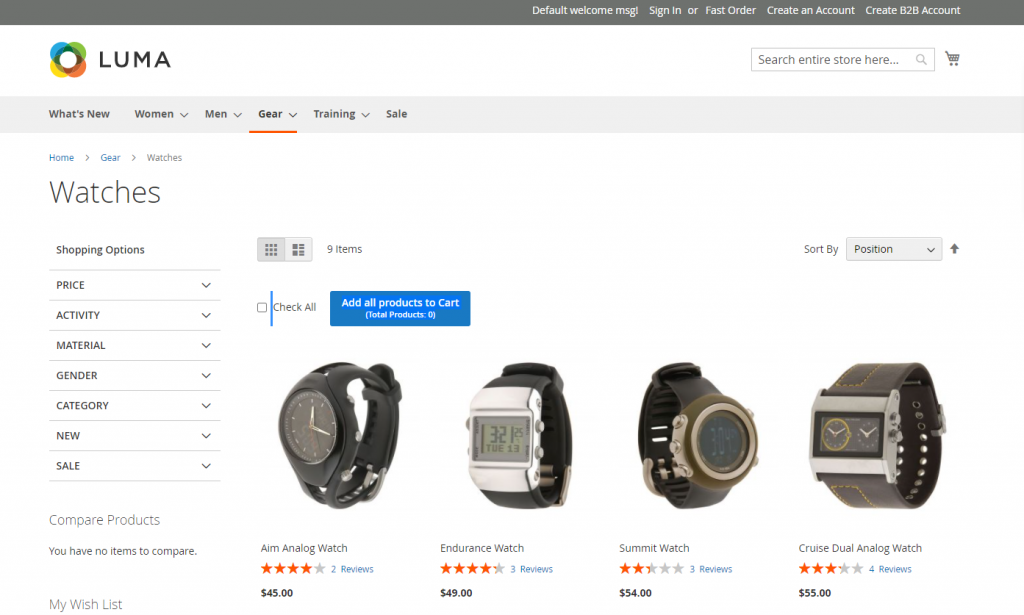
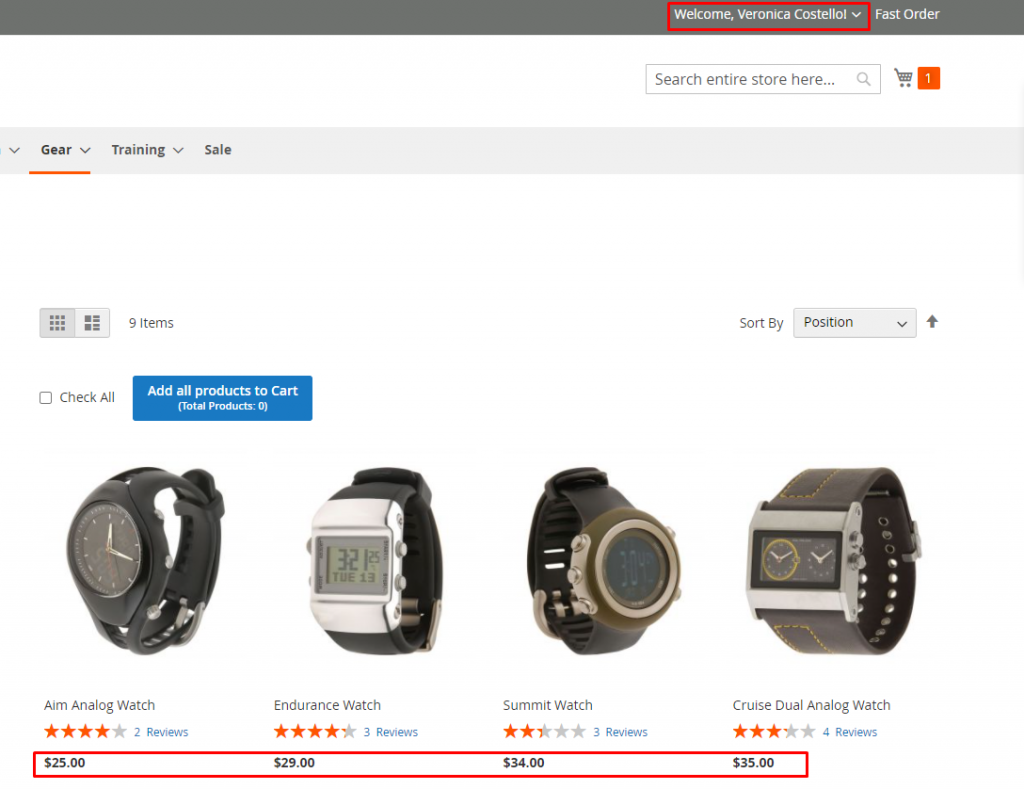
7. Price Per Customer
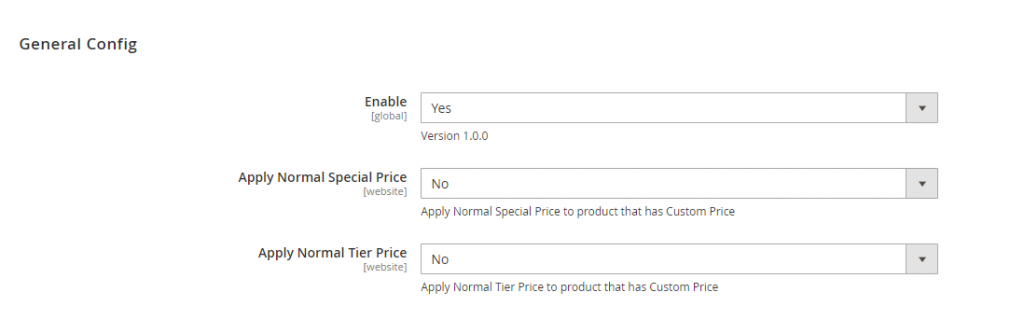
In Enable: choose Yes to enable Custom Pricing functions. In Apply Normal Special Price: Choose how to display prices for products assigned both Special Price and Custom Price. - Choose Yes to enable this configuration:
- If Special Price < Custom Price: the system will show Special Price in the frontend.
- If Special Price > Custom Price: the system will show Custom Price in the frontend.
- Choose No to disable this, the system will auto show Custom Price in the frontend. In Apply Normal Tier Price: Choose how to display prices for products assigned both Tier Price and Custom Price. - Choose Yes to enable this configuration:
- If Tier Price < Custom Price: the system will show Tier Price in the frontend.
- If Tier Price > Custom Price: the system will show Custom Price in the frontend.
- Choose No to disable this, the system will auto show Custom Price in the frontend.
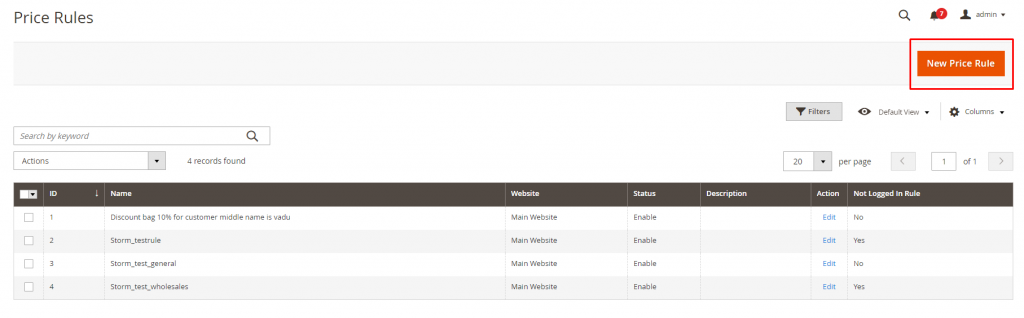
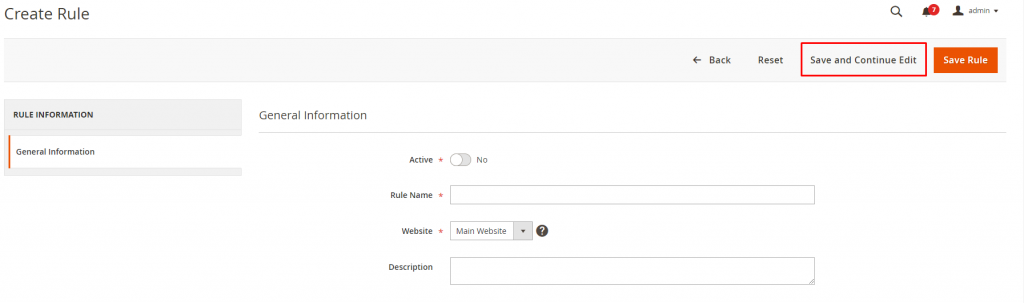
Go to Catalog ⇒ Price Rules Add New Price Rule by clicking the New Price Rule button at the top right corner.
In the General Information section:
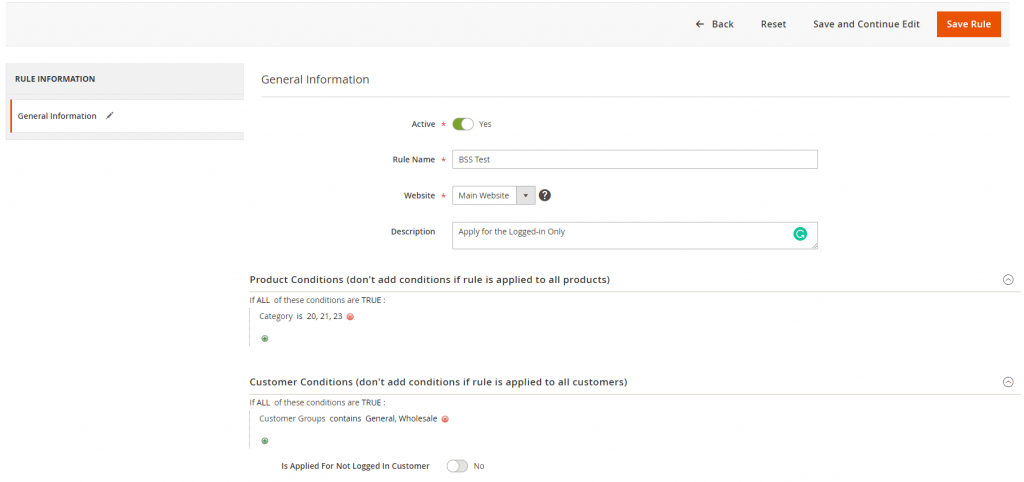
Switch Active to Yes to use this rule on the frontend. Choose No to disable this rule. Rule Name: Type the name you want to set for the rule. Website: Choose the Scope of this rule. Description: Write a short description of this rule for better management. Select Product Conditions and Customer Conditions applied for this rule. * Please note that if you leave all blank, the price rule will be applied for all products and all customers on the website. If you want to use this rule for non-logged-in customers, please switch Is Applied For Not Logged In Customer to Yes. Click Save and Continue Edit. (This step is crucial, please don't forget it!)
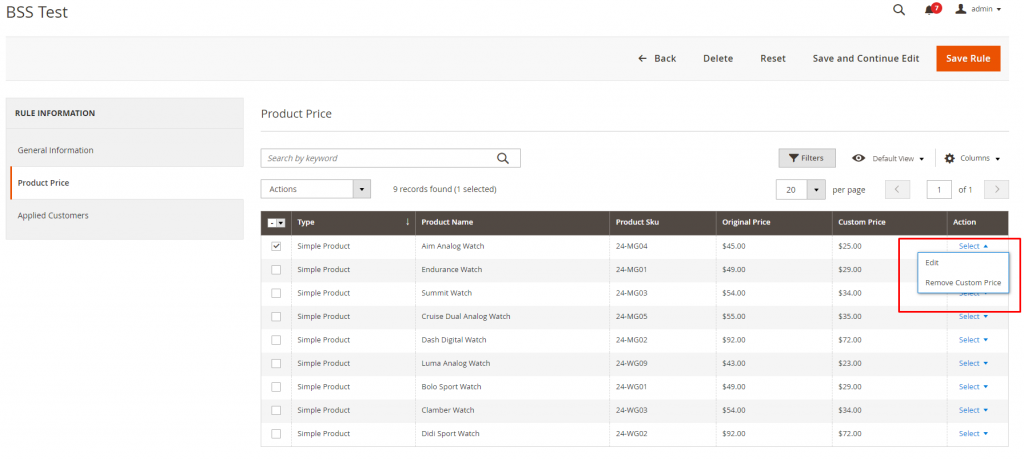
In Product Price Tab
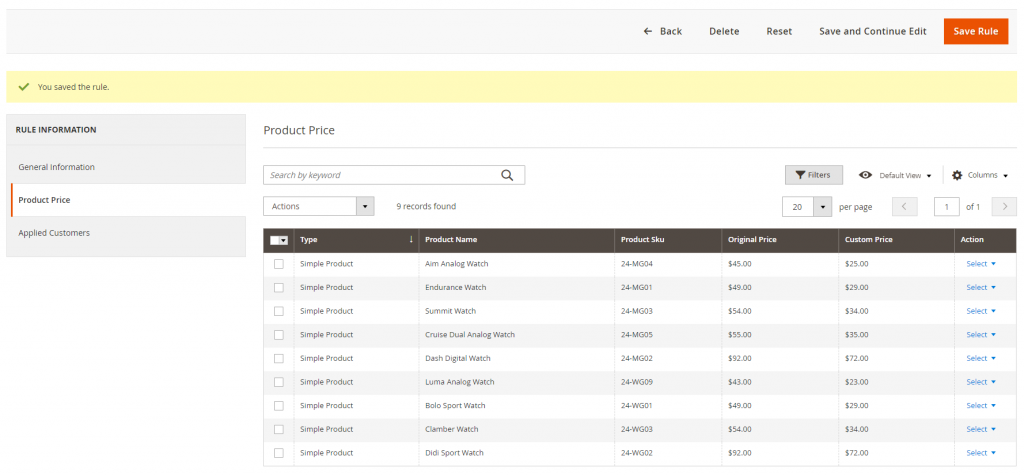
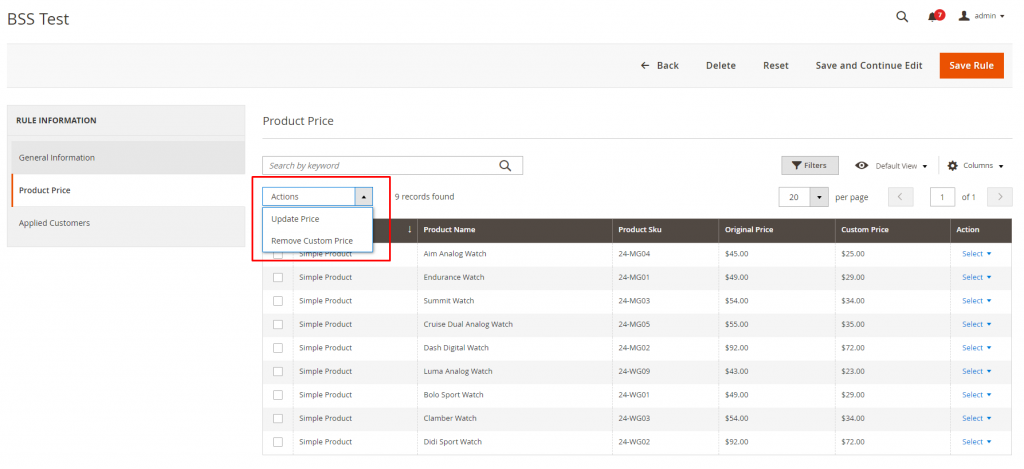
There are 2 ways to set Custom Price for Products: 1. Set price for each product individually - You should use this when you have more custom prices for 1 product: Click Select (in Action column) and Edit.
2. Set price for bulk products - You should use this when you want to apply only 1 absolute price or 1 discount rule for all products: Tick all products or specific items you want to set custom price ⇒ Click Action/Update Price.
In Edit Custom Price Tab
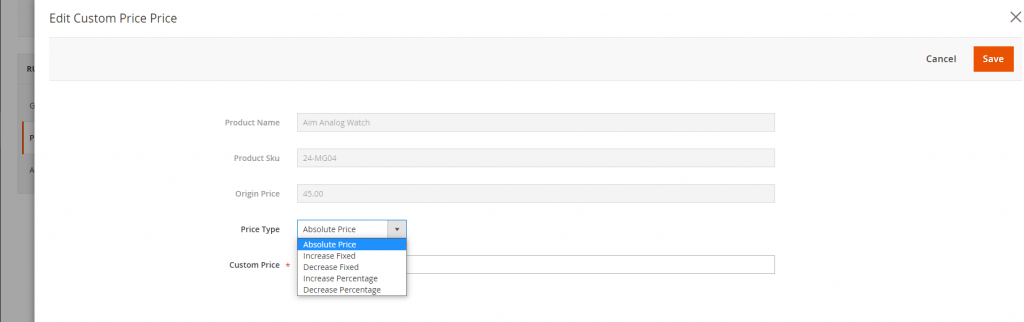
There are 5 options to set custom prices for customers based on your sales campaigns.
- Absolute Price: Set up a single price for all products. For example, you enter $20 for t-shirts, shirts, and shorts, all 3 items are priced at $20, regardless of the initial price of each product.
- Increase Fixed: Custom Price will equal to the original price plus the price entered in the box.
- Decrease Fixed: The Custom Price will equal to the original price minus the price in the box.
- Increase Percentage: Custom Price will equal to the original price plus % increase filled in the box.
- Decrease Percentage: Custom Price will equal to the original price minus % increase filled in the box.
In Applied Customer tab:
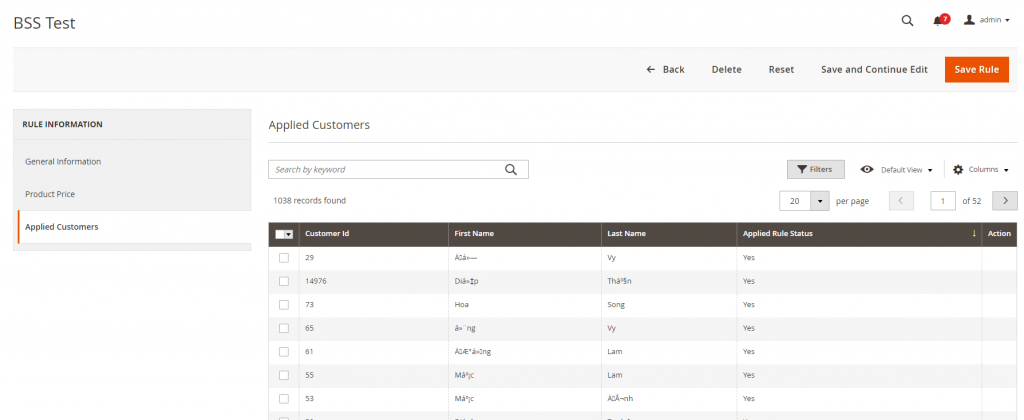
You can see all customers who are able to purchase with the custom prices in this price rule (based on Customer Conditions selected in the General Information tab). Here, you have options to select which customers would be excluded from this price rule by using Edit inline.
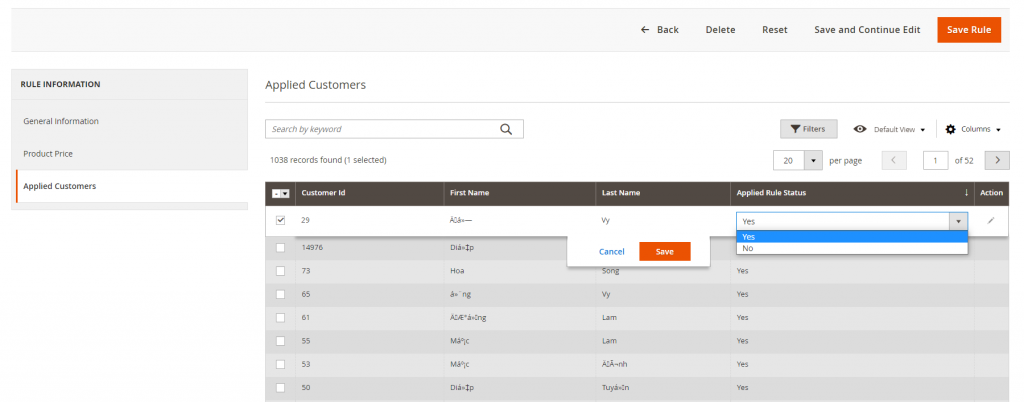
* Note: If Applied Rule Status is Yes, that customer is able to see the custom price. Click Save button to save the price rule. Finally, go to the frontend and check the result.
8. Quick Order
8.1. Fast Order CMS Page
We have already built a Fast Order CMS Page for you. To check, please go to Content ⇒ Pages ⇒ Fast Order 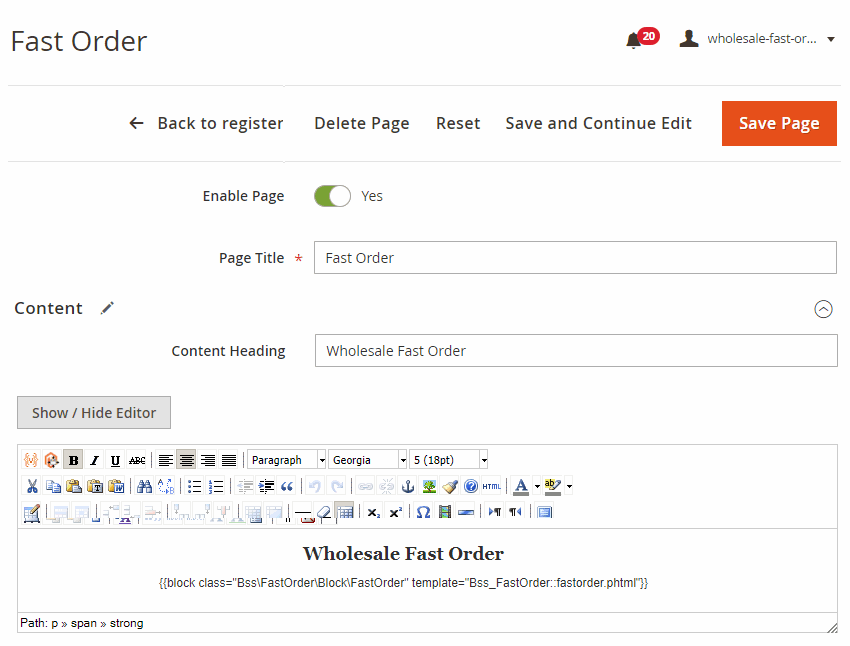
- Expand the Search Engine Optimization section to fill in the meta-information.
In URL Key, there is an auto-generated key. Copy the key to use in the fast order form configuration. 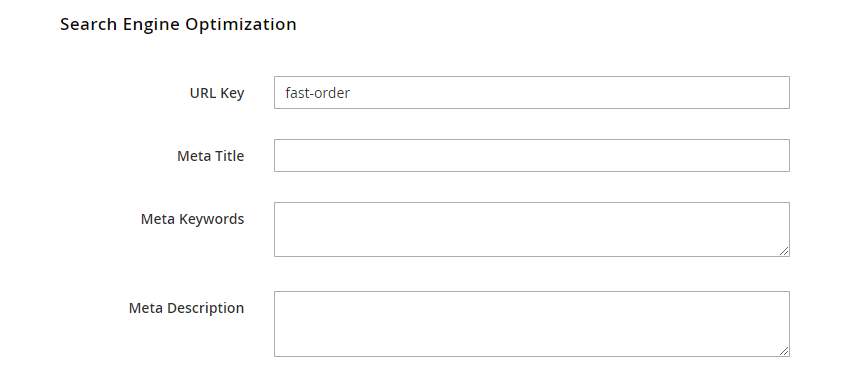
- Remember to Save Page if you make any changes.
8.2. Backend configs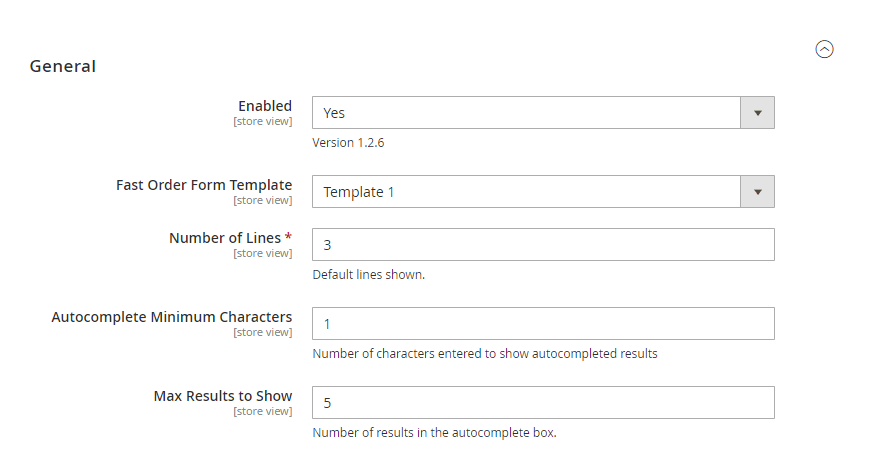 In Enabled: choose Yes to enable the module or No to disable it.
In Fast Order Form Template, choose either Search box in row or Search box out row.
In Number of Lines: set the number of lines of Fast Order auto shown on the CMS page.
In Autocomplete Minimum Characters: set the minimum characters typed in the search box so that the result can appear.
In Max Results to Show: set the number of results displayed in the autocomplete box.
In Main Color, pick the color of header and buttons that fits the design of the whole website.
In Shortcut URL Key, enter the URL key of the Fast Order CMS Page. This field is filled in advance, so skip if you do not change anything in the CMS Page.
In Position of Fast Order Shortcut, choose where to display the shortcut link.
- Near mini cart
- In top menu
- In footer
In Enable for customer groups: choose groups to enable Wholesale Fast Order function. 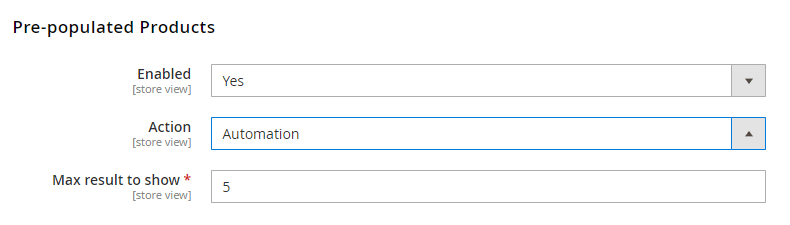 Our extension supports a smart algorithm to pre-load multiple products based on customers’ order history whenever they access the fast order form.
In Enabled, choose Yes to activate this smart feature.
In Action, choose either Automation or Manual.
- If you choose Automation, the pre-populated products are auto-loaded by two criteria:
+ 5 out of the Bestseller list according to default report, or
+ Most frequently ordered products from the customer's account.
+ Enter Max results to show. 5 is recommended.
+ Remember to Reindex data so that the automotive pre-populated products can be shown.
- If you choose Manual, you can add a list of products at will
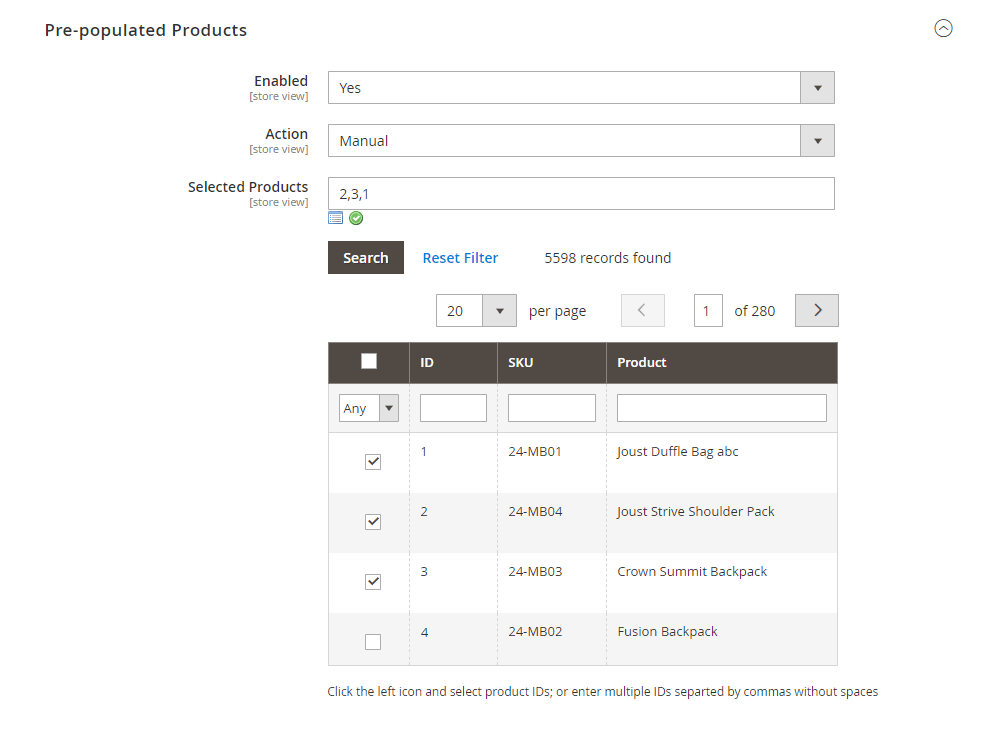 Click the left icon and select products IDs, or enter multiple IDs separated by commas without spaces. In the end, save and flush the Cache.
9. Shipping & Payment Methods per Customer Group
Please go to STORES ⇒ Methods for Customer Group by BssCommerce ⇒ Payment / Shipping.
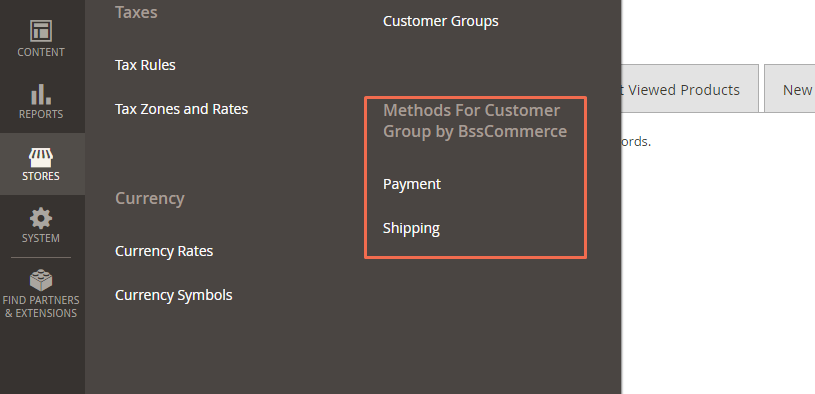
IN PAYMENT
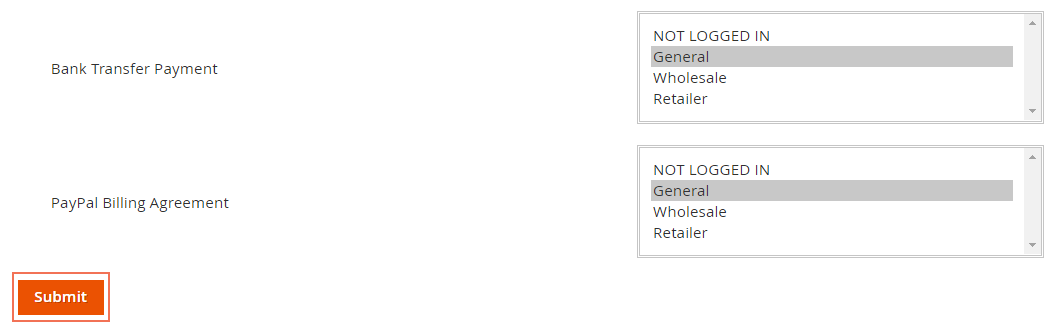
In Payment Methods, choose one or multiple customer groups in each of the enabled payment methods available.
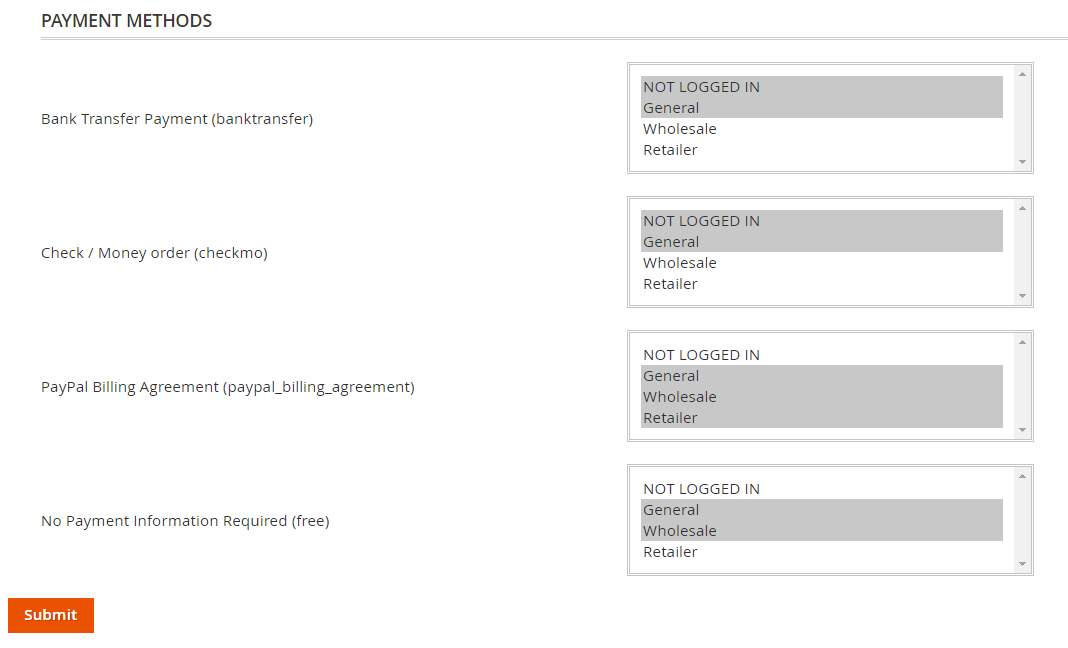
Then, click Submit button to save all figuration.
IN SHIPPING
In Shipping Methods, select one or multiple customer groups in each of enabled shipping methods available.
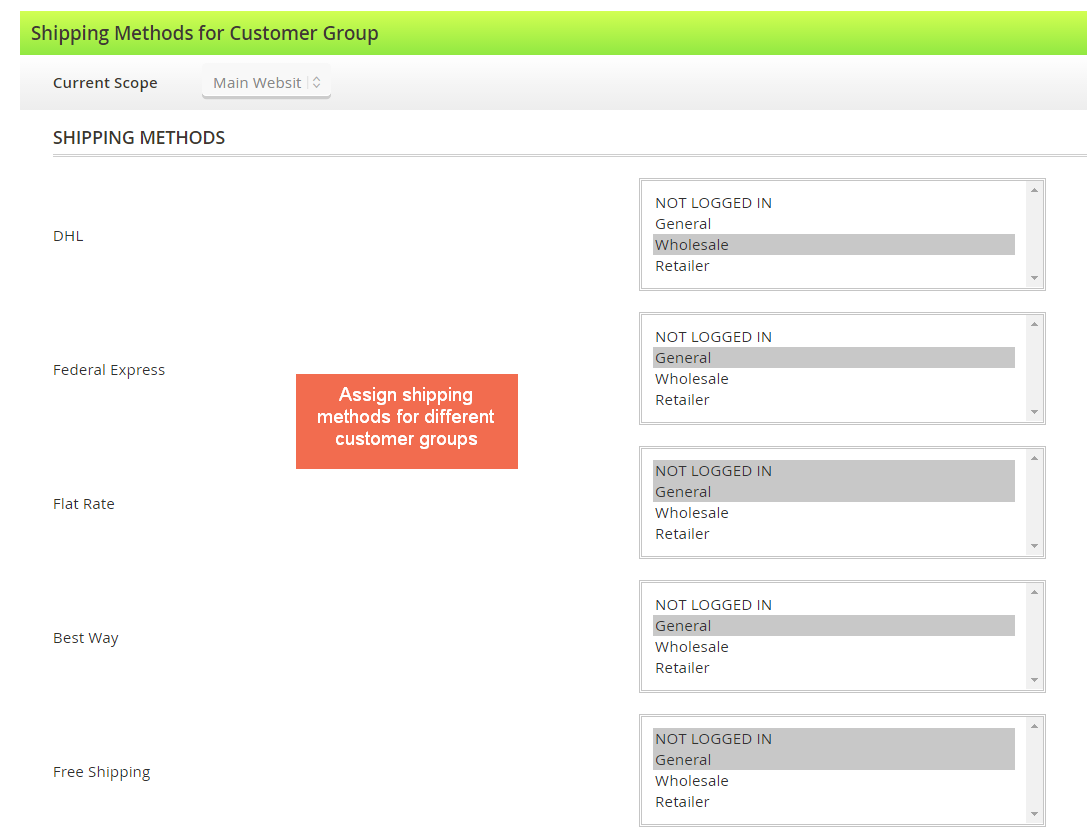
Then, click the Submit button to save all figuration.
10. Hide Price
There are two levels of Hide Price: Product Config and Global Config, in which Product Config has a higher priority.
10.1 Global config
Go to Stores ⇒ Configuration ⇒ BSSCommerce ⇒ Hide Price General Config.
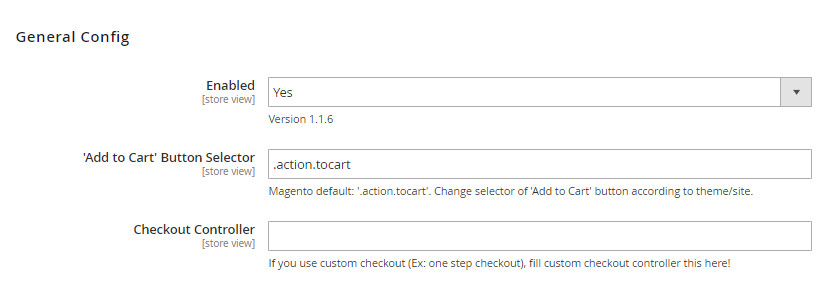
In Enabled, choose Yes to enable the extension or No to disable it.
In ‘Add to Cart’ Button Selector, enter the selector of Add to Cart button depending on the website’s theme.
In case you use One Step Checkout extension which does not use the URL form "domain/checkout", you need to enter the new form URL to the Checkout Controller field.
For example, our One Step Checkout extension use onestepcheckout/index/index
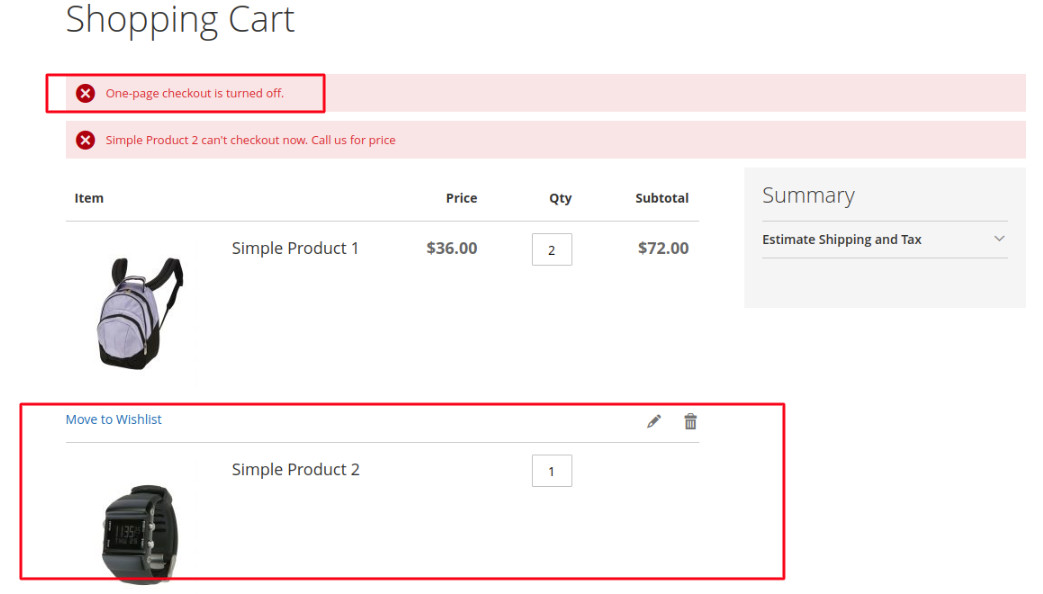
Then, hide-price products will not be added to the checkout and a message will show accordingly as above.
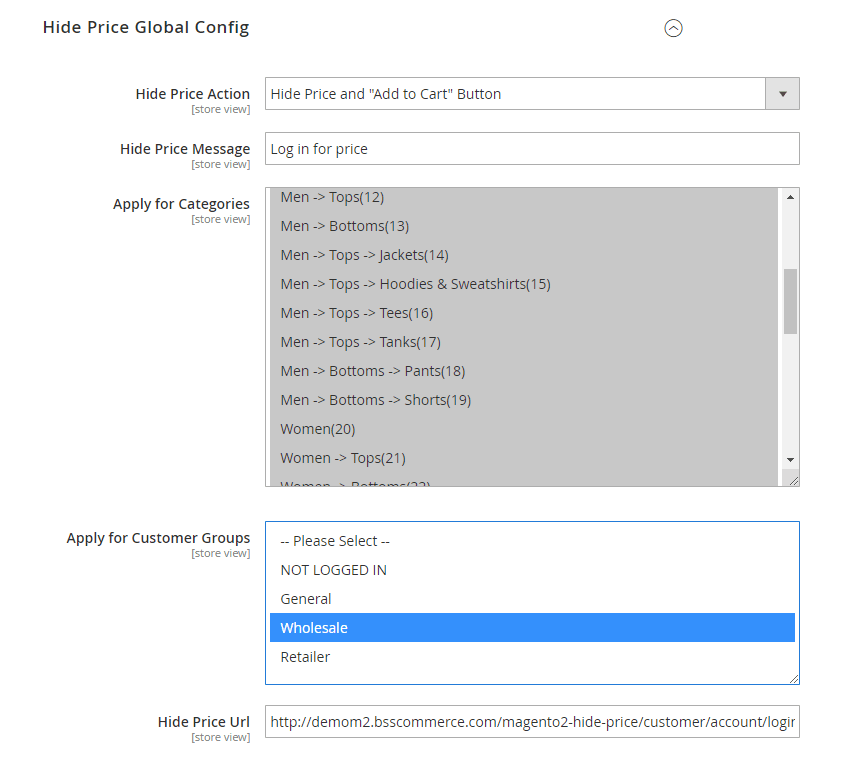
In Hide Price Action choose options:
- Hide Price and “Add to Cart” button;
- Show Price and Hide “Add to Cart” button;
In Hide Price Message, enter a custom message which is shown in place of the Add to Cart button.
In Apply for Categories, choose categories in which you want to hide price from chosen customer groups.
Price is hidden on all product pages under the chosen categories except for which you enable the Hide price product config.
In Apply for Customer Groups, choose groups from which you want to hide price.
In Hide Price URL, enter an URL to link to the custom message.
10.2 Product config
Go to Catalog ⇒ Products ⇒ Product Edit Page ⇒ Hide Price.
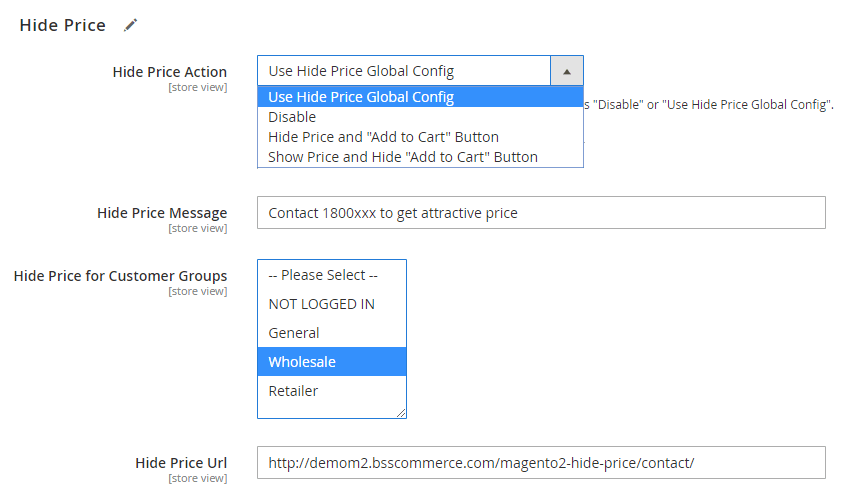
In Hide Price Action, choose 1 of the following 4 options:
- Use Hide Price Global Config: Apply hide price in Global Config by default.
- Disable: Disable hide price for the product.
- Hide Price and “Add to Cart” Button: Hide both product price and Add to Cart button.
- Show Price and Hide “Add to Cart” Button: Hide Add to Cart button but still show the product price.
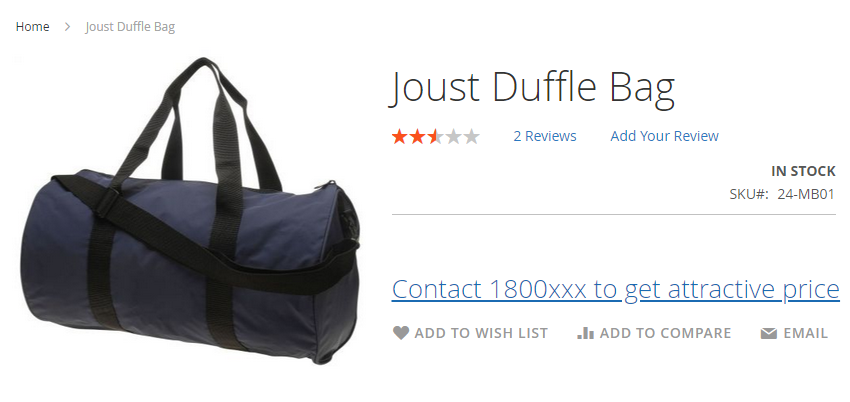
When you choose to Hide "Add to Cart" Button, the hide price message will be in place.
In Hide Price Message: tailor the message to inform customers of how to get the price.
In Hide Price for Customer Groups, choose the customer groups from which you want to hide price.
In Hide Price URL, enter an URL to link to the custom message.
In the frontend, the price is hidden from the chosen customer groups.
*Note: You should not set up Hide Price for the child products of the configurable product. Instead, setting Hide Price for the configurable product is enough!
*Note:
1. Configurable product:
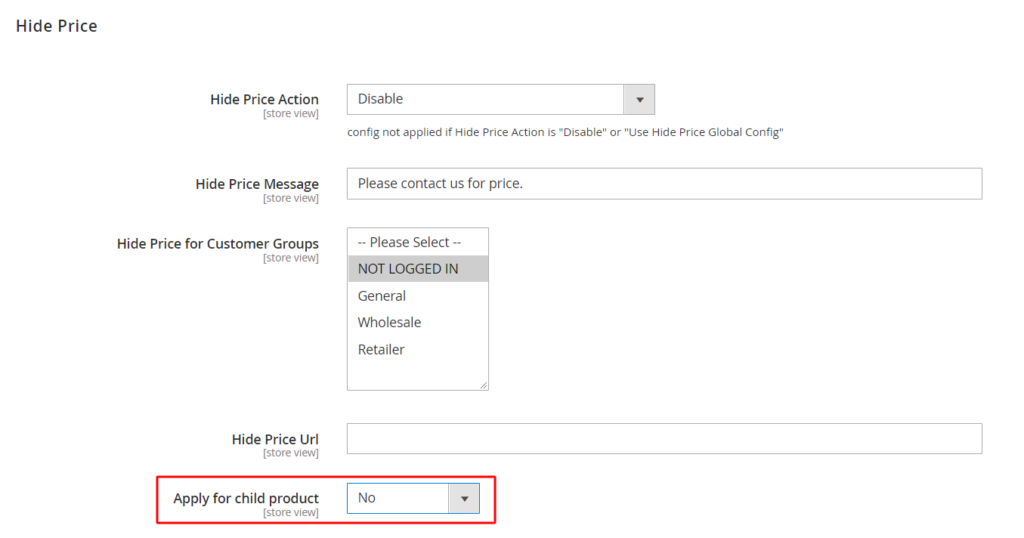
In Apply for child product section:
- Preselect (Default)/ Yes: Preserve the original configuration. Apply hide price configuration of a parent product for all child products.
- No: Not apply hide price configuration of parent product for child product.
2. Bundle product:
2.1. Bundle product without dynamic price: Apply config following the parent product.
2.2. Bundle product with dynamic price:
- Bundle product hides price: Hide both parent and child products' prices.
- Bundle product displays price, child products hide price: Apply based on each child product configuration. Customers can't add to cart the child product, which has hide price configuration.
3. Grouped product:
- Grouped product hides price: Hide all parent and child products prices.
- Grouped product displays price, child products hide price: Apply based on each child product configuration. Customers can't add to cart the child product, which has hide price configuration.
10.3 Customer Config
Go to Customer ⇒ All Customers ⇒ [specific_customer] Edit ⇒ Account Information.
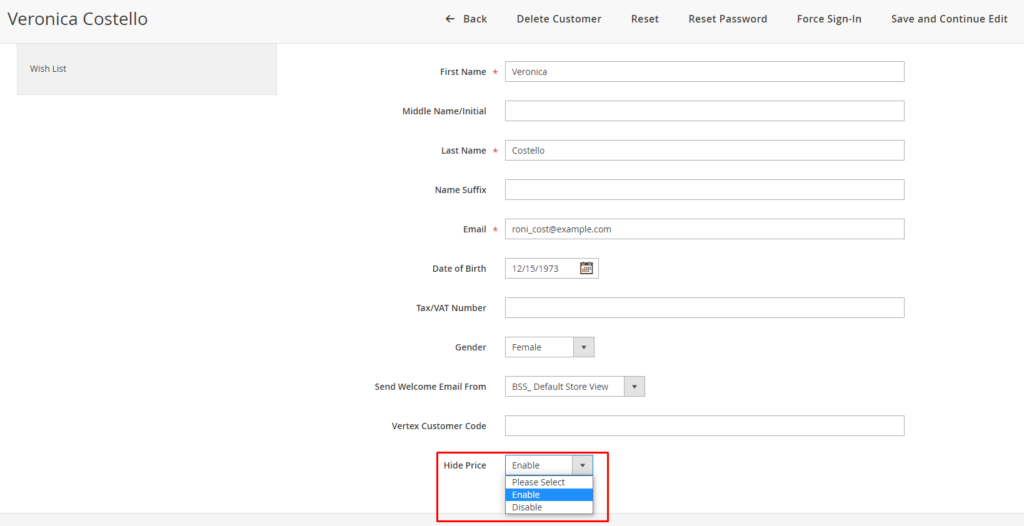
In Hide Price, choose 1 of the following 3 options:
- Please select: apply hide price rules to this customer following Customer group configurations of Product detail and/or Global Config.
- Enable: apply hide price rules to this customer not depending on Customer group configurations of Product detail and/or Global Config.
- Disable: hide price rules are not applied to this customer.
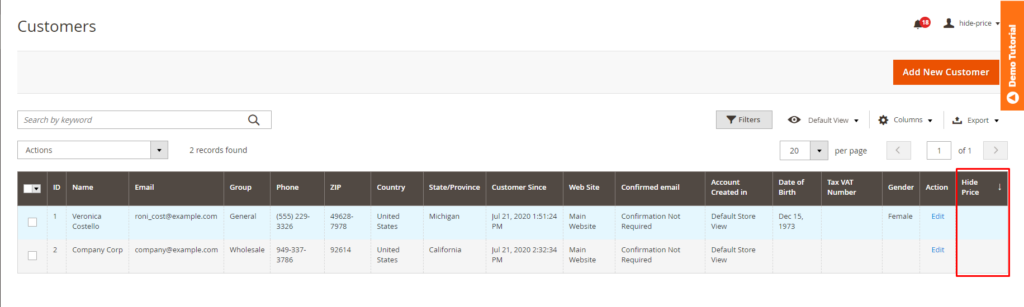
You also track hide prices for each customer in the customer grid.
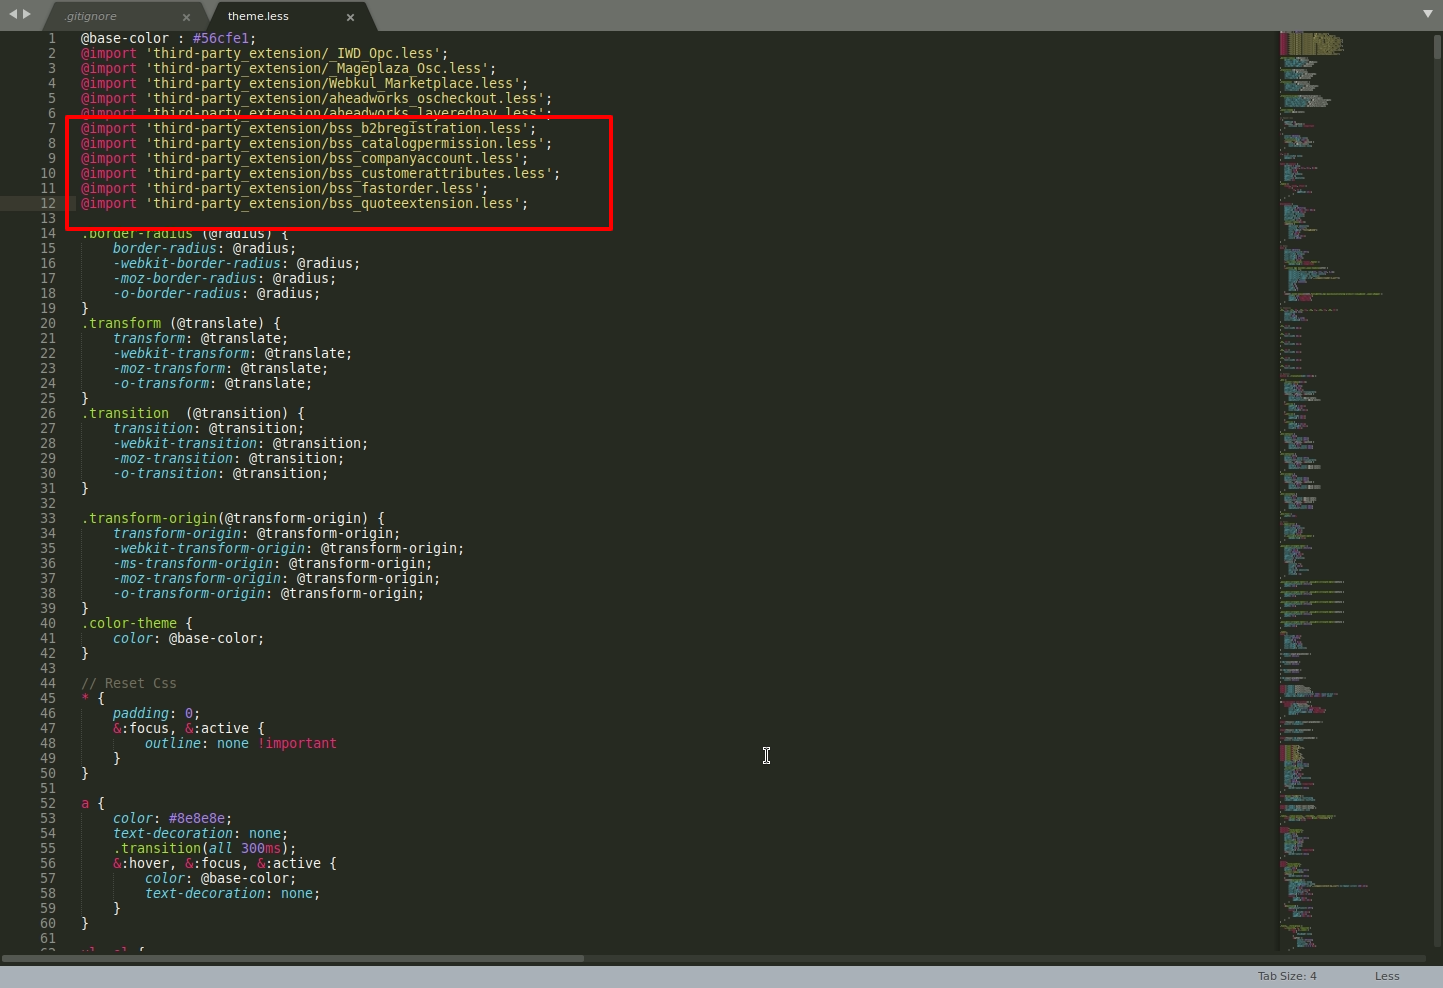
Theme Compatibility
For those using Claue Theme, please follow these steps to ensure the compatibility of the theme with B2B modules:
- Step 1: Update the download code or clone from https://bitbucket.org/bsssupport/m2-b2b-claue-theme/
- Step 2: Import the less files of the module into the file: app / design / frontend / Mgs / claue / web / css / theme.less as shown below