
1. Overview
Magento 2 B2B Account Management Kit is a comprehensive solution to enhance corporate account management efficiency right from the customer data collecting step.
Let's see how to configure it!

2. How Does It Work?
2.1. B2B Registration
Please go to Store ⇒ Configuration ⇒ BSSCommerce ⇒ B2B Registration.
2.1.1. General Settings
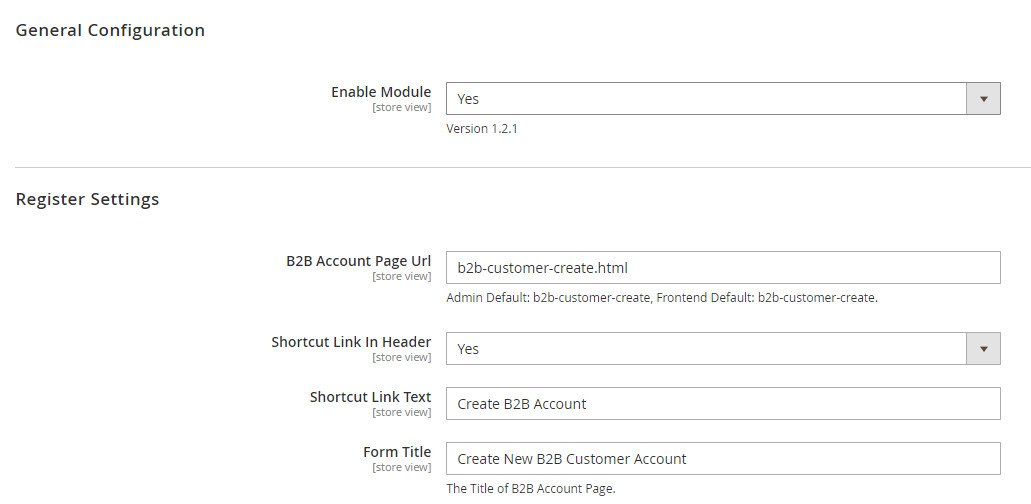
- In Enabled: choose Yes to enable the module.
2.1.2. Register settings
- In B2B Account Page URL: enter URL of the customer registration page
- In Shortcut Link in Header: select Yes to enable the shortcut link in the header. So customers can click this shortcut link to navigate the registration page.
- In Shortcut Link Text: enter the title of the shortcut link in the header.
- In Form Title: enter the title of the B2B registration form.
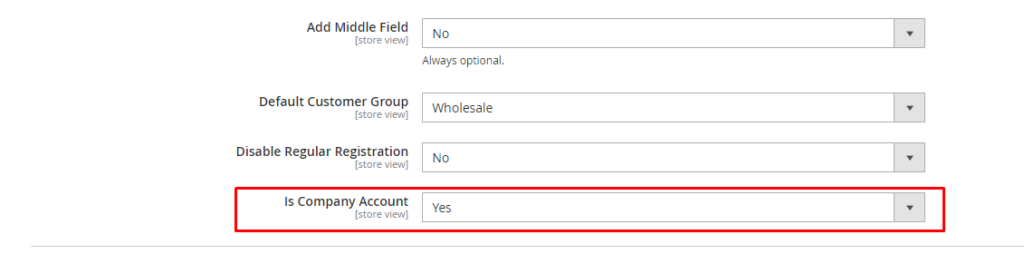
Choose additional fields in the B2B Registration form. If you do not want any fields to show up, choose No.

In Is Company Account, choose Yes to allow customers to register as a company account in the frontend.
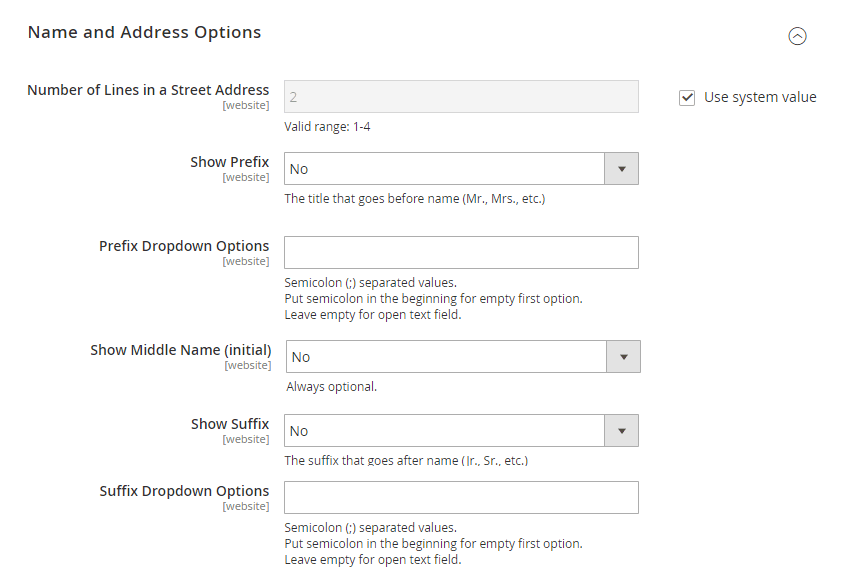
Please ensure that by default, these fields are not required. Go to Configuration ⇒ Customer Configuration ⇒ Name and Address Options to check.
2.1.3. Customer groups

- In Default Customer Group: choose a group that you want to add the customer into.
- In Disable Regular Registration: select Yes to disable the standard “Create an Account” link in the header, “Create an Account” button in Sign-in Page, and checkout page.
Choose No to enable both "B2B Registration link" and the default "Create an Account link."
2.1.4. Approval settings
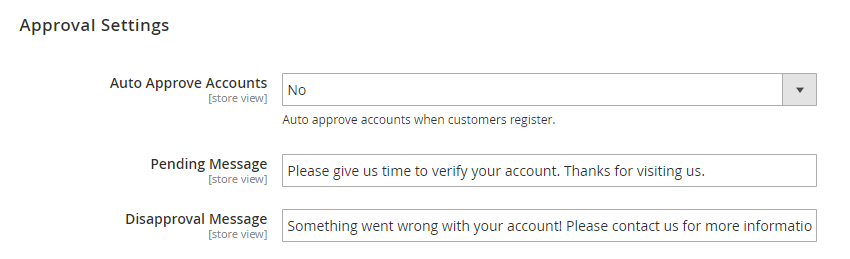
- In Auto Approve Accounts: Choose Yes if you want to accept new B2B accounts automatically or No if you want to approve accounts manually.
NOTE: Even when you approve the B2B registration requests automatically, you can still change their status in the backend.
- In Pending Message: enter Pending message.
- In Disapproval Message: enter Disapproval message.
2.1.5. Admin email settings
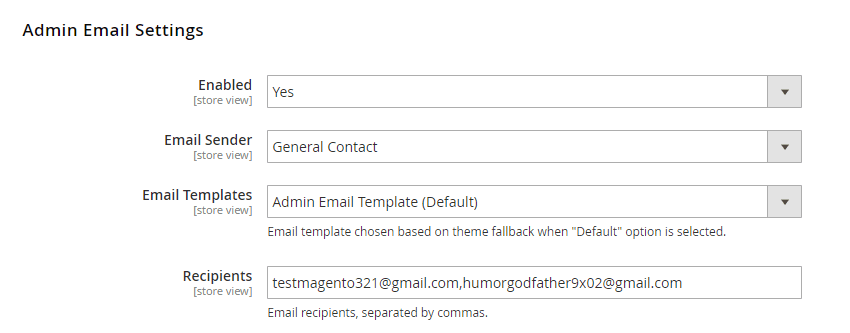
- In Enabled: choose Yes to enable configurations below.
- In Email Sender: enter the name of the sender from Store Email Address of the default.
- In Email Templates: choose among available email templates of websites to notify the admin of new B2B accounts.
- In Recipients: enter emails, separated by commas, to receive notification about new accounts created.
2.1.6. Customer email settings

- In Enabled: choose Yes to send notification emails to customer
- In Email Sender: enter the name of the sender from Store Email Address of the default.
- In Approval Email Templates: select among available email templates of your site to send an email after the admin approves the B2B registration
- In Disapproval Email Templates: select among available email templates of your website to send an email after the admin rejects the B2B registration
2.1.7. Default captcha support
To enable Captcha in the B2B Registration form, please follow Stores ⇒ Configurations ⇒ CUSTOMERS ⇒ Customer Configuration ⇒ CAPTCHA

- Set Enable CAPTCHA on Storefront to Yes.
- In Form, choose Create User form to enable the CAPTCHA
- Set Display Mode to either Always to After number of attempts to login.
- Define CAPTCHA settings.
2.1.8. MANAGE B2B REGISTRATION REQUESTS
In Customer Grid:
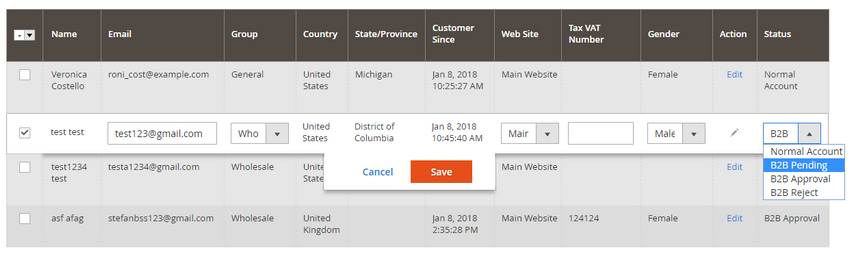
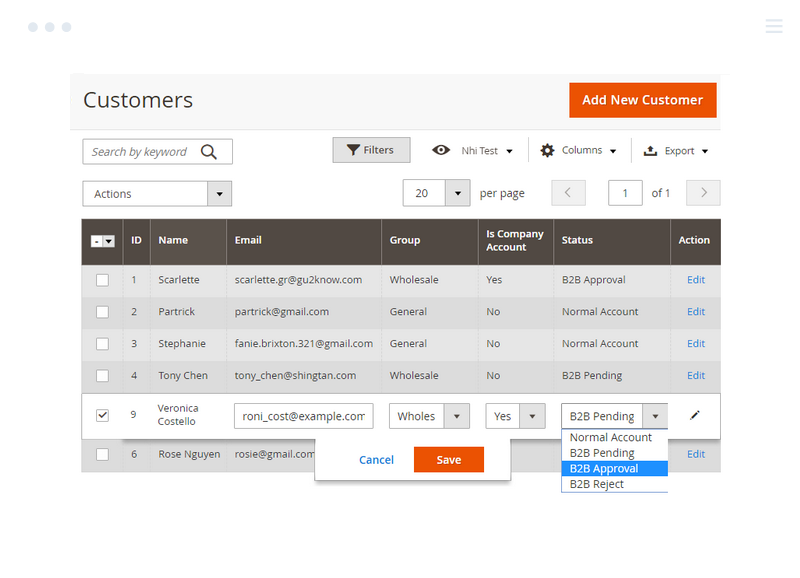
There is an additional Status column in Customer Grid in the backend so that the admin can check B2B accounts' status and make adjustments accordingly.
The admin can edit the status of a single B2B account by double-clicking in any position in the row:
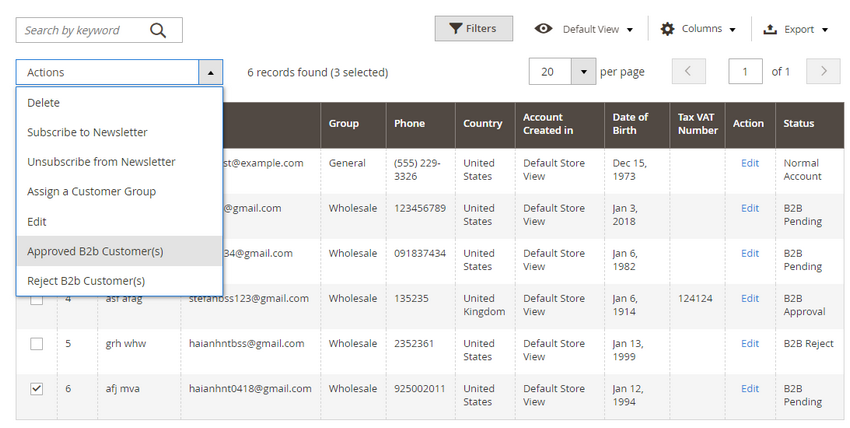
or multiple B2B accounts:
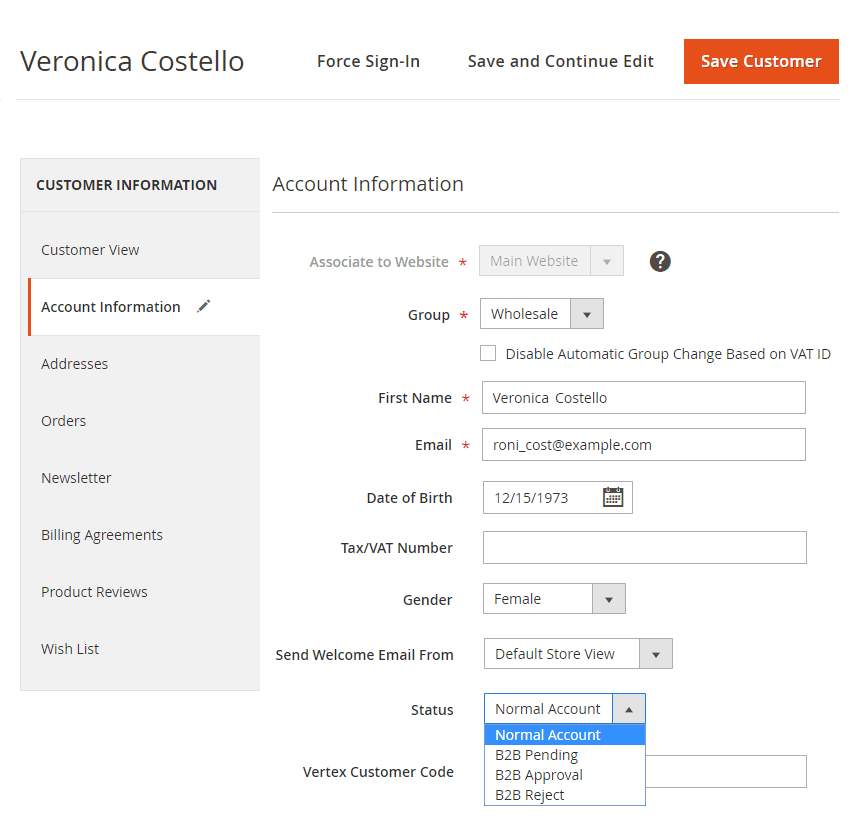
or in Account Information of specific account:
*Note:
If the admin creates an account in the backend for a customer, an approval notification email is sent to the customer after creating it.
However, that account has Normal status; admin can change into B2B Approval status, then there will also be a notification email sent to that customer.
2.2. Customer Attributes
2.2.1. General config
Go to Stores ⇒ Configuration ⇒ BSSCommerce ⇒ Customer Attributes.
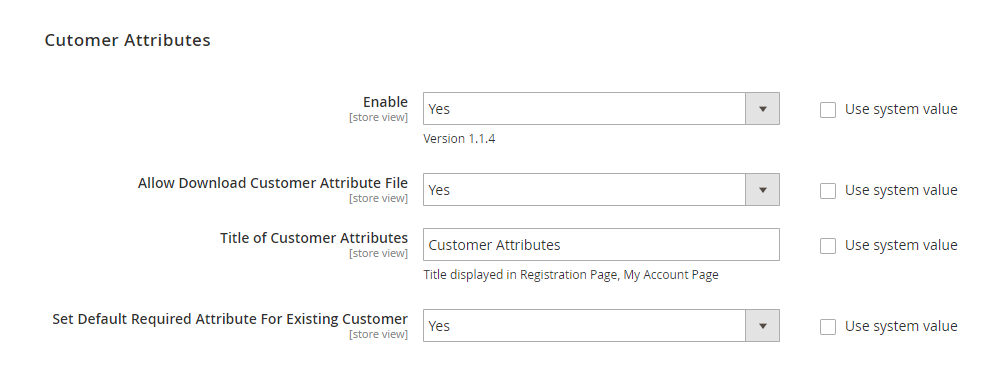
In Enable, choose Yes to enable the extension or No to disable it.
*Note: The Enable config only affects frontend display. Other backend functions aren’t affected by this config.
In Allow Dowload Customer Attribute File: choose Yes to allow downloading the file uploaded to customer attribute or No to restrict downloads.
In Title of Customer Attributes, enter the name for the customer attributes block. This title will be displayed on the Registration Form and My Account Page.
In Set Default Required Attributes for Existing Customer, choose Yes if you want required attributes to be applied for existing customers. Otherwise, choose No.
2.2.2. Create new customer attributes
Go to Customers ⇒ BSSCommerce ⇒ Customer Attributes.
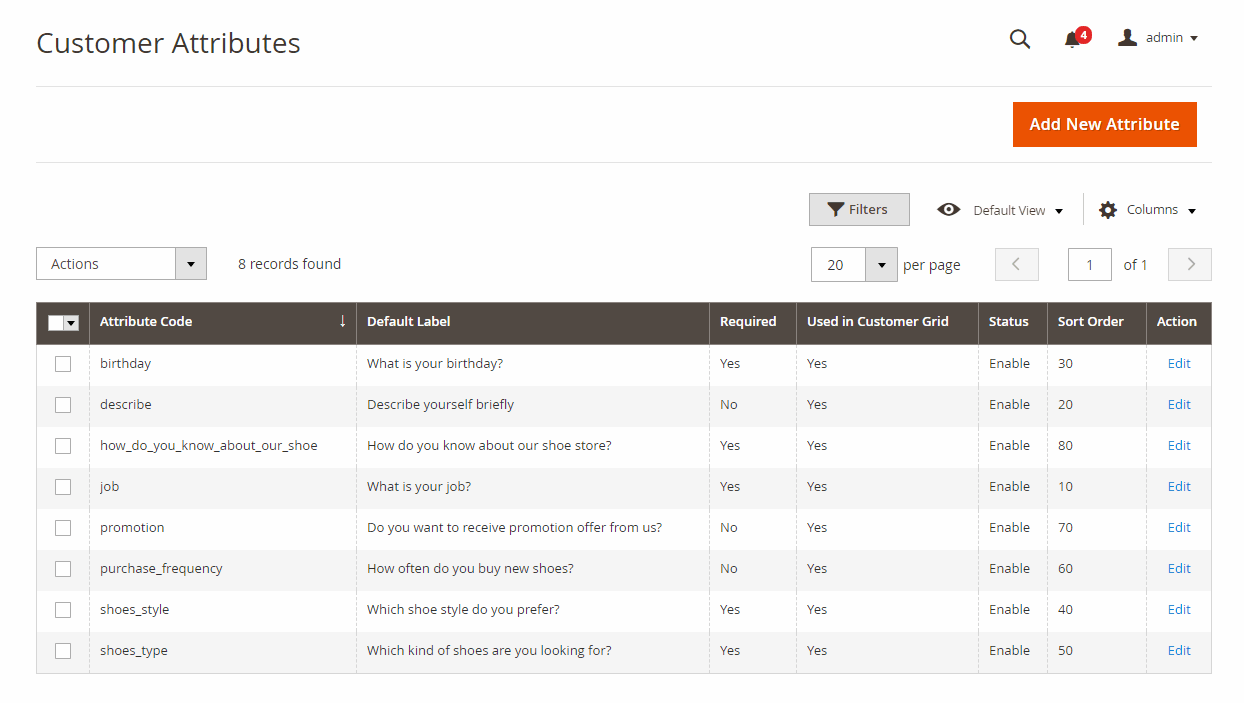
Customer Attributes Grid which displays all customer attributes created by admin. The Customer Attributes Grid is equipped with all functions like a default Magento 2 grid, including filter, column, and mass action (delete, update status).
Click Add New Attribute button to create a new customer attribute. Then, you will see 3 tabs: Properties, Manage Labels, and Display Configuration.
Later, you can also remove Magento 2 customer attributes, as wished.
2.2.3. PROPERTIES
Attribute Properties:
In Default Label, enter a name for the customer attribute.
In Input Type, choose 1 of the 9 input types: Text Field, Text Area, Date, Yes/No, Multiple Select, Dropdown, Checkbox and Radio Button, File (Attachment).
*Note:
- If you choose Multiple Select, Dropdown, Checkbox, or Radio Button, add options for the customer attribute in Manage Options.
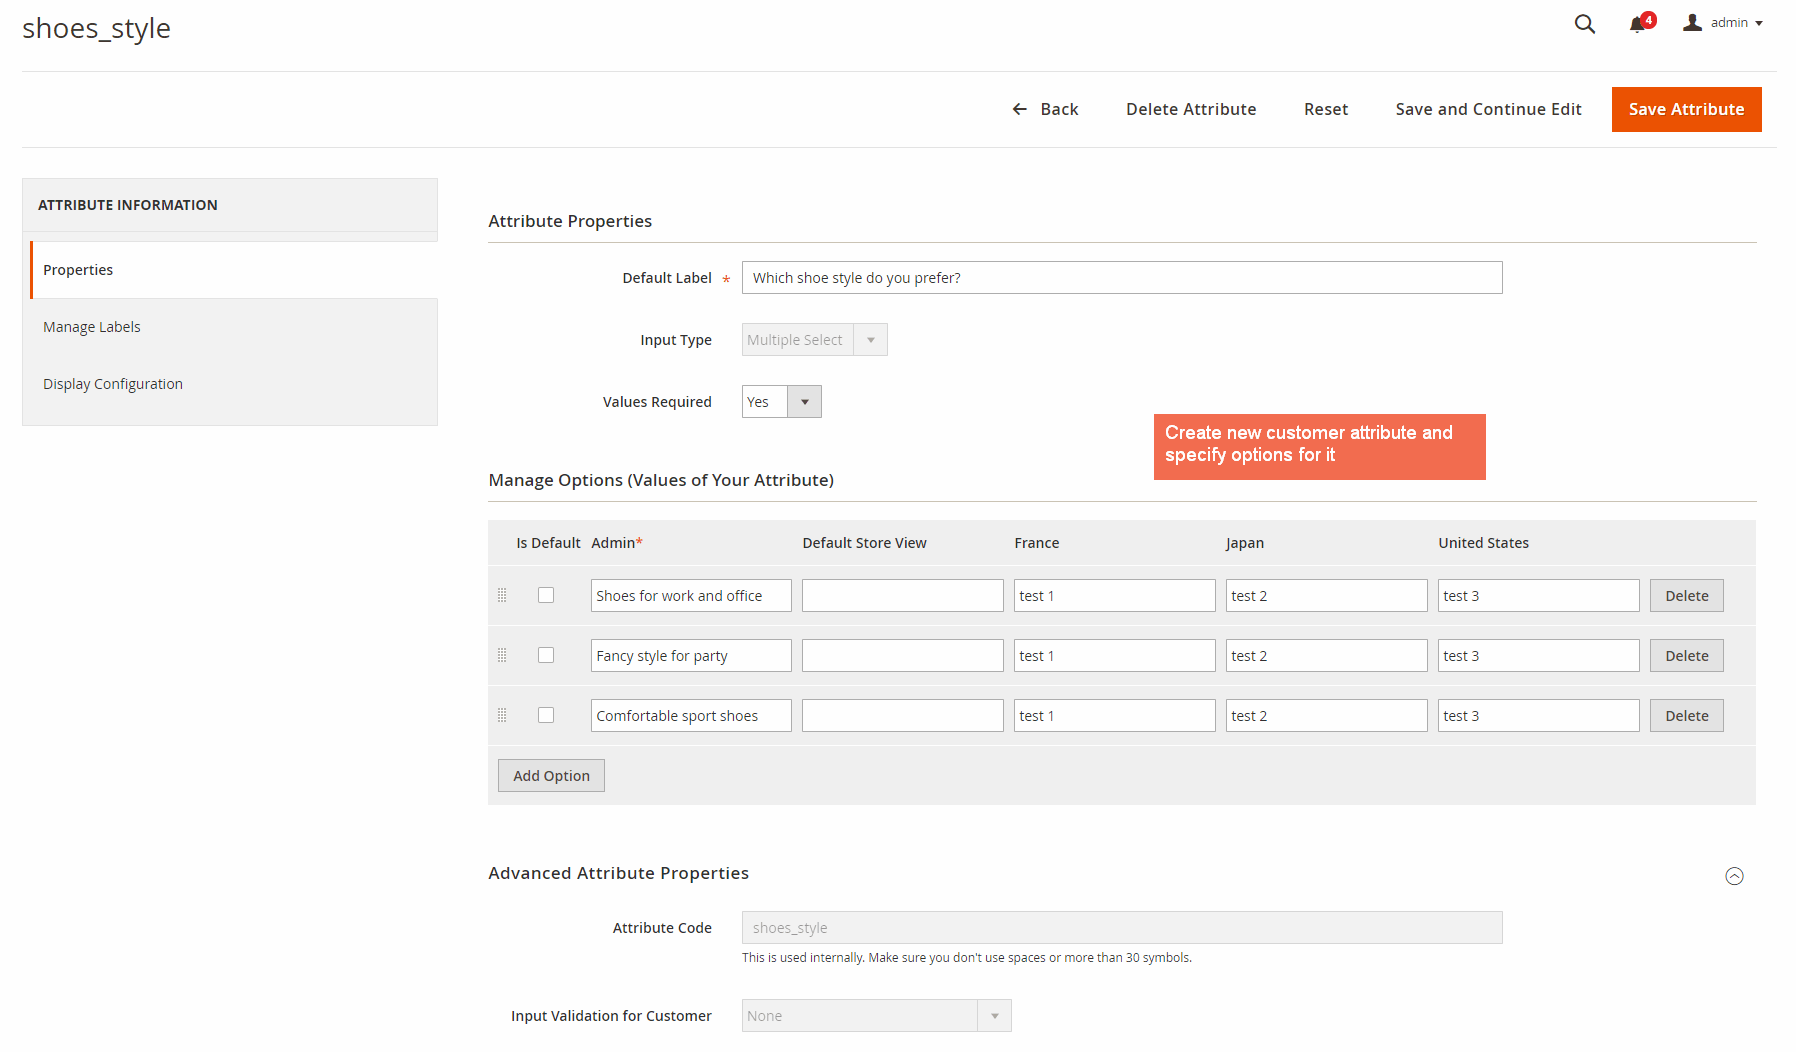
In Values Required, choose Yes to make the customer attribute compulsory to fill in; otherwise, choose No.
Advanced Attribute Properties:
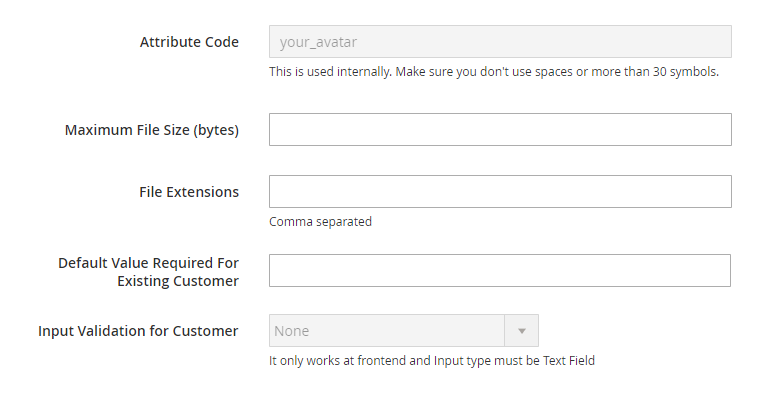
In Attribute Code, enter a code for the customer attribute. No space allowed, and no more than 30 symbols.
*Note: In case none value is entered for Attribute Code, the extension will automatically get the value of Default Label as value for this field.
In Maximum File Size (bytes), enter a number to define the largest file size possibly uploaded.
In File Extensions, type allowed file extension that can be uploaded to the customer attribute. Each is separated by a comma.
In Default Value Required for Existing Customer, enter a value if the attribute is set as Required. This field will only be shown when the Values Required is Yes, and the Input Type is text field, area, datetime, or file.
In Input Validation for Customer, set a type of data allowed in the field. The available values depend on the Input Type specified.
None—The field has no input validation during data entry.Decimal number—Accepts only decimal number during data entry.Integer Number—Accepts only integer number during data entryEmail—Accepts only an email address during data entry.URL—Accepts only a URL during data entryLetters—Accepts only letters during data entryLetters (a-z, A-Z) or Numbers (0-9)—Accepts any combination of numbers (0-9) and alphabetic characters (a-z, A-Z) during data entry.
2.2.2 MANAGE LABELS
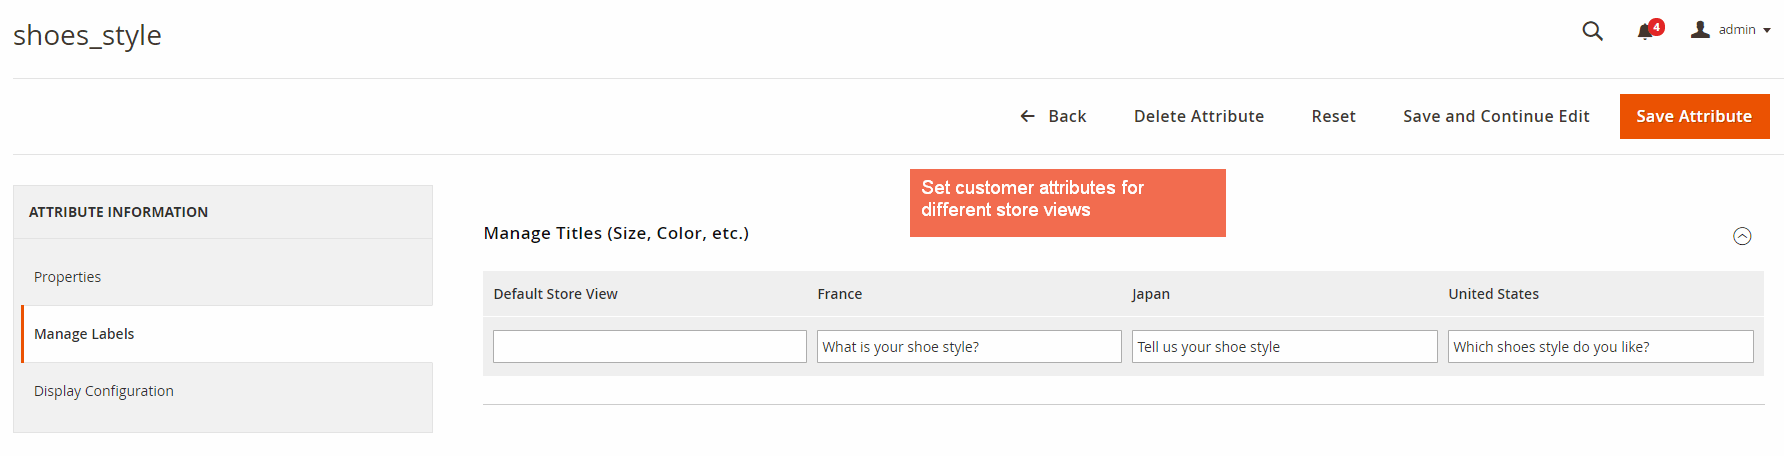
Customer Attributes for Magento 2 extension supports multiple store view, so you can display different customer attribute labels per store view.
2.2.3. DISPLAY CONFIGURATION
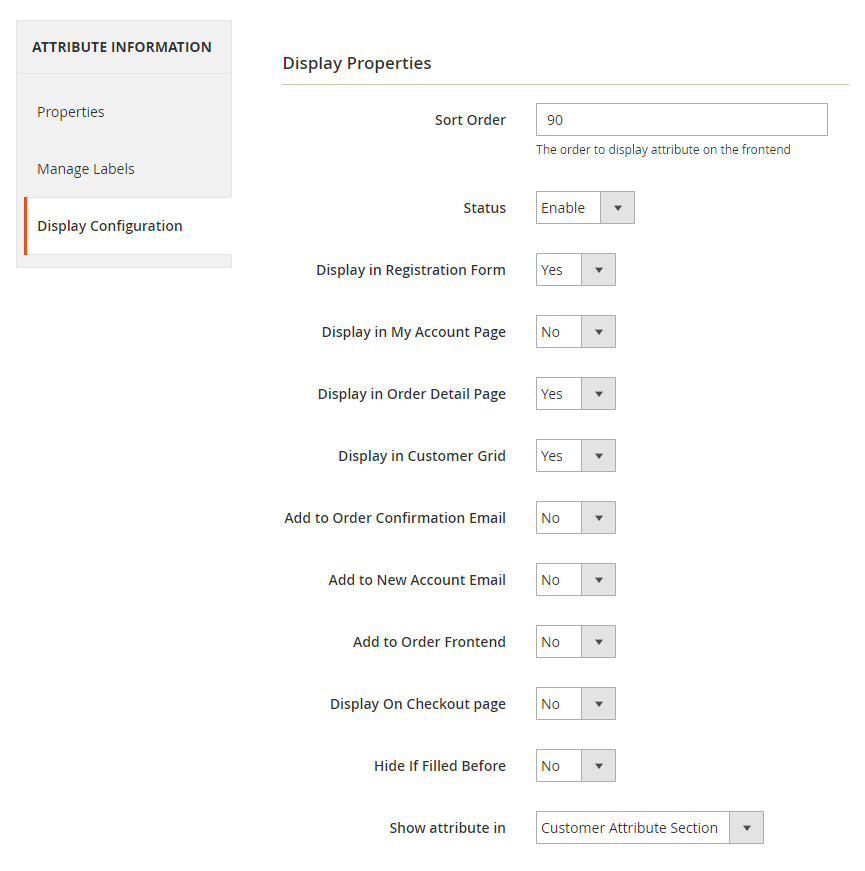
In Sort Order, set the order of appearance for the customer attribute in the Registration form.
*Note: The sort order set here will also decide the order of appearance of the attributes in the backend.
In Status, enable or disable the customer attribute.
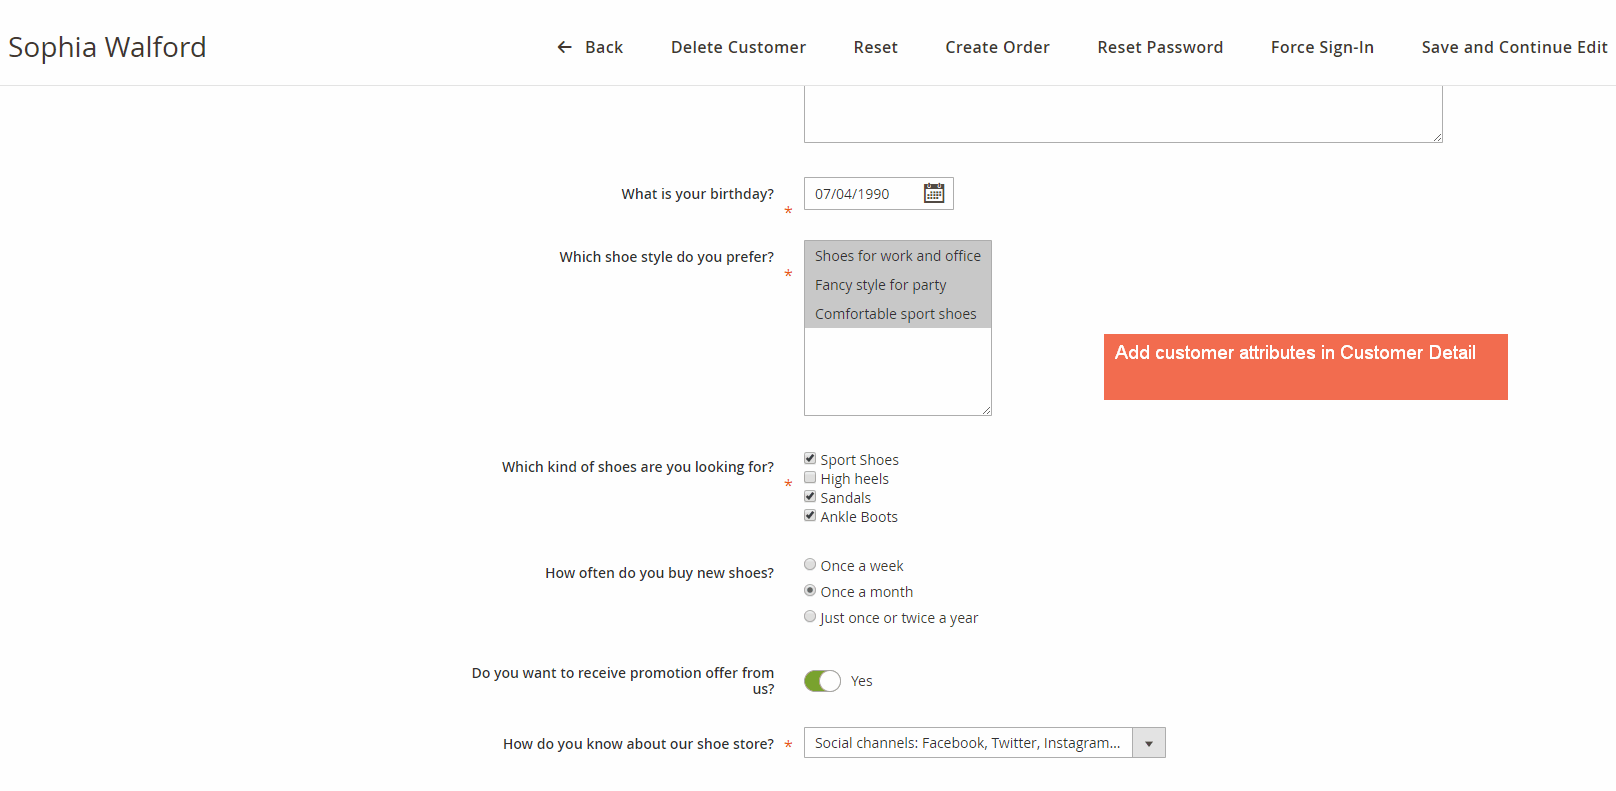
In Display in Registration Form, choose Yes to add the customer attribute to the Registration Form.
In Display in My Account Page, choose Yes to add the customer attribute to My Account Page.
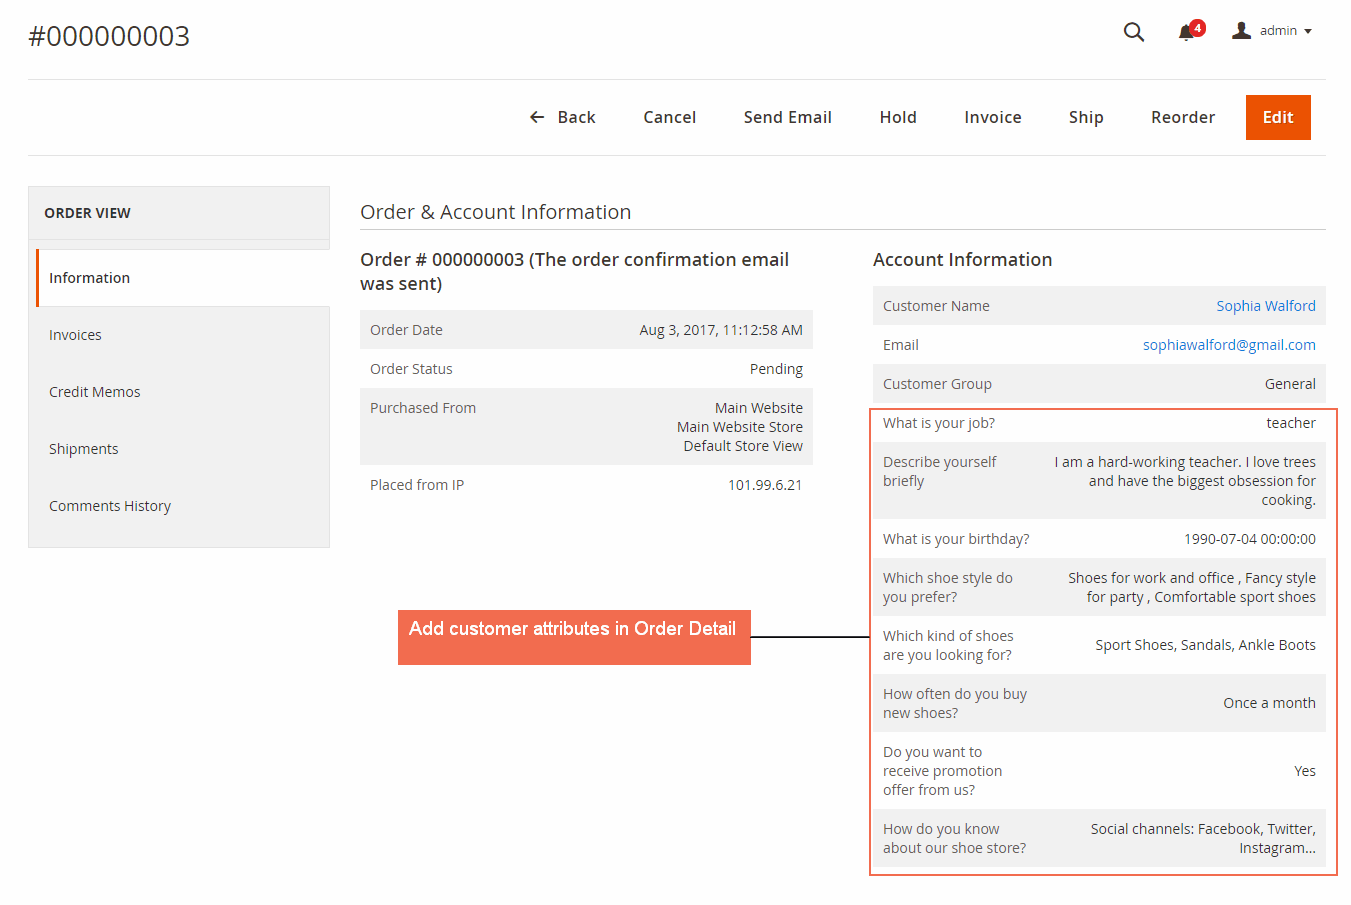
In Display in Order Detail Page, choose Yes to add the customer attribute to Order Detail Page under Sales of Admin Panel.
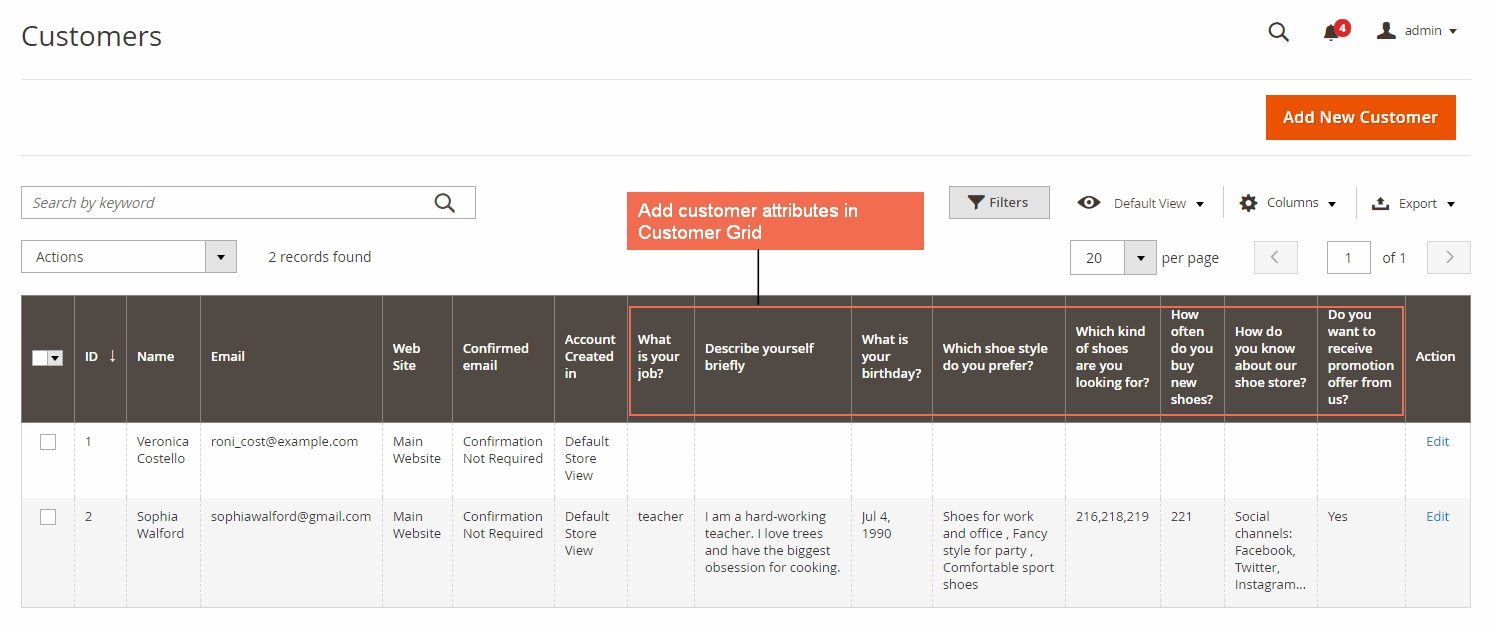
In Display in Customer Grid, choose Yes to add the customer attribute to Customer Grid.
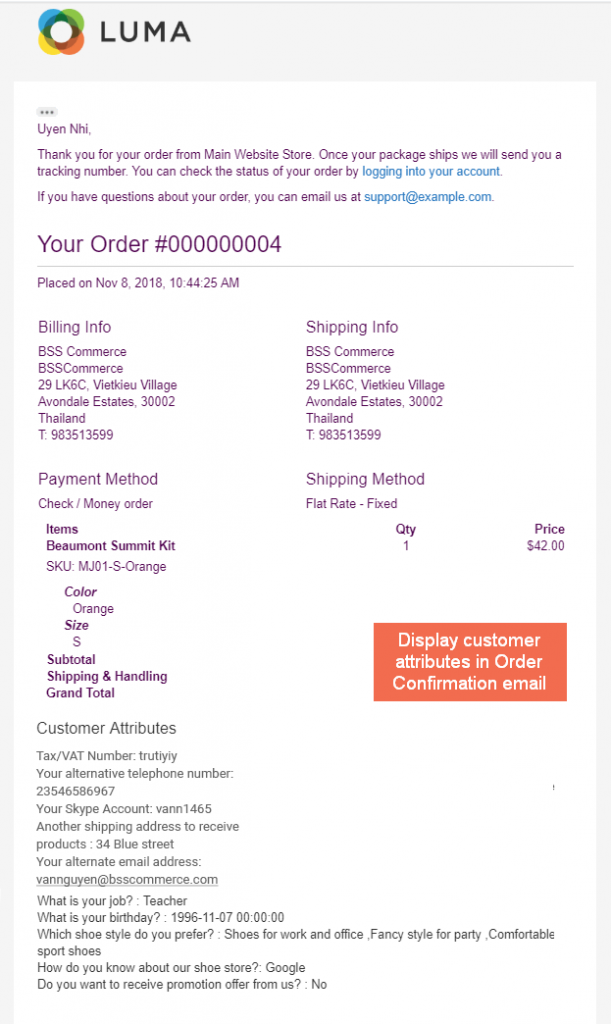
In Add to Order Confirmation Email, choose Yes to display the customer attribute in the Order Confirmation email.
In Add to New Account Email, choose Yes to display the customer attributes in New Account email.
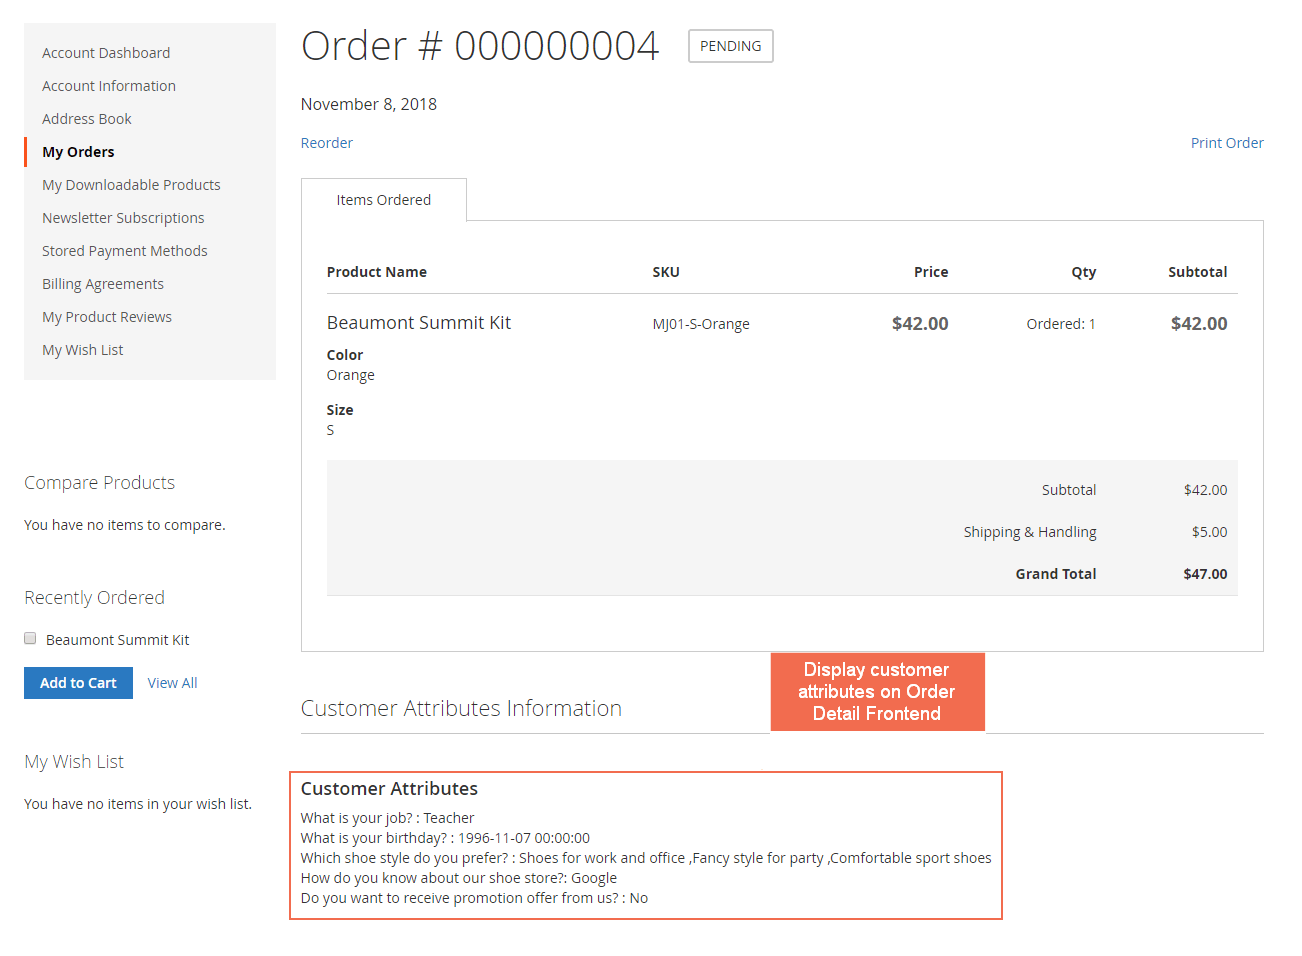
In Add to Order Frontend, choose Yes to display the customer attributes on Order Detail Page under My Account.
*Note: You need to reindex Customer Grid data whenever you make any change in Display in Customer Grid config.
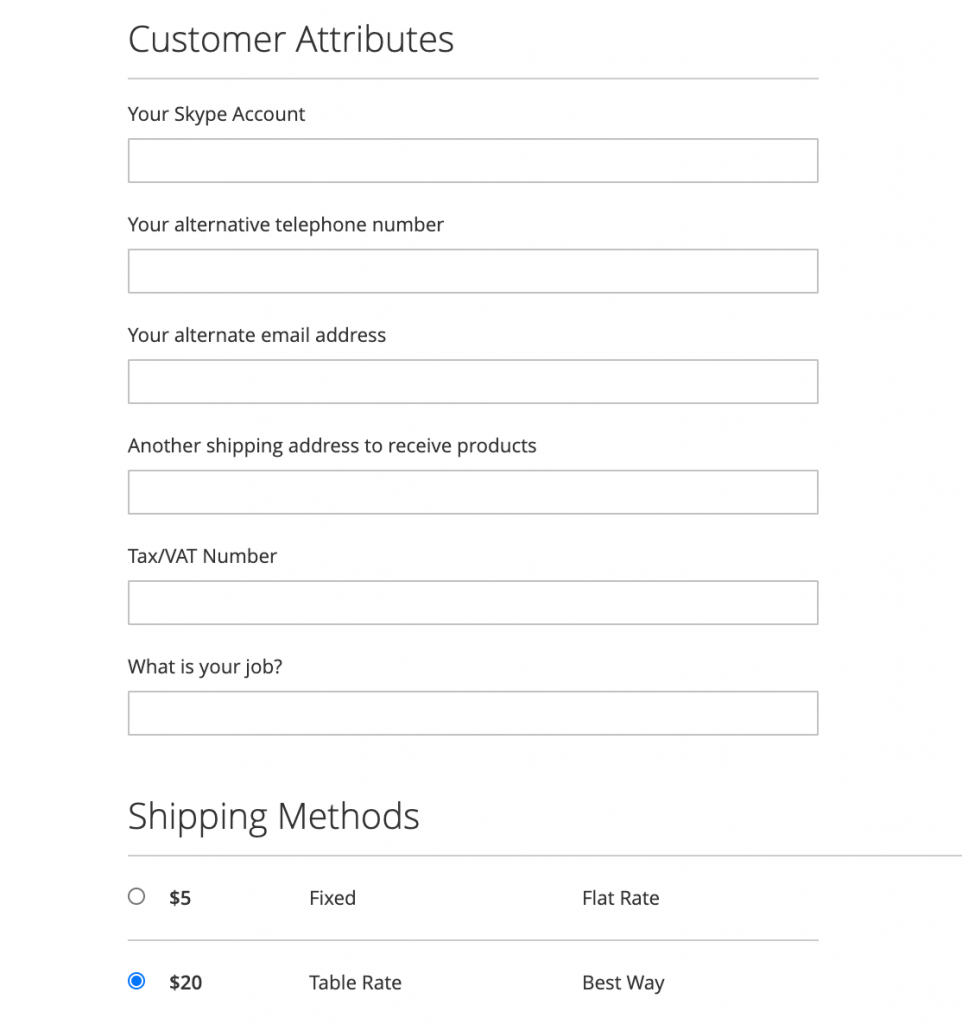
In Display on Checkout Page, choose Yes to show added customer attributes in the checkout page - under the shipping address or the payment method (with the virtual cart.) All filled information is saved upon order placement.
*Note: Attributes of all input types, except for "File", are supported at the checkout page.
In Hide If Filled Before, choose Yes to hide the customer attributes at the checkout page if they are filled before.
In Show Attribute in, choose where to show the attribute in the registration form, among Customer Attribute Section, Sign-in Information Section, and Personal Information.
2.2.4. Create a new customer address attribute
Go to Customers ⇒ BSSCommerce ⇒ Customer Address Attributes.
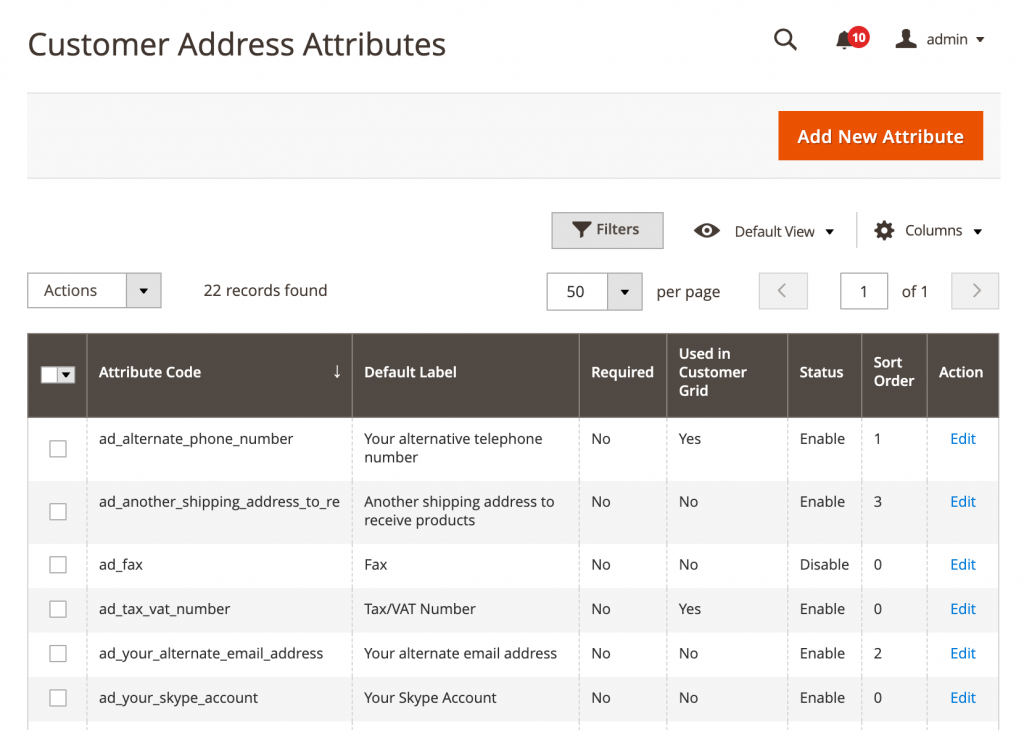
Click Add New Attribute button to create a new customer attribute.
Like adding customer attributes in section 2.2, there are also 3 tabs: Properties, Manage Labels, and Display Configuration.
In each tab, you do the same steps as creating customer attributes to fill information in each field.
In Display Configuration tab, you set Yes/No to decide whether to show customer address attributes in these positions or not.
2.2.5. Create a new email template
As above, customer attributes are possibly set to display on Order Confirmation email and New Account email.
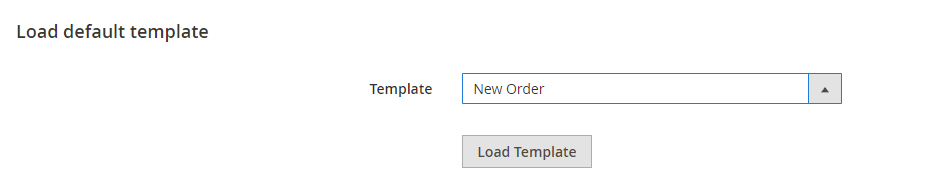
First off, you need to create a new template that includes customer attributes variable. Please follow Marketing Email Templates Add New Template.
- New Order Confirmation email template
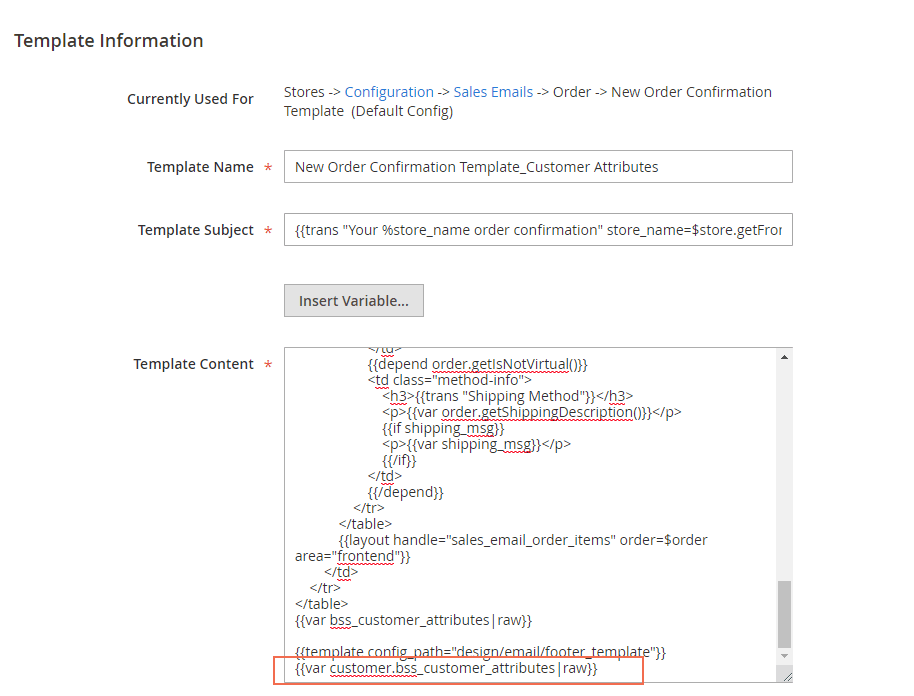
In Template section of Load default template, you can select among various default email templates, for example, New Order. Then, hit on Load template button.
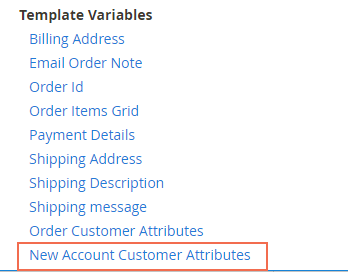
Under Template Information, select Insert Variable… to add customer attributes to the new order confirmation template.
Do not forget to enter Template Name and Save the new template.
Secondly, set this new template as the Order Confirmation email by going to Stores Configuration Sales Sales Emails Order.
In New Order Confirmation Template, uncheck Use system value box and choose the newly created email template.
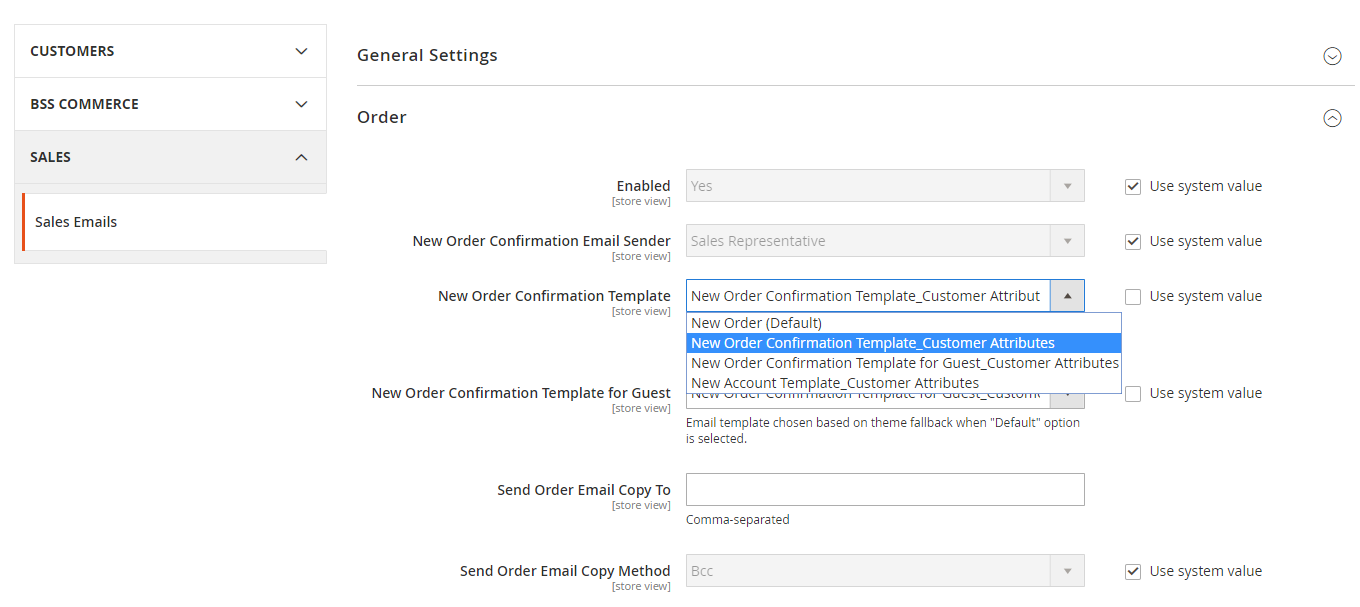
Upon completing, please Save Config.
- New Account email template
Similarly, you can create a new template with customer attributes for New Account email.
In Template of Load default template section, choose New Account (Default) template and hit Load Template.
Under Template Information, enter Template Name and select Insert Variable… to add customer attributes to New Account template.
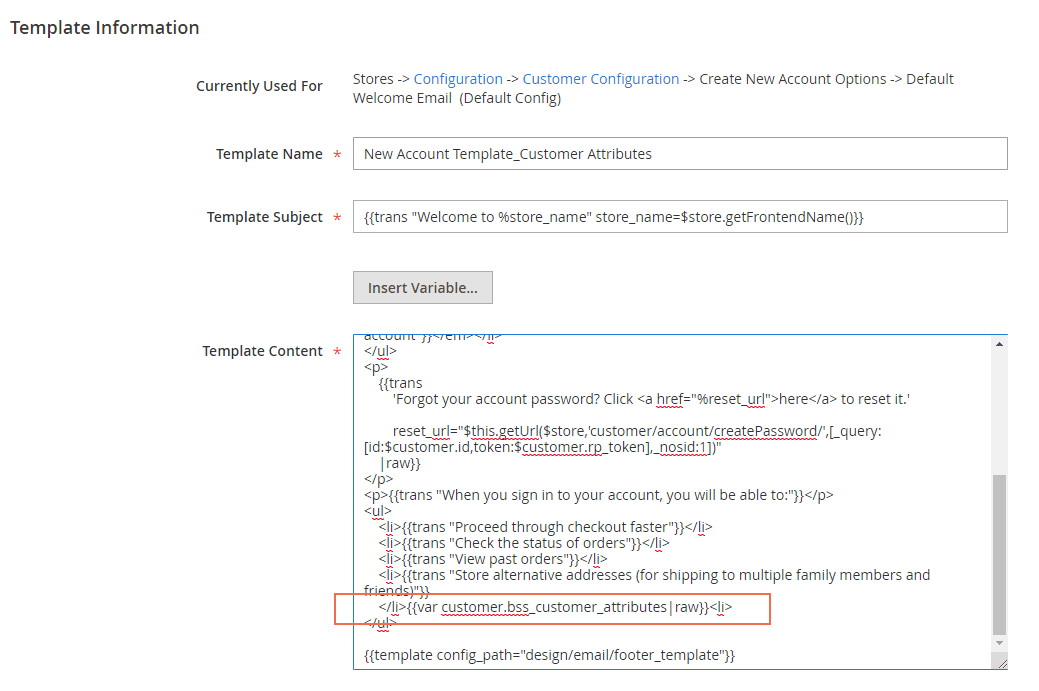
Then, Save Template.
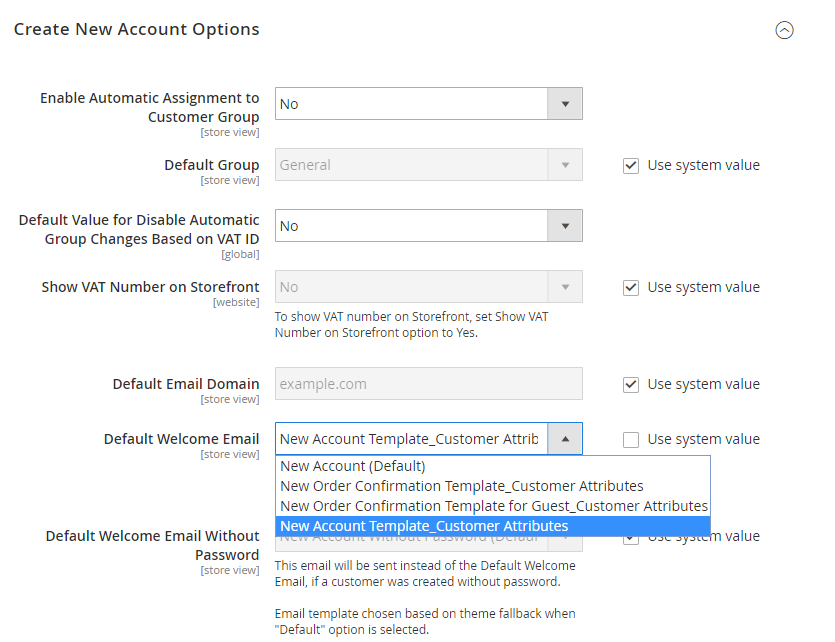
To set this new template as the New Account template, please follow Stores Configuration Customers Customer Configuration and expand Create New Account Options.
In Default Welcome Email, unmark Use system value box. Then choose the newly created template. Save Config to complete the settings.
2.2.6. Display Customer Attributes
Frontend
Display customer attributes in Registration Page:
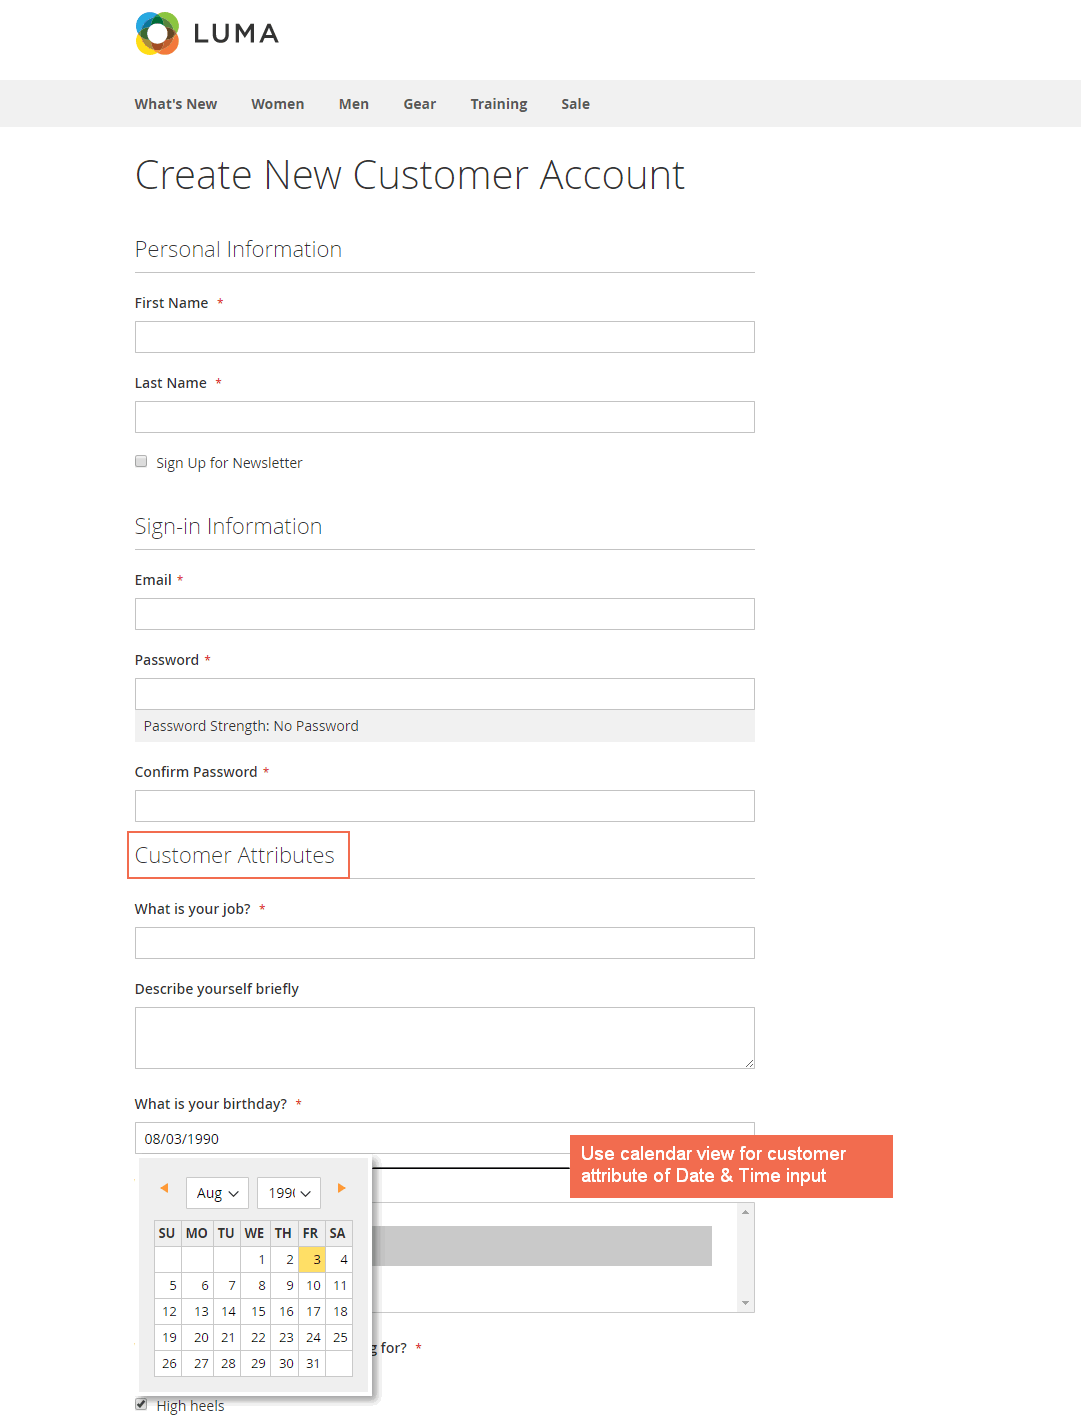
*Note: Customer Attributes for Magento 2 extension only supports checkbox in the frontend while in the backend, the checkbox is displayed in multiple-selection type.
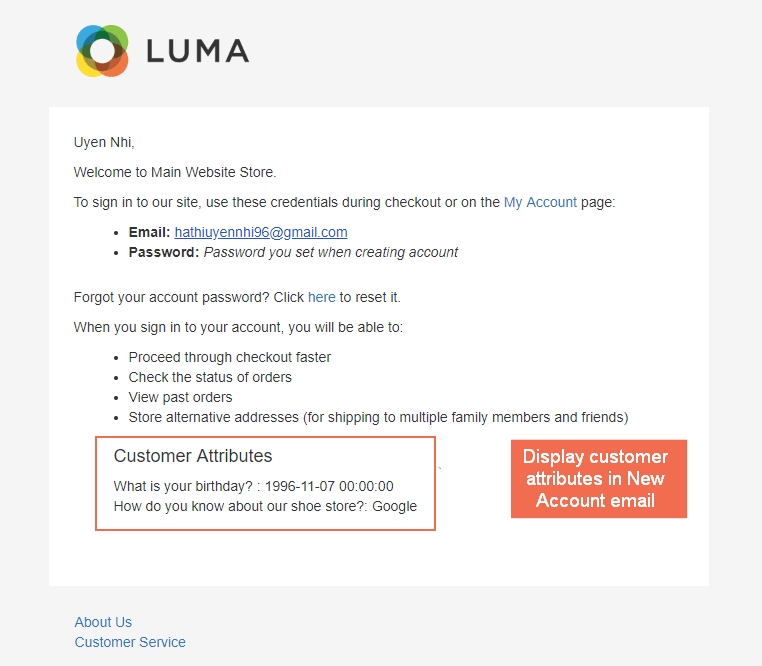
A New Account email will be sent to the register, which includes the customer attributes based on the admin’s configuration.
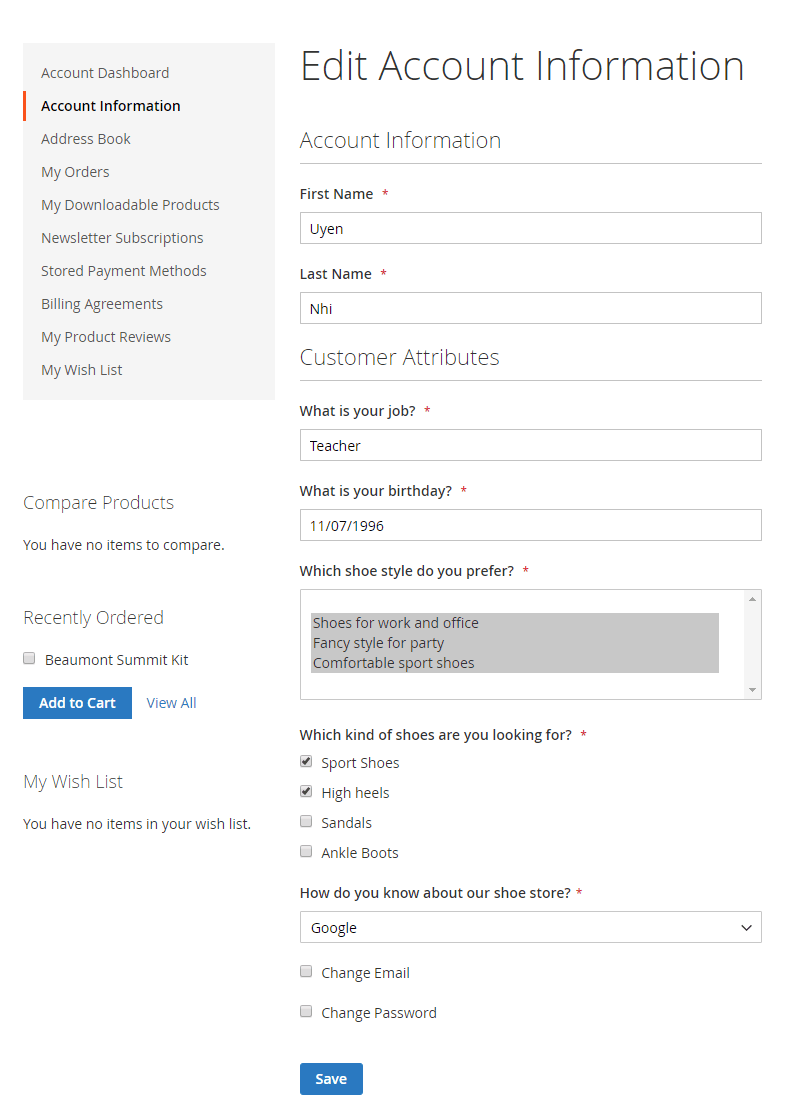
Display Customer Attribute in Account Information of My Account Page:
At Checkout page: You can display both customer attributes and customer attribute address on this page.
Customer attributes and customer address attributes can also be displayed on Order Confirmation email:
And on Order Detail Page under My Account.
Backend
Go to Customers ⇒ All Customers.
Display customer attributes in Customer Grid:
Display customer attributes in Customer Detail Page:
Go to Sales Orders.
Display customer attribute in Order Detail Page:
2.2.7. Import Customer with Attributes
Customer Attributes for Magento 2 extension allows importing customers with the created customer attributes using the .csv file.
Firstly, prepare the file of customer information with customer attributes to import. All created customer attributes must be included in the import file with each customer attributes code listed in separate columns. Please make sure that all customer attribute codes are the same as attribute codes of existing customer attributes.
For customer attributes with the input type is a checkbox or radio button, use option's ID instead of options' value. For customer attributes with the input type is a dropdown or multiple select, fill in with correct options' value.

Admins can also download the sample file by following System Import.
In Entity Type, choose Custom Main File to import new customers with customer attributes.
In Import Behavior, select one of the following actions:
- Add/Update complex data: New data is added to the existing attributes in the database.
- Delete Entities: Any existing data of entities in the import file is removed from the database of the stores.
- Custom Action: Admins can also override the import behavior by writing a custom option.
In Select file to Import, upload the file prepared earlier. Make sure that the size of the uploaded file is not more than 3M.
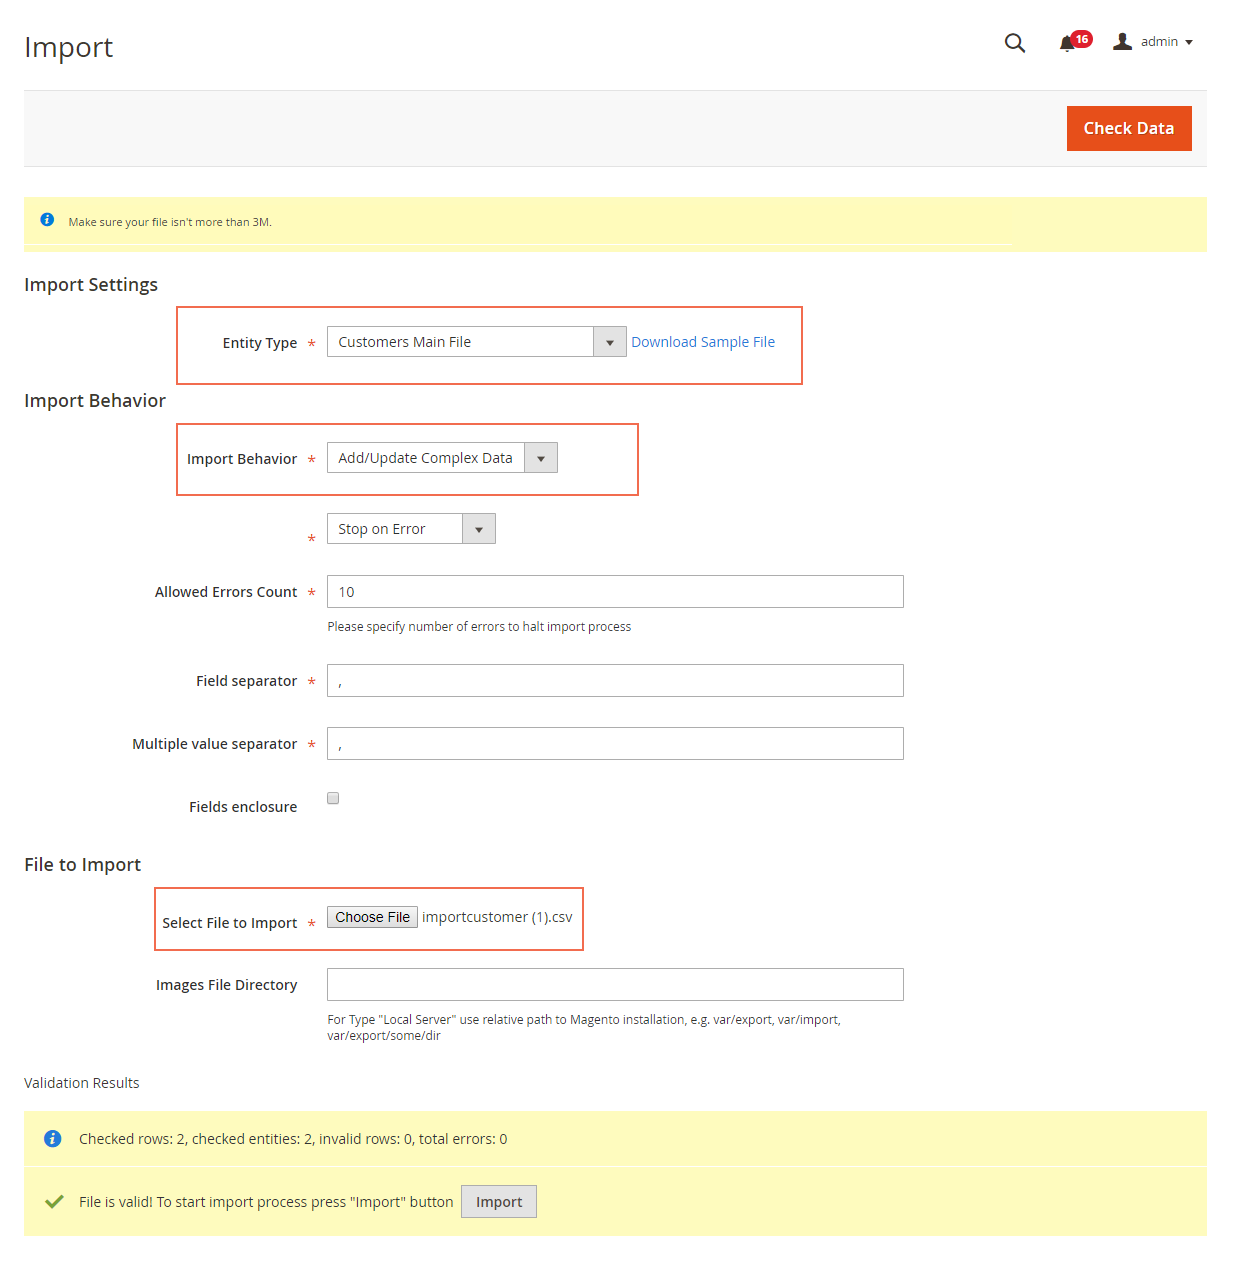
On completing, tap Check Data button in the upper-right corner. Wait for few seconds for the validation to perform.
If the import data is valid, the successful message will be displayed as in the screenshot. Click on Import button to process the import to the end of the data. Otherwise, there is any problem in data, the error message will appear. Just correct the invalid data and re-upload the file.
2.2.8. API Support
We provide you lists of Restful API that our Magento 2 Customer Attribute extension supports.
Restful API support is included in the main module package (from Customer Attribute v1.2.7).
| No | API | URL | Method |
| 1 | Get customer by id | {baseUrl}/rest/V1/customers/:id | GET |
| 2 | Get order by id | {baseUrl}/rest/V1/orders/:id | GET |
2.3. Company Account
2.3.1. General settings
Please go to Stores => Configurations => Company Account.
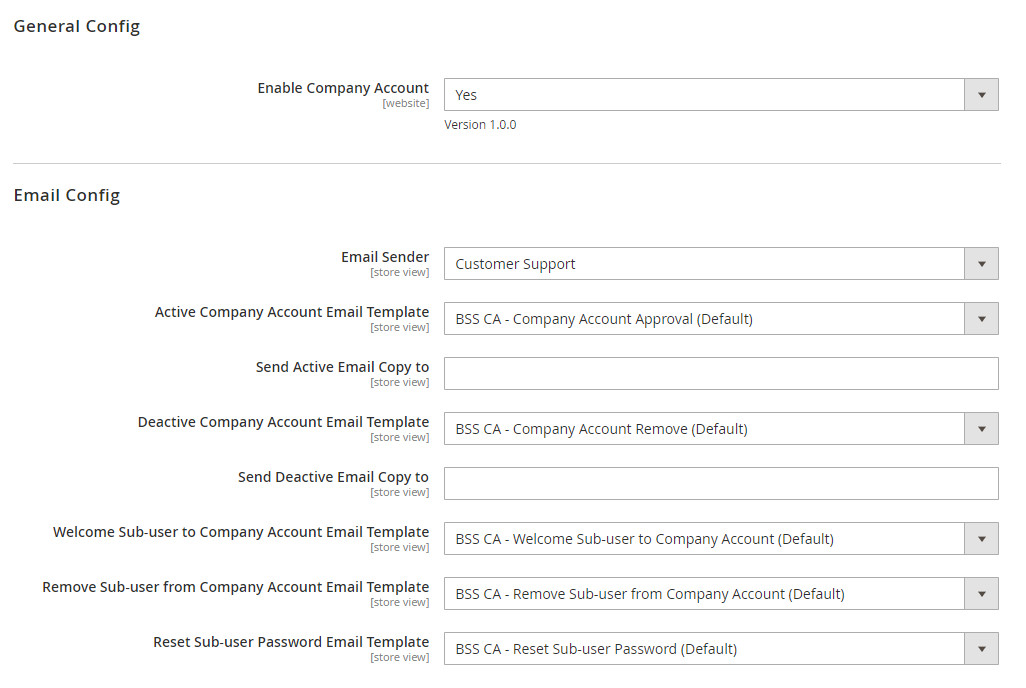
Set Enable Company Account to Yes.
In Email Config, choose the sender and templates.
Notes:
In "Send Active Email Copy to" and " Send Deactive Email Copy to", input multiple emails separated by commas.
2.3.2. A customer registers for an account in the storefront
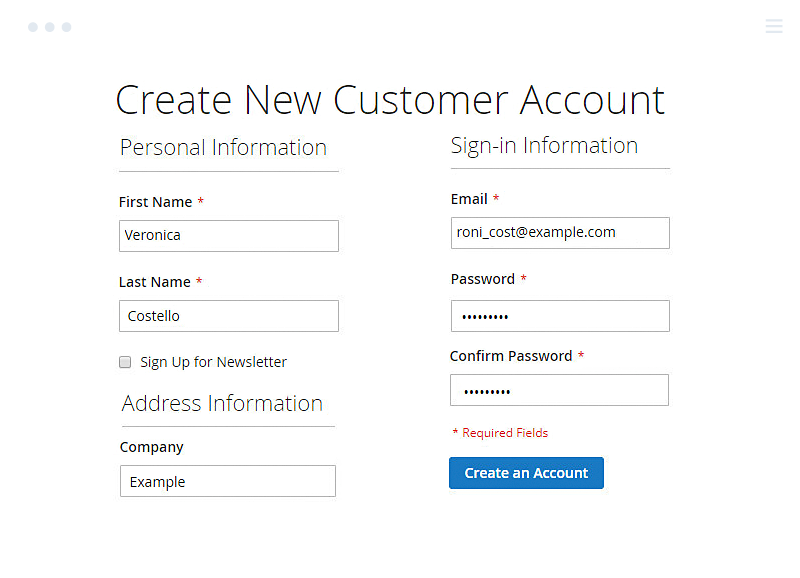
To start with, a customer will sign up for a new account via the default registration form.
Then, he/she needs to contact the store admin to switch the created account to the company account in the backend.
2.3.3. Approve/Reject company accounts in the backend
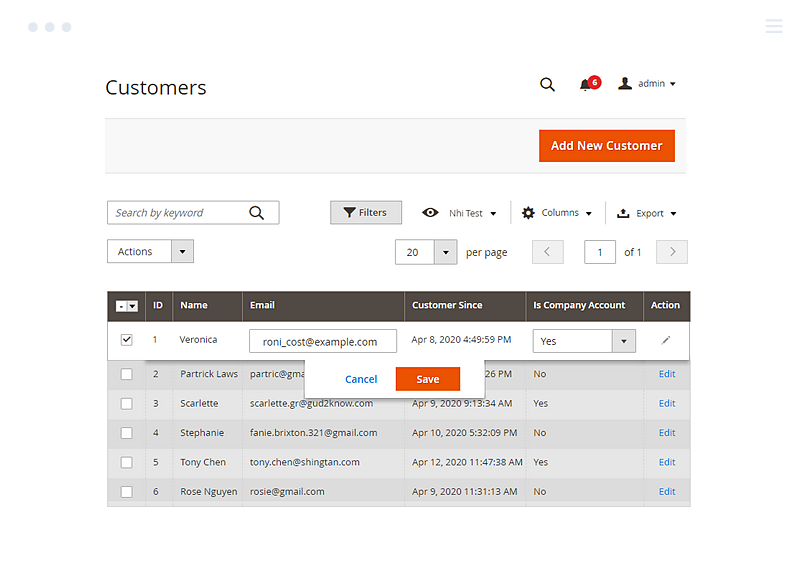
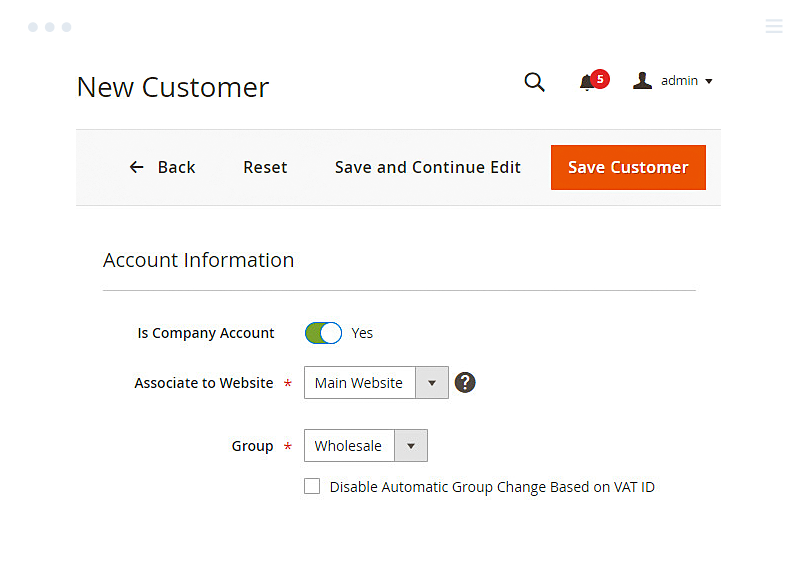
All registered accounts, including company accounts, are reported in the Customers grid. Upon contact with the customer, the admin then switches a normal account to the company account in 2 ways:
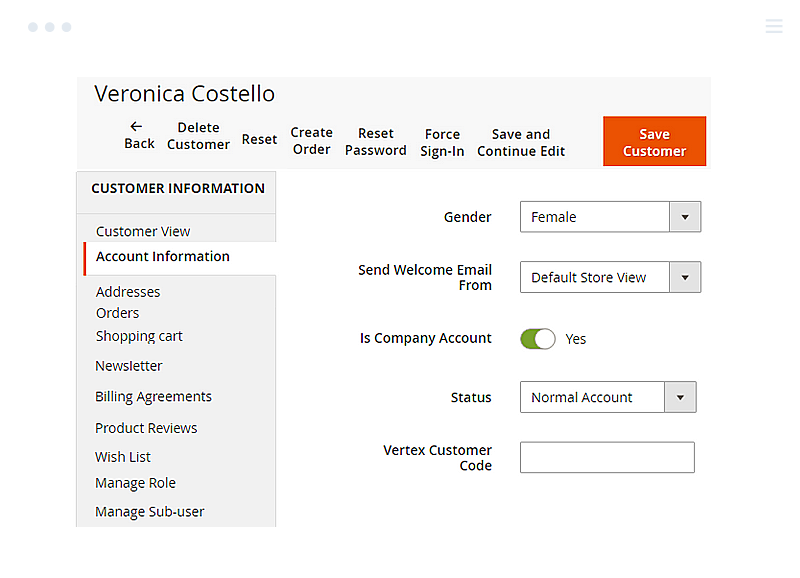
Under Account Information, there is a new field "Is Company Account".
- By setting this field to Yes, a company account is now available.
- Setting it to No means the account is just a normal account.

Otherwise, the store admin can change multiple accounts to company accounts or remove them from company accounts with the mass action.
Registered accounts are recorded in Customers grid for further action.
2.3.4. Create users, roles, and permissions in the storefront
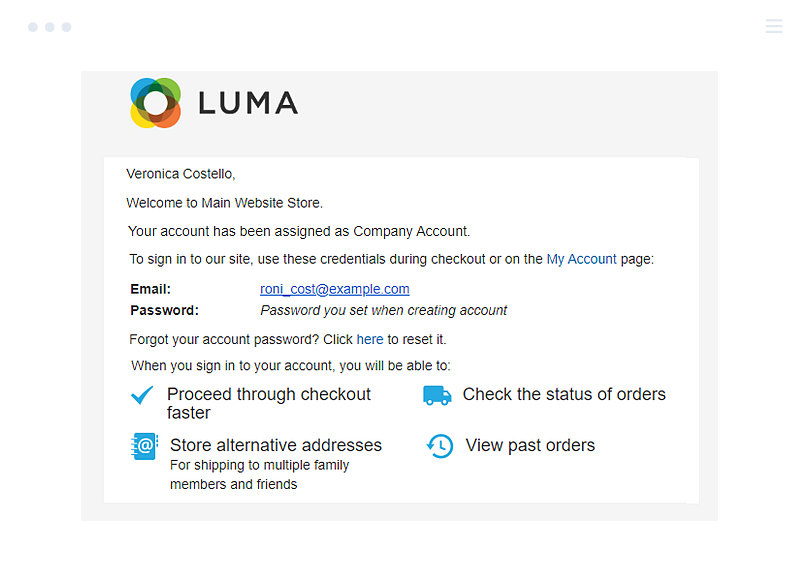
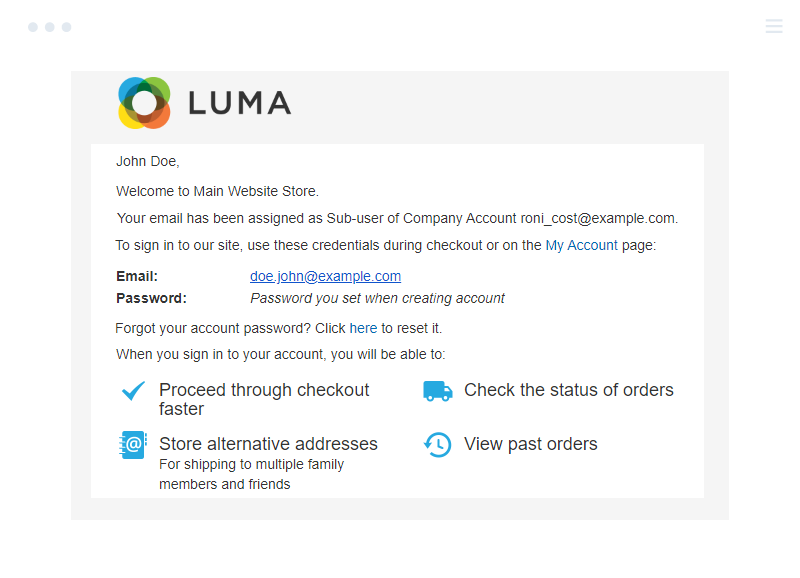
When the store admin switches an account to the company account, a notification email is sent accordingly. Then, the company admin can login to his/her account.
From now on, you must get familiar with three new roles:
- The store admin: It is the person who will review, approve, or disapprove the company account registration
- Company admin: One who registers the company account in the first place and who is assigned the role "Admin."
- Sub-users: Sub-users are created by company admin or store admin under Account management. They have limited roles and permissions.
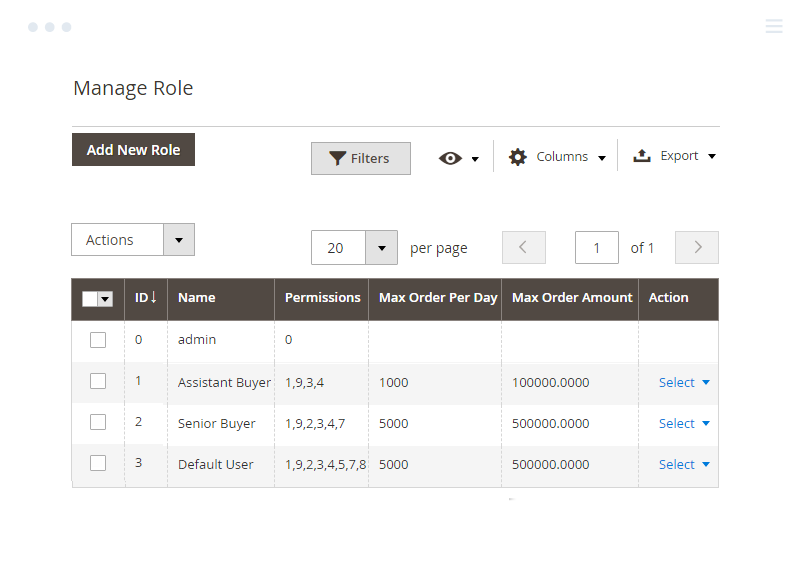
CREATE AND MANAGE NEW ROLES
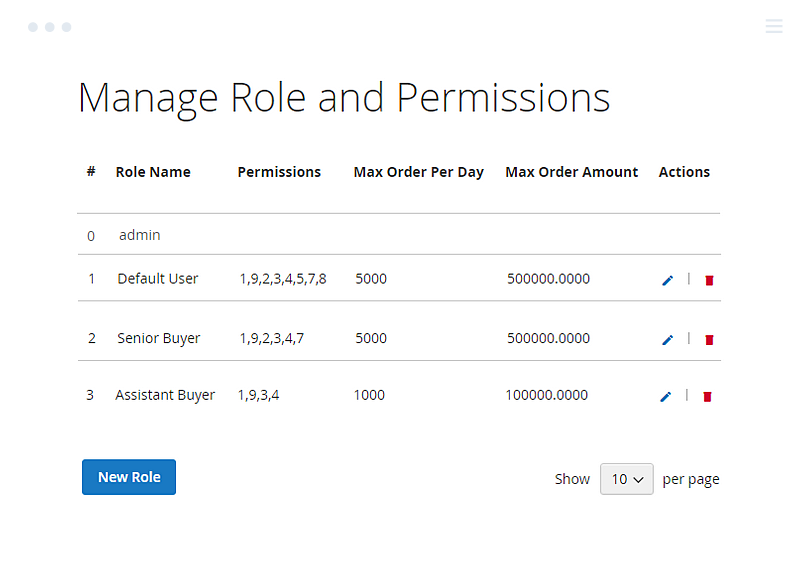
Go to Manage Role under Account Dashboard; the company admin can add new roles for users.
Please note that the Admin role is available in advance. Those assigned the Admin role will have permissions as the company admin.
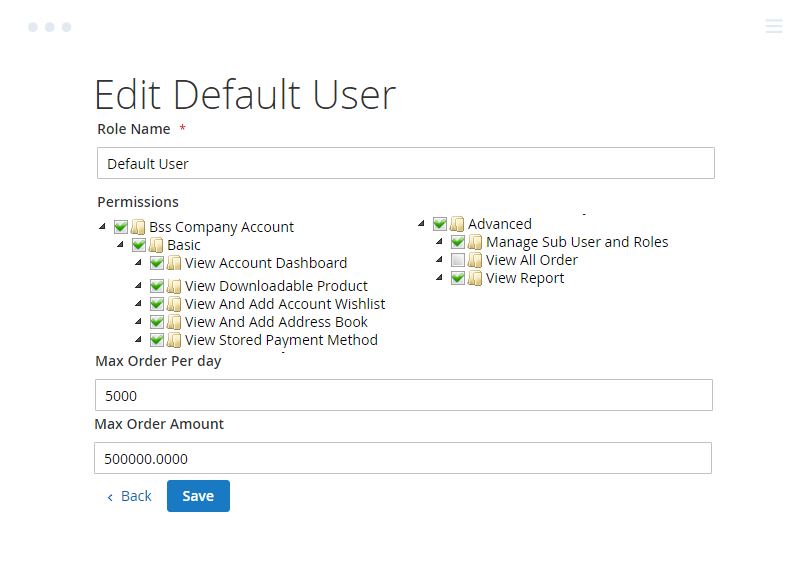
Choose to add New Role and assign built-in permissions to the role.
- In Role Name: input the role
- In Permissions: Among available resources, choose what information can be accessed and managed by the role.
- In Max Order per Day: input an amount. Skip this field if you do not want to set an order amount limitation.
- In Min Order per Day: input an amount. Skip this field if you do not want to set an order amount limitation
Remember to Save the settings.
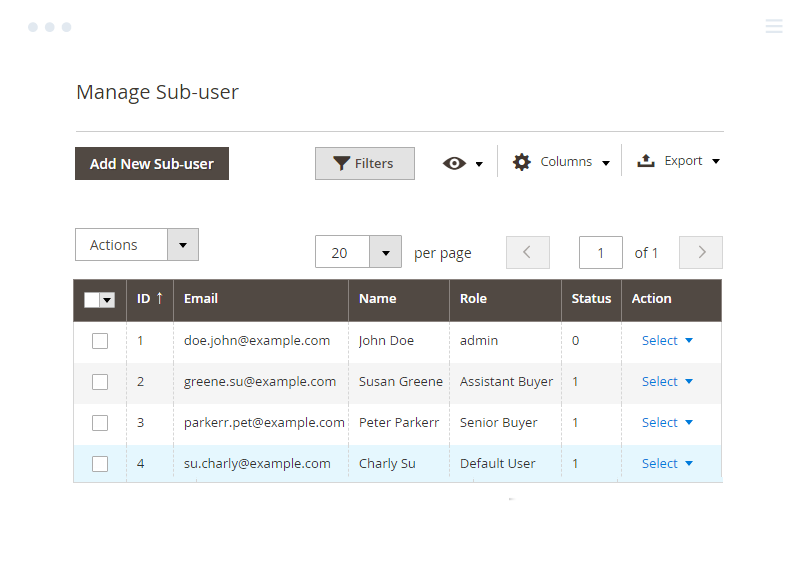
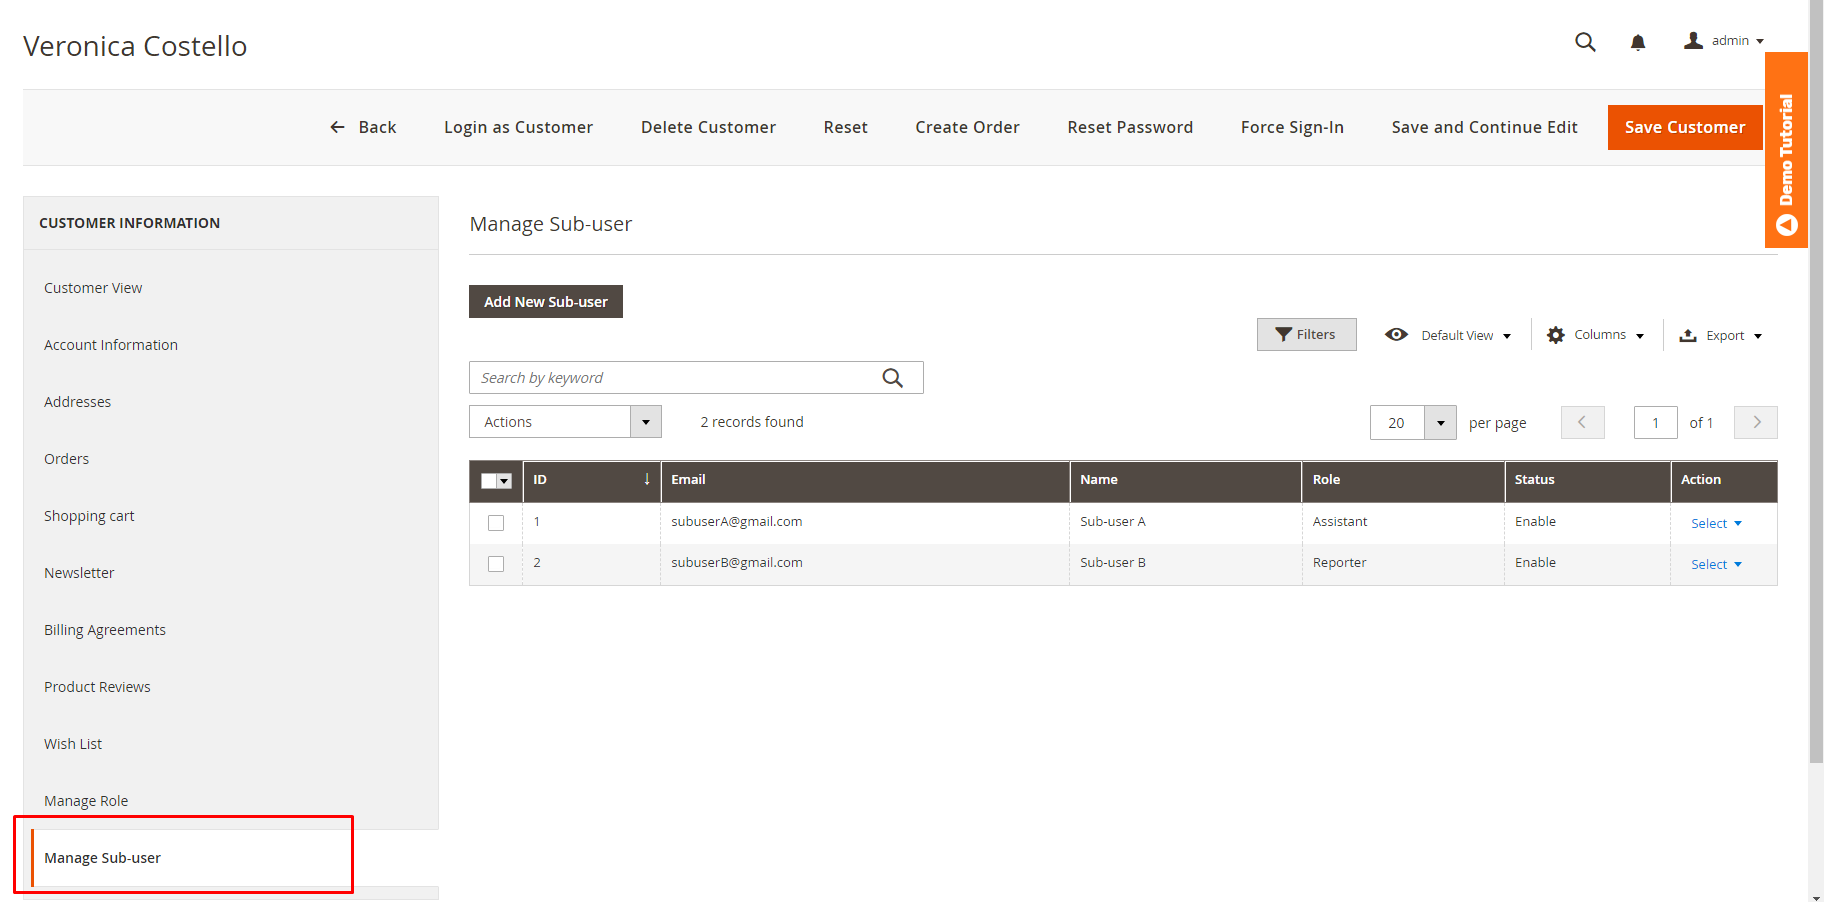
CREATE AND MANAGE NEW SUB-USERS
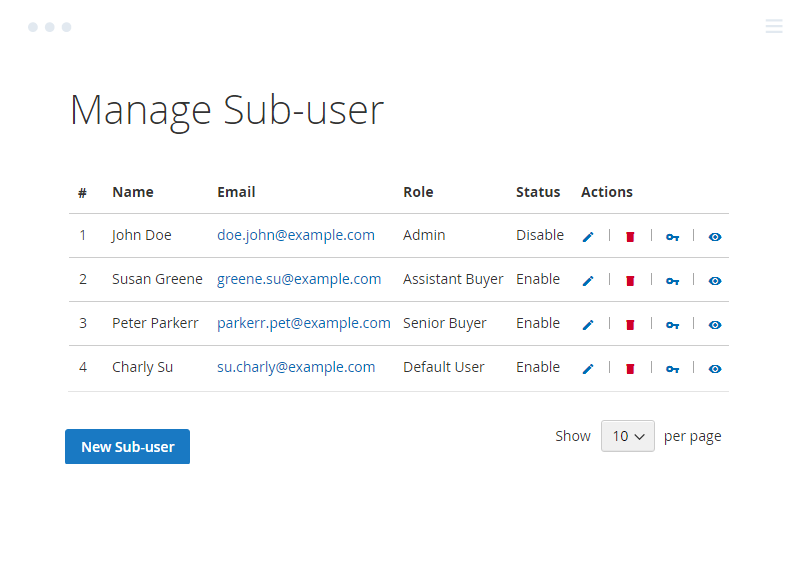
Now, go to Manage Sub-users to create new sub-users.
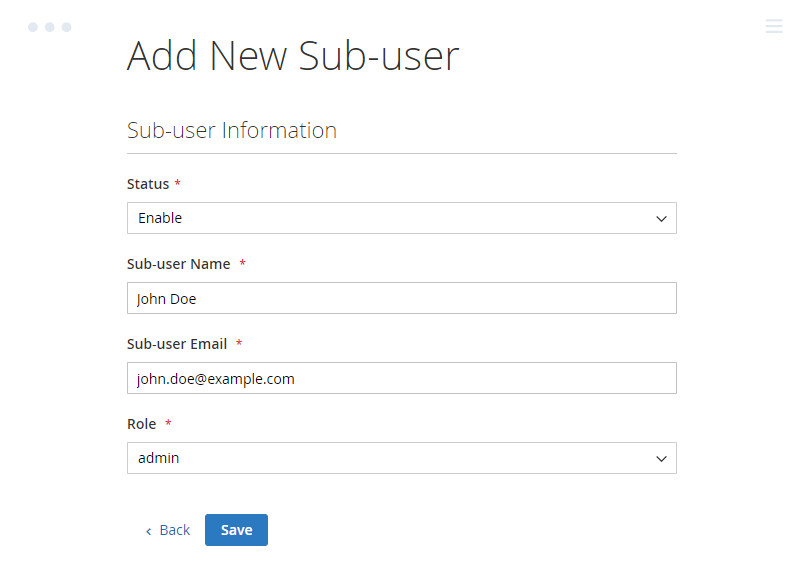
Choose to add New Sub-user and assign a built-in role to the sub-user.
- In Status: choose to Enable or Disable the sub-user
- In Sub-user Name: Input name of the user
- In Sub-user Email: input an email which is not added before.
- In Role: pick up an available role.
Remember to Save the settings.
An email will be sent to the sub-user.
2.3.5. Create a company account, roles and permissions, and sub-users in the backend
The admin can also create a company account, sub-users, and assign roles/permissions to the users.
CREATE A NEW COMPANY ACCOUNT
CREATE AND MANAGE ROLES
CREATE AND MANAGE SUB-USERS
2.4. Convert Existing Account to Sub User (Addon)
2.4.1. In the Backend
The add-on works very simply. For any existing customer that you (as the store admin) want to turn into a sub-user of a company account, you just need to go to Customer Grid and go to the detail page of that customer.
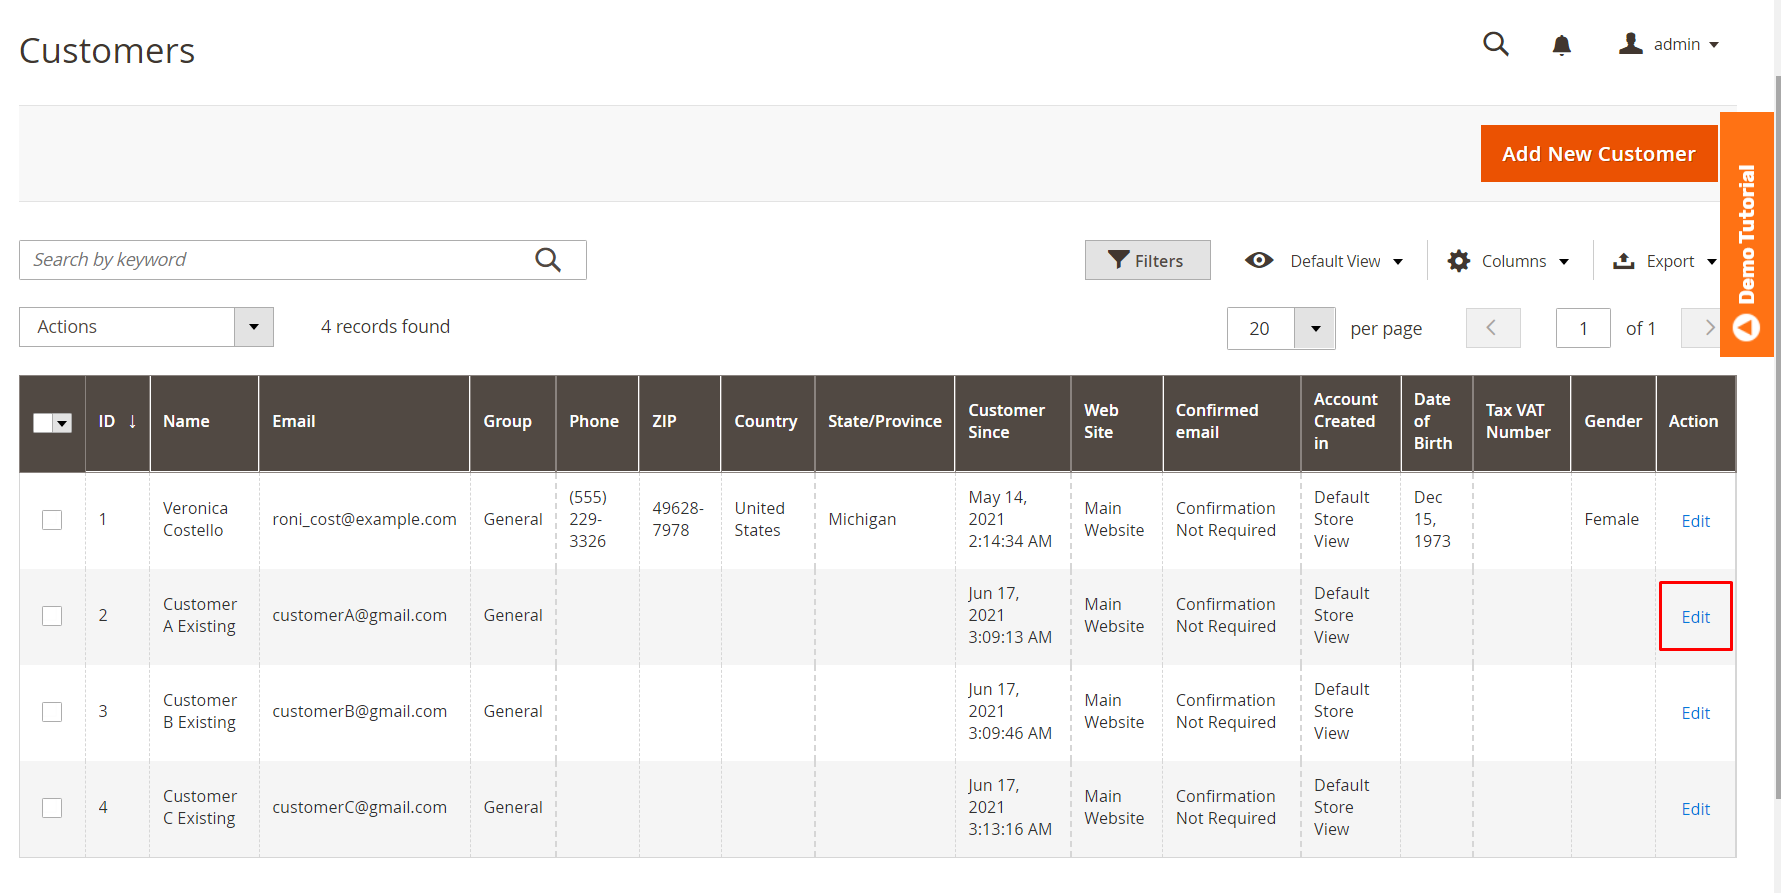
As long as this customer is not a company account, you will see a tab at the bottom of the Customer Information section called “Assign as Sub-user”.
In this tab, you will see a list of company accounts that you can assign this customer to be a sub-user of. Please choose the company first, then the equivalent roles will be automatically loaded for you to choose from.

After this customer has been assigned, you will see them in the list of sub-users of this company account.
2.4.2. In the Frontend
After the customer has been assigned as a sub-user, they will receive an email saying their account has been successfully transferred. All their former attribute information will be deleted but their orders will be kept.
Now when logging into their account, they will see the information of their company account and take some actions that their role allows them to.
2.5. Custom Pricing
Please go to Store ⇒ Configuration ⇒ BSSCommerce ⇒ Custom Pricing
2.5.1. General configs
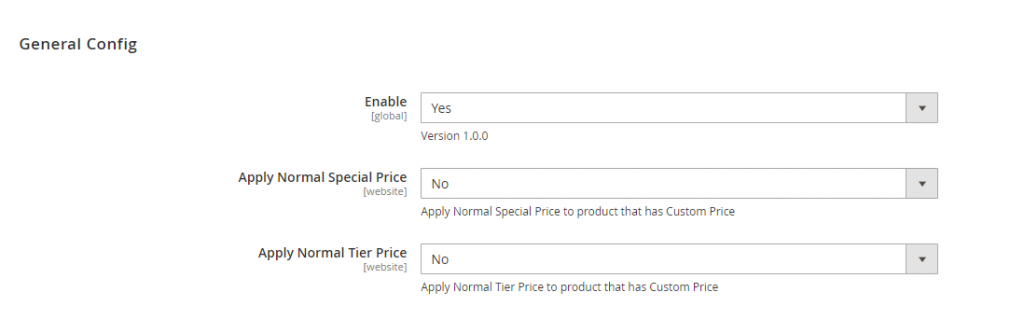
In Enable: choose Yes to enable Custom Pricing functions.
In Apply Normal Special Price: Choose how to display prices for products assigned both Special Price and Custom Price.
- Choose Yes to enable this configuration:
- If Special Price < Custom Price: the system will show Special Price in the frontend.
- If Special Price > Custom Price: the system will show Custom Price in the frontend.
- Choose No to disable this, the system will auto show Custom Price in the frontend.
In Apply Normal Tier Price: Choose how to display prices for products assigned both Tier Price and Custom Price.
- Choose Yes to enable this configuration:
- If Tier Price < Custom Price: the system will show Tier Price in the frontend.
- If Tier Price > Custom Price: the system will show Custom Price in the frontend.
- Choose No to disable this, the system will auto show Custom Price in the frontend.
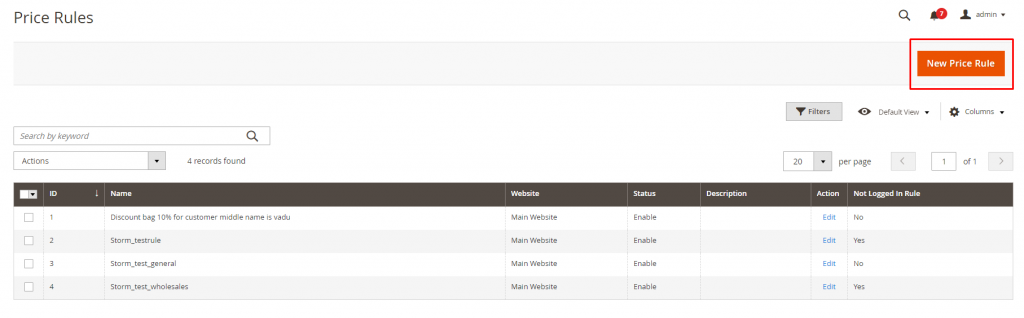
2.5.2. Price Rules (Setup Rules to Assign Custom Price to Product)
Go to Catalog ⇒ Price Rules
Add New Price Rule by clicking the New Price Rule button at the top right corner.
2.5.2.1. Setup general information
In the General Information section:
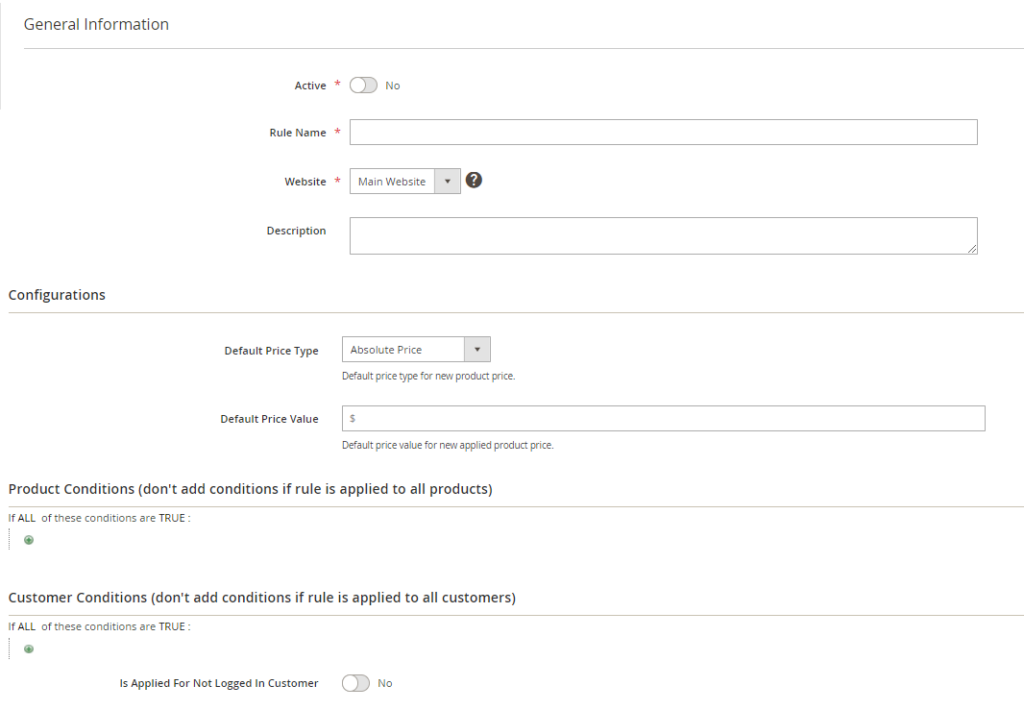
- Switch Active to Yes to use this rule on the frontend. Choose No to disable this rule.
- Rule Name: Type the name you want to set for the rule.
- Website: Choose the Scope of this rule.
- Description: Write a short description of this rule for better management.
In the Configurations section:
- Default Price Type: Select the type of custom price for the default price.
- Default Price Value: Type the value that you want to custom for the default price.
Note: 2 above fields define Expected Price when the product meets the rule.
- Select Product Conditions and Customer Conditions applied for this rule.
* Please note that if you leave all blank, the price rule will be applied for all products and all customers on the website.
If you want to use this rule for non-logged-in customers, please switch Is Applied For Not Logged In Customer to Yes.
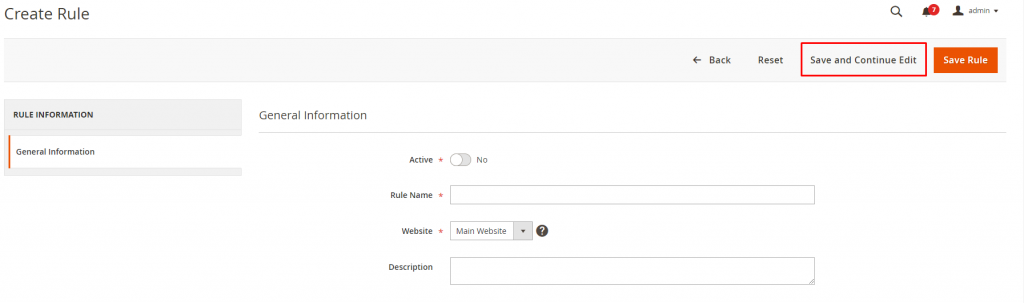
Click Save and Continue Edit. (This step is crucial, please don't forget it!)
2.5.2.2. Setup and assign custom price to products
In Product Price Tab
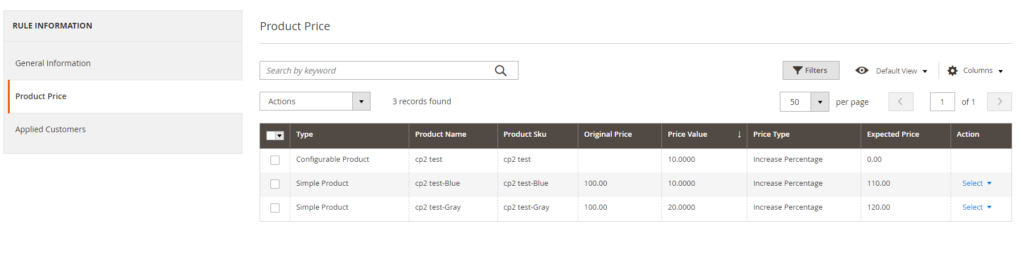
Besides applying default price rule in General Information, you can custom product price in 2 ways below and products will be applied by this new custom price rule instead of default price rule.
1. Set price for each product individually - You should use this when you have more custom prices for 1 product: Click Select (in Action column) and Edit.

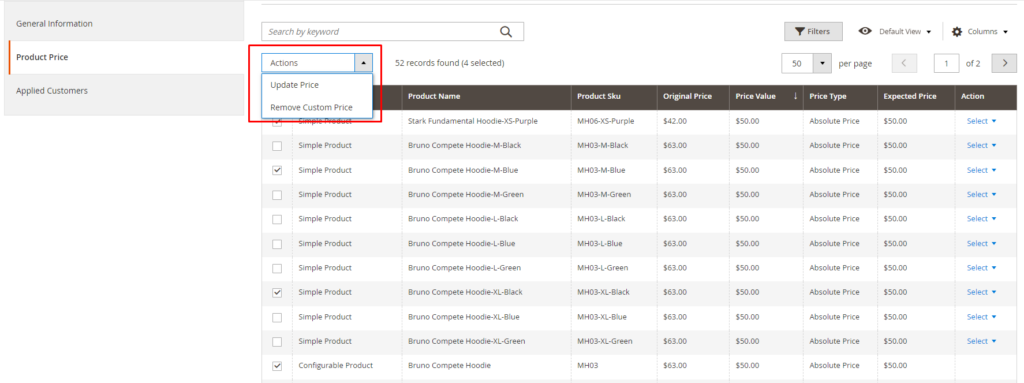
2. Set price for bulk products - You should use this when you want to apply only 1 absolute price or 1 discount rule for all products: Tick all products or specific items you want to set custom price ⇒ Click Action/Update Price.
In Edit Custom Price Tab

There are 5 options to set custom prices for customers based on your sales campaigns.
- Absolute Price: Set up a single price for all products. For example, you enter $20 for t-shirts, shirts, and shorts, all 3 items are priced at $20, regardless of the initial price of each product.
- Increase Fixed: Custom Price will equal to the original price plus the price entered in the box.
- Decrease Fixed: The Custom Price will equal to the original price minus the price in the box.
- Increase Percentage: Custom Price will equal to the original price plus % increase filled in the box.
- Decrease Percentage: Custom Price will equal to the original price minus % increase filled in the box.
*Note:
- New products added to the rule will be applied default price type and default price value
- Automatically update Expected Price in the rule when updating price of the product.
2.5.2.3. Review applied customers
In Applied Customer tab:

You can see all customers who are able to purchase with the custom prices in this price rule (based on Customer Conditions selected in the General Information tab).
Here, you have options to select which customers would be excluded from this price rule by using Edit inline.
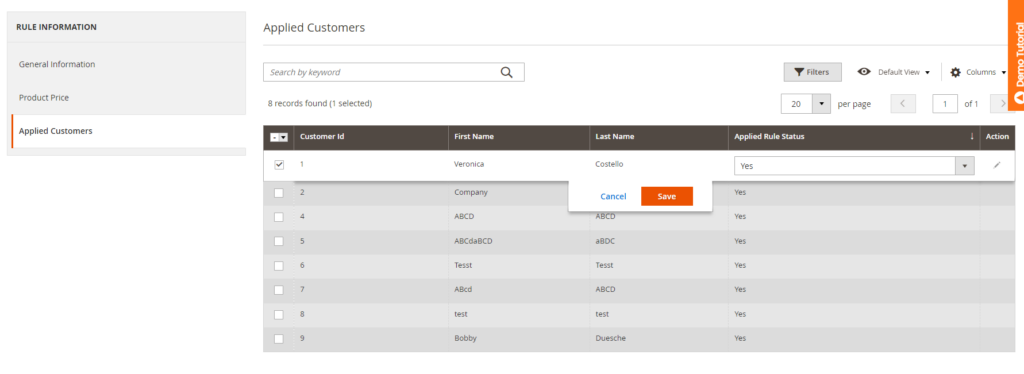
* Note: If Applied Rule Status is Yes, that customer is able to see the custom price.
Click Save button to save the price rule.
* Important: You need to reindex data and clear cache after each time you hit "Save" for any price rule.
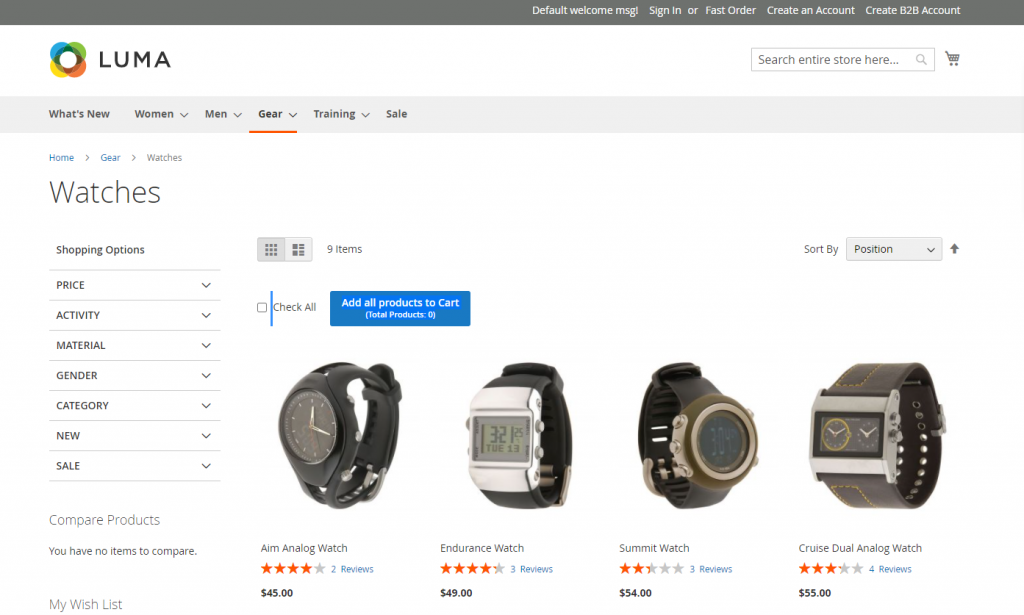
Finally, go to the frontend and check the result.
2.6. B2B Company Credit
2.6.1. General Configs
Please Go to Admin ⇒ Stores ⇒ Configuration ⇒ BSSCommerce ⇒ Company Credit.

In Enabled: Choose Yes to enable the extension.
* Note: You need to go to Admin ⇒ Stores ⇒ Configuration ⇒ Sales ⇒ Payment Methods ⇒ Purchase Order to enable the Purchase Order Payment Method.
In Email Config, choose the sender and templates.
2.6.2. Credit Limit Configuration
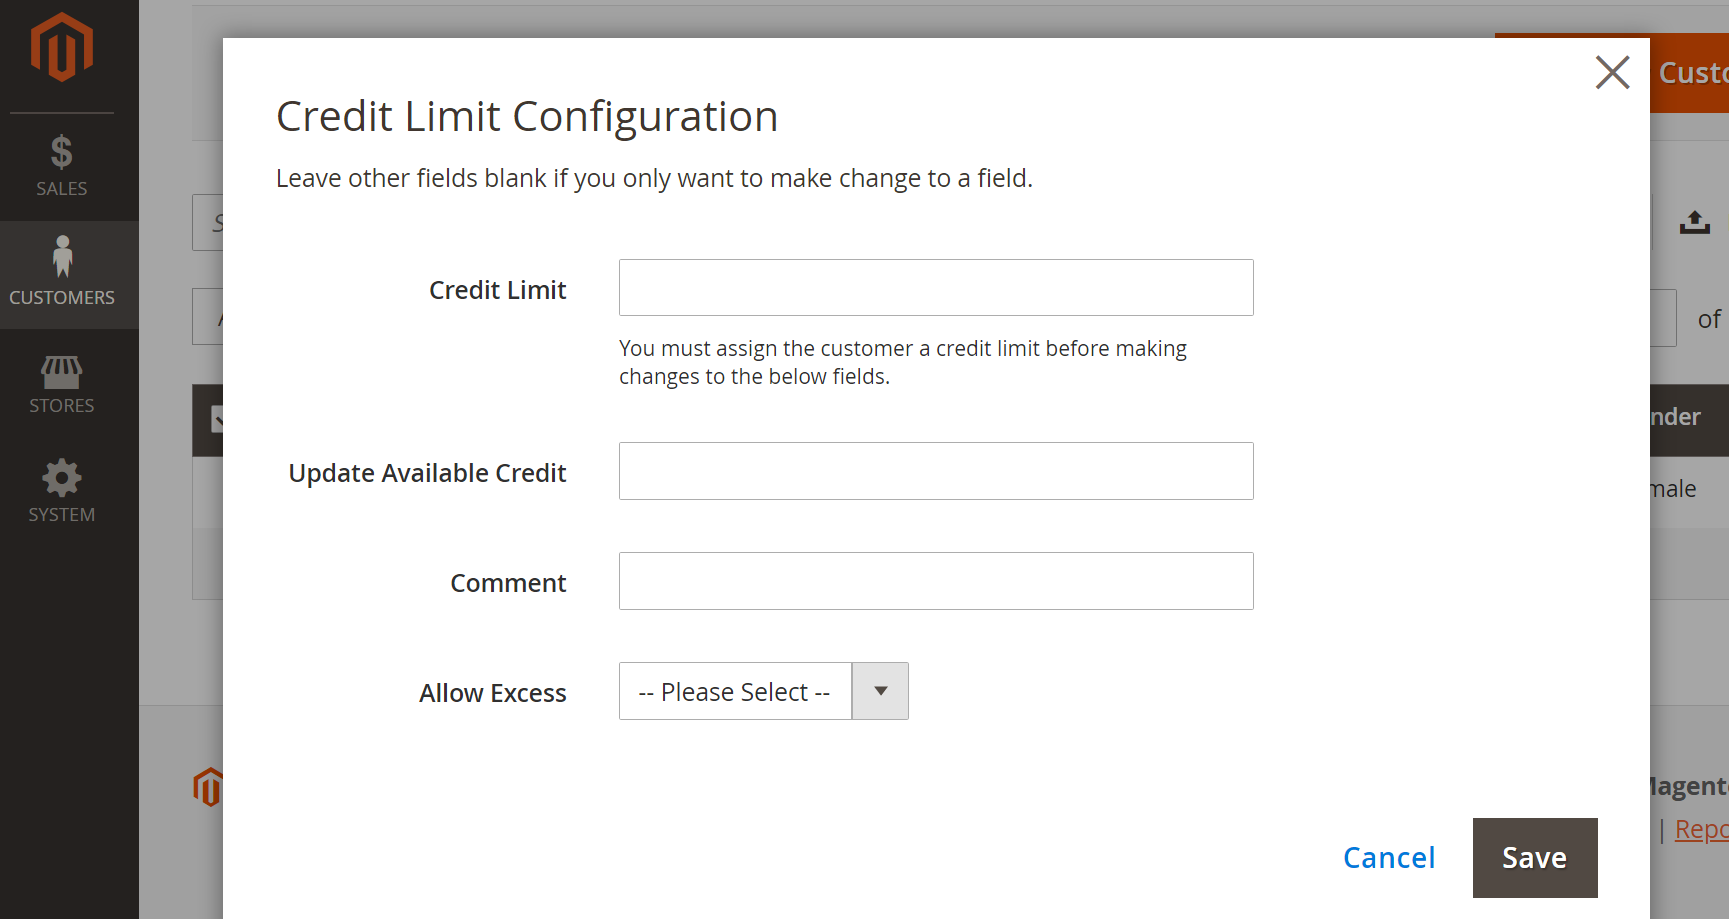
* Note: In the Comment section, you can add some notes for any update in the credit limit configuration, whether you change credit limit, update available credit, or enable/disable credit excess for the customer.
2.6.2.1. Assign A Credit Limit for Customers
To assign a credit limit for customers, you can either go to the Customer Detail Page or configure right on Customer Grid.
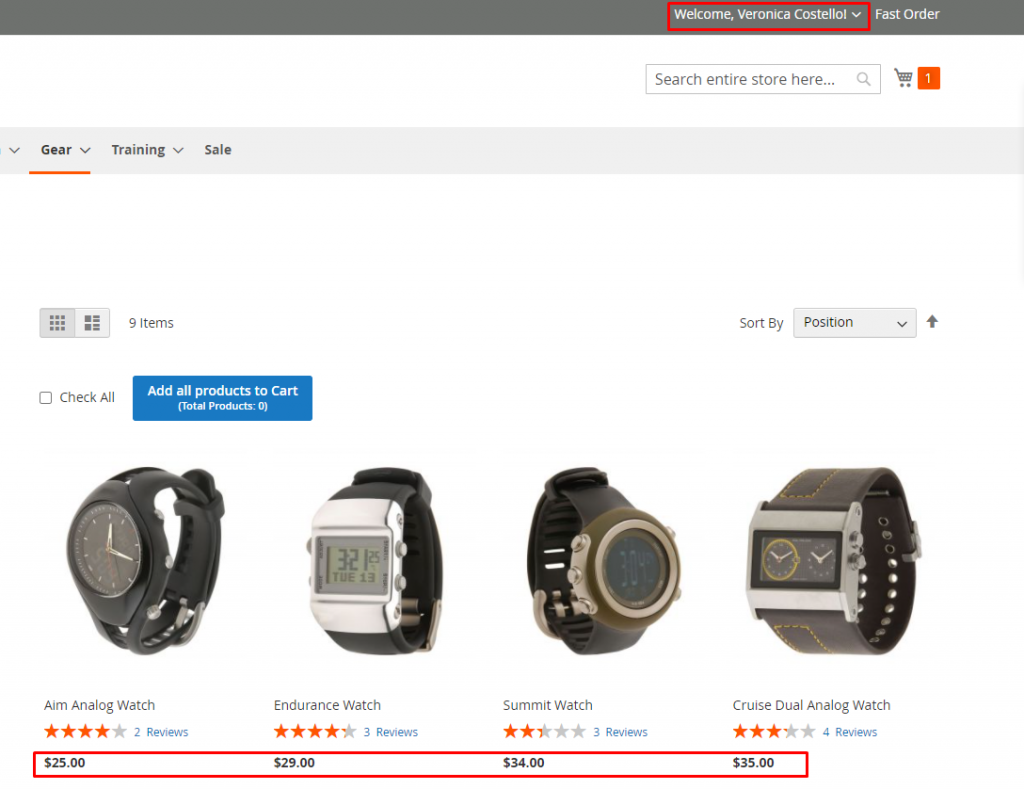
1st way - In Customer Detail Page: Choose tab “Company Credit”: You can assign a credit limit for the customer and choose to allow him/her to exceed the available credit or not. You also can set the payment due date for each customer here.
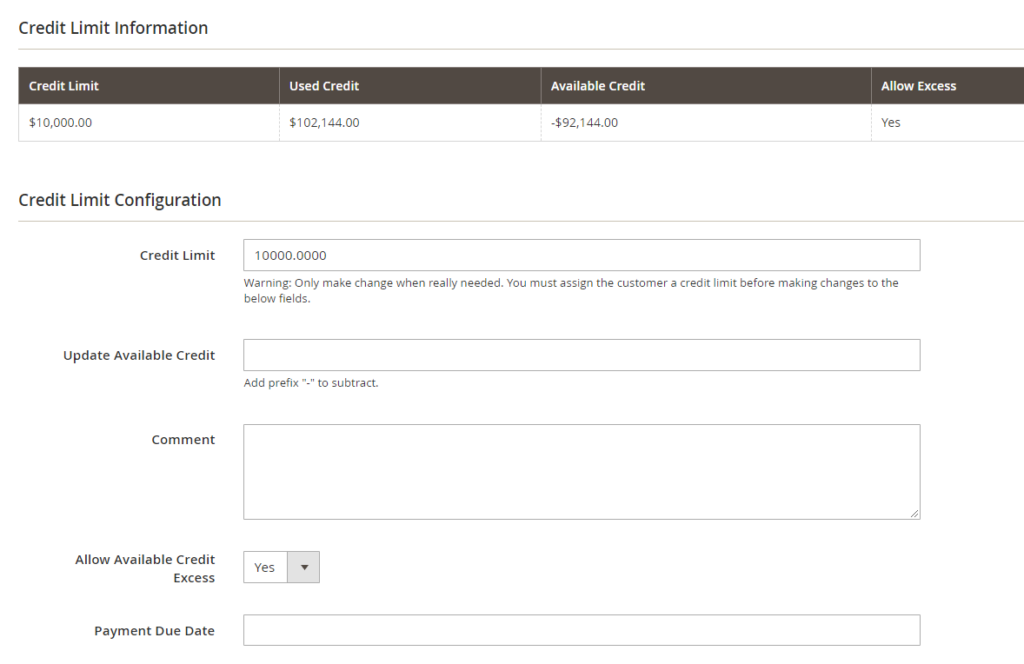
After you have set the values, hit “Save Customer”.
2nd way - In Customer Grid: Choose the customers that you wish to assign a unanimous credit limit:
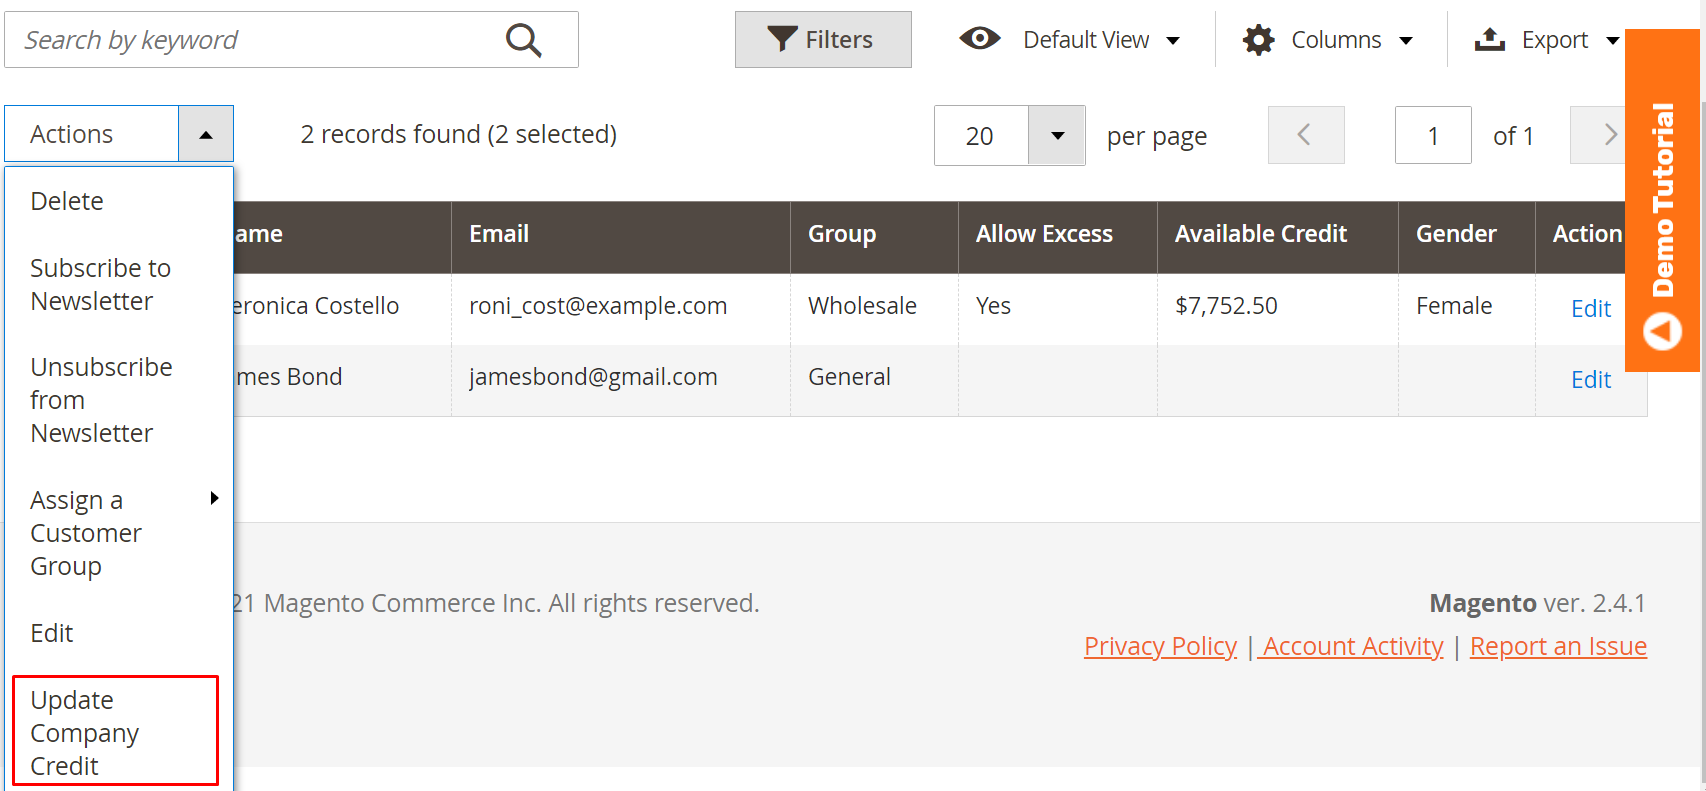
After clicking “Update Company Credit”, you can assign a credit limit and allow credit access just like in the first way:
2.6.2.2. Update Customers’ Available Credit
There is only one event that affects the customer’s available credit without the admin’s interference, that is when the customer places an order.
To update the customer’s available credit, that is, the credit left after the customer has placed order(s), you can enter a value in the “Update Available Credit” field, either in the Customer Detail Page (or you also enter in Update Credit column) or Customer Grid Action.
The value you entered will be added to the current available credit.
* Note:
- You cannot add an amount to the available credit that makes it greater than the credit limit.
- Please add the prefix “-” if you want to subtract the customer’s available credit.
2.6.2.3. Change Customer’s Credit Limit
Sometimes while working with customers, you may wish to increase or decrease their credit limit. To do so, you can directly enter a value in the credit limit field.
The updated credit limit will be the value you have just entered, not an added value to the former limit.
2.6.3. Configure Admin Actions to Company Credit
If you do not want all admin users to be able to view or change the company credit info of customers, then you can configure the setting in Role Resources.
- No tick on View or Save Company Credit:
- Admin users cannot see Allow Exceed & Available Credit info in the customer grid.
- Admin users cannot see the Company Credit tab on the customer detail page, therefore unable to update or create company credit.

- Only tick on View Company Credit:
- Admin users cannot save company credit on the customer detail page.
- Admin users receive the notification “Sorry, you need permissions to save company credit" when trying to change credit info.
- In Mass Actions, admin users still see the “Update Company Credit” option but will be redirected to the permission page when hitting “Save” credit.
- Tick on both View and Save Company Credit: Admin users can both see and edit company credit of customers that he/she has access to. \
If you have any questions about our solution kit, feel free to contact us.