
I. GeoIP Store Switcher Extension
Being an owner of a global Magento 2 store, you must know better than anyone the challenges of running a multiple store view ecommerce. GEOIP Store Switcher for Magento 2 will bring up user experiences in multi-store website to a whole new level. The extension helps detect user’s IP location and redirect them to the appropriate store view.
Please go to Stores ⇒ Configuration ⇒ BSSCOMMERCE and start the configuration.
Before enabling the extension, you should update the GEOIP database for both IPv4 and IPv6. Please choose one of the 3 options in each database update.
1.1. In Update Database GEOIP
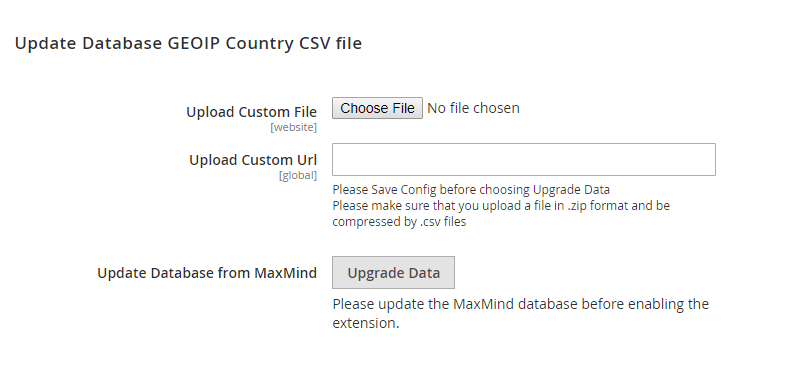
In Upload Custom File, you can upload a custom file (such as a paid database version from MaxMind) to be the database. However, in case the uploaded file is larger than the limit of the server, this option will be not available.
* Note: When you upload the file, you need to rename it and use the right format so that the file can be uploaded successfully and then the system runs cron. The file format must be the .zip file (This .zip file includes CSV files). After finishing uploading, choose Save Config then click Upgrade Data.
In Upload Custom URL, you can fill in the URL of the database file if you cannot upload it in the Custom File option (when the file is larger than the limit of the server). After completing, choose Save Config then click Upgrade Data.
In Update Database from MaxMind, please click in Upgrade Data to automatically download the Database from MaxMind or to use the uploaded file. After the file is extracted, a notification “Waiting for Cron run!” will be shown, and please wait for the database to be updated.
*Note: If Upload Custom File and Upload Custom URL are left blank, the module will use the Country Lite Database in MaxMind page. Hence, not all IP countries are available in this database.
On the other hand, the extension also uses another tool named IPinfo to identify the IP country in case it cannot be found in the database.
In the following configuration, please go to Stores ⇒ Configuration ⇒ BSSCOMMERCE GEOIP Switch Store
1.2.GeoIP Switch Store
1.2.1. IN GENERAL
In Enable: Choose Yes to enable the module and please note that you need to Upgrade Data before using this extension.
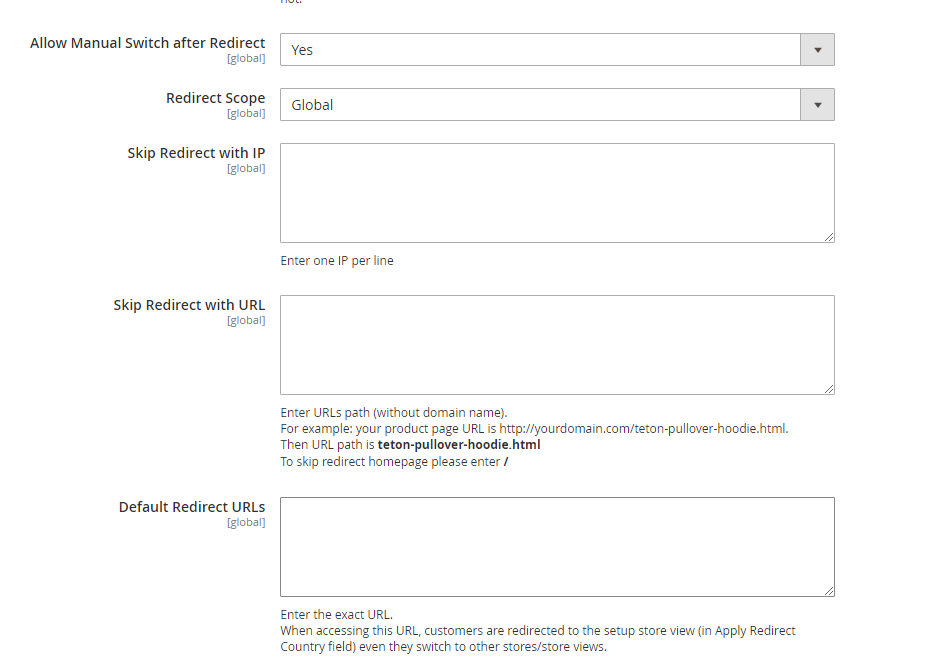
In Allow Manual Switch after Redirect: Choose Yes to allow customers to switch store view after being redirected, otherwise choose No.
In Redirect Scope: There are 3 options: Global, Website, and Store. To explain how to configure this correctly, we will use the following website hierarchy as an example.
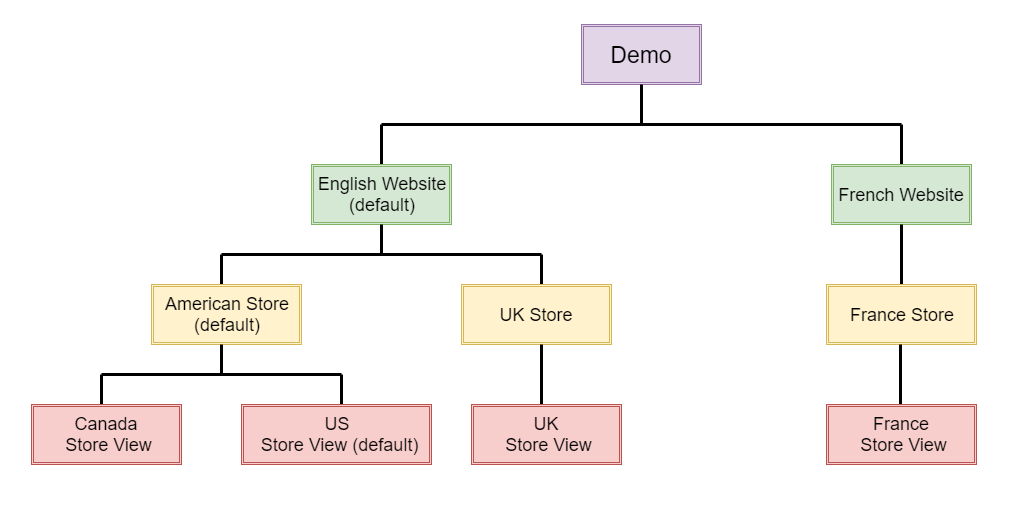
+ If you choose Store as Redirect Scope, the visitors will be redirected within the store views under the same store. For example, Canada customers will always be redirected to Canada Store View when they go to the American Store. If they go to the rest 2 stores (French, UK), they will not be redirected.
+ It’s similar for Website as Redirect Scope. Visitors will be redirected when they access any of your store views under the same website. For example, Canada customers will always be redirected to Canada store view when they go to any of the store views and store under the English website. If they go to the French website, they will not be redirected.
+ For Global Scope, visitors will be redirected when they enter any store views. For example, Canada customers will always be redirected to Canada store view in any case.

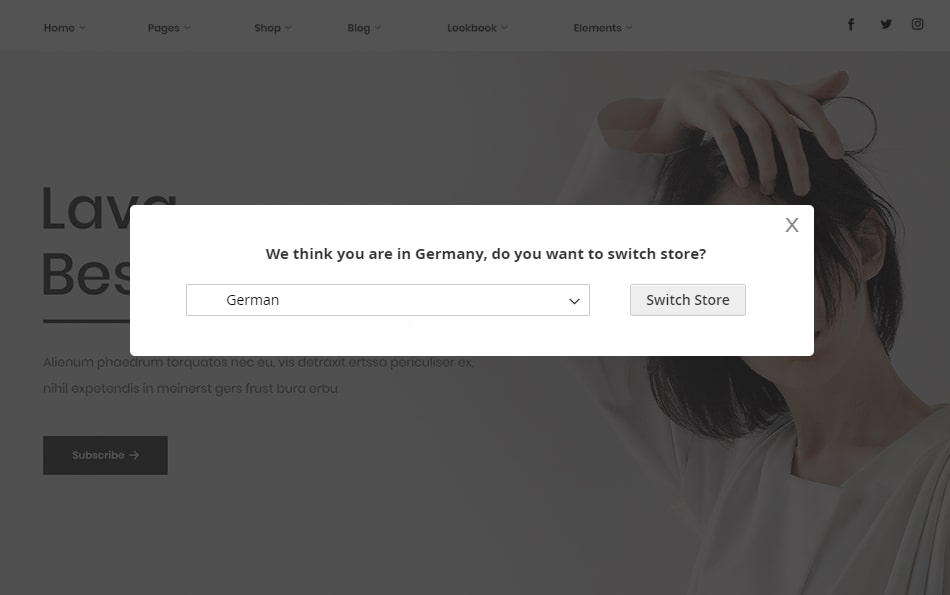
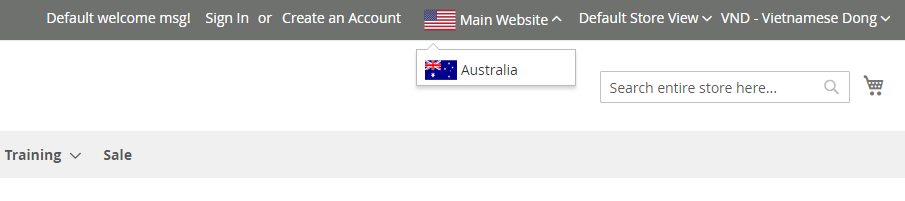
In Enable Popup: Choose Yes to enable this function; otherwise, choose No.
When you select Yes, this Popup appears for customers to switch store view as wanted with the first choice is the current IP of the visitor:
*Note: The Popup configuration needs to work well with settings in the Redirect Scope sections:
+ If you select Redirect Scope as Store, a popup is shown when users access a store view under the same store with the intended store view. For example, Canada customers can receive a popup when they come to the US store view. (The intended store view is Canada store view).
+ If you select Redirect Scope as Website, a popup is shown when users access a store view under the same website with the intended store view. For example, Canada customers can receive a popup when they come to the UK store view.
+If you select Redirect Scope as Global, a popup is shown when users access to any store views under the global installation. (It is not the intended store view, of course).
Furthermore, you need to navigate to each store view in the website and make more configurations for this option. When you change the scope, you can also see 2 settings for the popup which ask customers whether they want to switch store view or not (as we mentioned above). You need to configure these 2 sections according to each store view.
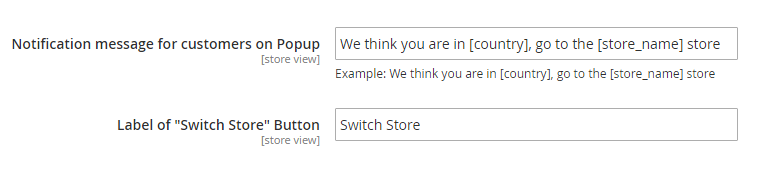
+ Notification message for customers on popup: enter a message to notify customers on the popup.
+ Label of "Switch store" button: enter a wanted label for the "Switch Store" button for customers to click.
In Skip Redirect with IP: Enter one IP per line to set the IPs to be excepted from redirection. Visitors from these IPs are not redirected to setup store views.
In Skip Redirect with URL: Enter one URL path per line to set the URL to be excepted from redirection. When visitors access these URLs, they will stay in the default store view.
+ For homepage: enter /
+ This function works with store view URL under the format: _store=us, for instance.
In Default Redirect URLs: This is an additional configuration you need to set up in case you select Yes in the above Allow Manual Switch after Redirect field. It means if customers go to this default redirect URL, they are always redirected to the setup store view (in Apply Redirect Country field), even when they switch to other stores/ store views.
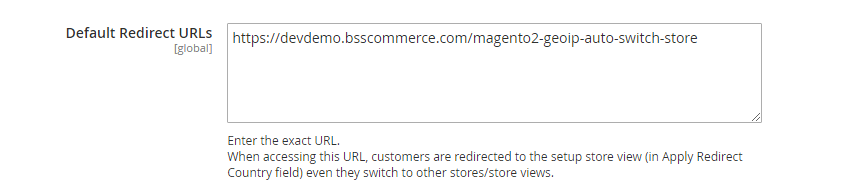
For example: Admin enter a default redirect URL as https://domain.com
+ Set up country code as Singapore. Customers from Singapore are redirected to Singapore store view: https://domain.com/sg.
+ When customers go to the https://domain.com from Singapore, they are redirected to https://domain.com/sg. Then, they switch to the US store view https://domain.com/us. However, when they access to https://domain.com again, they are still redirected to https://domain.com/sg. (In case admin choose store view scope as Singapore and set Apply Redirect Country as Singapore - this configuration is explained later).
+ If you leave it blank (no default redirect URL), customers from Singapore, in this case, stay on https://domain.com/us when they visit https://domain.com because the system only redirects them once.
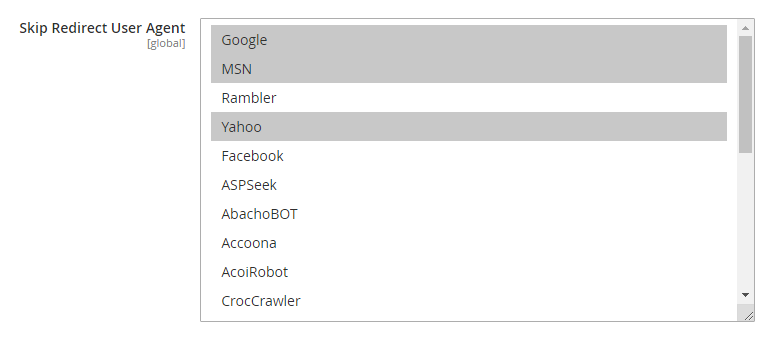
In Skip Redirect User Agent: Select user agents to prevent them from being redirected when crawling to your site. Please note that bots are not redirected if your website does not have the URL with store code.
*Note: If you select Agent as Google, you need to resubmit Google Ads to be approved again.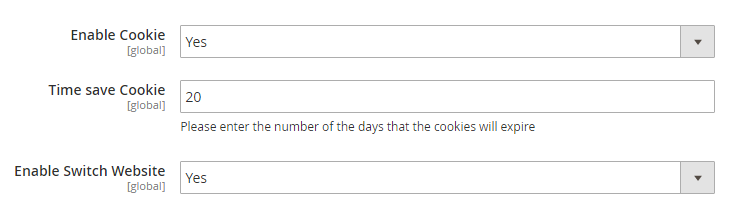
In Enable Cookie: Choose Yes to enable saving cookies about GEOIP data, otherwise choose No. In case the cookies are enabled, the data about GEOIP will be saved. When visitors go to your site, the GEOIP data will be taken from the previous visit.
In Time Save Cookies: Enter the time duration for the cookies to be saved. Please note that you mustn't enter a number exceeding 300 years (equal to 109,500 days); otherwise, you will face with an error.
*Note: The popup asking customers to switch store view also disappears when this cookie saving time terminates.
In Enable Switch Website: choose Yes to show a dropdown list of websites to switch conveniently.
For example:
*Note: For flags to describe websites, you need to add flags to this folder: /Bss/SwitchWebsite/view/frontend/web/images/flags.
Image should be named under the format as flag_<store_view_code>.png
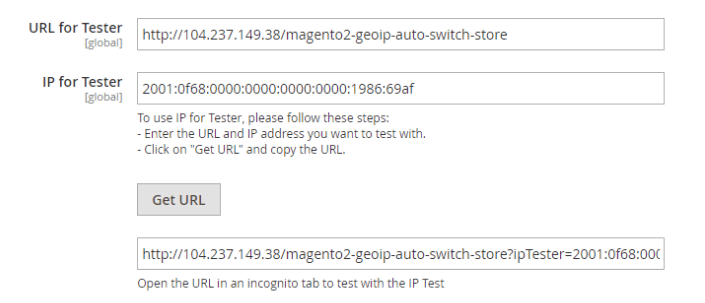
For testing purposes, we come up with URL for Tester and IP for Tester as follow:
- Enter the URL in URL for Tester and IP address in IP for Tester.
Note:
- If you cannot use IP or Fake IP, it is possible to enter URL or IP of any country and check the module.
- Our Magento 2 GEOIP Store Switcher extension works well with both Ipv4 and Ipv6 address.
- The IP for Tester feature will redirect users to store view assigned by the IP entered.
- Hit Get URL button.
- Copy the URL. Open an incognito tab to check whether you are redirected to the right store view.
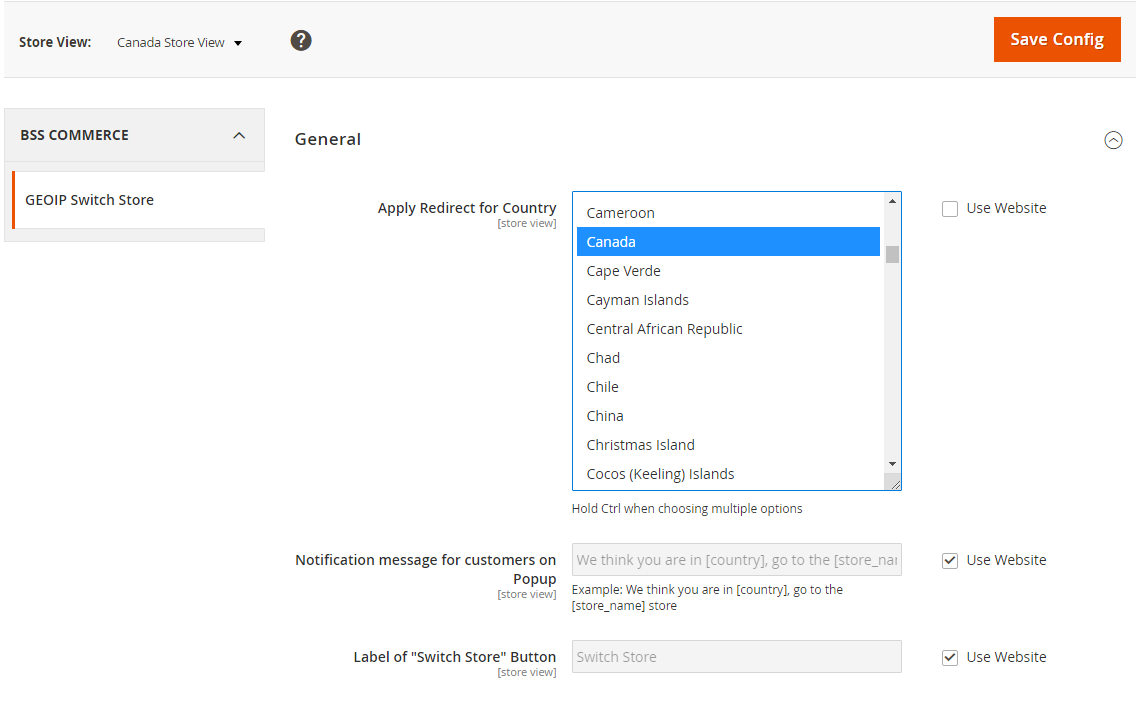
1.2.2. IN APPLY REDIRECT FOR COUNTRY
Please change the scope to Store View of the website and start configuration. You can select one or multiple countries so that customers coming from these chosen countries will be redirected to each corresponding store view. For countries that are not assigned to any store view, visitors from those will be redirected to the default store view. In case one country is assigned to 2 store views, customers are redirected to the store view with lower ID.
For example: If you want customers from Canada to be redirected to Canada store view, you need to change the scope to Canada store view and select Canada as Apply Redirect for Country.
1.2.3. IN GEOIP BLOCK
This feature allows admins to block specific IPs and countries from access to your site. The blocked IPs and countries will be redirected to an assigned URL only.
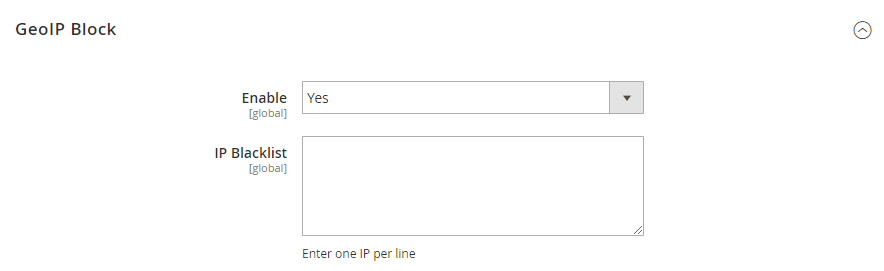
In Enable: Choose Yes to enable GEOIP Block, otherwise choose No.
In IP Blacklist: Enter one IP per line to set the IPs to be blocked. Then, visitors from these IPs cannot access your site. When trying to do so, they will only be redirected to an URL you set below.
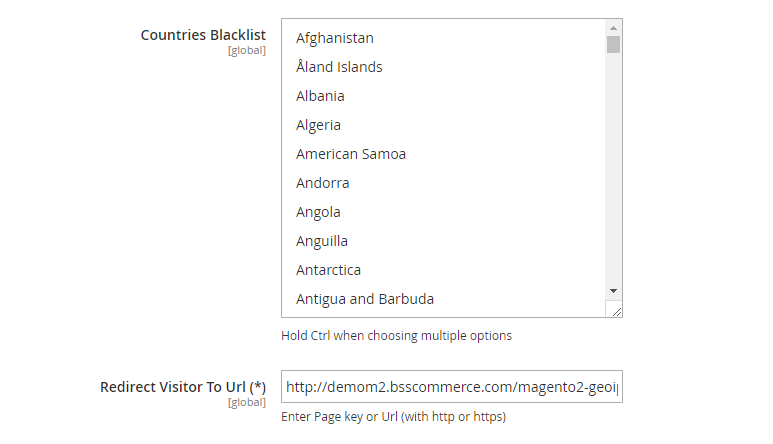
In Countries Blacklist: Select countries to be blocked from your site. Then, visitors from these countries cannot access your site. When trying to do so, they will only be redirected to an URL you set below.
In Redirect Visitor to URL: Enter URL including http:// or https:// to redirect blocked users to a page. If you want to redirect blocked visitors to a CMS page, please enter URL key of the page. If you leave this option blank, visitors will be redirected to Homepage.
1.2.4. VARNISH CONFIGURATION
This is the configuration to make GEOIP work with Varnish Cache.
You can read more about how to configure Magento to use Varnish HERE.
*Note: before you exporting VCL for Varnish 3 and 4, you need to save all configs.
After exporting the Varnish Configuration file, you need to modify it as below:
- At sub vcl_rev , find the following code snippet:
# collect all cookies
std.collect(req.http.Cookie);
Then under the found code, insert this code:
if (req.http.Cookie !~ "country_code" && req.url !~ "^/(pub/)?(media|static)/.*\.(ico|css|js|jpg|jpeg|png|gif|tiff|bmp|mp3|ogg|svg|swf|woff|woff2|eot|ttf|otf)$") {
return (pass);
}
⇒ Result:
# collect all cookies
std.collect(req.http.Cookie);
if (req.http.Cookie !~ "country_code" && req.url !~ "^/(pub/)?(media|static)/.*\.(ico|css|js|jpg|jpeg|png|gif|tiff|bmp|mp3|ogg|svg|swf|woff|woff2|eot|ttf|otf)$") {
return (pass);
}
- At sub vcl_hash, find the following code:
if (req.http.cookie ~ "X-Magento-Vary=") {
hash_data(regsub(req.http.cookie, "^.*?X-Magento-Vary=([^;]+);*.*$", "\1"));
}
Then under the found code, insert this code:
if (req.http.cookie ~ "country_code=") {
hash_data(regsub(req.http.Cookie, "^.*?country_code=([^;]*);*.*$", "\1"));
}
1.3. GeoIP Switch Currency (from v1.1.8)
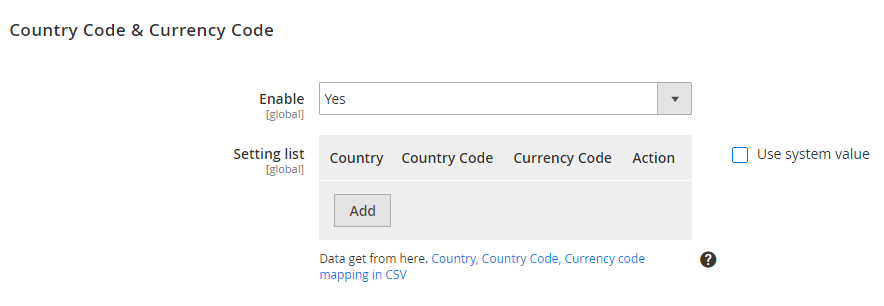
In Enable: Choose Yes to enable this function. It only works when you select No for Enable Popup settings (in 2.2.1 part).
If you choose No, currency works as default.
In Setting list: click Add and then enter the information of country, country code, and currency code.
For example:
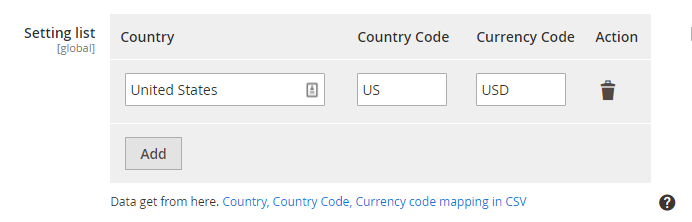
It means that US visitors accessing the website are redirected to US store view and Display currency is also switched to USD if USD is included in Allowed Currency of the US store view.
II. Multiple Store View Pricing
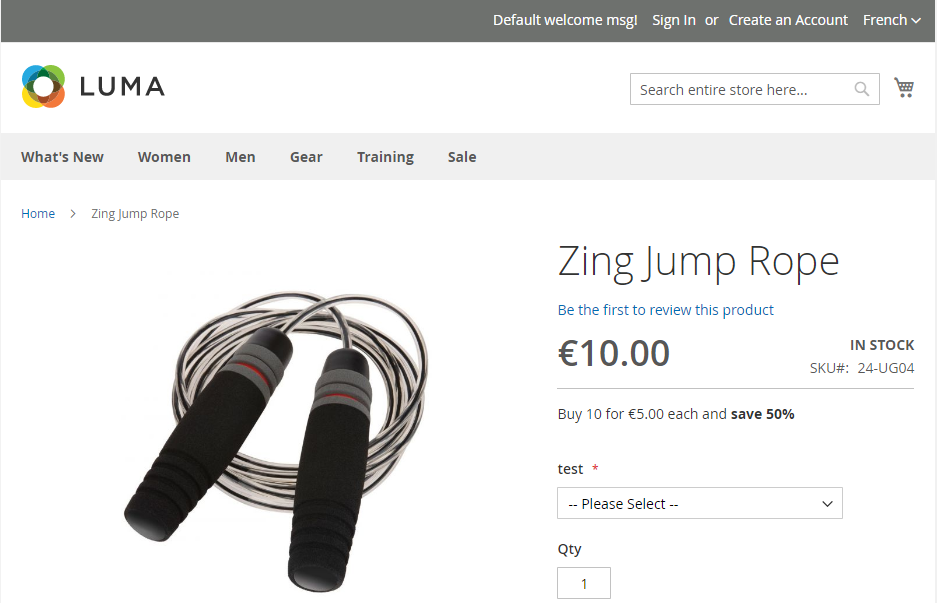
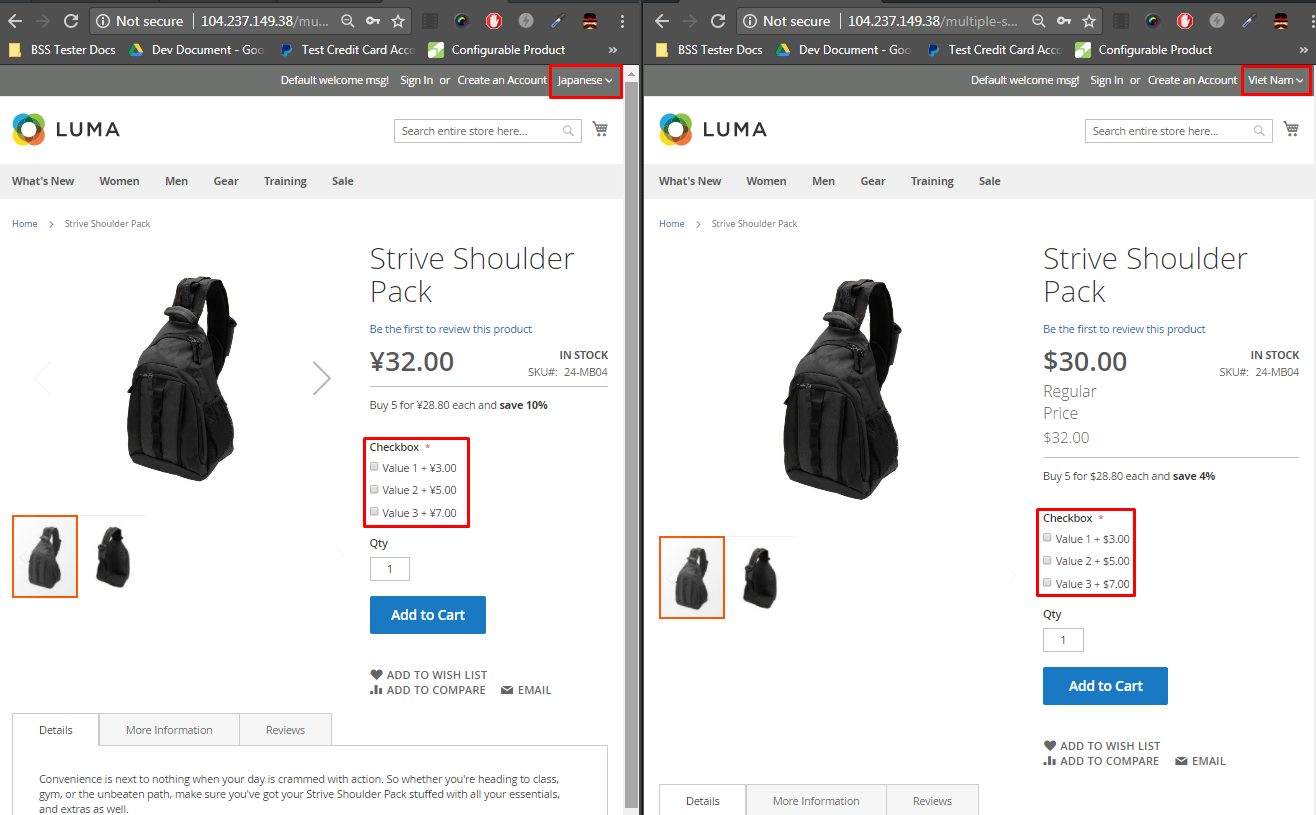
Multiple Store View Pricing for Magento 2 extension helps store owners to set up different prices for the same product in various store views of a store while Magento 2 default does not support this function. For example, you want to sell a table at £50 in English store view but in the French store view, the price you want customers to pay is €80. Therefore, it totally depends on the demands of store owners as well as business strategies for each local target customers.
Moreover, this module also allows administrators to set up base currency for each store view so that customers can easily checkout with the currency of store view. It can be said that this is really another very outstanding feature of Multiple Store View Pricing for Magento 2 to make more convenient for both customers and store owners.
*Note: This user guide is applied to Magento 2 Multiple Store View v2.1.4 and above. If you want to read user guides of other versions, please contact us!
=> WATCH USER GUIDE TUTORIAL VIDEO!
1. Enable the extension
Please go to Stores ⇒ Configuration ⇒ Catalog.
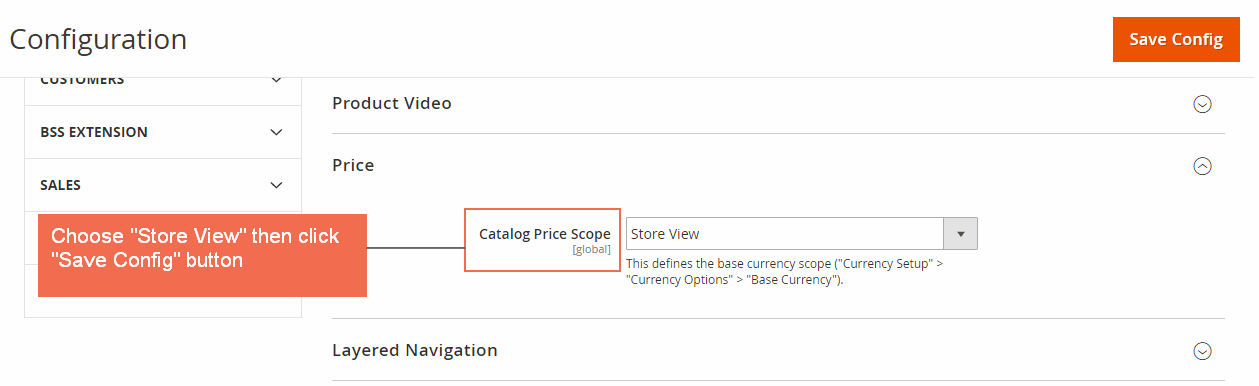
In Catalog Price Scope, there are 3 options for admin to choose: Global, Website and Store View. You choose Store View to enable the module.
Then you click Save Config and begin to customize prices of products in each store view of each store.
*Note: After saving config, you need to do the following things:
+ Reindex catalog price by running php bin/magento indexer:reindex catalog_product_price so that prices can be reindexed according to each store.
+ Reindex catalog price rules.
In addition, you go to BSSCommerce ⇒ Multiple Store View Pricing in Configuration also to select how to set up tier prices.
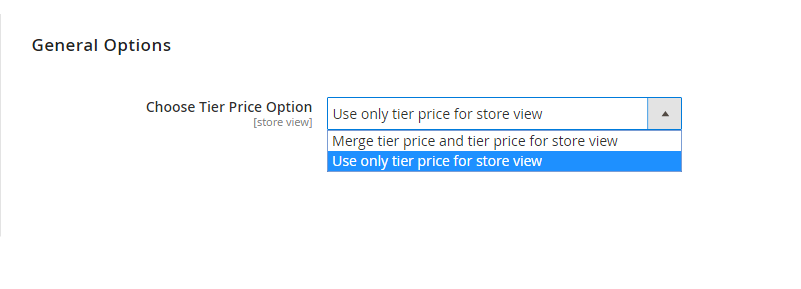
There are 2 options for using tier prices:
- Merge Tier Price and Tier Price for Store View: It means that the product will take tier price set up for both website and store view.
- Use Only Tier Price for Store view: The product only takes tier prices set up for store view.
→ In this case, we select "Use only tier price for store view".
(This configuration is explained in details section 3 at the end of User Guide. Please take a look for better understanding).
2. Set up base currency for each store view
2.1 Set up base currency for English store view
In Configuration, you go to General ⇒ Currency Setup to set up base currency for English store view.
- Choose English store view from Store View Section.
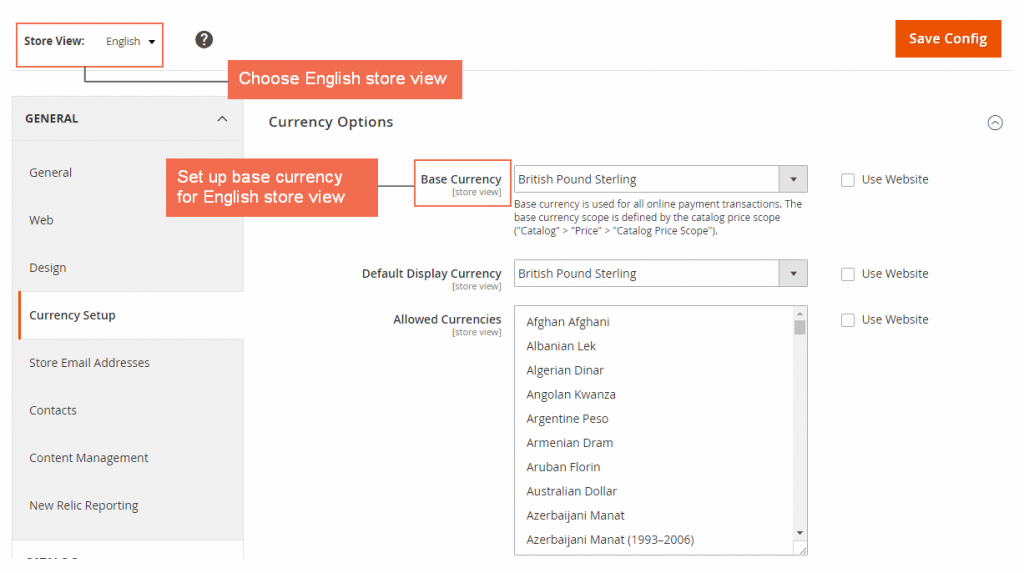
- In Base Currency: Choose British Pound Sterling as base currency and customers will use this one to checkout.
- In Default Display Currency: you can choose British Pound Sterling or any other currency because this one is only displayed in the product or category page, not used in the checkout.
- In Allowed Currencies: Choose British Pound Sterling.
Then, click to Save config button.
2.2. Set up base currency for French store view
In Configuration, you go to General ⇒ Currency Setup to set up base currency for French store view.
- Choose French store view from Store View Section.
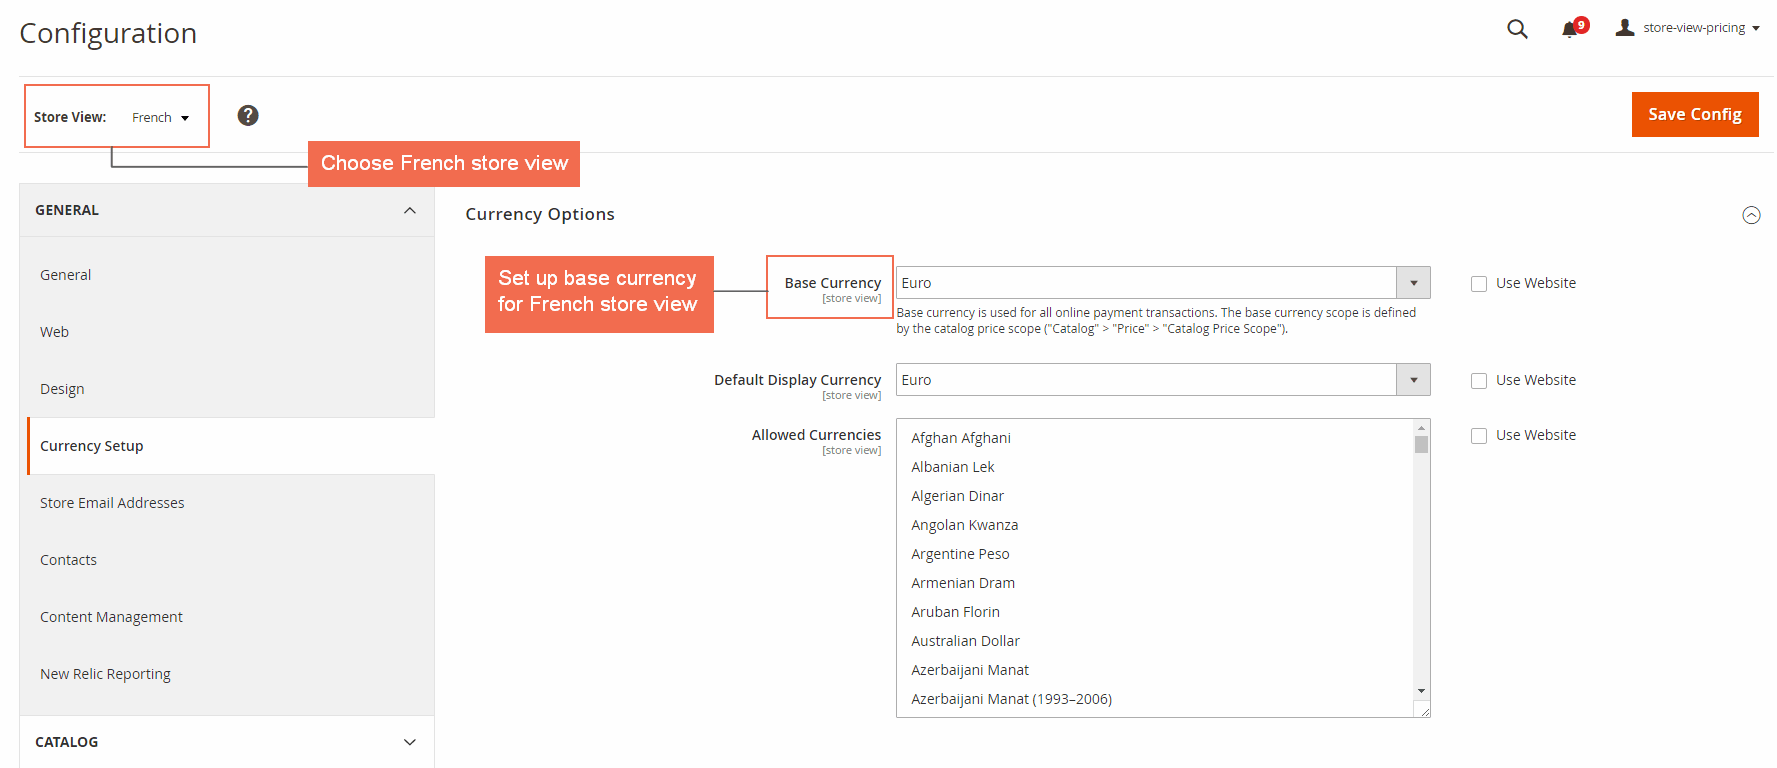
- In Base Currency: Choose Euro as base currency and customers will use this one to checkout.
- In Default Display Currency: you can choose Euro or any other currency because this one is only displayed in the product or category page, not used in the checkout.
- In Allowed Currencies: Choose Euro.
Then, click to Save config button.
3. Set up different prices for the same product per store view
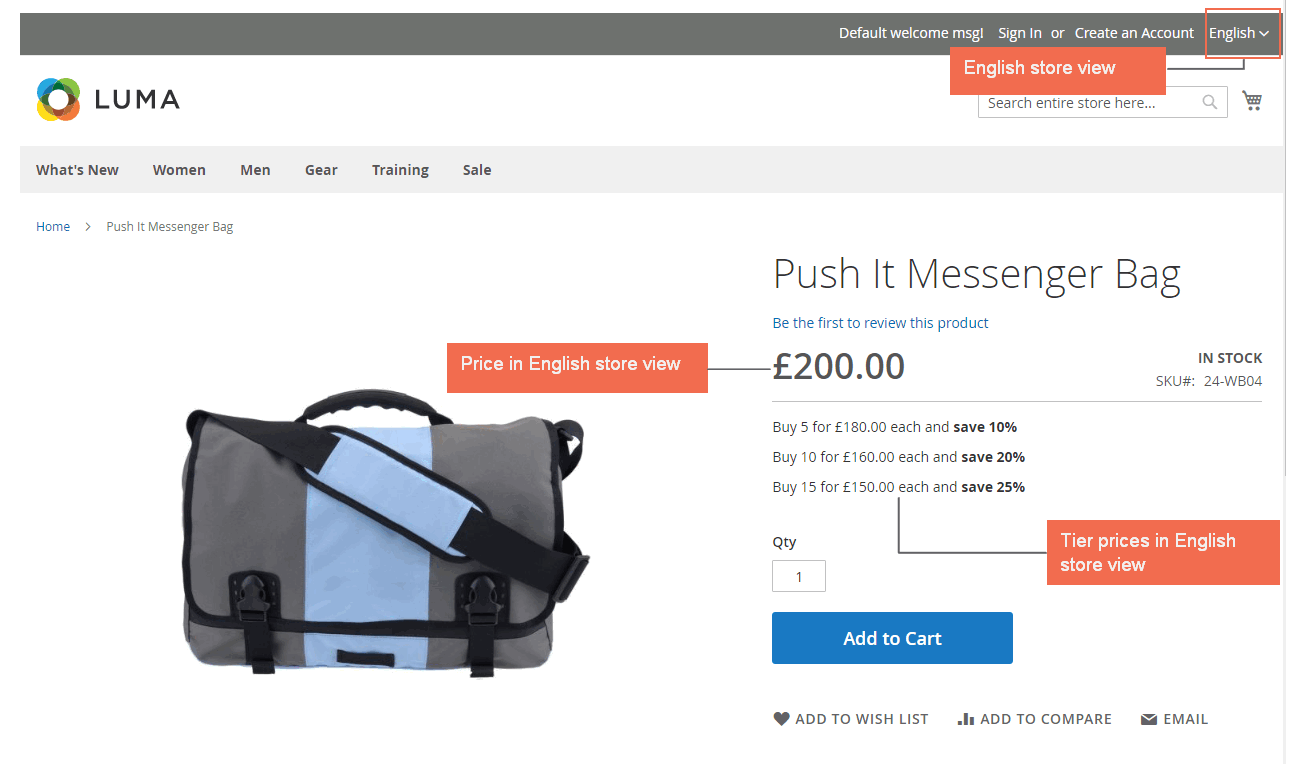
3.1. Set up product price in English store view

Step 1: Choose English in Store View box.
Step 2: In Price section, you unmark “Use Default Value” and add your wanted price for the product in this English store view: £100, for instance.
Step 3: You can also set up Special Prices and Tier Prices for this product by clicking Advanced Pricing.
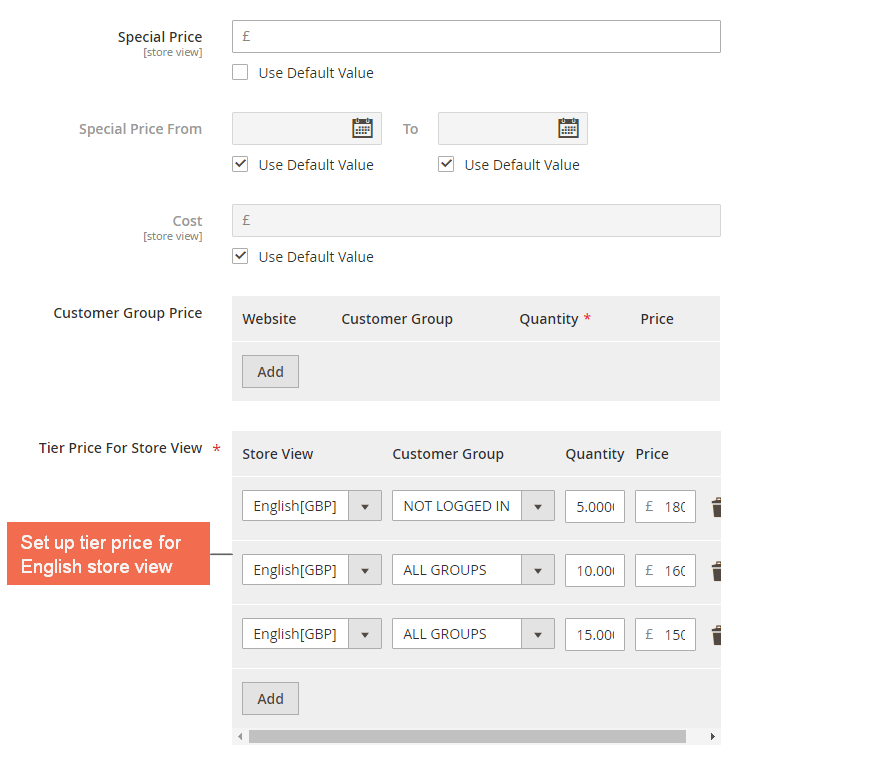
Step 4: You save configuration and see changes in the frontend.
- Price of Put It Messeger Bag in the English store view:
3.2. Set up product price in French store view
Step 1: Choose French in Store View box.
Step 2: In Price section, you unmark “Use Default Value” and add your wanted price for the product in this French store view: €200, for instance.
Step 3: Set up Special prices and Tier prices for product in French store view.
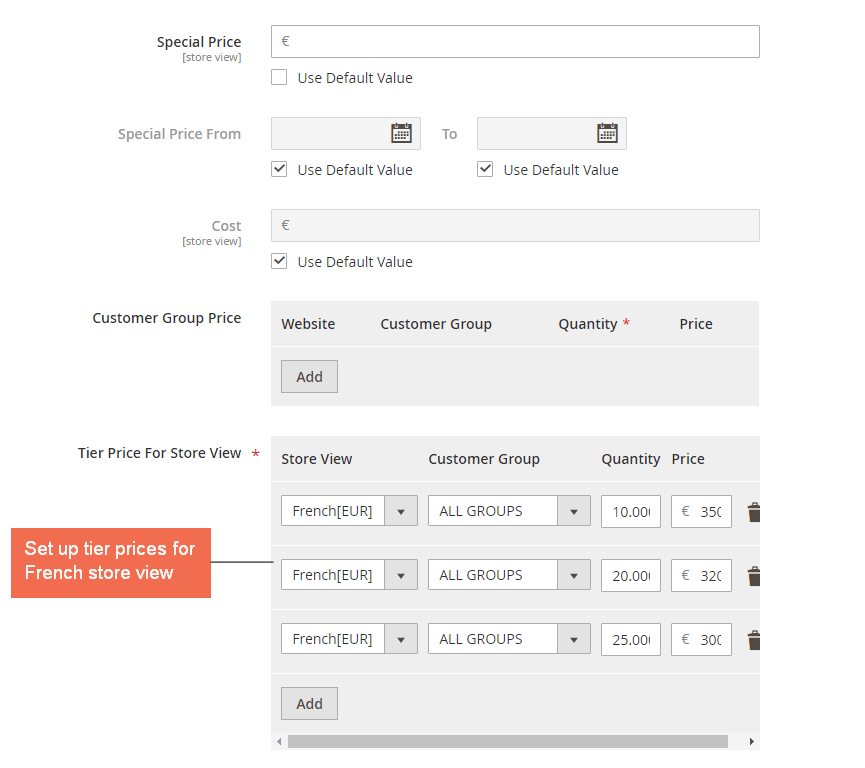
Step 4: You save configuration and go to the frontend to see the changes:
- Price of Put It Messenger Bag in the French store view:
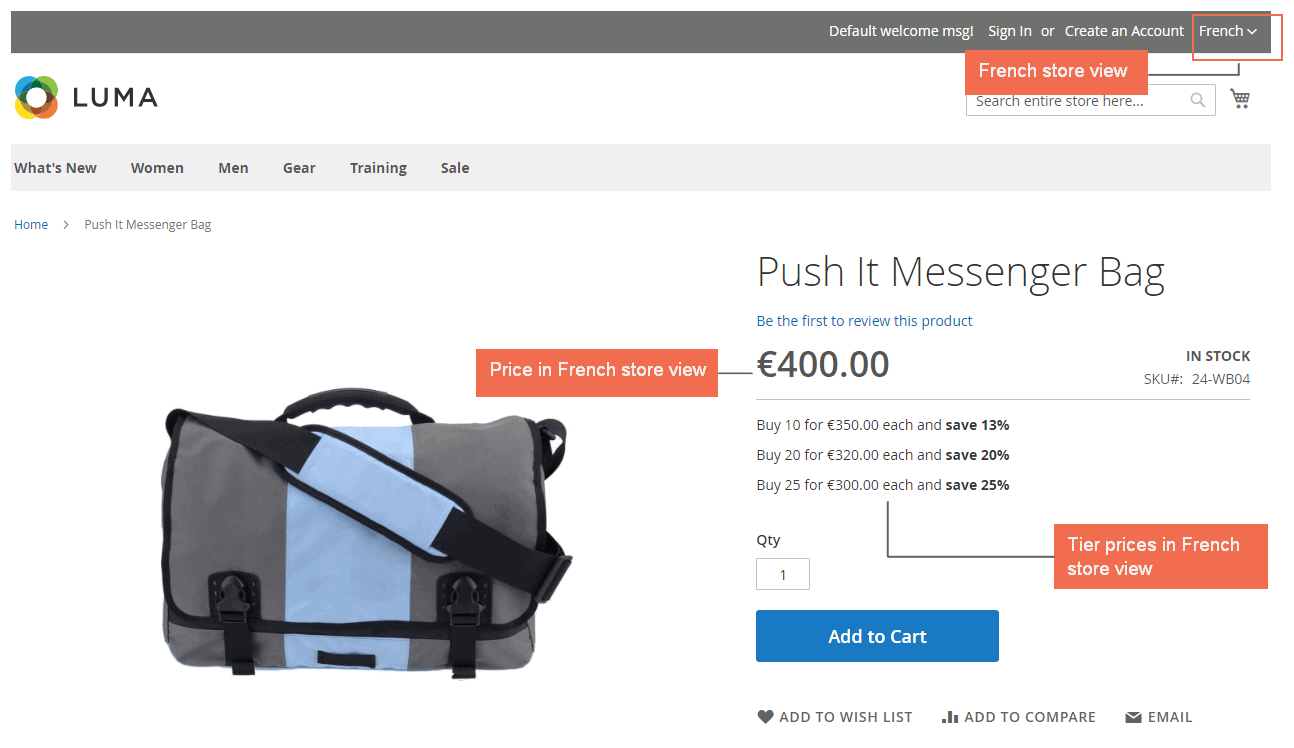
As a result, you can successfully set up different prices for a product in two store views.
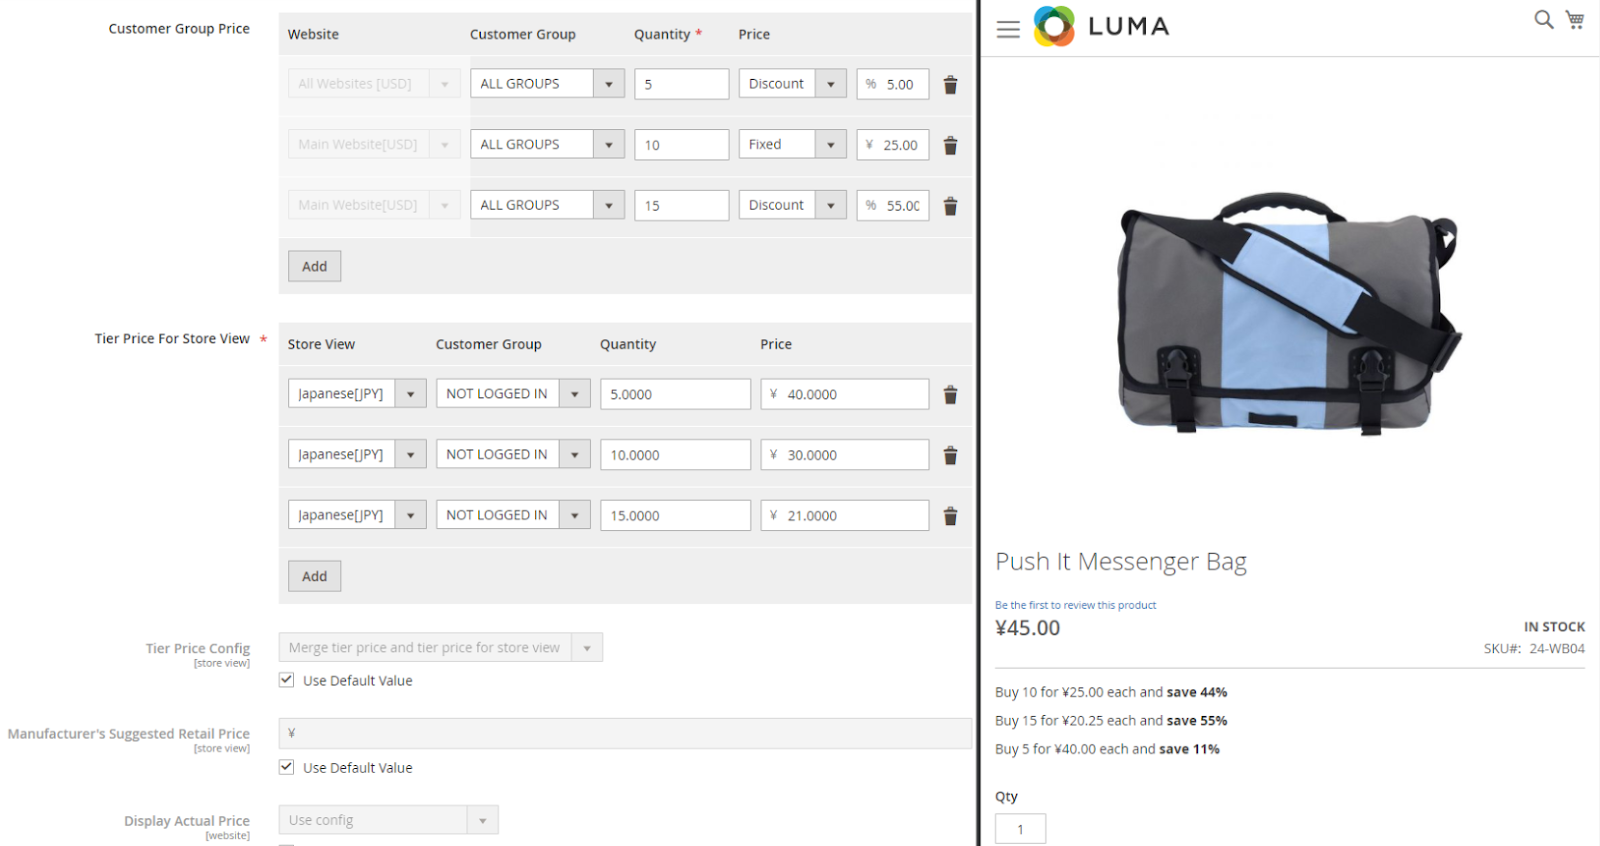
4. Explanation about Tier Price Config
When you edit tier prices for product in each store view, there are 2 options for you to choose in Tier Price Config and it determines how tier prices are displayed in the frontend.
- Merge Tier Price and Tier Price for Store View: It means that the product will take tier price set up for both website and store view.
- Use Only Tier Price for Storeview: The product only takes tier prices set up for store view.
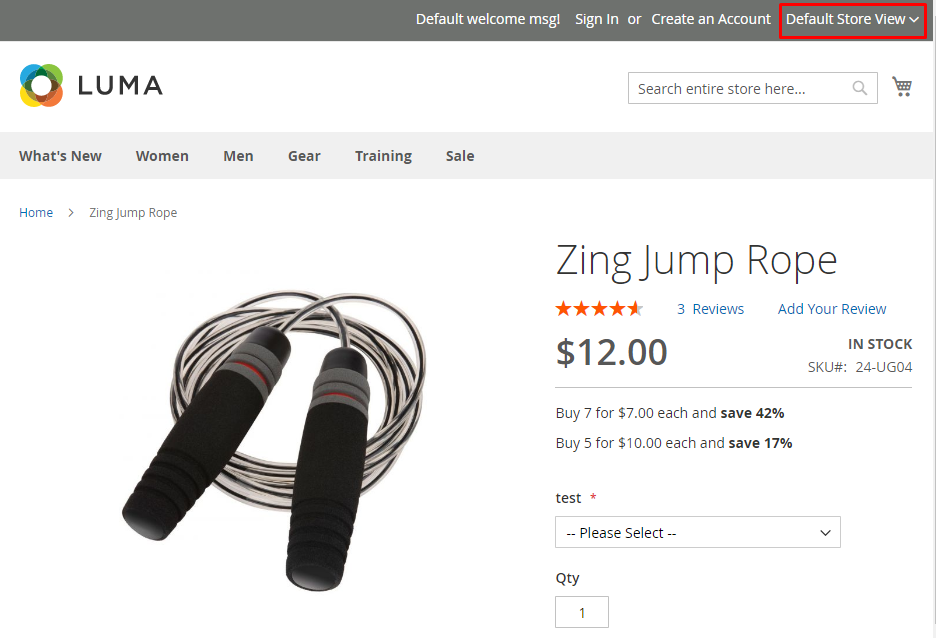
Let's take an example: You have a product with the following settings as below:
- Website tier price: buy 7 for $7 each.
- Store view tier prices:
+ Default store view: buy 5 for $10 each.
+ French store view: buy 10 for $5 each.
- Tier Price Config:
+ Default store view: choose Merge Tier Price and Tier Price for Store View.
+ French store view: choose Use Only Tier Price for Store view.
- In the frontend, we have results as below:
+ In Default store view:
+ In French store view:
*Note: You want to set up tier prices for the same customer group in Customer Group Price and Tier Price for Store View configuration at the same quantity but different prices, tier prices displayed in the frontend are the lowest values.
3. Some notes
- In case you use Multiple Store View Pricing with Catalog Price Rule per Store View (Magento 2), please take some following notices:
+ To make Catalog Price Rule per Store View work with Multiple Store View Pricing, you go to the app/etc/config.xml file of Magento, find this line 'Bss_MultiStoreViewPricingCatalogRule' => 1 and then you replace this line by another line 'Bss_MultiStoreViewPricingCatalogRule' => 0
+ Flush cache
+ You should reindex after setting up or editing catalog price rules.
- When you add a new store, you also need to reindex.
- When you edit prices of simple products of bundle products and group products in each store and then go to the category including these products, the prices are not changed. Because it is the way that the core is solving.
- When you sort by or filter, default Magento does not take special price of simple products of configurable products. It will sort or filter based on the original price of configurable products.
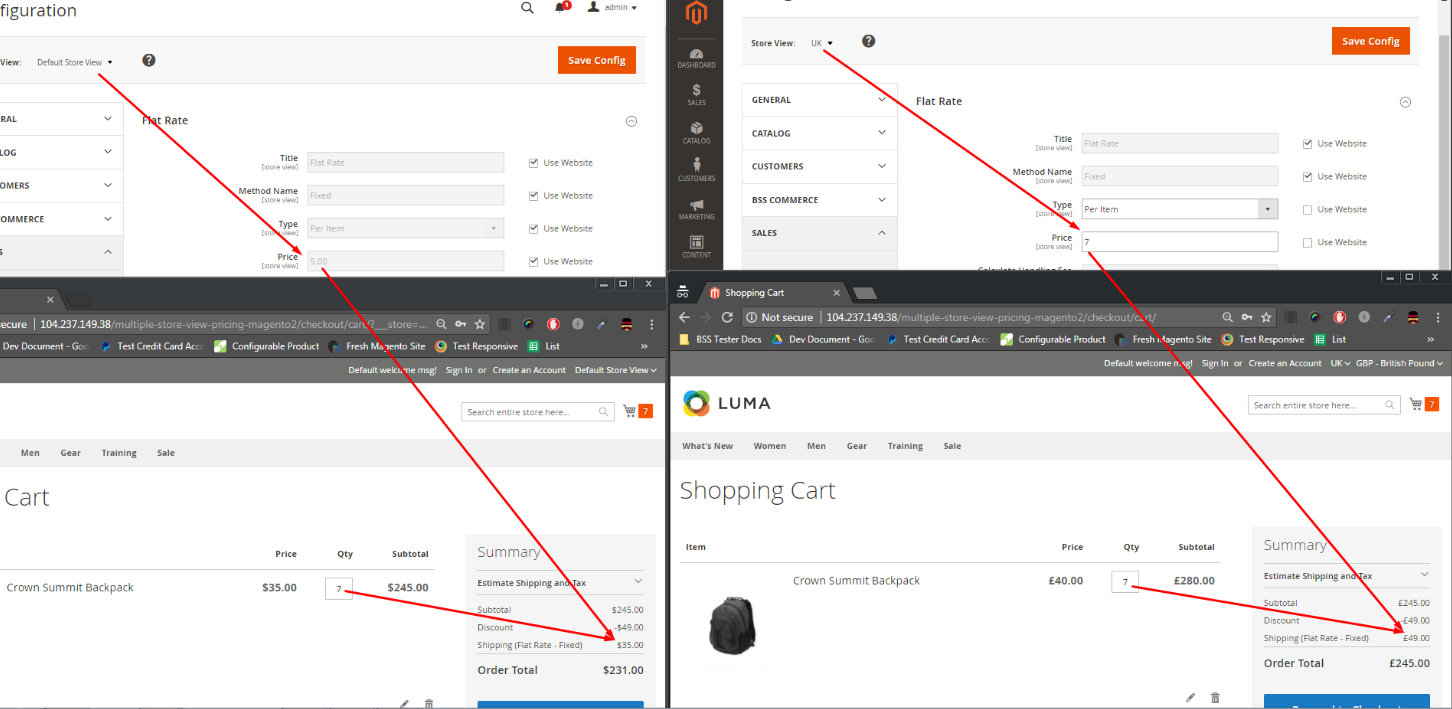
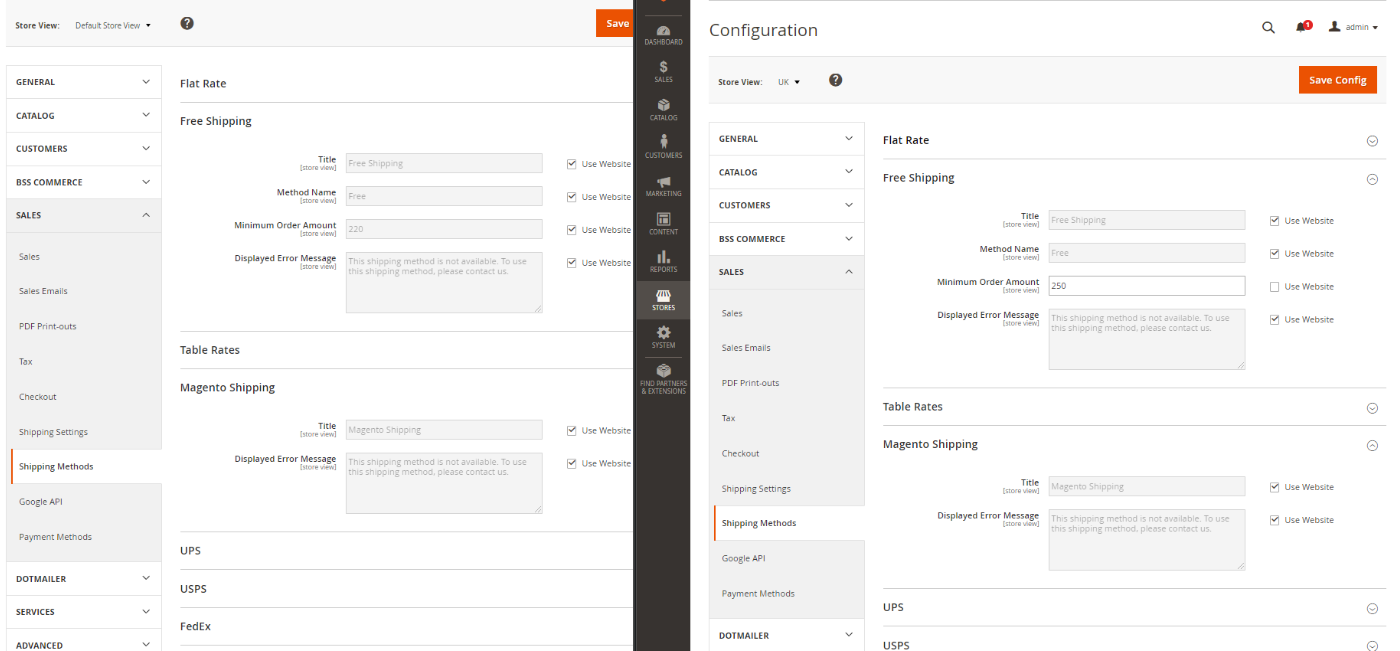
- Set up shipping cost (Table Rate, Free Shipping and Flat rate) for store view level. It means that admin can change shipping cost, shipping condition and handling fee of these shipping methods for each store view. You can take a look the following examples:
+ Flat Rate:
+ Free Shipping:
+ Table Rate:
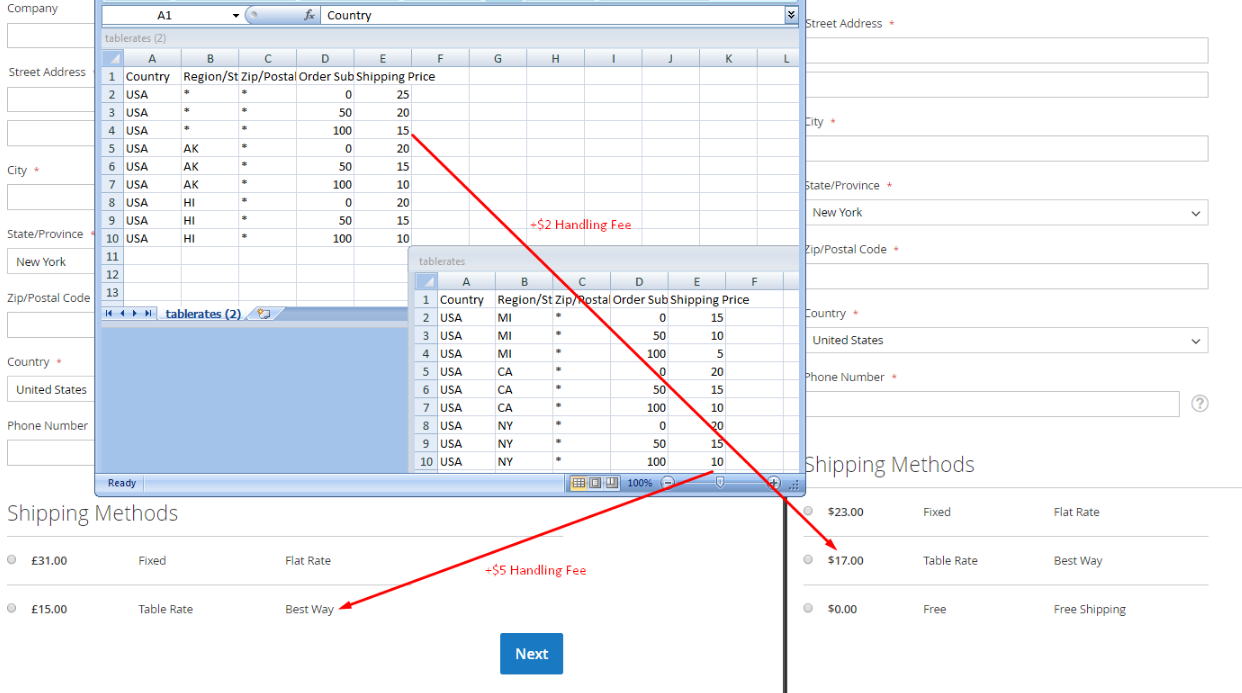
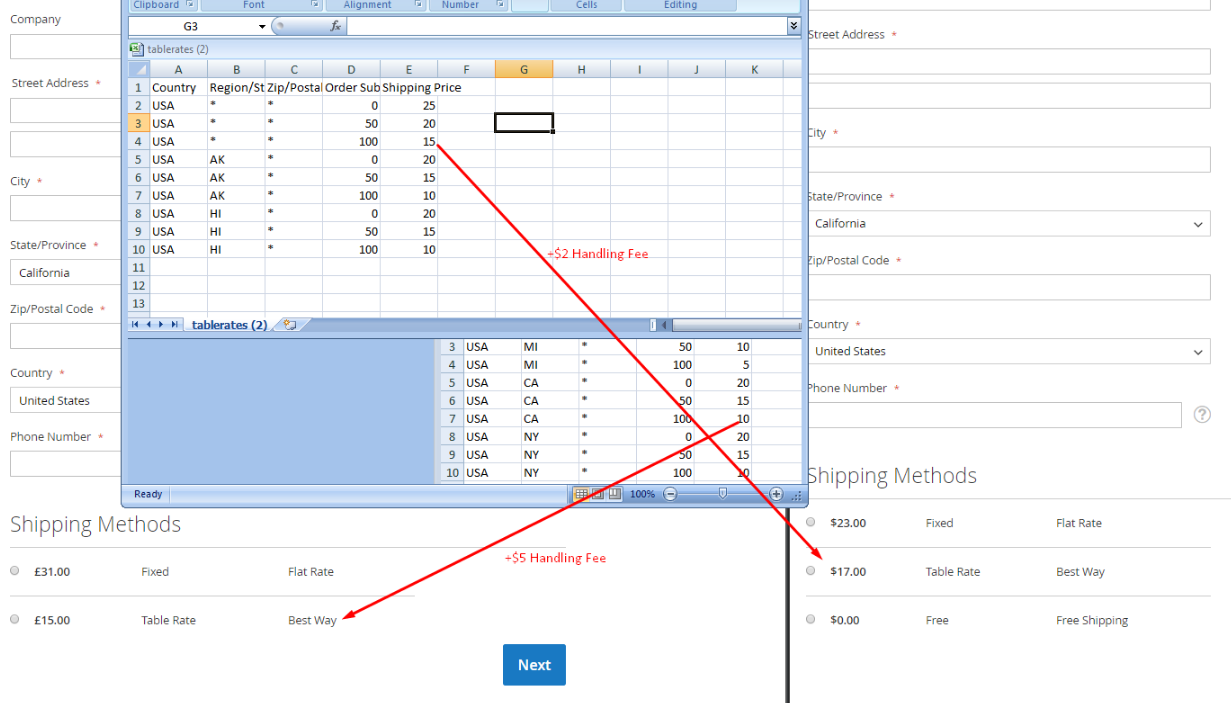
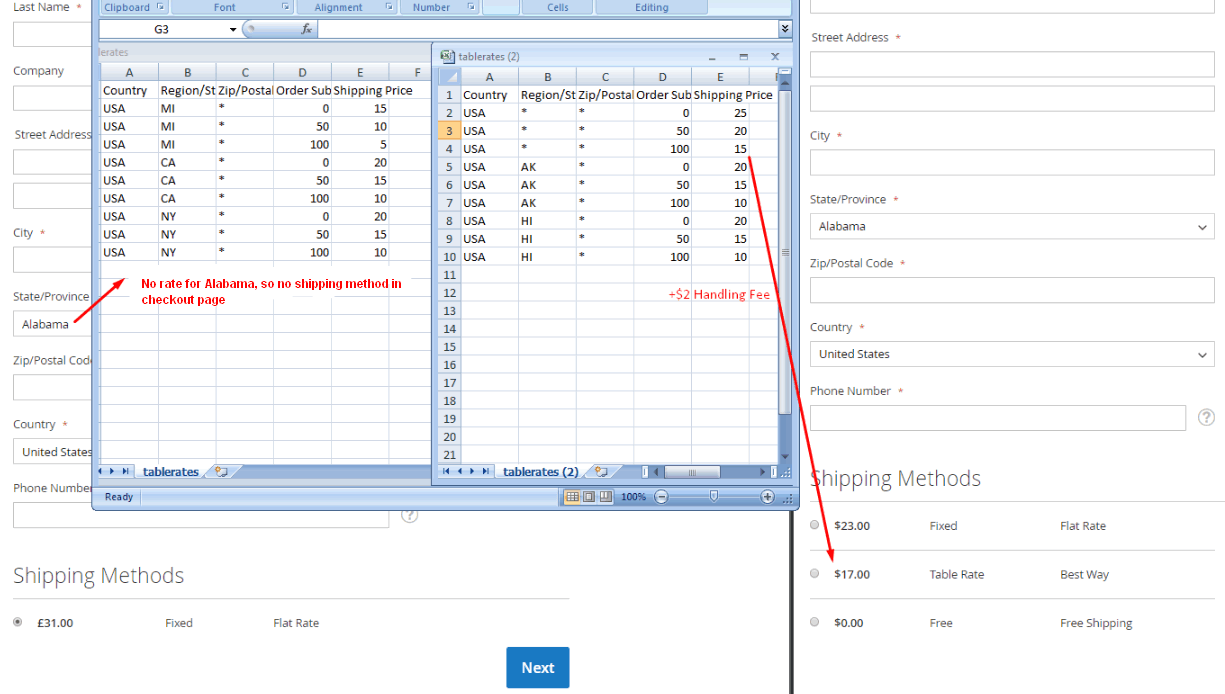
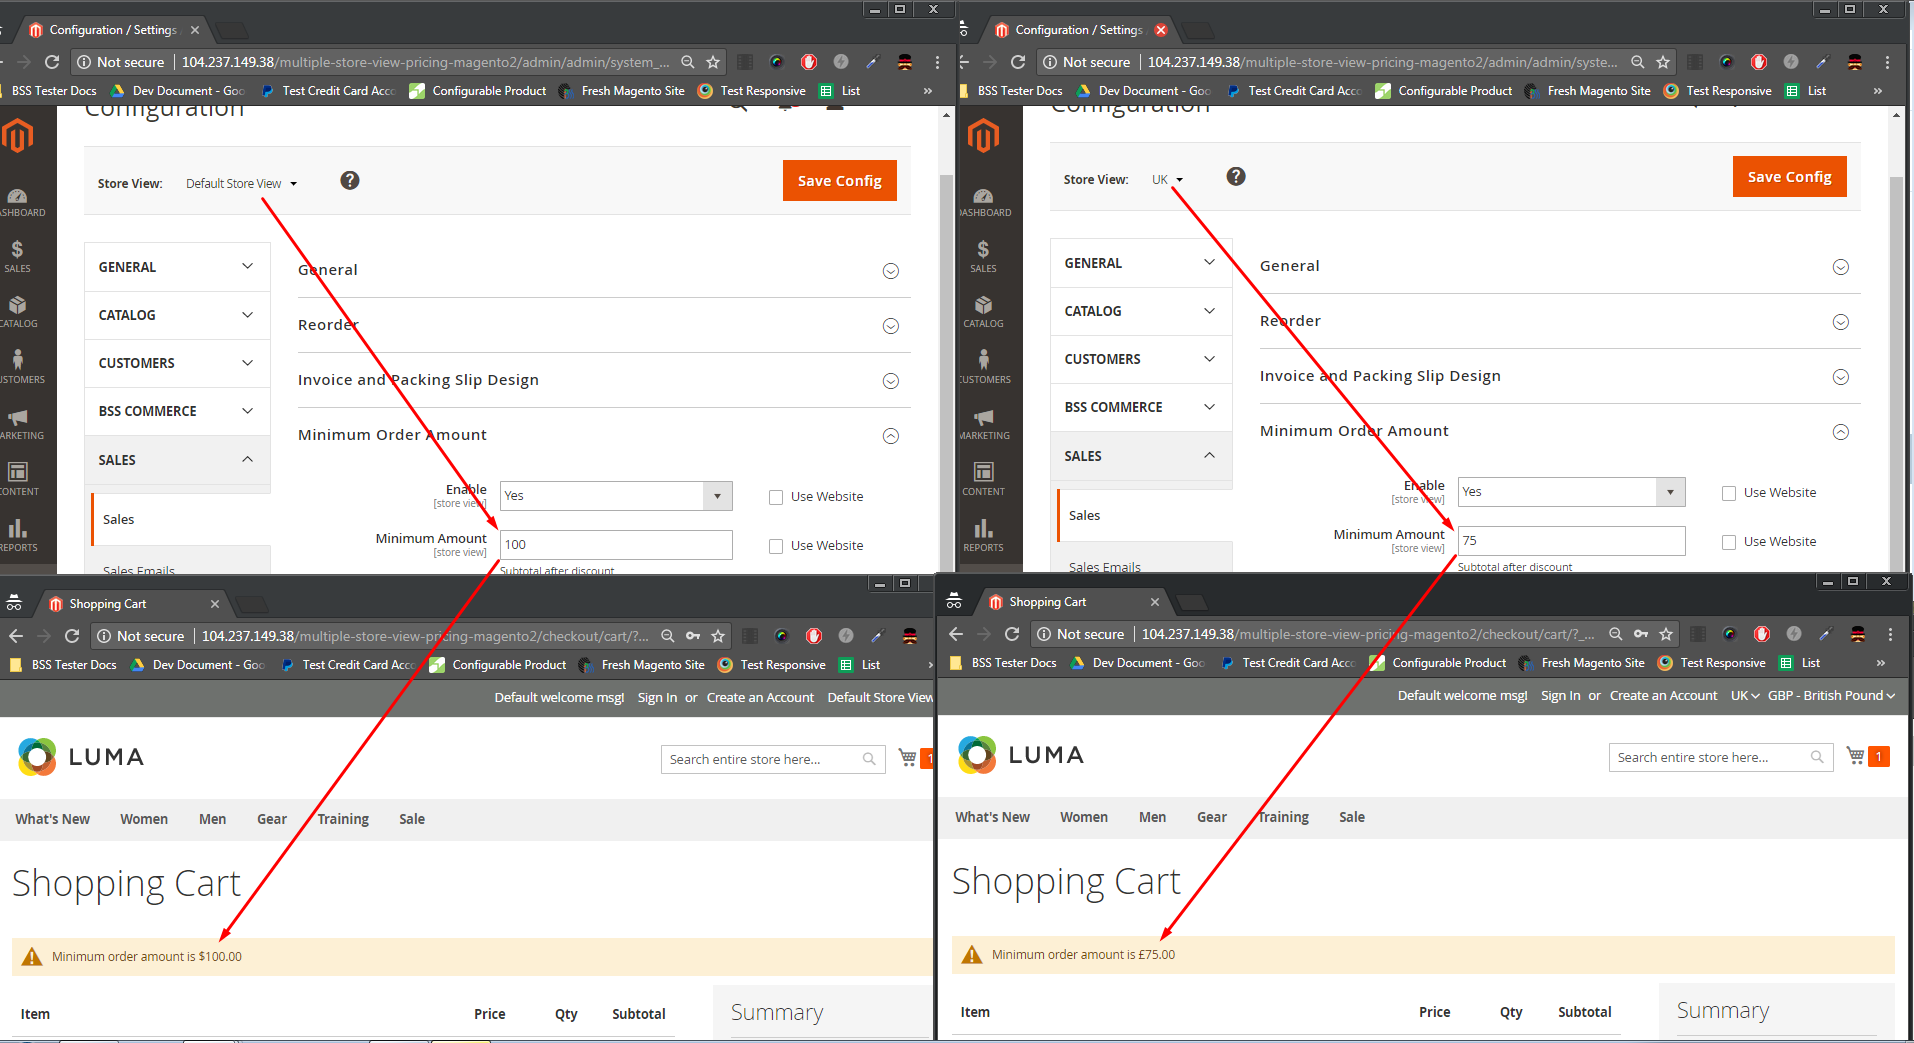
- Set up Minimum order amount for each store view.
- For custom options that are set up for products.
Custom options will similarly work to default Magento, which means prices of custom options don't change and just currency changes.
You can take a look at the following example:
- The module works well with Promotion rule
In case you select discount as fixed amount, the module will convert amount based on currency of the default config and base currency of store view.
- The option "Use default Value" is always ticked for Special price and Normal price and if you haven't yet unticked, special price and normal price take values of default configs.
In addition, there are some more important issues you should take a look at. Read all HERE!
5. Note to install module
Before installing this extension, you had better take a look at the following table to select the suitable module version from the package, corresponding to your Magento Version and Edition. It is extremely important to install the right extension because you can avoid conflicts during the usage period.
| Magento versions | Module for CE | Module for EE | Note | User guide |
| M2.1.x | v2.1.3 | v2.1.3 | Contact for hotfix |
+ User guide for v2.1.3 and below
|
|
M2.2.0 - M2.2.3 |
v2.1.6 | v2.1.5 | After installing the module, you need to implement a solution HERE.
However, if you are using M2.2.0, please follow another solution. |
|
| M2.2.4 - M2.2.5 | v2.1.7 | v2.1.5 | ||
| M2.2.6 and over | v2.2.0 | v2.1.9 | ||
| M2.3.0 | v2.2.0 | v2.1.9 | Follow this solution after installing the module on M2.3.0 CE. | |
| M 2.2.8, M2.3.1 and M2.3.2 | v2.2.0 | v2.1.9 |
For example: if you are using Magento 2.1.x, Community edition, then you install the module v2.1.2.
III. Catalog Price Rule per Store View
As you know, default Magento just allows creating catalog price rules for the whole website. It means that a rule will be set up and applied for all stores or store views of a website. Therefore, Catalog Price Rule per Store View for Magento 2 is developed to help administrators to set up catalog price rules for each store view easily, which can offer different promotion programs for customers in particular areas and generate sales more effectively.
After installing this module, you will select store views to set up cart price rules when you create new rules.
You go to MARKETING ⇒ Catalog Price Rules ⇒ Add New Rule.
You fill in the necessary information in sections of Rule information. Especially, in Store View section, you will select store views to set up this rule and apply it in the frontend. You can select multiple store views to carry out set up at one time.
Take 2 following examples to see how Shopping Cart Price Rule per Store View for Magento 2 can function in details.
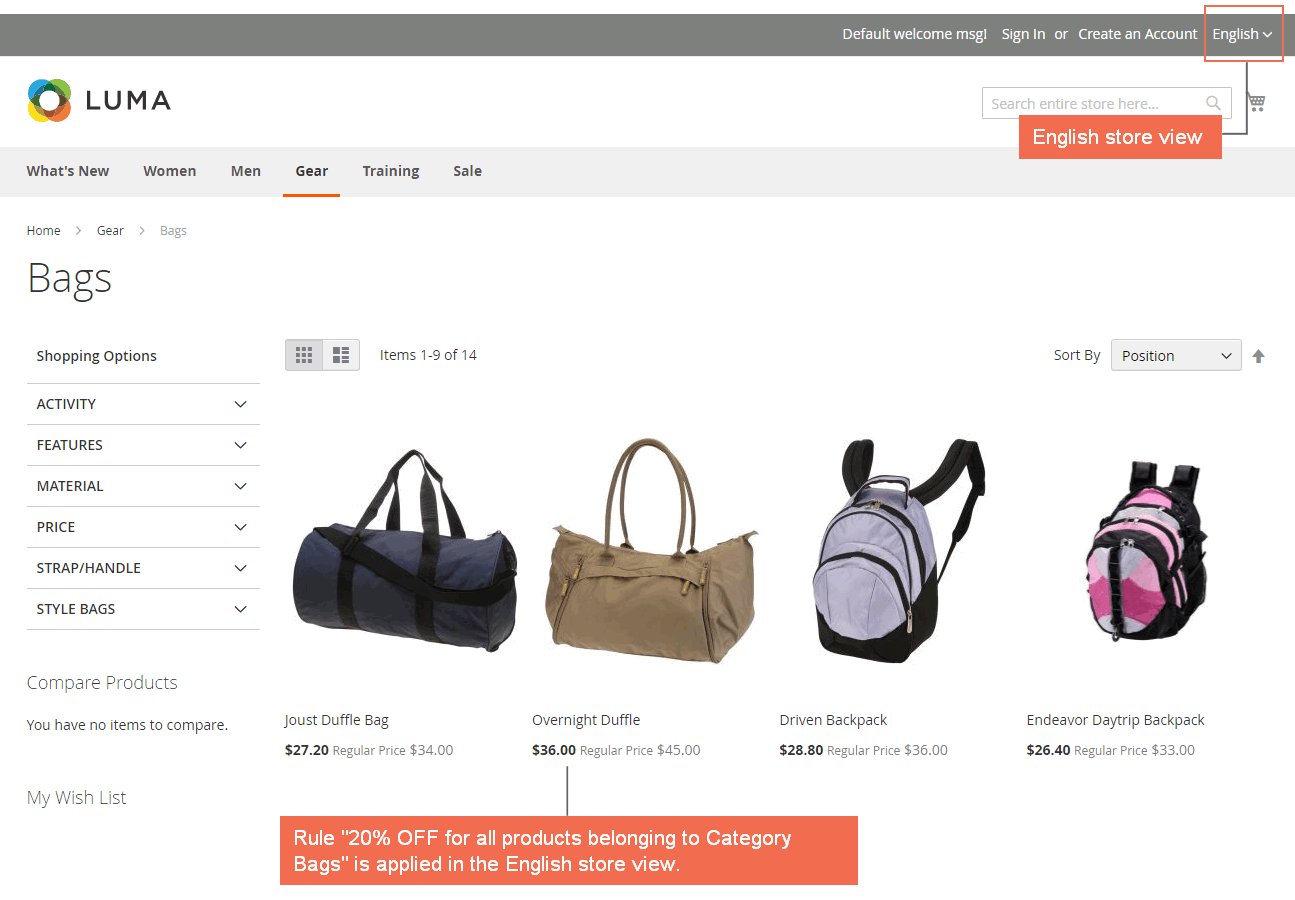
- Example 1: Set up a rule “20% OFF for all products belonging category Bag” for English store view.

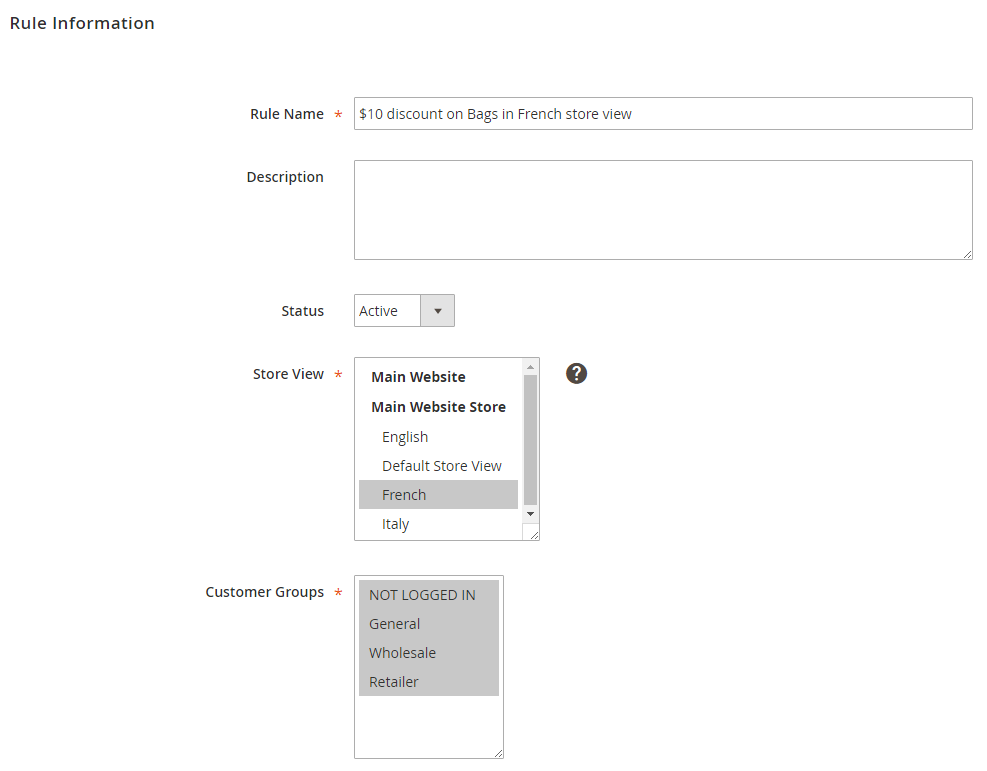
In Rule Information:
- Fill in Rule name and Description.
- Set Yes for Active.
- Select English of Main Website Store in Store View section.
- Select customer groups to apply.
- Fill in other information: time and priority
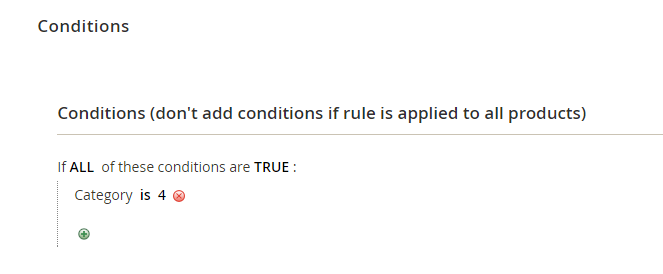
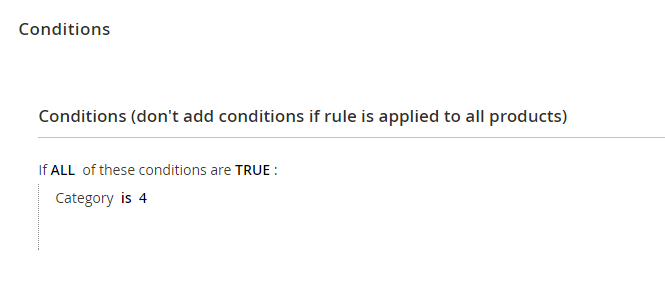
In Conditions: Set up the right condition for this rule.
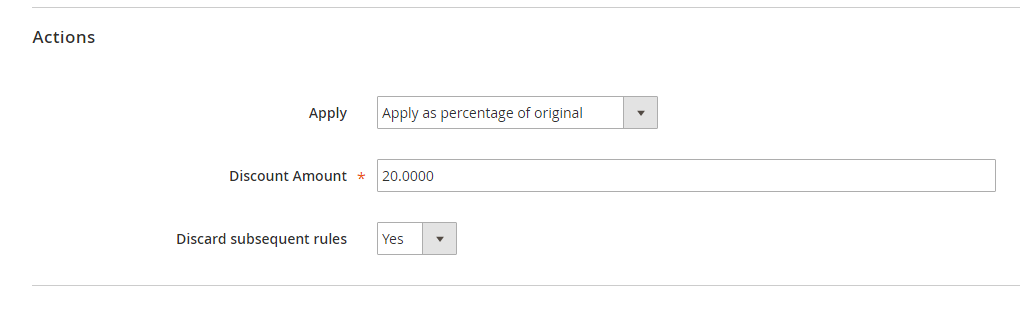
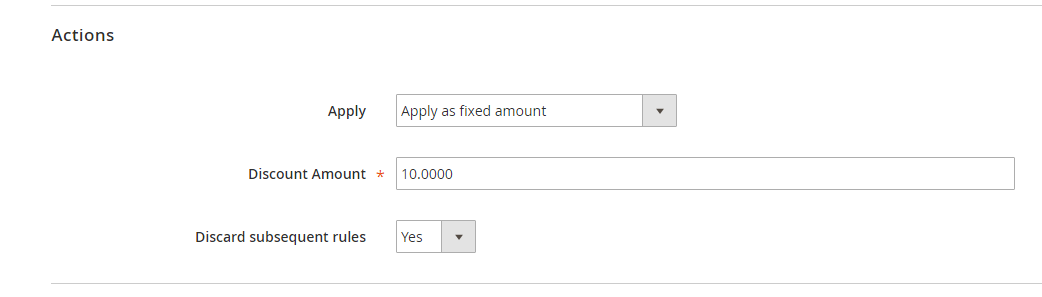
In Actions: Choose suitable actions for the rule.
Finally, you Save and Apply the rule and then see how it is applied in the frontend of the English store view:
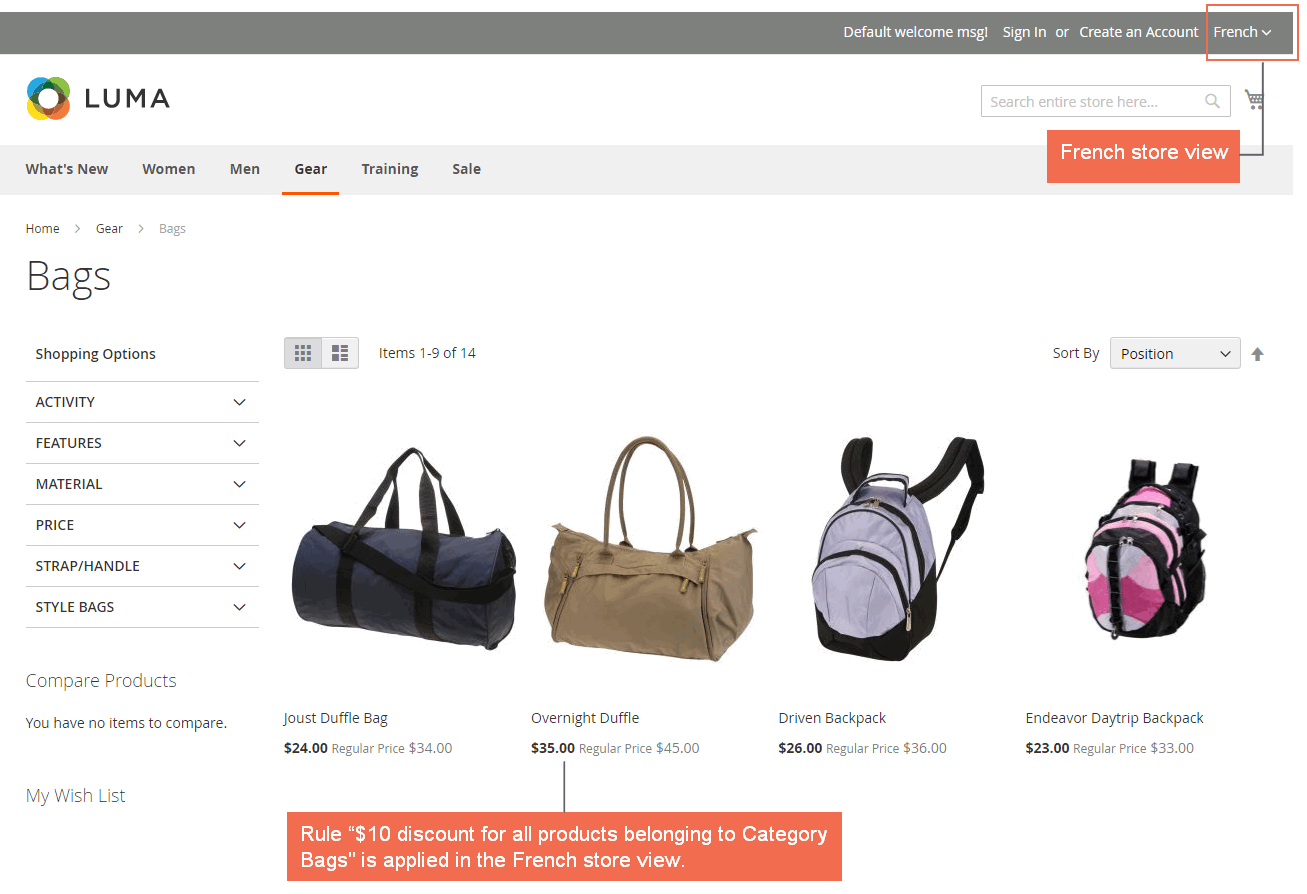
- Example 2: Set up a rule “10% discount for all products belonging category Bag” for the French store view.
You do the same steps as in Example 1 but you need to choose French store view to set up in Store Views section.
In Conditions:
In Actions:
Finally, you Save and Apply the rule and then see how it is applied in the frontend of French store view:
*NOTE: To know how to create a shopping cart price rule for Magento 2, let's take a look at our following tutorial: How to Create Catalog Price Rules in Magento 2.
IV. Shopping Cart Price Rule per Store View
Shopping Cart Price Rule per Store View for Magento 2 helps administrators to set up shopping cart price rule for store views, instead of the whole website as Magento default. Therefore, store owners can provide their local customers with particular promotions programs to encourage them to purchase more and enhance sales effectively.
After installing this module, you will select store views to set up cart price rules when you create new rules.
You go to MARKETING ⇒ Cart Price Rules ⇒ Add New Rule.
You fill in the necessary information in sections of Rule information. Especially, in Store View section, you will select store views to set up this rule and apply in the frontend. You can select multiple store views to carry out set up at one time.
Take 2 following examples to see how Shopping Cart Price Rule per Store View for Magento 2 can function in details.
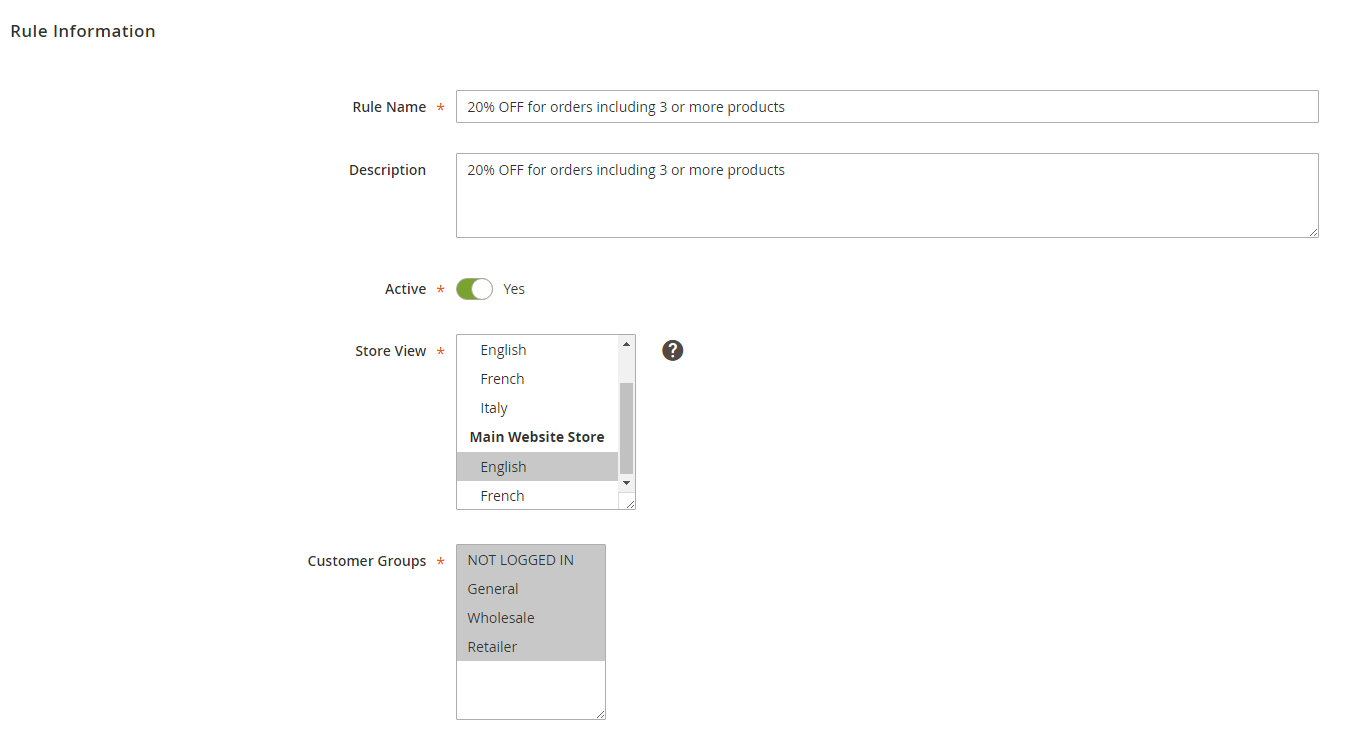
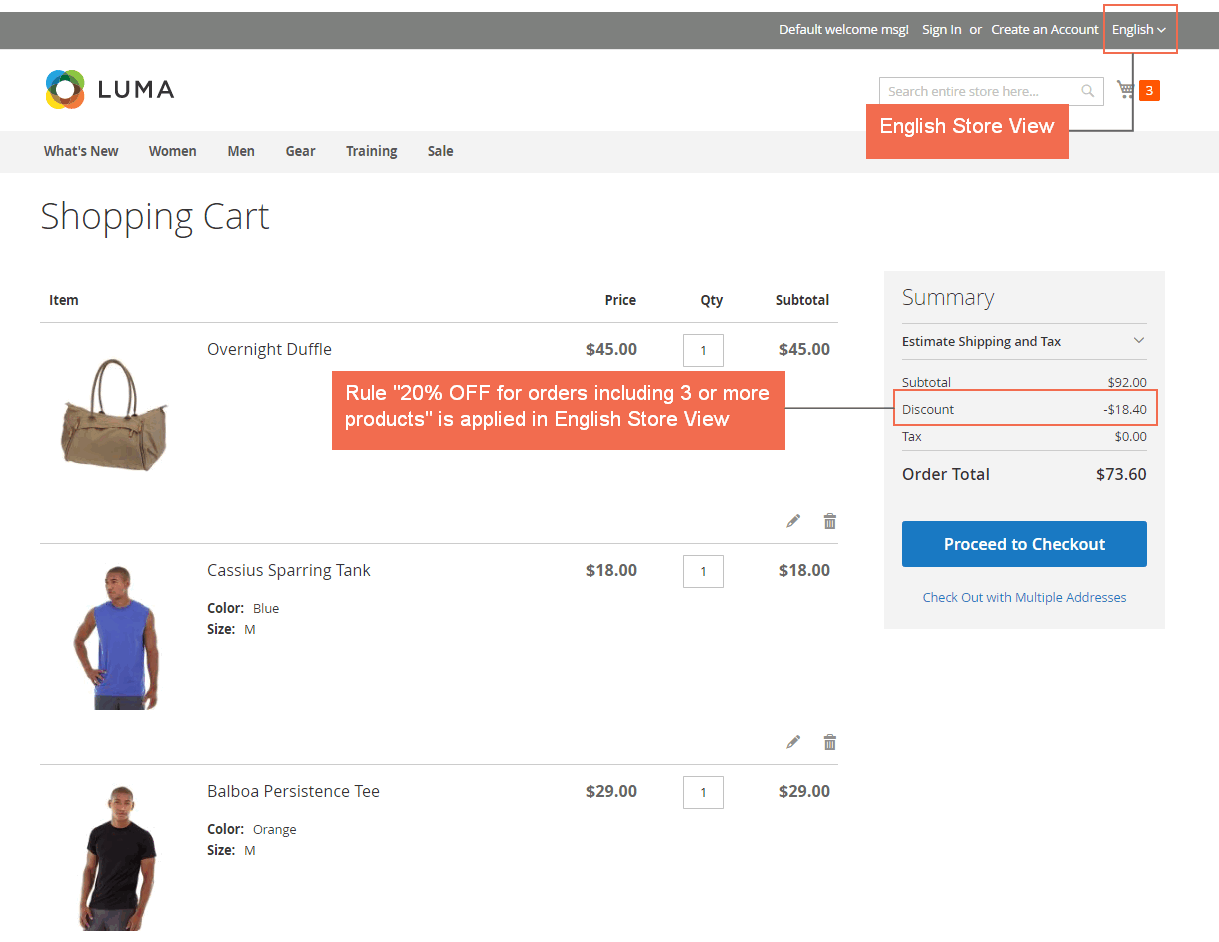
- Example 1: Set up a rule “20% OFF for orders including 3 or more products” for English store view.
In Rule Information:
+ Fill in Rule name and Description.
+ Set Yes for Active.
+ Select English of Main Website Store in Store View section.
+ Select customer groups to apply.
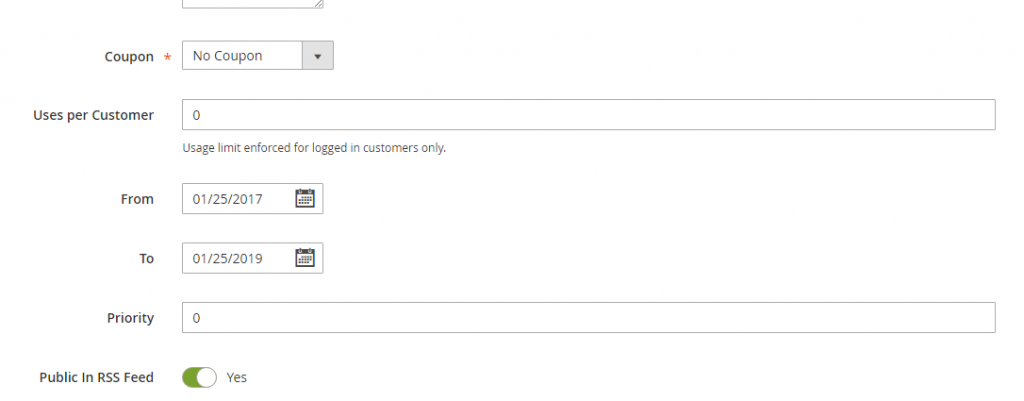
+ Set up Coupon, Uses per Customers, Valid Time and Priority for this rule.
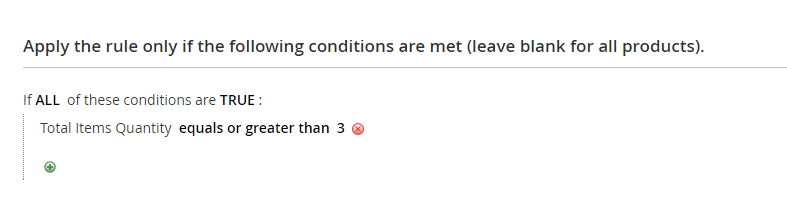
In Conditions: Set up the right condition for this rule.
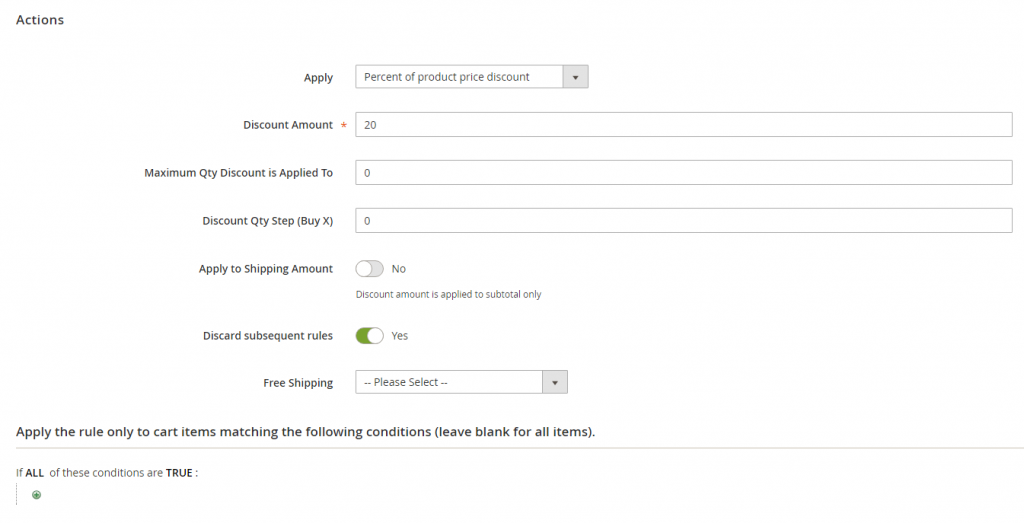
In Actions: Choose suitable actions for the rule.
In Labels: Write a label for each store view to specify which promotion is being applied.
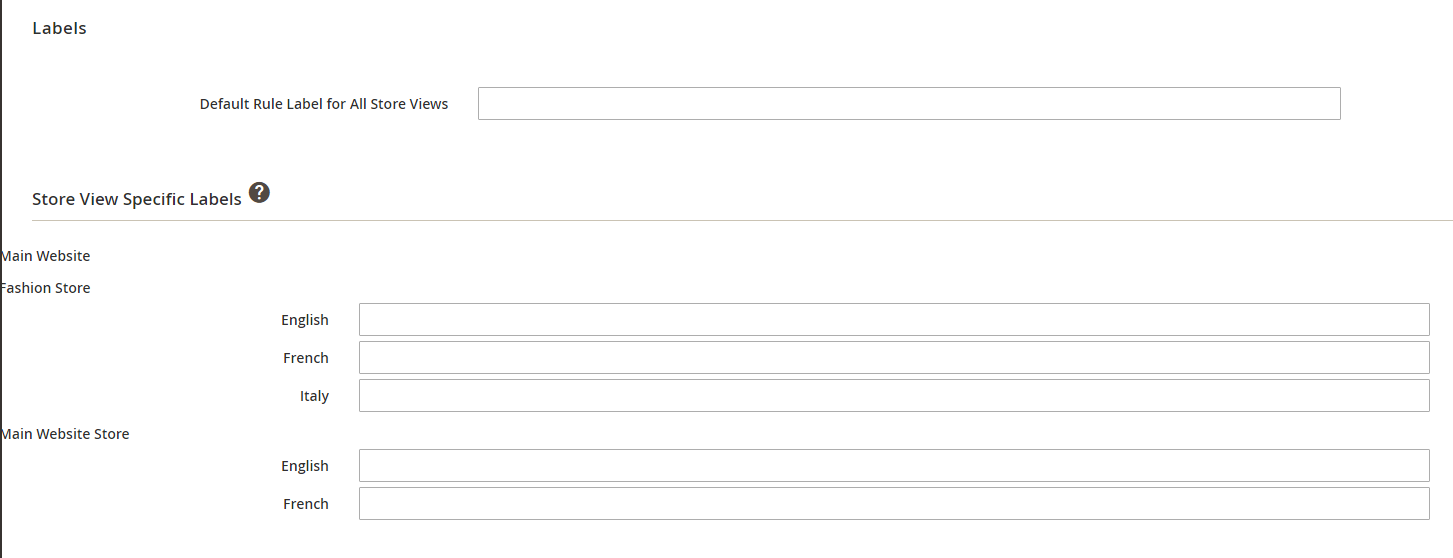
Finally, you save the rule and see how it is applied in the frontend:
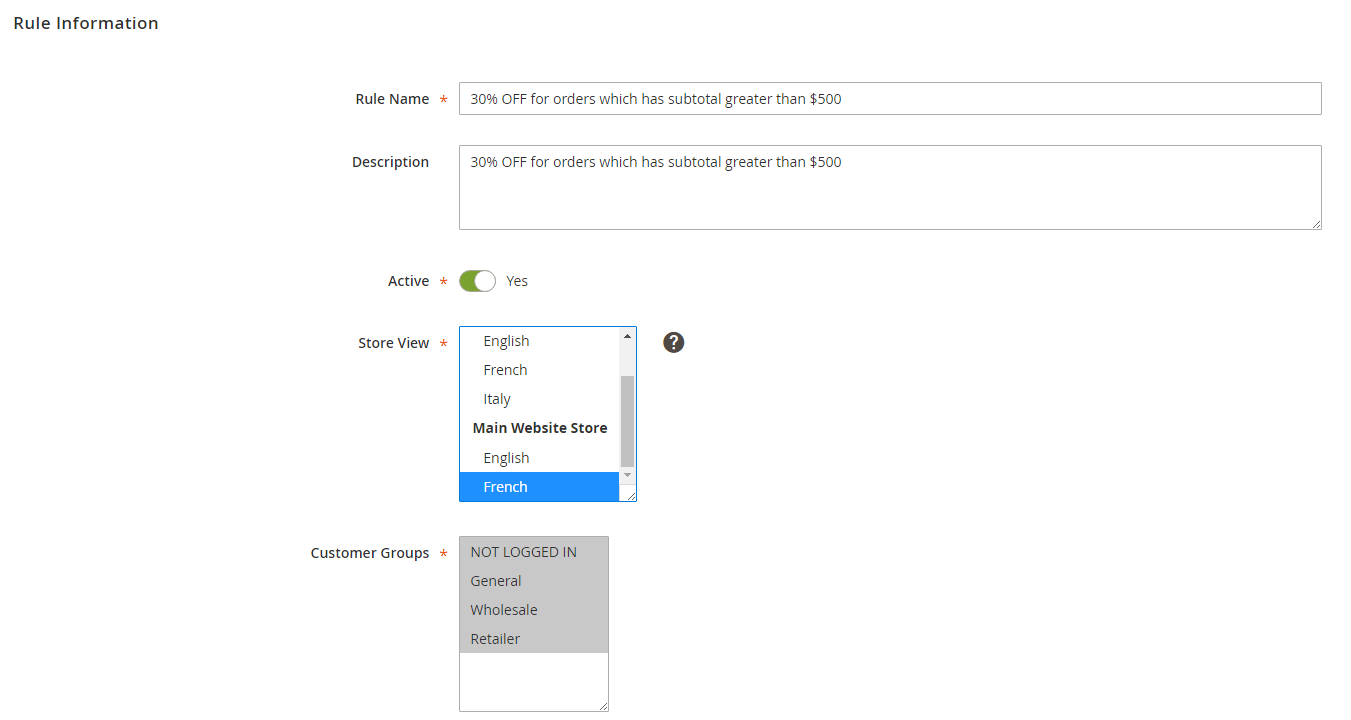
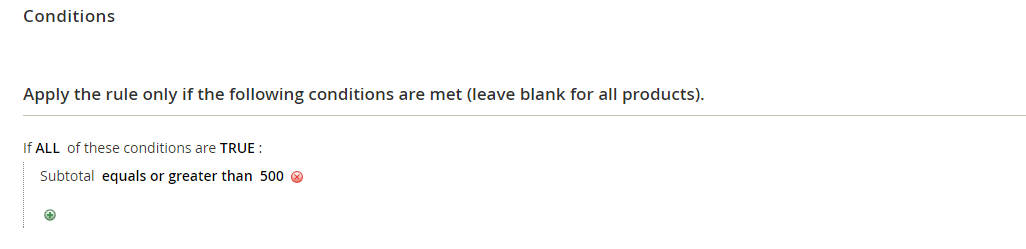
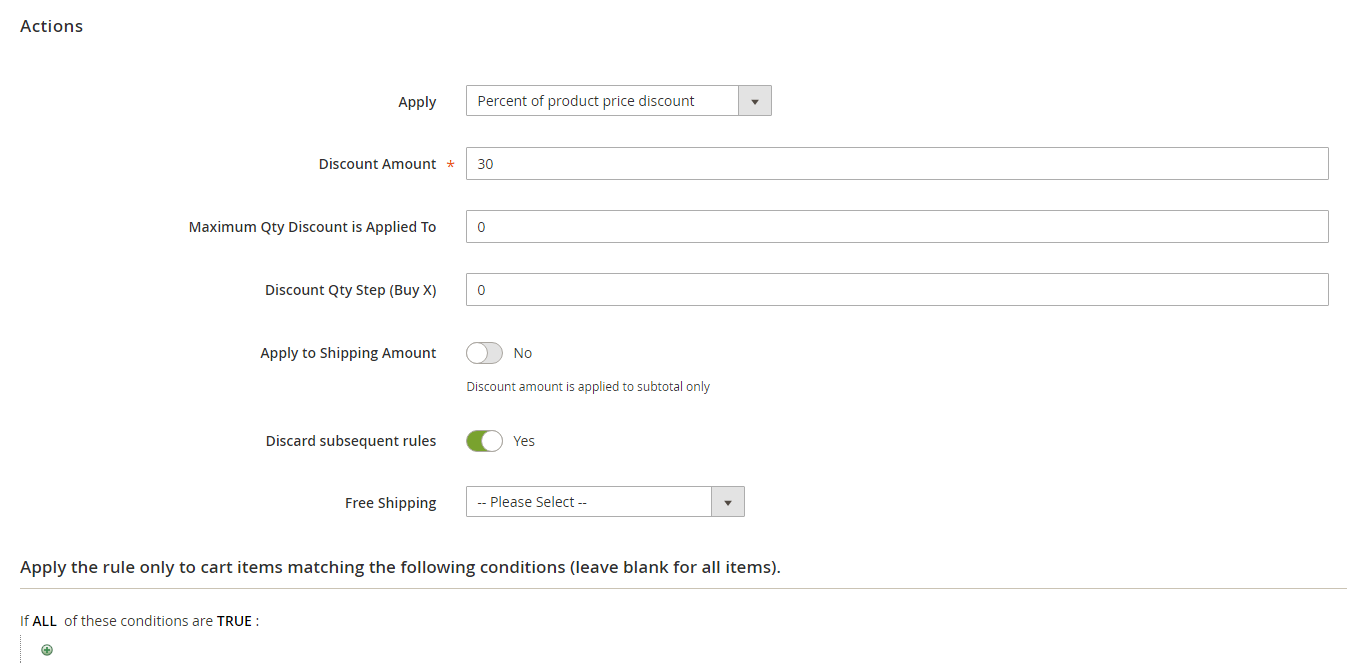
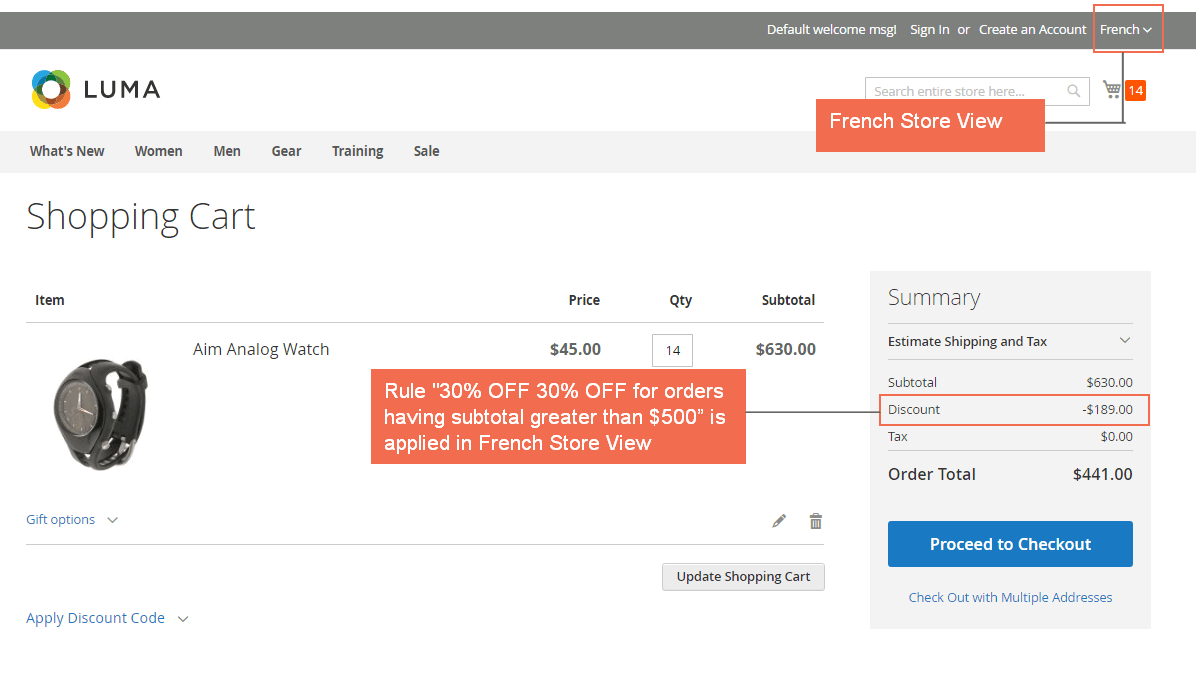
- Example 2: Set up a rule “30% OFF for orders which have subtotal greater than $500” for French store view.
You do the same steps as in Example 1 but you need to choose French store view to set up in Store Views section.
In Conditions:
In Actions:
Finally, you save the rule and see how it is applied in the frontend:
*NOTE: For more understandings about how to create a shopping cart price rule for Magento 2, you can take a look at our following tutorial: How to Create Shopping Cart Price Rule for Magento 2.
V. Tax per Store View
Tax per Store View for Magento 2 extension helps admin to set different taxes for a product per store view by changing the scope of Tax class attribute into Store View. Therefore, this module is really a good solution for Magento 2 stores with multiple store views to charge local customers particular taxes.
To Enable/Disable the extension, please go to Store ⇒ Configuration ⇒ BSSCOMMERCE ⇒ Tax per Store View:
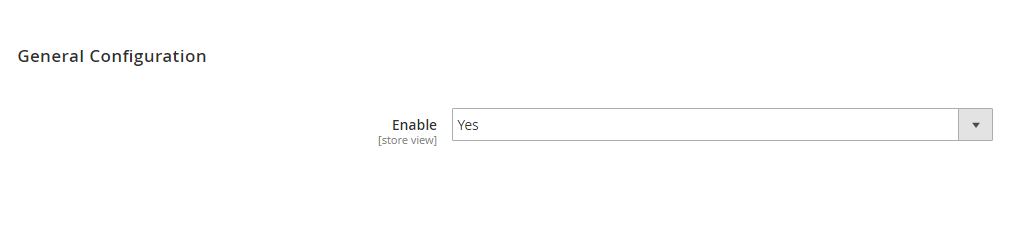
+ Set Yes to enable the module or set No to disable.
This extension solves tax issues for each store view by allowing admin to select different Tax Classes with specific tax rates to apply for each product in the store view level, instead of the website level as in default Magento.
Therefore, we will follow 4 steps:
- Set scope for Tax Class as Store View.
- Create Tax Rate (if necessary).
- Create tax rules to apply for each tax class along with wanted tax rates. Tax rate in each rule will be applied for products in each store view as you want.
- Edit Product tax class of each product per store view.
1. Set Scope for Tax Class attribute
You go to Store ⇒ Attributes ⇒ Product and find Tax Class attribute.
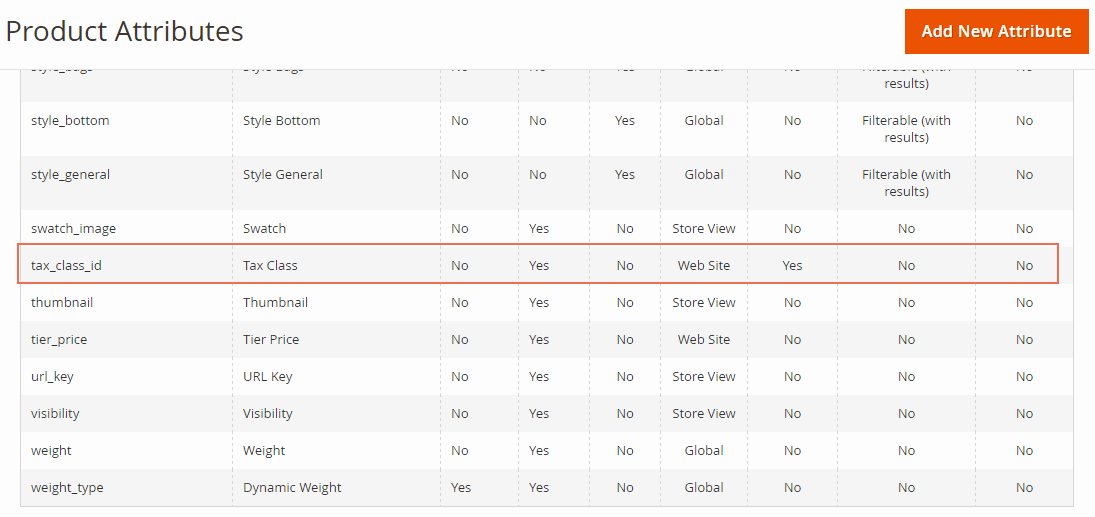
*Note: You should search the attribute code of Tax Class or Attribute Label that you name when creating it. In this case, we search attribute code of Tax Class as tax_class_id and click to edit.
In Properties, you go to Advanced Attribute Properties and change Scope into Store View:
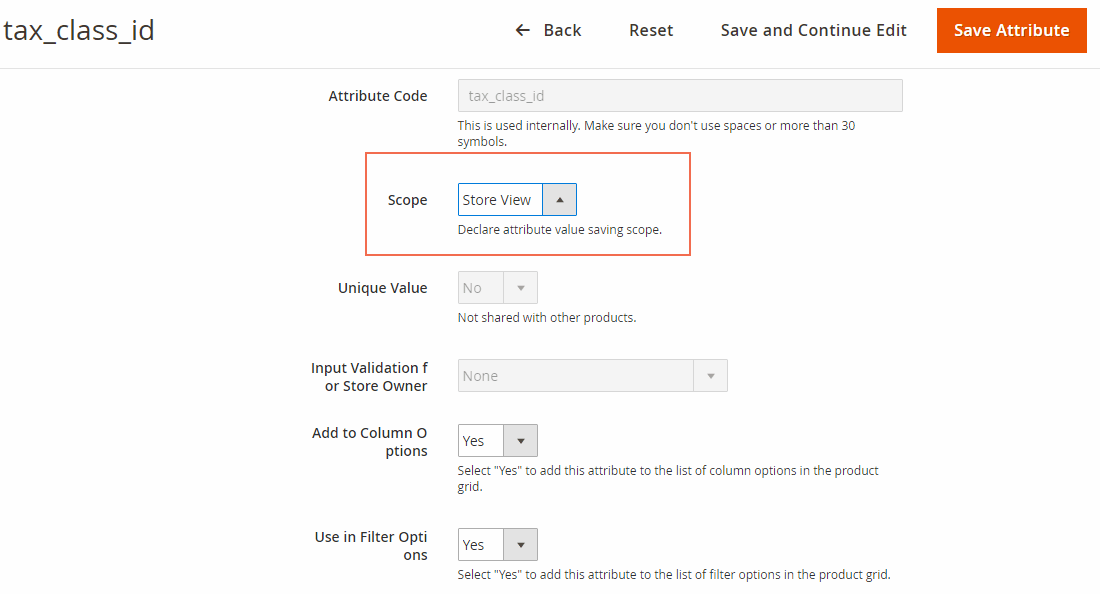
Then click Save Attribute.
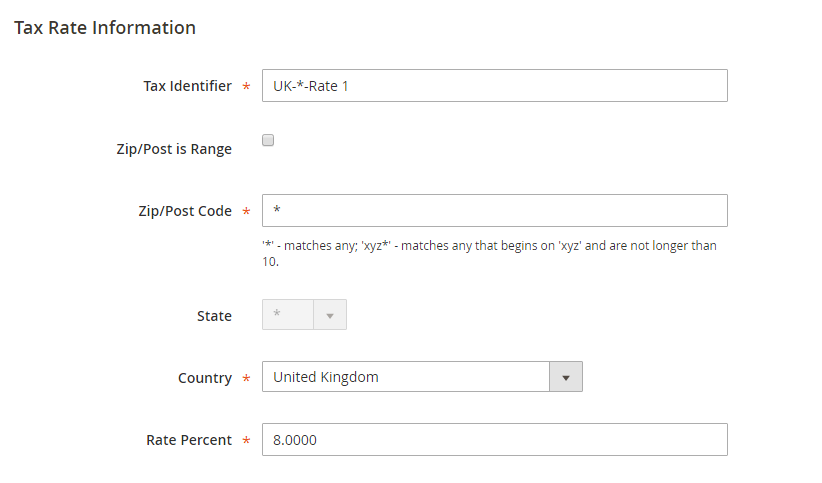
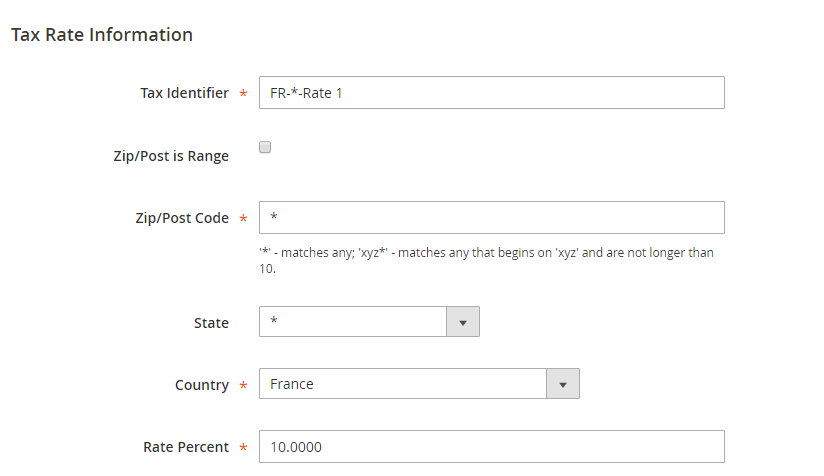
2. Create Tax Rates
You go to Store ⇒ Taxes ⇒Tax Zones and Rates to add new tax rates with different rates that are suitable for your store views.
To help you understand better, we take two examples: we add 2 new tax rates as below:
- UK-*-Rate 1: This tax with a rate of 8% is used for the United Kingdom.
- FR-*-Rate 1: This tax with a rate of 10% is used for France.
3. Create Tax Rules
After creating suitable tax rates for each country (corresponding to each Store View), you need to add tax rules as you want.
You go to Store → Taxes → Tax Rules and click Add New Tax Rule.
In our examples, we will create 2 tax rules for 2 store views as below:
- Tax rule is applied for the English store view with a rate of 8%:
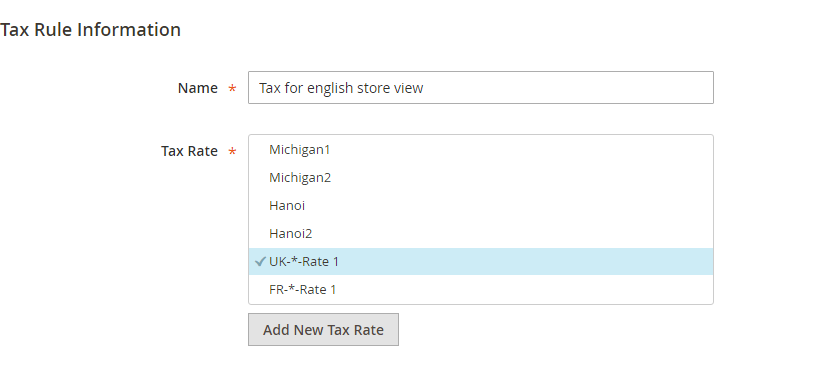
In Rule Information:
+ Name: fill in the name of your rule.
+ Tax Rate: select wanted tax rates for this rule. In this case, we select the rate as UK-*-Rate 1.
*Note: You can also add new tax rates here by clicking Add New Tax Rate button and there is a popup appeared for you to create. In addition, you can quickly import/export tax rates in Additional Settings:
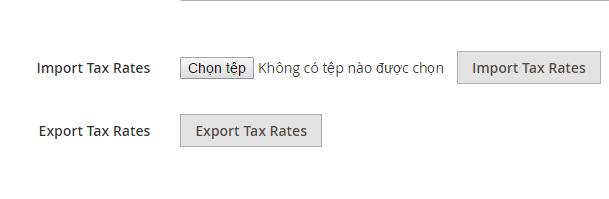
Hence, there are 3 ways for you to add new tax rates.
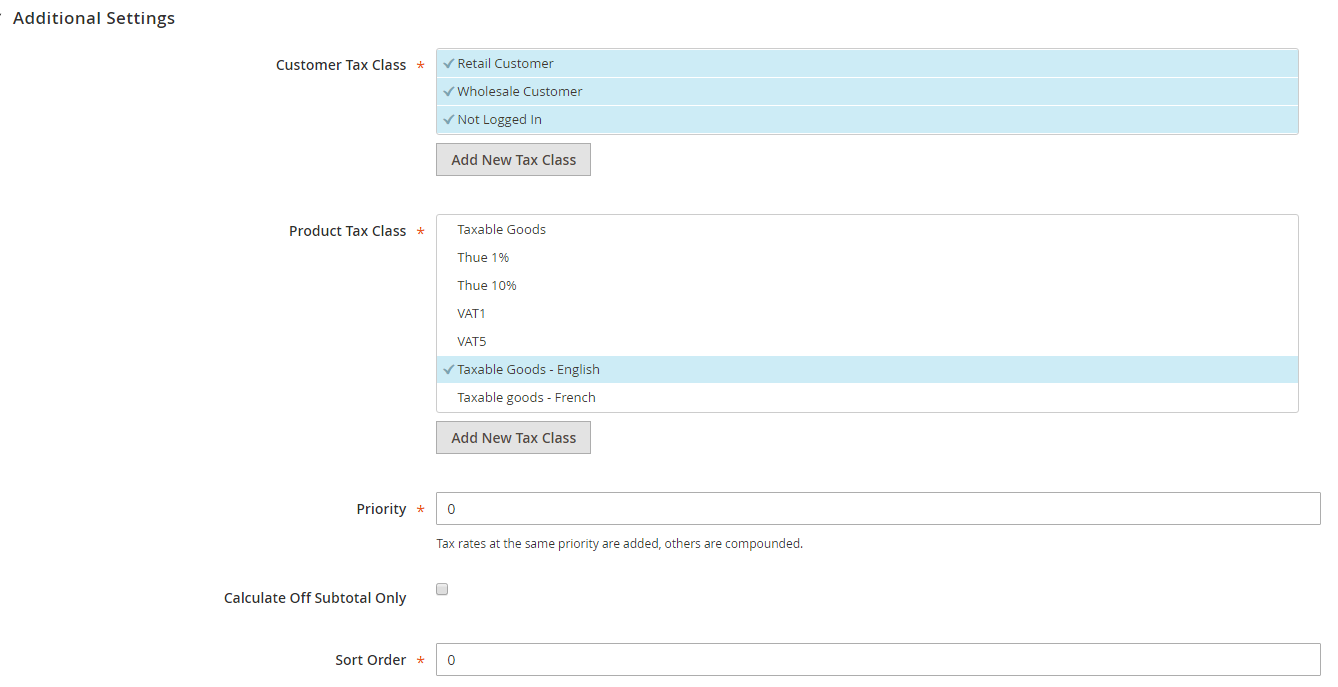
In Additional Settings:
+ Customer Tax Class: Select wanted customer class to apply this rule. If you want to create new customer tax classes to apply, let's click Add New Class button.
+ Product Tax Class: select a product tax class or multiple product tax classes to set for products. If you want to create new ones, let's click Add New Tax Class button.
In this example, we create a new one called Taxable Goods - English and select it for this tax rule.
+ Priority: enter a number to indicate the priority of this tax, when more than one tax applies
+ Calculate Off Subtotal Only: tick this box if you want taxes to be based on the order subtotal.
+ Sort Order: enter a number to indicate the order of this tax rule when listed with others.
Then Save Rule.
- Tax rule is applied for the Frech store view with a rate of 10%
You follow the same above steps by selecting the tax rate as FR-*-Rate 1, creating a new Product Tax Class as Taxable Goods - French and choose it for this tax rule.
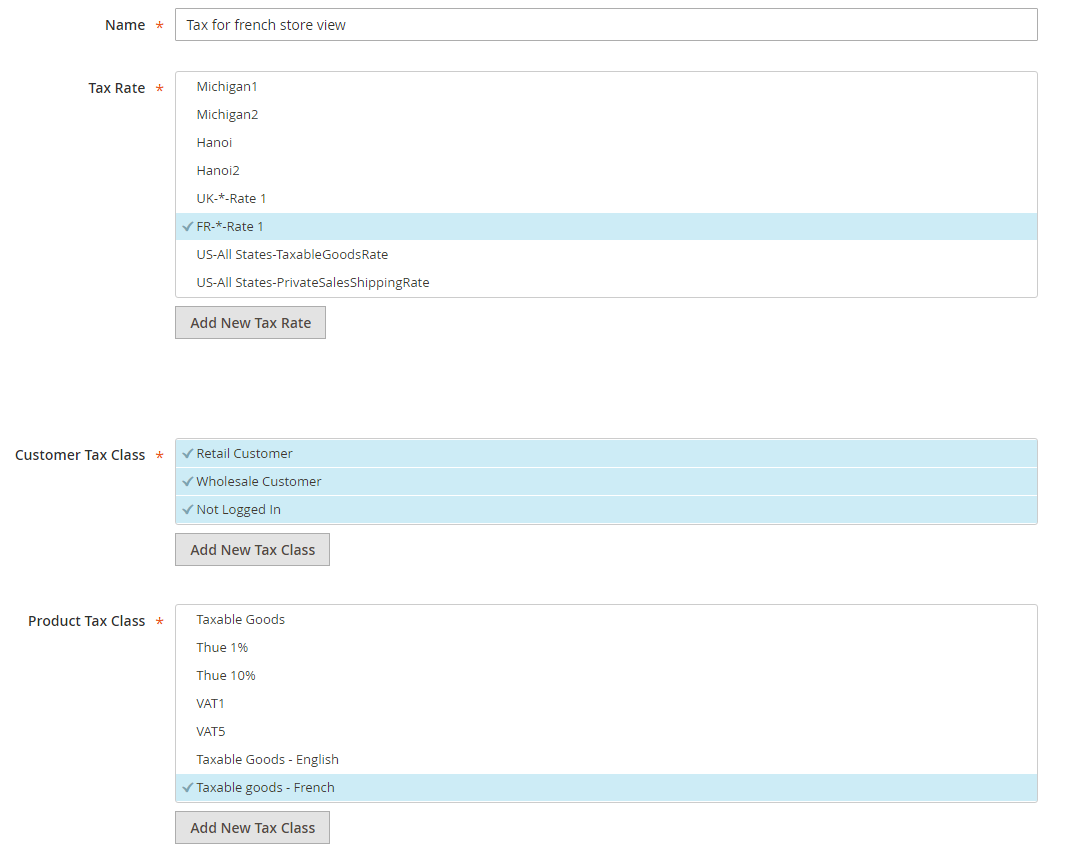
As a result, we have 2 tax rules used for the English store view and French store view. Each rule has its own rate and is used for particular product tax class.
4. Apply different product tax class
After you set up tax rules as you want, you need to edit the tax class of each product in each store view.
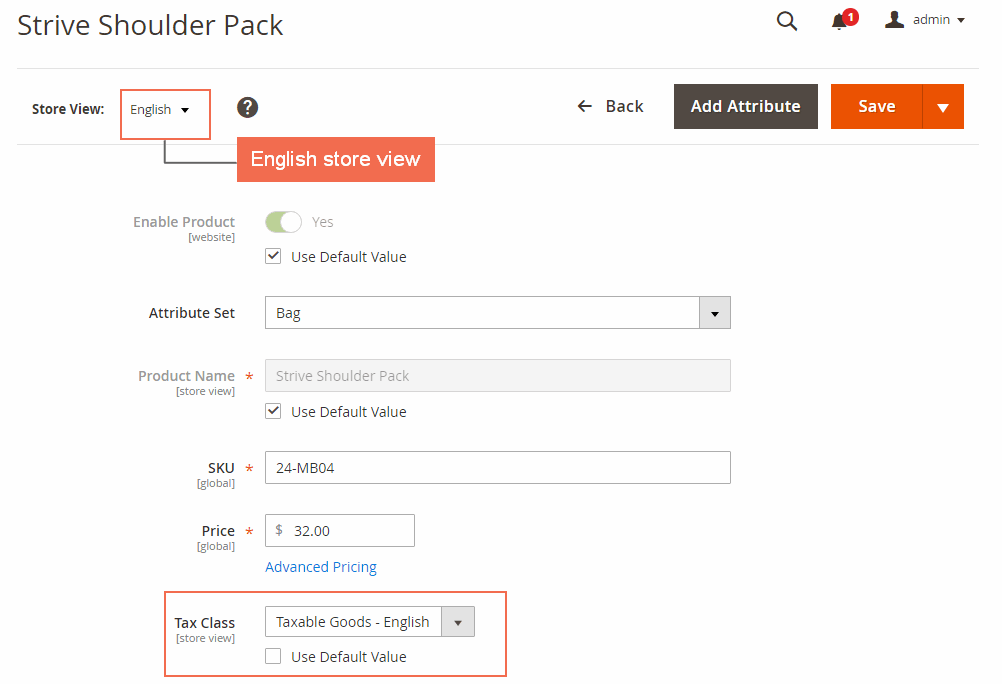
You go to Products ⇒ Catalog ⇒ Choose a product to edit ⇒ Price and switch store view to select product tax class with your wanted tax rates set up in the tax rules.
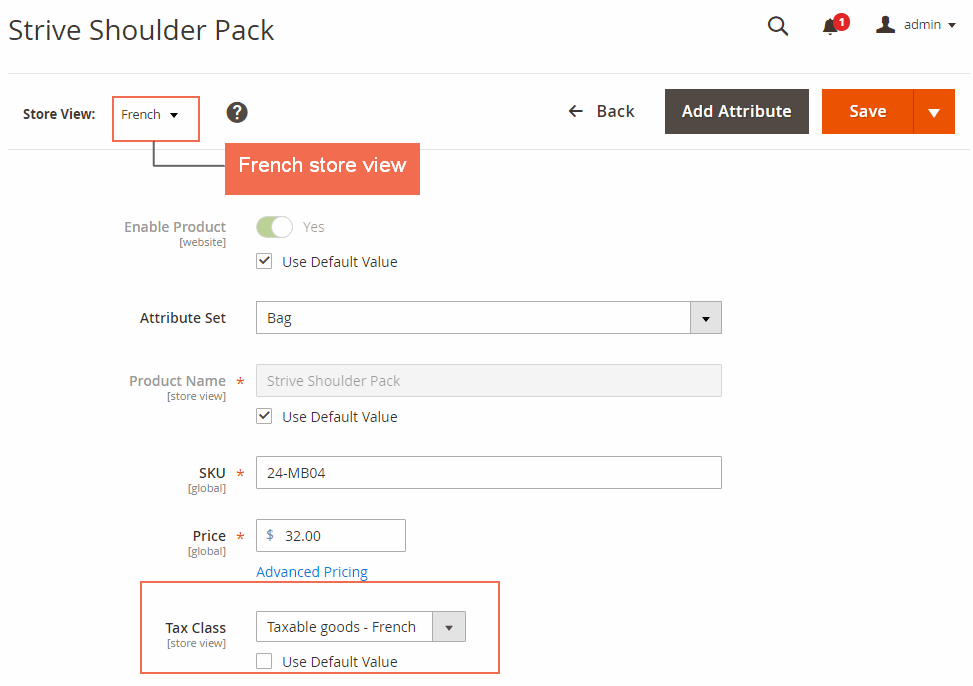
In this case, we choose Strive Shoulder Pack product with the original price in default store view as $32.
- In English store view: we select Tax Class as Taxable goods - English (this product tax class is included in the Tax rule "Tax for English store view" with the tax rate of 8%.
- In French store view: we select Tax Class as Taxable goods - French (this product tax class is included in Tax rule "Tax for French store view" with the tax rate of 10%.
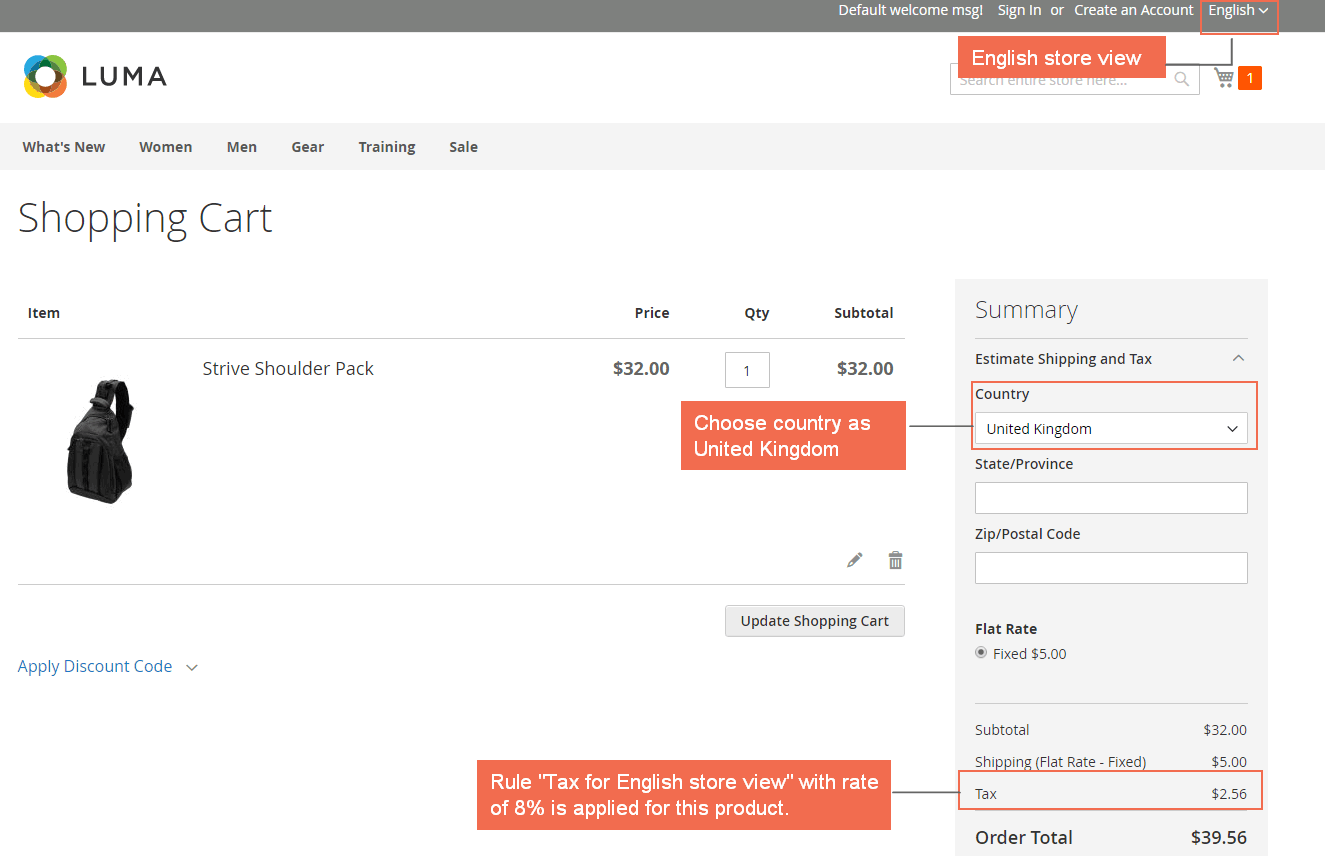
Then you go to the frontend, add this product to cart and see the results:
- In English store view: the product is taxed at the rate of 8%. You add this product to cart and see how the tax is applied as below:
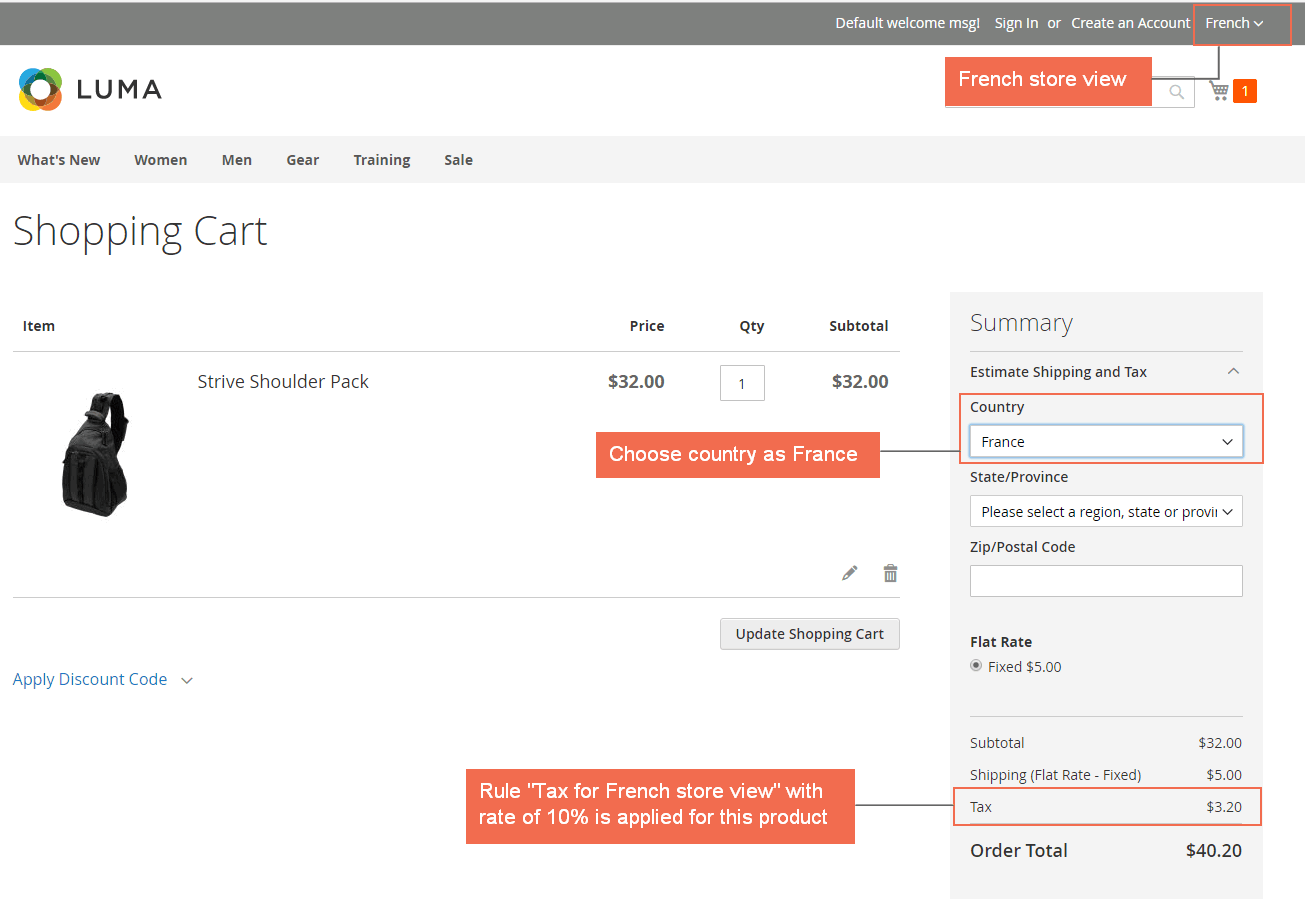
- In French store view: the product is taxed at the rate of 10%.
You should clear all products in the shopping cart, then switch to French store view and add Strive Shoulder Pack to cart:
VI. Storeview Flags
Magento 2 Storeview Flags extension helps to increase visuality of the whole website by adding nice flats next to store view’s names or replacing these names with flags only. This makes customers easily recognize where to switch stores as well as improve convenience of your multilingual websites.
You go to Store ⇒ Configuration ⇒ BSSCommerce ⇒ Storeview Flags to start making configuration.
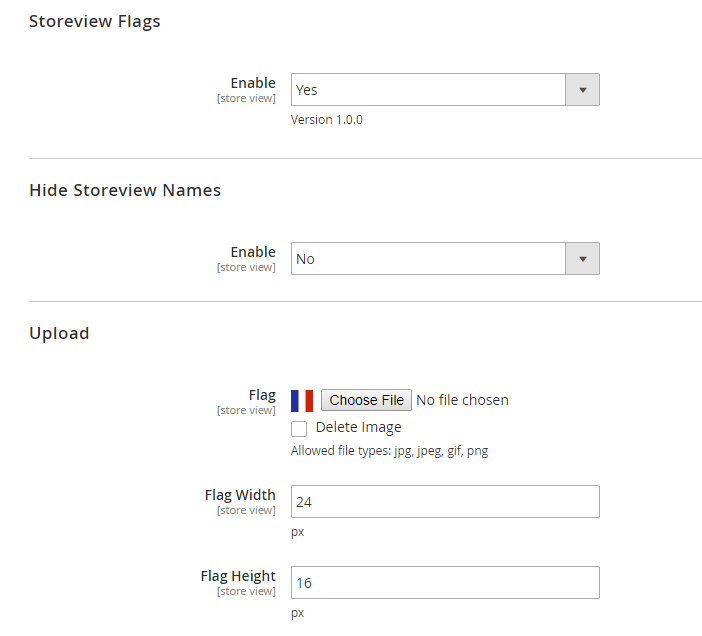
In Storeview Flags: Set Yes to enable the extension or choose No to disable the function on your website.
*Note: You need to change the scope to configure these settings for each store view.
In Hide Storeview Names:
- Select Yes to hide store view names in the drop-down menu. Only flags are displayed.
- Select No to show flags along with store view names.
In Upload:
- Flag: Upload image of flag for each store view.
- You can freely set up flag width and height depending on your website.