1. Overview
How to know your website performance in real-time, daily, weekly, monthly, etc.? Google Analytics 4 (GA4) is a savior here! Our Magento 2 Google Analytics 4 extension helps to directly integrate GA4 and your store by filling in the GA4 measurement ID.
With just one step, you will be able to track, record, and view crucial data for your eCommerce business right in your Google Analytics account. Keep track of your purchases, cart additions, impressions, and overall user activity and confidently plan your next move.
2. How Does It Work?
Please go to Stores ⇒ Configuration ⇒ BSSCOMMERCE ⇒ Google Analytics 4.
IMPORTANT: To prevent duplicate events, disable native Magento GA4 if supported in your Magento version: Stores ⇒ Configuration ⇒ Sales ⇒ Google API.
2.1. General Config
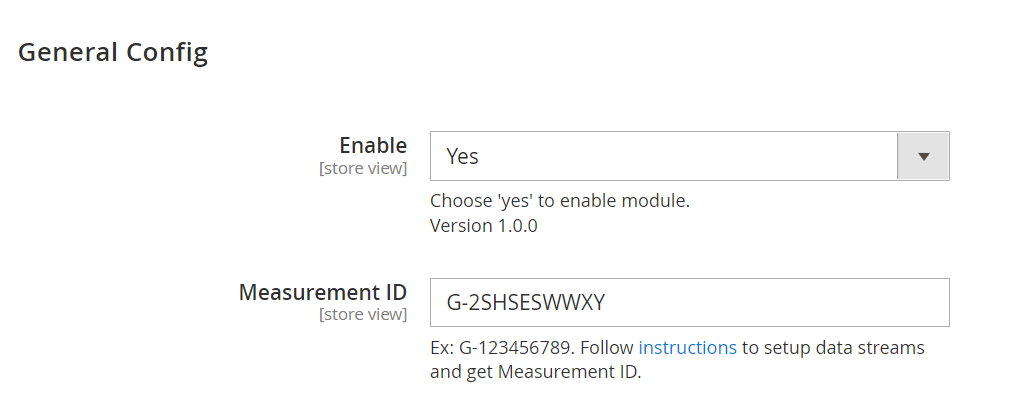 In Enable, choose Yes to enable or No to disable the module.
- Measurement ID: Fill in your GA4 Measurement ID. Check the instructions below (part 2.2) to set up data streams and get the Measurement ID.
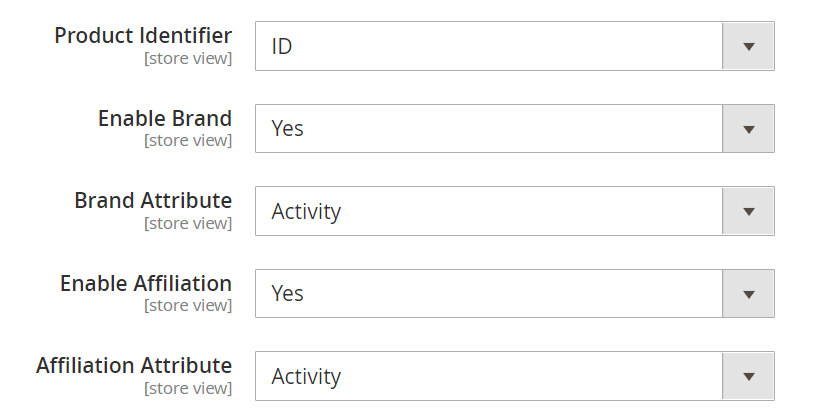
- Product Identifier: Allow store owners to choose attributes to identify products imported to GA4: ID or SKU.
- Enable Brand: Choose Yes to add param item_brand to the item’s data; otherwise, choose No. (The default is No)
- Brand Attribute includes all product attributes (system and custom) on site. This config allows the store owner to choose identified attributes for the product’s brand.
For example,
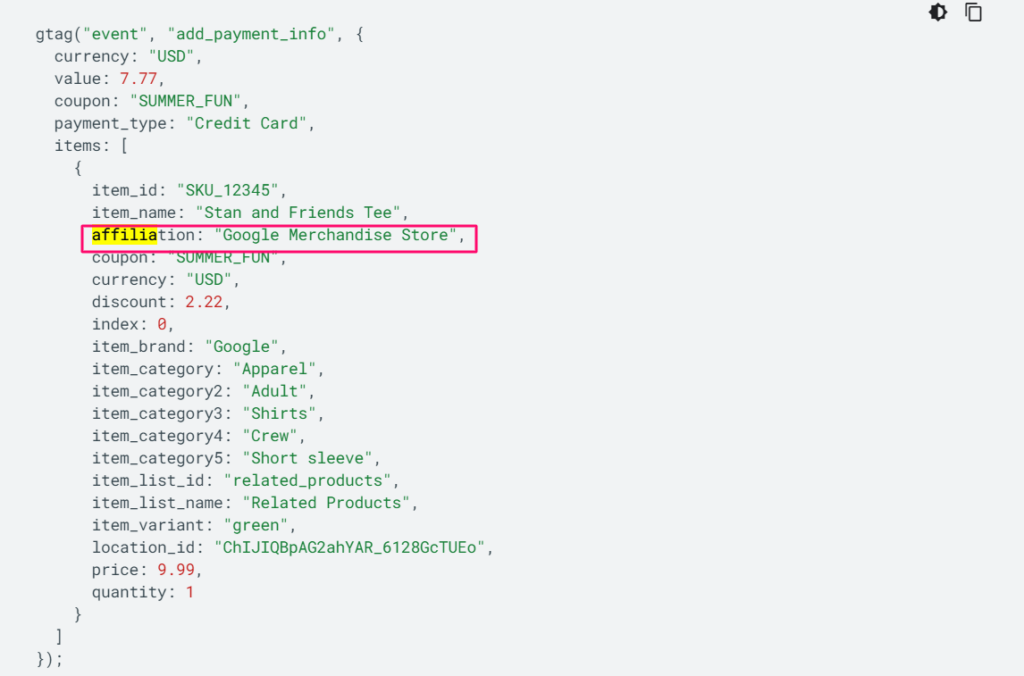
- Enable Affiliation: Choose Yes to add param affiliation to the item’s data; otherwise, choose No. (The default is No)
- Affiliation Attribute includes all product attributes (system and custom) on site. This config allows the store owner to choose identified attributes for the product’s affiliation.
For example,
Next, you can also customize the value of the transaction:
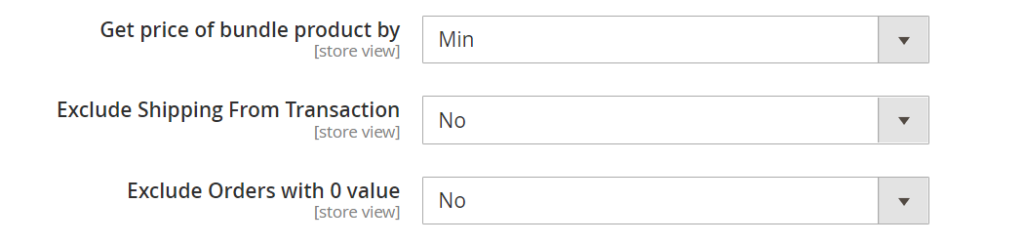
- Get price of bundle product by: There’re 3 options: min, max and average to choose from. This function helps admin to decide which bundle price will be listed on GA4.
- Exclude Shipping From Transaction: Choose Yes if you don’t want to calculate shipping costs to transactions listed on GA4. Otherwise, select No. (The default is No)
- Exclude Orders with 0 value: Choose Yes if you don’t want to list Orders with 0 value on GA4. Otherwise, select No. (The default is No)
2.2. How To Get GA4 Measurement ID
2.2.1. Create an Analytics account if you haven’t had one yet
Step 1: Go to Admin => Account column => Create Account.
Step 2: Fill out the account name and set up the data-sharing to monitor which data you share with Google.
Step 3: Click Next
2.2.2. Create a property
Step 1: In Admin => Property column => Create Property
Step 2: Enter a name for the property. Then, select the reporting time zone and currency.
Step 3: Choose Next. Select your industry classification and company size.
Step 4: Click Create.
2.2.3. Add a data stream
Click Web => Enter your website URL => Enable enhanced measurement if you want to use eCommerce tracking => Create stream.
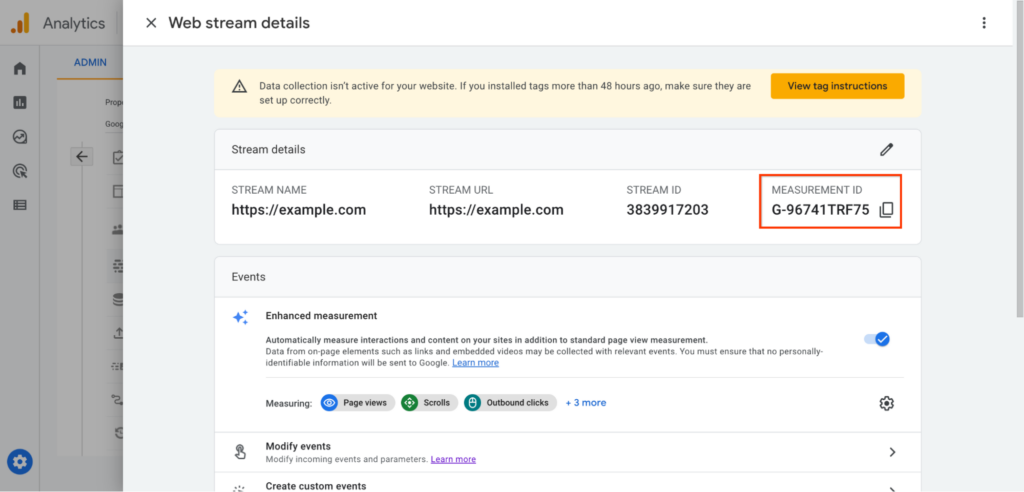
2.2.4. Get your measurement ID
Paste your "G-" ID into the Measurement ID field that the module provides. Your "G-" ID appears at the upper right.
* Note: Starting the data collection process could take up to 30 minutes. The real-time report or debug mode can confirm that you are receiving data.
2.2.5. Monitor events in DebugView
DebugView displays the events and user properties that Analytics collects from a user in real time, allowing you to troubleshoot issues as you install your tags or step through an external user's live activity.
First, you need to install and enable the Google Analytics Debugger extension to enable debug mode in your browser.
Then, to enable debug mode for all user devices, you need to update your configuration:
- Monitor all events
To monitor all the events on a page, add a 'debug_mode':true parameter to your config command, as follows:
gtag('config', 'G-12345ABCDE', { 'debug_mode':true });
- Monitor some events
To monitor certain events only, add a 'debug_mode':true parameter to just those events, for example:
gtag('event', 'xyz', { 'debug_mode':true });
- Disable debug mode
To disable debug mode, exclude the 'debug_mode' parameter; setting the parameter to false doesn't disable debug mode.
Once you enable debug mode on your devices, go to Admin > DebugView in the left navigation monitor the events as they're triggered.
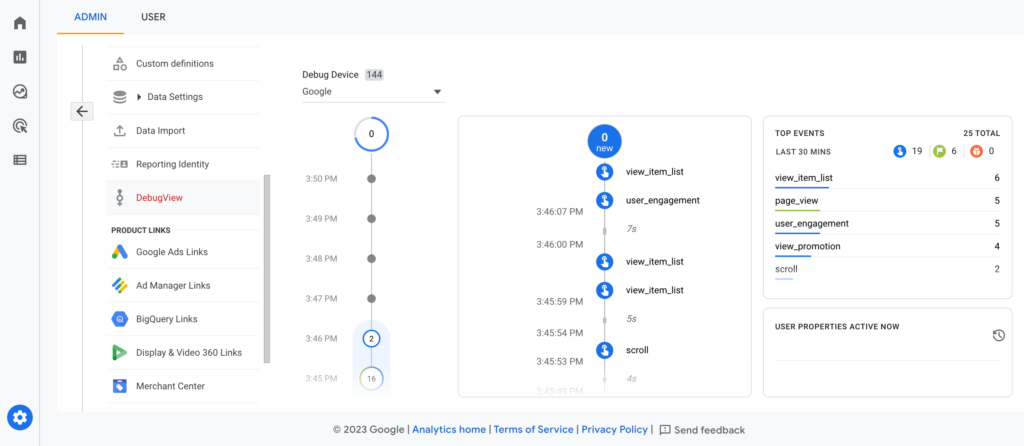
The Seconds stream (the middle column) shows the events that have been logged in the last 60 seconds. The Minutes stream (the left column) shows a series of archives of events in the last 30 minutes. The right column shows the Top Events logged in the 30-minute period and the user properties for the currently selected device.
3. eCommerce Events Tracking
3.1. Recommended events for eCommerce stores
We recommend you to track these eCommerce events via Google Analytics 4 to measure sales on your Magento store:
| Event | Trigger when | Parameters |
| add_payment_info | a user submits their payment information | See Google docs |
| add_shipping_info | a user submits their shipping information | See Google docs |
| add_to_cart | a user adds items to cart | See Google docs |
| add_to_wishlist | a user adds items to a wishlist | See Google docs |
| begin_checkout | a user begins checkout | See Google docs |
| purchase | a user completes a purchase | See Google docs |
| refund | a user receives a refund | See Google docs |
| remove_from_cart | a user removes items from a cart | See Google docs |
| select_item | a user selects an item from a list | See Google docs |
| view_cart | a user views their cart | See Google docs |
| view_item | a user views an item | See Google docs |
| view_item_list | a user sees a list of items/offerings | See Google docs |
3.2. Payment methods for conversion tracking
Our module supports these following payment methods for conversion tracking:
- Paypal Express
- Braintree
- Klarna
- Stripe
- Check/Money order
- Bank Transfer
- Cash On Delivery
- Zero Subtotal Checkout
- Purchase Order
- Authorize.net Direct Post
3.3. Track Custom Product Attributes
Besides the predefined dimensions that Google Analytics already provides, users can also add customized parameters for better tracking.
Our GA4 extension will support creating custom item-scoped dimensions in the backend for product attributes like color, size, product name, price, etc. within the items array of e-commerce events like 'purchase' or 'add_to_cart'.
3.3.1. How to set up
To do this, you have to (1) Add the custom event parameter to your website (which our module will do for you), then (2) Create item-scoped custom dimensions in your GA4 property.
First, in the backend, navigate Stores > Configuration > BSS Commerce > Google Analytics 4 > Custom Dimension.
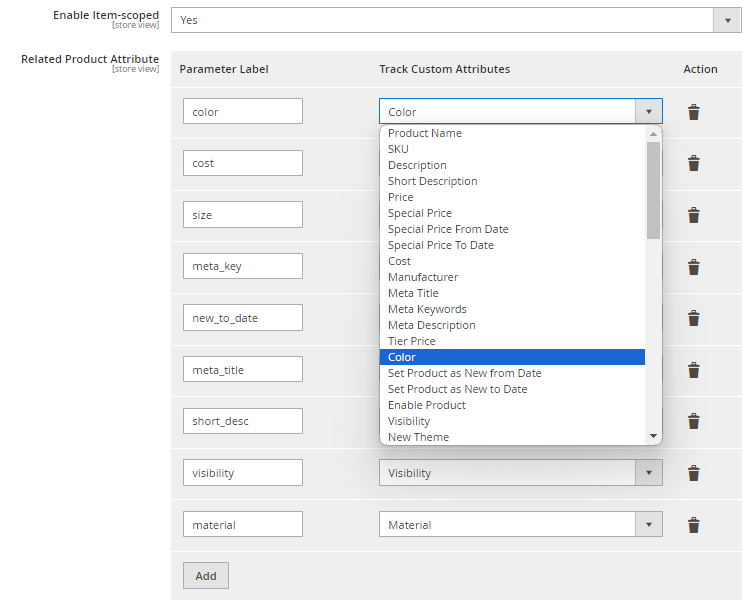
At Enable Item-scoped, choose Yes to enable this function.
At Related Product Attribute:
-
- To add a custom dimension/parameter, click the Add button. You can add only up to 10 custom dimensions.
-
- In Track Custom Attributes column, choose the product attributes you want to add to GA4 tracking.
- In Parameter Label column, you name the dimension/parameter for the selected attribute. Note: this label must have the same name as the item parameter dimension you’re about to add to GA4.
Then click Save Config button to finish.
After that, create the custom dimension in your GA4 property following this guide from Google.
Note:
- The product attributes to be tracked are only supported in these formats: 'text', 'textarea', 'date', 'date/time', 'dropdown', 'multi-select', 'price', 'boolean', 'swatch_visual', 'select', 'swatch_text'.
- With Dimension Name, you can't use hyphens in the name, but you can use underscores and spaces instead.
3.3.2. Expected Results
Note: It usually takes around 24-48 hours for custom parameters to be sent to Google Analytics. During this period, the value displayed will often be "not set".
To view all the dimensions added on GA4, by these ways:
(1) See the list of item-scoped dimensions you add by navigating: Admin > Data Display > Custom Definitions

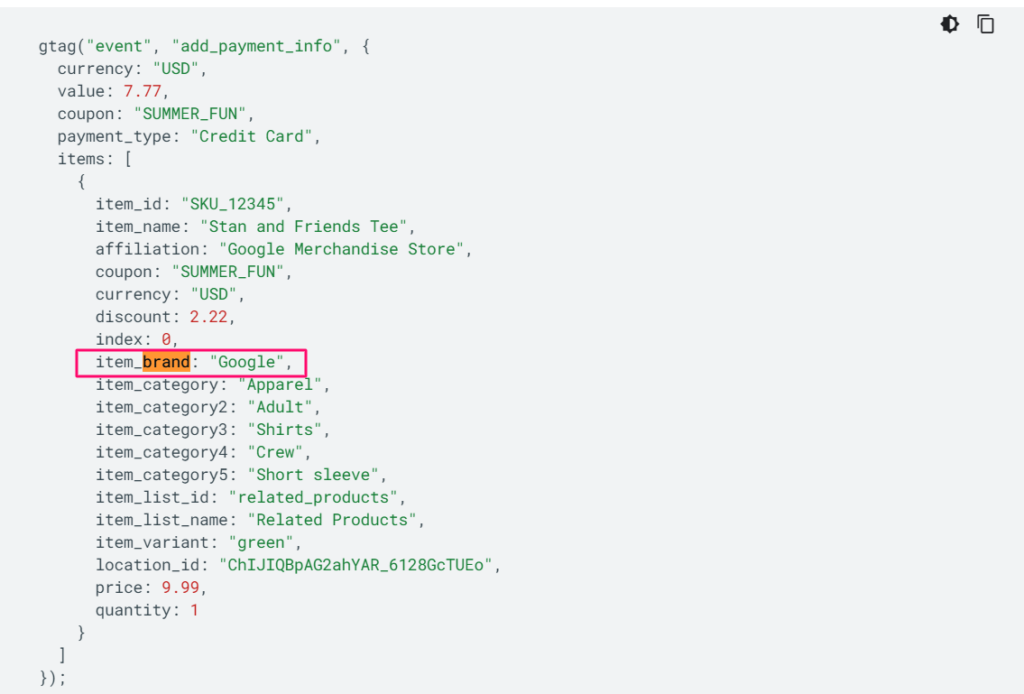
(2) See the custom parameters in ‘purchase’ or 'add_to_cart' events in Google Analytics 4 reports or in Tag Assistant's Data Layer like this:

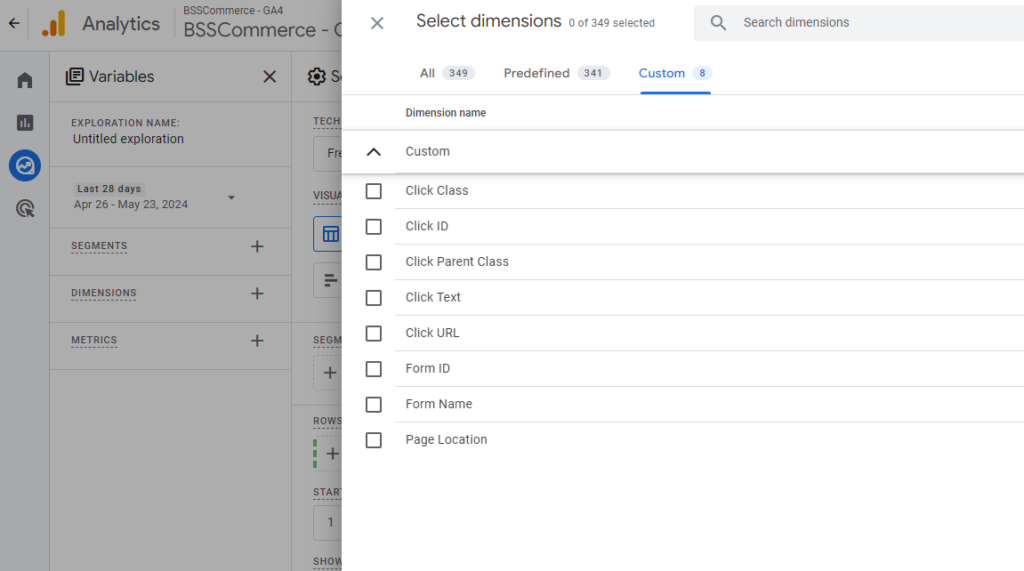
(3) Use in Explore function of GA4:
- Navigate to the Explore. Then select Create New Exploration.
- You will see the Dimensions tab on the left. Click the + button to see all the Dimensions.
- Choose the Custom tab. Then expand the Custom section, and you will see the added dimensions. Now, your custom dimensions are accessible for use in your report.