
1. Overview
Magento 2 Import Export Categories extension allows administrators to import a lot of categories at once via a CSV file.
Admin just needs to prepare a CSV file with all necessary information about categories such as categories id, store id, patent id, name, description, category products, and so on.
Then they make Import settings like the default function, validate the CSV file, and start import categories to websites.
Besides, this extension also helps to export available categories by store ID and category id or even export all categories at once.
EXPLORE Magento 2 Import Export Extension to break the default limit!
Important note:
- If you want to import multiple level categories in 1 file, you need to make sure ALL rows parent category are above rows subcategory.
- Category id in the CSV file will set a temporary relation with parent id. After importing to the new site, the system will automatically generate the new category id ascendingly. However, the category id and parent id columns CAN NOT be the same value as the new category id that will be generated by the system. (So you better add 000 after the numbers in the category id column and parent id column).
2. How Does It Work?
2.1. Export Categories
You go to System ⇒ Export by BSS and select Category in the drop-down list of Entity Type.
You choose CSV in the Export File Format field.
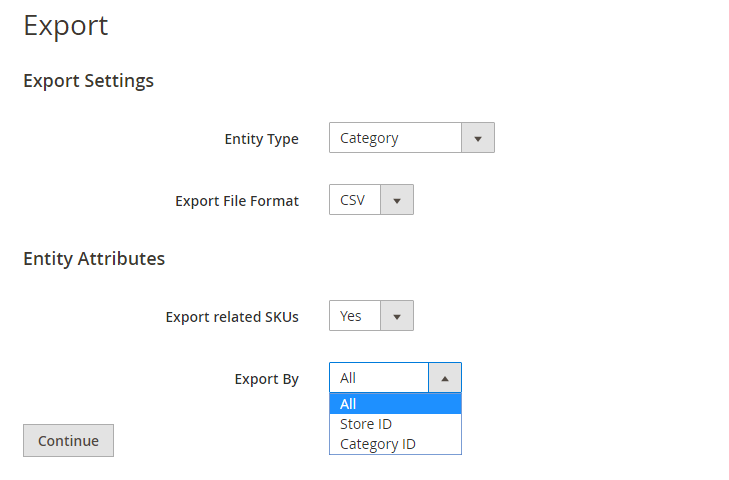
- Step 1: Entity Type choose Category
- Step 2: Export File Format - Choose the file format to export (CSV)
- Step 3: Export Related SKUs - Choose Yes to export including the SKUs of the products from category; if not, choose No
- Step 4: Export By
+ Choose All - Export all categories in the database
+ Choose Store ID - Export following Store ID which is selected from dropdown
+ Choose Category ID - Export following category ID which is entered.
- Step 5: Click to button Continue to process Export
2.2. Import Categories
You go to System ⇒ Import by BSS and select Category in the drop-down list of Entity Type.
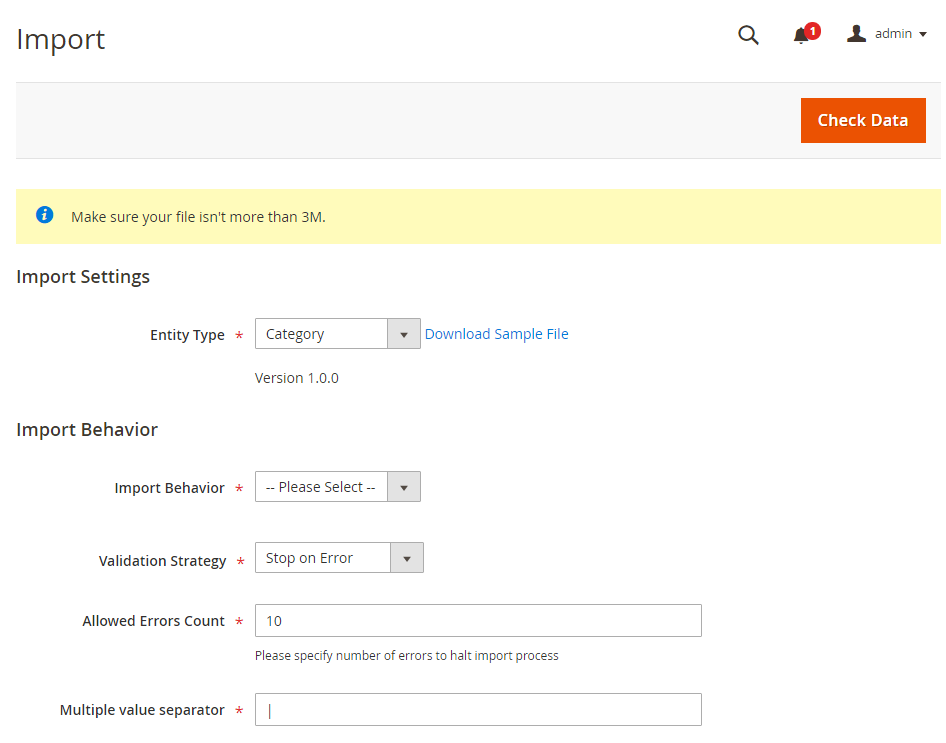
2.2.1. In Import Behavior
- Import Behavior: There are 3 options for you to select.
+ Add/Update: This option allows administrators to add new categories of the website. In addition, it also updates categories if these categories already exist in the database and have the same category _id as data in the CSV file.
+ Replace: The module will delete old categories and then add new ones.
+ Delete: This option allows the system to load categories based on category_id in the CSV file, then delete these categories which are available in the database.
- Validation Strategy: select one option from the drop-down list to determine how the system operates when there are errors in the import process.
+ Stop on Error: the system stops importing when there are errors.
+ Skip error entries: the system skips errors and continues to import.
- Allowed Errors Count: This setting allows you to choose the allowed maximum number of errors when importing. If the number of errors happening in the import process exceeds the maximum number you fill in this field, the system will stop importing.
2.2.2. CSV File Preparation
Before you import categories via a CSV file, you need to prepare the CSV file with enough necessary information. You can download this CSV sample file by clicking Download Sample File. Then you open this file and fill in fields:
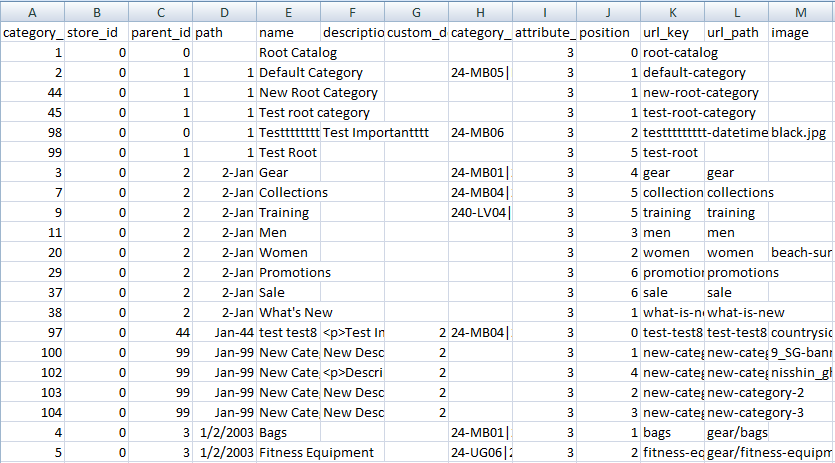
- category_id: Complete category id which is saved in the database.
+ Value of category_id to enter is a Natural number.
+ If you leave it blank, a new category is added.
+ If you enter a value that exists, the module will update data to the category with corresponding ID.
- store_id: Store Id which is available in the store.
+ Value of store_id to enter is a Natural number
+ If you leave it blank, store_id will get the value of 0 (store _id=0). You don't need to fill store_id when adding a new category.
- parent_id: is an ID of the existing category in the database
+ Value of parent_id to enter is a Natural number.
+ If you enter the ID which does not exist, the module will notify as an error in the Check data process.
* Note: If you are using 1.0.1 version:
In case you have to import a new parent category and new children category in the same CSV, take some notices as below:
+ In parent category: enter new category_id.
+ In children category: enter parent_id which is the same as new category_id of the parent category.
As a result, children categories will be imported to the right parent category.
In addition, after importing, IDs of parent category and children category can be different from new category_id which is entered in the CSV file.
- path: This is the path from the root category to the current category.
+ path is a string of characters.
+ When importing, you don't need to enter data for this column.
- name: Name of the category.
+ If you leave it blank, the module will notify as an error in the Check data process.
- description: Detailed description of the category.
- custom_design: Enter ID of the theme used in the category
+ Value of custom_design to enter is a Natural number.
- category_products: Enter SKUs of products assigned to the category. For group products, bundle products, and configurable products, you need to enter SKUs of parent products.
+ If SKU is wrongly entered, the module will skip this SKU and continue to import other SKUs.
+ If SKU has existed in the category, the module will skip this SKU.
+ If the SKU has not yet existed, the module will add it as a new one.
+ category_products has a format as SKU1|SKU2|SKU3.
*Note: You just can add new SKUs to the category in this column, but cannot remove existed SKUs from the category.
- attribute_set_id: ID of attribute set.
+ Value of attribute_set_id to enter is a Natural number.
+ If you leave it blank, the module will take ID of the default attribute set.
- position: Postion of the category in the parent category.
+ Value of position to enter is a Natural number.
- url_key: URL key of the category.
+ If you leave it blank, a new URL key for this category is created based on its name.
- url_path: URL path of the category.
- image_name: Name of image file of the category. Category image should be uploaded to pub/media/catalog/category folder of Magento folder.
- is_active: Enable the category.
+ You enter 0 or 1 for this column. If you enter 1, it means the category status is enabled.
- include_in_menu:
+ You enter 0 or 1 for this column. If you enter 1, the category will be displayed in the menu.
- display_mode: display mode of the category.
+ You can choose one of these values to enter: PRODUCTS, PAGE, and PRODUCTS_AND_PAGE.
- page_layout: choose layout for the category.
+ Values of layout include: 1column, 2columns-left, 2columns-right, 3columns và empty.
- custom_design_from: Time when custom design begins.
+ Standard format is: yyyy-mm-dd or yyyy/mm/dd
- custom_design_to: Time when custom design ends.
+ Standard format is: yyyy-mm-dd or yyyy/mm/dd
- default_sort_by: Select how to sort products of the category on the frontend. For example: sort by name, position, and price.
- available_sort_by: Sorting type can be allowed to use in the category. They can be name, position or name or you can combine all of them.
+ Standard format is: sort1|sort2|sort3
- is_anchor: You can enter 0 or 1 in this column.
- custom_use_parent_settings: Select whether applying parent category's settings or not.
- layered_navigation_price_step:
+ value of layered_navigation_price_step is a decimal number.
- custom_apply_to_products: You can enter 0 or 1 in this column.
- If you want to use exported categories to import into another website with Delete import behavior, you need to remove rows of system root category (ID=1) and store root category in the CSV file because default Magento doesn't allow you to delete root category.
- If you want to import the whole category tree, you need to arrange parent category and children categories to the right order in the CSV file. The first is the parent category, and the next are children categories.
2.2.3. Add the new category into a new site
- Step 1: Export Category from the old site
Note: Export By choose Store ID, Choose Store via ALL (Avoid the case of exporting a category having many rows in different store views, when importing will report the URL key existed)
- Step 2: Open file CSV which is exported, edit store_id ALL into 0, delete the Root Catalog lines and then save again.
- Step 3: Admin > System > Data Transfer > Import by BSS
In Entity Type chooses Category, Import Behavior choose Add/Update, click to choose file to upload the edited file.
- Step 4: Click the button check date to check data in the CSV file before importing.
- Step 5: Click the Import/Import By Cron button to process import.
*Note: Read section 2.2.5 to learn the difference between Import and Import By Cron.
2.2.3. Update category following each storeview (If the value is not set differently according to the store view, there is no need to update)
- Step 1:
+ On the site just importing on part I, process Export Category to get the right category id
+ Export By: - choose All if need to update all storeview
- choose Store ID -> Choose Store and storeview which is needed to export
- Step 2: Open the CSV file which is just exported, then process to edit the file:
+ Delete Root Catalog lines
+ Delete Root Category lines (parent_id = 1) (because these lines rarely need to be updated according to the storeview)
- Step 3: Admin > System > Data Transfer > Import by BSS
Entity Type choose Category, Import Behavior choose Add/Update, click choose file to upload edited file
- Step 4: Click the button check date to check the data in the CSV file before importing.
- Step 5: Click the Import/Import By Cron button to process import.
*Note: Read section 2.2.5 to learn the difference between Import and Import By Cron.
2.2.4. Check Data and Import
After you select the CSV file, you need to click the Check Data button to validate data before importing.
- If your CSV file is free from errors, there is a message to notify validation results and the Import and Import By Cron button now appears to click.

You click the Import or Import By Cron button to start importing categories in the CSV file into Magento 2 website.
*Note: Read section 2.2.5 to learn the difference between Import and Import By Cron.
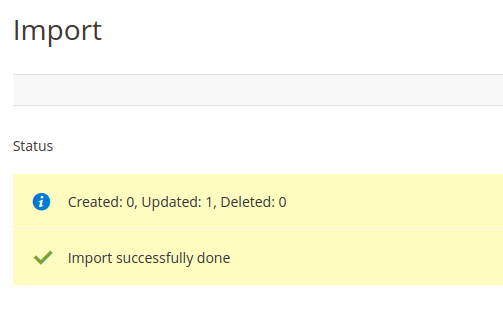
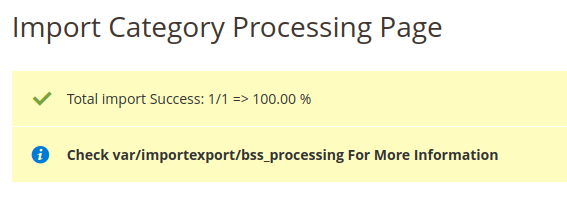
Then a notification about the results of the import process will be displayed.
- If your CSV file includes errors, the Import button cannot be displayed for you to click, and there is a notification about these problems.
2.2.5. Import & Import by cron
Import: After importing, you will be redirected to the import status page, which only shows the import result.
Import By Cron: After importing, you will be redirected to the import process page. You can reload the result report page to see the import process result in detail.
More Magento 2 Import Export extension from BSSCommerce are useful for your work: