
1. Overview
Magento 2 Administration Package is a comprehensive solution to assist admin in carrying out essential tasks and managing activities in the backend of a Magento 2 website. It includes 13 extensions:
|
+ Admin Email Notification + Admin Action Log + Admin Product Preview Plus + Inventory Report + Guest to Customer + Custom Order Number + Auto Invoice |
+ Product Grid Inline Editor + Duplicate CMS Page/Block + Delete Order + Reindex from the Backend + Custom Product Attribute Export + Disable Compare |
2. How Does It Work?
2.1. Admin Email Notification
Please go to Store ⇒ Configuration ⇒ BSSCommerce ⇒ Admin Email Notification.
2.1.1. Select Email sender
 In Email Sender: choose an email from your system to send notification emails.
2.1.2. New Order Notification Email
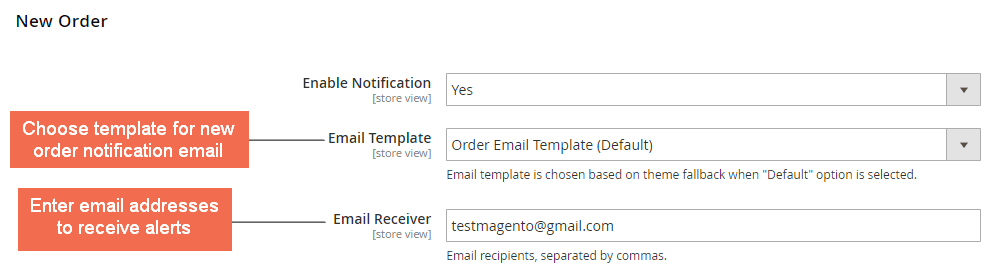
In Enable Notification: choose Yes to enable notification email when a new order has been placed, or Not to disable it.
In Email Template: select email template for new order notification email. This module has a default email template but you can create your new email template to apply to this config. (Marketing → Email Templates)
In Email Receiver: enter email addresses to receive the notifications, the emails are separated by commas (,). This module supports sending multiple emails.
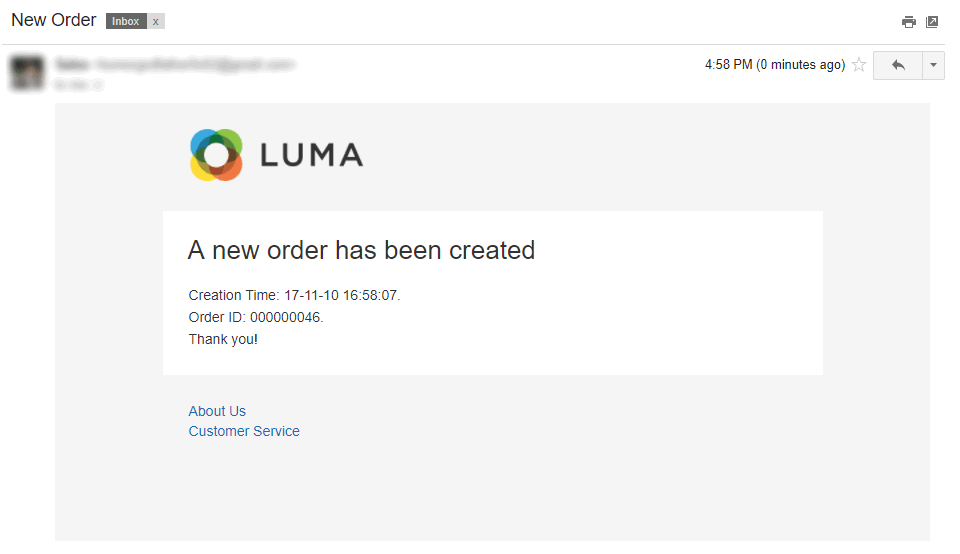
- Output Email (default template)
2.1.3. Low stock products
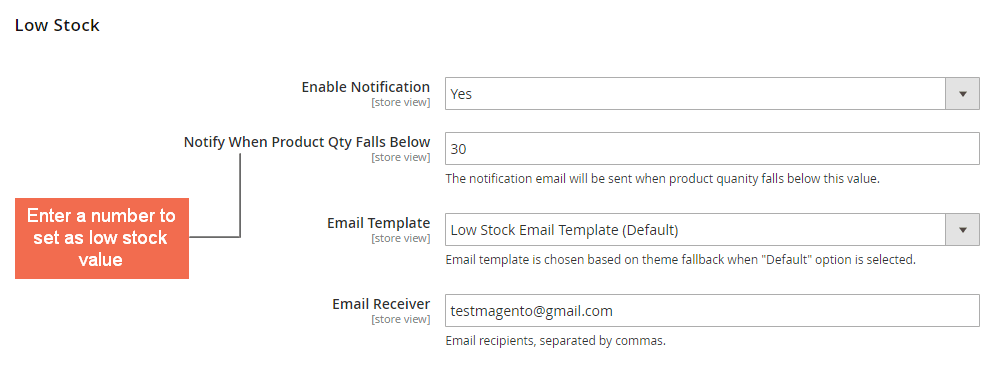
In Enable Notification: choose Yes to enable notification email when a product becomes low stock, or Not to disable it.
In Notify When Product Qty Falls Below: enter a number to set as low stock value. The notification email will be sent if product quantity falls below this value.
In Email Template: select email template for low stock notification email. This module has a default email template but you can create your new email template to apply to this config. (Marketing → Email Templates)
In Email Receiver: enter email addresses to receive the notifications, the emails are separated by commas (,). This module supports sending multiple emails.
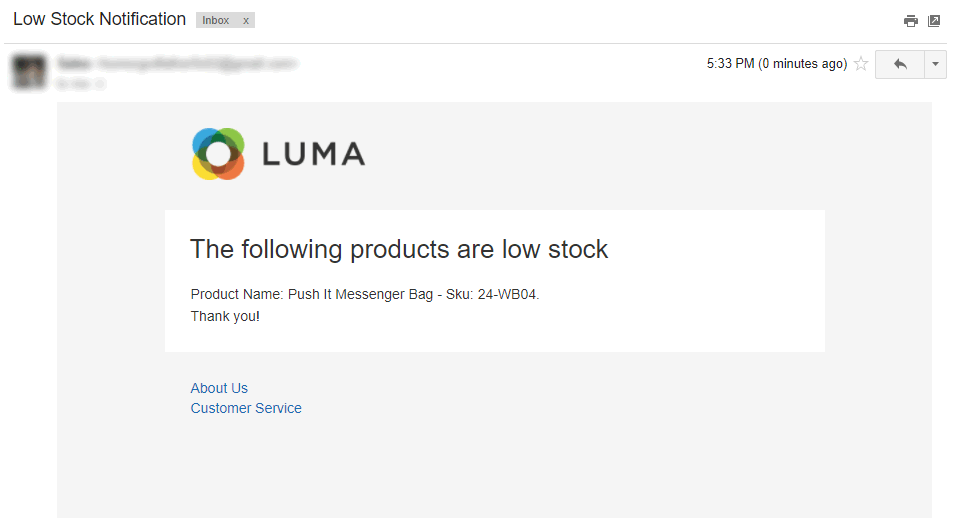
- Output email (default template)
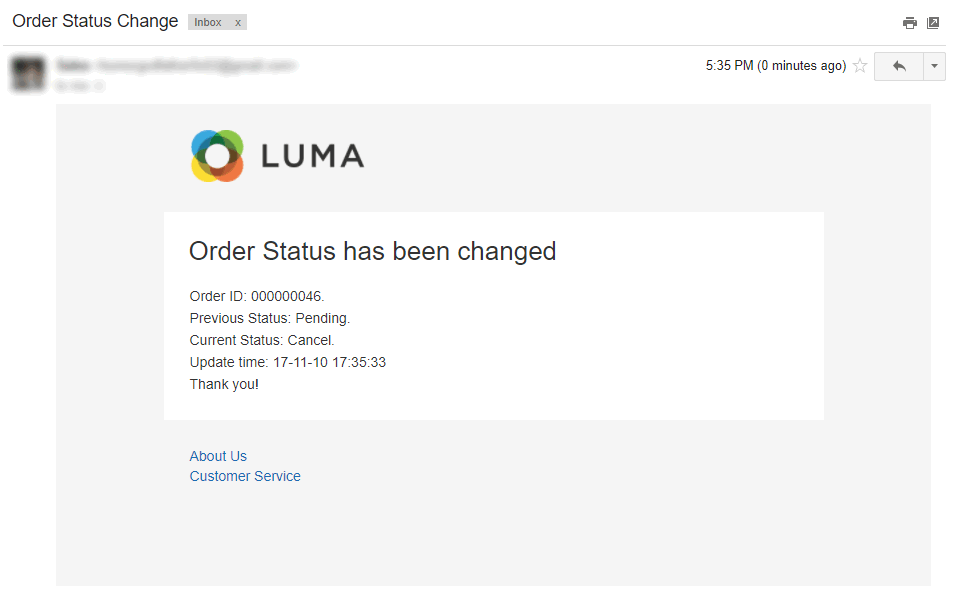
2.1.4. Order status change
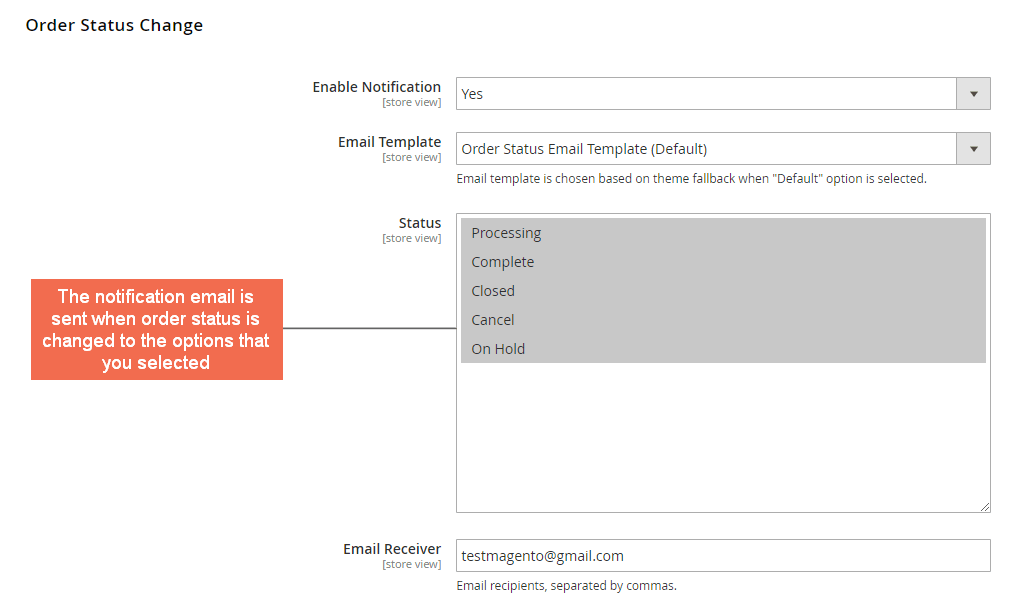
In Enable Notification: choose Yes to enable notification email when order status has been changed, or Not to disable it.
In Email Template: select email template for order status change notification email. This module has a default email template but you can create your new email template to apply to this config. (Marketing → Email Templates)
In Status: select statuses that you want to receive email when order status change to what you selected.
In Email Receiver: enter email addresses to receive the notifications, the emails are separated by commas (,). This module supports sending multiple emails.
- Output email (default)
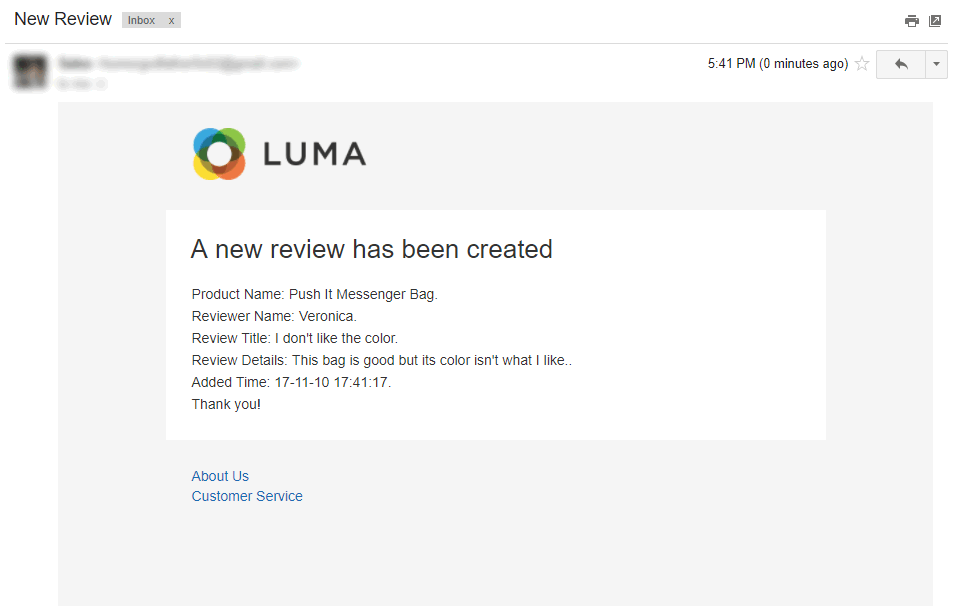
2.1.5. New review
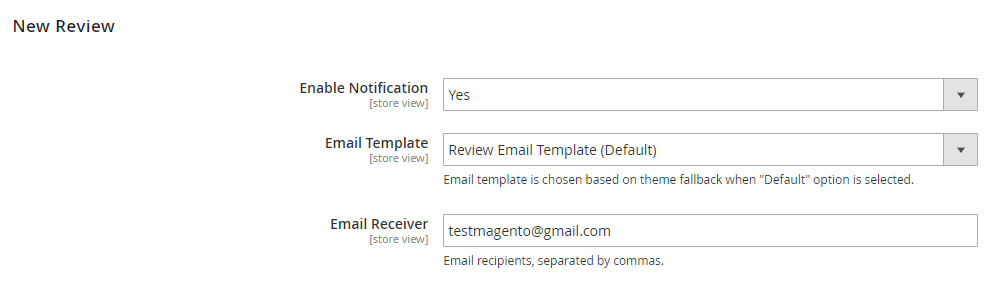 You can customize this section the same as New Order Notification Email.
- Output Email (default template)
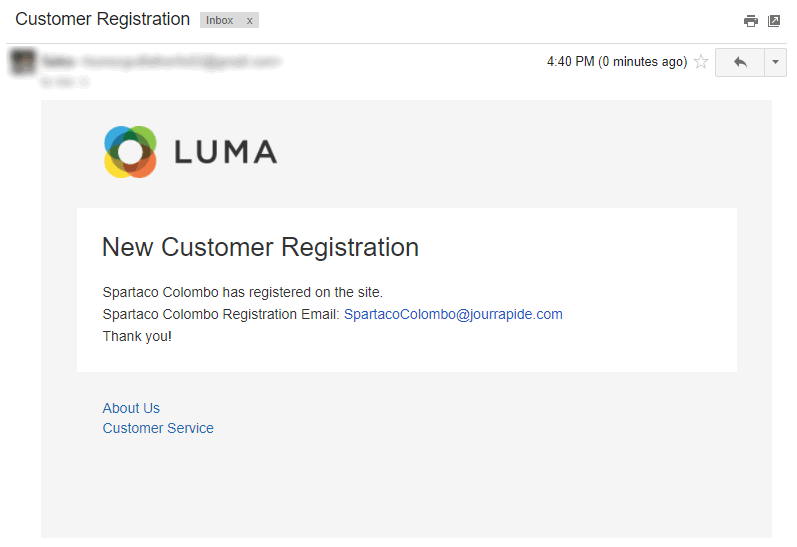
2.1.6. New customer registration
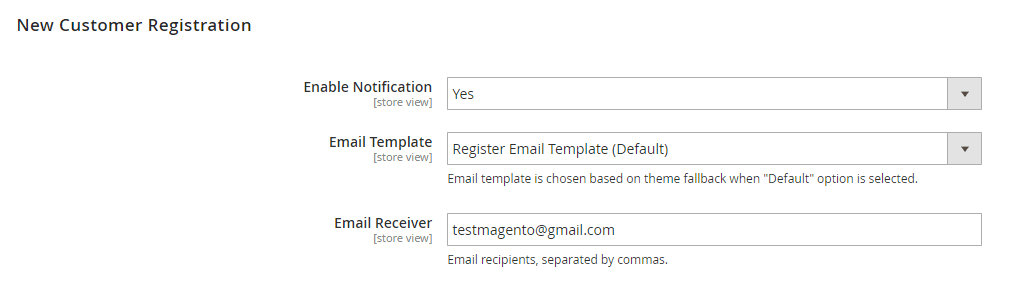 You can customize this section the same as New Order Notification Email.
- Output email (default template)
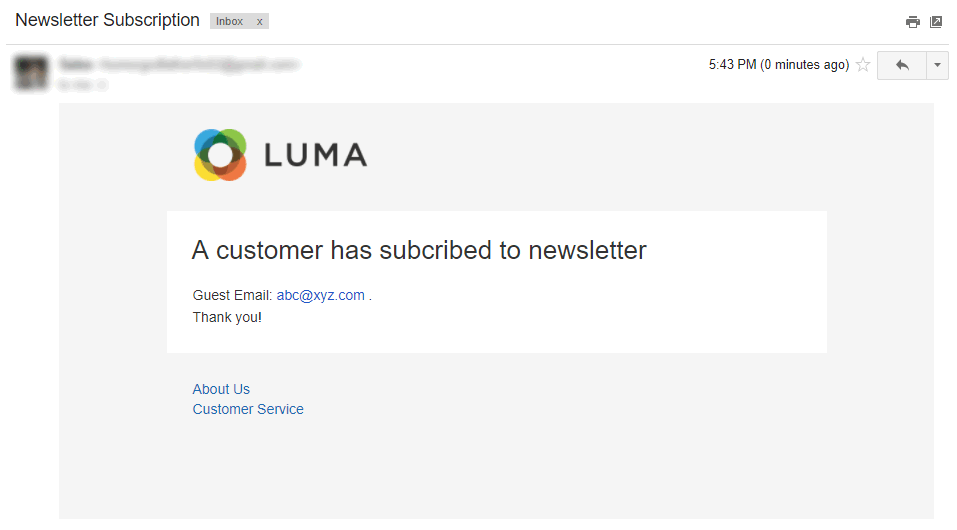
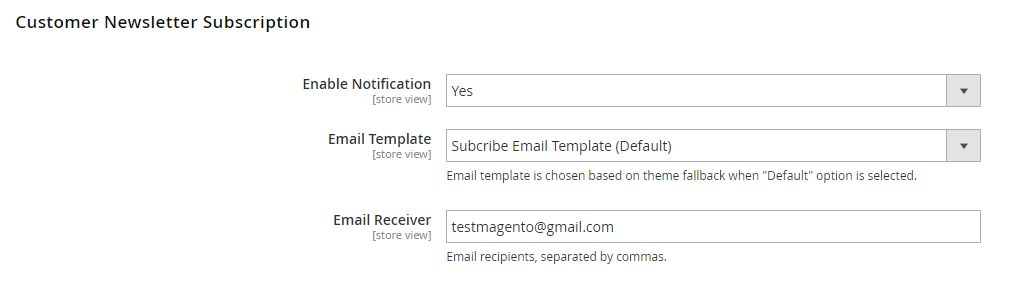
2.1.7. Customer newsletter subscription
 You can customize this section the same as New Order Notification Email.
- Output email (default template)
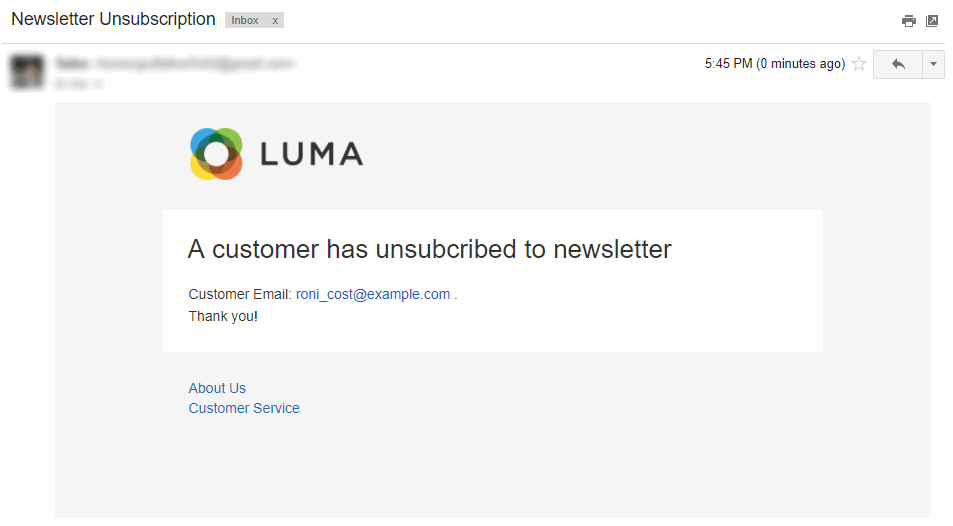
2.1.8. Customer newsletter unsubscription
 You can customize this section the same as New Order Notification Email.
- Output email (default template)
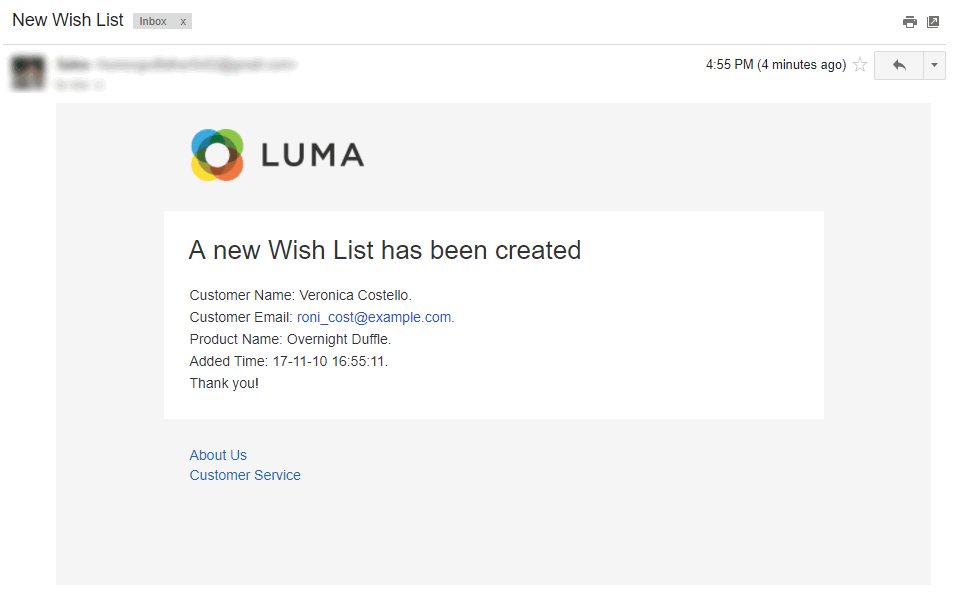
2.1.9. New wish list
The new wish list notification email will be sent only when customers add products to wishlist the first time. 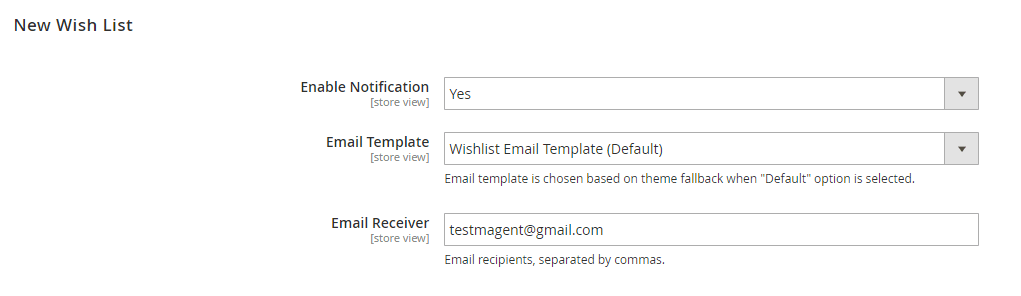 You can customize this section the same as New Order Notification Email.
- Output email (default template)
***Note: After setting, you need to press Save Config button to save your configuration then flush cache to start using the module.
2.2. Admin Action Log
2.2.1 General configs
Please go to Store ⇒ Configuration ⇒ BSSCommerce ⇒ Admin Action Log.
In Enabled: choose Yes to enable the module, or No to disable it.
In Automatically Clear Action Logs after…Days: enter a number (days) to set how long the log records will be deleted automatically.
In Enable Objects: Select objects to log actions related to. 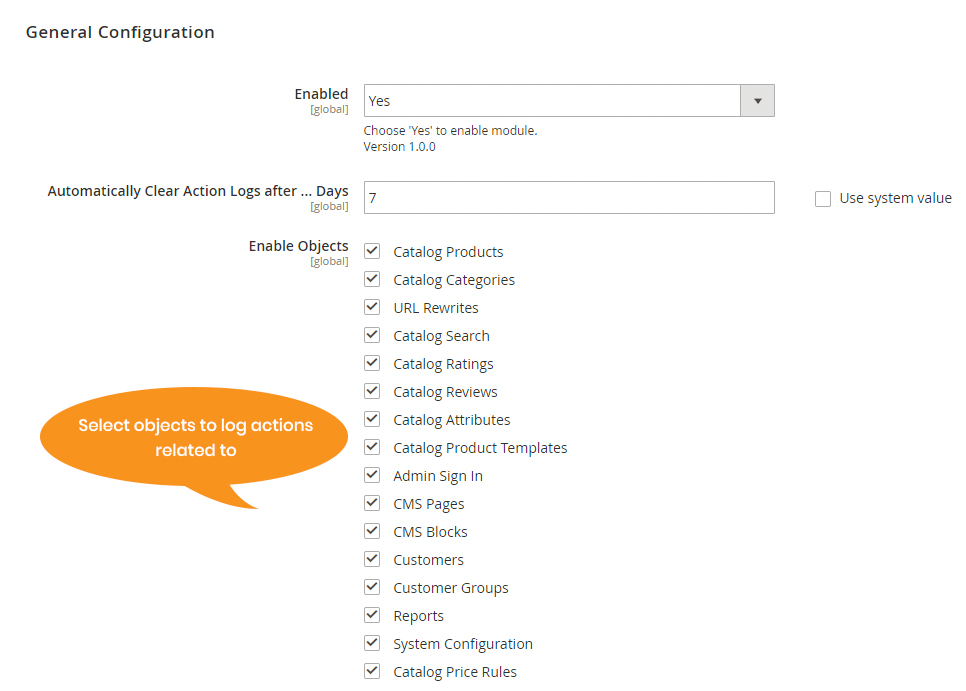
2.2.2. Admin action log
2.2.2.1 Action Logs Grid
Please go to Amin Panel ⇒ Admin Action Log ⇒ Admin Logs Grid. 
In Date column: the date and time when action is performed.
In User Name column: show user name of the admin.
In IP Address column: the IP Address of the corresponding admin user.
In Action Name column: full name of the action.
In Action Type column: display type of action, including Delete, Mass Delete, Save, Edit, Flush, View, Login, Print,…
In Object column: object of the action, this extension only logs actions related to objects selected in the General Configuration above.
In Specific Object column: the specific object was affected by the action.
In Result column: the result of the action, it can be “Success” or “Failure”.
In View column: click on “View” link to preview action log detailed page.
2.2.2.2. Action Log Details Page
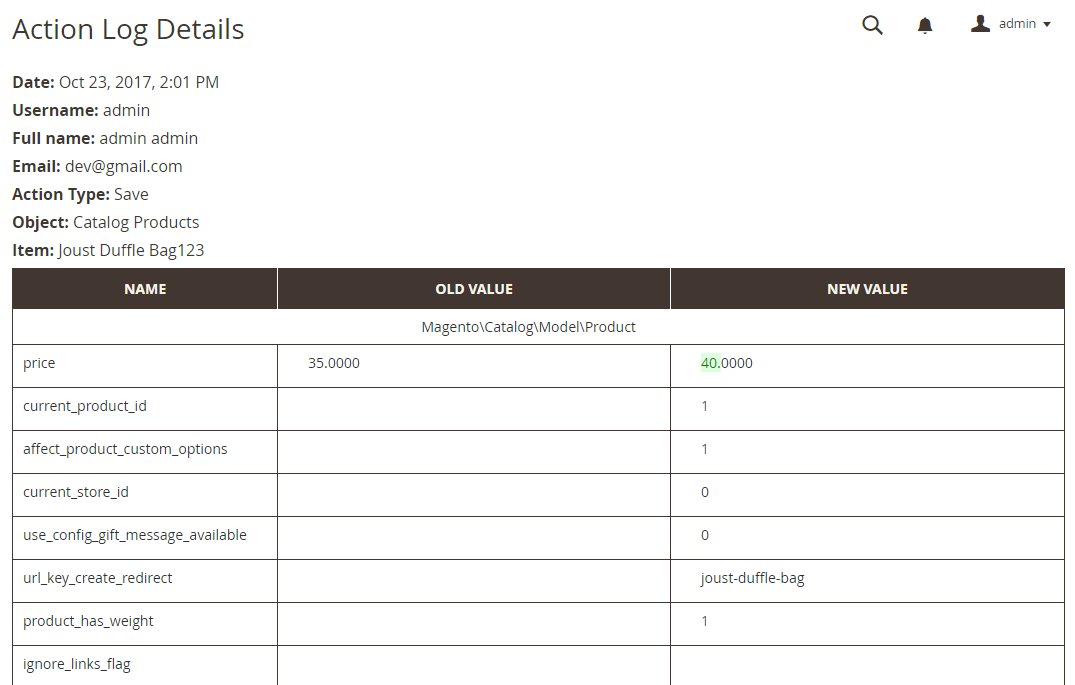 The Action Log Details page displays:
- The general information of the action displayed in the grid
- A table shows all detailed information about the action, including:
+ Source data (it is the line Magento\Catalog\Model\Product in the screenshot above)
+ Name column: name of item attributes
+ Old Value column: the value of attributes before performing the action
+ New Value column: the value of attributes after performing the action. The changed value is highlighted to realize easily.
***Note: The table showing detailed changes in attribute value will be disabled for some action types such as Login, View, Flush, Delete, Mass Delete, Create,...
- Revert action
This extension allows you to revert actions affecting configs of System Configuration object change in case these modifications are incorrect. Please notice that you can only restore the changes of configs in Store → Configuration. 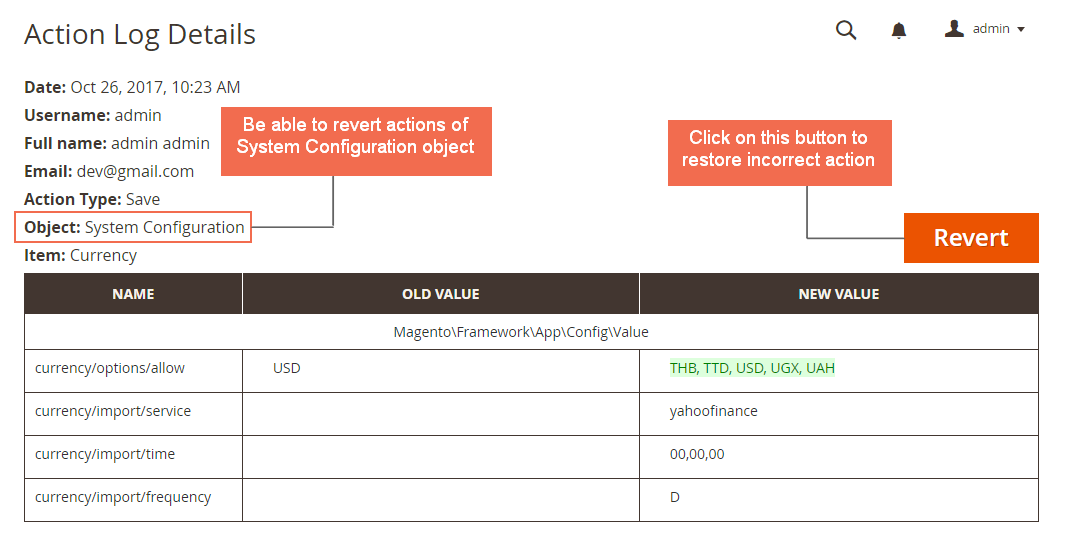
2.2.3. Login action grid
Please go to Admin Panel ⇒ Admin Action Log ⇒ Login Action Grid. The Login action Grid displays all login attempts of administrators to your store backend. 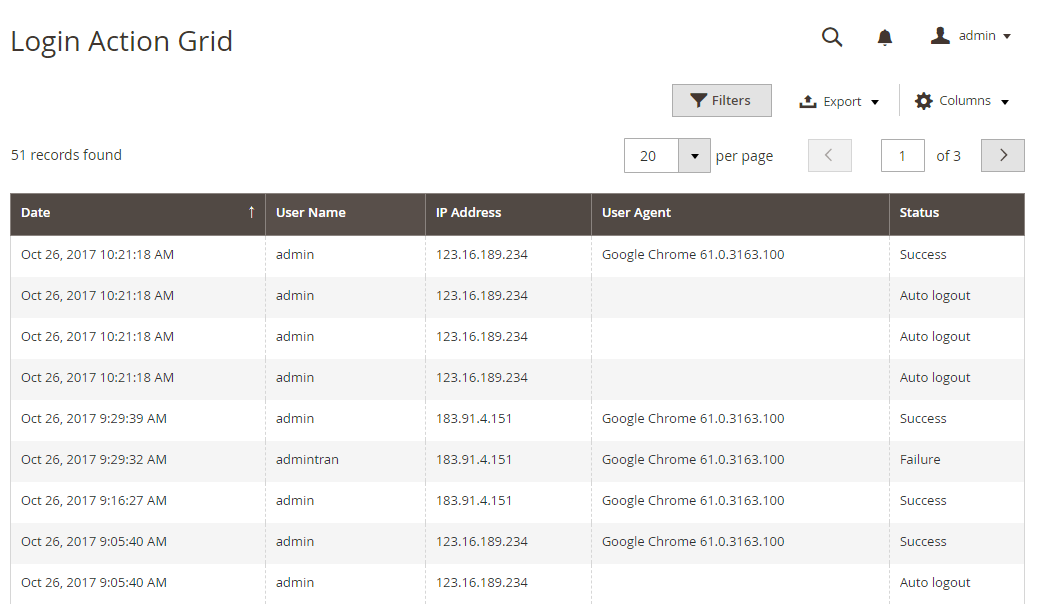
In Date column: the specific date and time when the user logins to the backend.
In User Name column: the name of the user who logins to the backend.
In IP Address column: IP address of the admin user.
In User Agent column: web-browsers that admin uses to login.
In Status column: the result of login action such as Success Failure, Auto Logout.
2.2.4. Page visit history
2.2.4.1. Page Visit History Grid
Please go to Admin Panel ⇒ Admin Action Log ⇒ Page Visit History The Page Visit History grid shows the browsing history of admins in each session. 
In User Name column: the user name of the administrator.
In Full Name column: full name of admin account.
In IP Address column: IP Address of the admin user.
In Session Start column: the specific time when a session started.
In Session End column: the specific time when the session ended. In case the session is currently active, the Session End field will be blank.
In View column: link to Page Visit Details of each session.
2.2.4.2. Page Visit Details
Please click on “View” link in View column to see the Page Visit Details of a specific session. 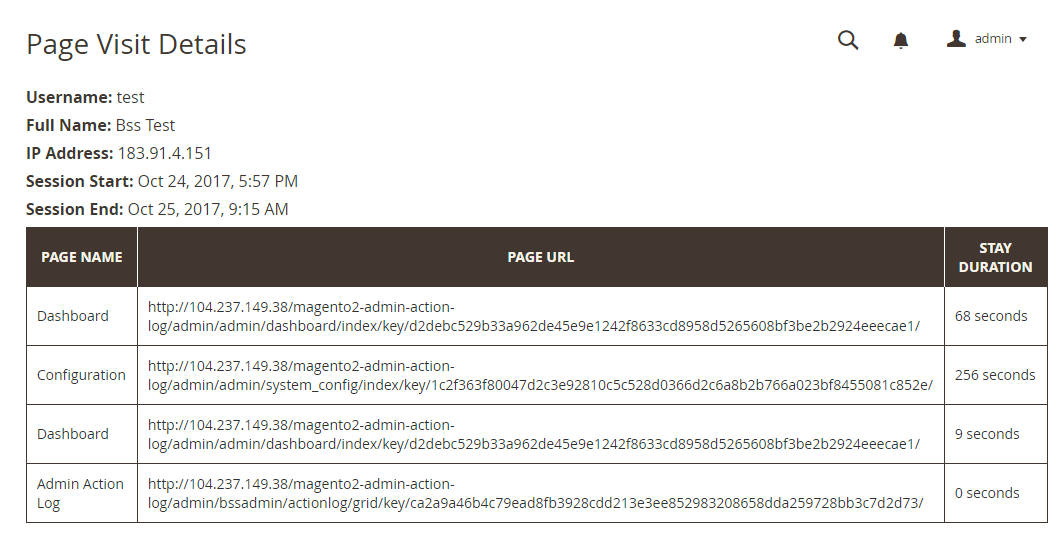 The first part is the general information displayed in the Page Visit History Grid.
A table lists all pages that the user visited in a session:
- In Page Name column: the title of the visited page
- In Page URL column: the URL link of this page
- In Stay Duration column: the duration time that the admin user stayed on the page.
2.2.5. Active session grid
Please go to Admin Panel ⇒ Admin Action Log ⇒ Active Sessions
The Active Sessions Grid lets you know who is online in your backend store. 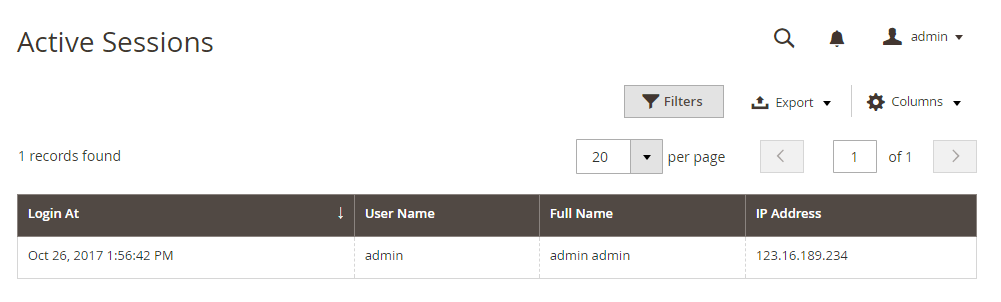
In Login At column: specific date and time that user logins to the backend.
In User Name column: user name of the admin.
In Full Name column: full name of the admin.
In IP Address column: IP Address of the admin user.
2.2.6. Admin user roles
Please go to System ⇒ Permissions ⇒ User Roles, press Role Resources tab 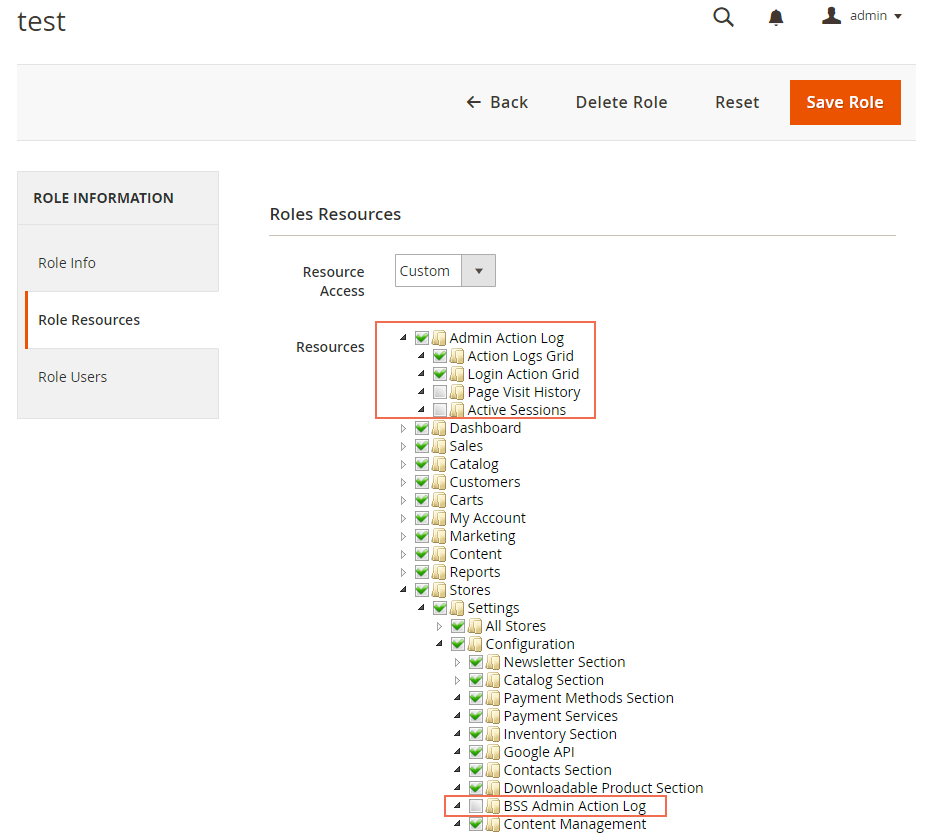 In the tree, mark the checkbox related to this module to allow the admin to access the module and action log pages, or don’t mark the checkbox related to this module to disable module settings and action log pages with the admin.
When complete, tap the “Save Role” button.
2.2.7. Email notification when quantity changes
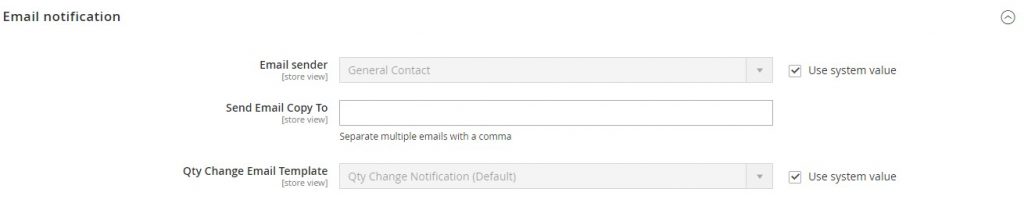
Here, you can set up:
Email sender: The default is General Contact. If you want to change the config, uncheck the Use system value box then choose from the drop-down field.
Send Email Copy To: Fill in the email you want to recieve the email nofication. You can enter multiple email here, use a comma to separate them.
Qty Change Email Template: The default is Qty Change Notification. If you want to change the config, uncheck the Use system value box then choose from the drop-down field.
2.3. Product Preview Plus
2.3.1. In Stores
Please navigate to Stores ⇒ Settings ⇒ Configuration.
In General Configuration.

In Enabled Admin Preview, choose Yes to enable module or choose No to disable module.
In Product Grid Preview Button Position, set position of product grid preview button by choosing In New Column or In Action Column.
In Customer Grid Login Button Column, set position of column of customer Log-in button by choosing In New Column or In Action Column.
In Product Preview Link Type, choose Frontend or Backend to decide the navigation of preview links.
In Disable Page Cache For Admin User, choose Yes to activate automatic cache flush before admin log in as customer and set show Product Preview Link Type to Frontend, otherwise choose No.
In Show Edit Link In Frontend For, choose one or multiple pages to place Edit Page buttons which directs admin to backend Edit Page from the frontend.
2.3.2. In Sales
Please go to Sales ⇒ Operations ⇒ Orders.
Then check the Sales Order Grid table consisting of various columns, in which Bill-to-name column presenting names of customers who have placed orders on site, and Item Ordered column displaying brief information of ordered product (SKU, name, image…)

Click the name of the customer to navigate to Customer Information section in the backend to check or make changes if needed.
Click the name of the product to see the preview of Product Page in the frontend.
2.3.3. In Products
2.3.3.1. Preview Products
To get preview of products, please navigate to Products ⇒ Catalog
Click Preview button in product grid view in Catalog section to see the preview of Product Page in the frontend, make changes in product information in Edit if necessary and click save.
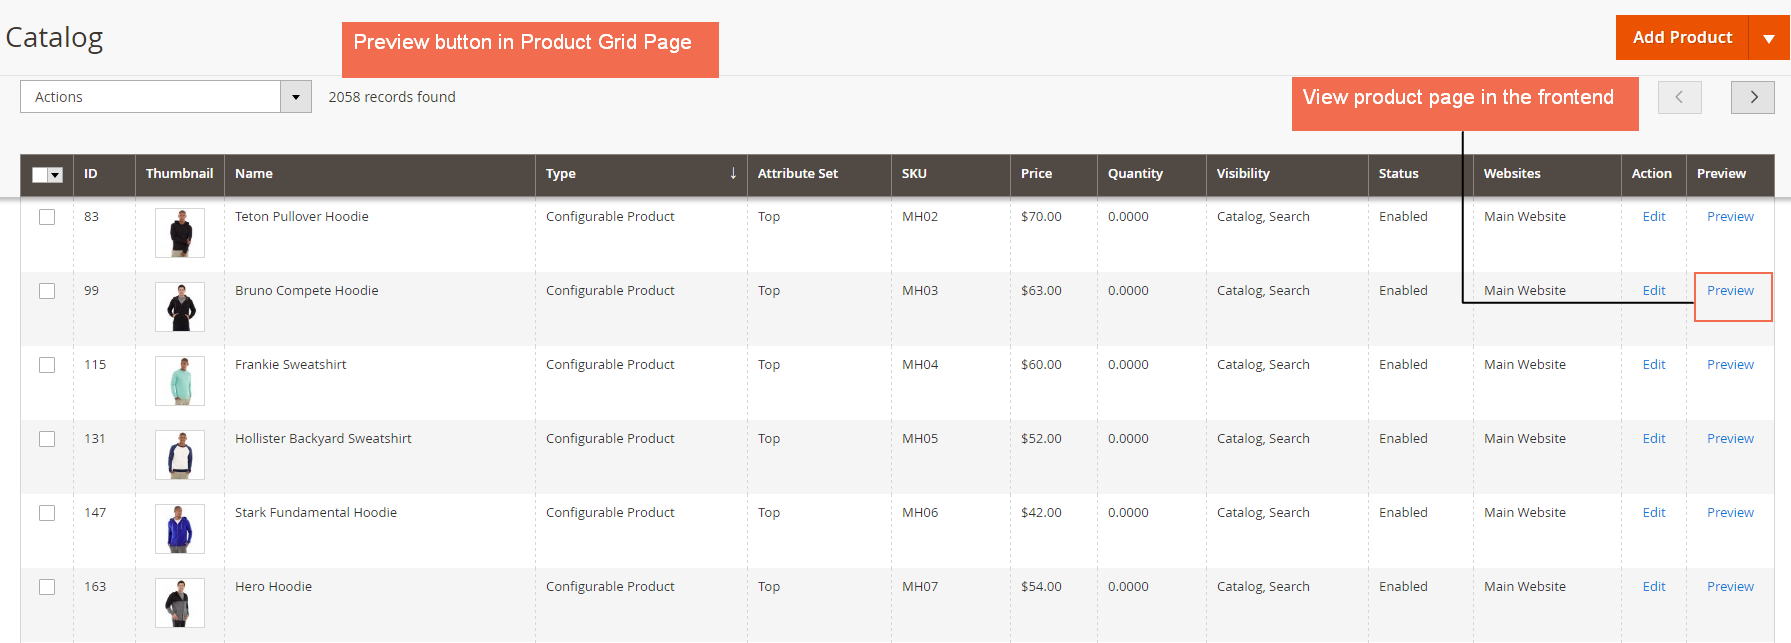
Admin need to enable the product to use the Preview button; however, you can decide to show that product to customers or not by using the Admin Preview attribute on Product Edit Page in the backend.
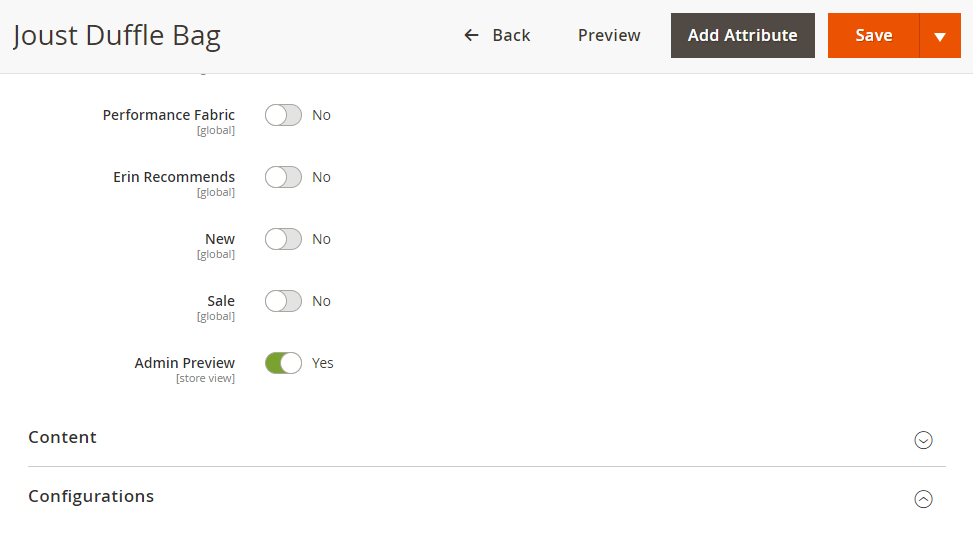
If choose Yes for the Admin Preview attribute, only you can see the preview of that product by clicking the Preview button. Customers can't search or see that product.
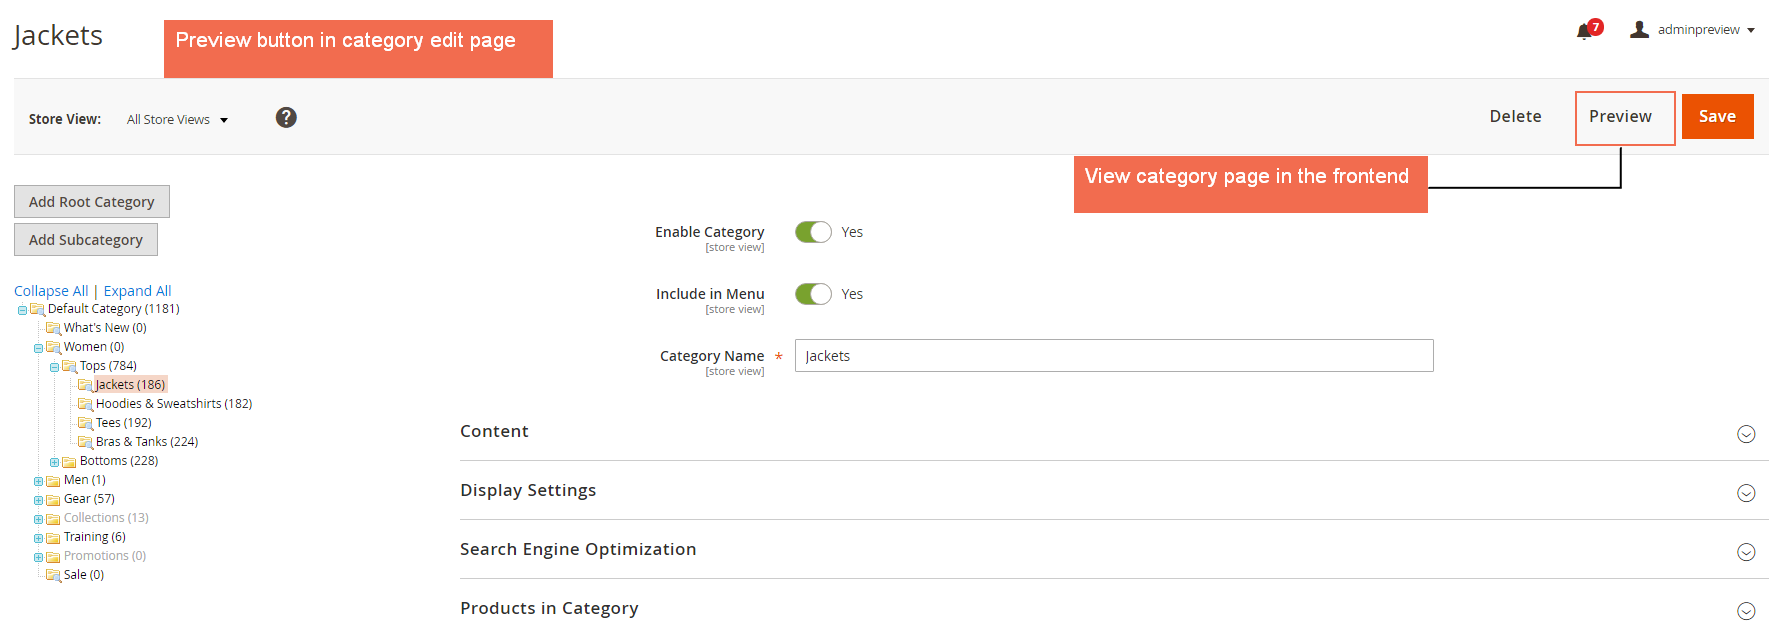
2.3.3.2. Preview Categories
To get the preview of categories, please go to Products ⇒ Categories
Check the list of Category Pages, make changes if needed, click Save then use Preview button to check the frontend display of the chosen Category Page.
2.3.4. In Customers
Please go to Customers ⇒ All customers Click Login button to log in customer account from the backend.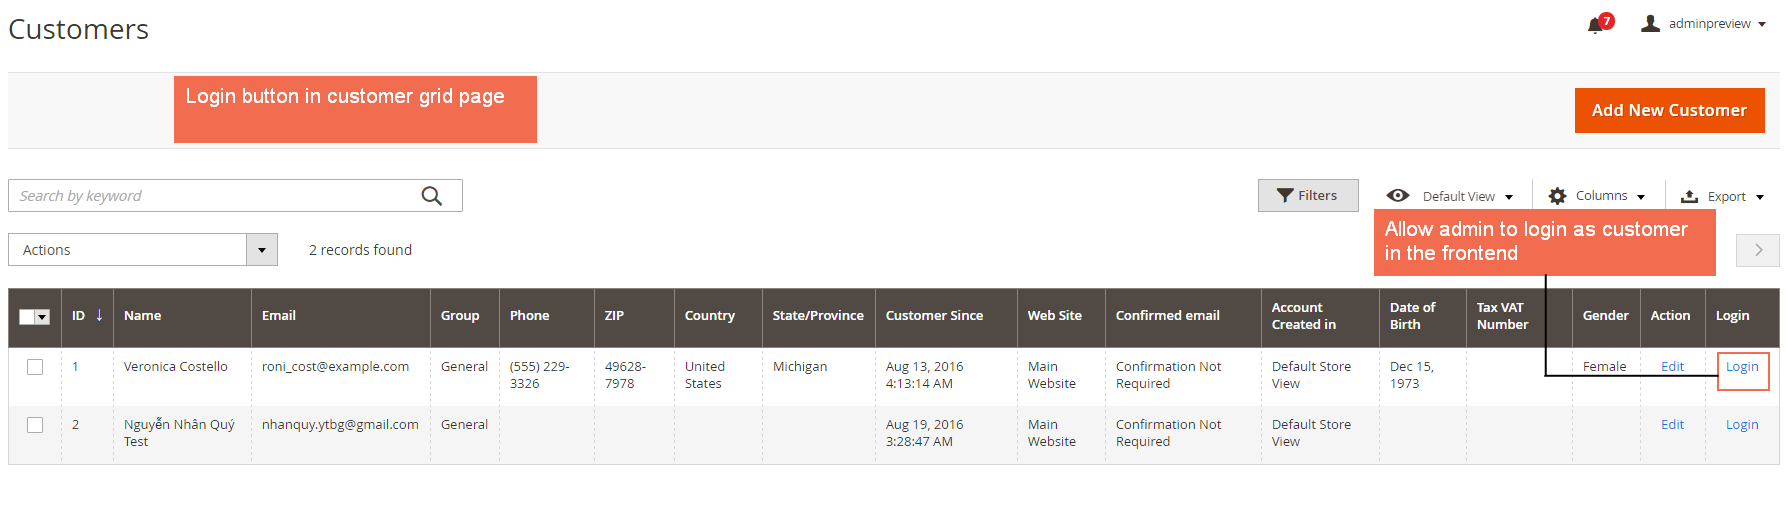 The module will permit admins to log in as customer in frontend page. In Customers ⇒ Login As Customer Log.
 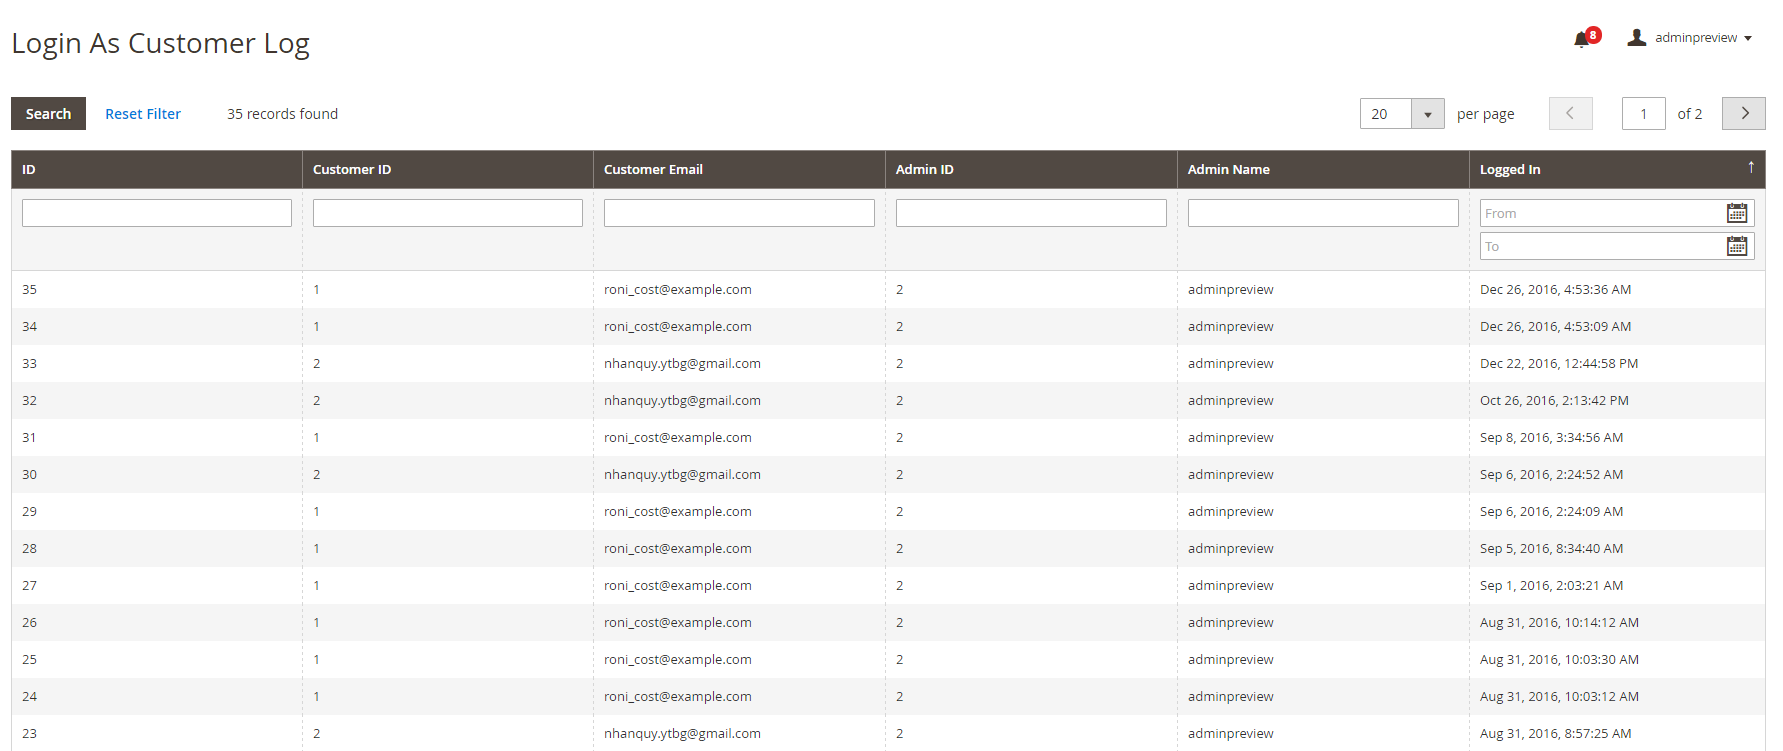 Login As Customer Log shows history of how many times admin has logged in as customer in the frontend.
2.3.5. In Content
Please go to Content ⇒ Elements ⇒ Pages.
Check the list of CMS Pages, click select and choose Edit to make changes in the content of CMS Pages, then click Save.
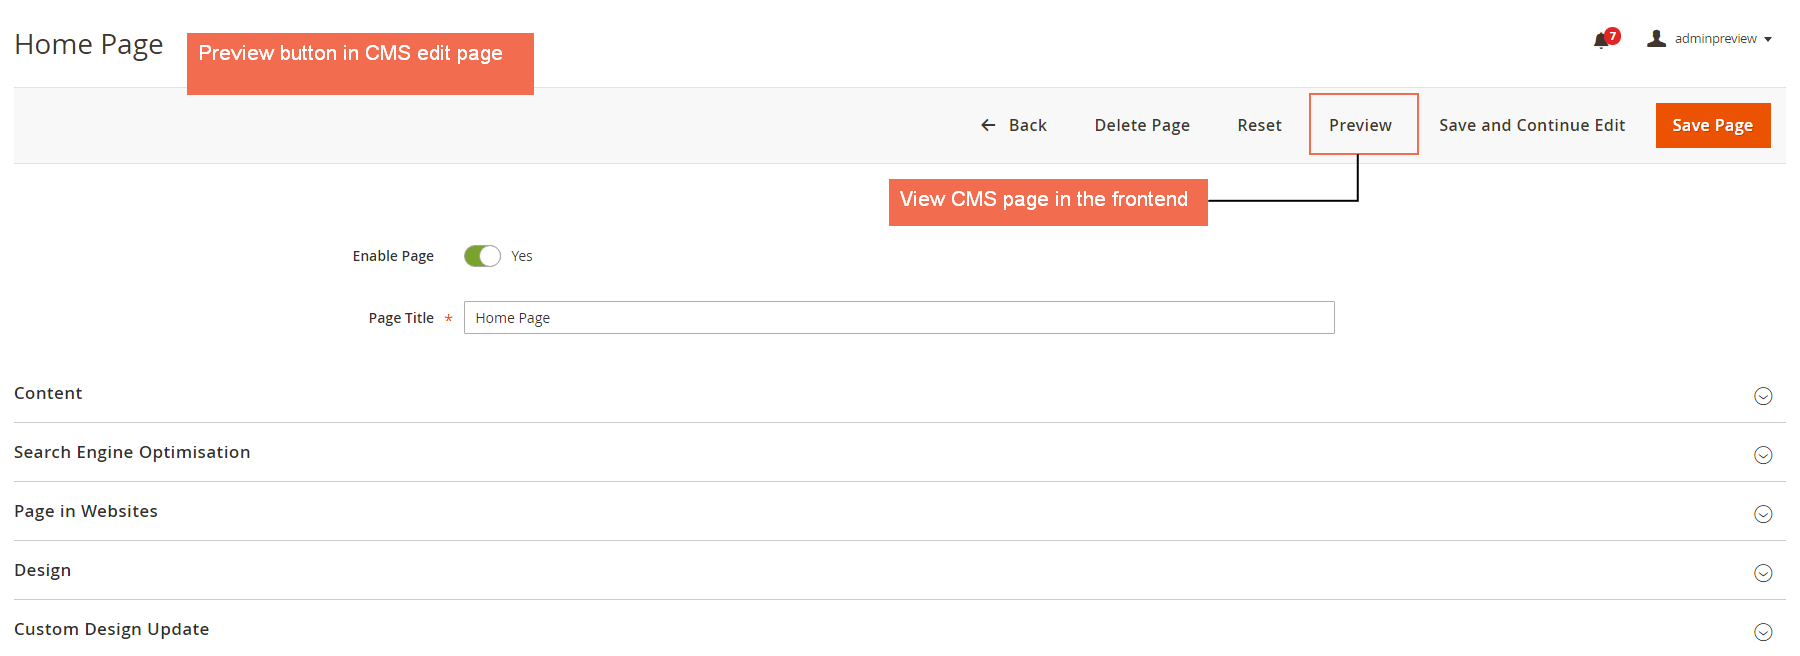
In Edit CMS page, make changes if necessary, click Save Page and use Preview button to check frontend display of the edited page.
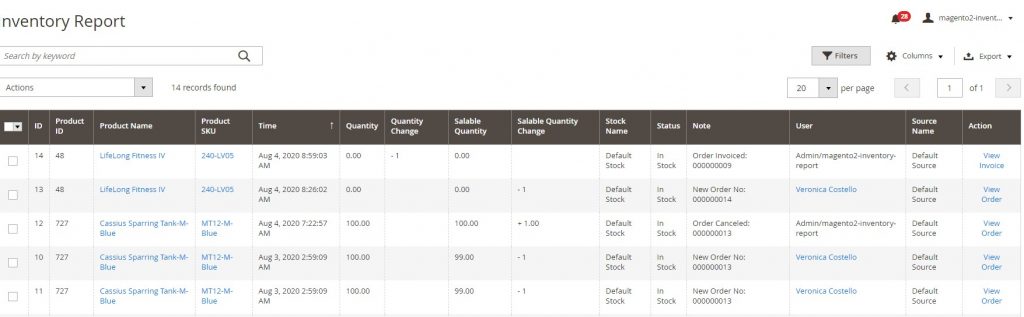
2.4. Inventory Report
2.4.1. Inventory Report for all products
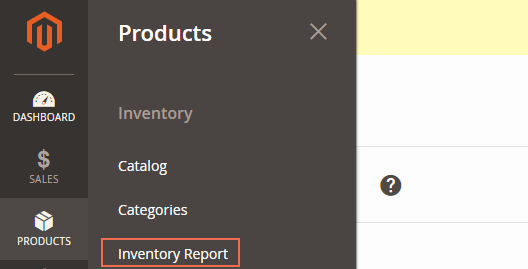
Please go to Admin ⇒ Products ⇒ Inventory ⇒ Inventory Report.
A grid logging all product stock movement will appear.
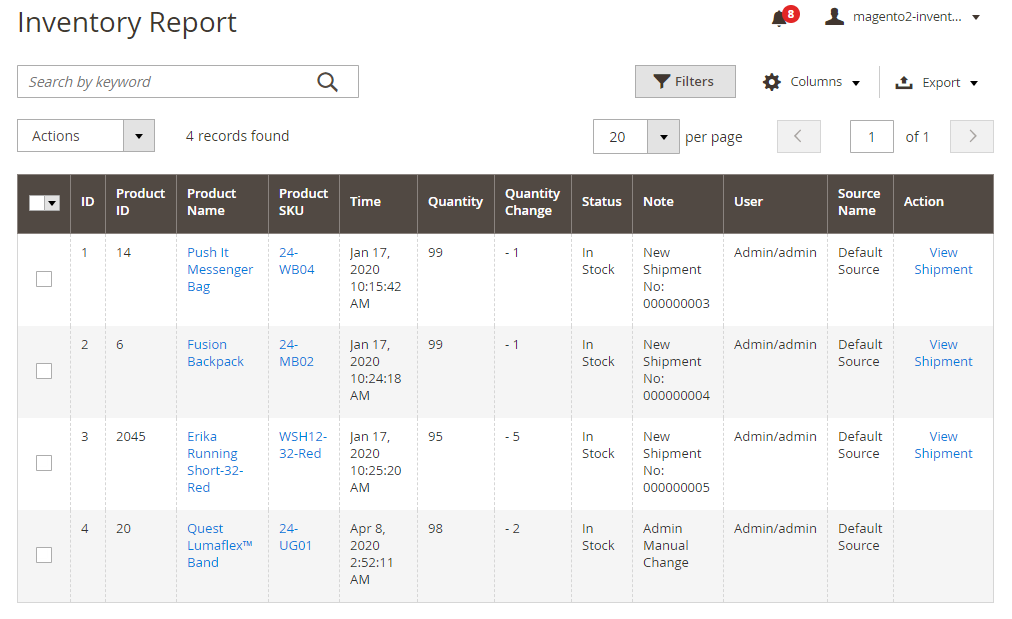
In ID column: ID of the change in product inventory.
In Product ID column: ID of product that is changed quantity.
In Product Name column: product name linked to product edit page.
In Product SKU: product SKU and it is linked to product edit page.
In Time column: the time that the inventory is modified. It depends on settings in Admin ⇒ Configuration ⇒ General ⇒ Locale Options. Click on the arrow (↑ or ↓) to change the order of time quickly.
In Quantity column: current quantity of product.
In Quantity Change column: quantity of products that are modified.
In Stock Status column: stock status of product (In Stock/Out of Stock)
In Note column: note the action that makes quantity change, such as Order Creation No, Order Cancellation No, Credit Memo Refund No, Import Product, Admin Manual Change and Change stock by REST API. (the order number is attached to the notes relating to order)
In User column: display who makes the product inventory change.
In Source Name column: new function in Magento 2.3 specifies the name of warehourses or physical stores where you get products to ship to customers.
In Action column: click on View Order or View Memo to see the detailed order or detailed credit memo.
New update:
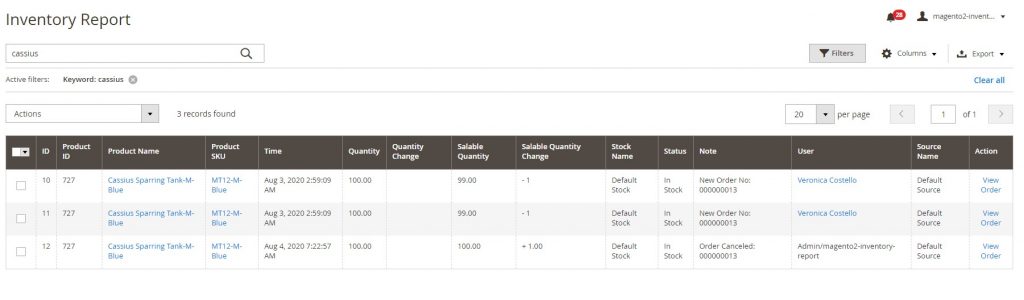
Enable Salable Quantity and Salable Quantity Change column:
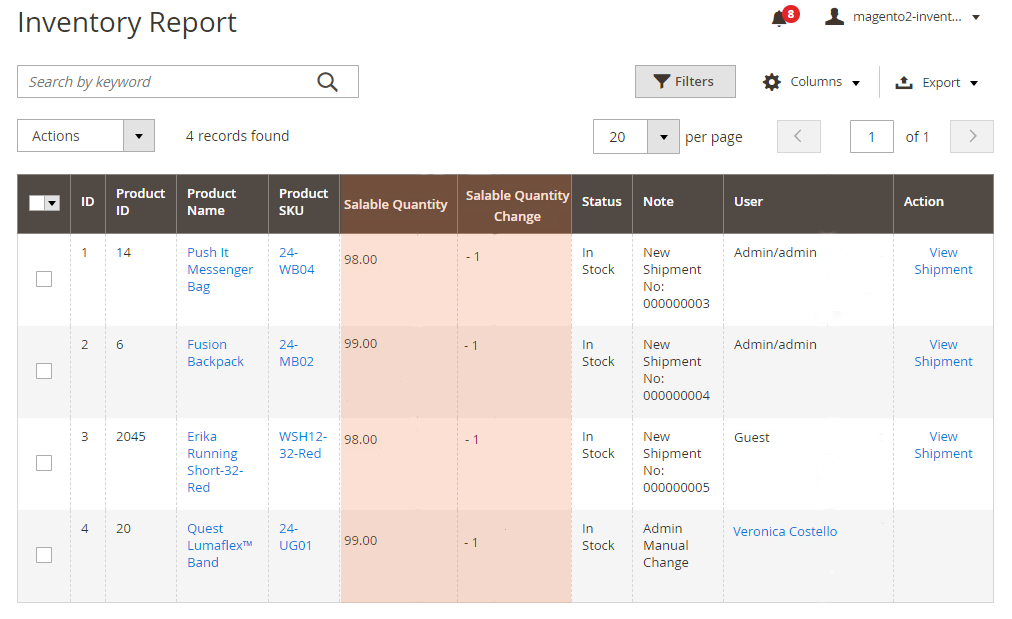
In the User column: separate the inventory changemaker: admin, customer, or guest. There is also a quick link to see the customer details.
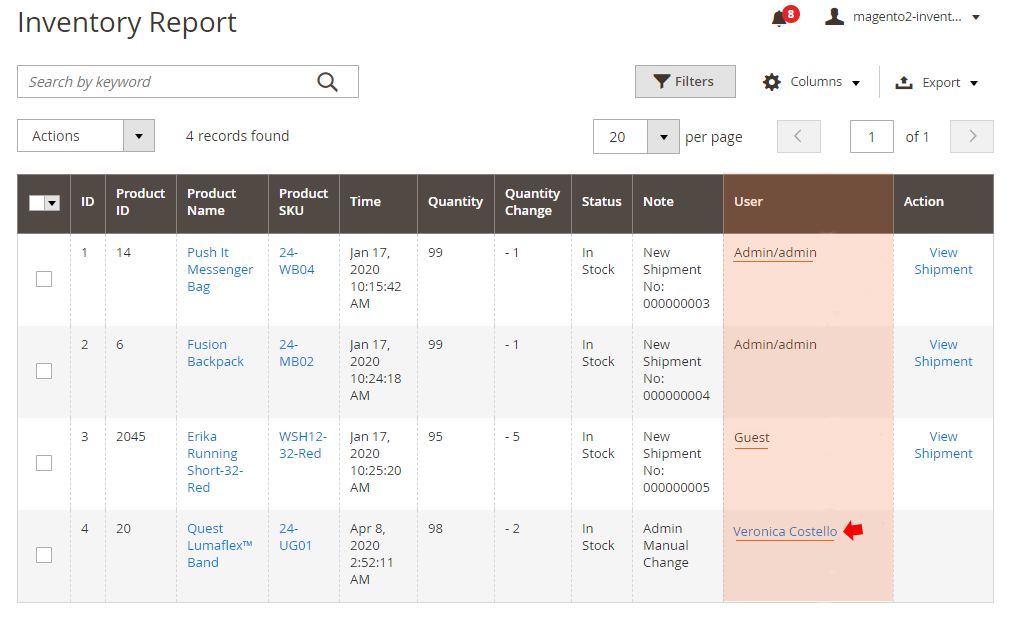
***Note:
- This module only works with products having stock management.
- All actions with grid in Magento 2 are also valid with this grid. You are able to sort, filter, search, show/hide columns, pagination and export data.
- You can delete inventory log by selecting wanted logs and click Action box to remove.
2.4.2. Inventory Report for each product
Please go to Admin ⇒ Products ⇒ Inventory ⇒ Catalog, click on Edit to go to product edit page.
In BSS Inventory Report section, there is a grid table showing all stock changes of this product.
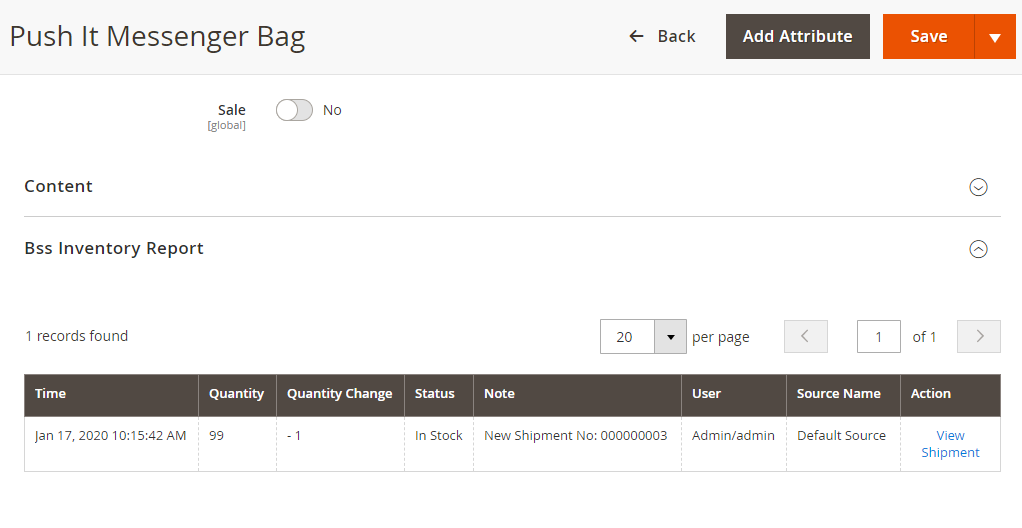
You can also navigate to product edit page by click on the product name or SKU in the inventory report grid of all products.
2.4.3. Actions make quantity change
- Admin manual change
+ Change quantity in product edit page

+ Add new product

- Create order
+ Customers create order from the frontend
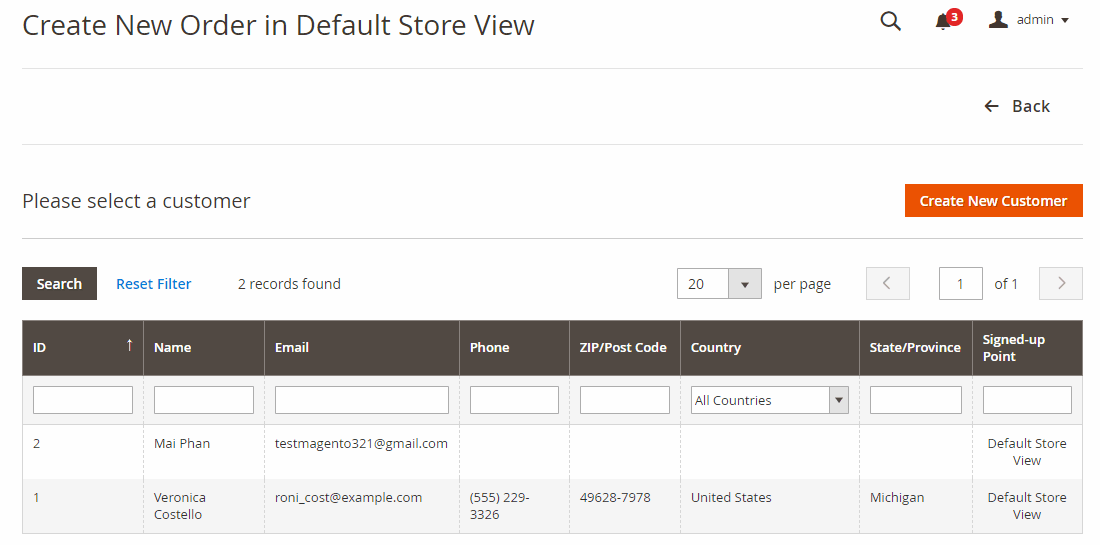
+ Admin Create order in the backend
Please go to Sales ⇒ Orders ⇒ Create New Order.
- Cancel the order and show the quantity change
- Create an invoice for the downloadable, virtual product, source quantity
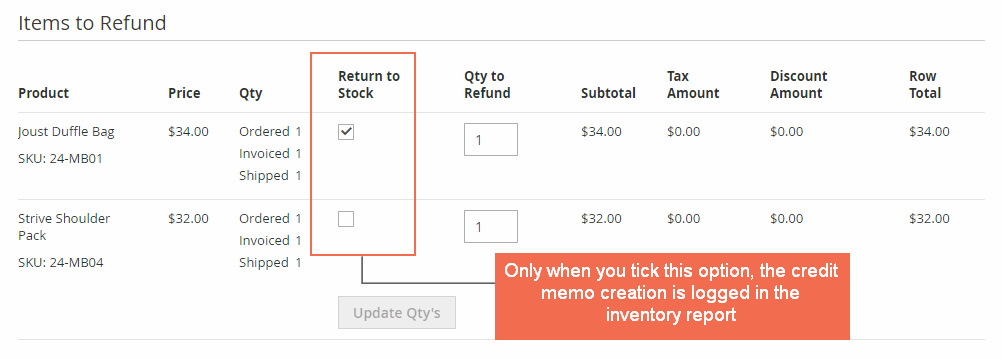
- Create credit memo: Refund (full/partial)
This module only logs the quantity change due to creating credit memo if you select the “Return to Stock” option.
- Import product (in case import new product or update quantity for product)
Go to System → Import, in Entity Type, select Products to import products.
Note: This module can also track if the order is backorder.
2.4.4. Disable Inventory Report
Because you can’t enable/disable the module by configuration, to disable the module, you need to:
+ Run php bin/magento module:disable Bss_InventoryReport
+ Run php bin/magento cache:flush to flush cache.
2.5. Guest to Customer
Please go to Store ⇒ Configuration ⇒ BSSCOMMERCE ⇒ Guest to Customer.2.5.1 General configs

In Enabled: set Yes to enable or set No to the module.
In Assign Orders with The Same Checkout Email to Customer: Choose Yes to enable this function and choose No to disable it. The logic of this config is presented as follow:
| Config status | Customer behaviors | Result |
| Yes | Create an account right after the purchase using this button on the checkout success page: 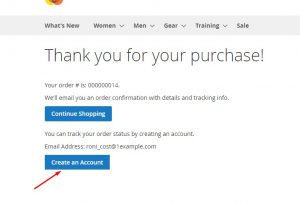 |
The order gets assigned to the customer profile both frontend and backend. |
| Yes | Create an account using after the purchase using the button on the header: 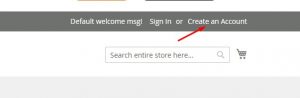 |
Due to complications regarding time delay between orders and the relation with the invoice, credit memo,... outside of a sheer order => Currently, in this case, the extension doesn't support assigning orders with the same email to the new account. |
| Yes | Checkout using the registered email but not login | The order gets assigned to the customer profile both frontend and backend |
- Config: Yes. The customer creates an account right after their purchase using the button => The orders get assigned to the customer profile both frontend and backend.
- Config: Yes.
In Sync address, choose Yes to synchronize customer's address when the billing address and shipping address are the same.
In Auto Convert to Customer: there are 2 options to select.
+ If you set Yes, guests are automatically converted to real customers after they finish their checkout.
In Customer Group: select customer group to assign converted customers.
+ If you set No, guest users after checkout will be included in a Guest Management grid table. Then, you can make mass actions to assign them to customer groups. This action also means that you manually convert them to real customers and create accounts for them.
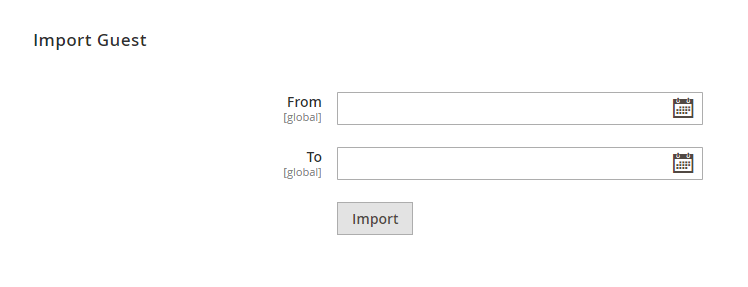
For guests placing orders before you install this extension, you can still import them to the Guest Management grid, and convert them into customers automatically or manually.
Accordingly, pick a period time to import guest in From and To.
Then, click Import button to import guests.
2.5.2. Guest Management
You go to Customers ⇒ Guest ⇒ Guest Management to check this table: 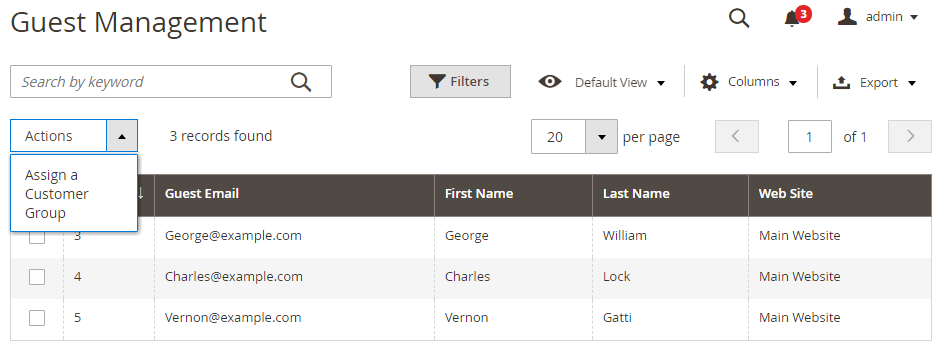 If you want to convert any guest to a customer, you tick in the box and then choose Assign a Customer Group. Specific customer groups are displayed to select:
 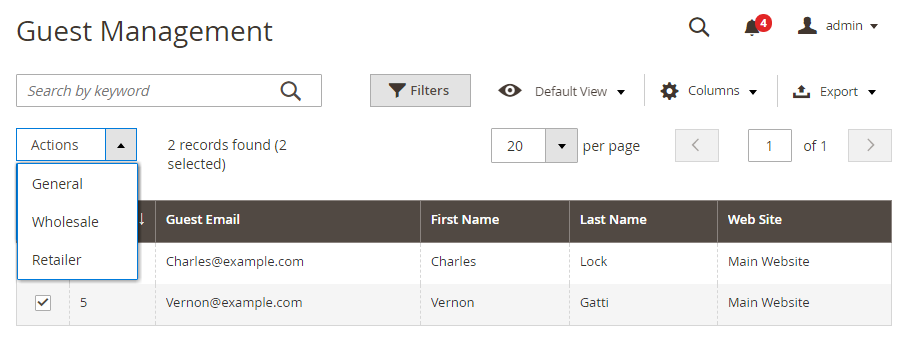 After choosing customer group and submit the request by click OK in the popup, guests are converted to customers.
2.5.3. Notification email
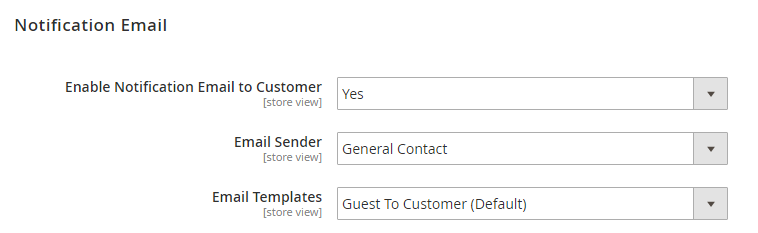 In Enable Notification Email to Customer: choose Yes to enable this function or choose No to disable it.
In Email Sender: select one store email to send notification emails to customers. These emails confirm customer account information to login into store website.
In Email Templates: select email template. This extension provides a default email template and you can easily customize in Marketing ⇒ Communications ⇒ Email Templates.
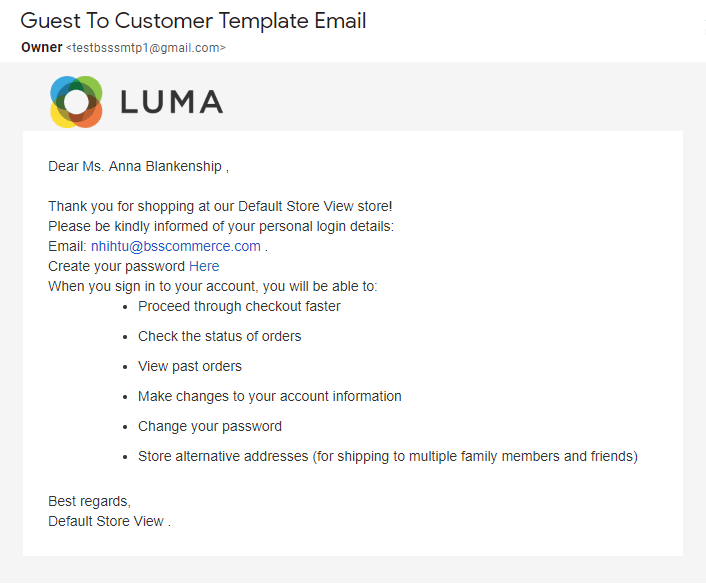
After converting, new customers will receive an email with templates as configured:
2.6. Custom Order Number
Please go to Stores ⇒ Configuration ⇒ BSSCommerce ⇒ Custom Order Number
2.6.1. Custom order number configuration
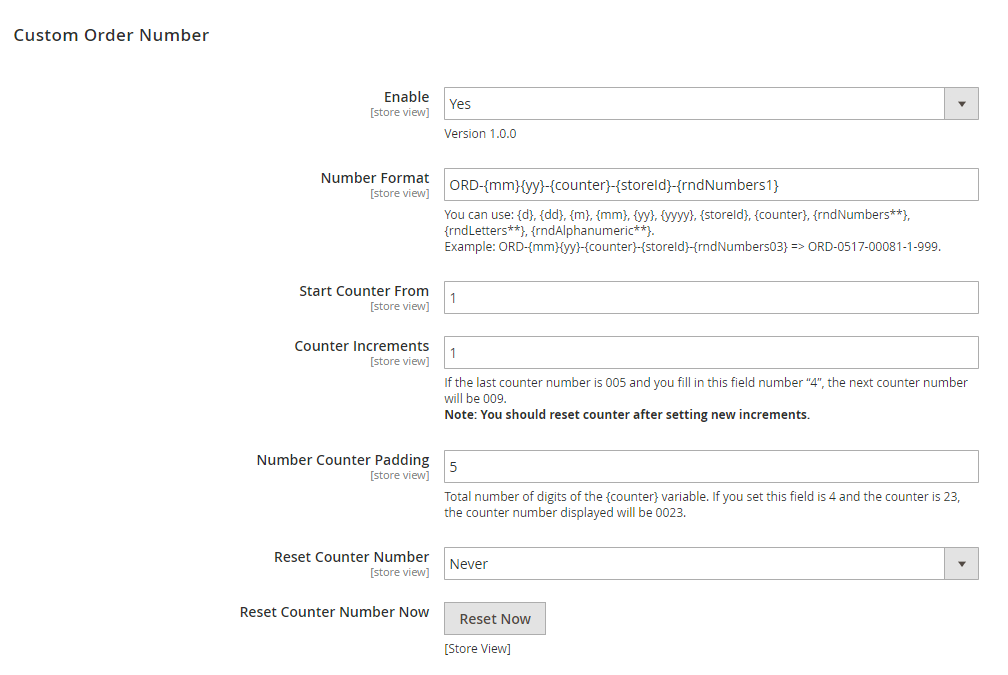 In Enable: choose Yes to enable customized order number, or No to disable it (the order number is default order number).
In Number Format: enter a format containing letters, numbers as well as variables for the order number.
+ The variables that you can add to the order number format:
- {counter}: an incrementing number, is set up in the below configs.
- {d}: date with no 0 leading.
- {dd}: date, always has 2 digits
- {m}: month with no 0 leading
- {mm}: month, always has 2 digits
- {yy}: year with 2 digits
- {yyyy}: year with 4 digits
- {storeID}: ID of the Store that customer placed the order in. It should be used in case your website has multiple stores.
- {rndNumbers**}: random a number, replace ** by a number to set the padding for a random number. For example, you enter {rndNumber01}: the output of this variable will be the one-digit number, {rndNumber02}: the output of this variable will be the two-digit number...
- {rndLetters**}: random letters, replace ** by a number to set the padding of this variable. For example, you enter {rndLetter01}: the output of this variable will be one letter (a, b, c...), {rndNumber02}: the output of this variable will be two letters (ab, mn...)
- {rndAlphanumberic**}: random both number and letters, replace ** by a number to set the padding of this variable.
- Configuration of {counter} variable:
- In Start Counter From: enter a number to set which number the {counter} variable begins counting.
- In Counter Increments: enter a number to set the {counter} variable increases by for every new order made. For example, if you set the increments to 5 and the last counter number is 004, the next counter number will be 009.
***Note: After setting the new increments, you should reset the counter to be not confused when managing the order document.
- In Number Counter Padding: enter a number to set the total of digits for the counter number. For example, if the counter is at 9 and you set padding is 6, it would output 000009 (there are 5 numbers “0” added into the front of the counter number).
- In Reset Counter Number: choose an option to reset counter numbers automatically daily (By Day), weekly (By Week), monthly (By Month), yearly (By Year) or choose Never to never reset the counter.
***Note: This module will reset counter depending on the time of sever and please make sure that cron job in your website always operates (refer Configure and run cron in MagentoDev Docs).
- In Reset Counter Number Now: click on the Reset Now button to reset the {counter} variable immediately. It is just reset for the next increment number.
***Note: If your website has multiple store views, you can customize the order number for each store view.
In Configuration Store View, please select a store view. The config “Use Different Counter Numbers for Different Store Views” will appear.
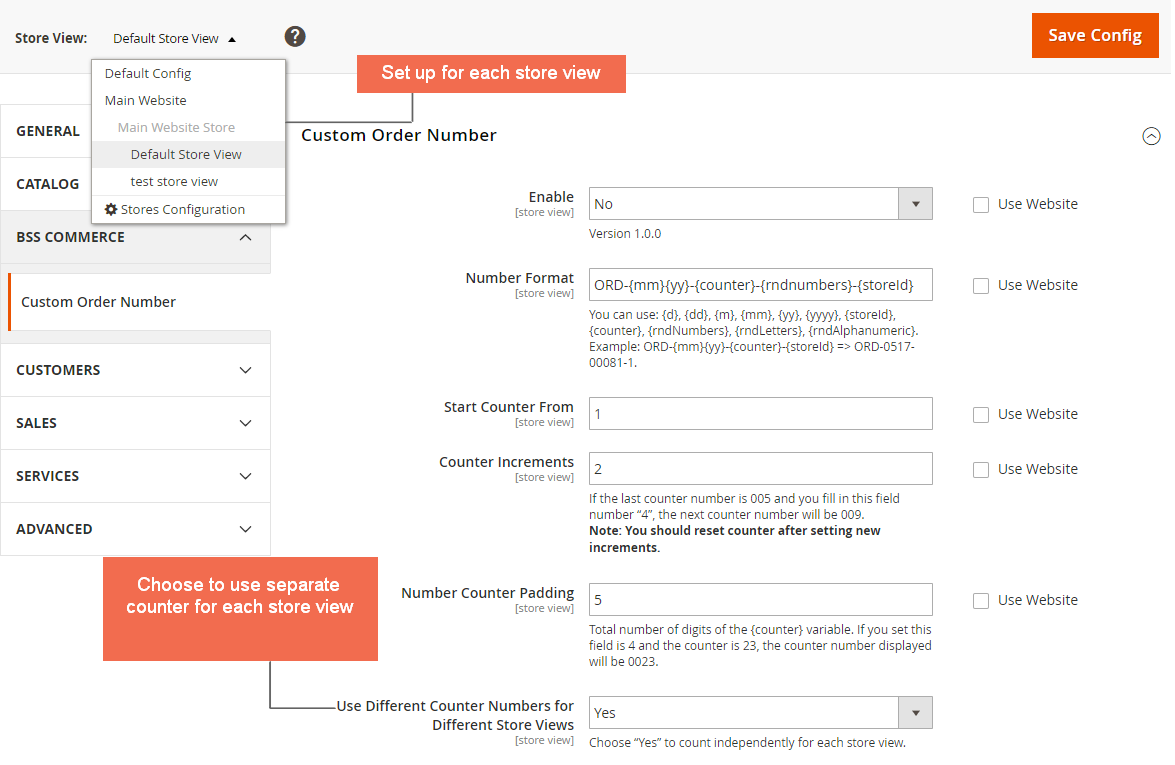 In Use Different Counter Numbers for Different Store Views:
+ Choose Yes to use an individual sequence of the counter for each store view, which means each store view has own sequence. For example, your website has 2 store views A and B.The first order is placed in store A and the sequence of {counter} variable of order number in this store is 1. After that, an order is placed in store B and the sequence of {counter} variable also is 1, because it is not depended on the store A.
+ Choose No to use the sequence of the counter for all store views (like default). In case the below example, the sequence of {counter} of order number in store B is 2, not 1.
***Note: If the order number is duplicated, a random number will be added to this number.
2.6.2. Custom invoice number configuration
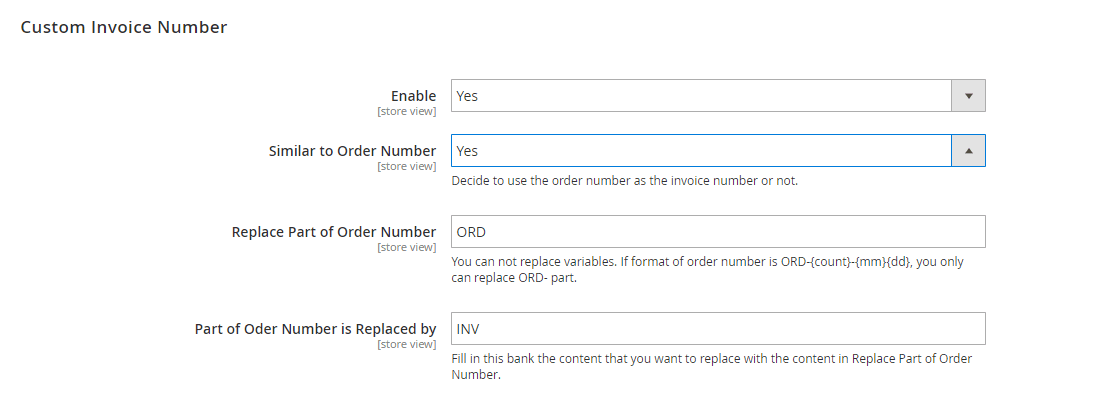 In Enable: choose Yes to enable the customized invoice number, or No to disable it (use the default invoice number).
In Similar to Order Number:
+ Choose Yes to use the invoice number same as the order number, which means that the invoice number will use the transaction the order number belongs to. You can replace letters part in order number format by other letters that are more suitable (you can’t replace the variable in order number format:
- In Replace Part of Order Number: enter a letters part of order number format that you want to replace it
- In Part of Order Number is Replace by: enter the letters that replace with the above part.
+ Choose No to not use the invoice number same as the order number. You can customize an individual invoice number like customizing order number above.
 2.6.3. Custom shipment number configuration
It is the same as the Custom Invoice Number Configuration.
2.6.4. Custom credit memo number configuration
It is the same as the Custom Invoice Number Configuration.
***Note:
- Because the scope of the module configuration is store view, you can customize the numbers for each store view.
- After setting, you need to save your configuration then flush cache to start using the module.
2.6.5. Set User Role to manage the module
Please go to System ⇒ Permissions ⇒ User Roles ⇒ Role Resources. 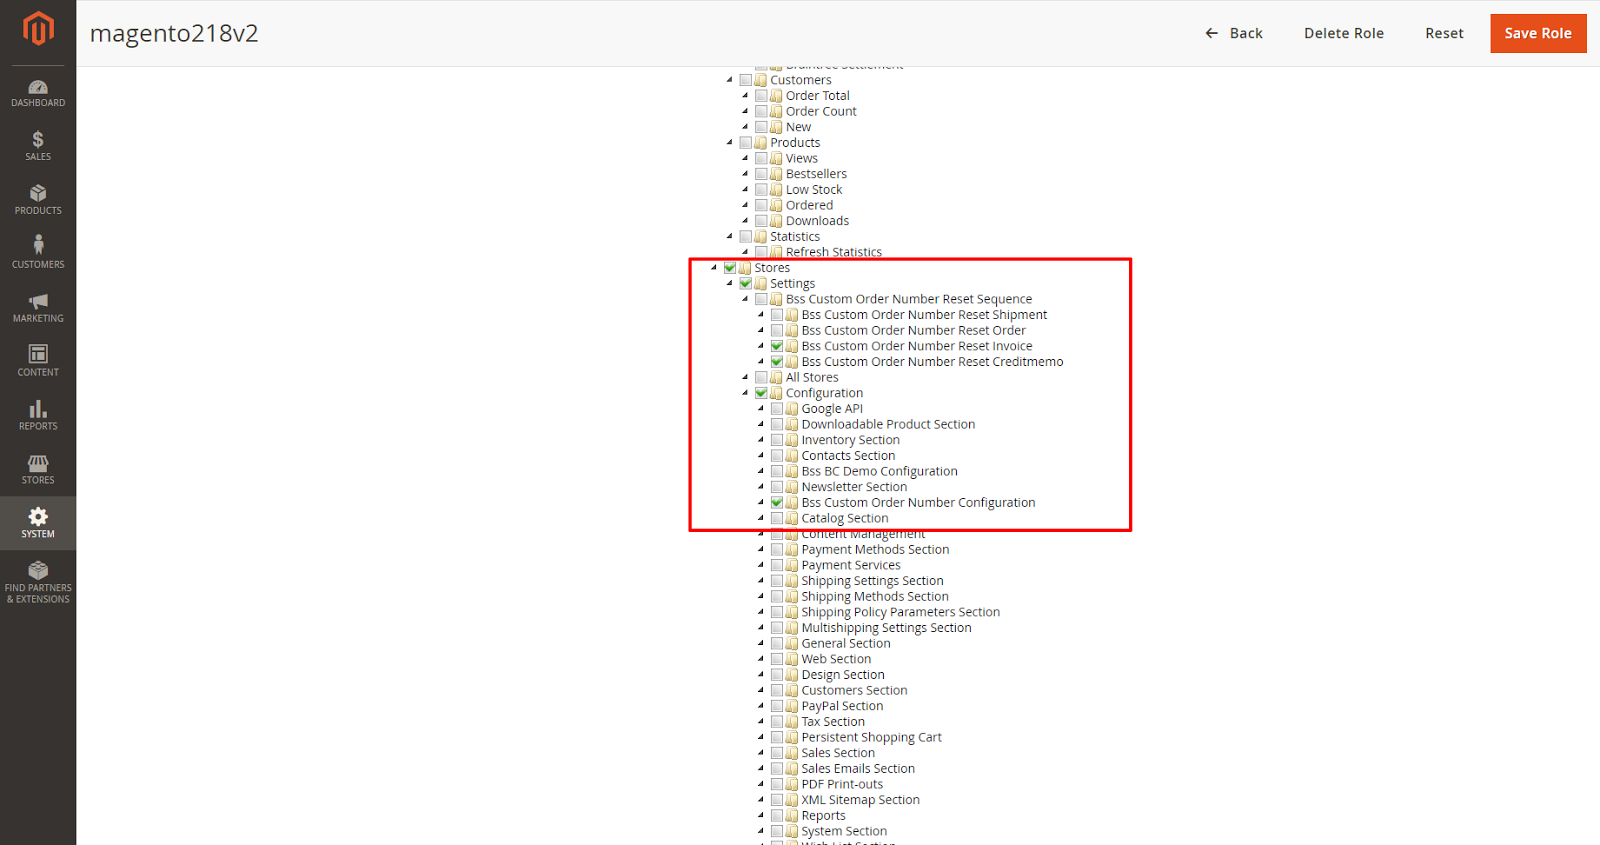
2.7. Auto Invoice
Go to Admin Panel ⇒ Store ⇒ Settings ⇒ Configuration ⇒ BSS COMMERCE ⇒ Auto Invoice.
In Enabled, choose Yes to enable the extension or No to disable it.

2.7.1. Select payment method
In Select Payment Methods, select one, multiple or all payment methods to apply auto invoice/shipment generation. 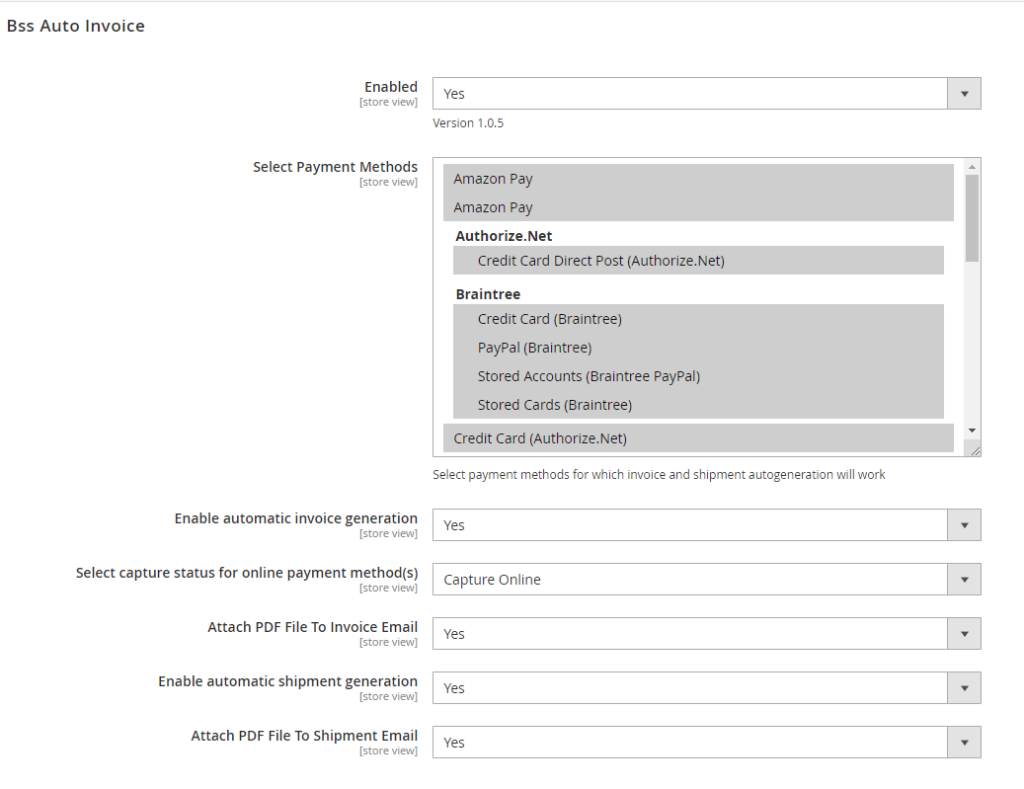 When a customer has successfully placed an order, this order has the order state as "new".
Based on the "new" order state and the selected payment method, Magento 2 Auto Invoice extension will automatically export the order invoice.
This means some online payment methods such as PayPal, Credit Card...which create order state as "processing" and "pending payment" won't work for this logic of Auto Invoice for Magento 2 extension.
***Note:
- When customers use Amazon Pay with payment action Charge on Order, the module works as normal.
- However if the payment actions is Charge on Shipment, request to create Invoice will get denied by Amazon. Hence, our module does not support this payment action.
NEW: The Magento 2 Auto Invoice extension is now:
- Compatible with Klarna payment
- Compatible with Paypal express method with action: Sale, Order, Authorize
2.7.2. Enable automatic invoice/shipment generation
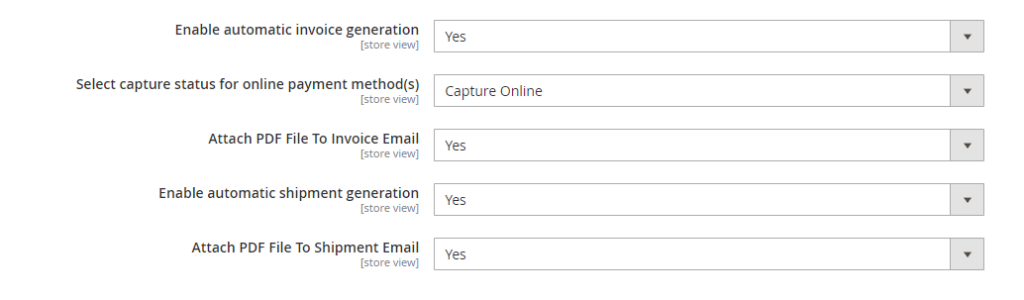 In Enable automatic invoice generation, choose Yes to enable the function then invoices will be generated automatically after orders are completed.
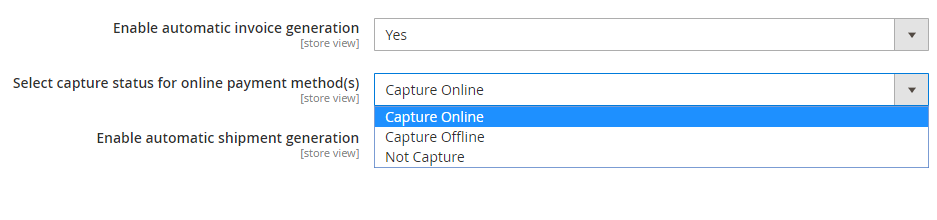
In Select capture status for online payment method(s), choose capture with auto invoice for online payment:
+ Capture Online: Once auto invoice is created, the amount captured will transfer from customers account to your business account.
+ Capture Offline: The order amount will not be processed via payment channel , invoice status = Paid
+ Not Capture: Orders that have not been paid, invoice status = Pending
In Attach PDF File To Invoice Email, choose Yes to add invoice PDF to invoice email. This config will show only when admin Enable Auto Invoice.
In Enable automatic shipment generation, choose Yes to enable the function then shipment will be generated automatically after orders are completed.
Remember that only when automatic invoice generation is enabled, can you enable automatic shipment generation.
In Attach PDF File To Shipment Email, choose yes to enable the function to add shipment PDF to email shipment. This config will show only when admin Enable Auto Shipment.
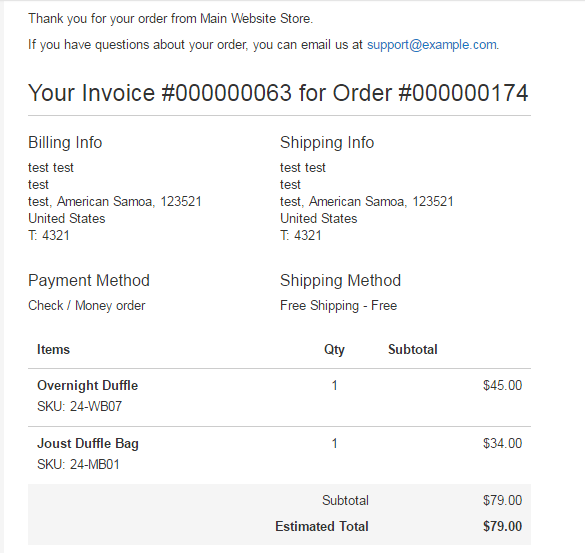
2.7.3. Invoice/Shipment confirmation email
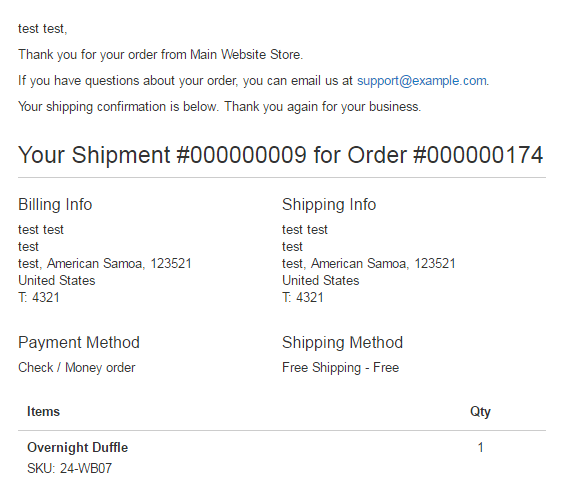
If you enable both the automatic invoice and shipment generations, your customers will receive 3 emails after ordering completely: Order confirmation, Invoice confirmation, and Shipment confirmation.
 Check email samples as follow: Invoice confirmation email
 Shipment confirmation email
2.7.4. Select capture status for online payment methods
In the configuration panel, you can choose to the capture status up to 3 status:
- Capture Online
- Capture Offline
- Not Capture
2.7.5. Create order shipment independent with order invoice
You can create order shipment independent with the order invoice within the backend configuration. This comes in handy when you want more flexible with your work flow.
For example: You allow customers to pay after they receive their order.
2.8. Product Grid Inline Editor
2.8.1. General configs
Please go to Store ⇒ Configuration ⇒ BSSCommerce ⇒ Product Grid Inline Editor.
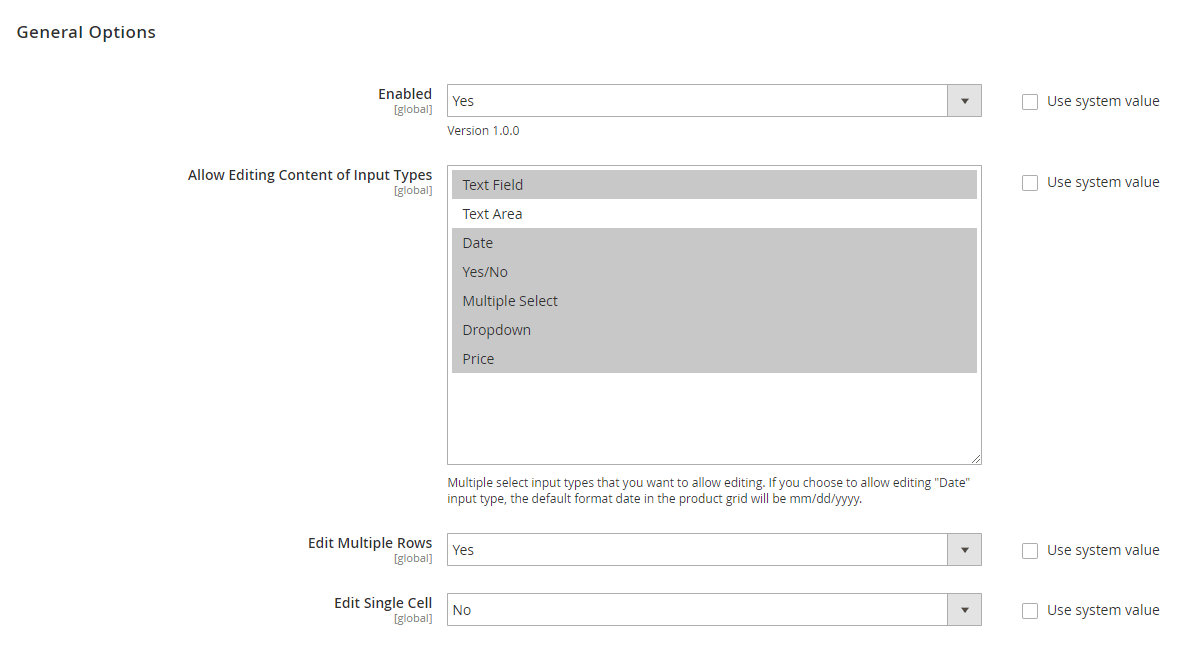 In Enabled: choose Yes to enable the module, or No to disable it.
In Allow Editing Content of Input Types: multi-select product attribute input types including Text Field, Text Area, Date, Yes/No, Multiple Select, Dropdown, and Price to allow editing in the grid.
***Note:
- If the Date input type is allowed editing, the default format in the grid for you to customize is mm/dd/yyyy.
- Quantity is considered as Text Field input type, so you can edit product quantity only when the Text Field is picked.
In Edit Multiple Rows: choose Yes to allow editing multiple rows (products) in the grid at once, or No to not allow.
In Edit Single Cell: choose Yes to only edit a cell is clicked at once, or No to take action on all editable fields in a row.
***Note: Edit Multiple Rows and Edit Single Cell function can’t work together. If you turn both configs to Yes, only Edit Single Cell function will be enabled. Although Edit Multiple Rows is Yes, you are not allowed to take action on multiple rows.
After selecting all configs, press Save Config button, and flush cache to start using this module.
2.8.2. Edit Attributes in the admin product grid
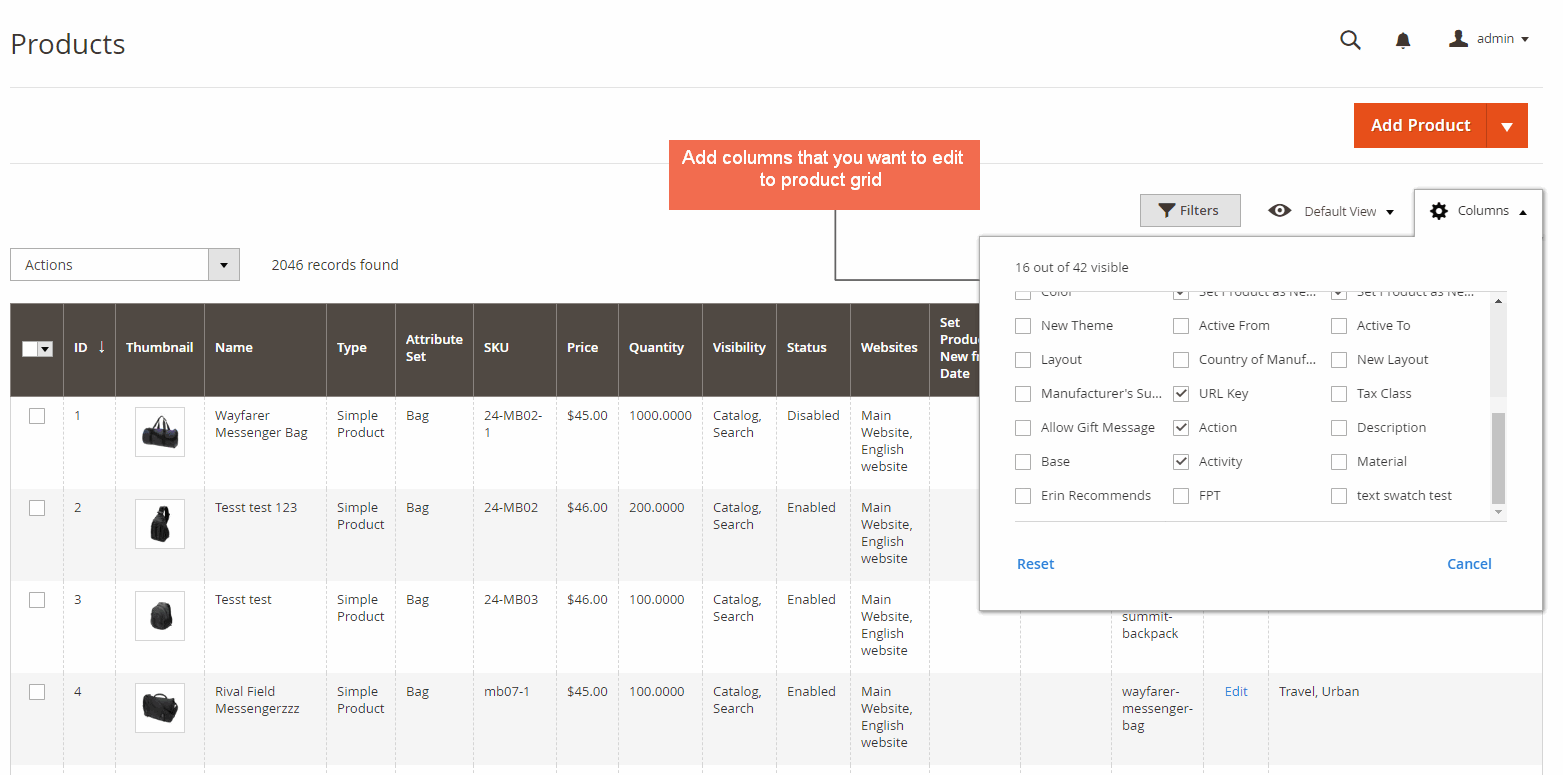
Please navigate to Catalog ⇒ Products, the admin product grid is displayed on this page. You can add columns (both default and custom columns) to product grid.
2.8.2.1 Edit a product in a row
To edit a product that is displayed on a particular row, please click on the row (except first tick-box and links).
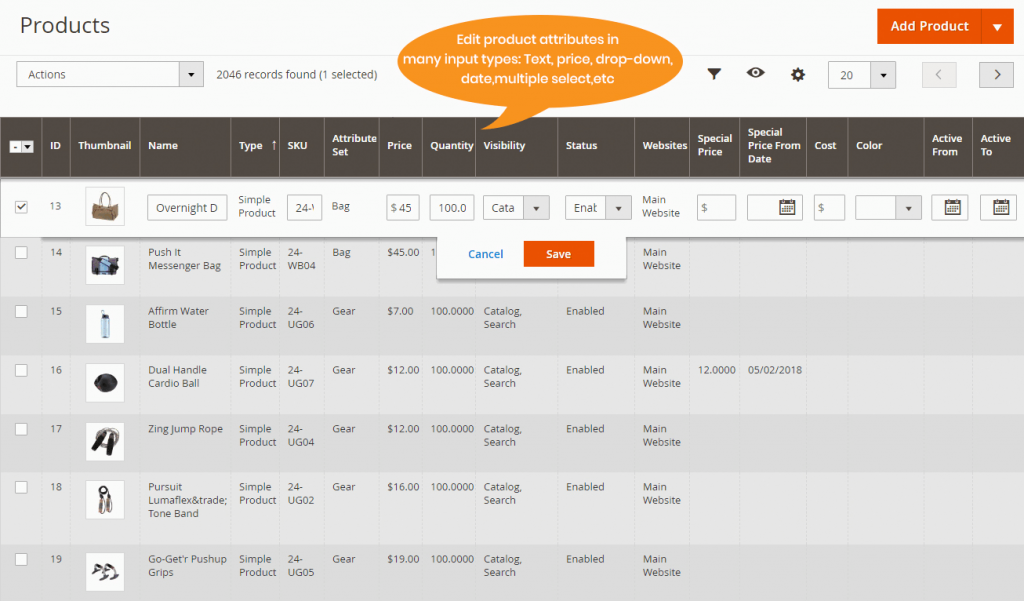
The selected row is enabled and the editable information and attributes are included in boxes, which are available for you to change their values. After editing, you need to hit one of the following buttons to complete:
- Cancel: cancel all your recent adjustments on this row, and all values in the row won’t be changed.
- Save: save your changes.
***Note: You are not allowed to:
- Edit Quantity of these product types: configurable, grouped, and bundle product.
- Edit cells in Price attribute input type of these product types: configurable product, grouped product, and bundle product with dynamic price.
- Edit ID, Thumbnail, Type, Attribute Set, Websites, Action (link) of all product types.
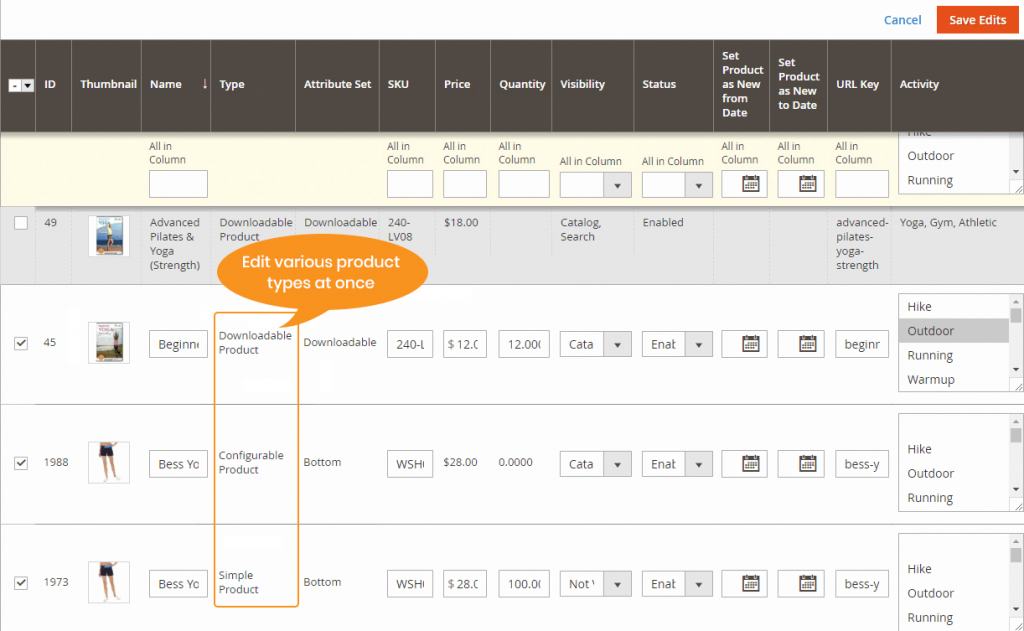
2.8.2.2. Edit multiple rows
To edit multiple rows at once, please follow this instruction:
Step 1: Choose a row
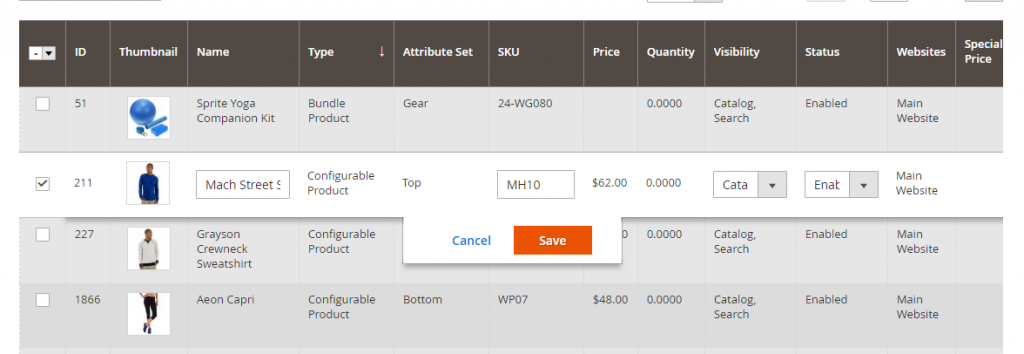
Step 2: Select other rows to be edited together by checking box, an additional row including editable boxes that are correlative to the selected rows will be enabled.
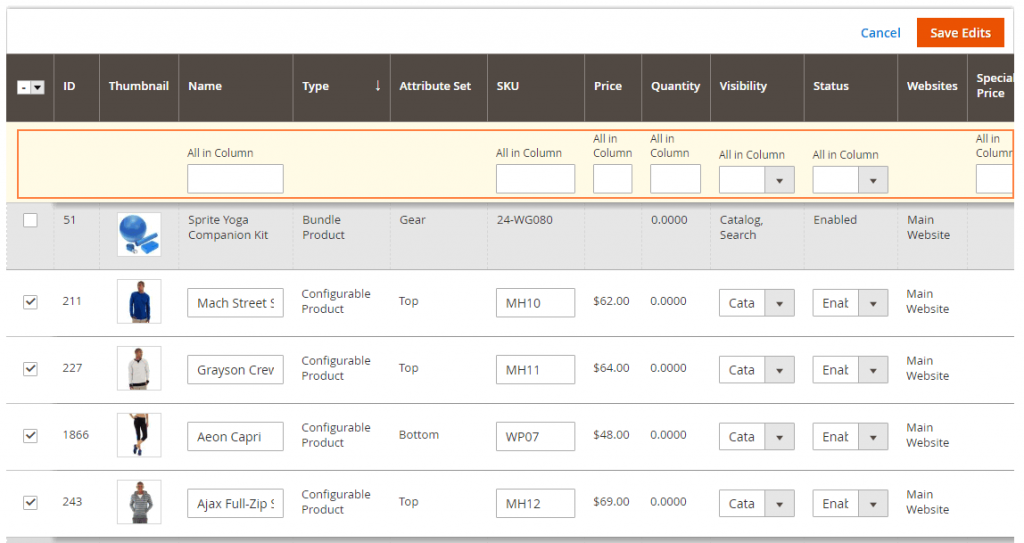
Step 3: enter the custom values to the All in Column boxes
Step 4: Choose Apply button in the additional row to apply new attribute values to all chosen products.
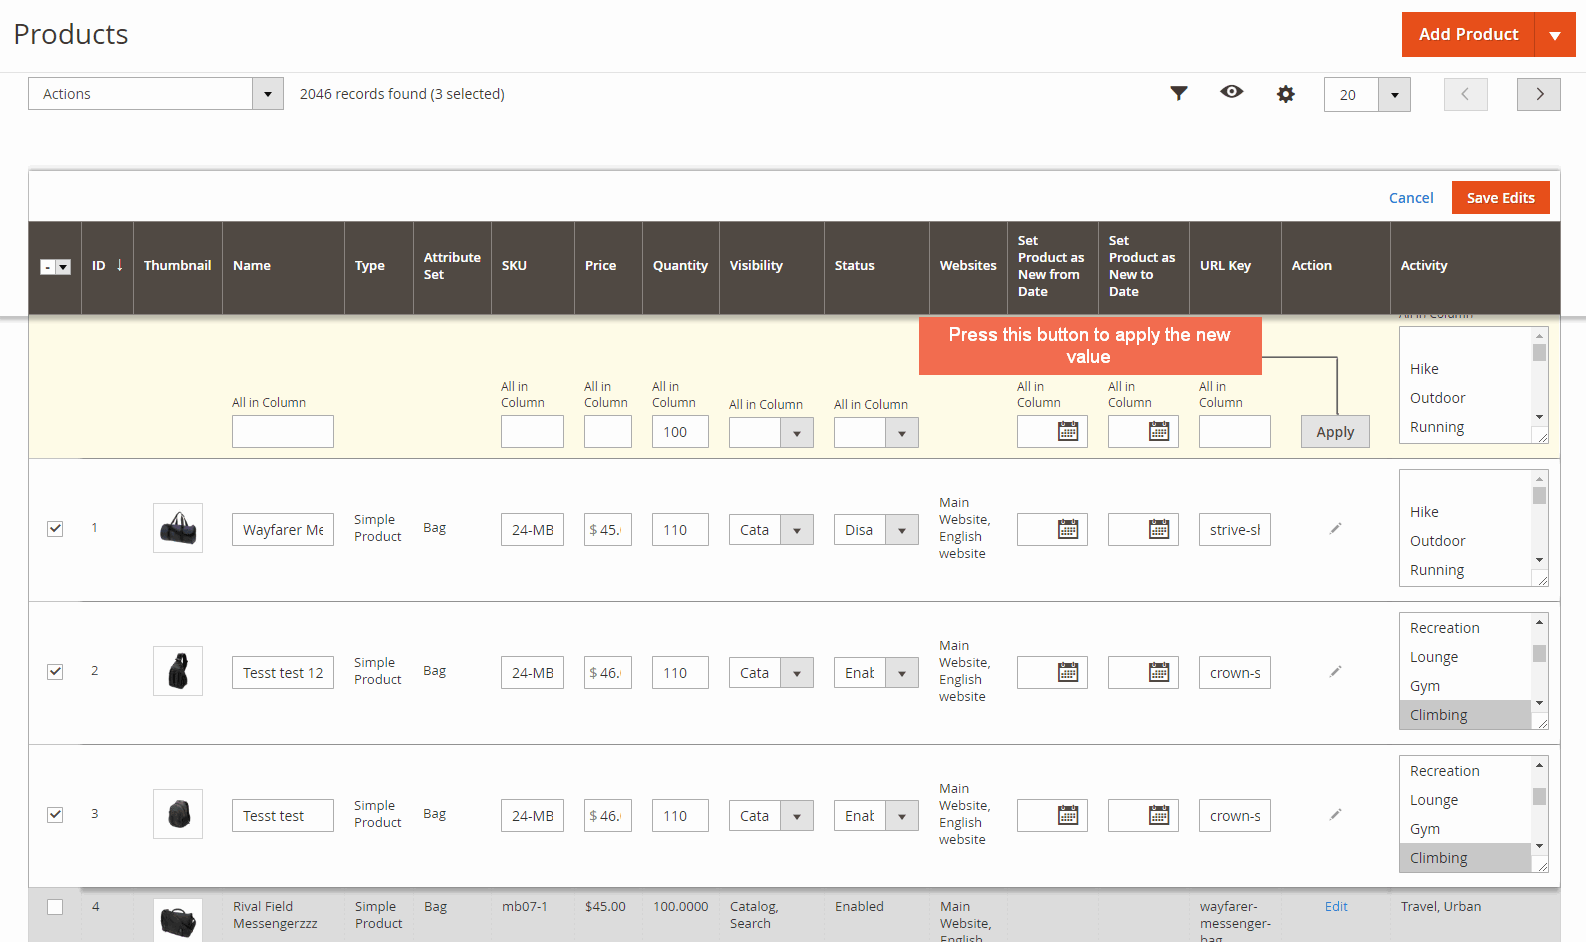
Step 5: Choose Save Edits or Cancel button to complete.
***Note: You can edit multiple products in different types, but the new values can be applied to only allowed editing input types.
2.8.2.3. Edit a single cell only
When you set to allow editing single cell only, you need to click on the cell you want to edit and enter the new value, then press Save button.
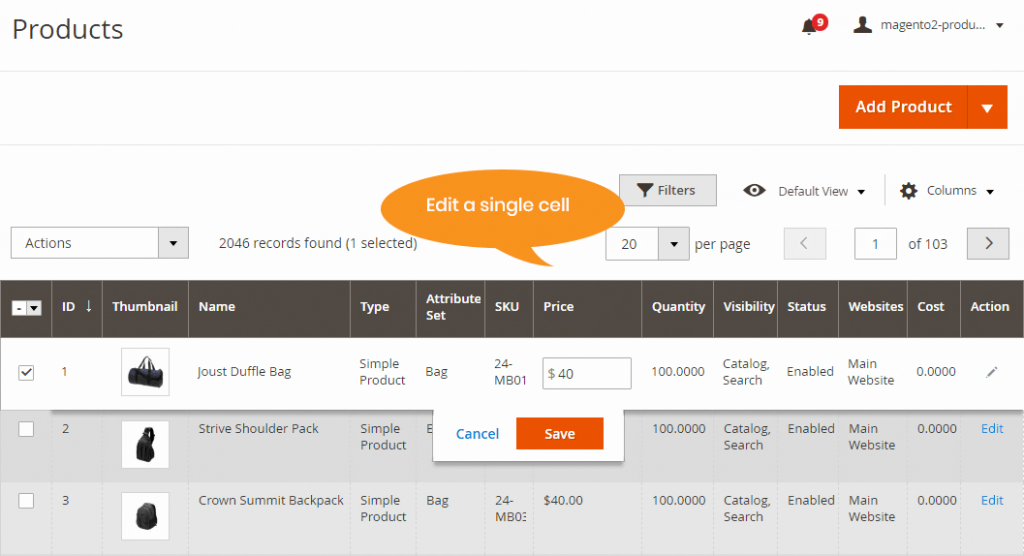
***Note: With MSI:
- You can edit multiple source quantity and status via popup under Edit Single Cell type only.
- Can not work with Edit Multiple Rows type.
- All enabled Sources will be displayed in the popup (including unassigned Sources); when a Source's quantity is edited, that Source will automatically be assigned for the product.
2.9. Duplicate CMS Page/Block
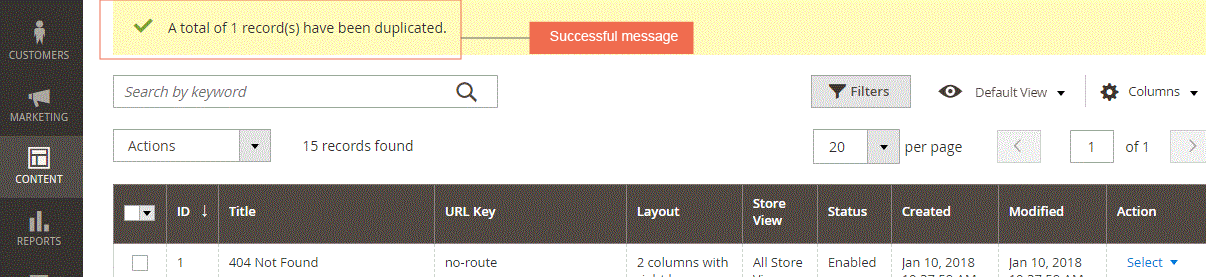
After completed installing, “Duplicate Button” will appear immediately in Content, as below:
- In Grid View
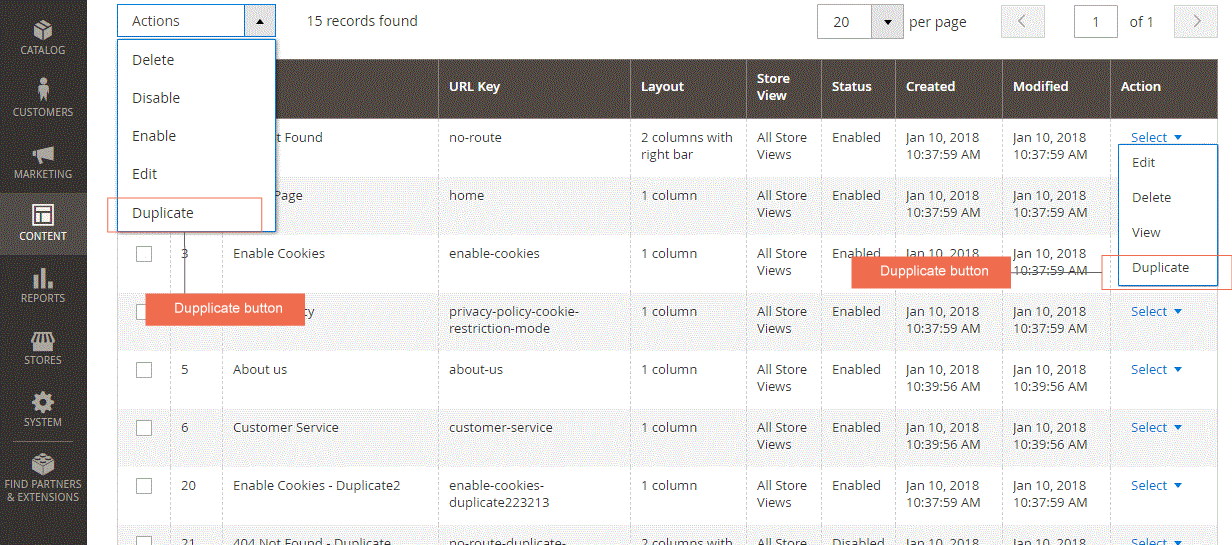
In Grid View, you can duplicate with “duplicate button” in the right action-column.
Besides, you are able to duplicate mass Pages/Blocks in the grid view. Firstly, you choose Pages or Blocks which you want to duplicate. Then, you click on “Duplicate Button” in the left Action column.
- In Detailed Page/Block
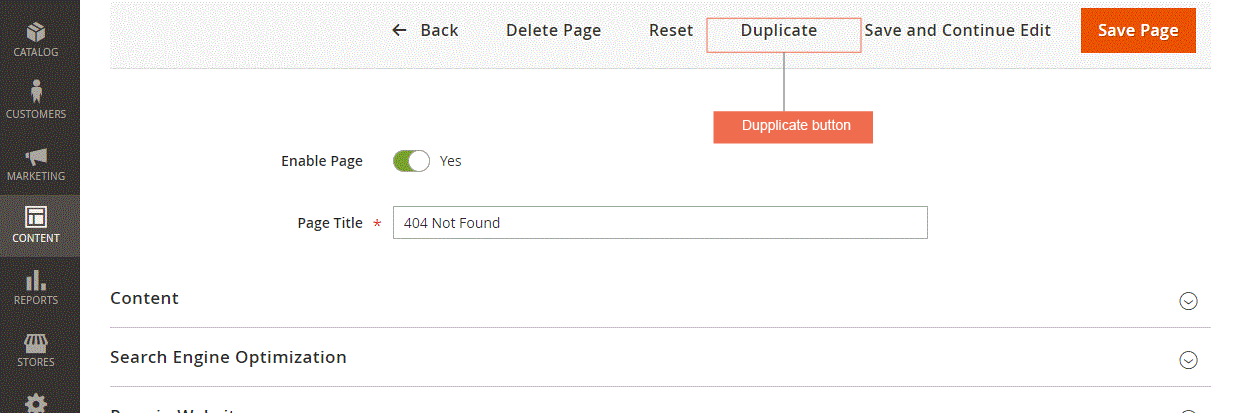
In the detailed view, “Duplicate button” appears on the menu bar.
A successful message will be displayed after the duplicating process.
After being duplicated, the status of your new CMS Page and Block is Disabled, but you can change to “enable” at any time.
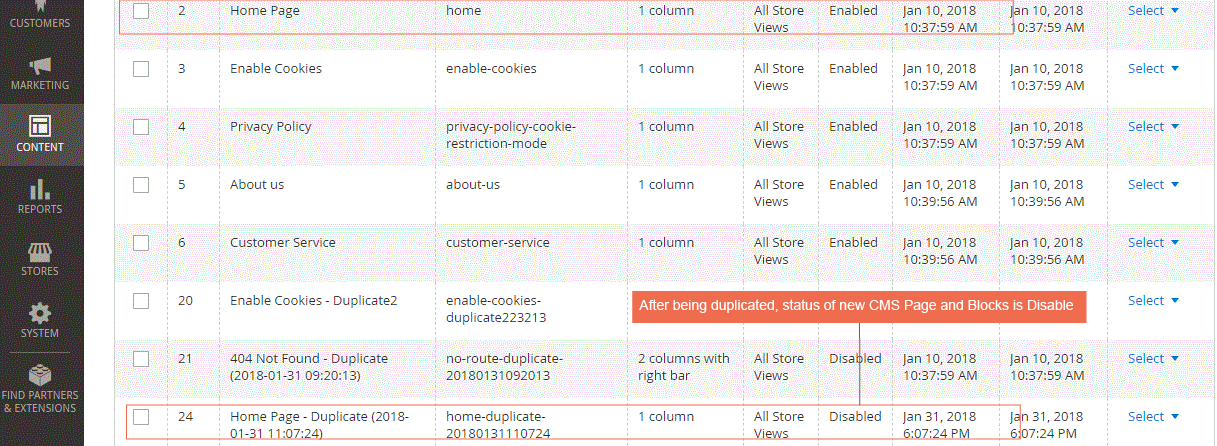
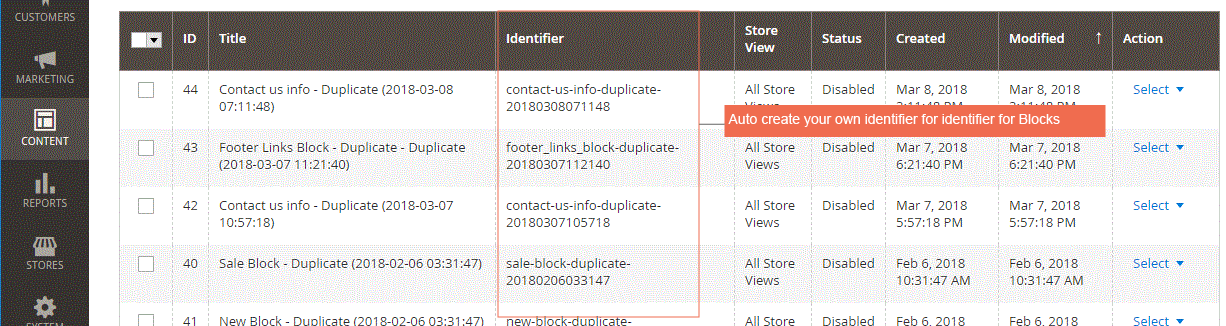
A new URL key and Identifier is automatically generated for your duplicated Page/Block. Additionally, you can freely change the URL key or Identifier for your purpose.
- URL Key in CMS Page

- Identifier in Block
2.10. Delete Order
2.10.1 Delete orders
Please go to Sales ⇒ Orders, a list of all orders will be shown as usual. Tick on the checkbox of unwanted order(s) and choose the action Delete Orders in Select Items box.
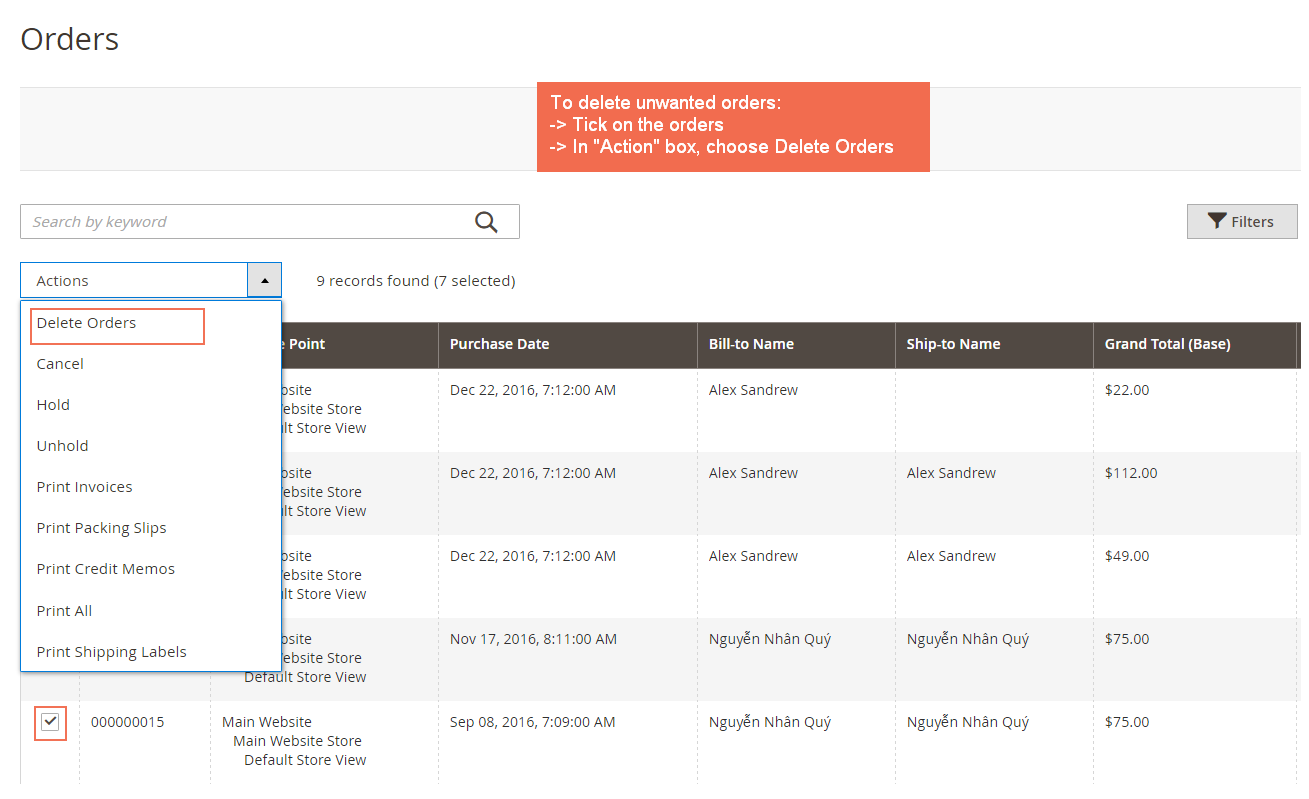
Then a pop-up will appear for action confirmation. Select OK to completely delete the order(s).

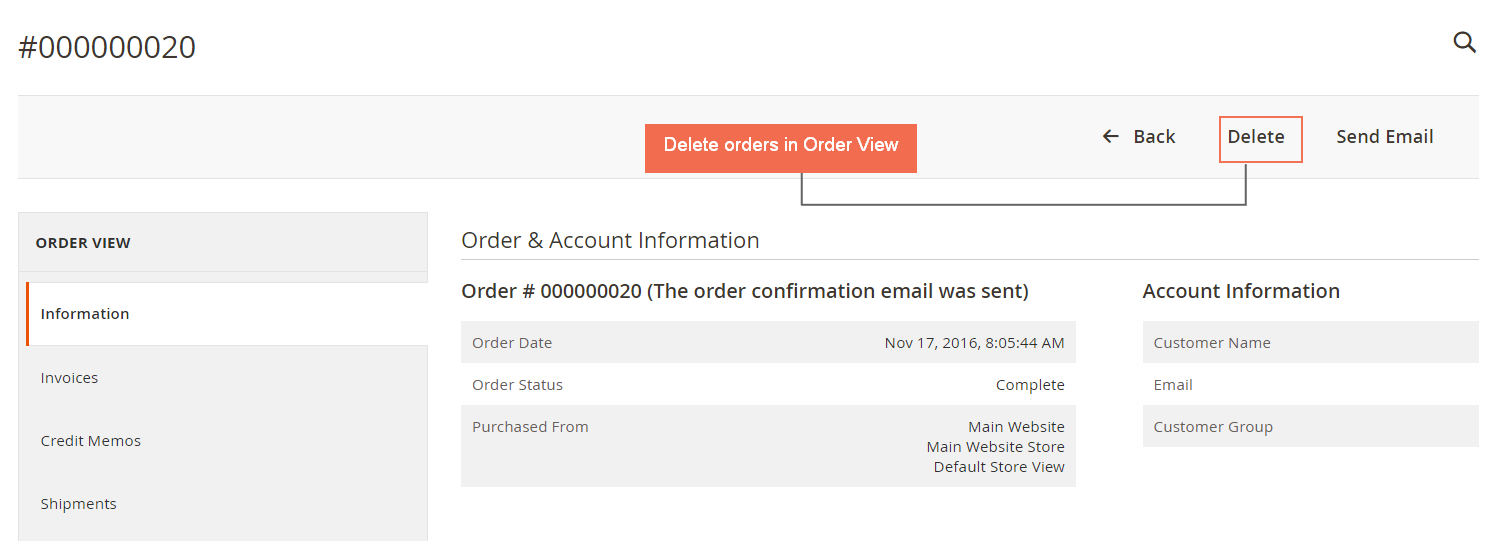
You can also delete orders from Order View Page by choosing Delete button in the Information tab of a particular order.
***Note:
- You can delete many delete orders at a time by ticking on their checkboxes.
- Once you delete an order, it would be removed permanently from the system and could not be restored. You’d better do it carefully.
- When an order is deleted, all of its related information like shipment, invoice, credit memo will be erased too.
2.10.2. Delete invoices
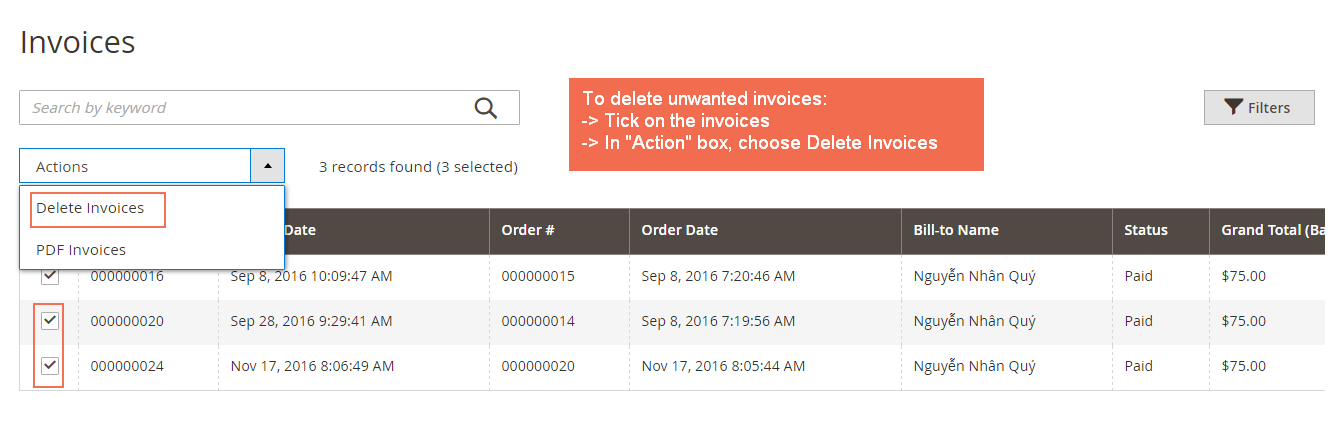
Go to Sales ⇒ Invoices and select Invoices you want to wipe out of the backend and then choose Delete Invoices in Select Items box. After that, a popup appears and you click OK to confirm removing these selected Invoices.
After Invoices are deleted, order status turns back to Pending (if shipments have not been created) or Processing (if shipments have already created). Credit memos are also removed. Invoices can be also recreated.
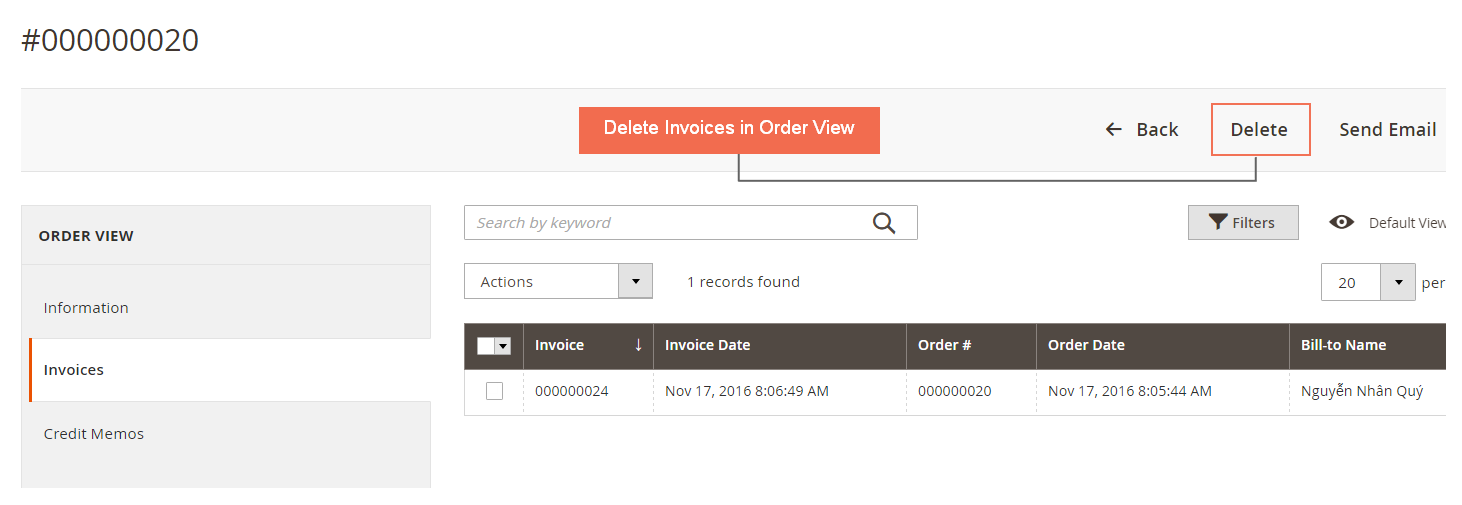
You can also delete invoice of a particular order in its Order View Page by going to tab Invoices, click on Delete button or choose Delete Invoices in Actions dropdown box.
2.10.3 Delete shipments
Similar to deleting orders and invoices, we can erase unneeded shipments by navigating to Sales ⇒ Shipments and select Shipments that you want to rub out. Then, you choose Delete Shipments in Select Items box and press OK in the confirmation popup to finish the process.
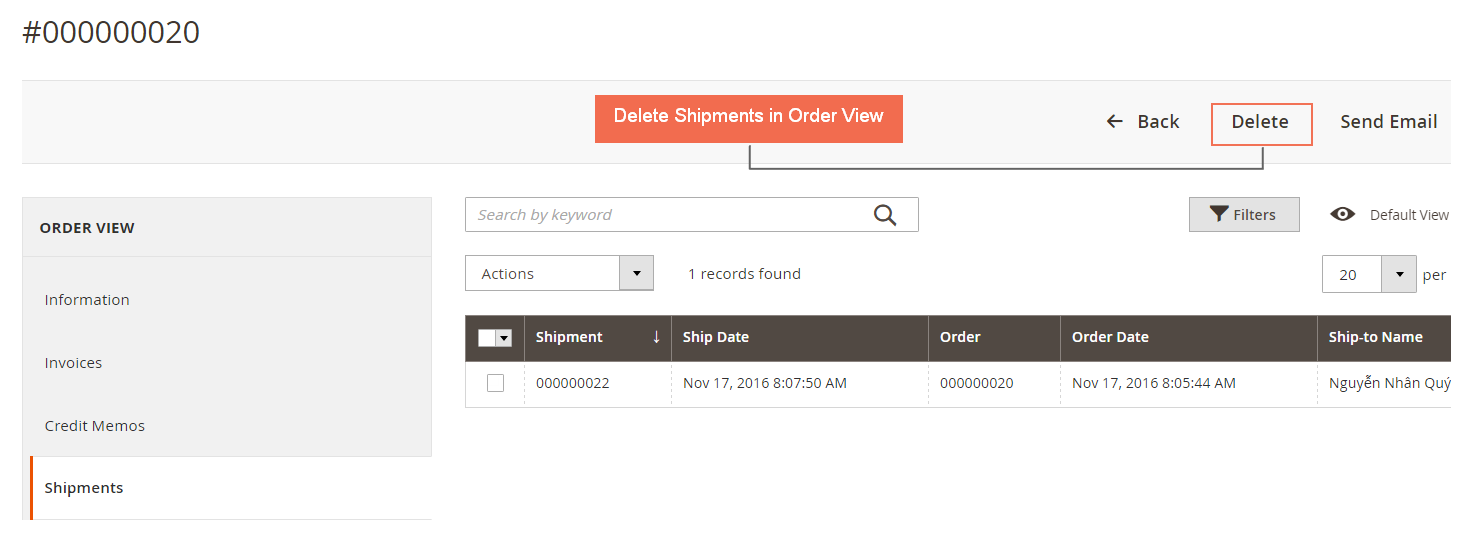
Similarly, you can delete shipment from Order View Page under Shipments tab by clicking on Delete button or choose Delete Invoices in Actions dropdown box.
When a shipment is removed, its order status is updated to Pending (if invoices have not been created) or Processing (if invoices have already been created). Admin can totally recreate shipments.
2.10.4. Delete credit memos
Like Invoices and Shipments, there are two ways to remove redundant Credit memos:
- Go to Sales ⇒ Credit memos, select unwanted Credit memo(s), choose Delete Credit memos in Select Items box, then click OK in the popup to completely exclude them from the backend.
- Under Credit Memos tab in Order View Page of a particular order, click on Delete or select Delete Credit Memos in Actions dropdown box.
Order Status is altered to Complete (if invoices and shipments have already been generated) or Processing (if only invoices have been created). Credit memos are easily recreated.
2.11. Reindex from the Backend
Please go to Stores ⇒ System ⇒ Index Management and start configuration.
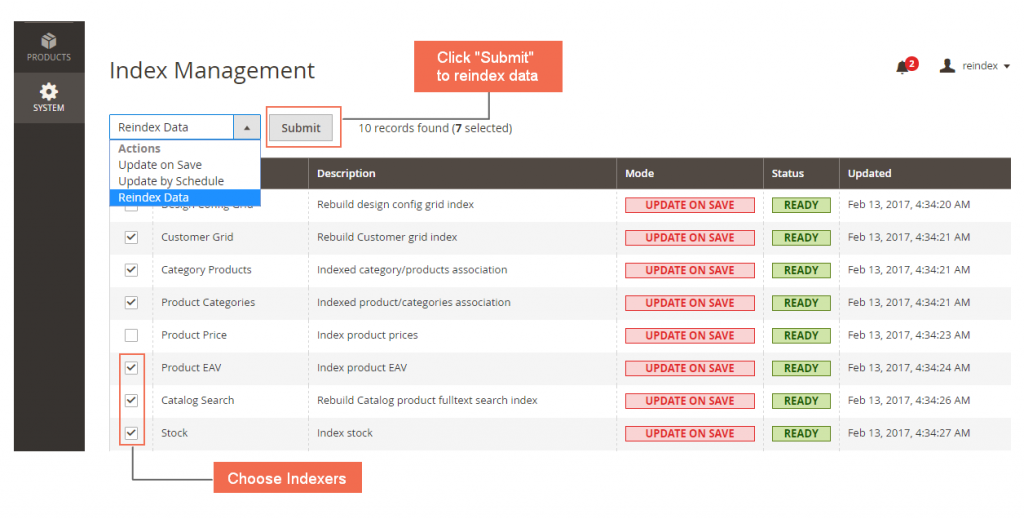
Choose the Indexers which you want to reindex.
In Action box: Choose Reindex Data.
Choose Submit to complete.
2.12. Custom Product Attribute Export
Please go to Stores ⇒ Configuration ⇒ BSSCOMMERCE ⇒ Product Export Column and start configuration.
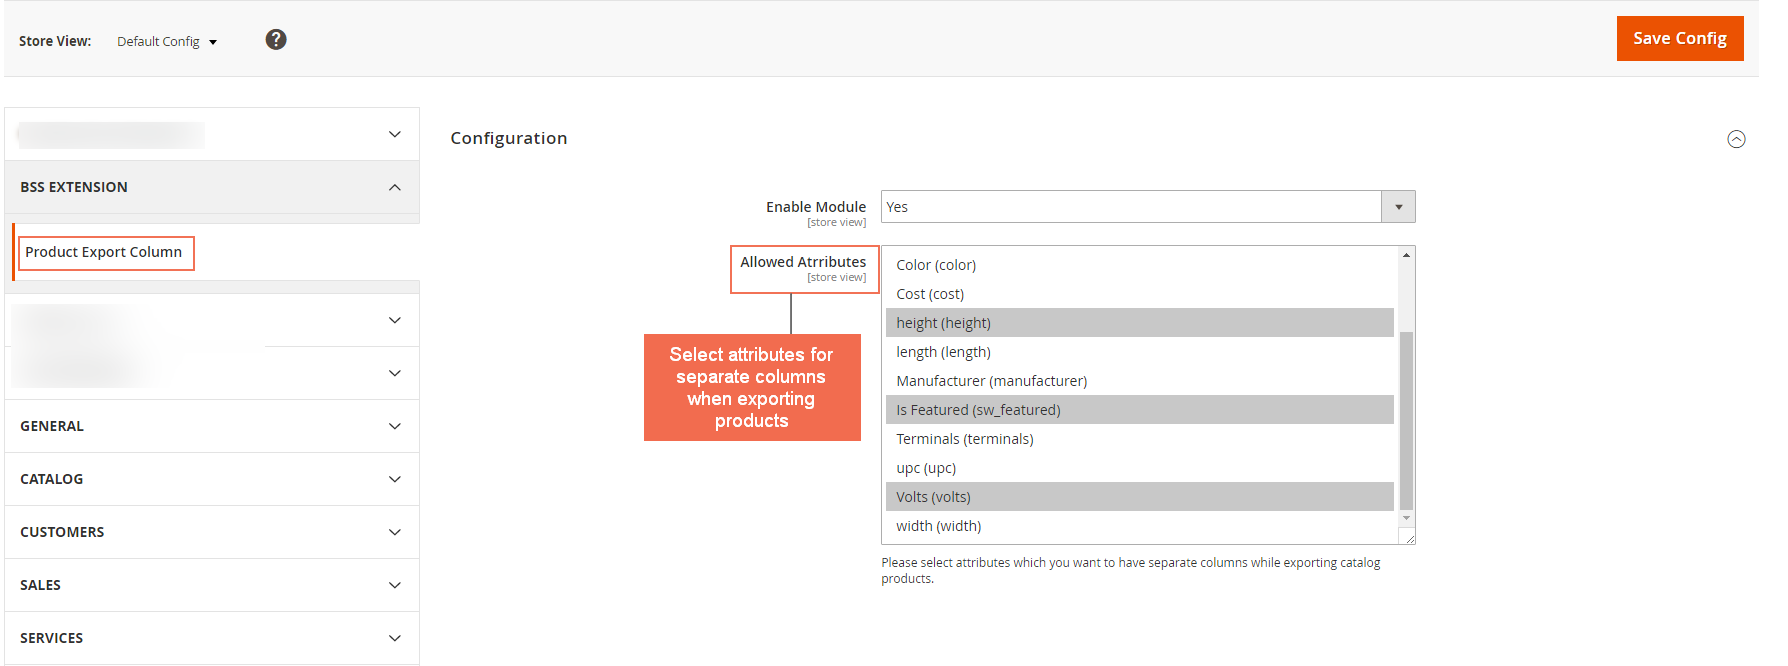
In Enable: Choose Yes to enable the module or choose No to disable it.
In Allowed Attribute: Choose the custom product attributes which you want to be in separate columns when exporting products.
After that, move over to System⇒ Data Transfer ⇒ Export.
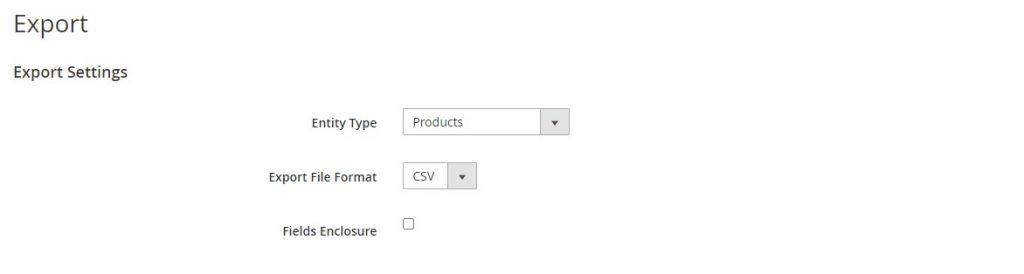
In Entity Type, select Products.
After that, scroll all the way to the end of the page and click Continue to export your product with custom attributes seperated.
***Note: For Magento 2.3.2, the export is processed under the backend. You need to set up Cron and wait for the export process complete and then check exported file by navigating to System ⇒ Export.
2.13. Disable Compare
Please go to Stores ⇒ Configuration ⇒ BSSCommerce ⇒ DisableCompare.
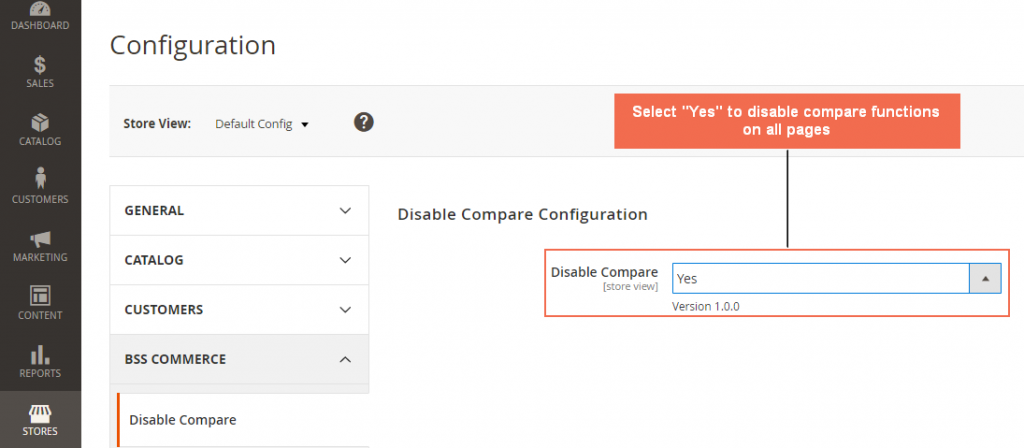
In Disable, choose Yes to remove all functions related to Compare. This action will:
- Remove the Compare button on the Widget, Category Page, Search Result Page, and Product Page.
- Remove Compare at the bottom of Layered Navigation.
- Remove Compare next to the Search Box (if you previously added one or more products to Compare)
- Remove Compare in the Related, Upsell, Cross-sell Products.
When you select No, Compare functions will work normally.