
1. Overview
Being an owner of a global Magento 2 store, you must know better than anyone the challenges of running a multiple store view ecommerce. GEOIP Store Switcher for Magento 2 will bring up user experiences in multi-store website to a whole new level. The extension helps detect user’s IP location and redirect them to the appropriate store view.
2. How Does It Work?
Please go to Stores ⇒ Configuration ⇒ BSSCOMMERCE and start configuration.
Before enabling the extension, you should update GEOIP database for both IPv4 and IPv6. Please choose one of the 3 options in each database update.
2.1. In Update Database GEOIP
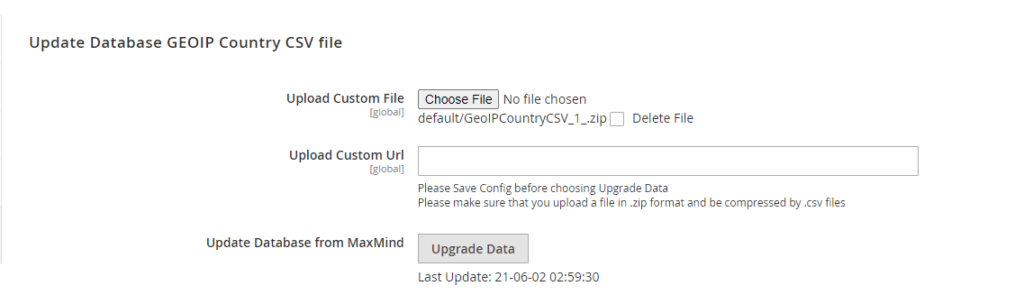
In Upload Custom File, you can upload a custom file (such as a paid database version from MaxMind) to be the database. However, in case the uploaded file is larger than the limit of the server, this option will be not available.
* Note: When you upload the file, you need to rename it and use the right format so that the file can be uploaded successfully and then the system runs cron. The file format must be the .zip file (This .zip file includes CSV files). After finishing uploading, choose Save Config then click Upgrade Data.
In Upload Custom URL, you can fill in the URL of the database file if you cannot upload it in the Custom File option (when the file is larger than the limit of the server). After completing, choose Save Config then click Upgrade Data.
In Update Database from MaxMind, please click in Upgrade Data to automatically download the Database from MaxMind or to use the uploaded file. After the file is extracted, a notification “Waiting for Cron run!” will be shown, and please wait for the database to be updated.
*Note: If Upload Custom File and Upload Custom URL are left blank, the module will use the Country Lite Database in MaxMind page. Hence, not all IP countries are available in this database.
On the other hand, the extension also uses another tool named IPinfo to identify the IP country in case it cannot be found in the database.
In the following configuration, please go to Stores ⇒ Configuration ⇒ BSSCOMMERCE GEOIP Switch Store
2.2.GeoIP Switch Store
2.2.1. In General
In Enable: Choose Yes to enable the module and please note that you need to Upgrade Data before using this extension.
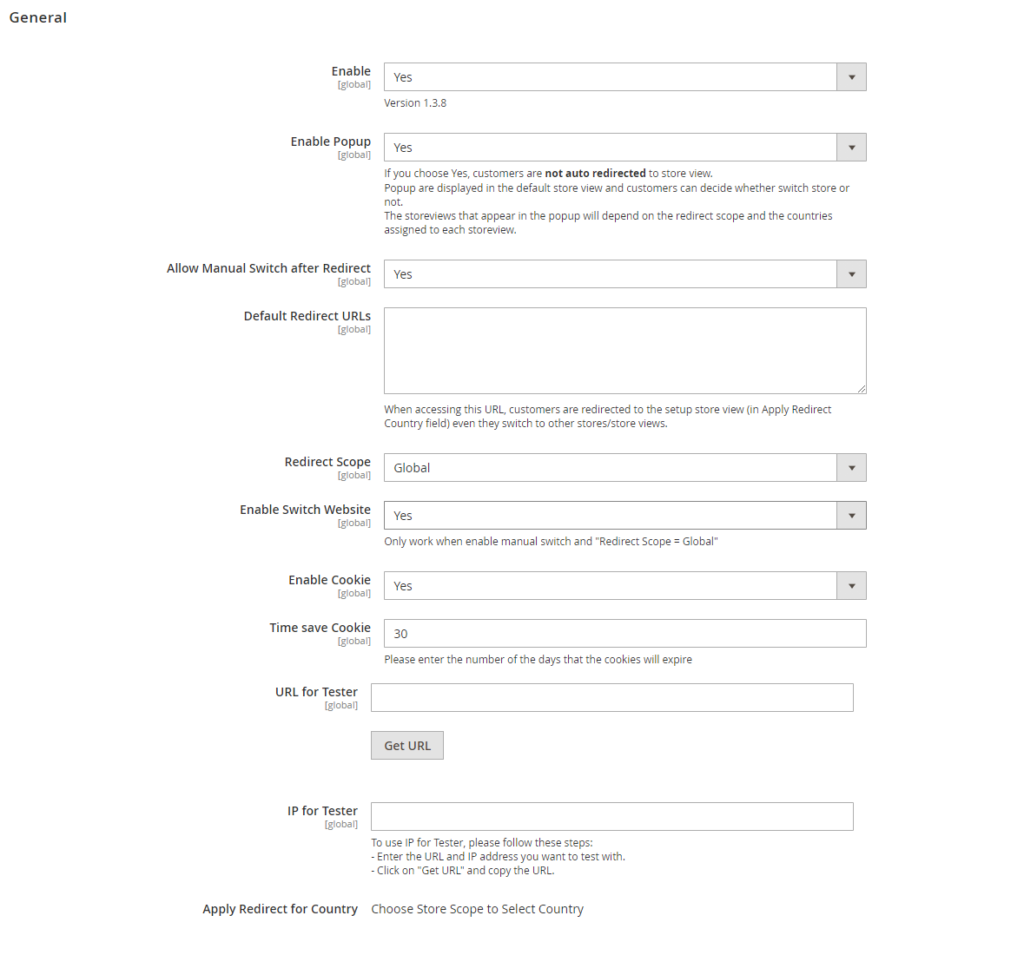
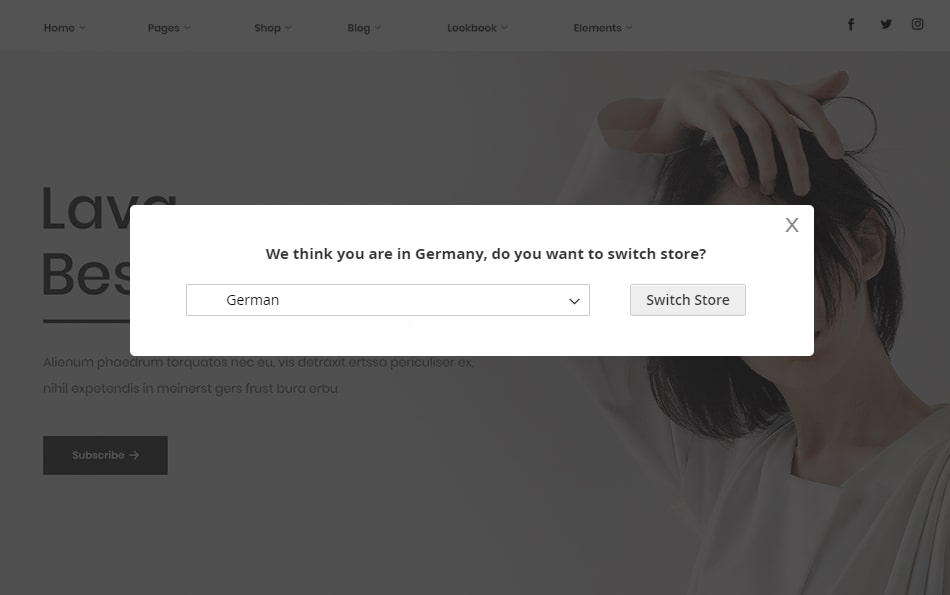
In Enable Popup: Choose Yes to enable this function; otherwise, choose No.
When you select Yes, this Popup appears for customers to switch store view as wanted with the first choice is the current IP of the visitor:
*Note: The Popup configuration needs to work well with settings in the Redirect Scope sections:
+ If you select Redirect Scope as Store, a popup is shown when users access a store view under the same store with the intended store view. For example, Canada customers can receive a popup when they come to the US store view. (The intended store view is Canada store view).
+ If you select Redirect Scope as Website, a popup is shown when users access a store view under the same website with the intended store view. For example, Canada customers can receive a popup when they come to the UK store view.
+If you select Redirect Scope as Global, a popup is shown when users access to any store views under the global installation. (It is not the intended store view, of course).
+ On the frontend, if customers close the popup and not proceeding with changing to a storeview, they will stay in the current storeview.
From the 1.3.9 version moving forward, the popup only shows storeviews that assigned to the visitor's country (determined via the visitor's IP).
Furthermore, you need to navigate to each store view on the website and make more configurations for this option. When you change the scope, you can also see 2 settings for the popup which ask customers whether they want to switch store view or not (as we mentioned above). You need to configure these 2 sections according to each store view.
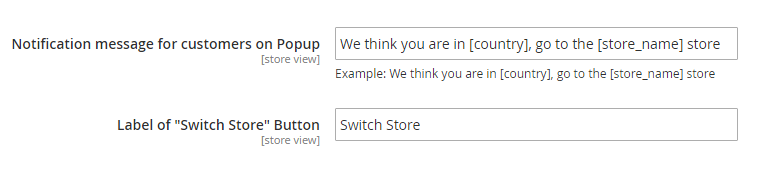
+ Notification message for customers on popup: enter a message to notify customers on the popup.
+ Label of "Switch store" button: enter a wanted label for the "Switch Store" button for customers to click.
In Allow Manual Switch after Redirect: Choose Yes to allow customers to switch store view after being redirected, otherwise choose No.
Ver 1.3.9 update:
- Given customer on the A page, after choosing redirect, they will be redirected to the same version of the A page on the destination storeview.
- In all cases of on/off manual, customers can't access other storeview via URL with store code.
- Once customers are on your website with a specific storeview, they can only switch to another storeview via a manual switch. If customers enter your site via a random URL of your site on another tab (given cookie is not expired), then they will always get redirected to the last storeview they previously switched to arrive.
In Default Redirect URLs: This is an additional configuration you need to set up in case you select Yes in the above Allow Manual Switch after Redirect field. It means if customers go to this default redirect URL, they are always redirected to the setup store view (in Apply Redirect Country field), even when they switch to other stores/ store views.
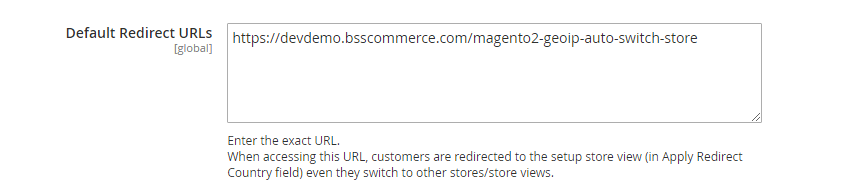
For example: Admin enter a default redirect URL as https://domain.com
+ Set up country code as Singapore. Customers from Singapore are redirected to Singapore store view: https://domain.com/sg.
+ When customers go to the https://domain.com from Singapore, they are redirected to https://domain.com/sg. Then, they switch to the US store view https://domain.com/us. However, when they access to https://domain.com again, they are still redirected to https://domain.com/sg. (In case admin choose store view scope as Singapore and set Apply Redirect Country as Singapore - this configuration is explained later).
+ If you leave it blank (no default redirect URL), customers from Singapore, in this case, stay on https://domain.com/us when they visit https://domain.com because the system only redirects them once.
In Redirect Scope: There are 3 options: Global, Website, and Store. To explain how to configure this correctly, we will use the following website hierarchy as an example.
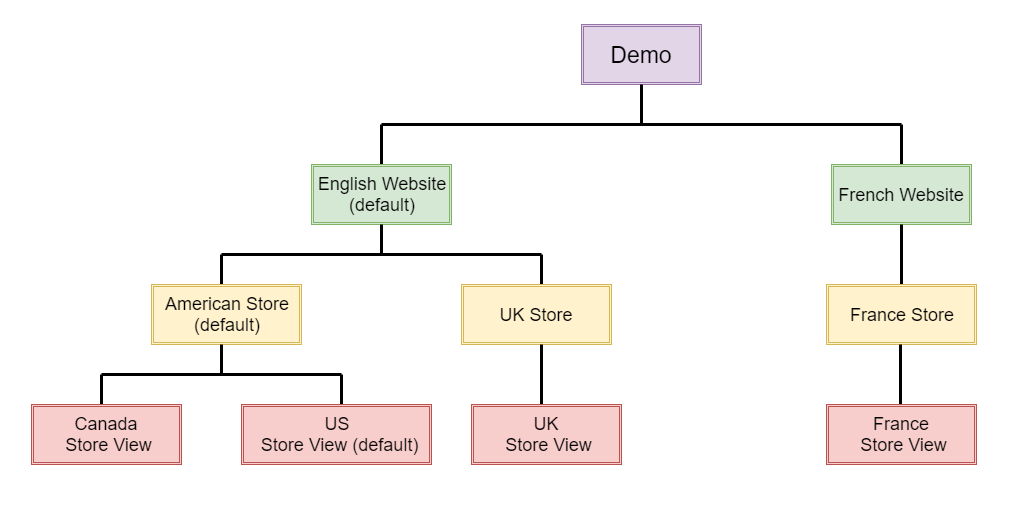
+ If you choose Store as Redirect Scope, the visitors will be redirected within the store views under the same store. For example, Canada customers will always be redirected to Canada Store View when they go to the American Store. If they go to the rest 2 stores (French, UK), they will not be redirected.
+ It’s similar for Website as Redirect Scope. Visitors will be redirected when they access any of your store views under the same website. For example, Canada customers will always be redirected to Canada store view when they go to any of the store views and store under the English website. If they go to the French website, they will not be redirected.
+ For Global Scope, visitors will be redirected when they enter any store views. For example, Canada customers will always be redirected to Canada store view in any case.
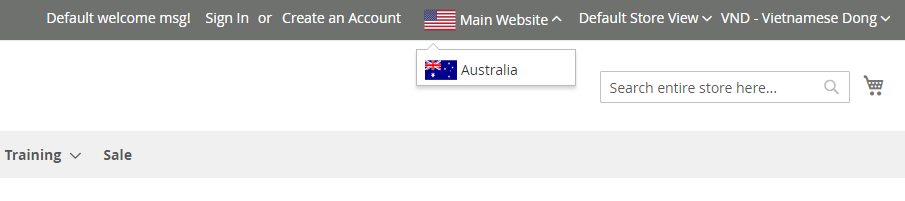
In Enable Switch Website: choose Yes to show a dropdown list of websites to switch conveniently.
For example:
*Note: For flags to describe websites, you need to add flags to this folder: /Bss/SwitchWebsite/view/frontend/web/images/flags.
Image should be named under the format as flag_<store_view_code>.png

In Enable Cookie: Choose Yes to enable saving cookies about GEOIP data, otherwise choose No. In case the cookies are enabled, the data about GEOIP will be saved. When visitors go to your site, the GEOIP data will be taken from the previous visit.
In Time Save Cookies: Enter the time duration for the cookies to be saved. Please note that you mustn't enter a number exceeding 300 years (equal to 109,500 days); otherwise, you will face with an error.
*Note: The popup asking customers to switch store view also disappears when this cookie saving time terminates.
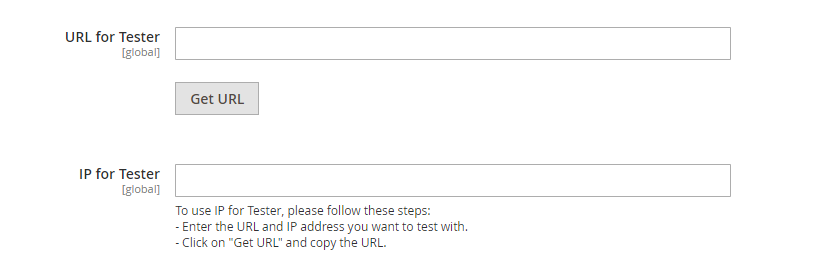
For testing purposes, we come up with URL for Tester and IP for Tester as follow:
- Enter the URL in URL for Tester and IP address in IP for Tester.
Note:
- If you cannot use IP or Fake IP, it is possible to enter URL or IP of any country and check the module.
- Our Magento 2 GEOIP Store Switcher extension works well with both Ipv4 and Ipv6 address.
- The IP for Tester feature will redirect users to store view assigned by the IP entered.
- Hit Get URL button.
- Copy the URL. Open an incognito tab to check whether you are redirected to the right store view.
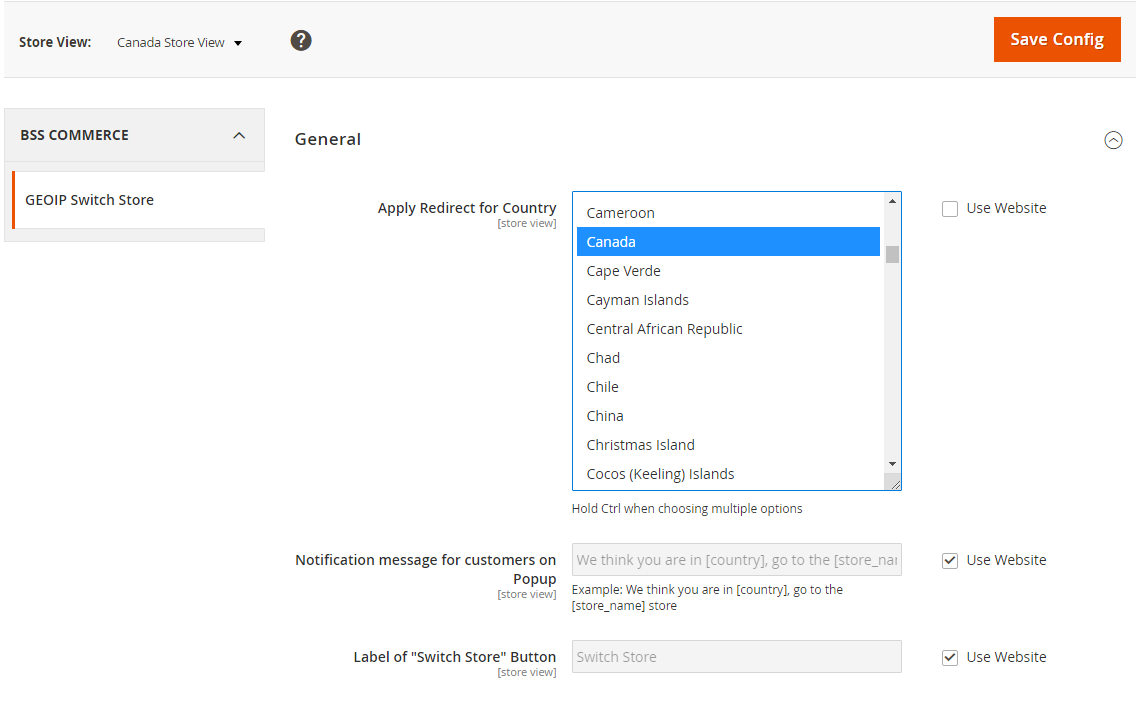
2.2.2. In Apply Redirect for Country
Please change the scope to Store View of the website and start configuration. You can select one or multiple countries so that customers coming from these chosen countries will be redirected to each corresponding store view. For countries that are not assigned to any store view, visitors from those will be redirected to the default store view. In case one country is assigned to 2 store views, customers are redirected to the store view with lower ID.
From ver 1.3.9: The module prioritizes the Store view with a smaller sort storeview. If the sort storeviews are similar then the priority shifts for storeview with smaller ID number.
For example: If you want customers from Canada to be redirected to Canada store view, you need to change the scope to Canada store view and select Canada as Apply Redirect for Country.
2.2.3. In GeoIP Blacklist/ Skip
This feature allows admins to block specific IPs and countries from access to your site. The blocked IPs and countries will be redirected to an assigned URL only.
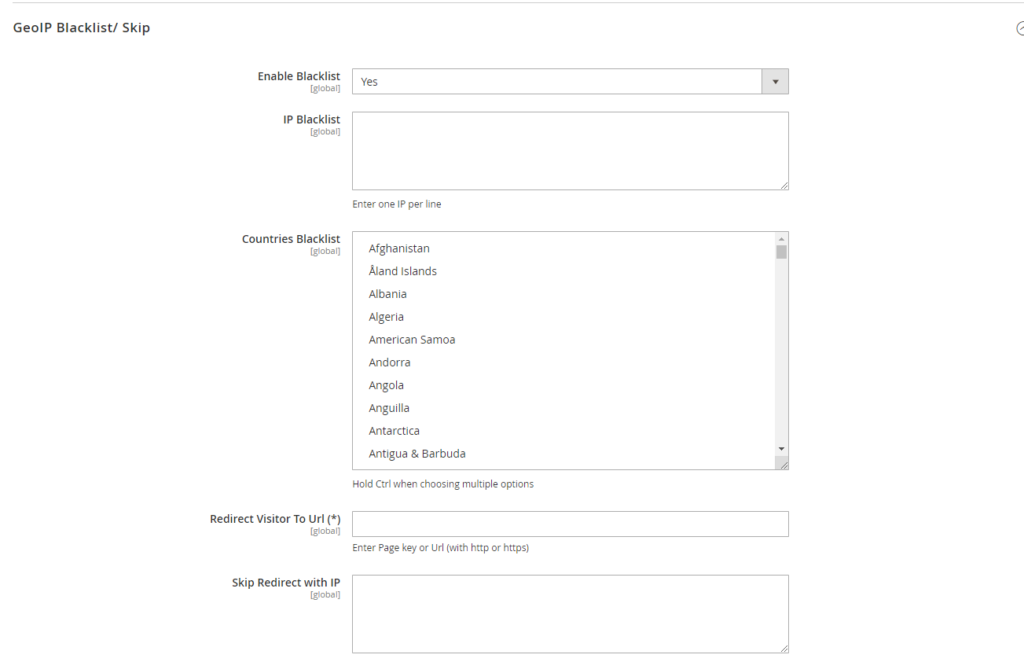
In Enable Blacklist: Choose Yes to enable GEOIP Blacklist, otherwise choose No.
In IP Blacklist: Enter one IP per line to set the IPs to be blocked. Then, visitors from these IPs cannot access your site. When trying to do so, they will only be redirected to an URL you set below.
Ver 1.3.9 update: If 1 country/IP get set in numerous configuration then the prioritized check sequence is processed as followed: Blacklist (P0) => skip redirect => default redirect => main redirect
In Countries Blacklist: Select countries to be blocked from your site. Then, visitors from these countries cannot access your site. When trying to do so, they will only be redirected to an URL you set below.
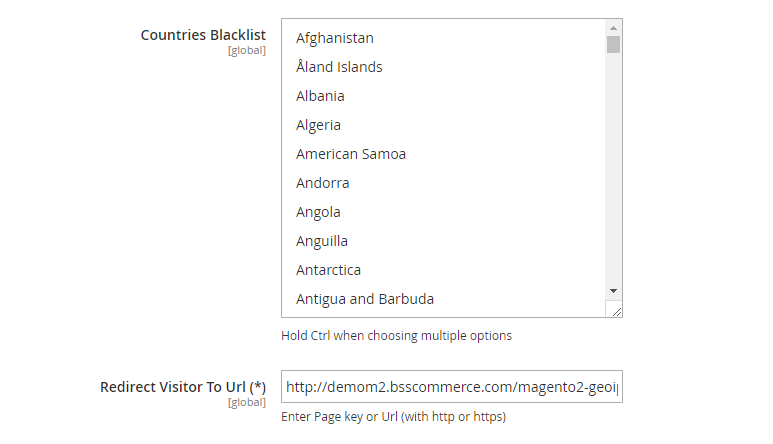
In Redirect Visitor to URL: Enter URL including http:// or https:// to redirect blocked users to a page. If you want to redirect blocked visitors to a CMS page, please enter the URL key of the page. If left blank or the URL entered is invalid, customers can enter whatever page they want.
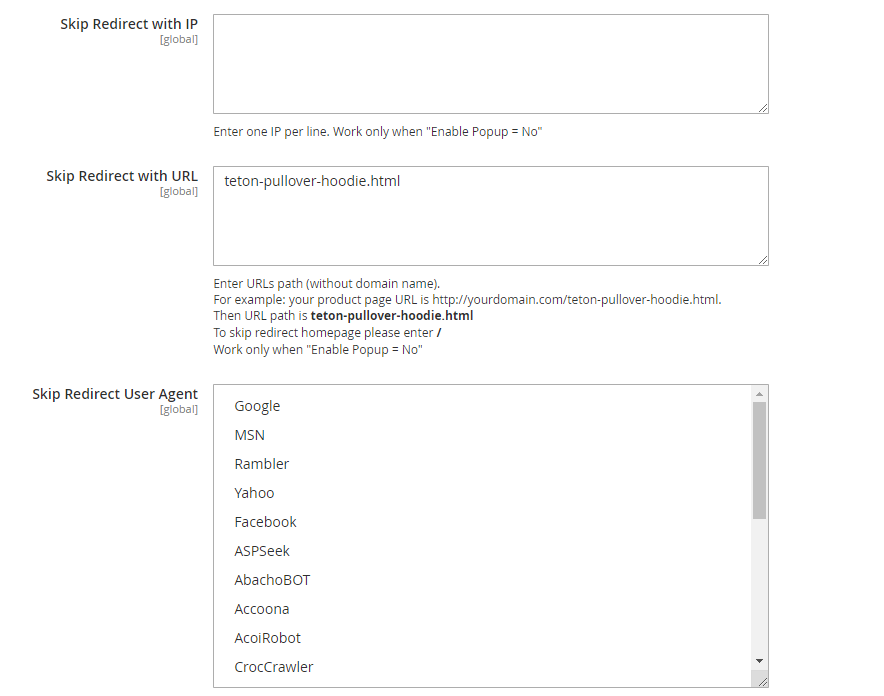
In Skip Redirect with IP: Enter IP addresses that will not be redirected when access your website. Enter one IP per line. Work only when "Enable Popup = No".
In Skip Redirect with URL: Enter one URL path per line to set the URL to be excepted from redirection. When visitors access these URLs, they will stay in the default store view. Work only when "Enable Popup = No".
+ For homepage: enter /
+ This function works with store view URL under the format: _store=us, for instance.
In Skip Redirect User Agent: Select user agents to prevent them from being redirected when crawling to your site. Please note that bots are not redirected if your website does not have the URL with store code.
*Note: If you select Agent as Google, you need to resubmit Google Ads to be approved again.
2.2.4. Varnish Configuration
This is the configuration to make GEOIP work with Varnish Cache.
You can read more about how to configure Magento to use Varnish HERE.
*Note: before you exporting VCL for Varnish 3 and 4, you need to save all configs.
Step-by-step process:
1. Login Magento as admin
2. Access config: STORES > Settings > Configuration > ADVANCED > System > Full Page Cache.
3. At config Caching Application, choose Varnish Caching.
4. Enter values according to Magento's guide.
5. Export file Varish config 6. Fix file Varnish config as follow:
- At sub vcl_hash , find the following code snippet:
if (req.http.cookie ~ "X-Magento-Vary=") { hash_data(regsub(req.http.cookie, "^.*?X-Magento-Vary=([^;]+);*.*$", "\1")); }
Then under the found code, insert this code:
if (req.http.cookie ~ "country_code=") { hash_data(regsub(req.http.cookie, "^.*?country_code=([^;]+);*.*$", "\1")); } if (req.http.cookie ~ "currency_status=") { hash_data(regsub(req.http.cookie, "^.*?currency_status=([^;]+);*.*$", "\1")); } if (req.http.cookie ~ "last_store_id_visited=") { hash_data(regsub(req.http.cookie, "^.*?last_store_id_visited=([^;]+);*.*$", "\1")); } if (req.http.cookie ~ "last_full_url_visited=") { hash_data(regsub(req.http.cookie, "^.*?last_full_url_visited=([^;]+);*.*$", "\1")); } if (req.http.cookie ~ "customer_has_redirected=") { hash_data(regsub(req.http.cookie, "^.*?customer_has_redirected=([^;]+);*.*$", "\1")); } if (req.http.cookie ~ "customer_has_open_popup=") { hash_data(regsub(req.http.cookie, "^.*?customer_has_open_popup=([^;]+);*.*$", "\1")); }
With version 1.3.9, there are changes regarding file varnish vcl's content, hence, you should follow the instructions below:
With customers that installed the module previously and used the old config varnish, you need to fix the file varnish vcl as follow:
+ at block config sub vcl_recv, find and delete this old config snippet:
if (req.http.Cookie !~ "country_code" && req.url !~ "^/(pub/)?(media|static)/.*\.(ico|css|js|jpg|jpeg|png|gif|tiff|bmp|mp3|ogg|svg|swf|woff|woff2|eot|ttf|otf)$") { return (pass); }
+ at block config sub vcl_hash, find and change this old config:
if (req.http.Cookie !~ "country_code" && req.url !~ "^/(pub/)?(media|static)/.*\.(ico|css|js|jpg|jpeg|png|gif|tiff|bmp|mp3|ogg|svg|swf|woff|woff2|eot|ttf|otf)$") { return (pass); }
-into this config:
if (req.http.cookie ~ "country_code=") { hash_data(regsub(req.http.cookie, "^.*?country_code=([^;]+);*.*$", "\1")); } if (req.http.cookie ~ "currency_status=") { hash_data(regsub(req.http.cookie, "^.*?currency_status=([^;]+);*.*$", "\1")); } if (req.http.cookie ~ "last_store_id_visited=") { hash_data(regsub(req.http.cookie, "^.*?last_store_id_visited=([^;]+);*.*$", "\1")); } if (req.http.cookie ~ "last_full_url_visited=") { hash_data(regsub(req.http.cookie, "^.*?last_full_url_visited=([^;]+);*.*$", "\1")); } if (req.http.cookie ~ "customer_has_redirected=") { hash_data(regsub(req.http.cookie, "^.*?customer_has_redirected=([^;]+);*.*$", "\1")); } if (req.http.cookie ~ "customer_has_open_popup=") { hash_data(regsub(req.http.cookie, "^.*?customer_has_open_popup=([^;]+);*.*$", "\1")); }
2.3. GeoIP Switch Currency (from v1.1.8)
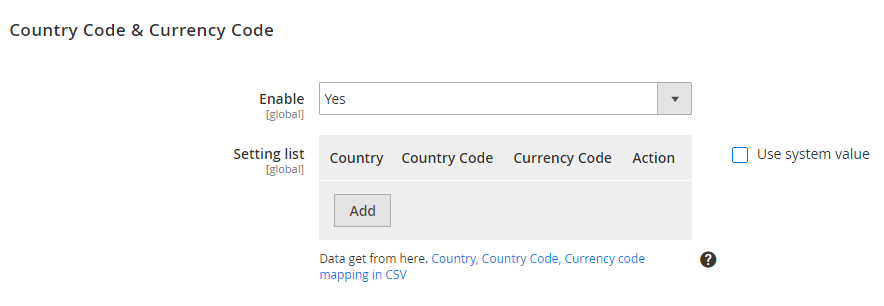
In Enable: Choose Yes to enable this function. It only works when you select No for Enable Popup settings (in 2.2.1 part).
If you choose No, currency works as default.
Ver 1.3.9 Update: This function works with both Enable/ Disable Popup.
In Setting list: click Add and then enter the information of country, country code, and currency code.
For example:
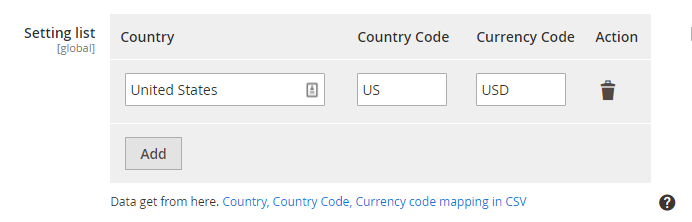
It means that US visitors accessing the website are redirected to US store view and Display currency is also switched to USD if USD is included in the Allowed Currency of the US store view.