
1. Overview
Import/Export Product Attributes for Magento 2 extension helps administrators to quickly import product attributes into websites via a standard CSV file.
Admin needs to prepare this CSV file with all necessary information about product attributes, then import by only one click. Moreover, the extension also supports exporting all available attributes into a CSV file conveniently.
Import/Export Product Attributes for Magento 2 extension is often used in case store owners want to change their Magento 2 websites into new ones or change from another platform to Magento 2.
Therefore, installing this module, they don't take them much time and human resources to do manually as before.
EXPLORE Magento 2 Import Export Extension Combo to break the default limit!
2. How Does It Work?
2.1. Import Product Attributes
You go to System ⇒ Import by BSS and select Product Attributes in the drop-down list of Entity Type.
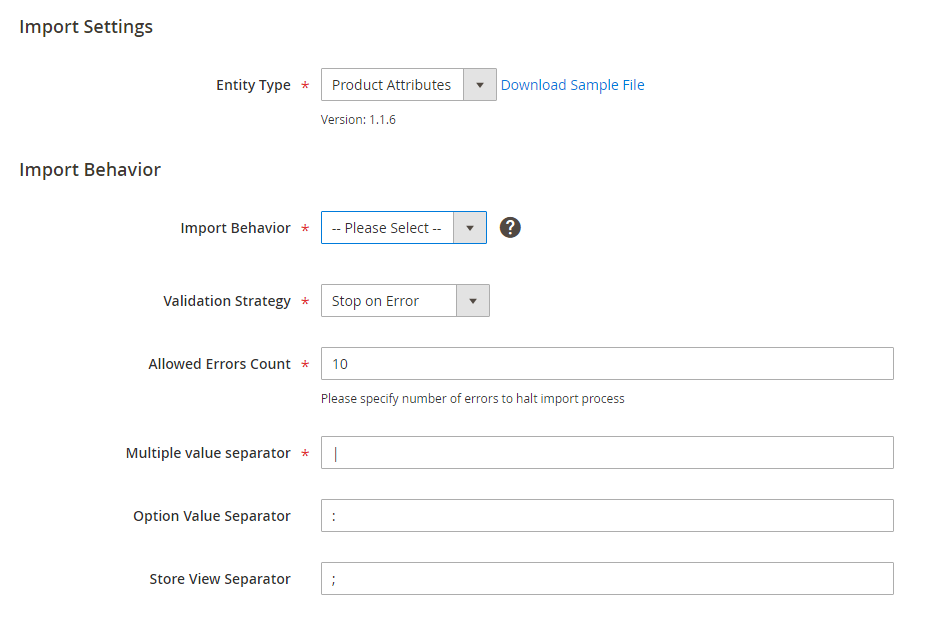
2.1.1. In Import Behavior
- Import Behavior: There are 3 options for you to select.
+ Add/Update: This option allows administrators to add new attributes to the website. In addition, it also updates attributes if their attribute_codes exist.
+ Replace: This option allows administrators to add new attributes to the website. In case attribute _ codes in the import data match with attribute_codes of existing attributes, these attributes are deleted and new records are created using the CSV data.
+ Delete: This option allows administrators to remove attributes in case their attribute_codes exist.
- Validation Strategy: select one option from the drop-down list to determine how the system operates when there are errors in the import process.
+ Stop on Error: the system stops importing when there are errors.
+ Skip error entries: the system skips errors and continues to import.
- Allowed Errors Count: This setting allows you to choose the allowed maximum number of errors when importing. If the number of errors happening in the import process exceeds that maximum number you fill in this field, the system will stop importing.
- Multiple value separator: Choose a character to separate data in a field column. In our CSV sample file, the vertical bar ( | ) is set up as the default value.
- Option value separator: separator between store view ID and values of attribute options.
- Store view separator: separator between values of different store views.
For example:
2.1.2. CSV file preparation
Before you import product attributes via a CSV file, you need to prepare the CSV file with enough necessary information. You can download this CSV sample file by clicking Download Sample File. Then you open this file and fill in fields:

| Data | Format | Meaning |
| attribute_code | A string of characters | Required to enter data.
Notify errors if you leave it blank. |
| attribute_set | attribute_set1|attribute_set2... | + When attribute_set of an attribute is left blank, this attribute is added as a new one that does not belong to any attribute sets or any attribute groups.
+ When attribute_set doesn't exist in the database, a new attribute set is created. |
| attribute_group_name | A string | The name of the attribute group to which the attribute is assigned after importing.
+ when you leave it blank, the attribute is added to the last attribute group of the assigned attribute set. + when attribute_group_name doesn't exist in the database, a new one is auto created. |
| attribute_group_code | (not required): It is auto-created based on the attribute group name.
If attribute_group_code is similar to attribute_group_code of an available group in the database, you will face an error. |
|
| is_global | 0,1,2 | 0 ~ Store View
1 ~ Global 2 ~ Website If it is left blank or wrong, it auto turns 0. |
| is_user_defined | 0, 1 | 0 ~ attribute is defined as system attribute.
1 ~ attribute is not system attribute. Admin can delete it. |
| is_filterable | 0,1,2 | Corresponding to the Use in Layered Navigation config in the StoreFront Properties tab of the attribute:
0 ~ No 1 ~ Filterable (with results) 2 ~ Filterable (no results) If you enter the wrong value, the config auto gets 0 after importing. |
| is_visible | 0,1 | Determines whether the attribute is visible in the grid or not:
0 ~ No 1 ~ Yes |
| is_required | 0,1 | Corresponding to the Value Required config of the attribute
0 ~ No 1 ~ Yes |
| is_visible_on_front | 0,1 | Corresponding to the Visible on Catalog Pages on Storefront config:
0 ~ No 1 ~ Yes |
| is_searchable | 0,1 | Corresponding to the Use in Search config:
0 ~ No 1 ~ Yes |
| is_unique | 0,1 | Corresponding to the Unique Value config:
0 ~ No 1 ~ Yes |
| frontend_class | Optional. Database value | |
| is_visible_in_advanced_search | 0,1 | Determines whether the attribute is shown in advanced search or not:
0 ~ No 1 ~ Yes |
| is_comparable | 0,1 | Corresponding to the Comparable on Storefront config of the attribute
0 ~ No 1 ~ Yes |
| is_filterable_in_search | 0,1 | Corresponding to the Use in Search Results Layered Navigation config:
0 ~ No 1 ~ Yes |
| is_used_for_price_rules | 0,1 | Determines whether the attribute is used for price rules or not:
0 ~ No 1 ~ Yes |
| is_used_for_promo_rules | 0,1 | Corresponding to the Use for Promo Rule Conditions config:
0 ~ No 1 ~ Yes |
| sort_order | Natural numbers | Smaller value, higher priority |
| position | Natural numbers | The display position of the attribute in layered navigation. |
| frontend_input | Corresponding to Catalog Input Type for Store Owner:
text – Text Field textarea – Text Area texteditor - Text Editor (from Magento 2.3) date – Date boolean – Yes/No multiselect – Multiple Select select – Dropdown, Visual or Text Swatch price – Price media_image– Media Image wee – Fixed Product Tax (Notify errors and skip them when entering wrong values) |
|
| backend_type | Optional. Database value | |
| backend_model | Optional. Database value | |
| source_model | Optional. Database value | |
| frontend_label | label|store_code1:label|store_code2:label | Label for the attribute, you can import label for many store views.
(Notify errors and skip them when you leave it blank) |
| default_value | String | Default value for the attribute |
| apply_to | simple|group|bundle|configurable|downloadable|virtual | Determines product type which the attribute is used for |
| is_wysiwyg_enabled | 0,1 | Corresponding to the Enable WYSIWYG config:
0 ~ No 1 ~ Yes |
| is_required_in_admin_store | 0,1 | 0 ~ No
1 ~ Yes |
| is_used_in_grid | 0,1 | Determines whether the attribute is used in the product grid or not:
0 ~ No 1 ~ Yes |
| is_visible_in_grid | 0,1 | |
| is_filterable_in_grid | 0,1 | Determines whether the attribute is used to filter in the product grid or not:
0 ~ No 1 ~ Yes |
| search_weight | Defines the weight of the attribute in search. | |
| is_html_allowed_on_front | 0,1 | Corresponding to the Allow HTML Tags on Storefront config.
0 ~ No 1 ~ Yes |
| used_in_product_listing | 0,1 | Corresponding to the Used in Product Listing config:
0 ~ No 1 ~ Yes |
| used_for_sort_by | Corresponding to the Used for Sorting in Product Listing config:
0 ~ No 1 ~ Yes |
|
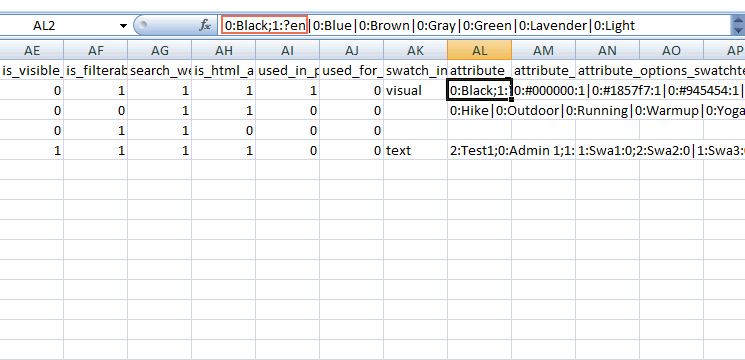
| swatch_input_type | Visual or text | Determines style of attribute having Catalog input type as select:
visual ~ attribute has visual swatch text ~ attribute has text swatch |
| attribute_options | admin:Label;store_code1:Label1|admin:Label2
Example: admin:Hike;default:Hike default;test:Hike New|admin:Outdoor;test:Outdoor Test |
Enters labels for the attributes with select type:
+ Admin ~ required + Store_code ~ not required.
('|' is corresponding to the Multiple value separator. ':' is corresponding to the Option Value Separator.) |
| attribute_options_swatchvisual | admin:value1:type;store_code1:value2:type|store_code2:value3:type
Example: admin:#000000:1|admin:#1857f7:1|admin:#945454:1| |
+ Value: is the value of swatch (it can be the image link or color code).
+ Type: is specified in the database. 1 is corresponding to visual color type and 2 is corresponding to visual image type. For example: +Visual color type: 0:#000000:1 + Visual image type: 0:a/_/a.jpg:2 |
| attribute_options_swatchtext | admin:value1:type;store_code1:value2:type;store_code2:value3:type
Example: admin:Swa:0;default:Swa1:0;test:Swa2:0|admin:Swa3:0;default:Swa4:0;test:Swa4:0| |
+ admin: required to enter. + store_code1, store_code2: not required+ Value: is the value of swatch.+ Type: is always 0.For example: 1:S:0;2:Small:0 |
*Notes:
- Your CSV file must include enough the number of columns like the sample file so that you can successfully import it. (If the number of columns is greater or fewer than those in the sample file, the system will notify you about errors).
- You can assign 1 attribute for many attribute sets in only 1 row in the CSV file. The format of the attribute set column is attributeSet1|attributeSet2|...
- If you enter the wrong product type in the "apply_to" column, the value of this column is changed into NULL.
- For columns with values as 0 or 1: if you enter the wrong value, the system will change into default value as 0.
- For columns including multiple values, you need to add multiple separators in the end. For example: 0:KBowl1;2:Elongated;1:Allong|
- You mustn't leave backend_type column empty:
+ if backend_type is static, you need to create a column in the catalog_product_entity. If you don't do this one, you cannot save the attribute's value when saving the product. However, it's better that you shouldn't select backend_type as static.
+ If backend_type is varchar, int, decimal, text, or data time, you can definitely save the attribute's value.
- If your CSV file includes special characters that belong to your own language (in case you do not use English), you need to convert your CSV file to UTF-8 format. You can read our instructions HERE.
2.1.3. In File to Import
After you finish the CSV file, tab Choose File button to select the file to import.
2.1.5. Check Data and Import
After you select the CSV file, you need to click Check Data button to validate data before importing.
- If your CSV file is free from errors, there is a message to notify validation results and the Import button now appears to click.
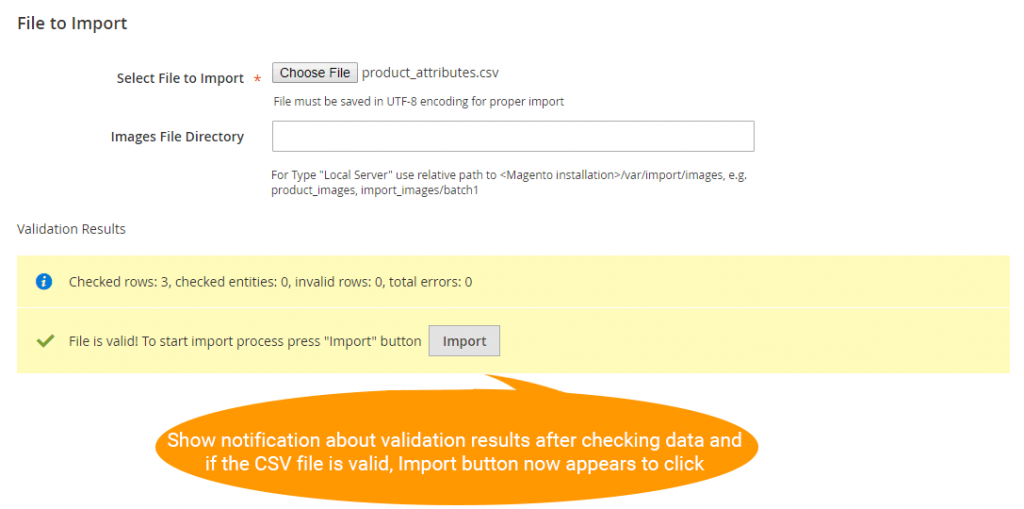
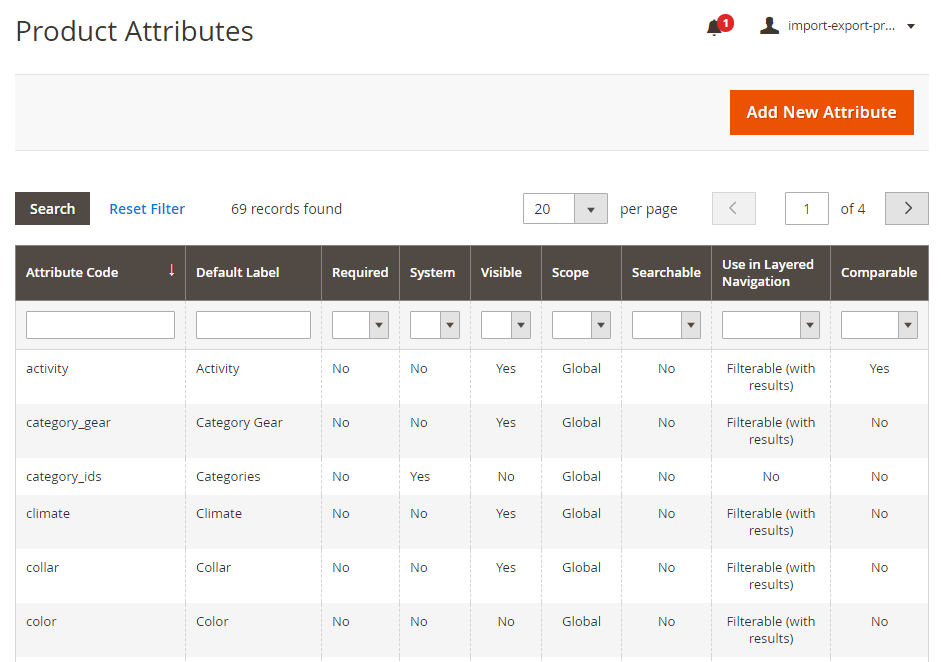
You click the Import button to start importing product attributes in the CSV file into Magento 2 website. To check these imported attributes, you navigate to
Stores → Products Attributes to see them in a grid view:
- If your CSV file includes errors, the Import button cannot be displayed for you to click and there is a notification about these problems.
*NOTE: You had better take notice about these following issues in the CSV file which affect data checking.
- Errors in the CSV file make you not successfully import:
+ Leave attribute_code as blank.
+ Enter the wrong Entity Type ID.
+ Enter a number of columns that are greater or less than those in the sample CSV file. (Please follow the sample file we provide you and don't add more columns or remove).
+ Enter the wrong value in the"is_global" column. (Please remember the standard values just includes 1,2 and 3).
- However, there some specific errors in your CSV file, but the system will skip and continues to import as well as still notifies you about problems. Let's check these skipped errors as below:
+ Enter the wrong backend_type or frontend_input.
+ Enter the wrong attribute_code when you choose Import behavior as Delete.
+ Enter the different multiple value separator from the one set up in the backend.
+ Enter the wrong format in the "attribute_option" or "attribute_option_swatch" columns.
When you are in this situation, your CSV file is still imported but it contains errors. Therefore, thanks to notification about these errors, you can edit the file and also do it better for the next time.
2.2. Export Product Attributes
You go to System ⇒Export by BSS and select Product Attributes in the drop-down list of Entity Type.
You choose CSV in the Export File Format field.

- In Entity Attributes and Export
In Entity Type section: you can export all available product attributes by choosing All from the drop-down list or export each attribute set.
Then click Continue button to export chosen items in a CSV file.
*Note: The admin can export product attributes that are not assigned to any attribute sets. (Update from version 1.0.9)
3. Tips
You can quickly import attributes with many options using source_model of attributes.
+ Create a source file in the module: Bss_ProductAttributesImportExport - this source file can be similar as the following file:
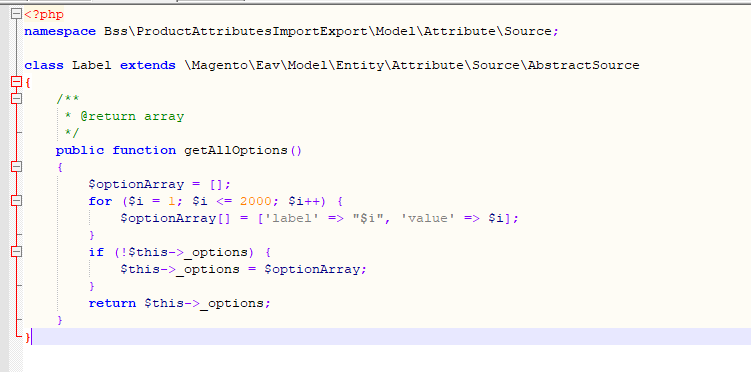
The path is Bss\ProductAttributesImportExport\Model\Attribute\Source\Label.
Enter this path to the source_model of the CSV file.
More Magento 2 Import Export extension from BSSCommerce are useful for your work: