
Magento 2 Import Export extension combo frees yourself from all default Magento limitations. Every Import and export features now stays in one place and you can enjoy speeding up adding or getting data on your website.
I. Import by BSS
Navigate to System ⇒ Import by BSS and select an Entity Type from the drop-down list.

1.Import CMS Page
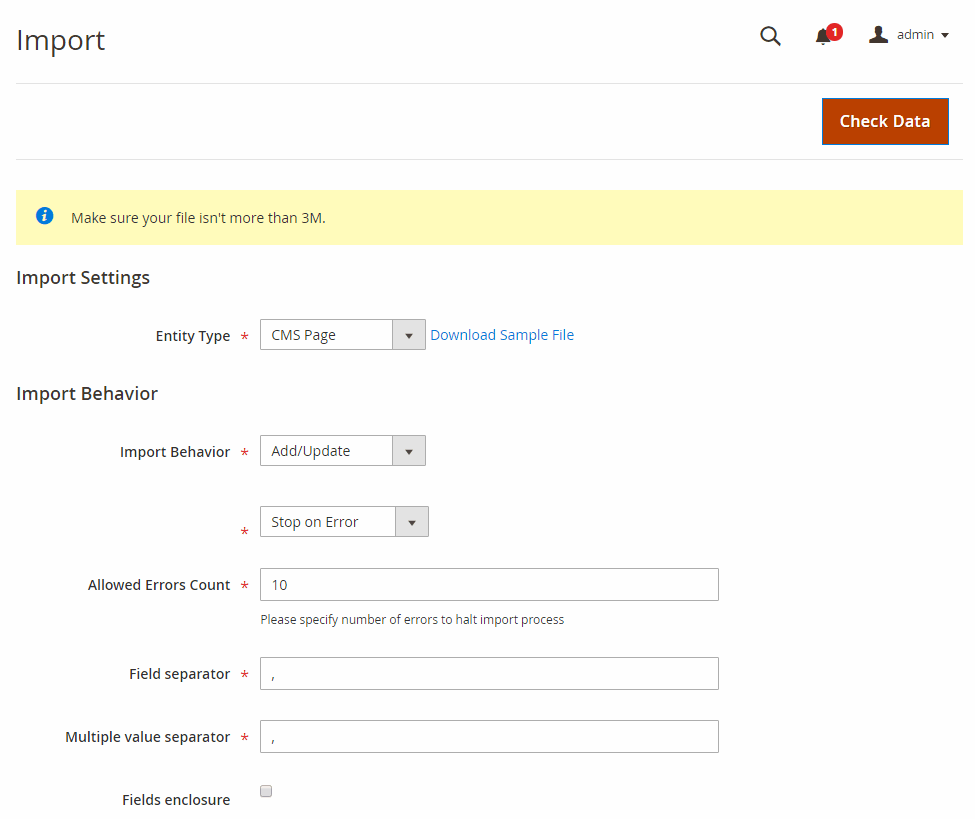
1.1. In Import Behavior
- Import Behavior: There are 3 options for you to select.
+ Add/Update: This option allows administrators to add new CMS Page of the website. In addition, it also updates CMS Pages if these pages already exist in the database and have the same URL keys (identifier) as data in the CSV file.
+ Replace: The module will delete old CMS pages and then add new ones.
+ Delete: This option allows the system to get CMS pages based on URL keys in the CSV file, then delete pages which are available in the database.
Next, you select one option from the drop-down list to determine how the system operates when there are errors in the import process.
+ Stop on Error: the system stops importing when there are errors.
+ Skip error entries: the system skips errors and continues to import.
- Allowed Errors Count: This setting allows you to choose the allowed maximum number of errors when importing. If the number of errors happening in the import process exceeds the maximum number you fill in this field, the system will stop importing.
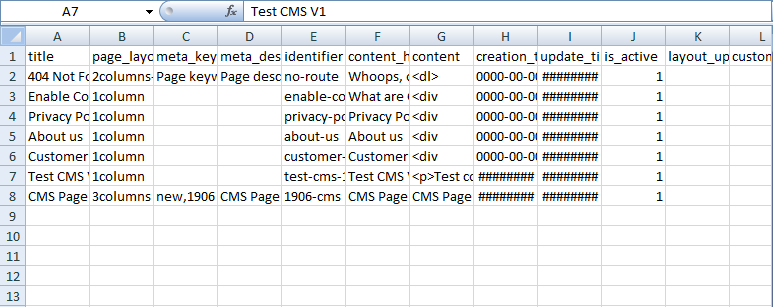
1.2. CSV File Preparation
Before you import CMS pages via a CSV file, you need to prepare the CSV file with enough necessary information. You can download this CSV sample file by clicking Download Sample File. Then you open this file and fill in fields:
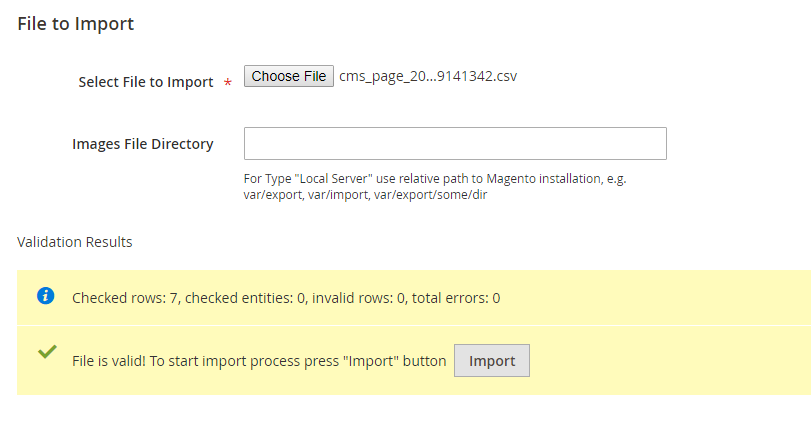
1.3. In File to Import
After you have finished the CSV file, tab Choose File button to select the file to import.
1.4. Check Data and Import
After you select the CSV file, you need to click Check Data button to validate data before importing.
- If your CSV file is free from errors, there is a message to notify validation results and Import button now appears to click.
 You click Import button to start importing CMS pages in the CSV file into Magento 2 website. There is also a notification about results of the import process.
- If your CSV file includes errors, the Import button cannot be displayed for you to click and there is a notification about these problems.
2. Import Categories
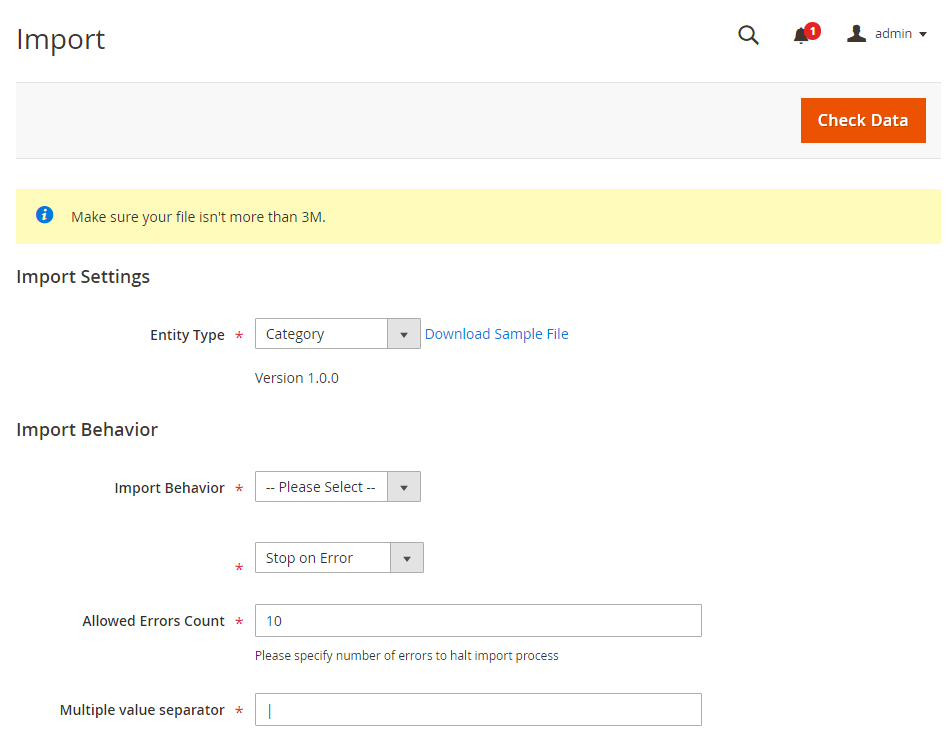
2.1. In Import Behavior
- Import Behavior: There are 3 options for you to select.
+ Add/Update: This option allows administrators to add new categories of the website. In addition, it also updates categories if these categories already exist in the database and have the same category _id as data in the CSV file.
+ Replace: The module will delete old categories and then add new ones.
+ Delete: This option allows the system to load categories based on category_id in the CSV file, then delete these categories which are available in the database.
Next, you select one option from the drop-down list to determine how the system operates when there are errors in the import process.
+ Stop on Error: the system stops importing when there are errors.
+ Skip error entries: the system skips errors and continues to import.
- Allowed Errors Count: This setting allows you to choose the allowed maximum number of errors when importing. If the number of errors happening in the import process exceeds the maximum number you fill in this field, the system will stop importing.
2.2. CSV File Preparation
Before you import categories via a CSV file, you need to prepare the CSV file with enough necessary information. You can download this CSV sample file by clicking Download Sample File.
Then you open this file and fill in fields:
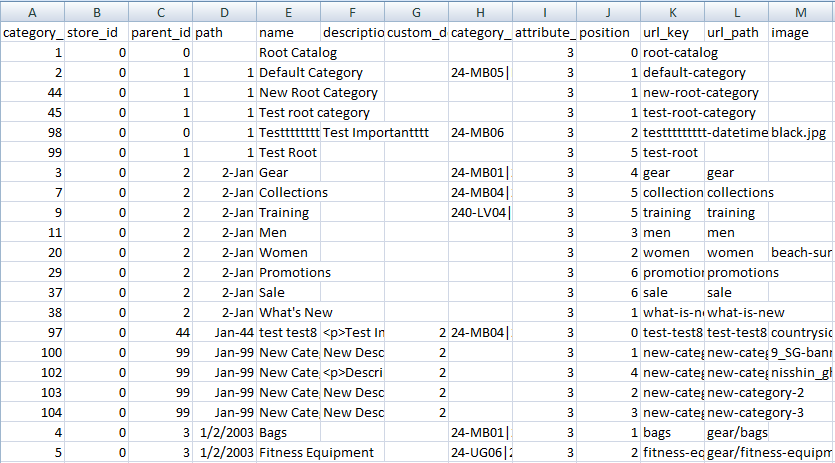
- category_id: Complete category id which is saved in the database.
+ Value of category_id to enter is a Natural number.
+ If you leave it blank, a new category is added.
+ If you enter a value that exists, the module will update data to the category with corresponding ID.
- store_id: Store Id which is available in the store.
+ Value of store_id to enter is a Natural number
+ If you leave it blank, store_id will get the value of 0 (store _id=0). You don't need to fill store_id when adding a new category.
- parent_id: is an ID of the existing category in the database
+ Value of parent_id to enter is a Natural number.
+ If you enter the ID which does not exist, the module will notify as an error in the Check data process.
* Note: If you are using 1.0.1 version: In case you have to import a new parent category and new children category in the same CSV, take some notices as below:
+ In parent category: enter new category_id.
+ In children category: enter parent_id which is the same as new category_id of the parent category. As a result, children categories will be imported to the right parent category. In addition, after importing, IDs of parent category and children category can be different from new category_id which is entered in the CSV file.
- path: This is the path from the root category to the current category.
+ path is a string of characters.
+ When importing, you don't need to enter data for this column.
- name: Name of the category.
+ If you leave it blank, the module will notify as an error in the Check data process.
- description: Detailed description about the category.
- custom_design: Enter ID of the theme used in the category
+ Value of custom_design to enter is a Natural number.
- category_products: Enter SKUs of products assigned to the category. For group products, bundle products, and configurable products, you need to enter SKUs of parent products.
+ If SKU is wrongly entered, the module will skip this SKU and continue to import other SKUs.
+ If SKU has existed in the category, the module will skip this SKU.
+ If the SKU has not yet existed, the module will add it as a new one.
+ category_products has a format as SKU1|SKU2|SKU3.
*Note: You just can add new SKUs to the category in this column, but cannot remove existed SKUs from the category.
- attribute_set_id: ID of attribute set.
+ Value of attribute_set_id to enter is a Natural number.
+ If you leave it blank, the module will take ID of the default attribute set.
- position: Postion of the category in the parent category.
+ Value of position to enter is a Natural number.
- url_key: URL key of the category.
+ If you leave it blank, a new URL key for this category is created based on its name.
- url_path: URL path of the category.
- image_name: Name of image file of the category. Category image should be uploaded to pub/media/catalog/category folder of Magento folder.
- is_active: Enable the category.
+ You enter 0 or 1 for this column. If you enter 1, it means the category status is enabled.
- include_in_menu:
+ You enter 0 or 1 for this column. If you enter 1, the category will be displayed in the menu.
- display_mode: display mode of the category.
+ You can choose one of these values to enter: PRODUCTS, PAGE, and PRODUCTS_AND_PAGE.
- page_layout: choose layout for the category.
+ Values of layout include: 1column, 2columns-left, 2columns-right, 3columns và empty.
- custom_design_from: Time when custom design begins.
+ Standard format is: yyyy-mm-dd or yyyy/mm/dd
- custom_design_to: Time when custom design ends.
+ Standard format is: yyyy-mm-dd or yyyy/mm/dd
- default_sort_by: Select how to sort products of the category on the frontend. For example: sort by name, position, and price.
- available_sort_by: Sorting type can be allowed to use in the category. They can be name, position or name or you can combine all of them.
+ Standard format is: sort1|sort2|sort3
- is_anchor: You can enter 0 or 1 in this column.
- custom_use_parent_settings: Select whether applying parent category's settings or not.
- layered_navigation_price_step:
+ value of layered_navigation_price_step is a decimal number.
- custom_apply_to_products: You can enter 0 or 1 in this column.
- If you want to use exported categories to import into another website with Delete import behavior, you need to remove rows of system root category (ID=1) and store root category in the CSV file because default Magento doesn't allow you to delete root category.
- If you want to import the whole category tree, you need to arrange parent category and children categories to the right order in the CSV file. The first is the parent category, and the next are children categories.
2.3. In File to Import
After you have finished the CSV file, tab Choose File button to select the file to import.
2.4. Check Data and Import
After you select the CSV file, you need to click Check Data button to validate data before importing.
- If your CSV file is free from errors, there is a message to notify validation results and Import button now appears to click.
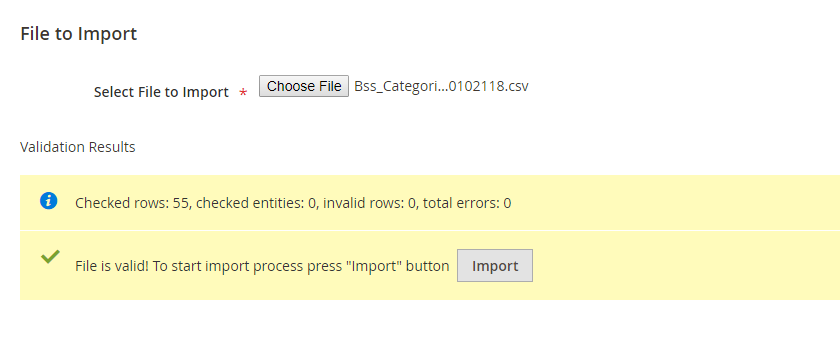 You click Import button to start importing categories in the CSV file into Magento 2 website. There is also a notification about results of the import process.
- If your CSV file includes errors, the Import button cannot be displayed for you to click and there is a notification about these problems.
3. Import Newsletter Subscribers
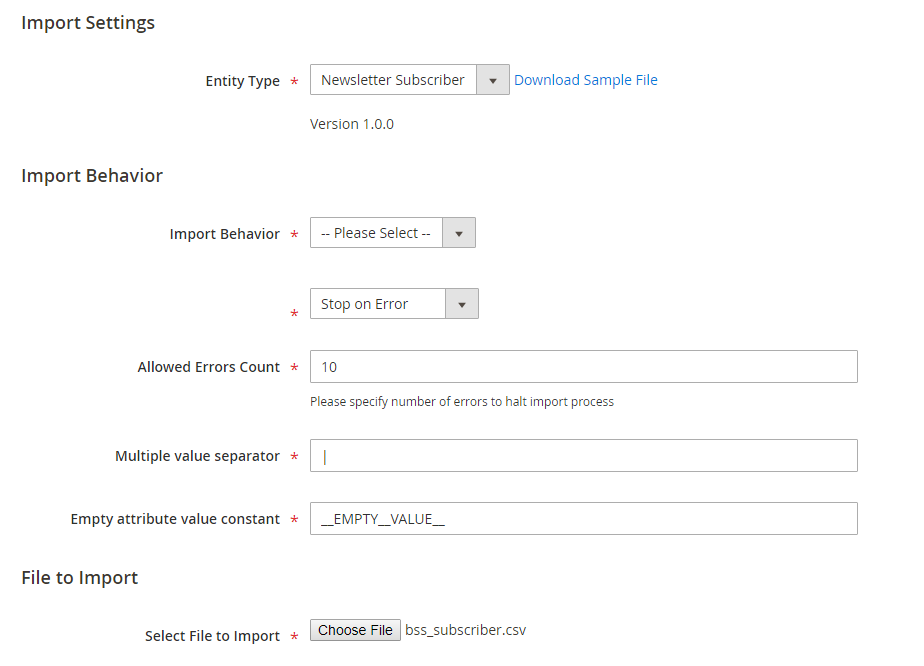
3.1. In Import Behavior
- Import Behavior: There are 3 options for you to select.
+ Add/Update: This option allows administrators to add new newsletter subscribers. In addition, it also updates newsletter subscribers if these subscribers already exist in the database.
+ Replace: The module will delete old newsletter subscribers and then add new ones.
+ Delete: This option allows the system to get newsletter subscribers based on customer_ID in the CSV file, then delete items which are available in the database.
Next, you select one option from the drop-down list to determine how the system operates when there are errors in the import process.
+ Stop on Error: the system stops importing when there are errors.
+ Skip error entries: the system skips errors and continues to import.
- Allowed Errors Count: This setting allows you to choose the allowed maximum number of errors when importing. If the number of errors happening in the import process exceeds the maximum number you fill in this field, the system will stop importing.
3.2. CSV File Preparation
Before you import newsletter subscribers via a CSV file, you need to prepare the CSV file with enough necessary information. You can download this CSV sample file by clicking Download Sample File.
Then you open this file and fill in fields:
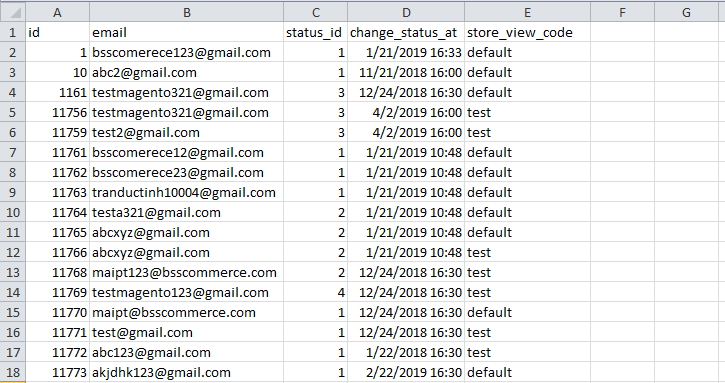
| Field | Format | Meaning |
| ID | Natural numbers | ID number of the newsletter subscriber. |
| Customer email – which is used to subscribe to newsletters. | ||
| type | String | Type of emails: customer or guest. |
| customer_first_name | String | The first name of the customer. For guests, enter "---" |
| customer_last_name | String | The last name of the customer. For Guests, enter "---" |
| status_id | Natural numbers |
+ Not Activated: Value = 2. + Subscribed: Value = 1. + Unsubscribed: Value = 3. + Unconfirmed: Value = 4. (If you don’t enter the status or you enter the wrong value, the default value is 1). |
| change_status_at | yyyy/m/d hh:mm:ss | The time when customers subscribe to the newsletter. |
| web_site | String | Website where customers subscribe to the newsletter. |
| store | String | Store where customers subscribe to the newsletter. |
| store_view_code | String | Store view where customers subscribe to the newsletter. If you enter the wrong value, it is changed into Default. |
3.3. In File to Import
After you finish the CSV file, tab Choose File button to select the file to import.
3.4. Check Data and Import
After you select the CSV file, you need to click Check Data button to validate data before importing.
- If your CSV file is free from errors, there is a message to notify validation results and Import button now appears to click.
You click Import button to start importing newsletter subscribers in the CSV file into Magento 2 website. There is also a notification about results of the import process.
- If your CSV file includes errors, Import button cannot be displayed for you to click and there is a notification about these problems.
4. Import Product Attributes
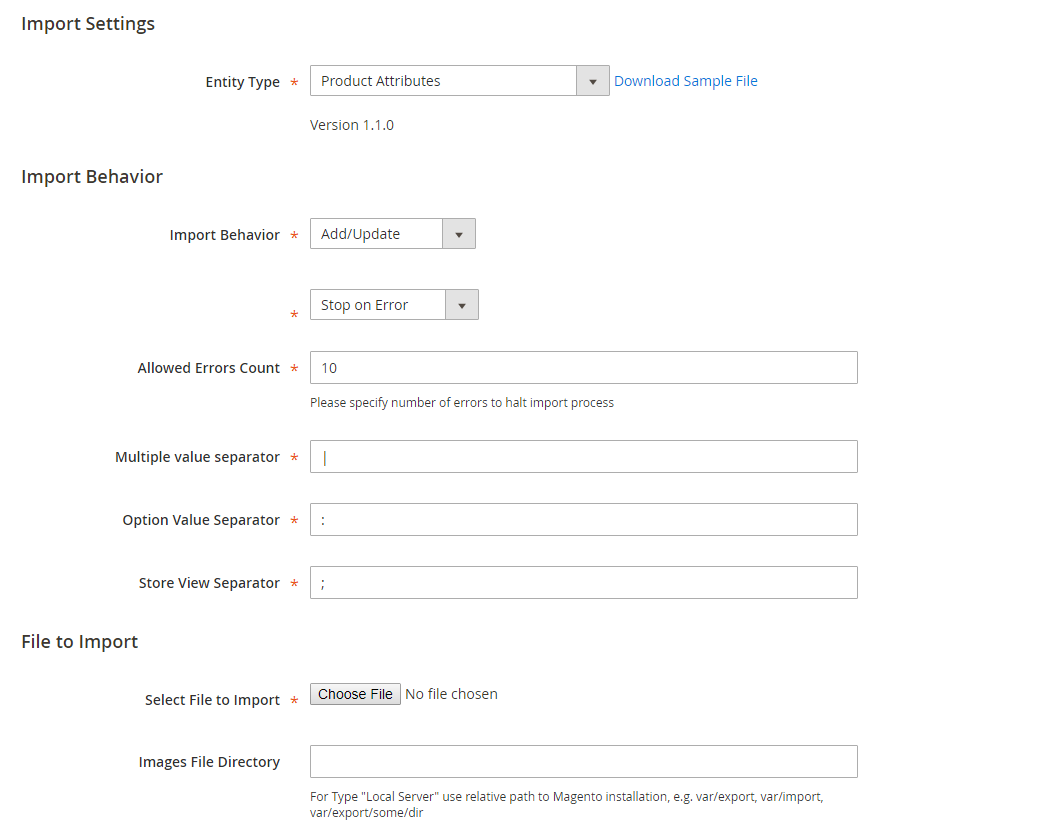
4.1. In Import Behavior
- Import Behavior: There is 3 options for you to select.
+ Add/Update: This option allows administrators to add new attributes into the website. In addition, it also updates attributes if their attribute_codes exist.
+ Replace: This option allows administrators to add new attributes into the website. In case attribute _ codes in the import data match with attribute_codes of existing attributes, these attributes are deleted and new records are created using the CSV data.
+ Delete: This option allows administrators to remove attributes in case their attribute_codes exist.
Next, you select one option from the drop-down list to determine how the system operates when there are errors in the import process.
+ Stop on Error: the system stops importing when there are errors.
+ Skip error entries: the system skips errors and continues to import.
- Allowed Errors Count: This setting allows you to choose the allowed maximum number of errors when importing. If the number of errors happening in the import process exceeds that maximum number you fill in this field, the system will stop importing.
- Multiple value separator: Choose a character to separate data in a field column. In our CSV sample file, the vertical bar ( | ) is set up as default value.
- Option value separator: separator between store view ID and values of attribute options.
- Store view separator: separator between values of different store views.
For example:
4.2. CSV file preparation
Before you import product attributes via a CSV file, you need to prepare the CSV file with enough necessary information. You can download this CSV sample file by clicking Download Sample File.
Then you open this file and fill in fields:

| Data | Format | Meaning |
| attribute_code | A string of characters | Required to enter data. Notify errors if you leave it blank. |
| attribute_set | attribute_set1|attribute_set2... |
+ When attribute_set of an attribute is left blank, this attribute is added as a new one which does not belong to any attribute sets or any attribute groups. + When attribute_set doesn't exist in the database, a new attribute set is created. |
| attribute_group_name | A string |
The name of the attribute group to which the attribute is assigned after importing. + when you leave it blank, the attribute is added to the last attribute group of the assigned attribute set. + when attribute_group_name doesn't exist in the database, a new one is auto created. |
| attribute_group_code | (not required): It is auto-created based on the attribute group name. If attribute_group_code is similar to attribute_group_code of an available group in the database, you will face an error. | |
| is_global | 0,1,2 |
0 ~ Store View 1 ~ Global 2 ~ Website If it is left blank or wrong, it auto turns 0. |
| is_user_defined | 0, 1 |
0 ~ attribute is defined as system attribute. 1 ~ attribute is not system attribute. Admin can delete it. |
| is_filterable | 0,1,2 |
Corresponding to the Use in Layered Navigation config in the StoreFront Properties tab of the attribute: 0 ~ No 1 ~ Filterable (with results) 2 ~ Filterable (no results) If you enter the wrong value, the config auto gets 0 after importing. |
| is_visible | 0,1 |
Determines whether the attribute is visible in the grid or not: 0 ~ No 1 ~ Yes |
| is_required | 0,1 |
Corresponding to the Value Required config of the attribute 0 ~ No 1 ~ Yes |
| is_visible_on_front | 0,1 |
Corresponding to the Visible on Catalog Pages on Storefront config: 0 ~ No 1 ~ Yes |
| is_searchable | 0,1 |
Corresponding to the Use in Search config: 0 ~ No 1 ~ Yes |
| is_unique | 0,1 |
Corresponding to the Unique Value config: 0 ~ No 1 ~ Yes |
| frontend_class | Optional. Database value | |
| is_visible_in_advanced_search | 0,1 |
Determines whether the attribute is shown in advanced search or not: 0 ~ No 1 ~ Yes |
| is_comparable | 0,1 |
Corresponding to the Comparable on Storefront config of the attribute 0 ~ No 1 ~ Yes |
| is_filterable_in_search | 0,1 | Corresponding to the Use in Search Results Layered Navigation config: 0 ~ No 1 ~ Yes |
| is_used_for_price_rules | 0,1 |
Determines whether the attribute is used for price rules or not: 0 ~ No 1 ~ Yes |
| is_used_for_promo_rules | 0,1 |
Corresponding to the Use for Promo Rule Conditions config: 0 ~ No 1 ~ Yes |
| sort_order | Natural numbers | Smaller value, higher priority |
| position | Natural numbers | The display position of the attribute in layered navigation. |
| frontend_input |
Corresponding to Catalog Input Type for Store Owner: text – Text Field textarea – Text Area texteditor - Text Editor (from Magento 2.3) date – Date boolean – Yes/No multiselect – Multiple Select select – Dropdown, Visual or Text Swatch price – Price media_image– Media Image wee – Fixed Product Tax (Notify errors and skip them when entering wrong values) |
|
| backend_type | Optional. Database value | |
| backend_model | Optional. Database value | |
| source_model | Optional. Database value | |
| frontend_label | label|store_code1:label|store_code2:label | Label for the attribute, you can import label for many store views. (Notify errors and skip them when you leave it blank) |
| default_value | String | Default value for the attribute |
| apply_to | simple|group|bundle|configurable|downloadable|virtual | Determines product type which the attribute is used for |
| is_wysiwyg_enabled | 0,1 |
Corresponding to the Enable WYSIWYG config: 0 ~ No 1 ~ Yes |
| is_required_in_admin_store | 0,1 |
0 ~ No 1 ~ Yes |
| is_used_in_grid | 0,1 |
Determines whether the attribute is used in the product grid or not: 0 ~ No 1 ~ Yes |
| is_visible_in_grid | 0,1 | |
| is_filterable_in_grid | 0,1 |
Determines whether the attribute is used to filter in the product grid or not: 0 ~ No 1 ~ Yes |
| search_weight | Defines the weight of the attribute in search. | |
| is_html_allowed_on_front | 0,1 |
Corresponding to the Allow HTML Tags on Storefront config. 0 ~ No 1 ~ Yes |
| used_in_product_listing | 0,1 |
Corresponding to the Used in Product Listing config: 0 ~ No 1 ~ Yes |
| used_for_sort_by |
Corresponding to the Used for Sorting in Product Listing config: 0 ~ No 1 ~ Yes |
|
| swatch_input_type | Visual or text |
Determines style of attribute having Catalog input type as select: visual ~ attribute has visual swatch text ~ attribute has text swatch |
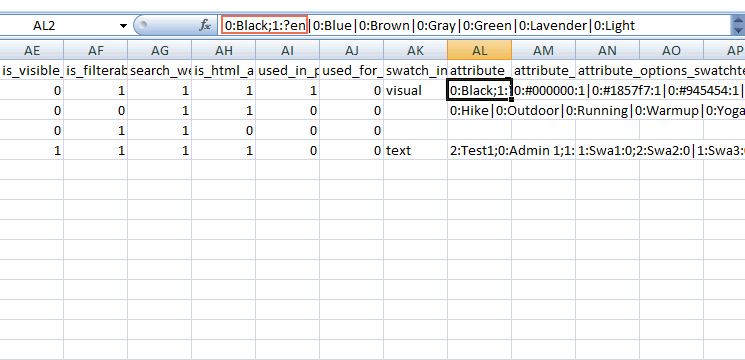
| attribute_options | admin:Label;store_code1:Label1|admin:Label2 Example: admin:Hike;default:Hike default;test:Hike New|admin:Outdoor;test:Outdoor Test |
Enters labels for the attributes with select type: + Admin ~ required + Store_code ~ not required. ('|' is corresponding to the Multiple value separator. ':' is corresponding to the Option Value Separator.) |
| attribute_options_swatchvisual | admin:value1:type;store_code1:value2:type|store_code2:value3:type Example: admin:#000000:1|admin:#1857f7:1|admin:#945454:1| |
+ Value: is the value of swatch (it can be the image link or color code). + Type: is specified in the database. 1 is corresponding to visual color type and 2 is corresponding to visual image type. For example: +Visual color type: 0:#000000:1 + Visual image type: 0:a/_/a.jpg:2 |
| attribute_options_swatchtext | admin:value1:type;store_code1:value2:type;store_code2:value3:type Example: admin:Swa:0;default:Swa1:0;test:Swa2:0|admin:Swa3:0;default:Swa4:0;test:Swa4:0| |
+ admin: required to enter. + store_code1, store_code2: not required + Value: is the value of swatch. + Type: is always 0. For example: 1:S:0;2:Small:0 |
*Notes:
- Your CSV file must include enough the number of columns like the sample file so that you can successfully import. (If the number of columns is greater or fewer than those in the sample file, the system will notify you about errors).
- You can assign 1 attribute for many attribute sets in only 1 row in the CSV file. The format of the attribute set column is attributeSet1|attributeSet2|...
- If you enter the wrong product type in the "apply_to" column, the value of this column is changed into NULL.
- For columns with values as 0 or 1: if you enter the wrong value, the system will change into default value as 0.
- For columns including multiple values, you need to add multiple separators in the end. For example: 0:KBowl1;2:Elongated;1:Allong|
- You mustn't leave backend_type column empty:
+ if backend_type is static, you need to create a column in the catalog_product_entity. If you don't do this one, you cannot save attribute's value when saving the product. However, it's better that you shouldn't select backend_type as static.
+ If backend_type is varchar, int, decimal, text, or data time, you can definitely save attribute's value.
- If your CSV file includes special characters that belong to your own language (in case you do not use English), you need to convert your CSV file to UTF-8 format. You can read the instruction HERE.
4.3. In File to Import
After you finish the CSV file, tab Choose File button to select the file to import.
4.4. Check Data and Import
After you select the CSV file, you need to click Check Data button to validate data before importing.
- If you CSV file is free from errors, there is a message to notify validation results and Import button now appears to click.
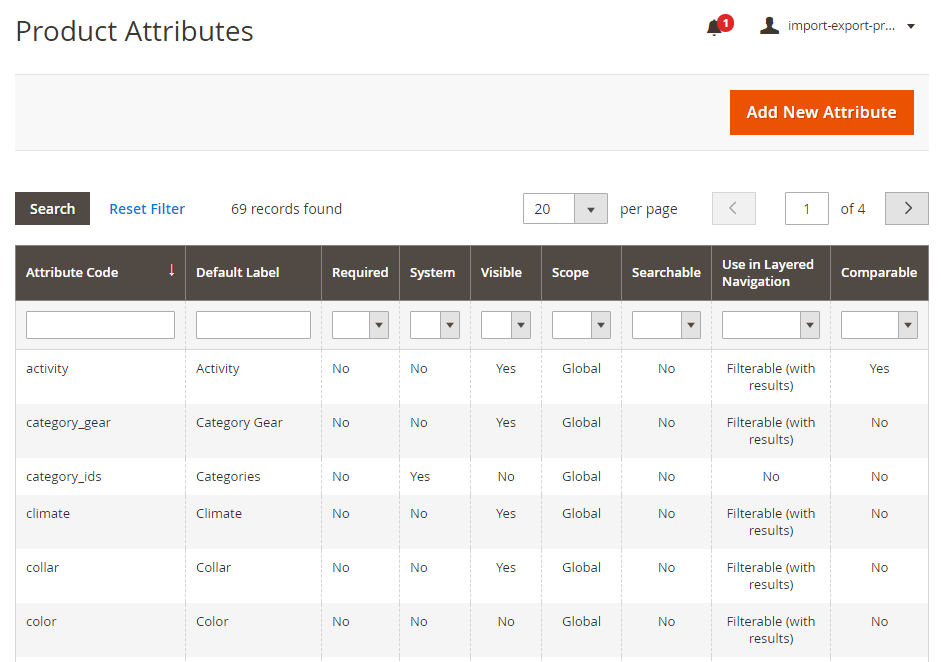
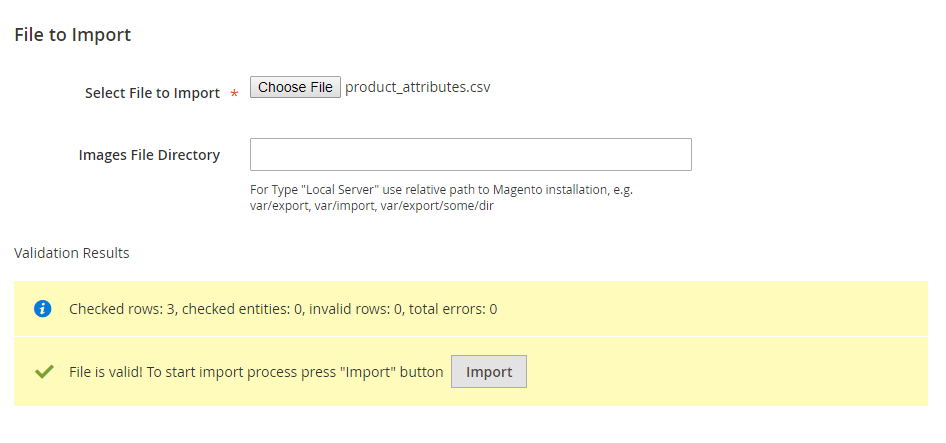 You click Import button to start importing product attributes in the CSV file into Magento 2 website. To check these imported attributes, you navigate to Stores → Products Attributes to see them in a grid view:
- If your CSV file includes errors, Import button cannot be displayed for you to click and there is notification about these problems.
*NOTE: You had better take a notice about these following issues in the CSV file which affect data checking.
- Errors in the CSV file make you not successfully import:
+ Leave attribute_code as blank.
+ Enter the wrong Entity Type ID.
+ Enter a number of columns which are greater or less than those in the sample CSV file. (Please follow the sample file we provide you and don't add more columns or remove).
+ Enter the wrong value in the"is_global" column. (Please remember the standard values just includes 1,2 and 3).
- However, there some specific errors in your CSV file, but the system will skip and continue to import as well as still notifies you about problems. Let's check these skipped errors as below:
+ Enter the wrong backend_type or frontend_input.
+ Enter the wrong attribute_code when you choose Import behavior as Delete.
+ Enter the different multiple value separator from the one set up in the backend.
+ Enter the wrong fomat in the "attribute_option" or "attribute_option_swatch" columns. When you are in this situation, your CSV file is still imported but it contains errors. Therefore, thank to notification about these errors, you can edit the file and also do it better for the next time.
*Tips
You can quickly import attributes with many options using source_model of attributes.
+ Create a source file in the module: Bss_ProductAttributesImportExport - this source file can be similar as the following file:
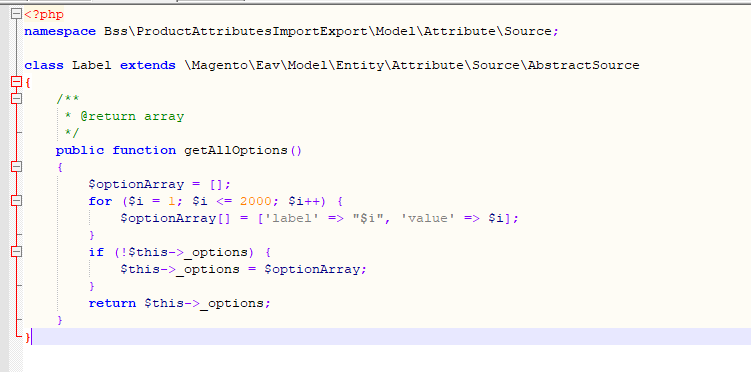 The path is Bss\ProductAttributesImportExport\Model\Attribute\Source\Label. Enter this path to the source_model of the CSV file.
5. Import Product Reviews
Before you import product reviews via CSV file, you need to prepare a CSV file with enough necessary information. You can download this CSV sample file by clicking Download Sample File.
Then you open this file and fill in fields:
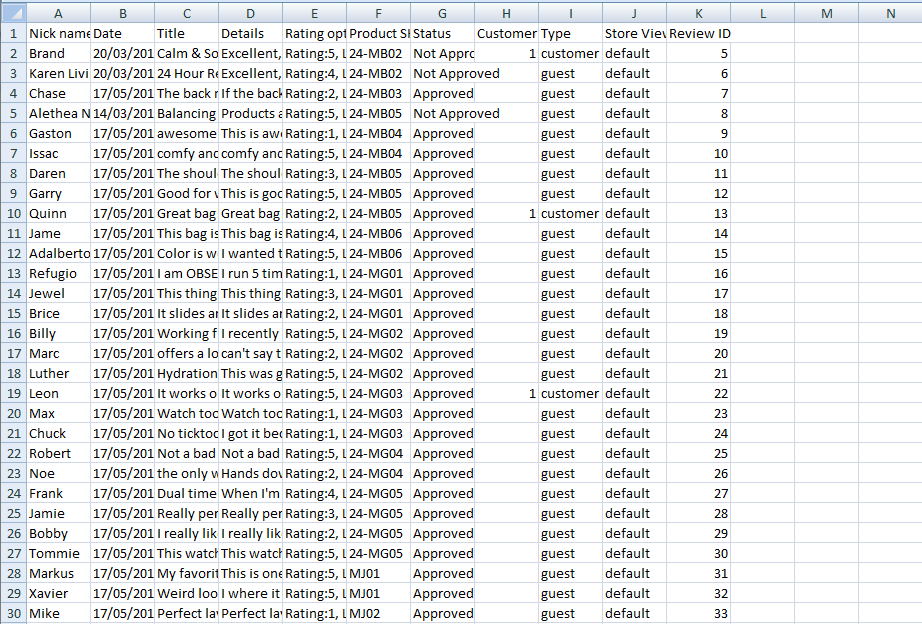
There are required data fields for you to complete such as review titles, review details, status, customer nicknames, product SKU and rating options.
If you don't finish this information, you cannot import product reviews at all.
For Date: Follow the right format "dd/MM/yyyy HH:mm:ss".
For Status: Enter Approved/ Disapproved. If you don't enter the right format, status is automatically Disapproved after being imported.
For Rating options: fill in ratings for products with the format: "rating_code1:number, rating_code2: number, rating_code3: number". For example: "Quality:5, Price:4, Service:4".
(*Note: In case you enter a new rating code that is not available in Ratings section of the backend, you can still import reviews and this rating type is automatically created in the backend.)
For Type: there are 3 types - Admin, Customer, and Guest. If you don't enter the right format, the module will change customer type into Guest or the review is created by a Guest.
For Customer ID: If you don't enter customer ID or enter the wrong format, the module will change customer type into Guest.
For Store View Code: Fill in store view code.
*Note: If you want to import product reviews for multiple store views, just separate them by character | For example: default|eng
For Review ID:
- You cannot import reviews if you enter the wrong format.
- In case you leave Review ID of a review blank and all of its remaining data is not similar to those of the available reviews shown in the frontend, the module will add this review with a new Review ID. (If there are some similar data to those of available reviews, the module still adds this review with a new Review ID).
- In case you leave Review ID of a review blank and all of its remaining data is the same as those of available reviews, the module will take it as an existing row.
- In case you enter a Review ID that is similar to an existed Review ID, the module will automatically update the product review based on one review ID.
- If Review ID is greater than the maximum review ID in the database, the module will atill add this new review.
For Store View Code: you enter the code of store view you want to add reviews into. If you enter the wrong format, the module will change into Default Store View.
*Note: The CSV file size does not exceed 2MB. When you finish the CSV file, just select it and click Import Product Reviews to import them into Magento 2 sites.
After you import the CSV file, there are messages to notify:
- Successfully import with the number of inserted rows
- The number of existing rows or invalid rows
After importing, you can manage these added reviews in:
- Admin → Product page →Product reviews
- Admin → Customer page → Product reviews
- Admin → Marketing → User content → Reviews
- Admin → Report → Reviews
*NOTE: You can also import product reviews by using this following method:
- Upload the CSV file to "var/import/reviews" folder
- Run this command in Magento root folder:
php bin/magento bss:reviews:import import/reviews/sample.csv
6. Import URL Rewrites

6.1. In Import Behavior
- Import Behavior: There is 3 options for you to select.
+ Add/Update: This option allows administrators to add new URL rewrites into the website. In addition, it also updates URL rewrites if their request_paths already exist in the database.
+ Replace: If the request_path does not exist in the database, you are notified about this non-existence and the module will add a new URL rewrite. If the request_path already exists in the database, the module will delete old URL and add a new URL rewrite.
+ Delete: This option allows administrators to remove URL rewrite according to the request_path.
Next, you select one option from the drop-down list to determine how the system operates when there are errors in the import process.
+ Stop on Error: the system stops importing when there are errors.
+ Skip error entries: the system skips errors and continues to import.
- Allowed Errors Count: This setting allows you to choose the allowed maximum number of errors when importing. If the number of errors happening in the import process exceeds that maximum number you fill in this field, the system will stop importing.
6.2. CSV file preparation
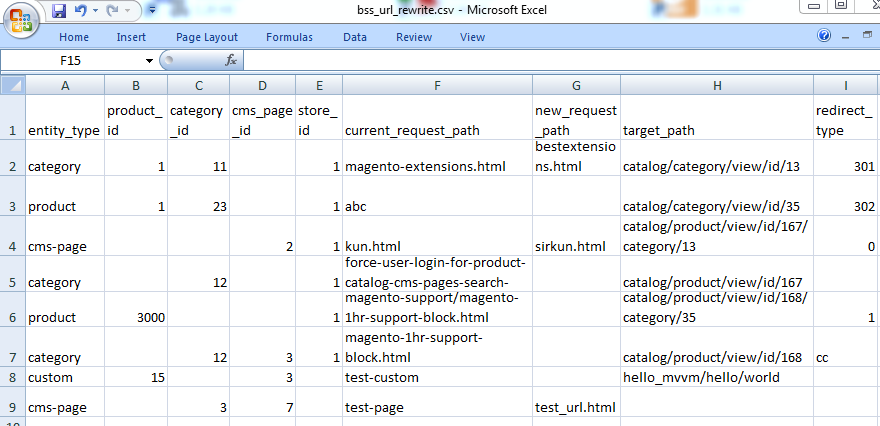
Before you import URL rewrites via a CSV file, you need to prepare the CSV file with enough necessary information. You can download this CSV sample file by clicking Download Sample File. Then you open this file and fill in fields:
*NOTES:
- Your CSV file must include enough the number of columns like the sample file so that you can successfully import. (If the number of column is greater or less than those in the sample file, the system will notify you about errors occurring).
- It is unnecessary to enter target_path if entity_type is product, category or cms-page because target_path in these cases are automatically generated according to corresponding ID.
- When you enter entity_type into the CSV file:
+ if entity_type is product: enter product_ID with category_ID that includes this product or you also don't need to enter category_ID for the product.
+ if entity_type is category: enter category_ID.
+ if entity_type is cms-page: enter cms_page_ID. + if entity_type is custom: no need to enter ID but you have to enter target_path to redirect.
- For current_request_path: enter the current path of the product or category or you can enter a new path if you want to add a new URL
- For new_request_path: enter the new path which replaces the current_request_path.
- For target_path: enter the internal path that is used by the system to point to the destination of the redirect
- For redirect_type: enter 0, 301 or 302. In case you enter the wrong redirect_type, it will be automatically changed into 0.
6.3. In File to Import
After you finish the CSV file, tab Choose File button to select the file to import.
6.4. Check Data and Import
After you select the CSV file, you need to click Check Data button to validate data before importing.
- If your CSV file is free from errors, there is a message to notify validation results and Import button now appears to click.
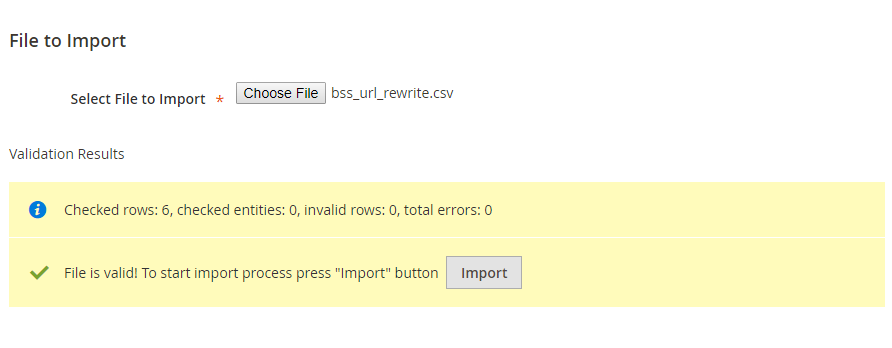 You click Import button to start importing URL rewrites in the CSV file into Magento 2 website. There is also a notification about results of the import process.
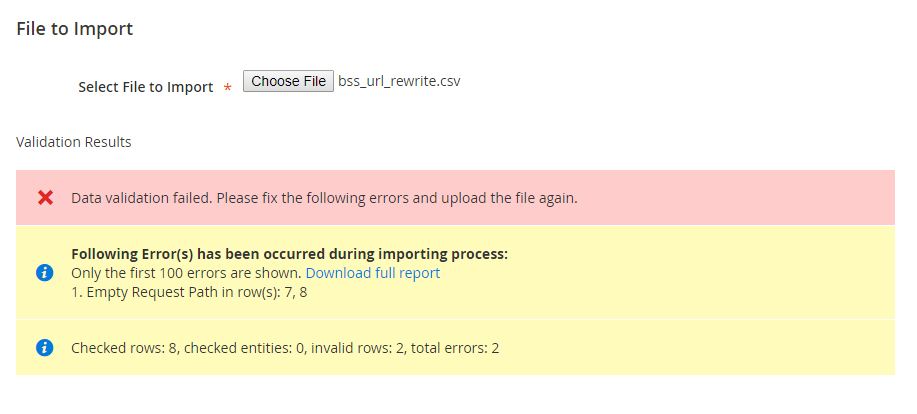
- If your CSV file includes errors, the Import button cannot be displayed for you to click and there is a notification about these problems.
7. Import Wishlist Item
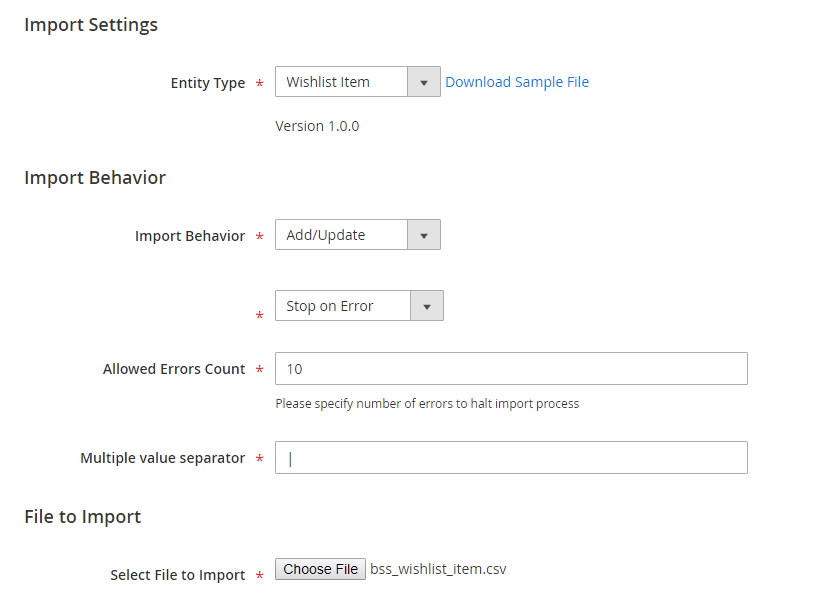
7.1. In Import Behavior
- Import Behavior: There is 3 options for you to select.
+ Add/Update: This option allows administrators to add new items to wishlist of the website. In addition, it also updates wishlist products if these products already exist in the database and have the same user_email and product_sku as data in the CSV file.
For Configurable product: If configurable_product_info in the CSV file is the same as the configurable_product_info of an available wishlist item in the database, this wishlist item will be updated.
If user_email and product_sku in the CSV file are similar to user_email and product_sku in the database, but the configurable_product_info does not exist in the database, this item is still added as a new one into the wishlist.
For Grouped product and Bundle product: If user_email and product_sku of parent products in the CSV file are the same as these in the database, the group and bundle product in the wishlist will be updated.
+ Replace: The module will delete old wishlist items and then add new ones. + Delete: This option allows the system to get wishlist items based on user_email and product_sku in the CSV file, then delete items which are available in the database.
*Note: In case, you are using Multiple Wishlists, this option also allows the system to get wishlist items based on user_email, product_sku, and wishlist_name of each wishlist product.
Next, you select one option from the drop-down list to determine how the system operates when there are errors in the import process.
+ Stop on Error: the system stops importing when there are errors.
+ Skip error entries: the system skips errors and continues to import.
- Allowed Errors Count: This setting allows you to choose the allowed maximum number of errors when importing. If the number of errors happening in the import process exceeds the maximum number you fill in this field, the system will stop importing.
7.2. CSV File Preparation
Before you import products to wishlist via a CSV file, you need to prepare the CSV file with enough necessary information. You can download this CSV sample file by clicking Download Sample File. Then you open this file and fill in fields:
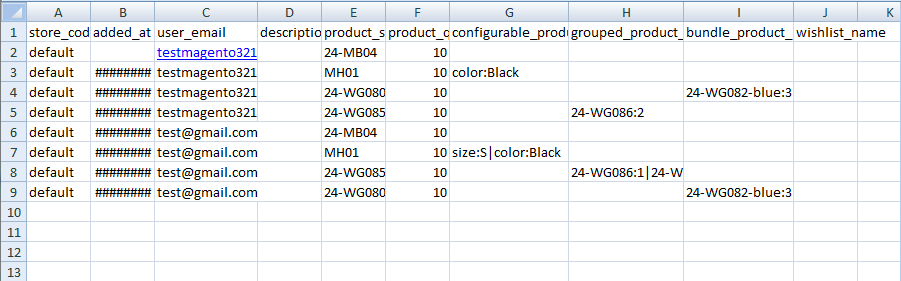
In the following image, you can know data fields in the CSV file and also their meanings.
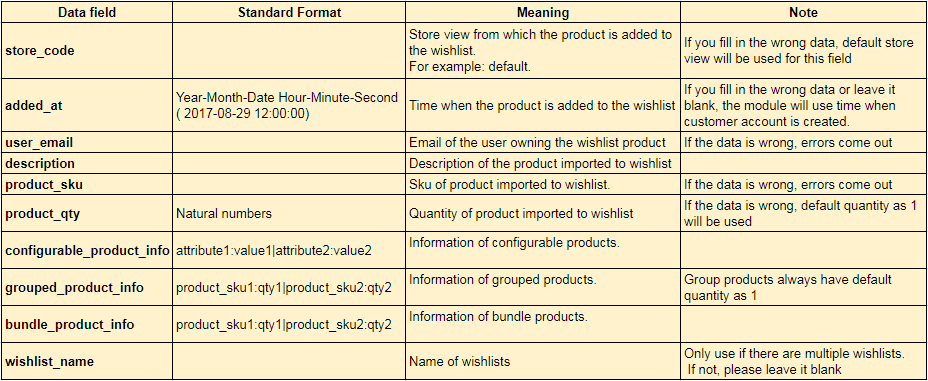
*Note:
- Your CSV file must include enough number of columns like the sample file so that you can successfully import. (If the number of columns is greater or less than those in the sample file, the system will notify you about errors occurring).
- For Configurable products: the format of configurable_product_info is attribute1:value1|attribute2:value2.
+ attribute: is attribute_code of an option
+ value: is the corresponding value
For example: size:S|color Black (If one of the attribute codes is wrongly entered in the CSV file, you can still import and the system will skip this wrong attribute.)
- For Grouped products: the format of grouped_product_info is product_sku1:qty1|product_sku2:qty2
+ product_sku: SKU of children product.
+ qty: quantity of the children product with corresponding SKU.
- For Bundle products: the format of bundle_product_info is product_sku1:qty1|product_sku2:qty2
+ product_sku: SKU of children product.
+ qty: quantity of the children product with corresponding SKU.
7.3. In File to Import
After you have finished the CSV file, tab Choose File button to select the file to import.
7.4. Check Data and Import
After you select the CSV file, you need to click Check Data button to validate data before importing.
- If your CSV file is free from errors, there is a message to notify validation results and Import button now appears to click.
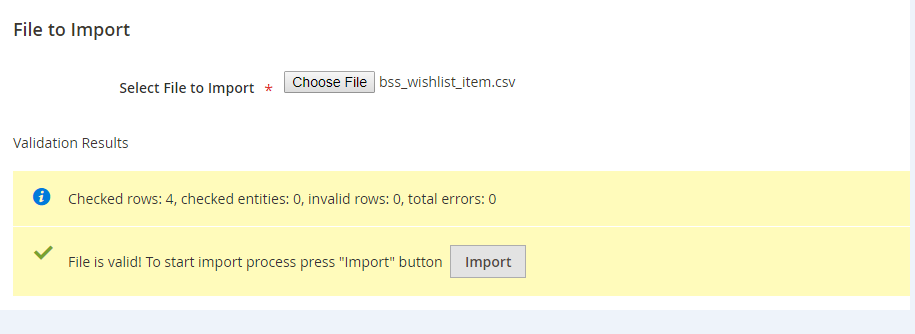
You click Import button to start importing products in the CSV file into the wishlist of Magento 2 website. There is also a notification about results of the import process.
- If your CSV file includes errors, the Import button cannot be displayed for you to click and there is a notification about these problems.
8.Import Order
Magento 2 Import Export module CAN ONLY WORK smoothly when you do the exact
2 steps below:

a. Always backup your database before using the extension for importing orders.

b. Always follow the user guide step-by-step while preparing for
your importation.
In the admin panel, go to System -> Import by BSS -> Set Entity Type to Order.
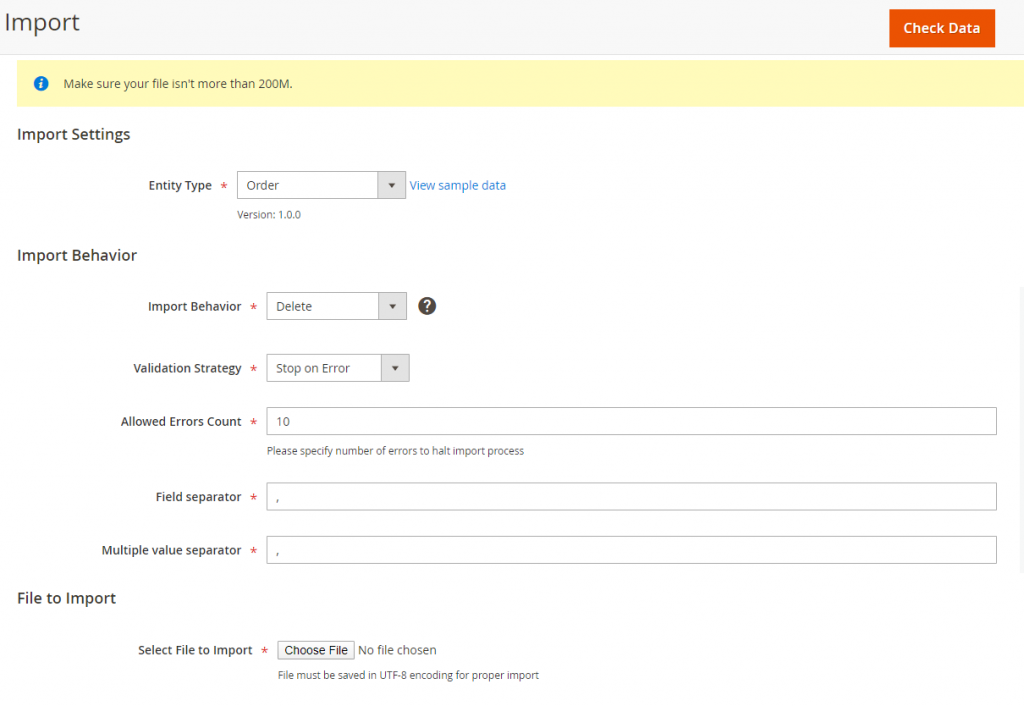
8.1 Understand The Import Behavior
- Import Behavior: There are 3 options for you to select.
+ Add: This option allows administrators to add new order into Magento 2 database.
+ Update: The module will update the existing order with the new information you’ve prepared with the CSV file.
+ Delete: This option allows the system to get orders based on the entity_id in the CSV file, then delete items that are available in the database.
- Validation Strategy: select one option from the drop-down list to determine how the system operates when there are errors in the import process.
+ Stop on Error: the system stops importing when there are errors.
+ Skip error entries: the system skips errors and continues to import.
- Allowed Errors Count: This setting allows you to choose the allowed maximum number of errors when importing. If the number of errors happening in the import process exceeds the maximum number you fill in this field, the system will stop importing.
- Multiple value separator: Accept the default value of a comma (,). A comma is the default separator in a CSV file. If you want to use a different character, please make sure that the data in the CSV file matches the character that you specify.
8.2 Prepare The CSV File
Before you import orders via a CSV file, you need to prepare the CSV file with enough necessary information. You can download this CSV sample file by clicking View sample data next to the Entity Type field, or click here. After that, fill in your CSV accordingly.
You can find all column descriptions on this spreadsheet.
8.2.1 Note while preparing csv file for each type of behavior
+ For Add and Update behavior, remember to follow this table:
| Object | Fields That Need To Have The Exact Same Value |
| Order | - entity_id - item:order_id - address:parent_id - payment:parent_id - transaction:order_id - tax:order_id - shipment:order_id - invoice:order_id - creditmemo:order_id - status_history:parent_id - download_link:order_id |
| Order Item | - item:item_id - tax_item:item_id - shipment:order_item_id - invoice:order_item_id - creditmemo:order_item_id - download_link:order_item_id |
| Address | - address:entity_id - shipping_address_id - shipment:shipping_address_id - invoice:shipping_address_id - creditmemo:shipping_address_id |
| Address | - address:entity_id - billing_address_id - shipment:billing_address_id - invoice:billing_address_id - creditmemo:billing_address_id |
| Tax |
- tax:tax_id |
| Payment | - payment:entity_id - transaction:payment_id |
| Shipment | - shipment:entity_id - shipment_item:parent_id - shipment_track:parent_id - shipment_comment:parent_id |
| Invoice | - invoice:entity_id - invoice_item:parent_id - invoice_comment:parent_id |
| Credit memo | - creditmemo:entity_id - creditmemo_item:parent_id - creditmemo_comment:parent_id |
| Downloadable Link | - download_link:purchased_id - download_link_item:purchased_id |
| Downloadable Link | - download_link:order_item_id - download_link_item:order_item_id |
+ For Update behavior, DO NOT CHANGE THESE FIELDS:
entity_id
item:item_id, item:order_id
address:entity_id, address:parent_id
status_history:entity_id, status_history:parent_id
tax:tax_id, tax:order_id
tax_item:tax_item_id, tax_item:tax_id, tax_item:item_id
payment:entity_id, payment:parent_id
transaction:transaction_id, transaction:payment_id, transaction:order_id
shipment:entity_id, shipment:order_id
shipment_item:entity_id, shipment_item:parent_id
shipment_track:entity_id, shipment_track:parent_id
shipment_comment:entity_id, shipment_comment:parent_id
invoice:entity_id, invoice:order_id
invoice_item:entity_id, invoice_item:parent_id
invoice_comment:entity_id, invoice_comment:parent_id
creditmemo:entity_id, creditmemo:order_id
creditmemo_item:entity_id, creditmemo_item:parent_id
creditmemo_comment:entity_id, creditmemo_comment:parent_id
+ For Update or Delete behavior, the best way to do this is to export the data first. This step will save you time on matching information in the filling CSV file.
+ For Delete behavior, if your intention is to delete the orders, all you need is a CSV file fills with the entity ID of said orders and you’re ready to go.
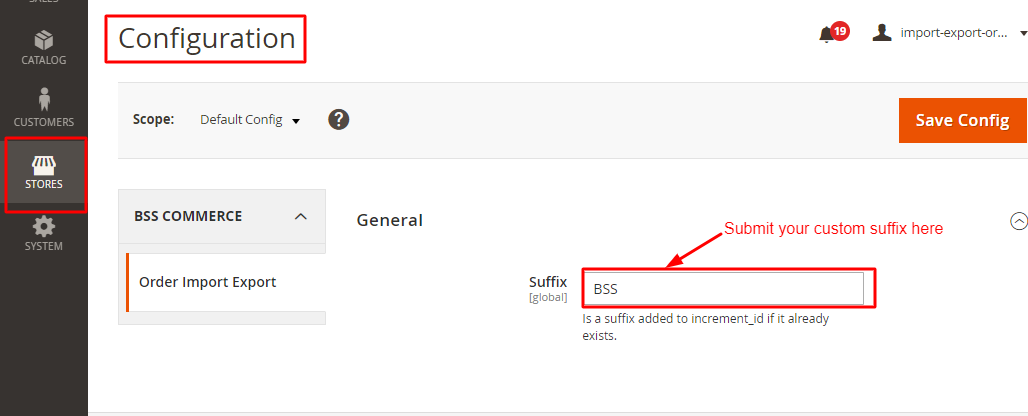
While importing, if the system encounters a similar increment_id in the database, it will automatically add in increment suffix (Default: BSS) and proceed to continue the
import.
Or you can add your custom suffix at the Suffix config. Please use only letters (a-z or A-Z), numbers (0-9) or underscore (_) in this field, and the first character should be a letter.
8.2.2 Note while preparing CSV file each type of product
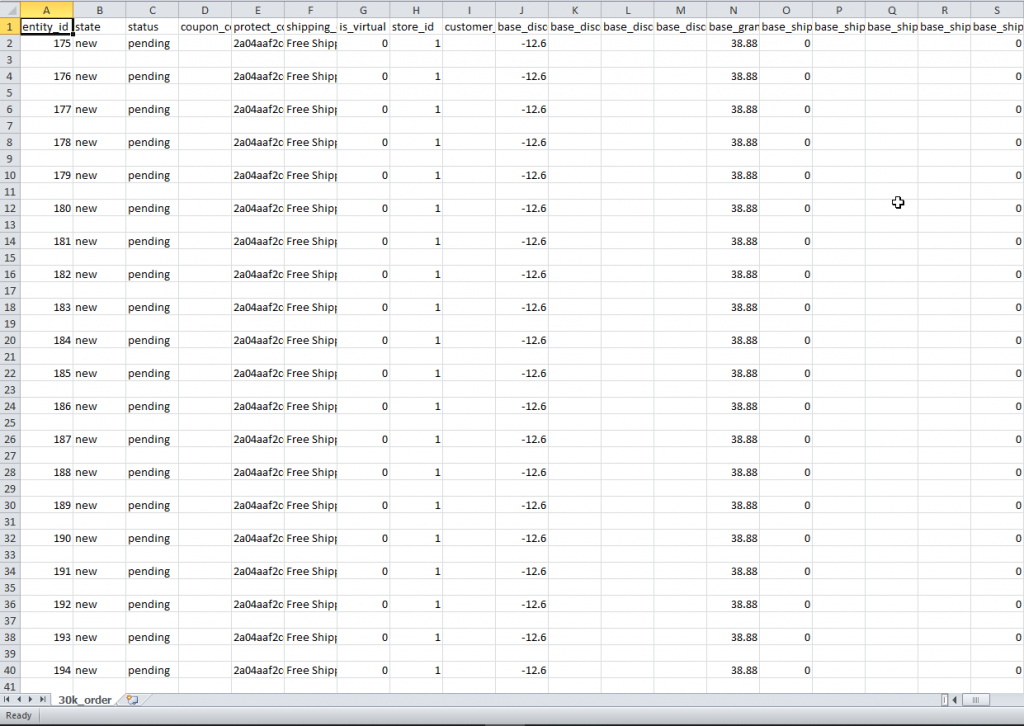
a. The least fields required to import order: you can download the file 1 in Sample Data. They include information for:
-Order
-Order Item (fields with prefix as item:)
-Payment (fields with prefix as payment:)
-Address (fields with prefix as address:)
b. For Physical Products, besides all the fields above, you need to have both shipping address and billing address in order to import orders.
c. For Virtual Products, besides all the fields in a., you need to have the billing address in order to import orders. In case you also fill in the shipping address, it will still proceed to import orders.
d. For Downloadable Products, you need to have download_link and download_link_item in addition to all the fields in a. to import order.
8.3 Load file to import
After you finish the CSV file, tab the Choose File button to select the file to import.
8.4 Check data and import
After you select the CSV file, you need to click the Check Data button to validate data before importing.
If your CSV file is free from errors, there is a message to notify validation results and the Import button now appears to click.
You click the Import button to start importing order in the CSV file into Magento 2 website. There is also a notification about the results of the import process.
If your CSV file includes errors, the Import button cannot be displayed for you to click and there is a notification about these problems.
8.5 Permission
You can set permission to use this extension for a specific admin user.
To grant Import permission, go to:
System > Permissions > User roles > Pick one admin user> Role Resources > Custom> System > Transfer Data -> Import by Bss -> Import Order
To grant Export permission, go to:
System > Permissions > User roles > Pick one admin user >Role Resources > Custom> System > Transfer Data -> Export by Bss -> Export Order
II. Export by BSS
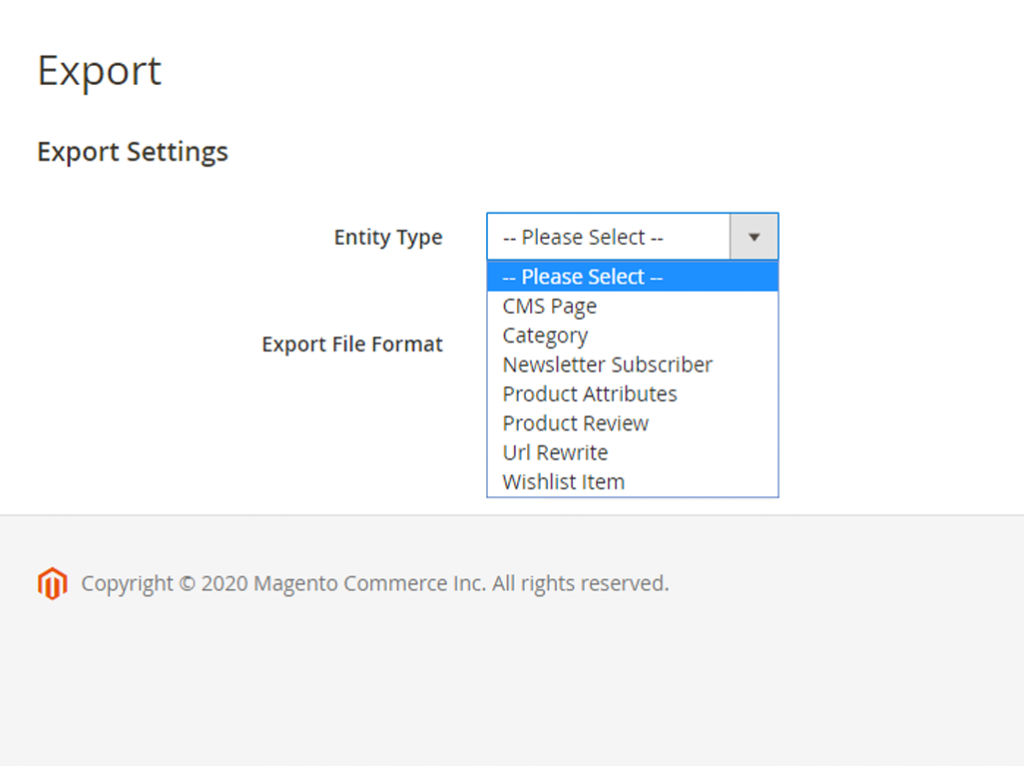
Navigate to System ⇒ Export by BSS and select an Entity Type.
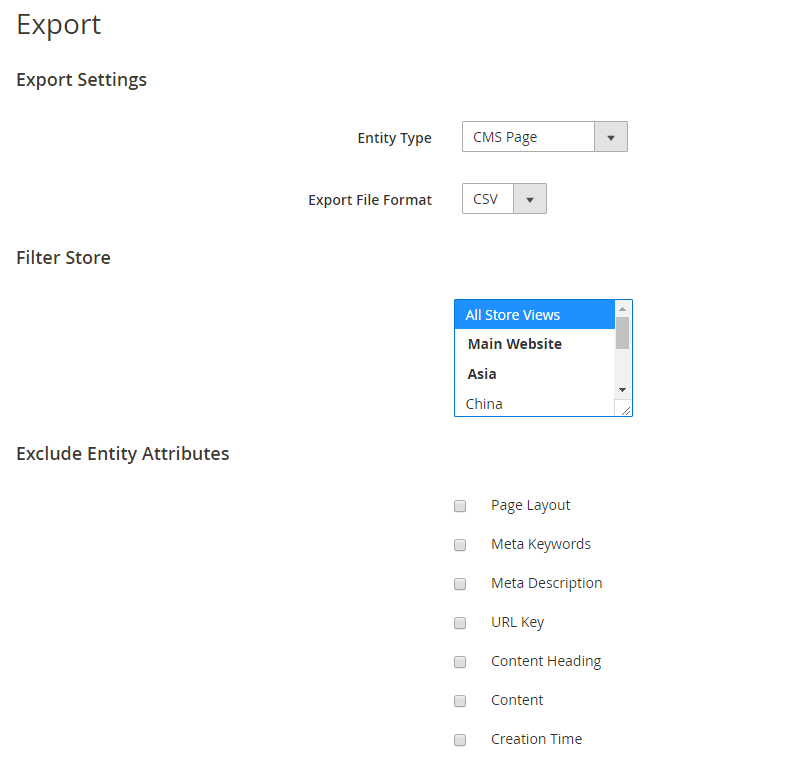
You choose CSV in the Export File Format field.

1. Export CMS Page
In Filter Store: You choose Store or store view to export CMS pages.
In Exclude Entity Attributes: you can select which data to be excluded from the CSV file after exporting.
2. Export Categories
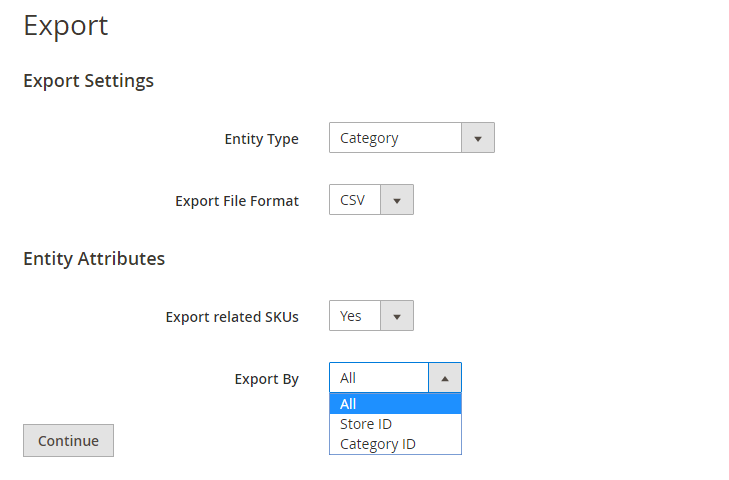
In Export Related SKUs: You choose Yes to export SKUs of products in the categories; otherwise, you choose No.
In Export By: You can select exporting all categories or export them by Store ID or Category ID.
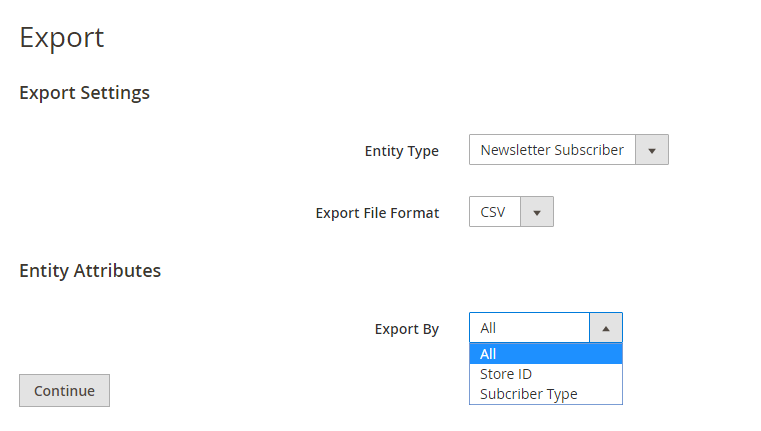
3. Export Newsletter Subscribers
In Export By section: you can export all available newsletter subscribers by choosing All from the drop-down list or export them based on store IDs or Subscriber type.
- Export by Store ID:
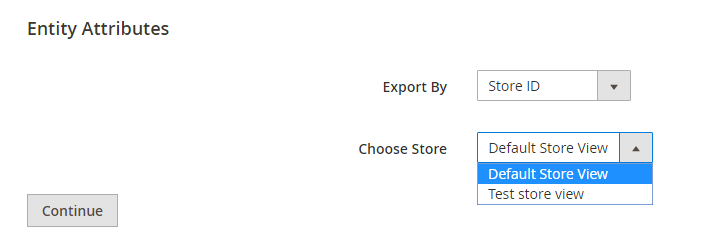 When exporting by Store ID, you need to select a store to export from.
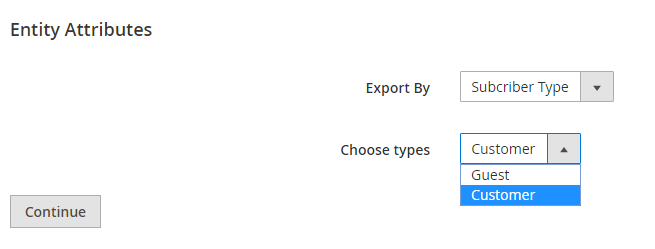
- Export by Subscriber type:
4. Export Product Attributes

- In Entity Attributes and Export
In Entity Type section: you can export all available product attributes by choosing All from the drop-down list or export each attribute set.
Then click Continue button to export chosen items in a CSV file.
*Note: The admin can export product attributes which are not assigned to any attribute sets. (Update from version 1.0.9).
5. In Export Product Reviews
Just click Export Product Reviews button to get a CSV file with all data of product reviews on the Magento 2 website.
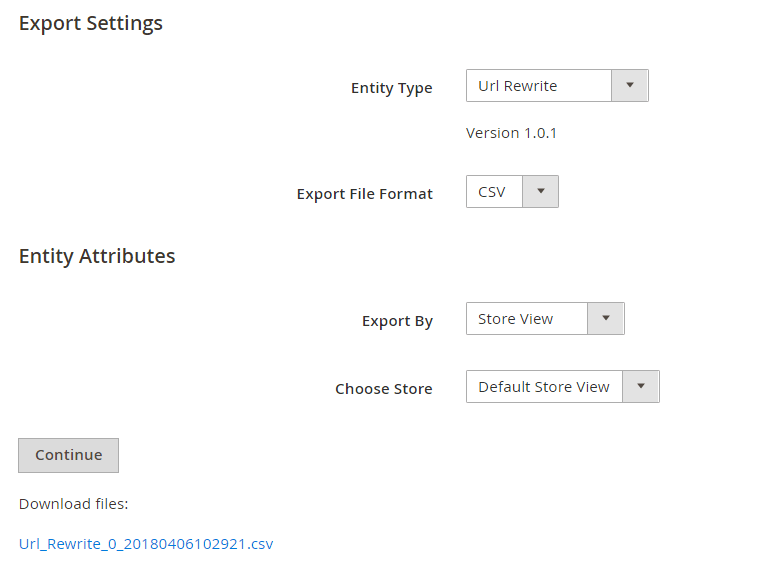
6. Export URL Rewrites

In Export By section: you can export all available URL rewrites by choosing All from the drop-down list or export URL rewrites based on each attribute.
- Export by Entity Type:
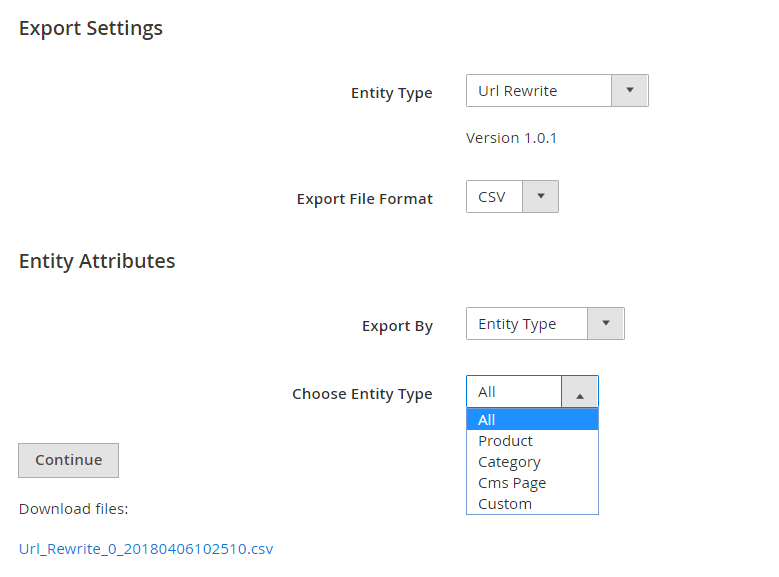 When exporting by Entity Type, you need to select all or which specific Entity type to export URL rewrites.
- Export by Store View:
When exporting by Store View, you need to select all or which specific Store view to export URL rewrites of this store view.
- Export by Redirect Type:
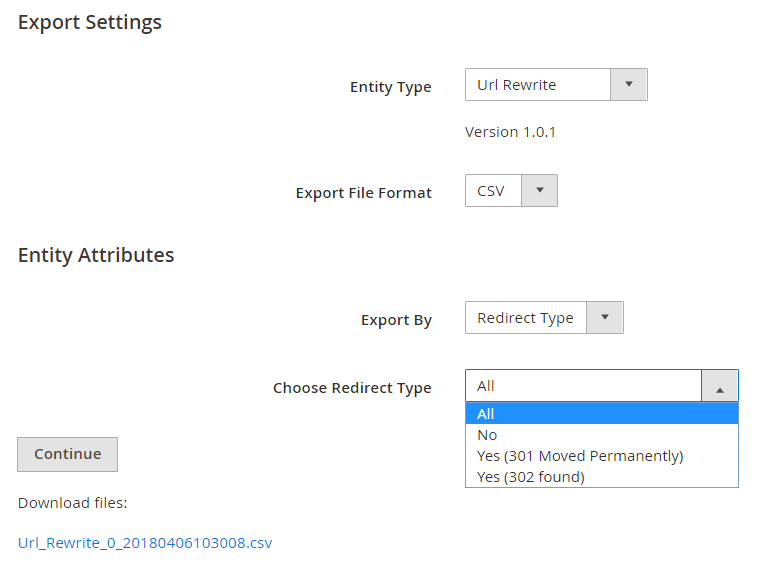
When exporting by Redirect Type, you need to select all or which specific Redirect type to export URL rewrites.
Then click Continue button to export chosen items in a CSV file.
*NOTE: If your site includes more than 50,000 URL Rewrites, this extension will export into different CSV files and each file can contain a maximum number as 50,000 URL rewrites. Therefore, there are also many links for you to download.
7. Export Wishlist Items
In Export By section: you can export all available wishlist items by choosing All from the drop-down list or export them based on customer email or product SKU.
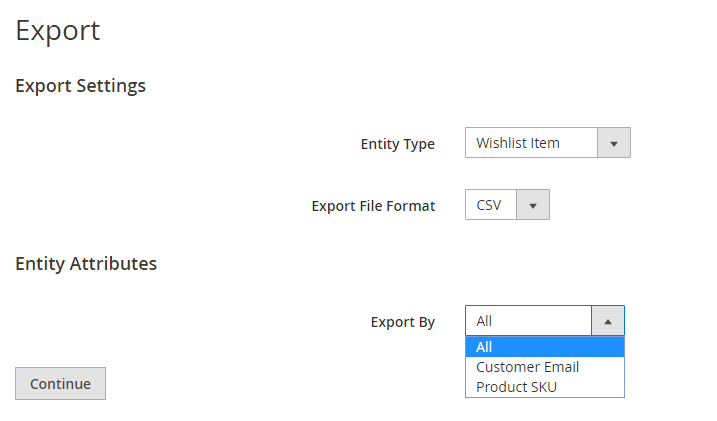
- Export by Customer Email:
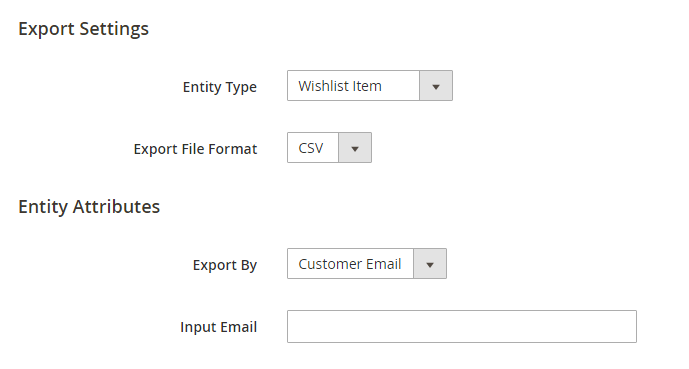
When exporting by Customer Email, you need to enter a specific email of a customer in Input Email.
- Export by Product SKU:
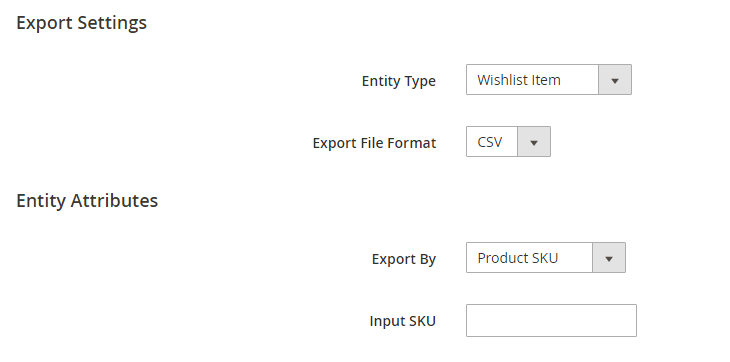 When exporting by Product SKU, you need to enter a specific SKU of a product in Input SKU. Then click Continue button to export wishlist items in a CSV file.
*Note: If you enter a customer email or a product SKU that is not available in the database, the system will export an empty CSV file.
8. Export Order
To export orders, follow this chain:
System -> Export by BSS -> Set Entity to Order
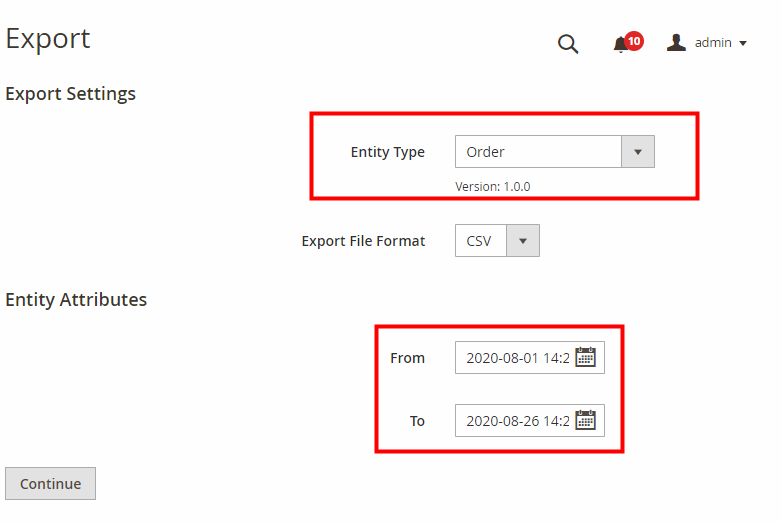
Here, you can choose the time window in which you want to extract and download the order from.