
1. Overview
Magento 2 Advanced Custom Option Package is a comprehensive solution to help you knock out the limitations of custom options by default. It includes these extensions below:
- Custom option template
- Custom option image
- Dependent custom option
- Custom option absolute price and quantity
2. How Does It Work?
To enable features of B2B Package in your Magento 2 website, please go to
Stores → Configuration → BSS COMMERCE
2.1. Custom option template
Choose Custom Option Template under BSS COMMERCE tab
2.1.1. Custom Options Template Grid
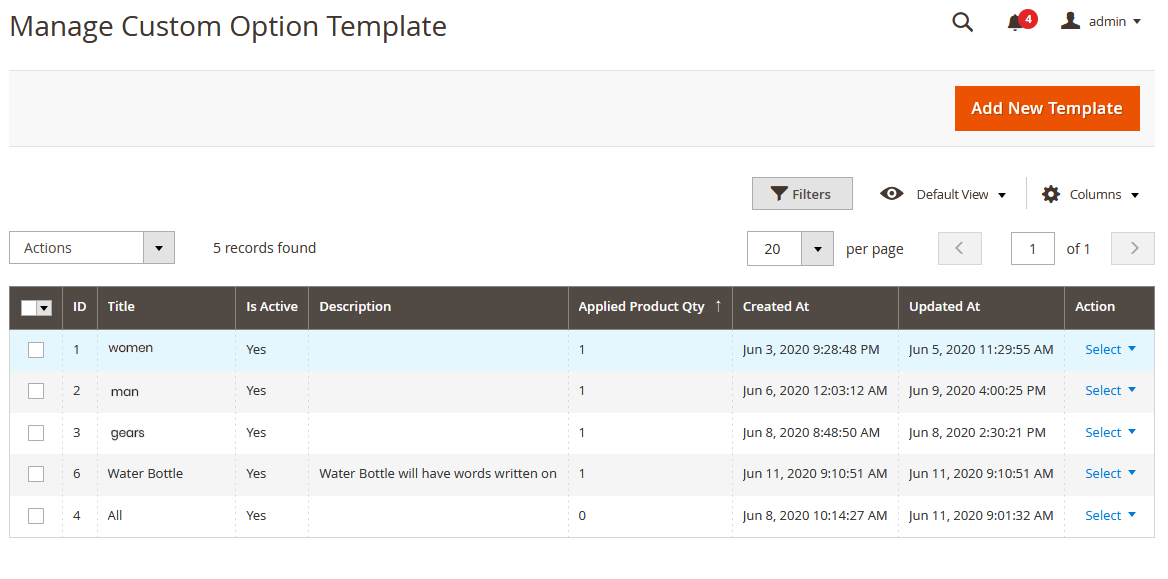
- In ID column: choose the ID of the template
- In Title column: choose the title of the custom option template
- In Is Active column: the status of the template. “Yes” means that the custom option is enabled in the frontend and “No” means that it is disabled.
- In Description column: description of the template
- In Applied Product Qty column: stated the number of products that have been applied to the displayed template.
- In Create At column: specific date and time that the custom options template was created.
- In Update At column: specific date and time of the last edition.
- In Action column: choose Edit to go to the custom options template edit page, or choose Delete to delete the template.
Note:
- Only count the products that are within the template applied rule, the product that isn't supported (E.g. Group products) won't be counted.
- The above information isn’t displayed in the frontend.
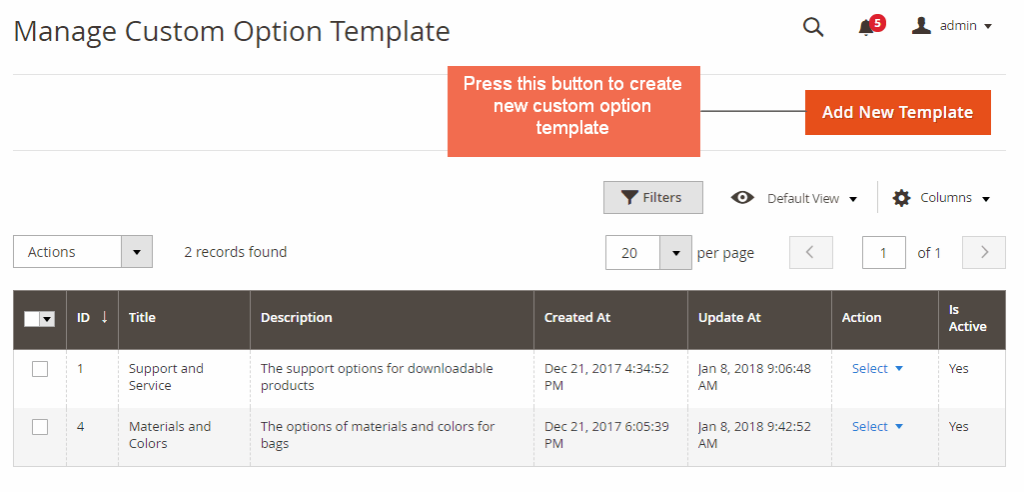
2.1.2. Create Custom Option Template
Please click on Add New Template button to create new custom options template.
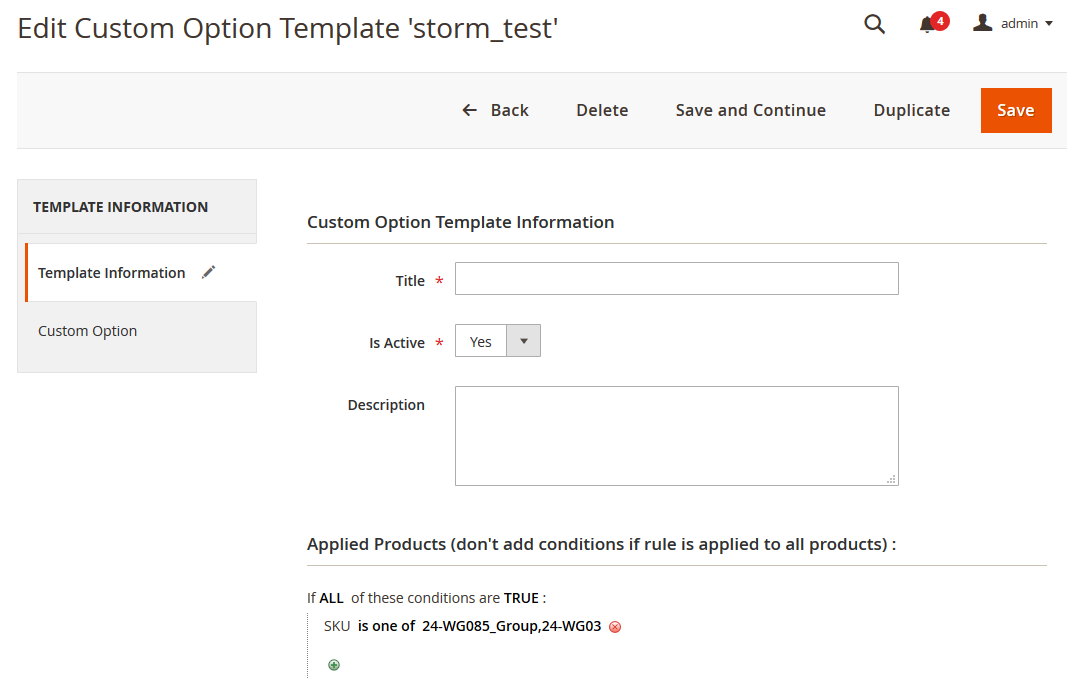
2.1.2.1. Custom Option Template Information
In Template Information tab, you can edit the general information for the template.

- In Title, edit a title for the template.
- In Is Active, choose Yes to enable the template in the frontend, or No to disable it.
- In Description, edit the description for the template that is being created.
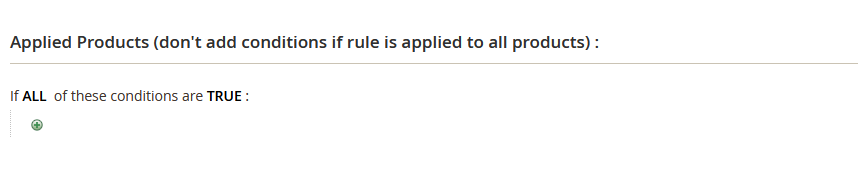
- In Applied Products: Add the right condition to apply the custom options template to products. Don’t set any condition to apply the template to all products.
After assigning custom option template, the custom options are immediately inserted to the Customizable Options tab in each product edit page in the backend and they will be displayed in the frontend.
2.1.2.2. Create Custom Options
To edit custom options of a template, please open Custom Option tab in Custom Option Template Edit page.

In this tab, you can create unlimited custom options by all input types. This section is the same as the Customizable Options tab on the product edit page.
After setting, you need to save to complete. There are 5 buttons for you to press:
- Save: save all settings and then you will be redirected to the custom option template grid
- Duplicate: duplicate the custom option template. The duplicate template is removed the selected products of the original one.
- Save and Continue: save the template and continue staying in the edit page.
- Delete: delete the template
- Back: back to the template grid.
Note:
When the custom option template is deleted or set from Yes to No in Is Active field, the custom options assigned to the product using that template is removed.
After the custom option template is assigned to the product,
- If there are new options added to the template, then those new options are also added to the product.
- If the admin edits any option of the template, the relevant option of the product is also updated.
- If the admin deletes any option of the template, the relevant option of the product is also removed.
Custom Options assigned to the product using the template will be associated with that template.
However, Magento 2 Custom Option Template allows you to exclude a product from a custom options template in the product edit page.
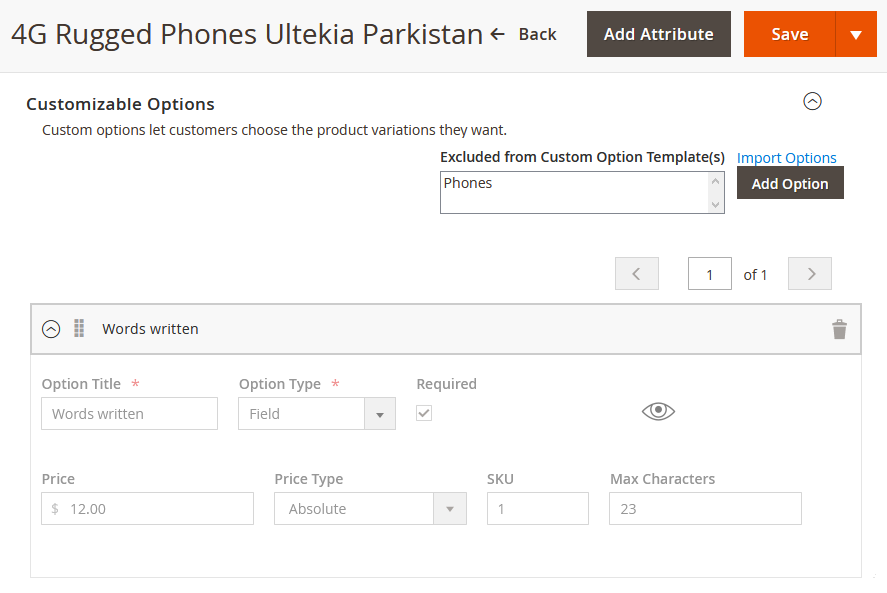
To exclude a product from one custom option template, click the template title in Excluded from Custom Option Template(s) multiple select box.
Magento 2 Custom Option Template extension allows that one product can be assigned to multiple templates.
Currently, the module supports assigning the template to products by the product’s conditions in the Template Edit Page. It means the template can not be assigned to products on the Product Edit Page.
When the custom option template is duplicated, assigned products will not be duplicated in the new template.
Note: When a product was excluded from a template, then rechoosing the template again, then it will be considered as a newly added custom options template.
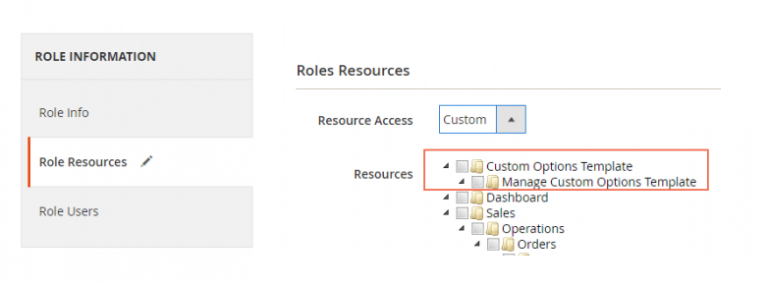
2.1.3. Manage Admin User Roles
Please go to System ⇒ Permissions ⇒ User Roles to restrict other admin accounts accessing the custom options template management.
2.1.4. Choose Save Mode
Navigate to Admin ⇒ Store ⇒ Configuration ⇒ Bss Commerce ⇒ Custom Option Template ⇒ Advanced Setting.
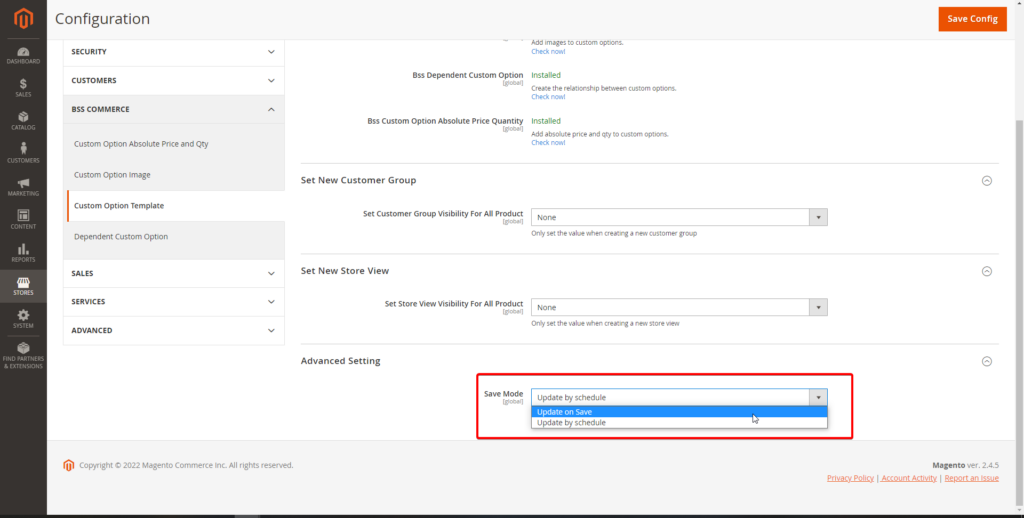
In the Save Mode, you can select the template save format.
- Update on Save: When clicking on the Save or Save and Continue button, that custom option product data will be updated right away. You should use this option when 1 template is assigned for a few products.
- Update by schedule: When clicking on the Save or Save and Continue button, that custom option product data will be updated via cron qua cron, and you can check the process in Bulk Action (System > Action Logs). You should use this option when 1 template is assigned for a bulk of products to avoid connect timeout issue.
2.2. Custom option image
2.2.1. General Configs
- In Enable, choose Yes to enable the extension, or No to disable it.

Note: The module works with simple product, configurable product, bundle product (without dynamic pricing), downloadable and virtual product.
It only supports adding images for products that can have custom options by Magento default so the extension does not work with the grouped product. In case of bundle product, it only supports uploading images for the custom options created by admin, not the bundle items.
2.2.2. Frontend View Settings

- In Drop-down Option View, choose one of the following options.
- Show image when selected: Image is only displayed when the custom option is selected.
For example:
- Show all images: All images are displayed in each custom option. If a customer selects an option, its image will be highlighted.
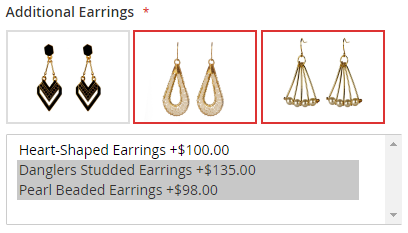
- In Multiple Select Option View, choose one of the following options:
- Show image when selected: Image is only displayed when the custom option is selected.
- Show all images: All images are displayed in each custom option. If a customer selects an option, its image will be highlighted.
For example:
2.2.3 Image Size Settings
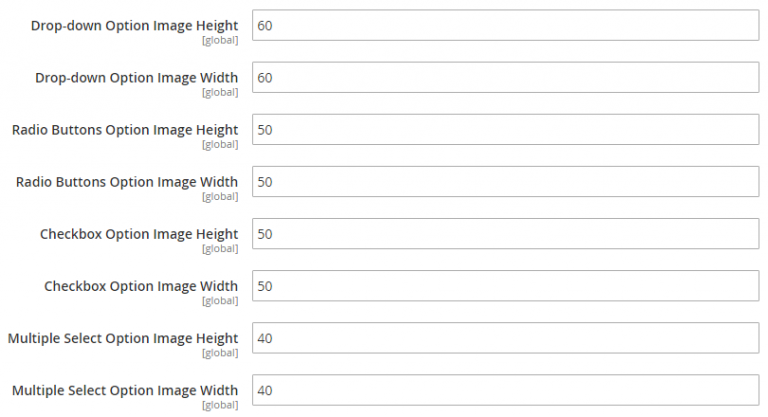
- In Drop-down Option Image Height, set image height for drop-down option type.
- In Drop-down Option Image Width, set image width for drop-down option type.
- In Radio Buttons Option Image Height, set image height for radio buttons option type.
- In Radio Buttons Option Image Width, set image width for radio buttons option type.
- In Checkbox Option Image Height, set image height for checkbox option type.
- In Checkbox Option Image Width, set image width for checkbox option type.
- In Multiple Select Option Image Height, set image height for multiple select option type.
- In Multiple Select Option Image Width, set image width for multiple select option type.
2.2.4. Upload Image for Custom Options
Go to Products ⇒ Catalog ⇒ Choose one product ⇒ Find Customizable Options
-
- Click the Image icon to insert the custom option’s image.
- Click on the Swatch Image icon to insert the swatch image to the custom option.
- Only the drop-down and radio button option type have swatch images.
- When hovering over the chosen image, the Delete and Edit icon will appear. Click icons to delete or edit the images and swatch images.
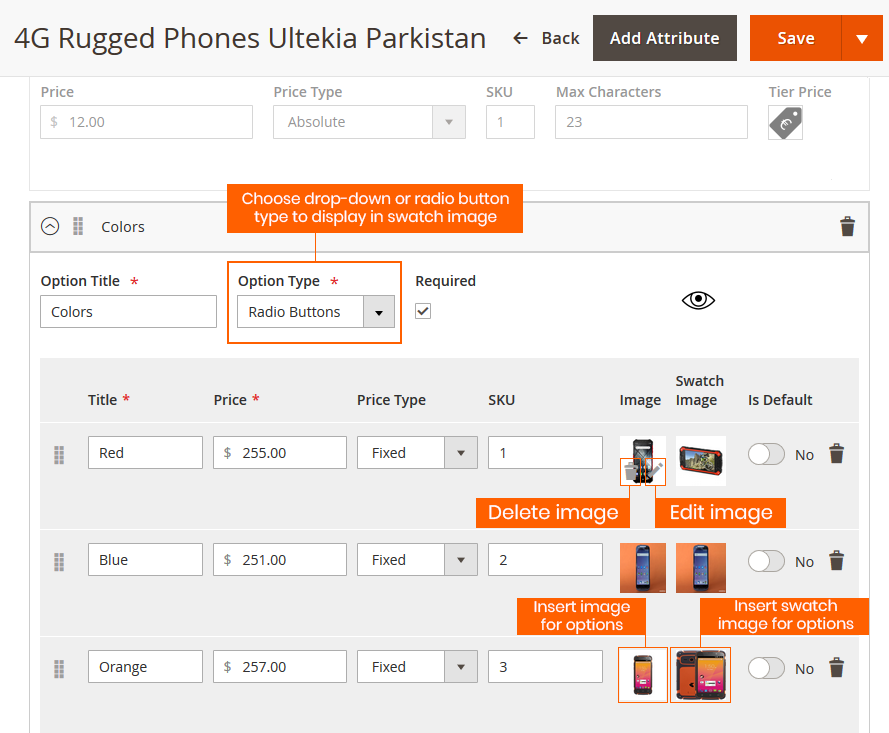
When finished inserting the images and swatch images, click the Save button to save the configurations.
Note: Don’t delete the custom option before save configuration or the images uploaded for options won’t be saved.
2.3. Dependent custom options
2.3.1. General Configuration
Please go to Store ⇒ Configuration ⇒ BSSCommerce ⇒ Dependent Custom Option
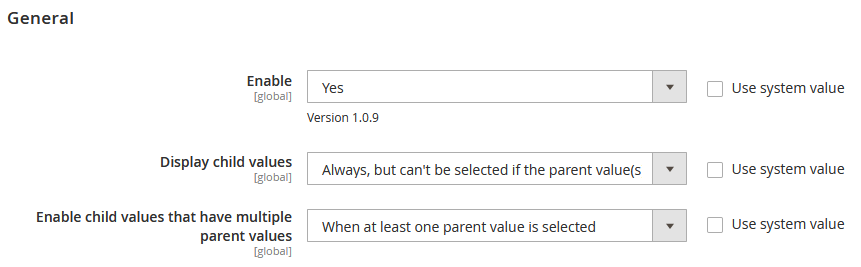
In Enable: choose Yes to enable the module, or No to disable it.
*Note: When you enable/disable the module, you need to check again and set up required configs of options. It is a must to enter values for Required Options only when editing Required Options on the frontend is possible (not to be hidden or disabled).
In Children Option Values Display:
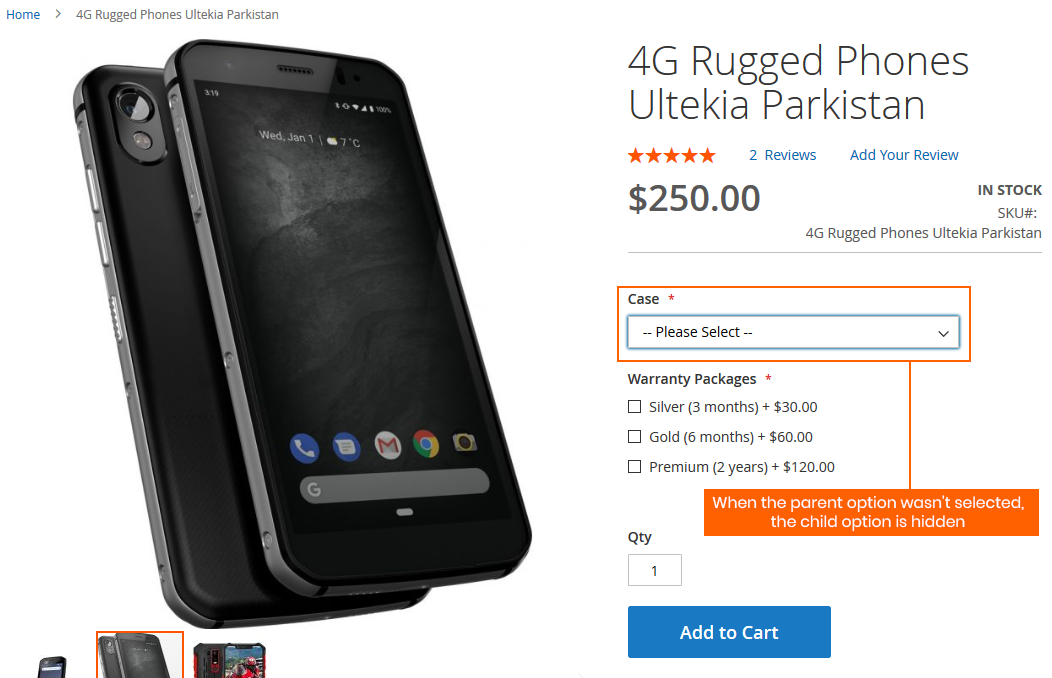
- Be Enabled Only If the Parent Option Value is Selected: choose this option to set the children options are hidden and they will be enabled only when their parent option is picked.
- Always be Displayed but Customers Can’t Pick If the Parent Option Value isn’t Selected: choose this option to set the children options always be shown but the checkboxes aren’t enabled until the parent option is selected.
In Children Options’ Values Depend on Multiple Parent Values: this configuration is applied when the child options depend on multiple parent options.
- Be Enabled If At Least One Parent Value is Selected: the child options will be enabled if at least one parent option is chosen.
- Be Enabled Only If All Parent Values are Selected: the child options will be enabled only when all parent options are chosen.
Note:
- The display of children options is dependent on the setting in Children Option Values Display config.
- The Children Options’ Values Depend on Multiple Parent Values can be configured in the Product Edit Page for custom options at the product level.
After setting, please press Save Config button and flush cache to start using the module.
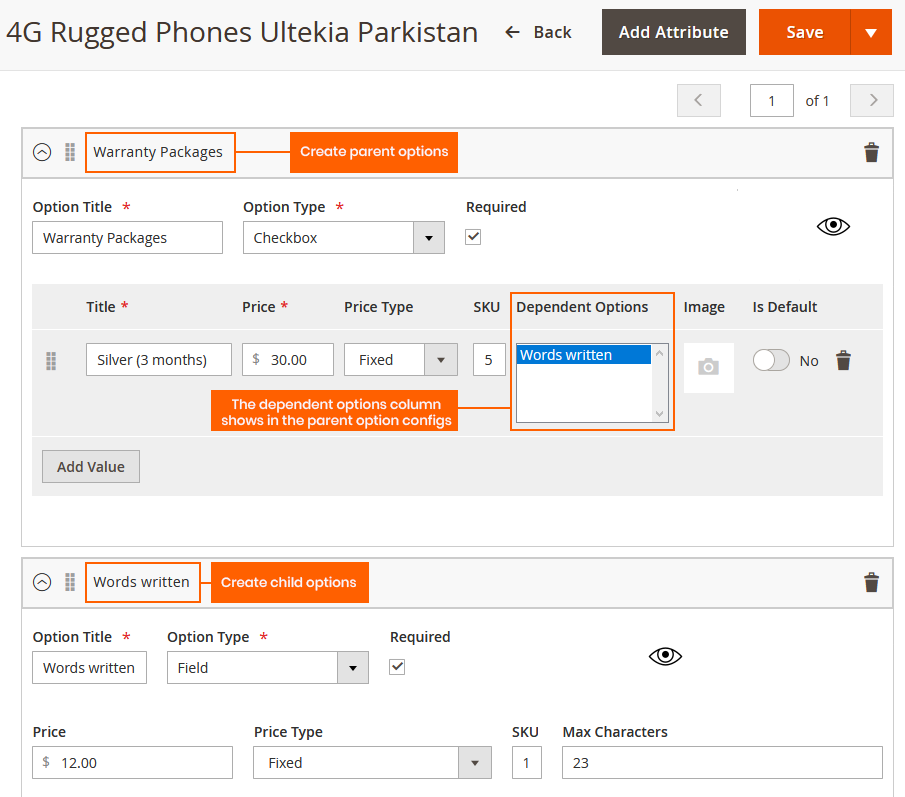
2.3.2. Set Dependent Custom Options
Note:
Only after you have created the child options,their names would appear on the dependent option list, and you can set the dependent options.
Please go to Admin Panel ⇒ Catalog, then pick a product, and go to Customizable Options section.
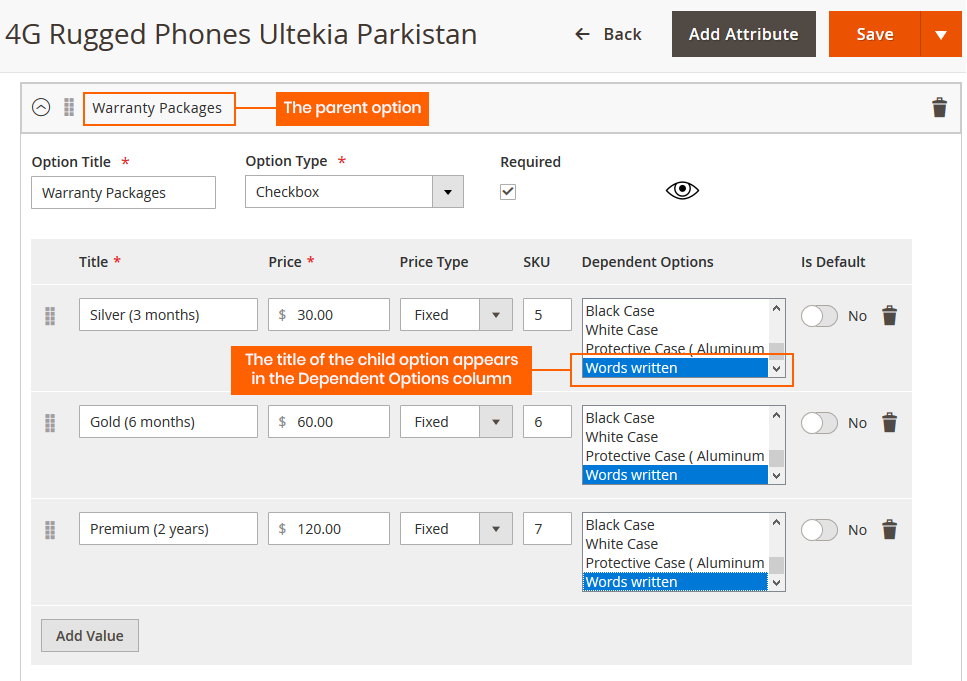
- Create both parent and child custom options, then in Dependent Options, pick the custom options’ titles.
You can change the configs of Child values that have multiple parent values on the product edit page for custom options at product level, which means only the custom options of that product are applied by this config.
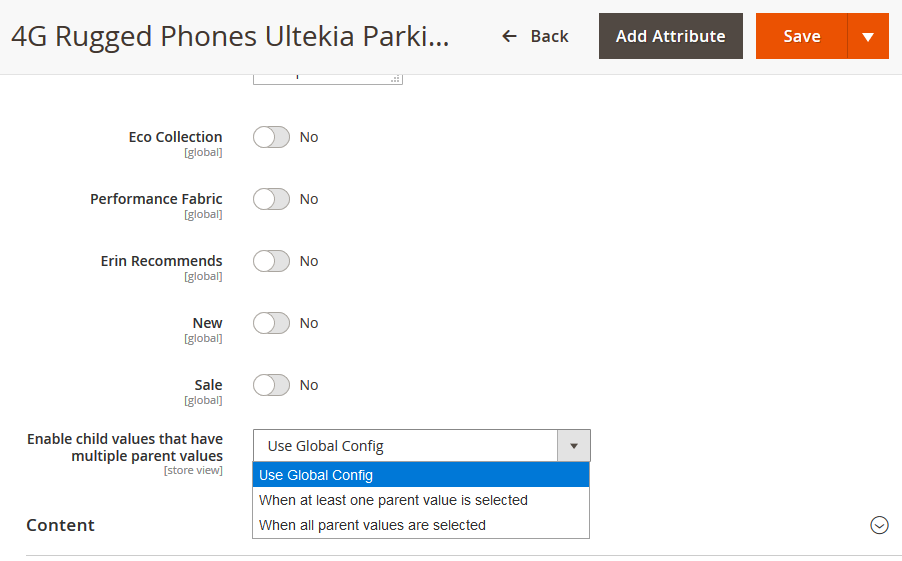
The configuration options are the same as the Children Options’ Values Depend on Multiple Parent Values under Store ⇒ Configurations section.
Note:
- The custom options depended on other options are called children options and the option values added dependent custom options are called parent options
- Only the custom option values in Select input types (Drop-down, Checkbox, Radio Buttons, and Multiple Select) can be the parent options.
- All custom options and option values in any input type can be the child options.
- The parent options and child options must be in the same product.
- The configuration Enable child values when all parent values are selected will not show children options with parent options in the drop-down or radio button type.
- A children option can be dependent on multiple parent options.
- When the dependent options and also the values of the custom option are both chosen, they can't be displayed in the frontend. In order for this to not happens, you should choose the parent option as the dependent instead.
After finishing the setting, press Save button on the product page.
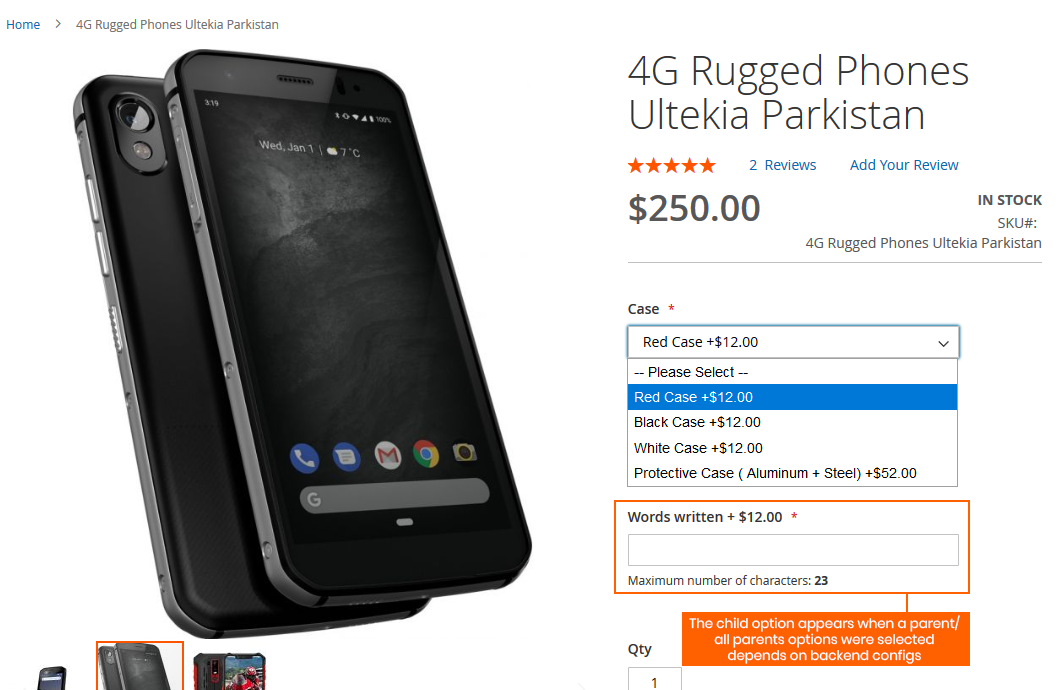
2.3.3. Frontend Display
Depends on the configs you set in the backend, the frontend product page will look like this:
2.4. Custom option with absolute price and quantity
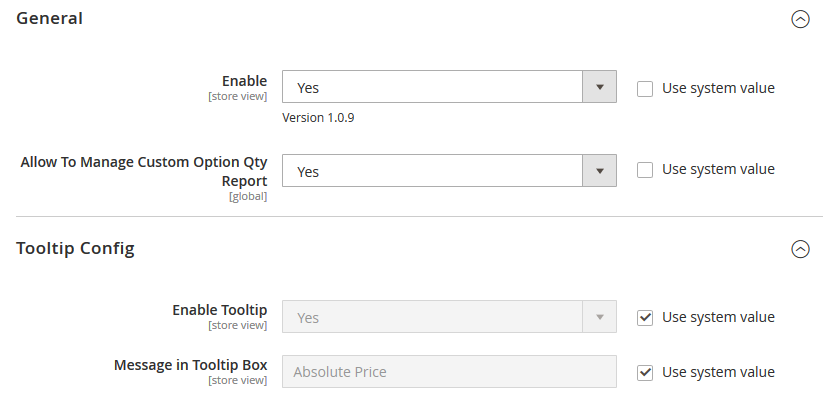
2.4.1. General Configs
Please go to Store ⇒ Configuration ⇒ BSSCommerce ⇒ Custom Option Absolute Price and Qty
- In Enable, choose Yes to enable the module, or No to disable it.
- In Allow To Manage Custom Option Qty Report, choose Yes to enable the Custom Option Stock Changes Report section, No to disable it.
- Tooltip Config: The tooltip that notifies customers about custom options with absolute pricing is enabled when users hover over the absolute price option. This extension allows you to customize the tooltip.
- In Enable Tooltip: choose Yes to enable the tooltip, or No to disable it.
- In Message in Tooltip Box: edit a message to be shown on the tooltip.
- After completely setting, please press Save Config button to save your customization.
2.4.2. Apply Absolute Price to Custom Options
Please go to the edit page of a product then press the Customizable Options tab to create custom options for the product.
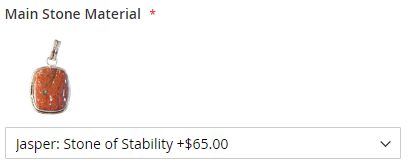
This module adds a new option “Absolute” to Price Type selection. Choose “Absolute” to set absolute pricing for the option you want.
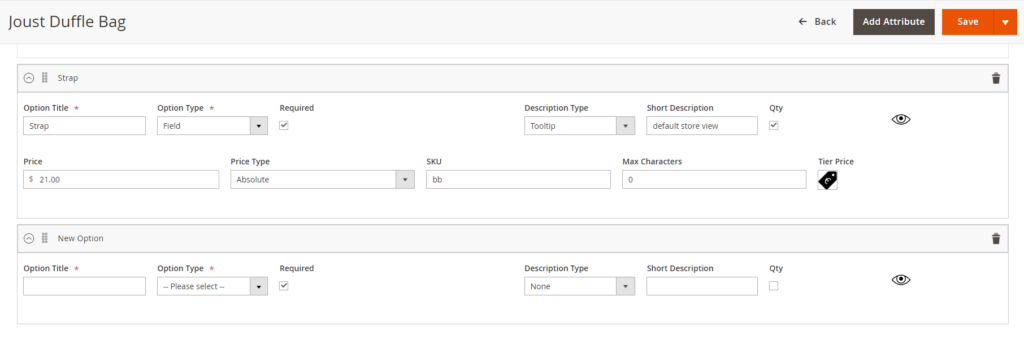
Two new configs when enabling Magento 2 Custom Option Absolute Price and Quantity:
Position: Product > Customizable options > “Description Type” and “Short Description”: Allow you to show description for each custom option at the frontend product page.
- Description Type: select one of 3 values - None/ Tooltip/ Small text
- If you select "None", Short description is not shown on the frontend.
- If you select "Tooltip/ Small text" but "Short description" is empty, Short description is not shown on the frontend.
- If you select "Small text", Short description will show a small text on the frontend, under the title of custom option.
- Short Description: can change following store view.
2.4.3. Quantity Select Box for Custom Options
Check the “Qty” box to enable the Quantity Selection Box for custom options.
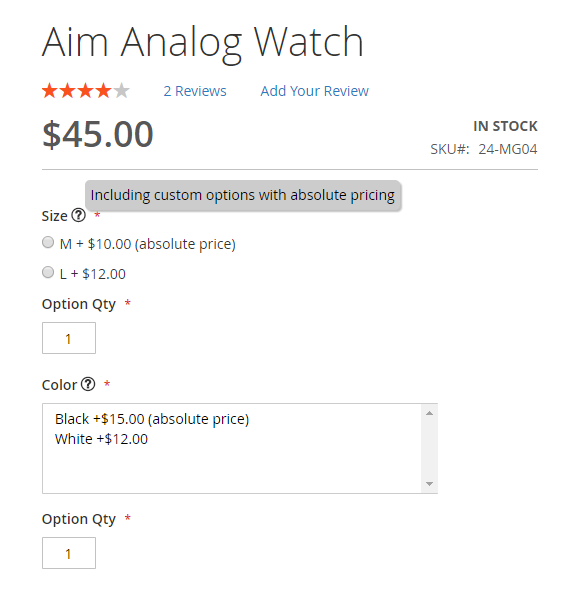
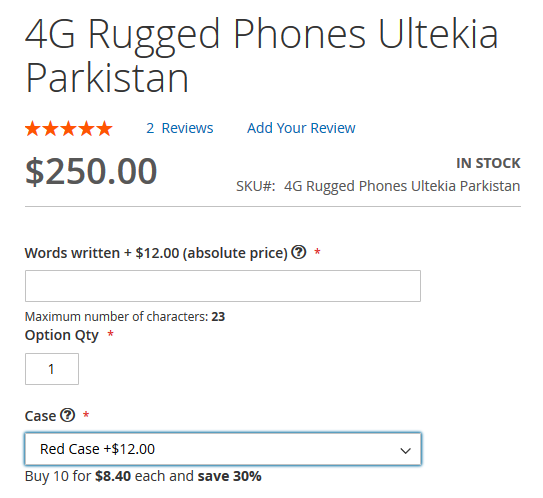
Here is how the absolute price and quantity of custom options are displayed in the frontend:
2.4.4 Set tier pricing for custom options
Choose the Tier Pricing icon in Customizable Option of a custom option to set the tier prices to custom options. An Advance Pricing window will open for you to edit the pricing information.
- Click Add to include a new tier pricing to the chosen custom option.
- In Website, set the website that the tiered pricing will be applied.
- In Customer Group, choose the customer groups that the tier price will be applied to.
- In Quantity: Determine the number of options bought to get the tiered price.
- In Price, choose Fixed for a fixed price, and discount for a discount percentage when buying certain custom options.

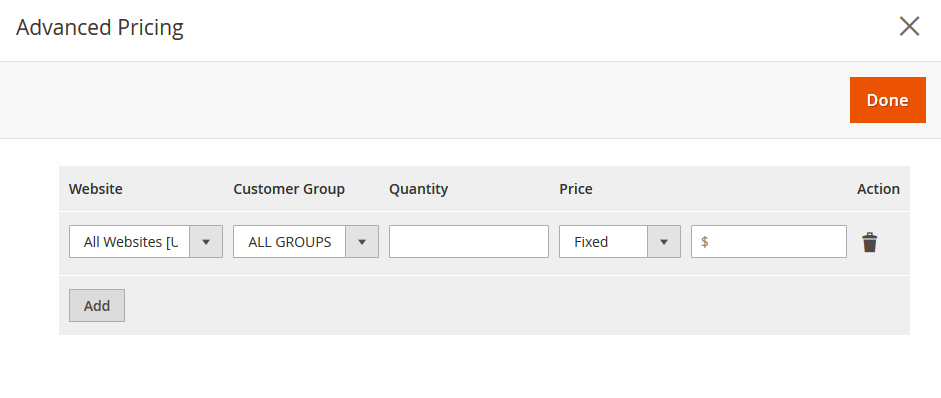
Note: Make sure to press Save after finishing setting up the configuration. The set price and quantity won’t be displayed until you click Save.
How does the tiered pricing show in the frontend:
2.4.5 Manage Stock Option Changes Report
Before access to the Custom Stock Options Change Report, make sure to enable the Allow To Manage Custom Option Qty Report in Configuration section.
Please go to Admin Panel ⇒ Catalog ⇒ Custom Option Qty Report to access the Manage Stock Option Changes grid.
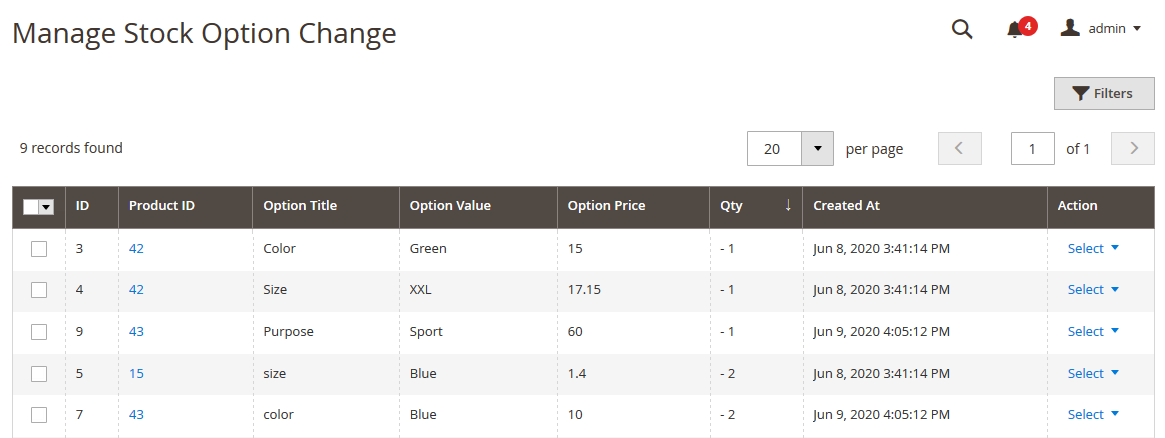
- In ID column: Shows the custom options SKUs
- In Product ID column: The ID of the product which the custom option belongs to.
- In Option Title: The title of the custom option.
- In Option Value: Shows the values of the custom option
- Options Price: Shows the price set for the custom options
- In Qty column: Displays the Qty changes of the chosen custom option
- In Create At column: specific date and time that the custom options were created.
- In Action column: View the order and credit memo of the custom option.
Note:
- When there is someone purchase a custom option, the Qty Change will decrease by the number of custom options bought.
- When a product is refunded, the Qty change in Manage Options Stock Change Report will increase by the number of products that get refunded.
- Short Description and Description Types configs also work with Magento 2 Custom Option Template. However, it can not change the description by store view at the template yet.