
1. Overview
Custom Option Image for Magento 2 extension allows admins to add images/swatch images/colors to custom options of products. It supports uploading unlimited images and assigning to custom options of different types, such as drop-down, multiple select, checkbox, radio button.
2. How Does It Work?
Please go to Stores ⇒ Configuration ⇒ BSSCOMMERCE ⇒ Custom Option Image.
2.1 General Configs

- In Enable, choose Yes to enable the extension, or No to disable it.
Note: The module works with simple product, configurable product, bundle product (without dynamic pricing), downloadable and virtual product.
It only supports adding images for products that can have custom options by Magento default so the extension does not work with the grouped product. In case of bundle product, it only supports uploading images for the custom options created by admin, not the bundle items.
2.2 Frontend View Settings

a. In Drop-down Option View, choose one of the following options.
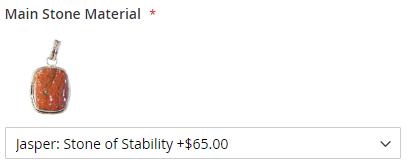
- Show image when selected: Image is only displayed when the custom option is selected.
For example:
- Show all images: All images are displayed in each custom option. If a customer selects an option, its image will be highlighted.
b. In Multiple Select Option View, choose one of the following options:
- Show image when selected: Image is only displayed when the custom option is selected.
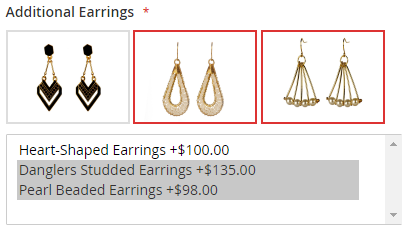
- Show all images: All images are displayed in each custom option. If a customer selects an option, its image will be highlighted.
For example:
2.3 Image Size Settings
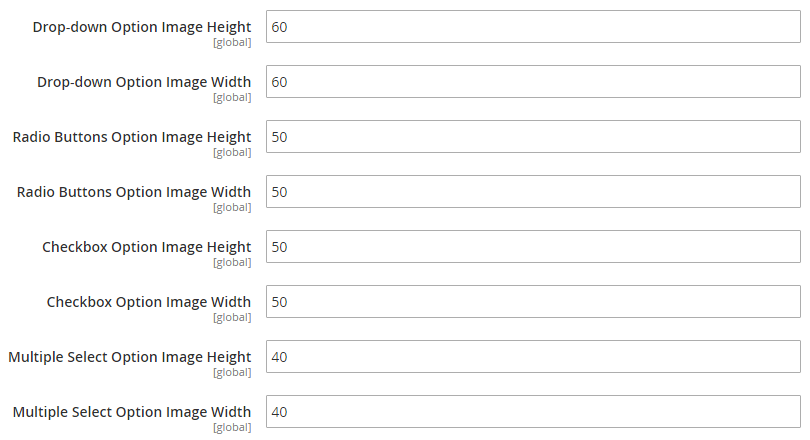
- In Drop-down Option Image Height, set image height for drop-down option type.
- In Drop-down Option Image Width, set image width for drop-down option type.
- In Radio Buttons Option Image Height, set image height for radio buttons option type.
- In Radio Buttons Option Image Width, set image width for radio buttons option type.
- In Checkbox Option Image Height, set image height for checkbox option type.
- In Checkbox Option Image Width, set image width for checkbox option type.
- In Multiple Select Option Image Height, set image height for multiple select option type.
- In Multiple Select Option Image Width, set image width for multiple select option type.
2.4 Upload Image for Custom Options
Go to Products ⇒ Catalog ⇒ Choose one product ⇒ Find Customizable Options
- Click the Image icon to insert the custom option’s image.
- Click on the Swatch Image icon to insert the swatch image to the custom option.
- Only the drop-down and radio button option type have swatch images.
When hovering over the chosen image, the Delete and Edit icon will appear. Click icons to delete or edit the images and swatch images.
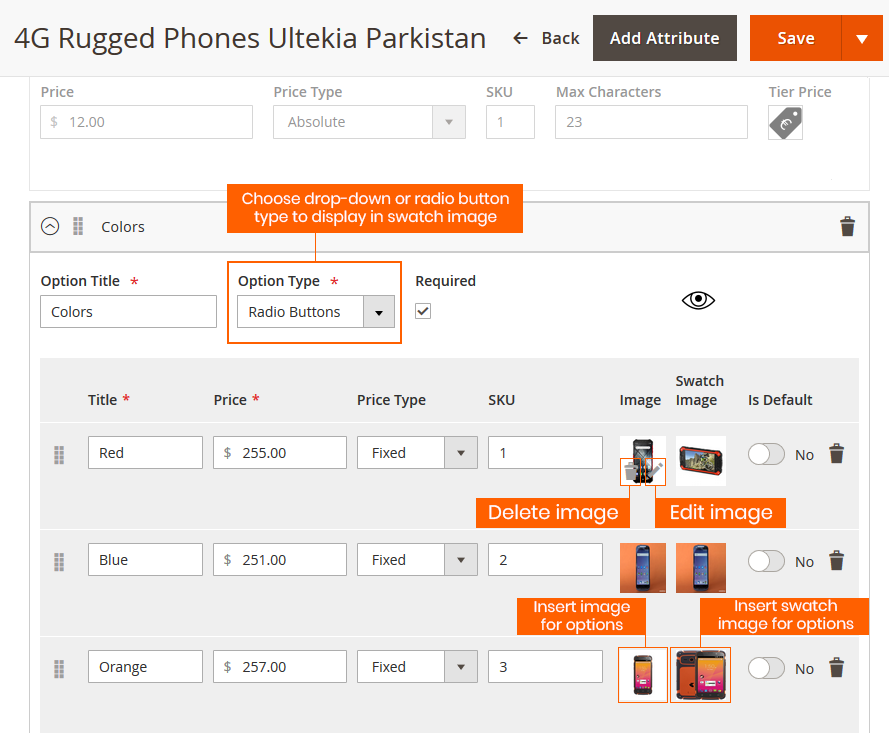
When finished inserting the images and swatch images, click the Save button to save the configurations.
Note: Don’t delete the custom option before save configuration or the images uploaded for options won’t be saved.