1. Overview
Gallery for Magento 2 extension allows admin to create image gallery from scratch, including uploading images, adding new albums, and configuring each image and album regarding its content, layout and display effect. This is an optimal tool to help admin manage all products’ images and provide better visualization of product for customer thanks to widget support and full responsiveness.
2. How Does it Work?
2.1 General Configs
Go to Stores ⇒ Settings ⇒ Configuration ⇒ BSS Commerce ⇒ Gallery
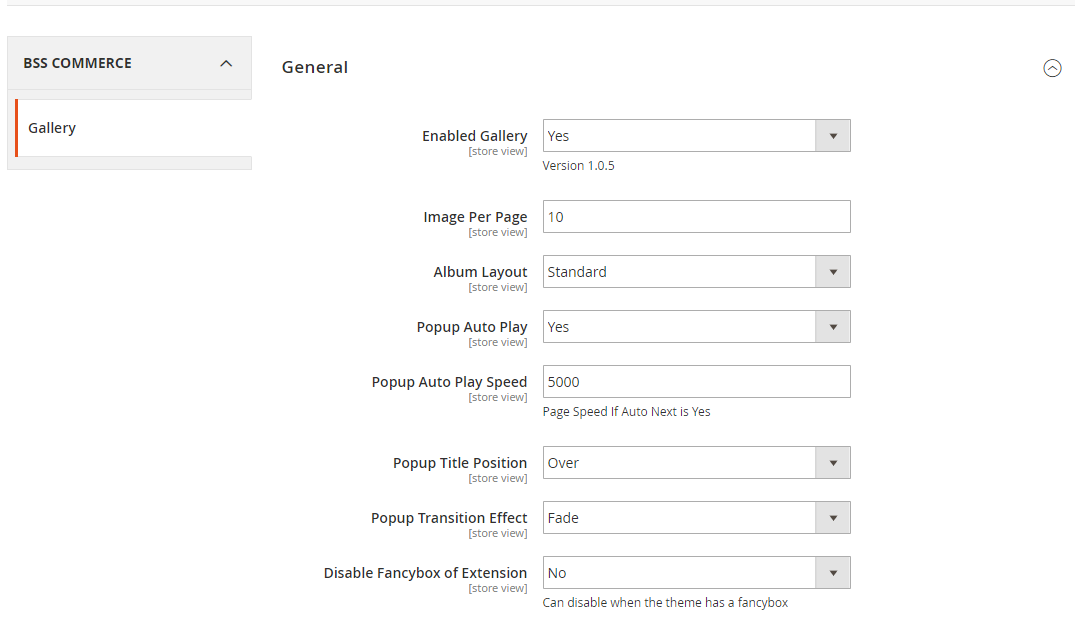
- In Enabled Gallery, choose Yes to enable the gallery, otherwise choose No
- In Image Per Page, limit the display of number of items for each page
- In Album Layout, choose one of the two available of album layout: Ajax or Standard
- In Popup Auto Play, choose Yes to enable automatic next image for the gallery as you might want
- In Popup Auto Play Speed, choose the speed for auto play
- In Popup Title Position, choose the position of fancybox title in with 3 options: Over, Inside, and Outside.
- In Popup Transition, choose the effect of image display with 2 options: Fade or None
- In Disable Fancybox of Extension, choose Yes to disable the fancybox function or No to enable it
Note: You should only set Disable Fancybox of Extension to No for theme which has already installed Fancybox function or you might come across some errors.
2.2 Content Management
2.2.1 Manage Item
Go to Content ⇒ BSS Gallery Manage ⇒ Manage Item. See the list of items here with information
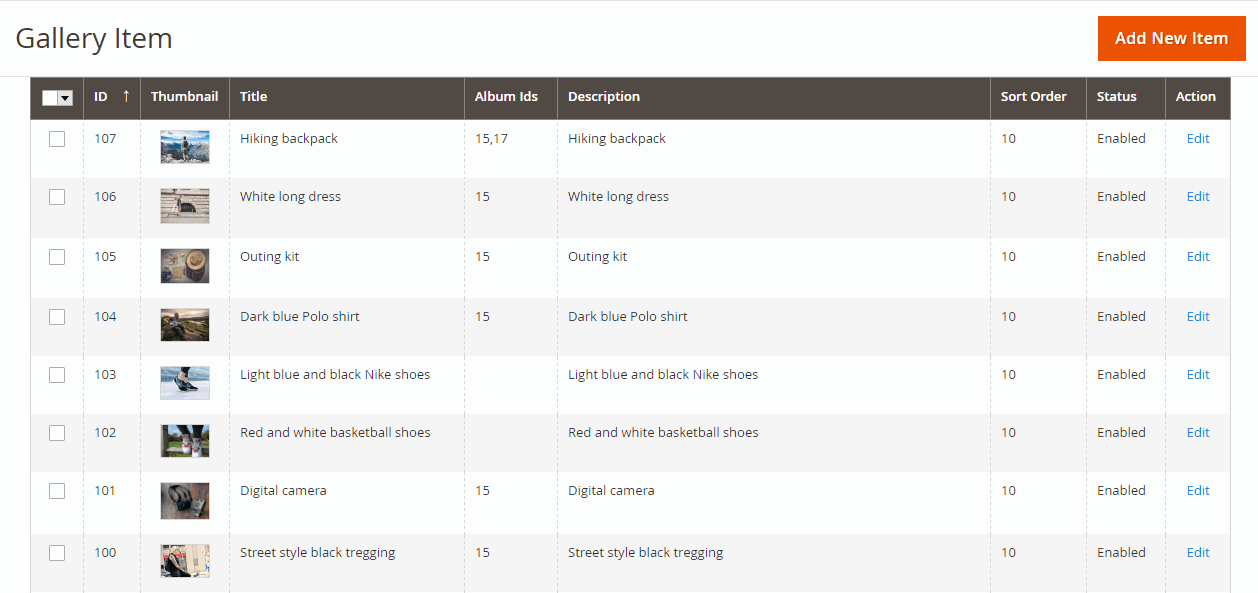
- Click Add New Item to a new item into one album
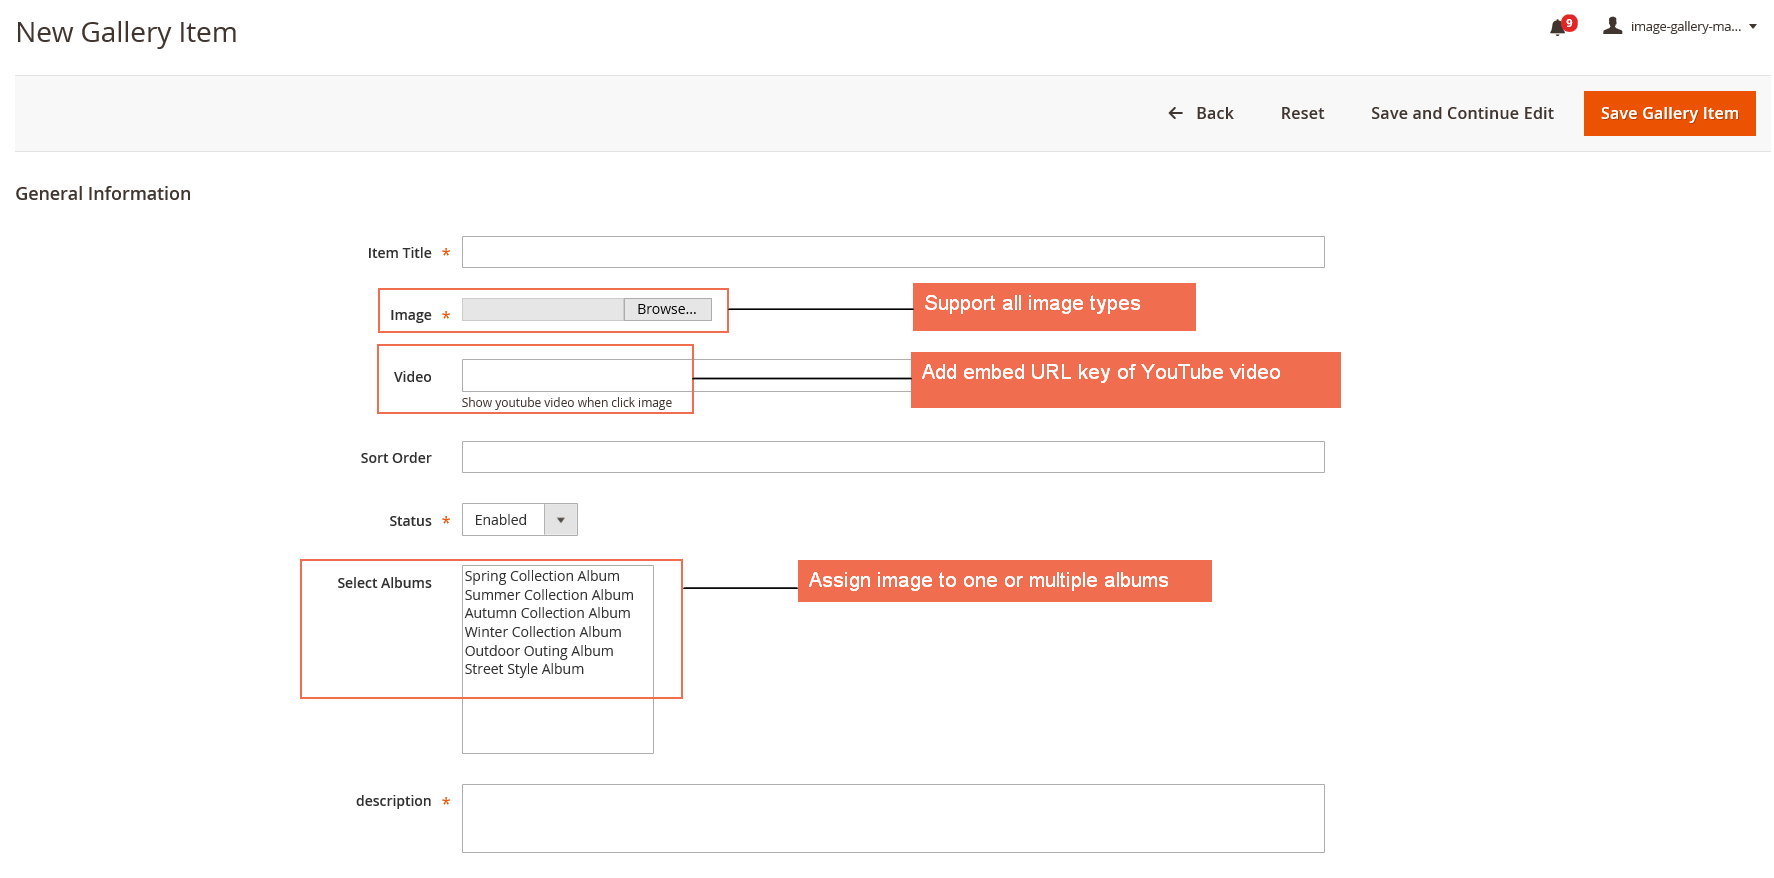
- In Item Title, pick title for the new item
- In Image, upload image for the new item
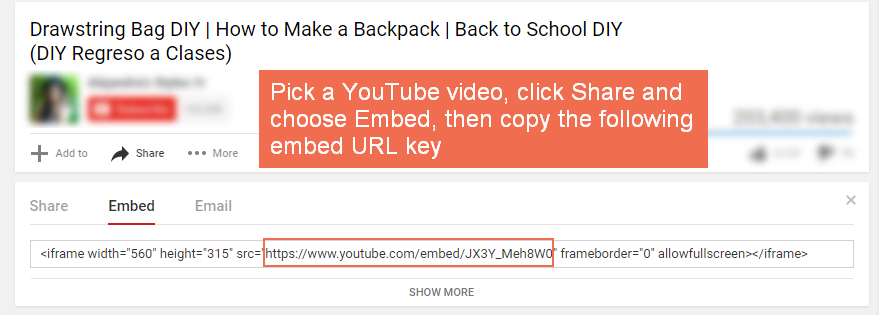
- In Video, if your item is a video which has already been uploaded on YouTube, add the embed url key
For example:
- In Status, choose Enabled to use this image
- In Sort Order, fill in the order of this image
- In Select Albums, choose one or multiple albums to assign your new item
- In Description, write its description if needed
Note: If you delete an item, please clear the cache to ensure the number of items is updated in frontend albums.
2.2.2 Manage Album
Go to Content ⇒ BSS Gallery Manage ⇒ Manage Album. See the list of albums here with information.
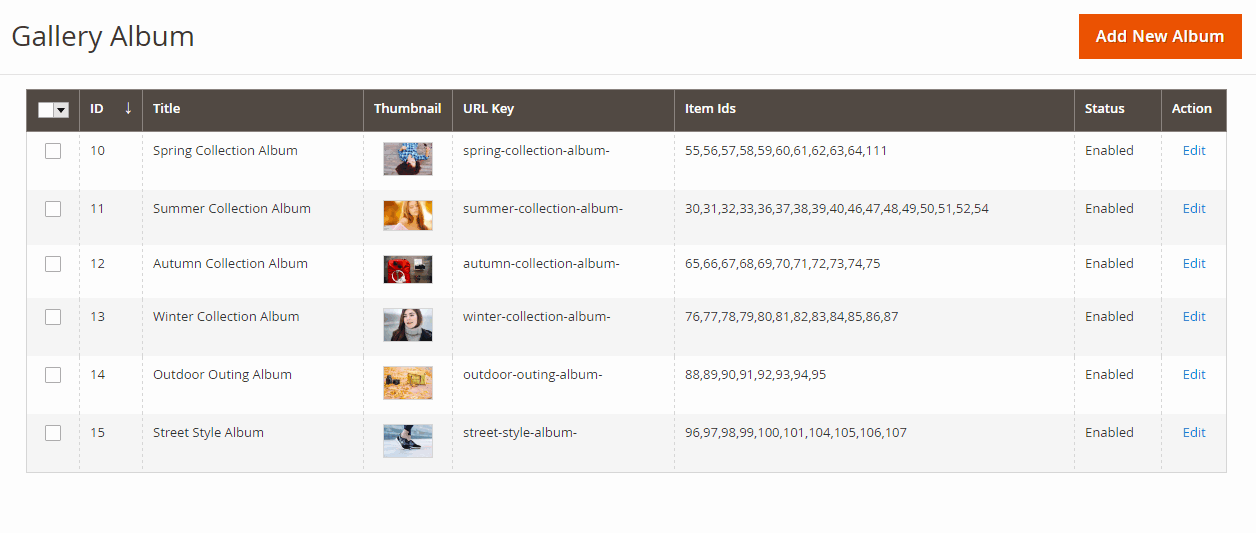
- In Add New Album, add new albums into the gallery
- In New Gallery Album ⇒ Album Information⇒ General, you can edit these following field.
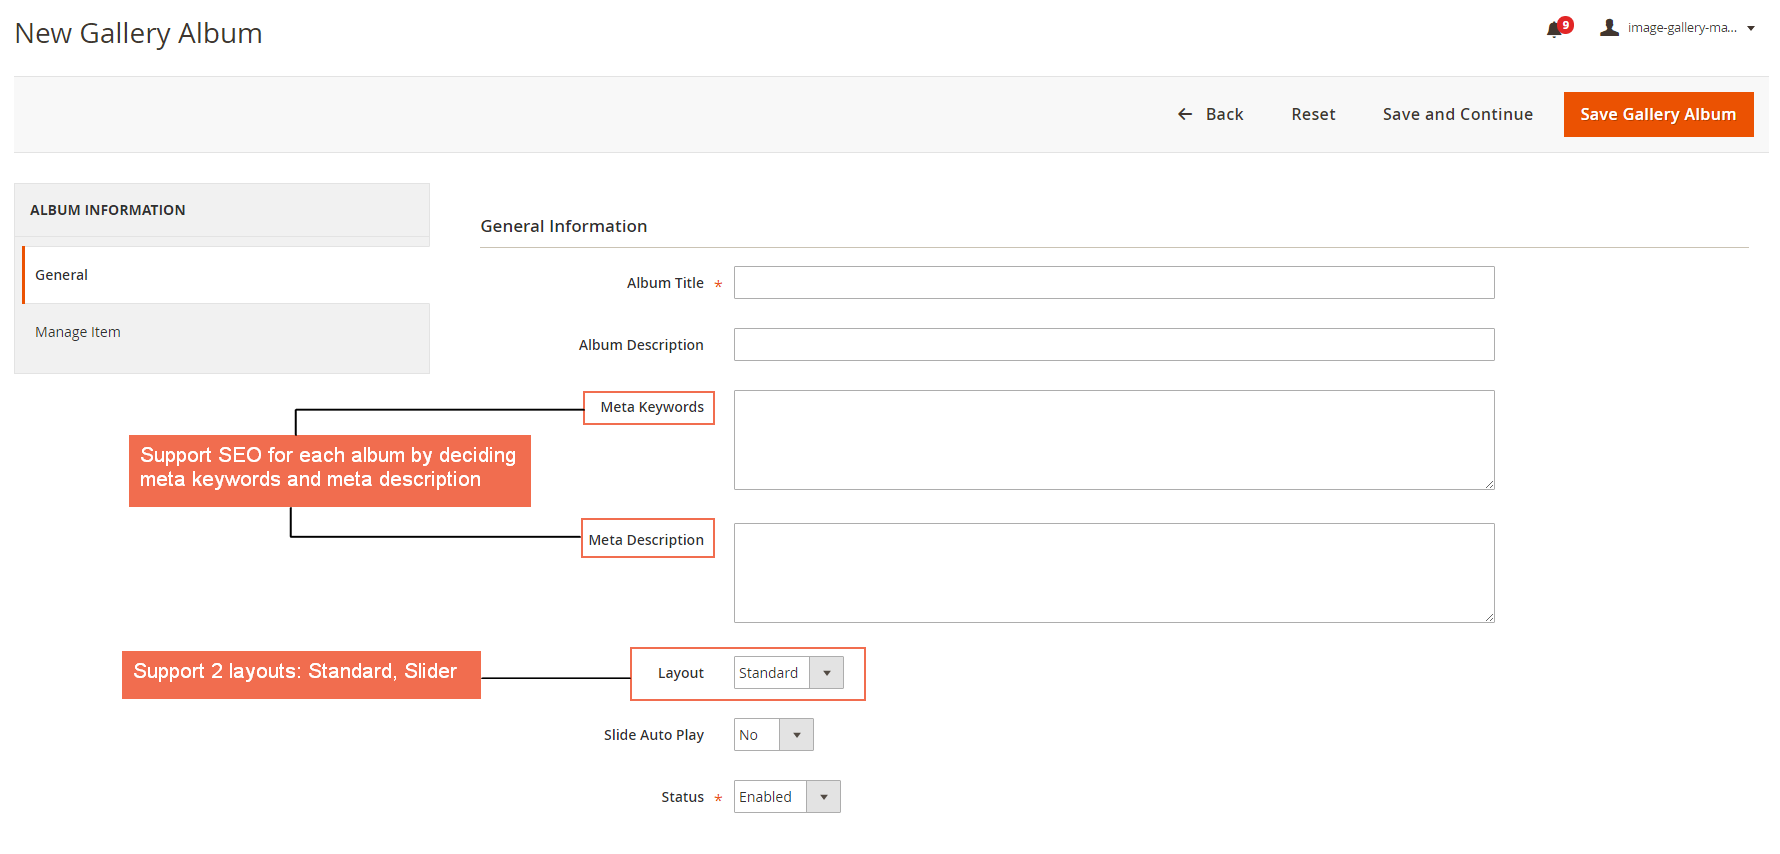
- In General Information, decide Album Title, write Album Description if needed, then write metadata in Meta Keywords and Meta Description to support SEO.
- In Layout: choose album layout type in : Standard or Slider.
If you want to set automatic sliding action for your album then choose Yes in Slide Auto Play, otherwise choose No.
- In Status, choose Enabled to activate the new album otherwise choose Disabled.
- In Assign to Store Views: select store view to display the album.
- In New Gallery ⇒ Album ⇒ Album Information ⇒ Manage Item
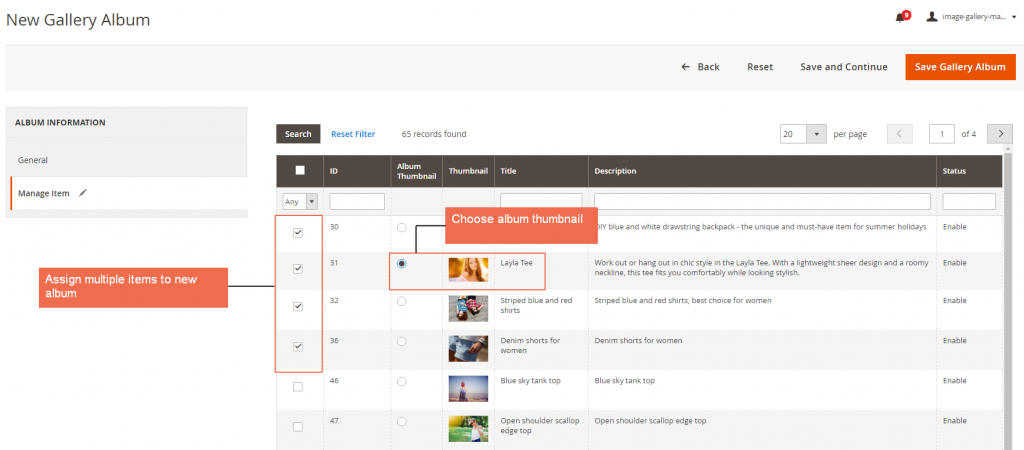
- In Manage Item, choose one or several items to add to the new album, then in AlbumThumbnail, choose an item to be album thumbnail.
2.2.3 IMPORT
Please navigate to Content ⇒ BSS Gallery ⇒ Manage Import. You can import/ export multiple albums/ items at the same time by using CSV files.

To import albums through CSV, you need a CSV file as below:

- Album ID: Album ID will be auto-counted with the existing Album ID. If you leave the field blank or enter an ID that does not match the previously existing IDs, a new album will be added to the Gallery. In case of filling an ID with the same existing ID, this means you will edit album with this ID.
- Album Title: Type the names of new albums. This field is required.
- Album Description: Type the description of new albums.
- Meta Key: Type the meta keywords of new albums.
- Meta Description: Type the meta description of new albums.
- Layout: This field has two values: 1 means Standard, 2 means Slider. In case of filling other values or leaving blank, Layout is set to Standard.
- Auto Play: This field has two values: 1 means Yes, 0 means No. In case of filling other values or leaving blank, Auto Play is set to Yes.
- Status: This field has two values: 1 means Enable, 0 means Disable. If you enter other values or leave blank, Status is set to Yes.
- Item IDs: Items with IDs added to the column will be assigned to the corresponding album.
To import albums, click button Choose File and select CSV file, then click Import Album.
To export album, click button Export Album, select the file location and click Save.
To import items through CSV, you need a CSV file as below:

- Item ID: If you leave the field blank or enter an ID that does not match the previously existing IDs, a new item will be added to the Gallery. In case of filling an ID with the same existing ID, this means you will edit item with this ID.
- Item Name: Type the names of new items. This field is required.
- Item Description: Type the description of new items. This field is required.
- Image Path: After uploading item images onto Magento site, you need to copy the sources of these images and paste them into this field. The folder to upload images in the computer is /pub/media/Bss/Gallery/Item/image.
- Video URL: You can show a video by copy URL link of the video on Youtube and paste it into this field.
- Sort Order: Type the display order of each item.
- Status: This field has two values: 1 means Enable, 0 means Disable. If you enter other values or leave blank, Status is set to Yes.
- Album IDs: Albums with IDs added to the column will contain the corresponding items.
To import items, click button Choose File and select CSV file, then click Import Item.
To export items, click button Export Item, select the file location and click Save.
2.2.4 Manage Config
This will direct you to the general configuration under Stores ⇒ Settings ⇒ Configuration ⇒ BSS Commerce ⇒ Gallery. So, check section 2.1 out.
2.3 Widgets
- Go to Content ⇒ Elements ⇒ Widgets.
- Click Add Widget button to add a new widget.
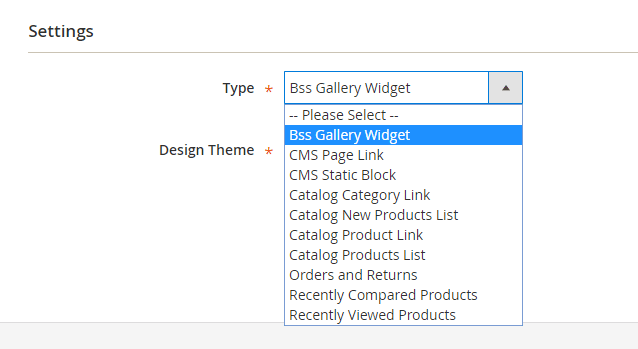
- In Type, choose BSS Gallery Widget.
- In Design Theme, select your website theme.
- Click on Continue button
- You will two tabs to configure here, which are: storefront properties and widget options
2.3.1 Storefront Properties
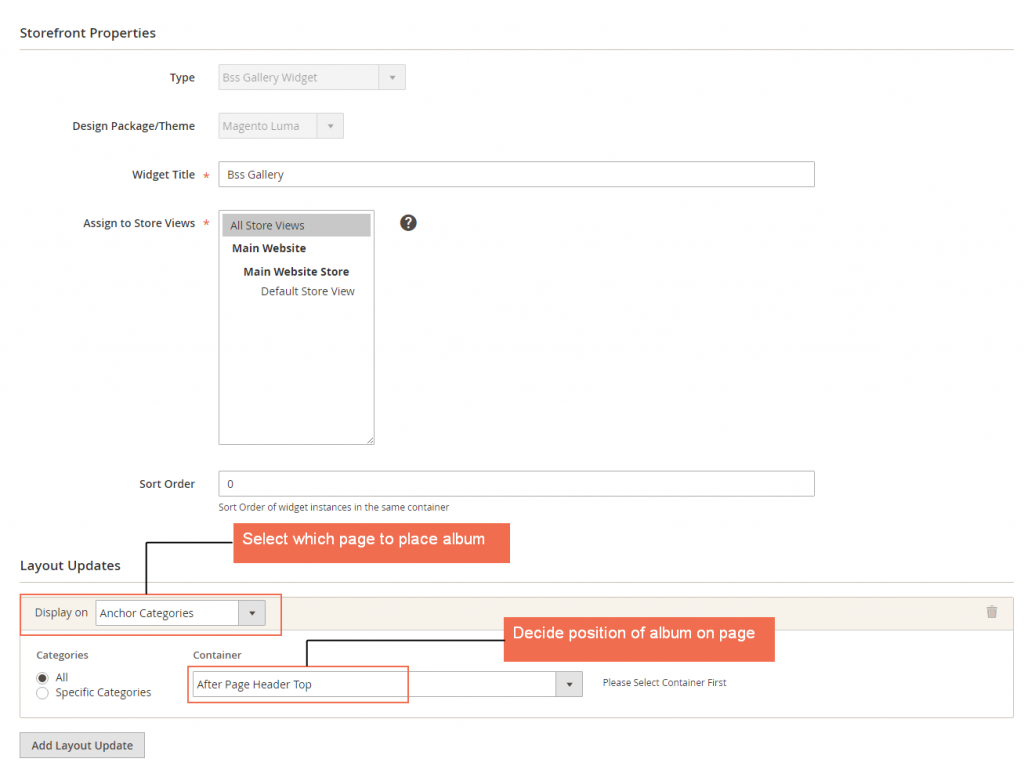
- In Storefront Properties, choose a title for the widget in Widget Title, and pick which store view to place widget
In Layout Updates, you can configure the following field.
- Display On to choose which category/product type/page for gallery displaying
- Container to choose an option among the available list of positions in the drop-down to place the widget on the page.
*Note:
- Only CMS pages of default Magento are displayed as the options in Layout Updates, the admin-created CMS page does not appear in the Specific Page list.
- To add a gallery album to these custom pages, in the page management grid, select Edit page > Insert Widget > Bss Gallery Widget.

2.3.2 Widget Options
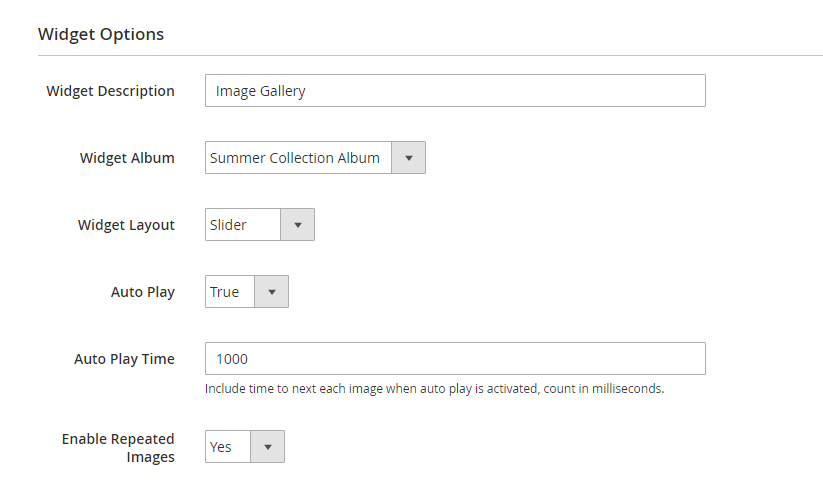
- In Widget Description, write a description for the widget.
- In Widget Album, choose which album to be displayed on the widget.
- In Widget Layout, choose one of the 2 layout types for the widget including slider and standard.
- If choose Slider for Widget Layout, select True to enable Auto Play, otherwise select False, then fill out the Auto Play Time if needed.
- In Enable Repeated Images: choose Yes to allow repeating images; otherwise choose No. If you select No, there appears the two following cases:
+ The number of images is less than or equal to 5: customers cannot click Next/Previous.
+ The number of images is greater than 5: there is an image slider but images cannot be repeated.
