
1. Overview
Keep improving your Magento 2 store to enhance customer experience and convince them to transact.
Use our Best Magento 2 Extension Combo to boost your company's performance without any effort.
What to expect?
2. How Does It Work?
2.1. Magento 2 Convert Images to WebP
2.1.1. General Settings
Please go to Stores ⇒ Configuration ⇒ BSS COMMERCE ⇒ Convert Image Webp ⇒ General Configuration.
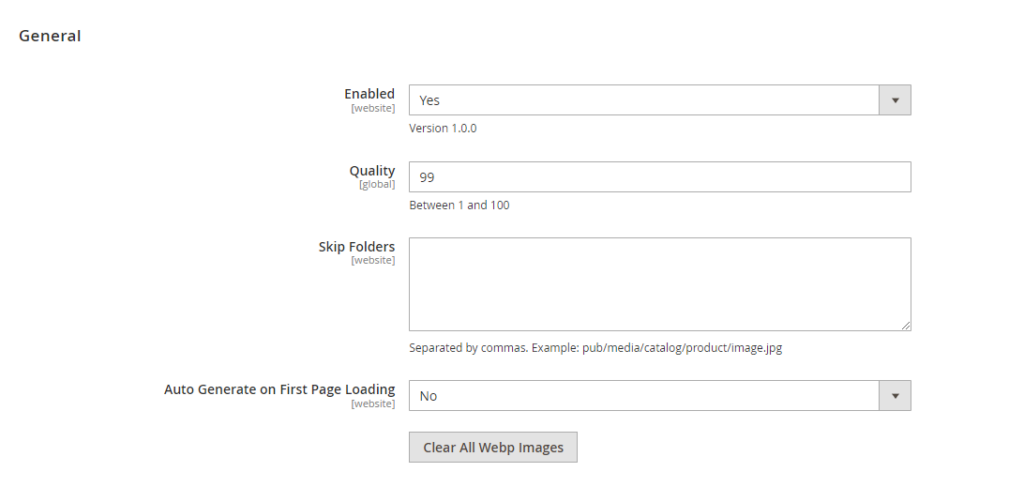
- In the Enabled section, choose:
- Yes: Enable Magento 2 webp online converter module. It starts the automatic conversion of webp image display in the frontend. - No: Disable the module. You don't want the automatic conversion and display of webp images in the frontend.
- Quality: The higher this value is, the higher the image quality will become. Our webp quality default is 75. * Note: This configuration can only be applied when uploading images or running commands., which means that the webp image quality displayed on the frontend will not depend on this value.
- Skip Folders: You can pick the image folders that you do not allow automatic conversion to webp images in the frontend. Enter the relative path of an image in its original format (jpg, png..).
- Auto Generate Webp Image: Choose "Yes" to automatically convert images to webp format when loading pages that have images in jpg, jpeg, or png format. Choose "No" to keep images in jpg, jpeg, or png format.
- Clear All Webp Images: Delete all webp images that the module generated (used when updating new quality)
Note: In case you want to update quality using command, you can run php bin/magento bss_c_i_w:convert [<path>] [<quality>], with [<path>] is the image location and [<quality>] is the new quality index. (e.g. php bin/magento bss_c_i_w:convert pub/media 80). With this cmd, you would not need to wait for the system to delete old webp images.
2.1.2. Choose the place on-site to convert to webp images
Magento 2 Convert images to webp enables you to choose the pages you want the webp image online converting. There are 4 main places: Product Page, Category Page, Home Page, CMS Page.
Product Page
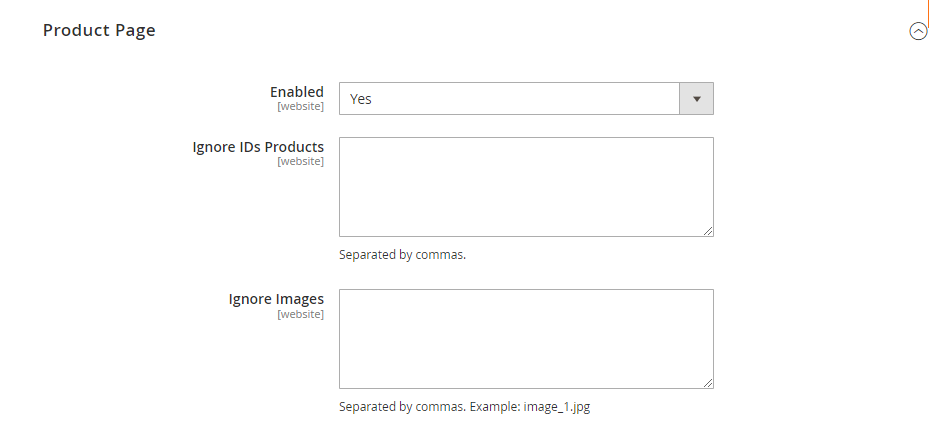
- Switch Enabled to Yes to enable the process of converting images to webp automatically at the Product Pages.
- Ignore IDs Products: For Product IDs inputted here, in the frontend, images in those product pages will be shown in the original format.
- Ignore Images: Input the image name in the original format. It's possible to input many images, each of them is separated by commas. The inputted images will be shown in the original format. This configuration is used when admin wants to display images with full size and quality on the frontend, which does not require to convert images into .webp format. * Note: In case you upload an existing image, Magento will auto-change the image name. So, please make sure to input the exact image name.
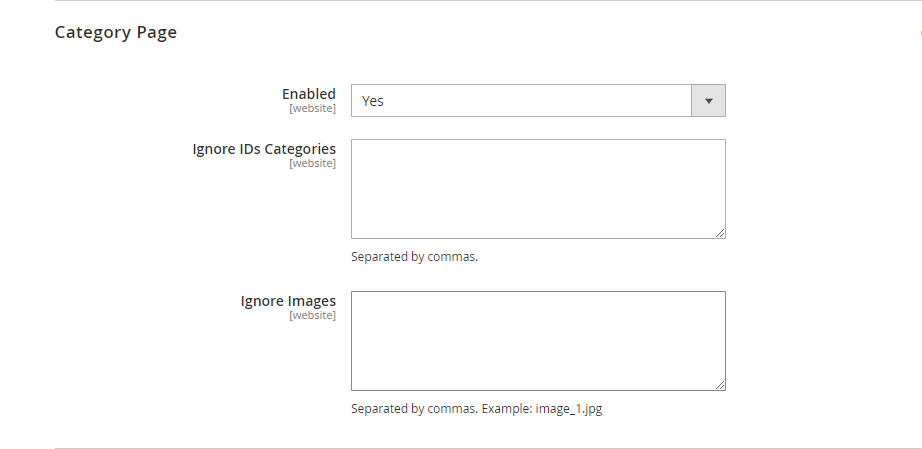
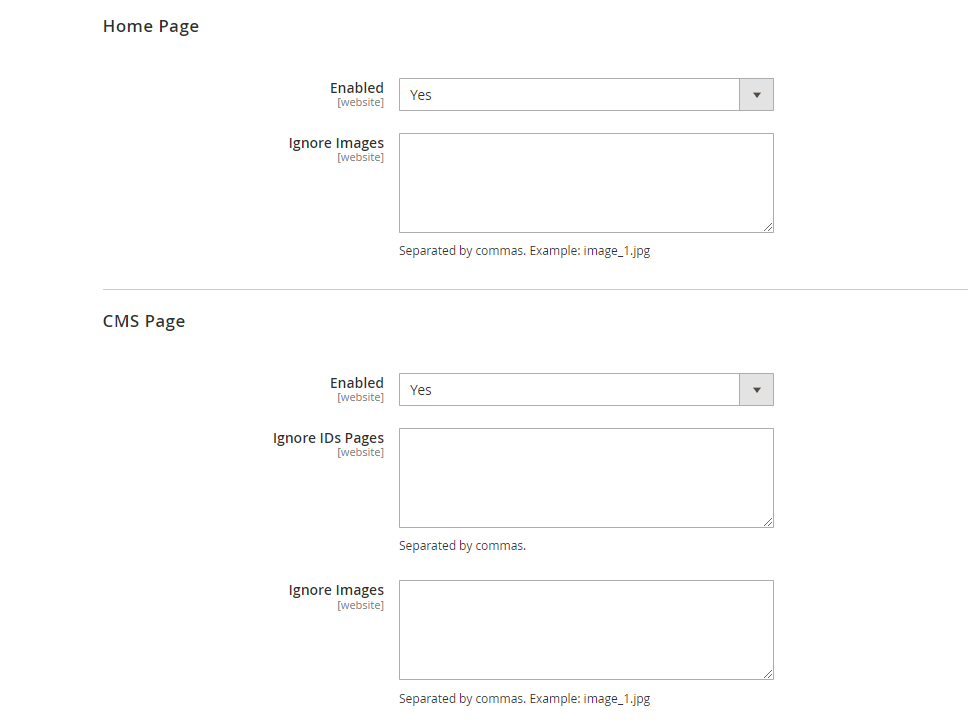
The same configurations are applied to the other page types.
Category page
Home Page & CMS Page
2.2. Magento 2 Social Login
Please go to Store ⇒ Configuration ⇒ BSS COMMERCE ⇒ Ajax Social Login.
2.2.1. General
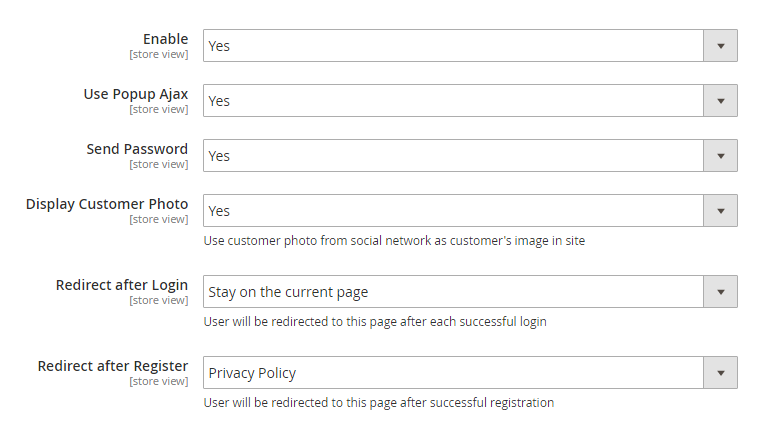 In Enable, choose Yes to enable the extension or No to disable it. In Use Popup Ajax, choose Yes to enable popup for login and register. Otherwise, choose No to disable it. In Send Password, choose Yes to send customers an email that contains the password after they login using a social account. The customer then can use their email and password to log in to your site. Choose No to disable it. In Display Customer Photo, choose Yes to display the customer’s profile photo from the social account they used for signup, or choose No to not display customer’s social photo. In Redirect after Login, select the page on site or any particular URL you want to redirect after customer login successfully. In Redirect after Register, select the page on site or any particular URL you want to redirect after customer completed register process.
2.2.2. Social Button Block
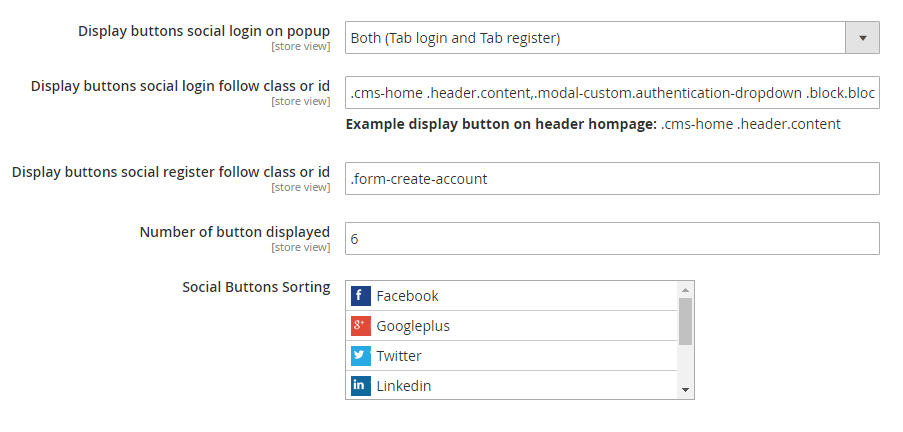 In Display buttons social login on popup, decide to display social buttons on Login tab or Register tab of popup, or place it on both tabs. In Display buttons social follow class or id, enter class/id to place social button social login on. In Display buttons social register follow class or id, enter class/id to place social button social register on. In Number of button displayed, set the restriction of number of buttons to display on social login block. In Social Button Sorting, decide the arrangement of buttons in social login block.
2.2.3. ReCaptcha
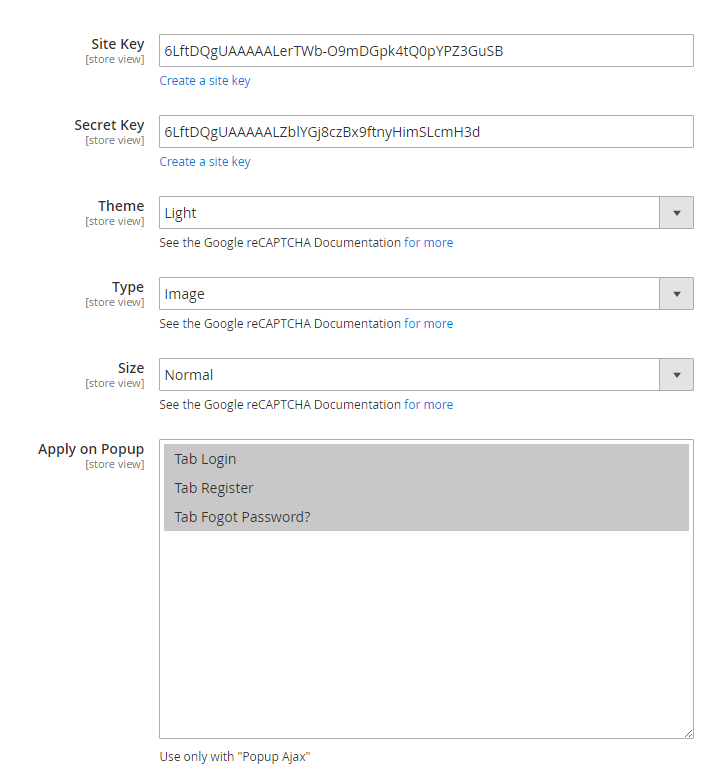 In Site Key and Secret Key, click “Create a site key” and register reCaptcha.
 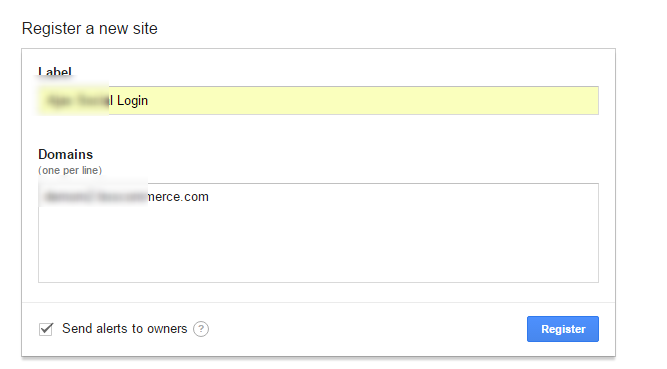 After registering, you will get the Site key and Secret key as below:
 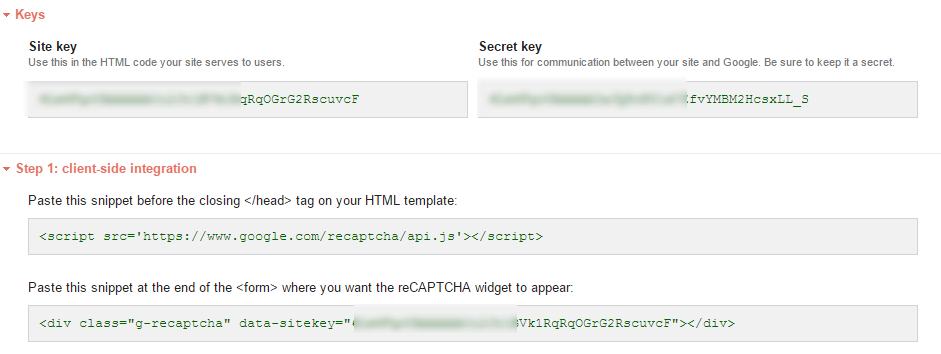 In Theme, choose the theme of reCaptcha between: Light:
 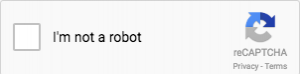 Dark:
Dark: 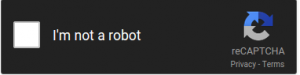 In Type: Choose the type of robot checking between Image and Audio In Size: Choose the size of reCaptcha widget between Normal and Compact. In Popup Form: Choose the form(s) of popup on site to place the reCaptcha widget. A form of popup includes Login, Register and Forgot Password?
2.2.4. Configure specific social account
2.2.4.1. Facebook
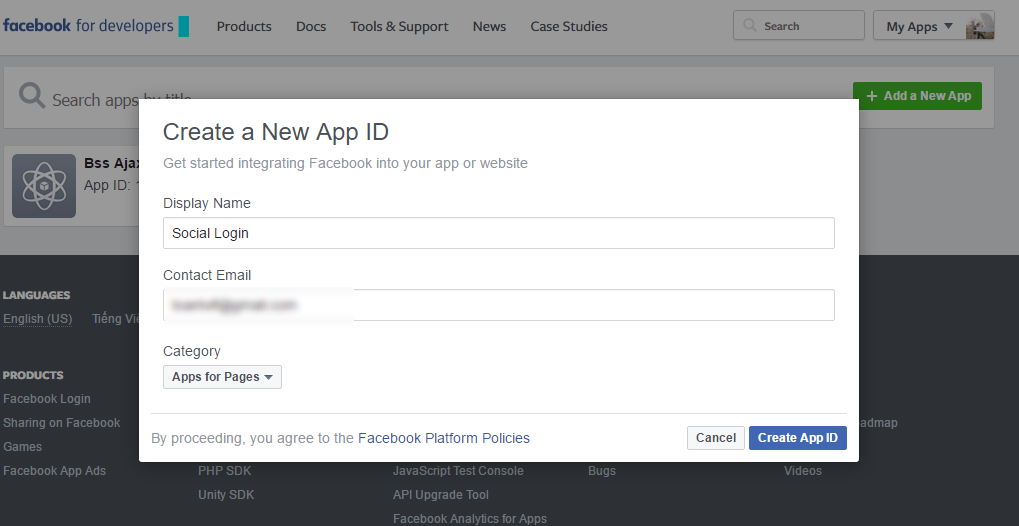
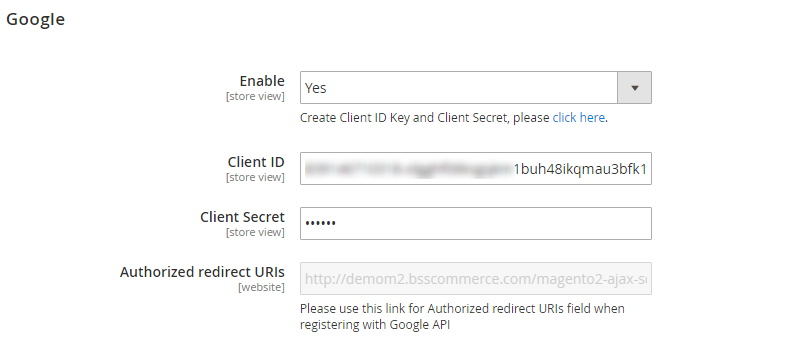
Take Facebook account as the example: 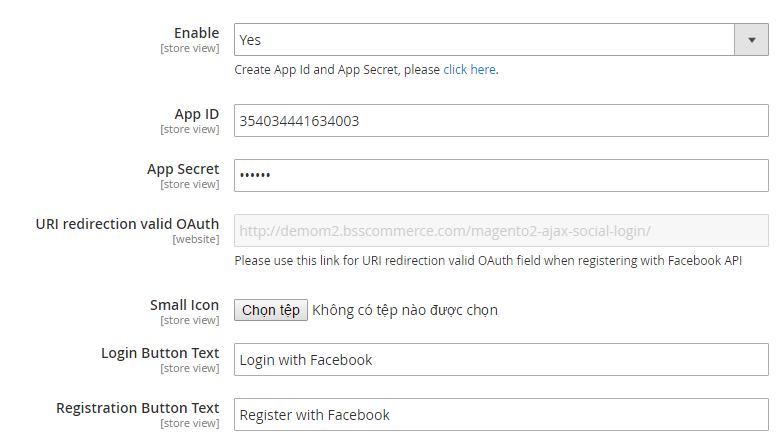 In Enable, choose Yes to enable Facebook account for login and register on the site, or choose No to disable it. In App ID and App Secret, click on “click here” below Enable dropdown box, you will be redirected to a page to set up new API like below.
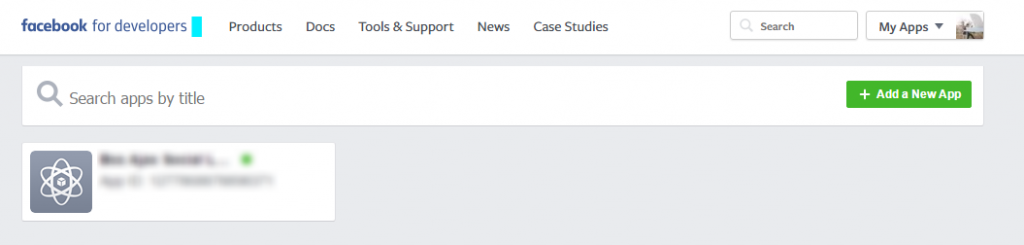
 After completing register step, you will see a page as below. Click on Get Started in Facebook Login.
 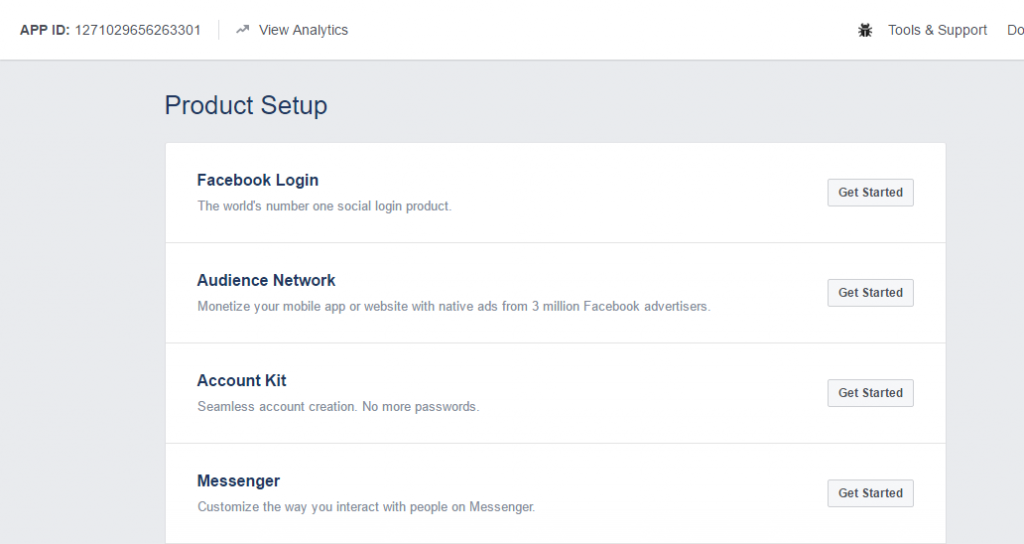 Click on Dashboard, you will see your App ID and App Secret - copy them and paste correspondingly into App ID and App Secret box in the backend configuration.
 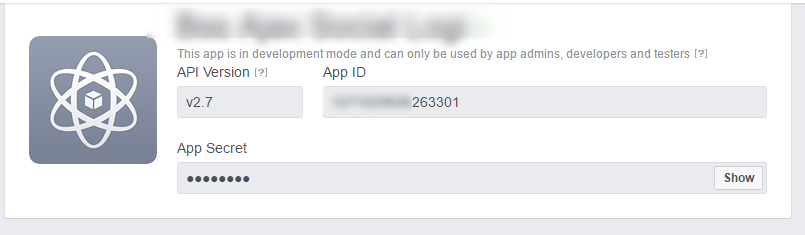 In URI redirection valid OAuth– copy the Valid OAuth redirect URIs like below and paste into the box URI redirection valid Oauth.
 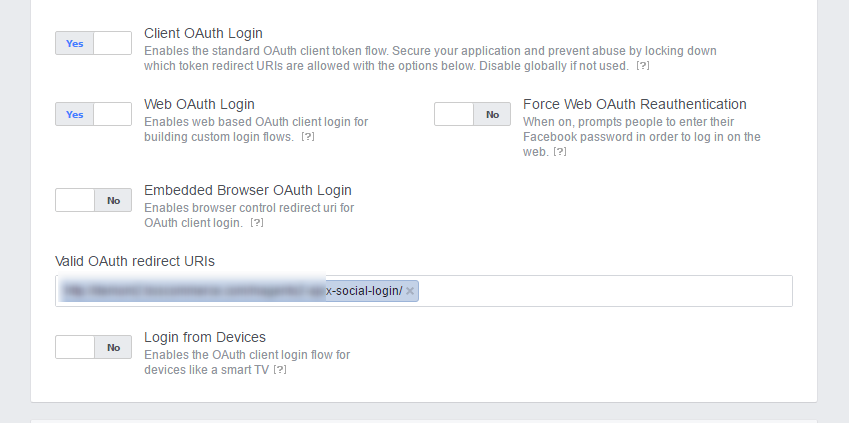 In Small Icon, upload the file for the icon of this account displayed in the frontend. In Login Button Text, customize the text in social login button. In Registration Button Text, customize the text in social registration button. Note: In case you run into the error “Blocked URL” use URI at the link to re-setup the configuration, as follow:
 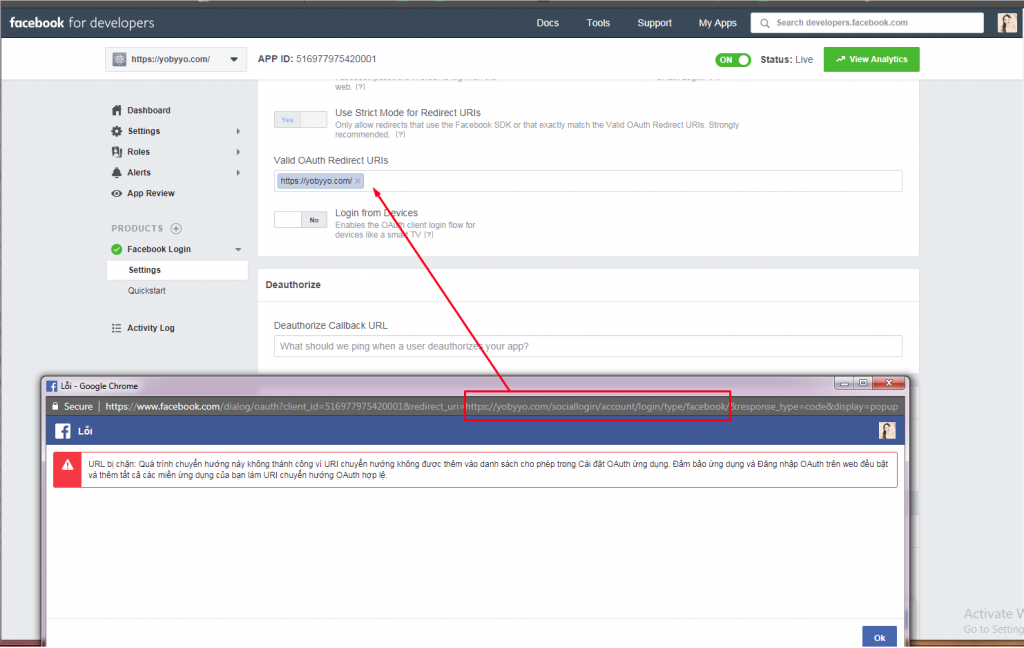 For other social accounts, follow similar steps like the setting for Facebook:
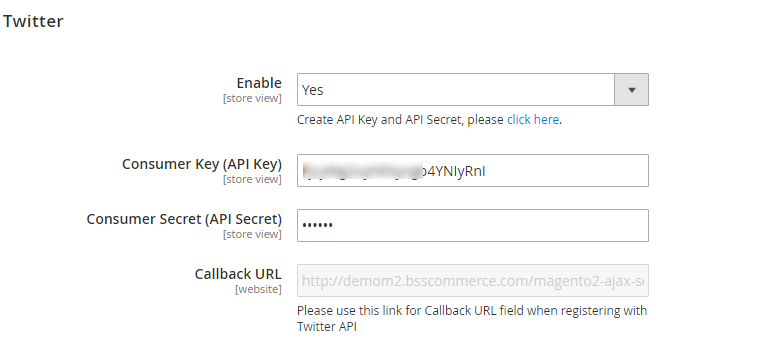
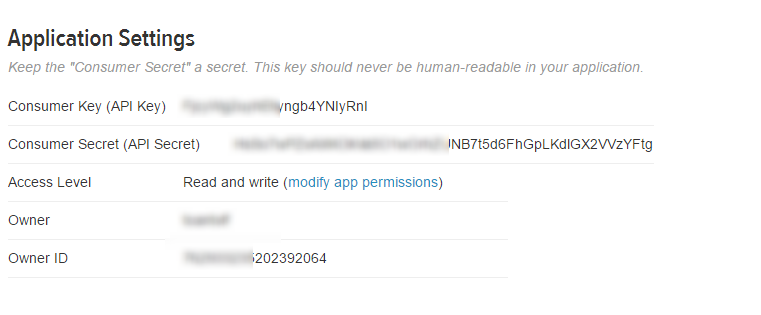
2.2.4.2. Twitter
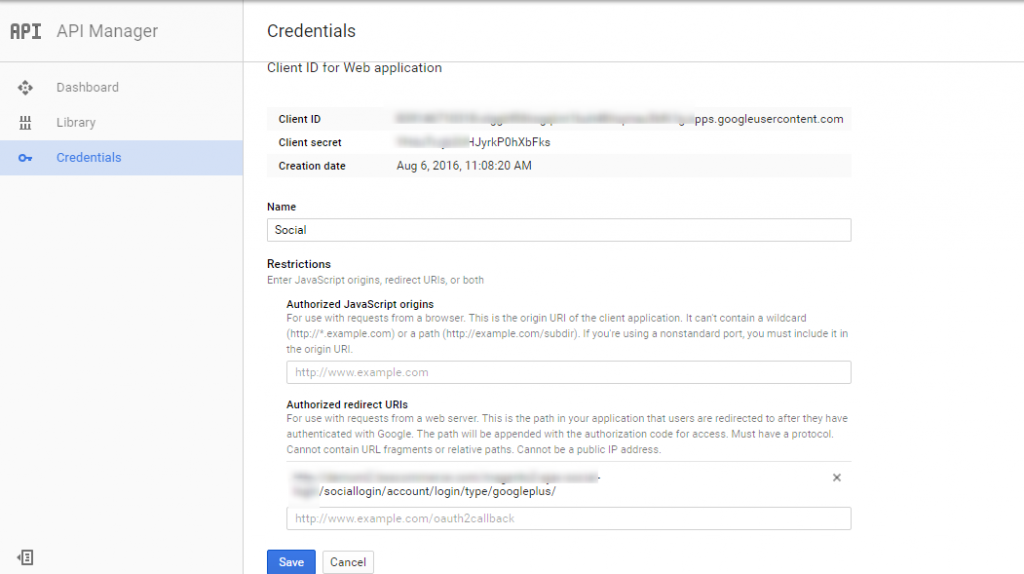
2.2.4.3. Google
2.2.4.4. LinkedIn
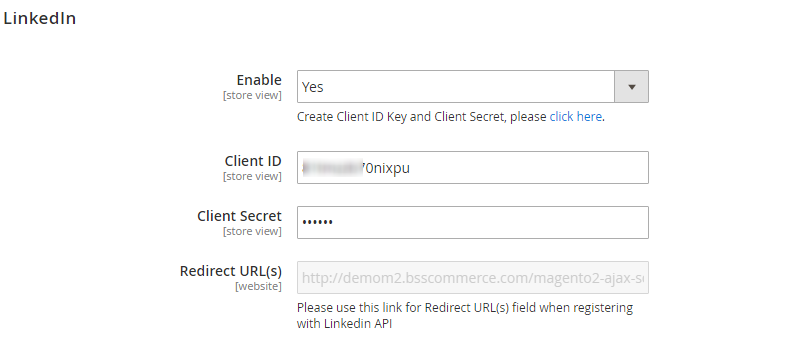 To get Client ID, Client Secret and Redirect URL, please click on "click here" link and follow steps as below: + Create new application:
 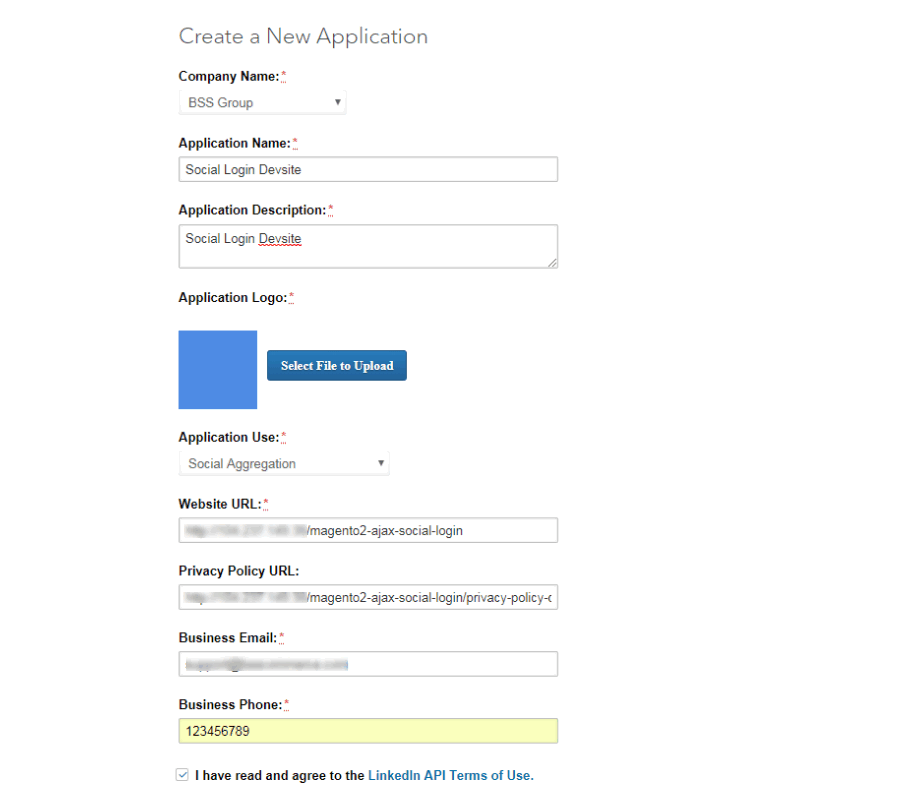 + Set up Authentication for application: You get Redirect URLs in this step:
 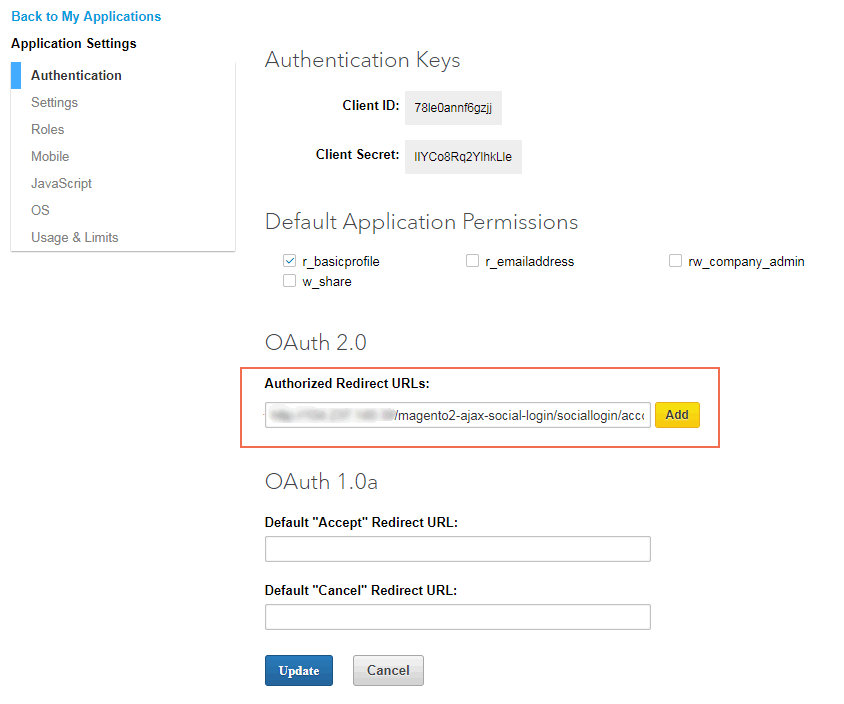 + Copy Client ID and Client Secret to the configuration:
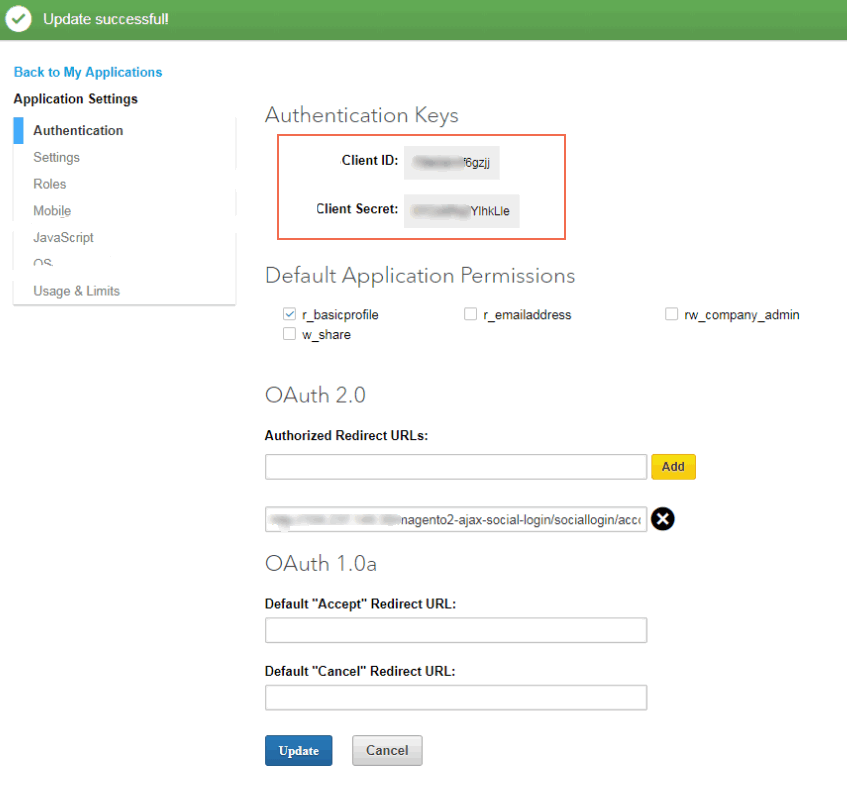
2.2.4.5. Window-Live
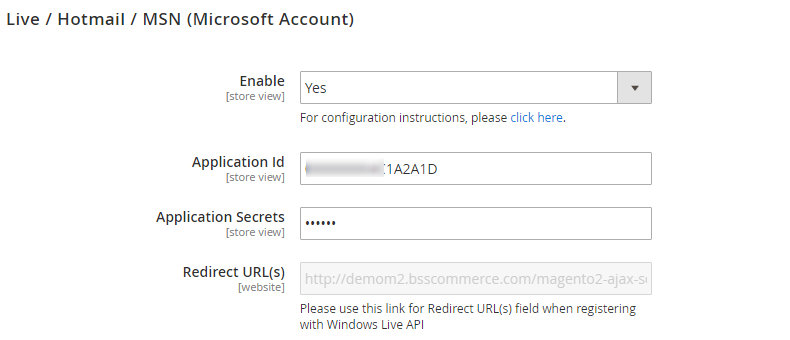 To get Application ID, Application Secret and Redirect URL, please click on "click here" link and follow steps as below: + Click on "click here" link to be redirected to Microsoft App register page:
 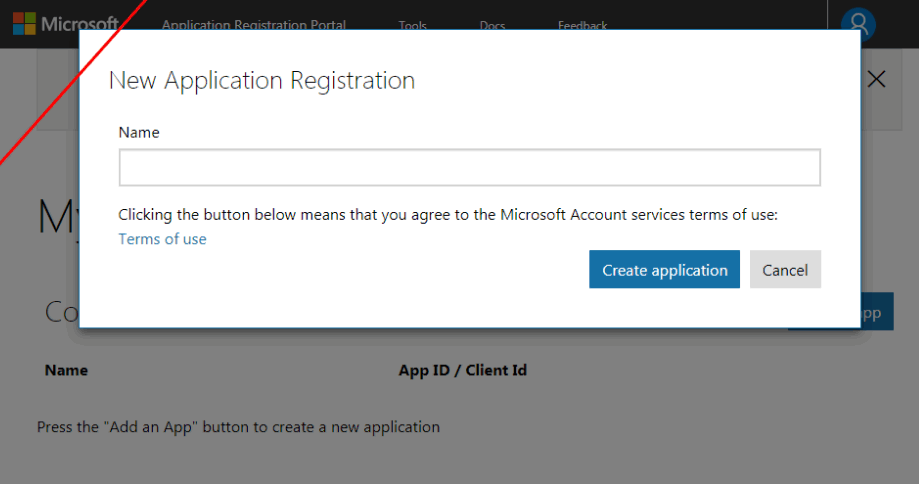 + Copy & Paste Redirect URL(s) to the app detail page:
 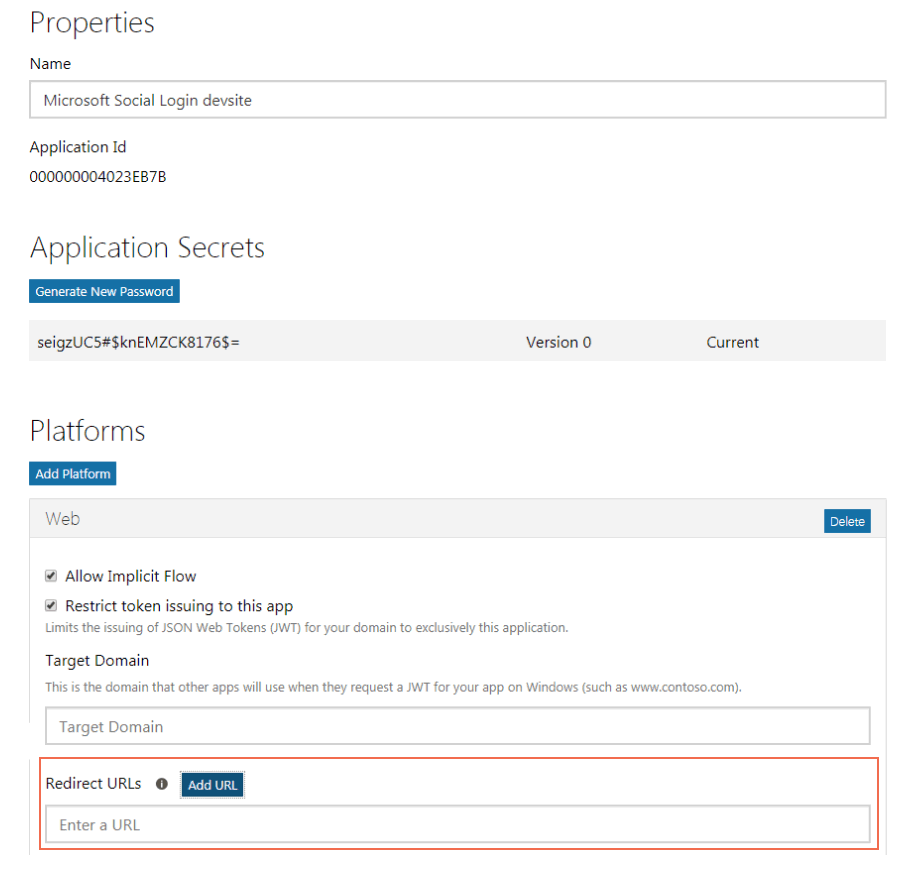 + Copy & Paste Application Id and Secret to Social Login configuration:
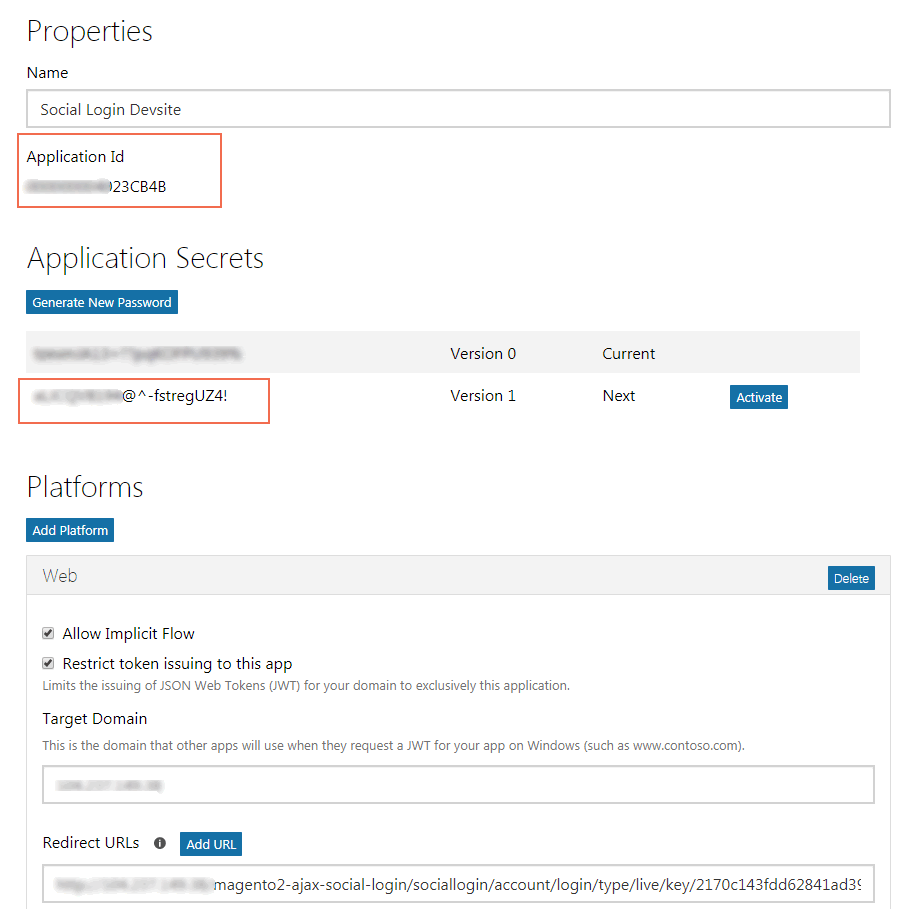
2.2.4.6. Instagram
Note: You need to edit the email after the 1st login. 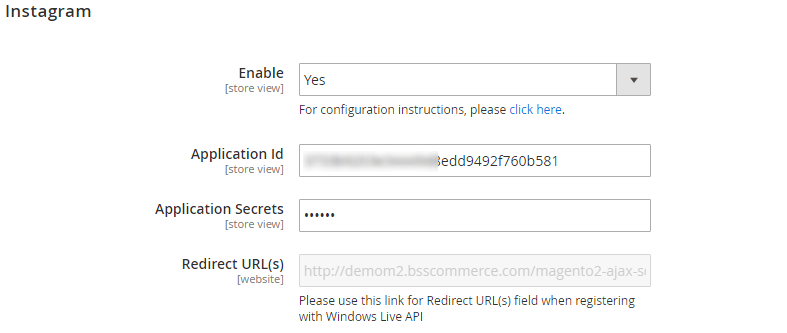 To get Application ID, Application Secret and Redirect URL, please click on "click here" link and follow steps as below: + Create New Client ID:
 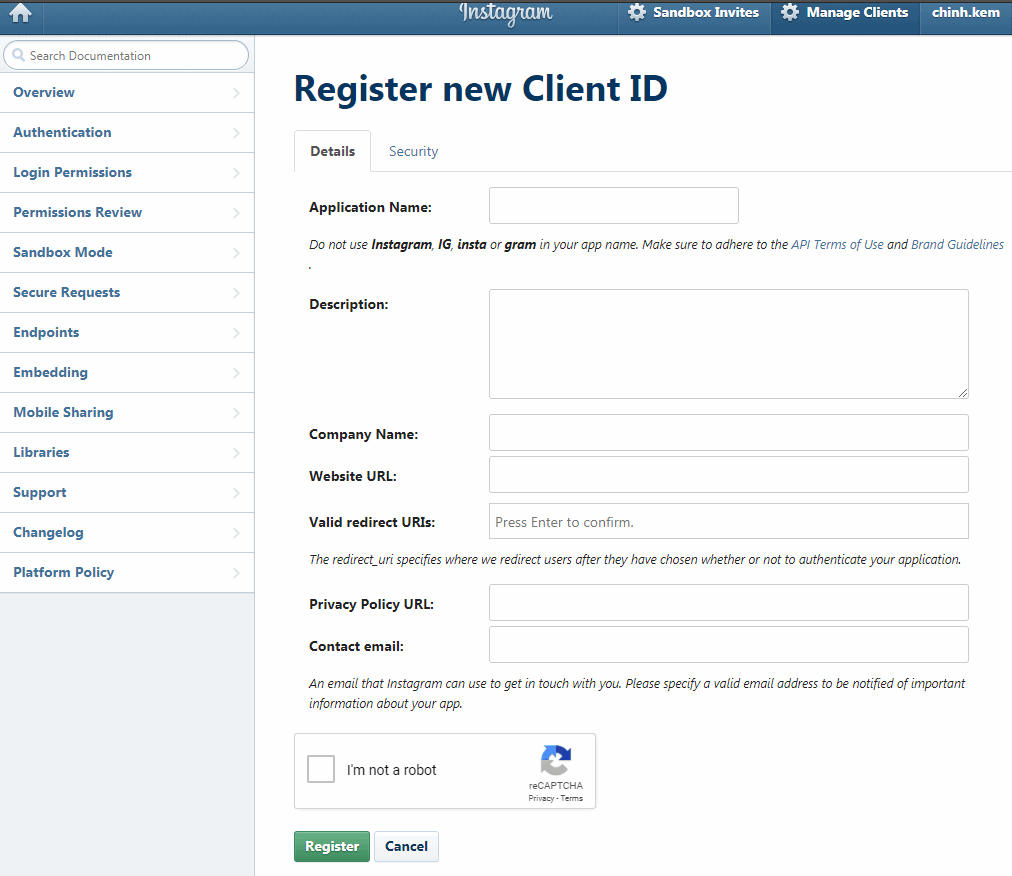 + Fill in web information:
 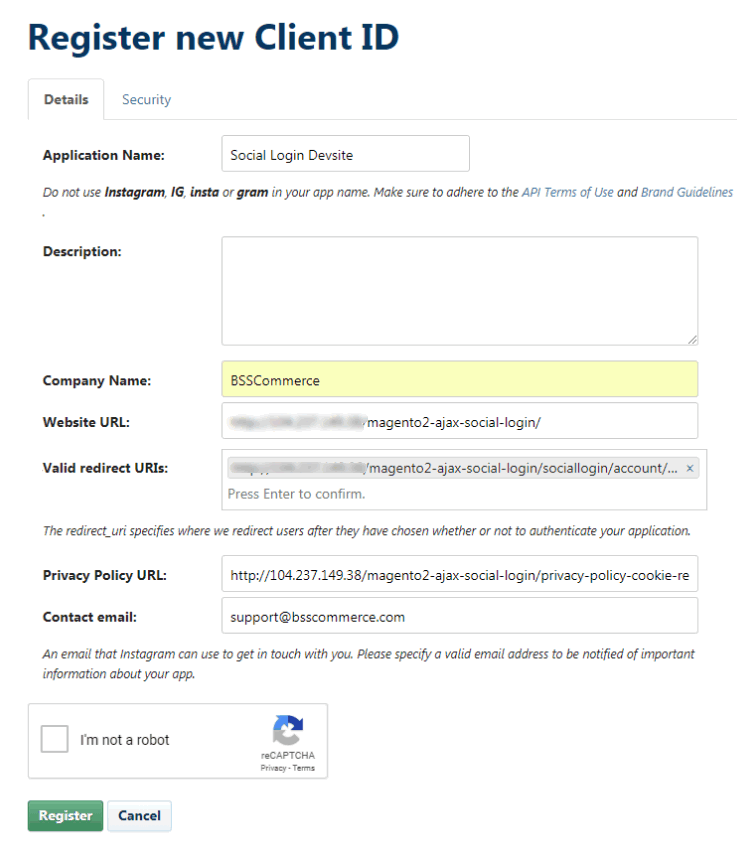 + Get Client ID and Client Secret:
 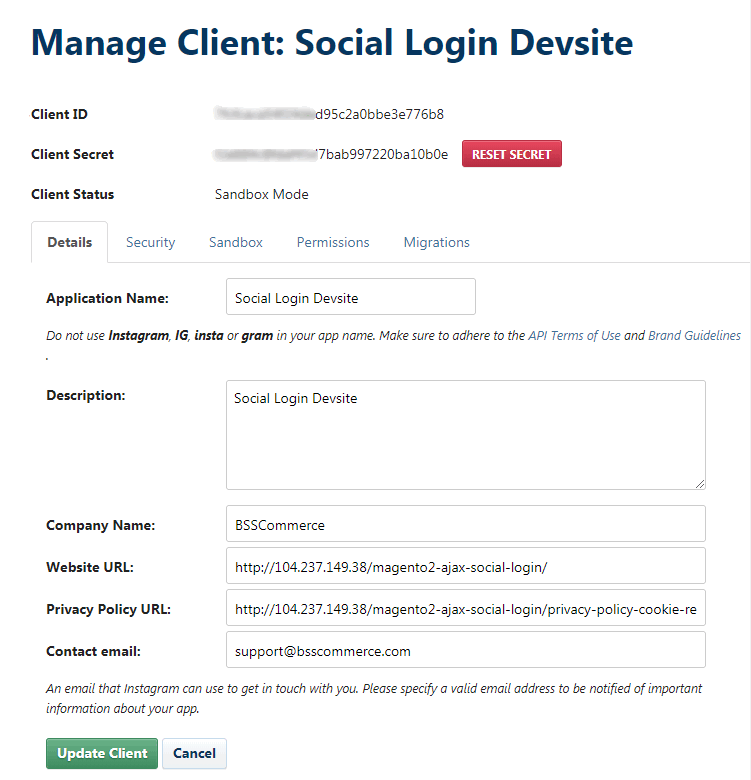 *Note: - Client status must be Authorized, then you can get the real Instagram account. In case you use sandbox mode, sandbox account is only accepted. - Sometimes, you might face up to the error like this.
 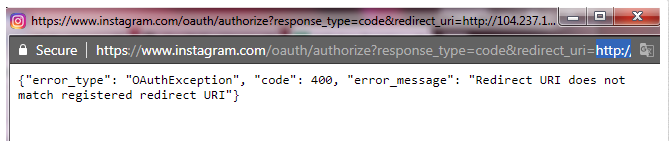 The solution is to copy the Redirect URIs and paste it in the client info page:
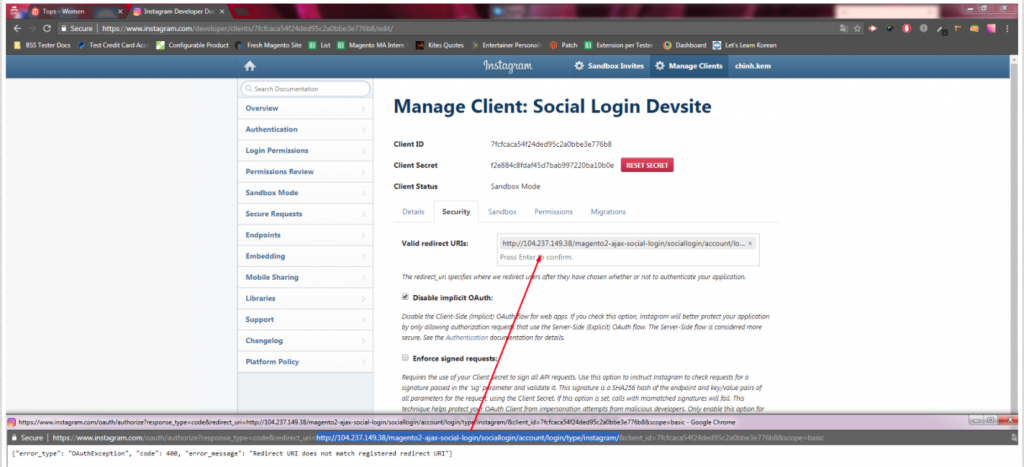
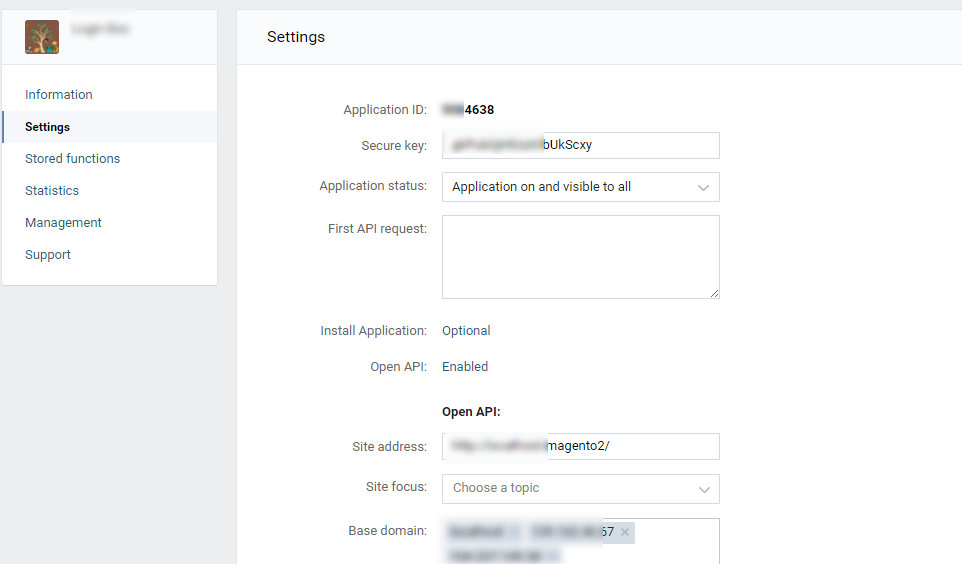
2.2.4.8. Vkontakte
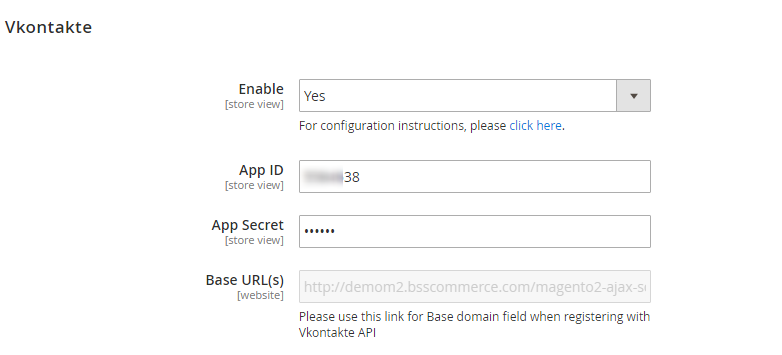
 Finally, click Save Config and to complete setting process.
2.3. Magento 2 Layered Navigation
Before going into details of the configuration, we want to remind you about some terms we will use in the User Guide. About Attributes: Attributes are the building blocks of your product catalog, and describe specific characteristics of a product. There are 2 terms will be used in the User Guide: Attribute Block and Attribute Option. 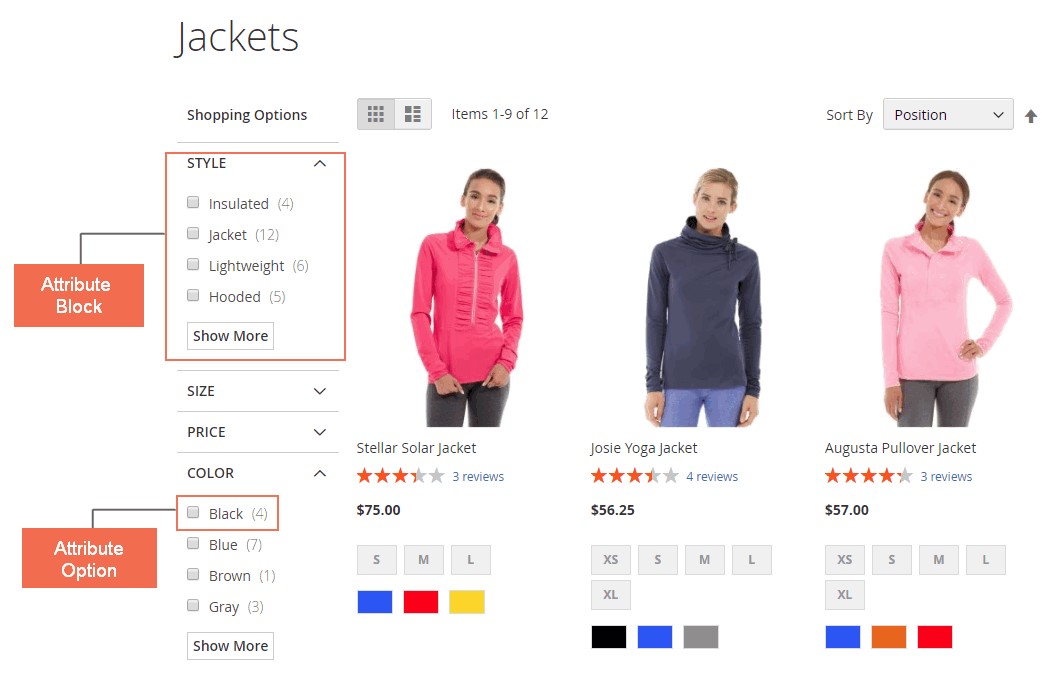
2.3.1. Layered Navigation Configs
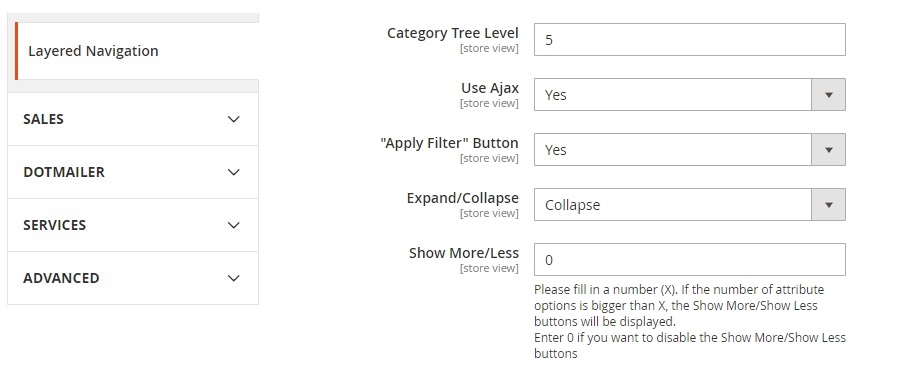
Please go to Stores ⇒ Configuration ⇒ BSSCOMMERCE ⇒ Layered Navigation and start configuration.
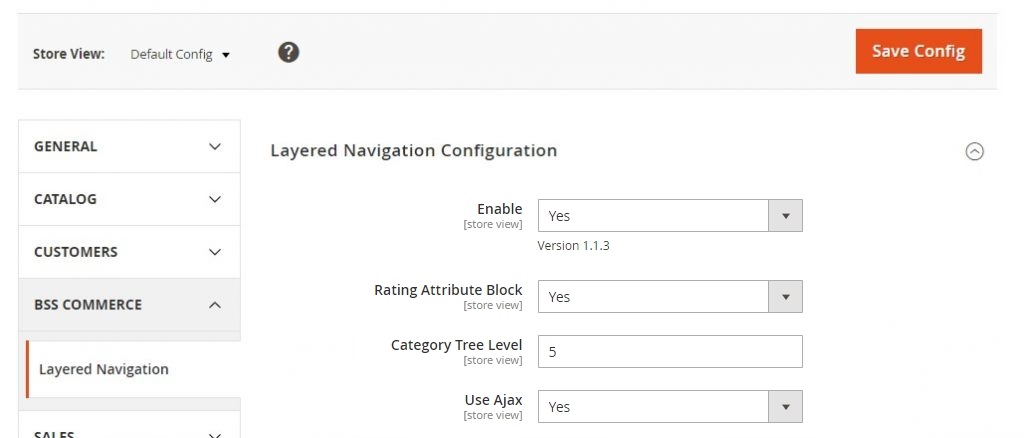
In Enable, choose Yes to enable the module, otherwise choose No. In Rating, choose Yes to enable filter by rating attribute, otherwise choose No. Multiple select is disabled for rating attribute block, and users can only select one rating attribute option at a time.
In Category Tree Level, enter the number of category tree level to be displayed in Category attribute block. Enter 0 to display the default Category. Let’s take the following example: 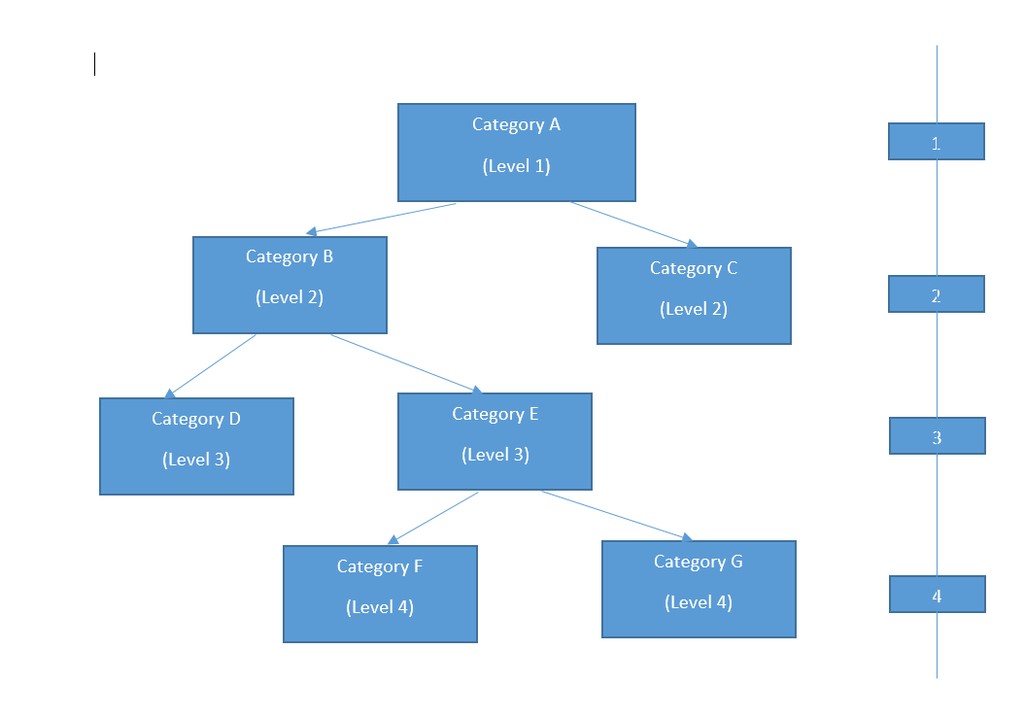
- If you enter 0: only show category A
- If you enter 1: show category A and sub-categories of the category A (B and C)
- If you enter 2: show category A, B, C and also sub-categories of category B.
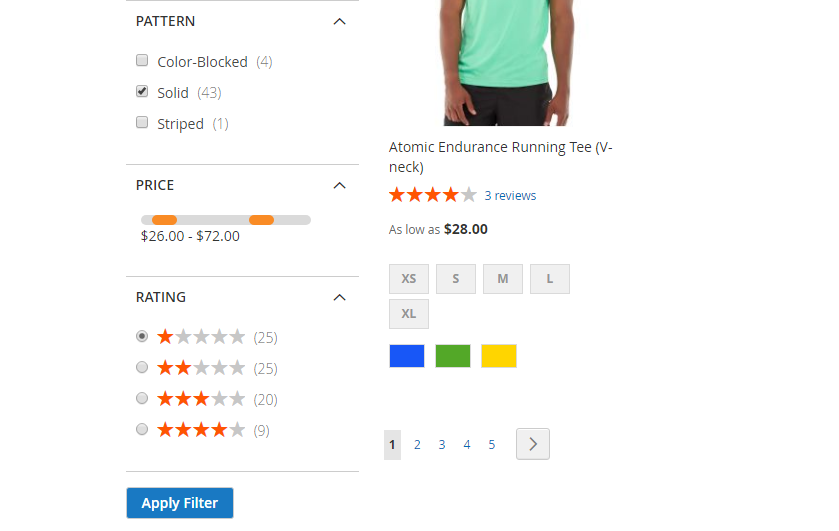
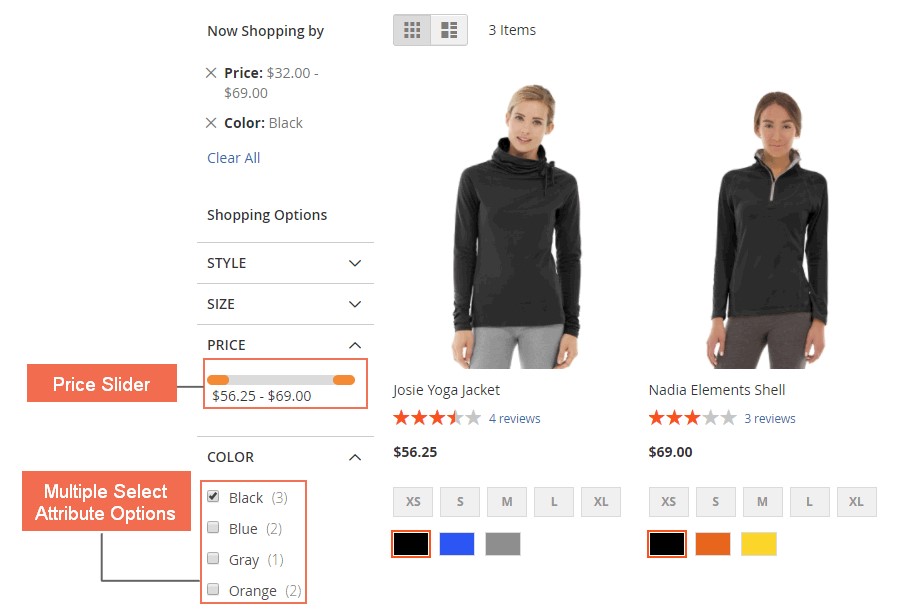
In Use Ajax, choose Yes to enable loading layered navigation result by Ajax, otherwise choose No. In Apply Button, choose Yes to display Apply Filter button on the frontend, otherwise choose No. If you choose Yes: customers can select wanted attribute options, and click Apply Filter button. Then, customers can get corresponding search results with their selected options. For example:
- Customer select options as below:
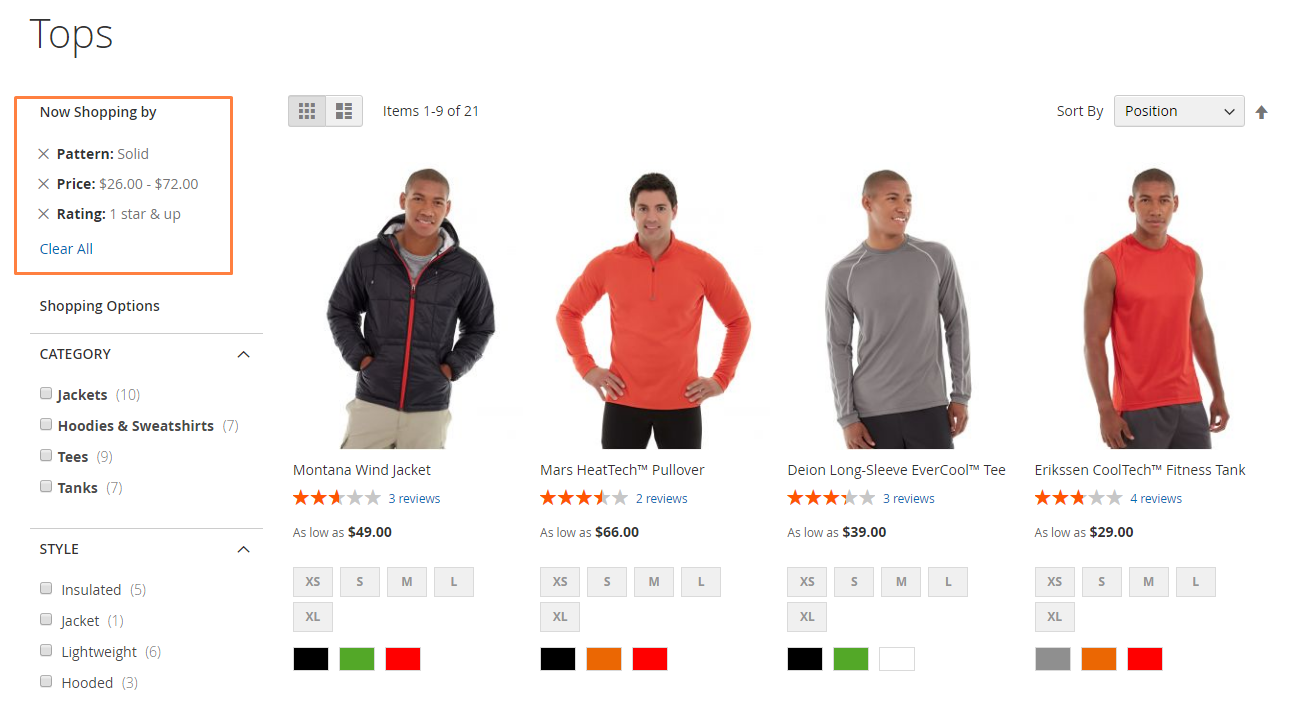
- Results are generated:
 To clear filters, customers click to Clear All. *Note: We will have some logic for filtering here:
-
- Filter by category: If you select 2 categories, only products belonging to either of 2 categories are displayed in the filter results (OR condition).
Eg: You select Jackets and Tees categories. Product A belongs to Jackets. Product B also belongs to Tees
→ Hence, product A and B will be displayed after filtering.
- Filter by attribute input type (Multiple select, Dropdown, and Swatch):
If you choose 2 options in an attribute, the results will show all products satisfying 1 or 2 of these 2 options (OR logic).
Eg. You select Insulated and Hooded in the style option. After filtering, you will get all products with Insulated OR Hooded style.
If you choose 2 options in 2 different attributes, the results will show all products satisfying both of these 2 options (AND logic).
Eg. You select Mesh and Fleece in the material option and select XS in the size option. After filtering, you will get all products with Fleece OR Mesh material AND with size XS.
- Filter by Price: you are allowed to filter Price by the only one range.
Eg: you can filter products with price from $20 to $50. It is impossible to filter products with 2 price ranges: $20-S50 and $70-$100.
Note:
+ Function Filter by price DOES NOT depend on the config default Price Navigation Step Calculation - set up 3 options in the configuration will not result in bug of displaying price in Layer Navigation.
+ If Price is set to be seen as List, the price range will not be influenced by default config set up at Configurations. However, it will get influenced by the config "Layered Navigation Price Step" set up at the backend Category page.
- Filter by Rating: you are allowed to filter by the only one rating option.
In Expand/Collapse, choose Expand to expand the attribute options after loading the page or filtering results. Choose Collapse to collapse the attribute options. In Show More/Less, fill in a number (X). If the number of attribute options is bigger than X, the Show More/Show Less buttons will be displayed. Enter 0 if you want to disable the Show More/Show Less button. 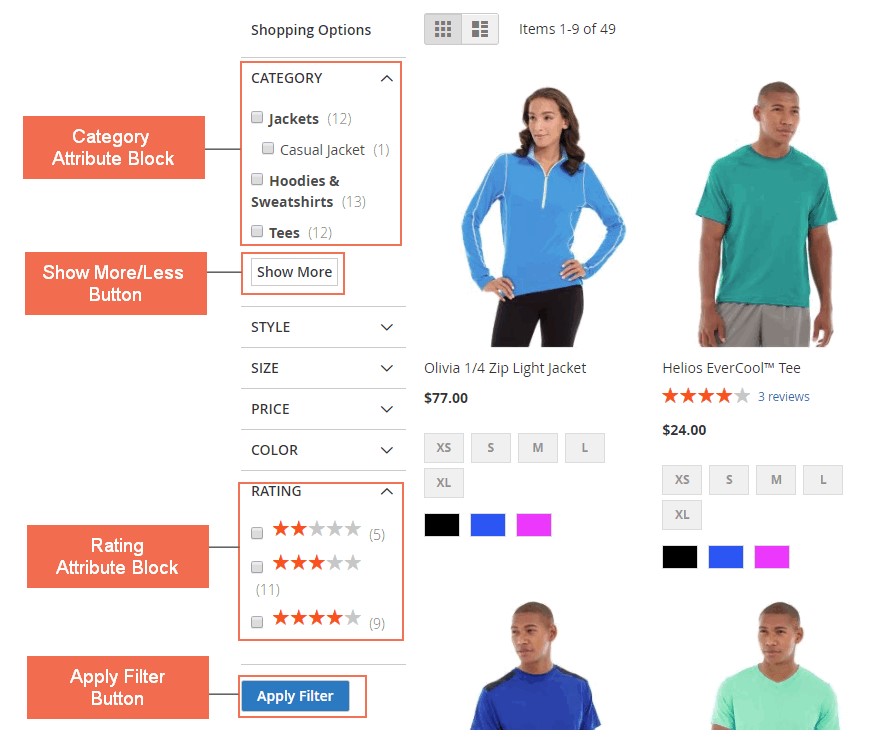
2.3.2. Product Attribute Settings
Please go to Stores ⇒ Attributes ⇒ Product Edit Product Attribute and start configuration. 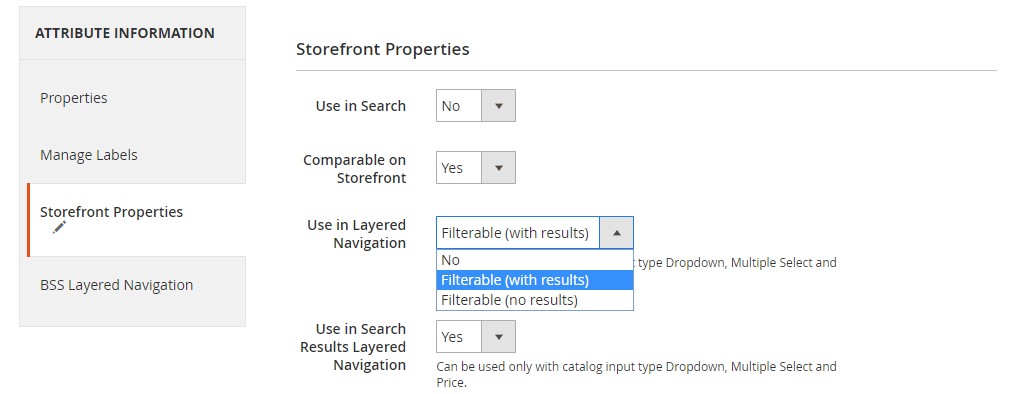
2.3.2.1.Storefront Properties
In Storefront ⇒ Properties Use in Layered Navigation, choose one of the two options below
- Filterable (with results): Layered navigation includes only those filters for which matching products can be found. Any attribute option that already applies to all products shown in the list does not appear as an available filter. Attribute options with a count of zero (0) product matches are also omitted from the list of available filters.
- Filterable (no results): Layered navigation includes filters for all available attribute options and their product counts, including those with zero (0) product matches. If the attribute option is a swatch, the value appears as a filter, but is crossed out.
Please note that Use in Layered Navigation is only available to catalog input type Dropdown, Multiple Select and Price.
2.3.2.2. Storefront Proper
Go to Attribute ⇒ Information ⇒ BSS Layered Navigation to start configuration.  In Display Option Settings, there are 8 display options to choose. But the options are available to specific catalog input types, here are how you can set up.
| Display Option | Catalog Input Type |
| Label with checkbox | Multiple Select + Dropdown |
| Label with radio box | |
| Visual swatch | Dropdown |
| Visual swatch with label | |
| Text swatch | |
| Price slider (from-to) | Price |
| Price range (automatic calculator) | |
| Price input box (from-to) |
 In Show More/Less, there are 2 options:
- No: disable Show More/Show Less button of the attribute block.
- Use General Setting: follow the general settings at Stores Configuration ⇒ BSSCOMMERCE Layered Navigation ⇒ Show More/Less.
In Expand/Collapse, there are 3 options:
- Expand: expand the attribute options after showing filtered results.
- Collapse: collapse the attribute options after showing filtered results.
- Use General Setting: follow the general settings at Stores ⇒ Configuration BSSCOMMERCE Layered Navigation ⇒ Expand/Collapse.
Click Save and flush the cache to complete the configuration. NEW UPDATE: Show/hide count in the layer by following this path config Catalog > Catalog > Layered Navigation > Display Product Count.
2.4. Magento 2 Popup
2.4.1 General Configuration
 Please go to Stores ⇒ Configuration ⇒ BSSCommerce ⇒ Pop-up General Configuration. In Enable, choose Yes to enable the extension, or No to disable it.
2.4.2 Manage Pop-up Grid
Go to Marketing ⇒ BSSCommerce ⇒ Pop-up ⇒ Manage Pop-up. 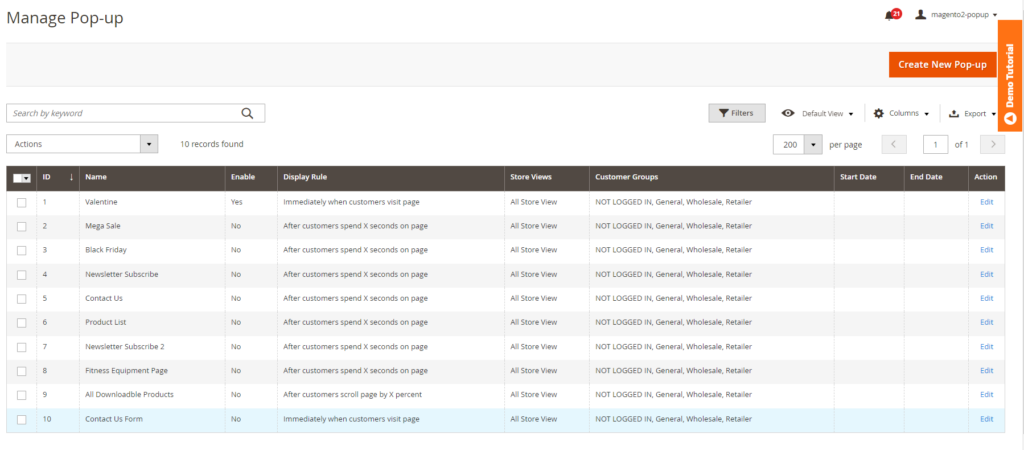 Manage Pop-up grid shows all pop-up you have created with full information, including Pop-up Name, Enable, Display Rule, Displayed Pages, Content, Store Views, Customer Groups, Start Date and End Date. The Manage Pop-up grid works just like standard grid in Magento 2 default with features such as mass action (delete, enable, disable), filter and column display.
2.4.3 How to Create New Pop-up
Please click on the Create New Pop-up button located on the top right of the grid. You will be redirected to the New Pop-up Page, which has 3 tabs:
- General
- Display Rule
- Content and Design
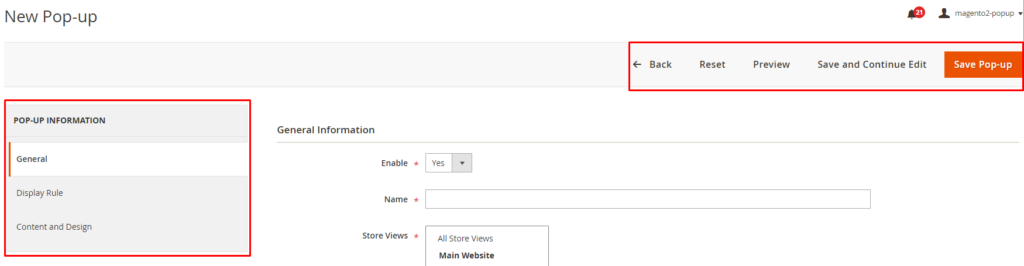 There are 4 buttons to support creating a new pop-up:
- Back
- Reset
- Save and Continue
- Save Pop-up
2.4.3.1 General
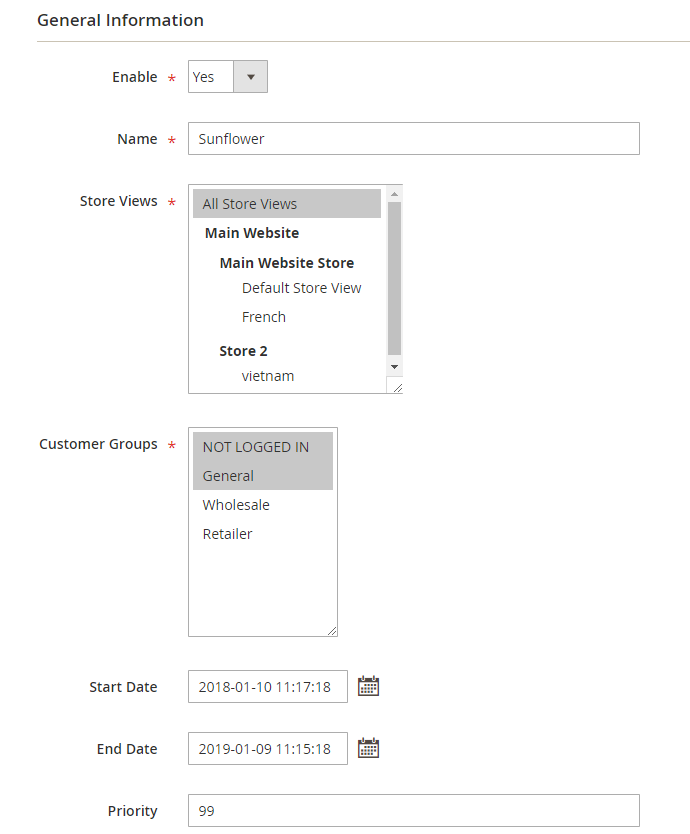 In Enable, choose Yes to enable the new pop-up. In Name, enter the pop-up’s name. In Store Views, select which store views to display the pop-up. In Customer Groups, choose the customer groups to view pop-up. In Start Date, select a date in the calendar view to begin showing the pop-up. In End Date, select a date in the calendar view to stop displaying the pop-up. In Priority, enter a number to decide the priority of the pop-up when multiple pop-ups are created on a page.
2.4.3.2 Display Rule
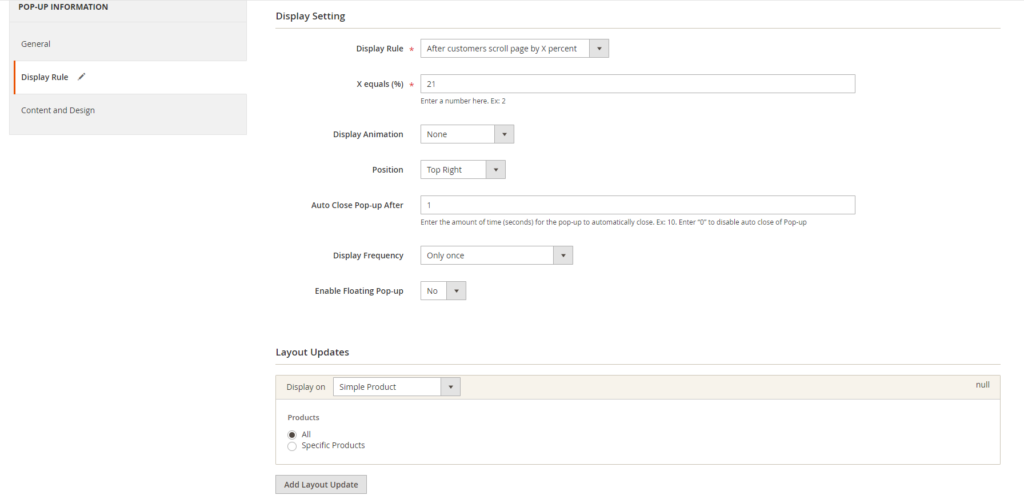 In Display Rule, choose one of the four following conditions to set conditions for displaying the pop-up:
- After customers spend X seconds on the page.
- After customers scroll page by X percent.
- After customers view X pages.
- Immediately when customers visit the page.
- Exit Intent
In X equals, enter a number to decide the value of X. In Display Animation, choose one of the six following options to set display effects for the pop-up:
- Zoom
- Horizontal Move
- Move from Top
- 3D Unfold
- Zoom-out
- None
In Position, select the position to display the pop-up on the page.
- Top Left
- Top Center
- Top Right
- Middle Left
- Middle Center
- Middle Right
In Auto Close Pop-up After, enter the amount of time (seconds) for the pop-up to automatically close. Ex: 10. Enter “0” to disable auto close of Pop-up In Display Frequency, determine the frequency of pop-up display by selecting one of the following options:
- When all conditions are satisfied: the pop-up appears if the above rules are executed.
- Only once: the pop-up only appears once.
- Only once per session: the pop-up appears once in a session. If you choose this option, you need to set Cookie Expires.
For example, if you choose Display Frequency as “Only once per session” and set the 2 minutes for the Cookie Expires, the pop-up is displayed when the conditions are satisfied, then it won’t be shown in the next 2 minutes (until the session ends or the cookie expires). In Enable Floating Pop-up, choose Yes to display Floating Popup (Popup still appear on product page after being closed by customer). After choosing Yes, you need to implement these configurations: In Floating Pop-up Type: Alter Popup into Icon/Button by selecting one.
- If you choose Icon, in Floating Icon, you can choose one of 8 available icon designs:
- Contact Form
- Hot Deal
- Newsletter
- Notification Bell
- Promotional
- Promotions
- Social Media
- Warning.
![]()
- If you choose Button, you can customize the text and color of the popup in Floating Button Text and Floating Button Fill Color.
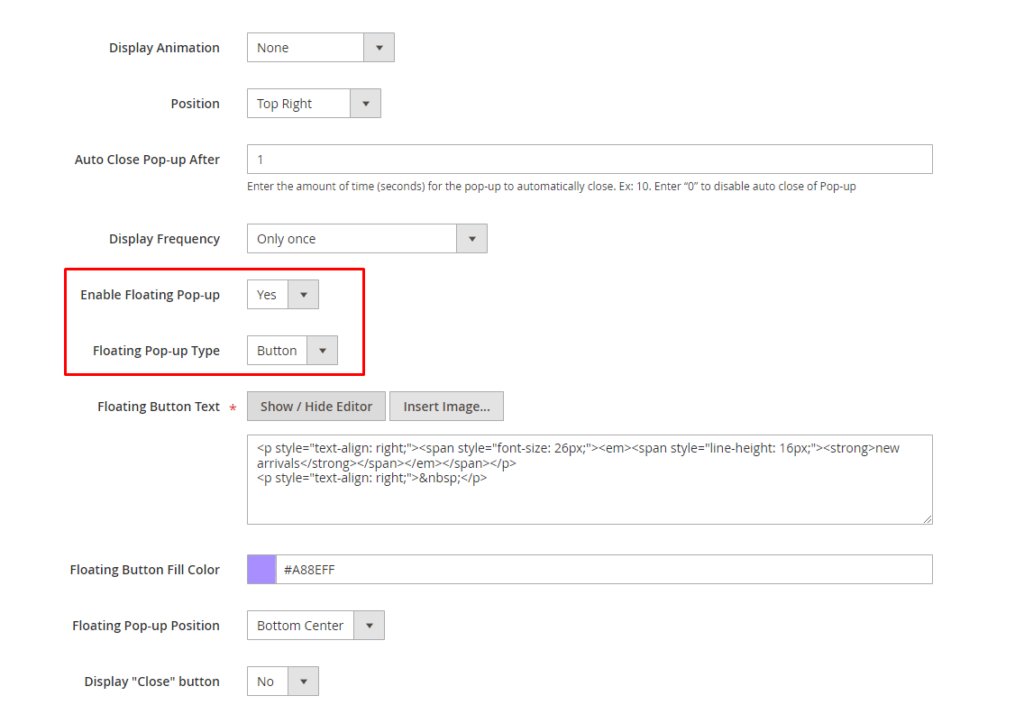 In Floating Pop-up Position, select the position to display the floating pop-up on the page:
- Middle Left
- Middle Right
- Bottom Center
- Bottom Left
- Bottom Right
In Display "Close" button, select No to not allow customers to close Floating Popup. Otherwise, select Yes. In Layout Updates: In Display on, select pages to show the pop-up, including the following types of pages:
- Category Pages
- Product Pages
- Generic Pages
When you choose each type of page, you can select all pages or specific pages depending on your demand. For example: + Category page: 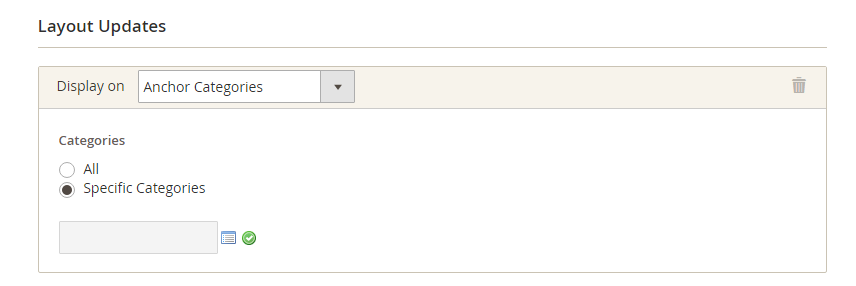 + Product page:
 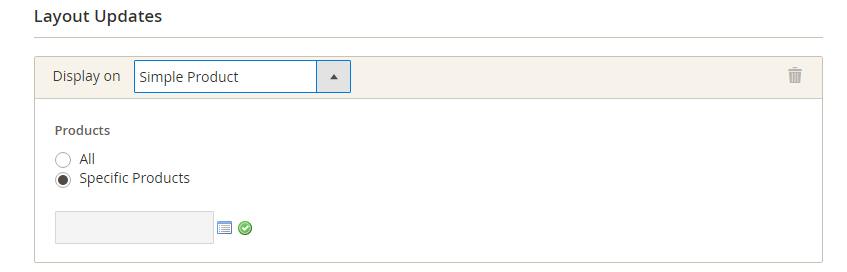 + All pages:
 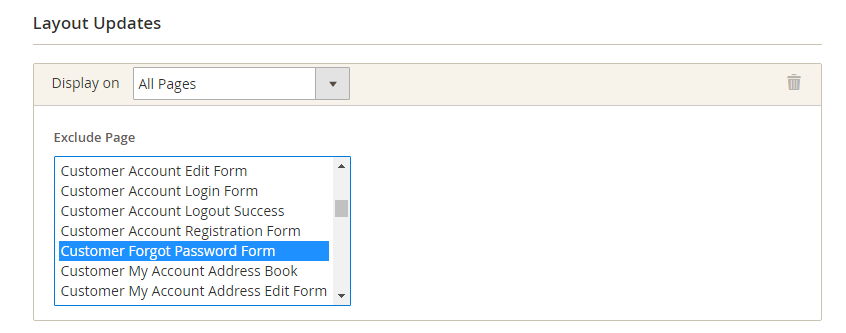 (You can exclude specific pages from displaying a popup when you select the option as All pages) Furthermore, it is easy to add more layout updates to show popup in more pages by clicking the button. After selecting the position and page, you can check the result on the front end.
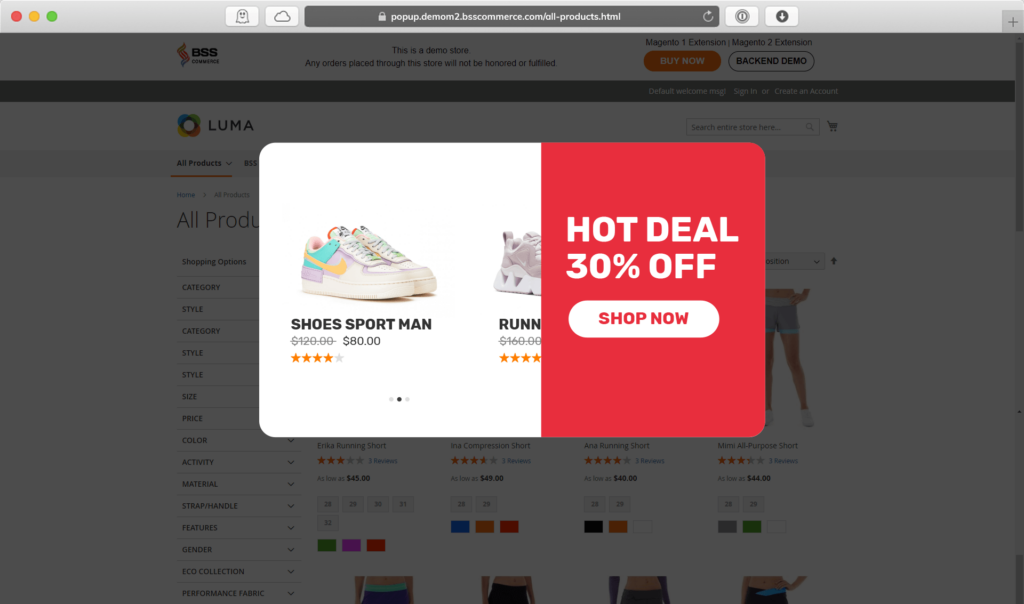
2.4.3.3. Content and Design
Content and Design 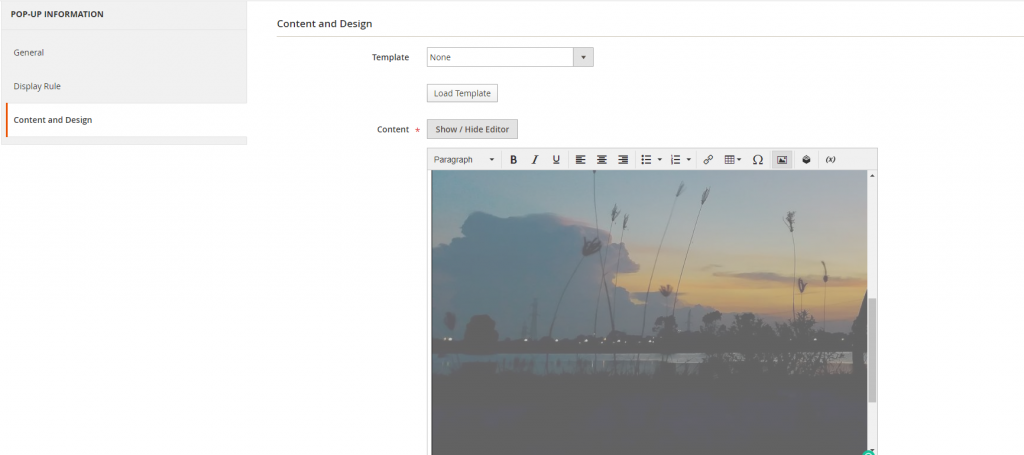 In Content, use the WYSIWYG editor to create content for the pop-up.
  You can use this tool to insert widget, image or video for the pop-up’s content. In Pop-up CSS, use CSS to change the design of the pop-up. If leaving blank, the default pop-up will be applied. Or, you can use our default template to quickly render your pop up.
 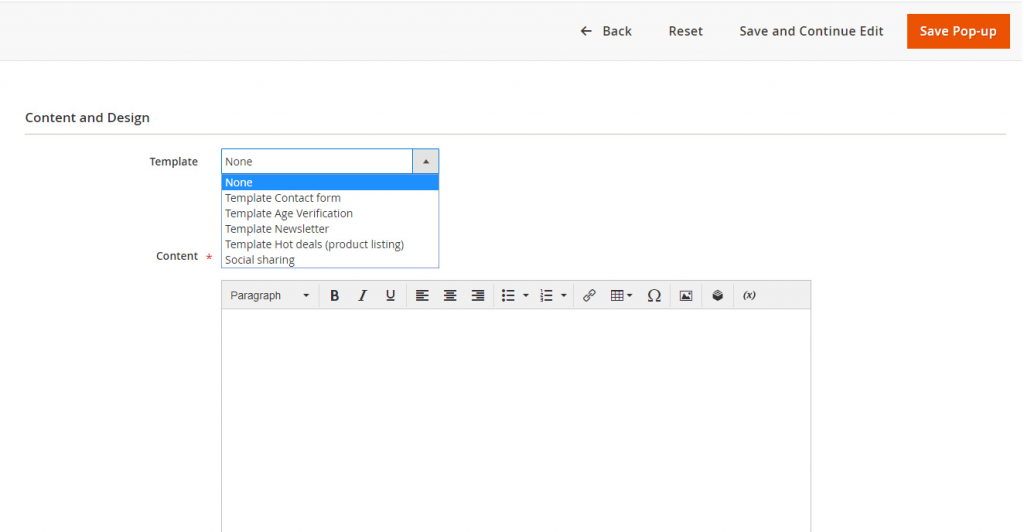 There are 5 templates to choose from:
- Contact Form
- Age Verification
- Newsletter
- Hot deals (product listing)
- Social sharing
After choosing your template, click on the Load Template button to make the template appear in the Content edit interface. 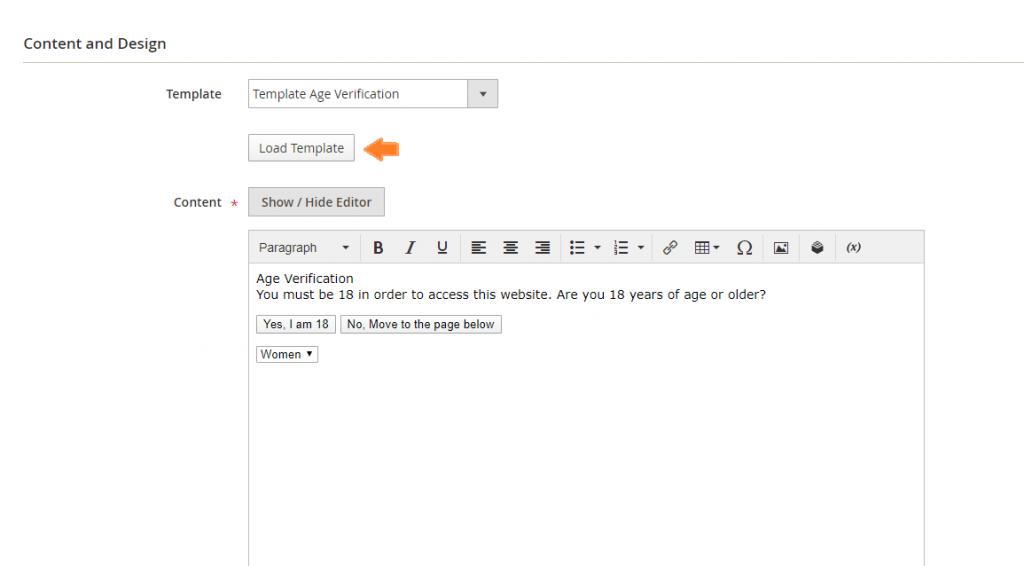 In the Content edit, you can make any modification if needed.
 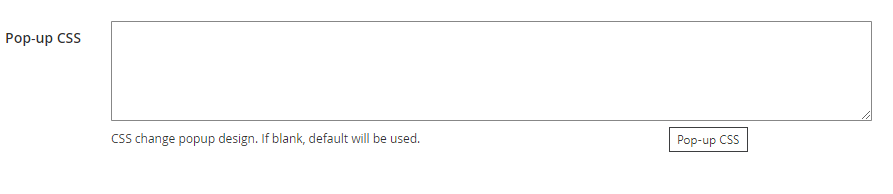 In Popup CSS, you can enter CSS code to change the popup design. If leave blank, the default design will be used. Note: After any change to the pop-up configuration, either Save, Delete, Mass delete, Mass active, is made, a cache notification will appear.
 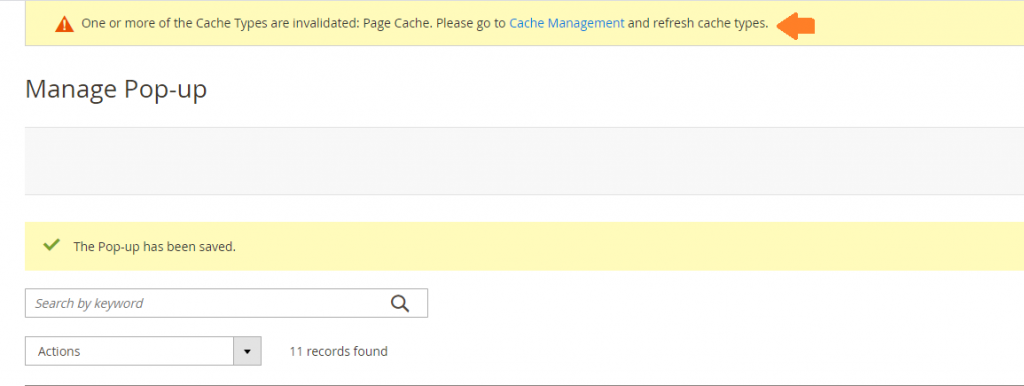 You then must go to SYSTEM -> Tools -> Cache Management ->Flush Magento Cache for those changes to be applied to the front end.
2.5. Magento 2 One Step Checkout
Please go to Stores ⇒ Configuration ⇒ BSSCOMMERCE ⇒ One Step Checkout.
2.5.1 In General
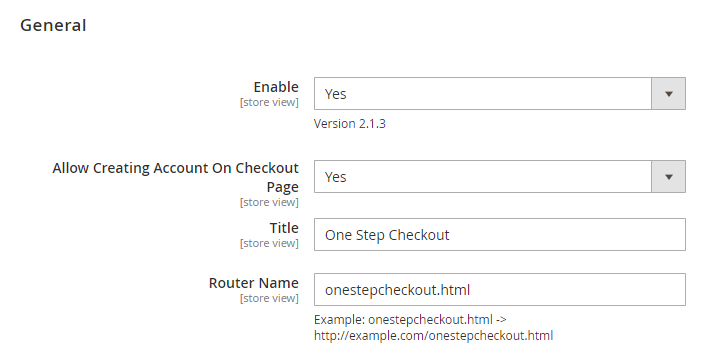 In Enable:
- Choose Yes to enable Magento 2 One Step Checkout extension.
- Choose No to disable this module.
In Allow Creating Account On Checkout Page:
- Choose Yes to allow customers to create their accounts right on the checkout page.
- Choose No to disable this function.
In Title: Write your wanted title for the checkout page. In Router Name: Choose an URL name for your checkout page.
2.5.2 In Fields Display
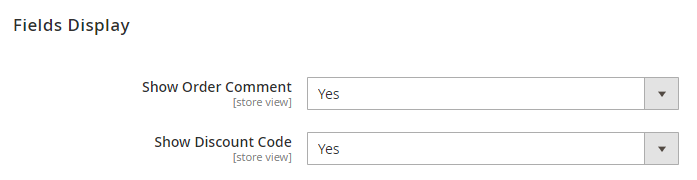 In Show Order Comment:
- Choose Yes to show a text box for customers to leave their comments for orders.
- Choose No to exclude this box from the checkout page
In Show Discount Code:
- Choose Yes to display a discount code box for entering coupon codes.
- Choose No to hide it.
2.5.3 In Newsletter
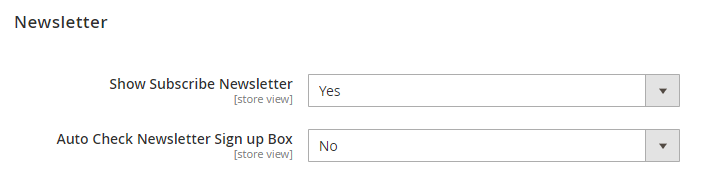 In Show Subscribe Newsletter:
- Choose Yes to allow customers to subscribe to the newsletter on the checkout page.
- Choose No to disable this function.
In Auto Check Newsletter Sign up Box: Choose Yes to automatically tick the Newsletter Sign up box or choose No to uncheck.
2.5.4 In Tracking Address by Google
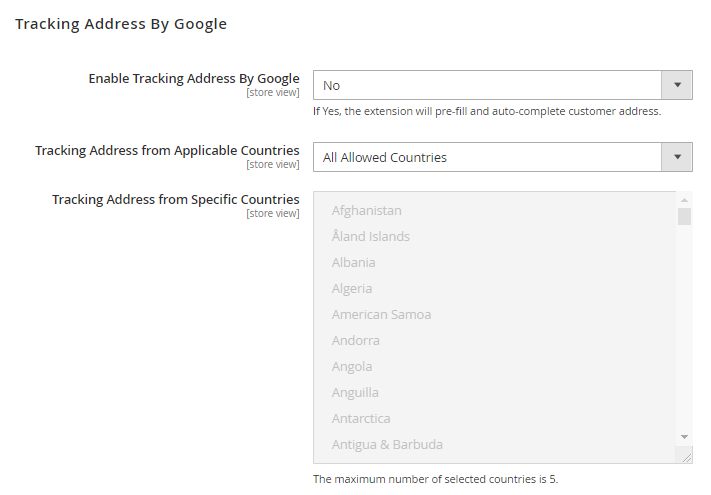 In Enable Tracking Address by Google:
- Choose Yes: Auto-detect and pre-fill customers' country, state/province, city - Google Suggest to autocomplete shipping address while typing.
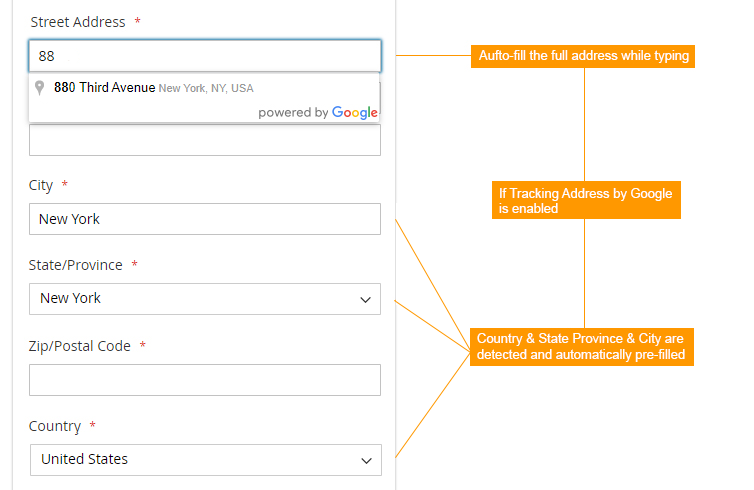
- Choose No: Customers have to find all street addresses and location information themselves.
In Google API Key: Fill in your API Key. In case you haven’t yet had an API Key, please click the link after this configuration to get it. In Tracking Address from Applicable Countries: This configuration determines which countries to apply auto-suggesting customer addresses. There are 2 options to select:
- If you choose All Allowed Countries: auto-suggesting address function is applied to every country.
- If you choose Specific Countries: there is a list of countries in Tracking Address from Specific Countries and the maximum number of countries you can select is 5. Moreover, when you choose this option, Google just auto-suggests city name and country, not street name. This is the default function of Google auto-suggest.
*Notes:
- Admin has to work with Google and pay for Google Maps to activate the address autocompleting feature.
- Your websites must be "https://" to run the auto-fill function.
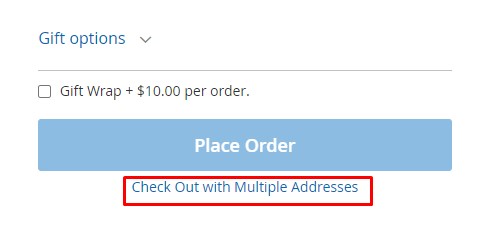
- Your login customers can checkout with multiple addresses.
2.5.5 In Order Delivery Date
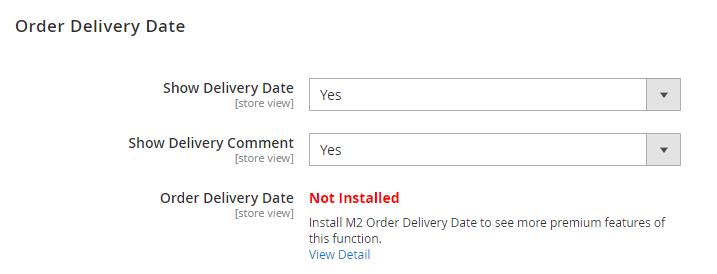 In Show Delivery Date:
- Choose Yes to display Order delivery date in the Shipping method section that allows customers to choose their own suitable dates and times to receive orders.
- Choose No to disable this function.
In Show Delivery Comment:
- Choose Yes to display a Delivery comment box in the Shipping Method section.
- Choose No to hide it.
*Install M2 Order Delivery Date to see more premium features of this function:
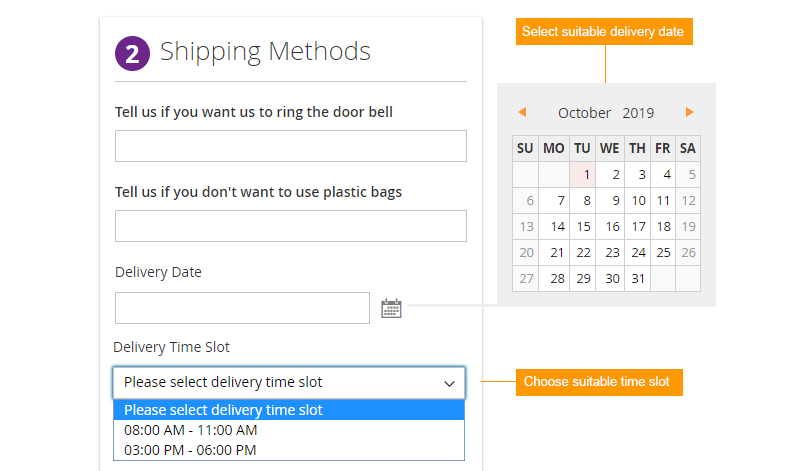
- In case M2 Order Delivery Date is installed: All features of M2 Order Delivery Date will be active. Customers can choose the delivery date and admin can give them certain delivery time slots:
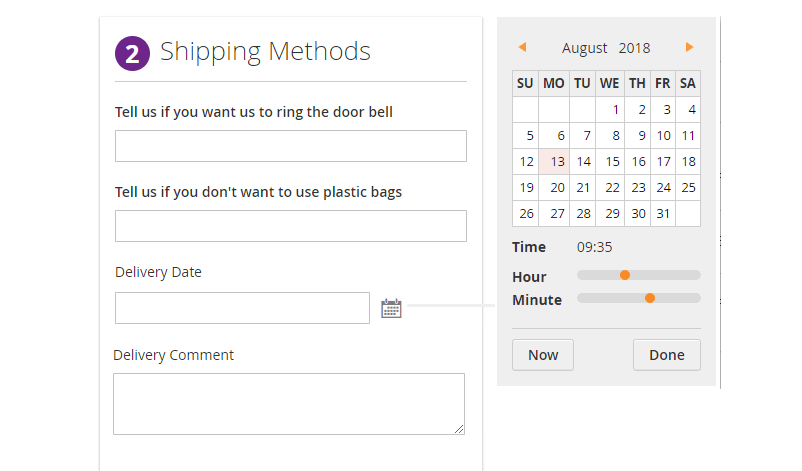
- In case M2 Order Delivery Date is not installed: All features of One Step Checkout delivery date will be active. Customers can choose whatever delivery date and time they want:
2.5.6 In Gift Message
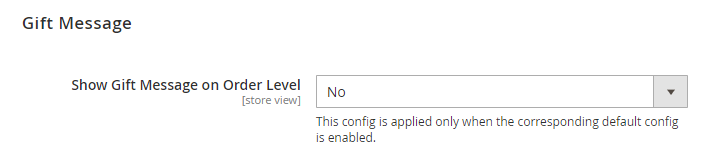 In Show Gift Message on Order Level:
- Choose Yes to allow customers to send a gift message to other people.
- Choose No to disable this function.
* Gift Message config is applied only when the corresponding default config is enabled. To enable the default config, please go to Stores ⇒ Sales ⇒ Sales ⇒ Gift Options and choose Yes to the suitable gift message level: 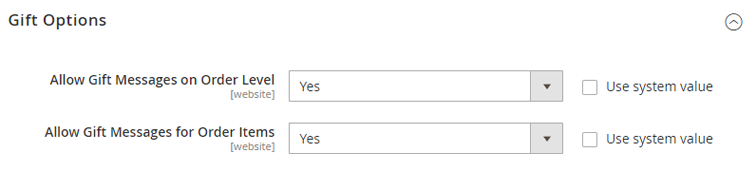
2.5.7 In Gift Wrap
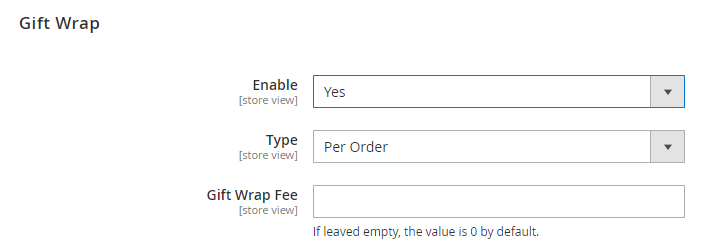 In Enable:
- Choose Yes to allow customers to request a gift wrap for their order.
- Choose No to disable this function.
In Type: This function currently supports gift wrap for each order only, so the value is Per Order by default. In Gift Wrap Fee: Fill the price for gift wrap service. The entered value is a positive number and automatically rounded to two decimal places. If left empty or filled with a negative number, the value would turn to be 0.
2.5.8 Additional Add-on
M2 One Step Checkout is already compatible with multiple related modules: M2 Customer Attributes, M2 Checkout Custom Field, M2 Reward Points, M2 Pre-Select Shipping/Payment. Install the suitable modules to better optimize M2 One Step Checkout. 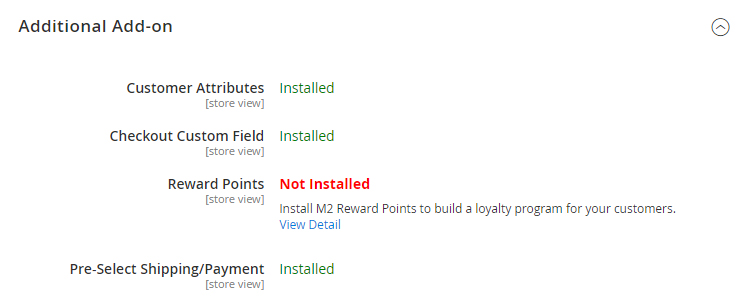
- M2 Customer Attributes: Carefully config the Customer Attributes function to give your customers the best shopping experience! Go to Customers ⇒ Customer Attributes. In each customer attribute, go to Display Configuration:
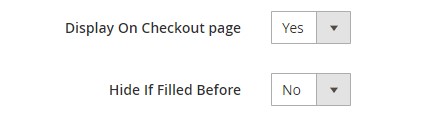
- In Display on Checkout Page: Choose Yes to make customer attributes be shown on the checkout page, choose No to disable this function.
- In Hide If Filled Before: Choose Yes so that if customers fill the customer attribute for the first time, it will not display after that. Choose No to always display the customer attribute whenever customers go to the checkout page.
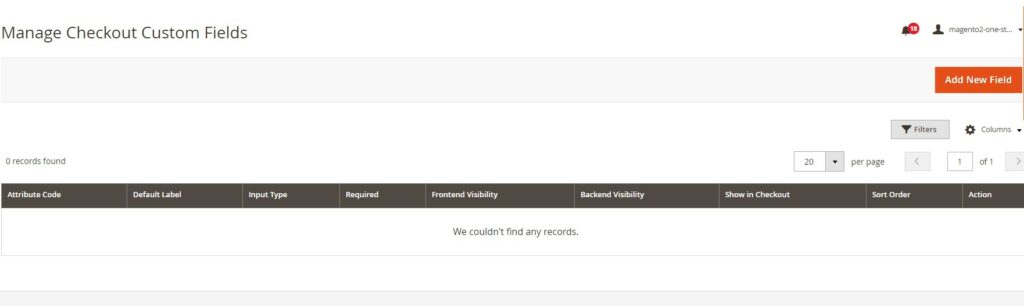
- M2 Checkout Custom Field: Go to Sales ⇒ Bss Commerce ⇒ Manage Checkout Custom Field ⇒ Add New Field to create a custom field for the checkout page.
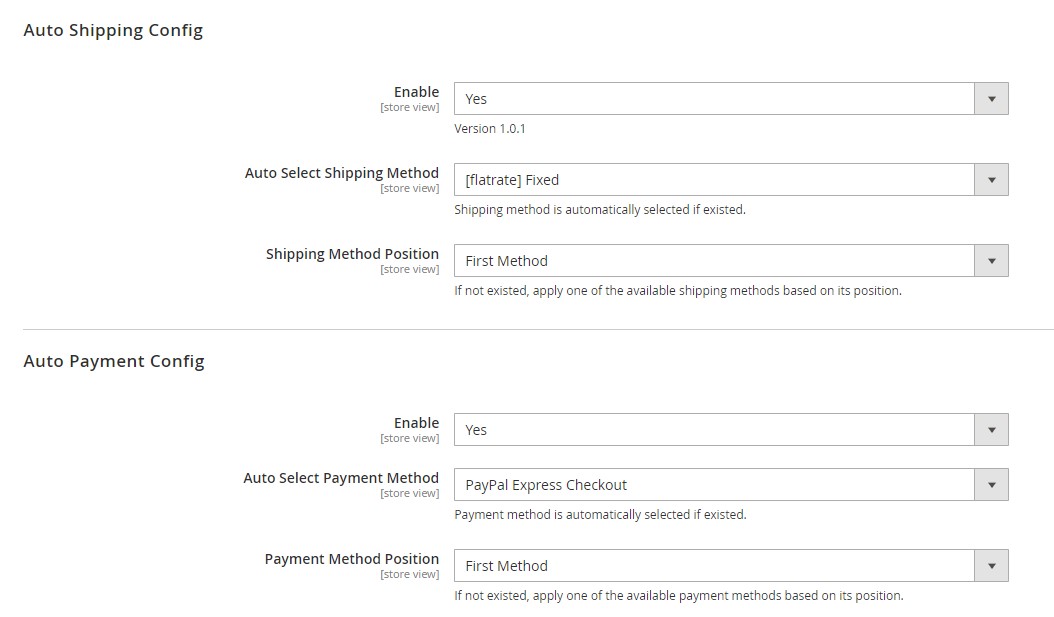
- M2 Pre-select Shipping/Payment: Go to Stores ⇒ Configuration ⇒ BSS COMMERCE ⇒ Pre-select Shipping/Payment to config the default shipping/payment method when customers enter the checkout page.
2.5.9 In Custom Style
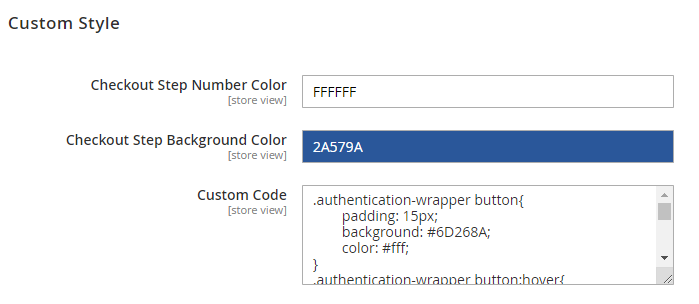 In Checkout Step Number Color: you choose the color for the checkout number steps. In Checkout Step Background Color: Choose a color for the background of checkout number steps. In Custom Code: you can add more code to customize about background color for the checkout page, “Sign in” button or text color and so on.
2.5.10 Somes notes
- Notes about custom code
+ Change background of the checkout page, you need to add more code:
body { background-color: #333333;

}
(#33333 is the color code which is corresponding to Black). + Change text color of the checkout page, you need to add more code:
body { color: #ffffff;

}
(#fffff is the color code which is corresponding to White). + Change Sign in to a button, you add more code:
.authentication-wrapper button{

 padding: 15px;

 background: #6D268A;

 color: #fff;

}

.authentication-wrapper button:hover{

 text-decoration: unset;

 background: #FF0000;

 color: #fff;

}
- Note about configuring payment method
+ You need to configure all payment methods that default Magento supports. + Current support payment methods:
- Amazon Payment
- Paypal, Paypal Braintree, Paypal Express Checkout, Paypal Payflow Pro & PayPal Payment Flow CreditCard
- Pay by Credit Eway
- Splitit Card-Based Installment Payment Solutions
- NMI payment Direct Post
- NEW! Sagepay payment (Ebizmarts_SagePaySuite
- Zalopay
- Pay by Card (Stripe), Credit Card
- Online banking, etc.
- Stripe official
- Note about adding payment trust badge
Step 1: Go to Content ⇒ Blocks ⇒ Add New Block to create a new block for payment trust badge. 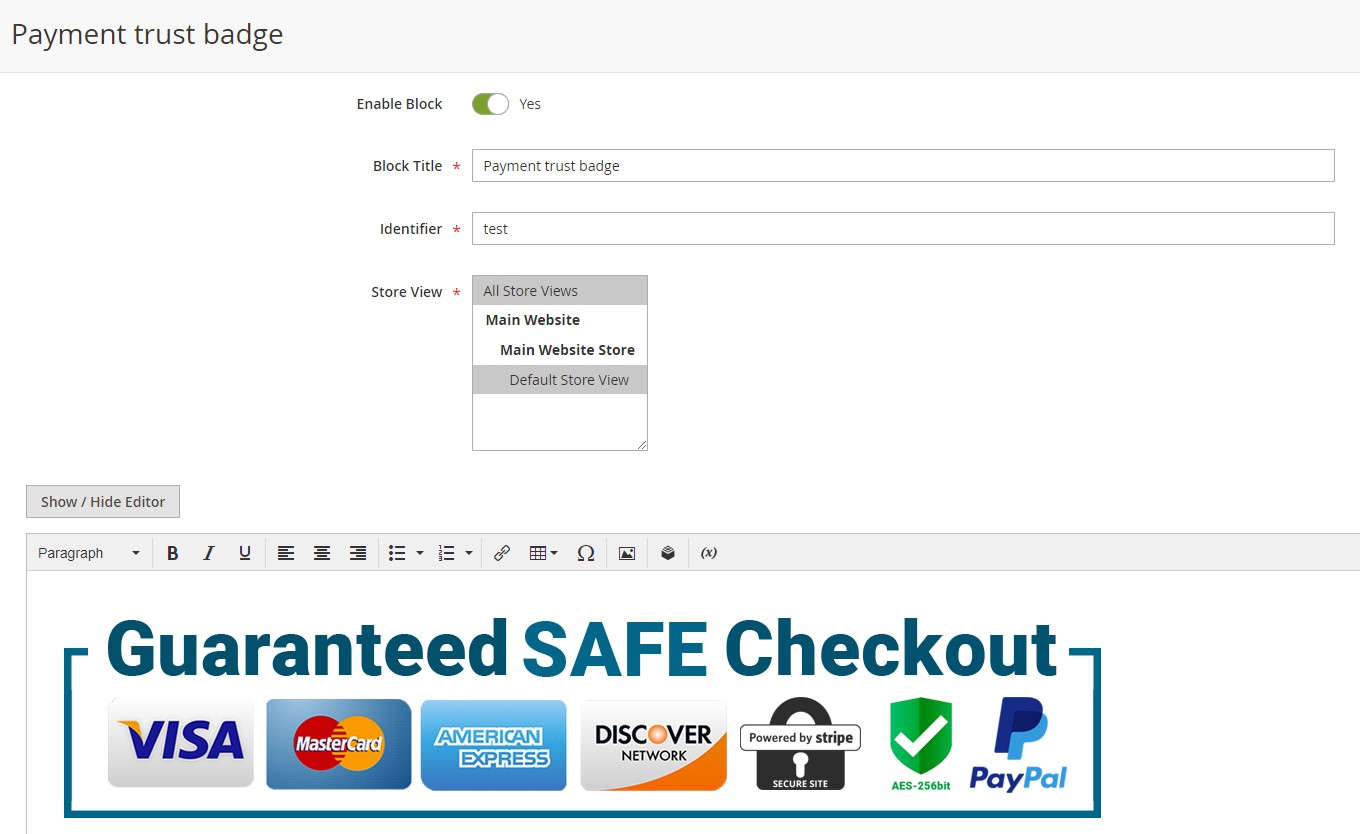 Step 2: Go to Content ⇒ Widgets ⇒ Add Widget to choose certain place to display the block of payment trust badge.
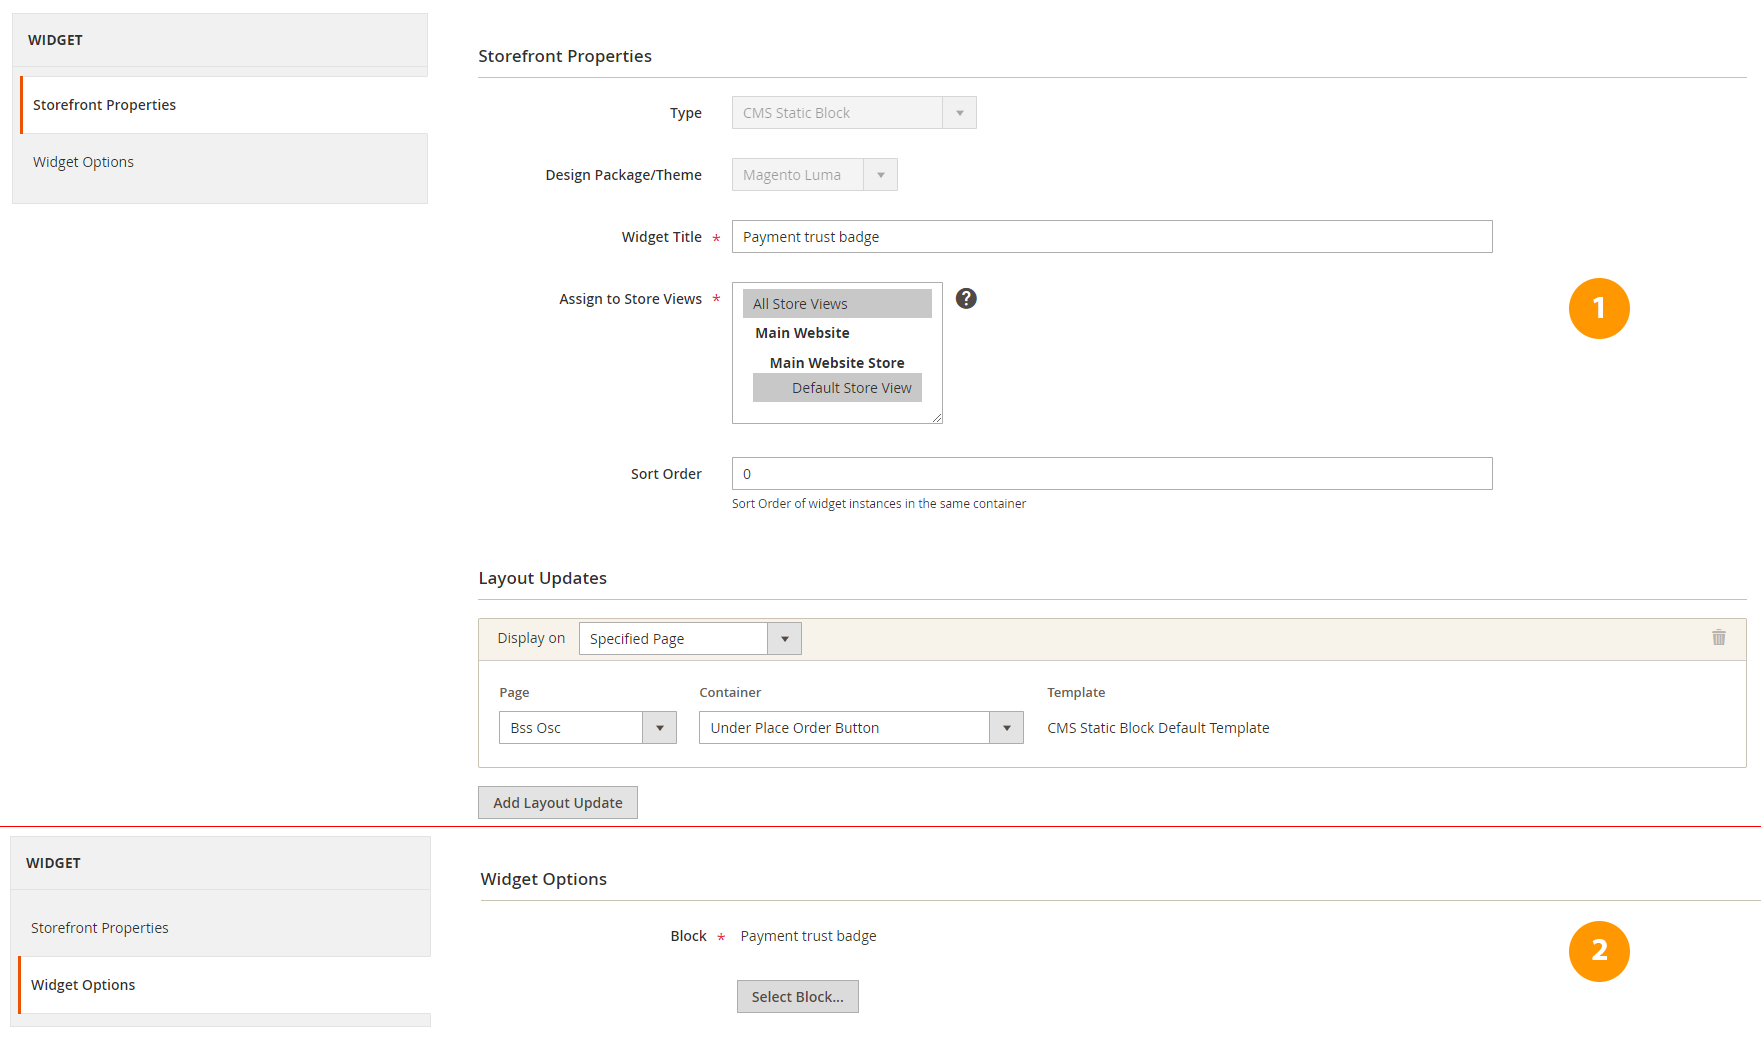
- Note about adding header/footer for the checkout page: Upload folder bss_onestepcheckout to app/design/frontend/theme_space/theme.
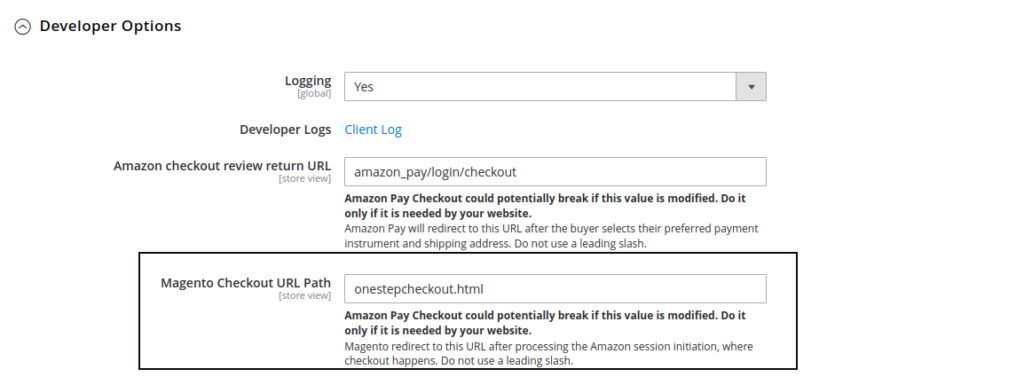
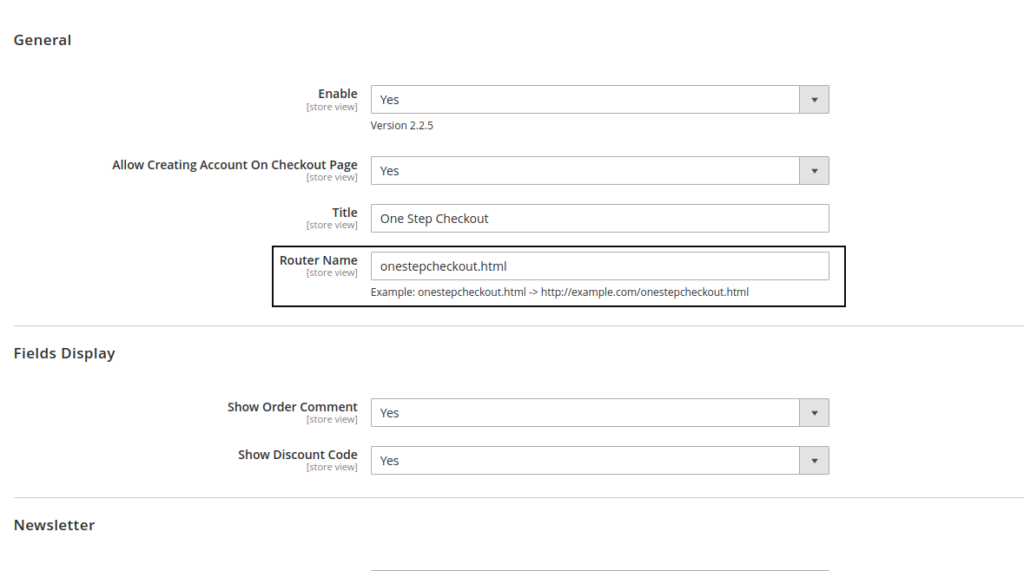
- To log in to Amazon Pay on the One step checkout page, you need to check and change the URL so that the URL of Router Name config in BSS One Step Checkout extension is the same as Magento Checkout Url Path one in Amazon.
Follow the steps: Amazon config: Configuration > Sales > Payment Methods > Amazon Pay > Advanced > Developer Options > Magento Checkout URL Path.
Bss config: Configuration > Bss Commerce > One Step Checkout > General > Router Name
*Note: This module supports the site that does not install Klarna payment method.
2.5.11. API Support
We provide you lists of Restful API and GraphQL API that our Magento 2 One Step Checkout extension supports. *Note:
- Restful API support is included in the main module package (from One Step Checkout v2.1.9).
- GraphQL API support is included in the GraphQL package, acting as an add-on for anyone who needs to use GraphQL.
2.5.11.1. Restful API
| No | API | URL | Method |
| 1 | Update cart information in One Step checkout when customers change product quantity (for Not logged-in customers) | {{base_url}}/rest/V1/bss-osc/guest-carts/:cartId/update-item | POST |
| 2 | Update cart information in One step checkout when customers change product quantity (for logged-in customers) | {{base_url}}/rest/V1/bss-osc/carts/mine/update-item | POST |
| 3 | Apply Gift Wrap | {{base_url}}/rest/V1/bss-osc/giftwrap/apply/0 | POST |
| 4 | Validate Gift Wrap | http://one-step-checkout.demom2.bsscommerce.com/rest/V1/bss-osc/giftwrap/validate/:fee/:use | POST |
| 5 | Add information about Order delivery date and delivery comment to orders when getting orders via /V1/orders/:id (default) | {{base_url}}/rest/V1/orders/:id | GET |
| 6 | Add information about Order delivery date and delivery comment to invoices when getting invoices via /V1/invoices/:id (default) | {{base_url}}/rest//V1/invoices/:id | GET |
| 7 | Add information about Order delivery date and delivery comment to credit memo when getting credit memo via /V1/creditmemos/:id (default) | {{base_url}}/rest/V1/creditmemos/:id | GET |
| 8 | Add information about Order delivery date and delivery comment to shipment when getting shipment via /V1/shipment/:id (default) | {{base_url}}/rest/V1/shipment/:id | GET |
| 9 | Get Store config of the module | {{base_url}}/rest/V1/bsscommerce/osc/storeconfigs/:storeview | GET |
| 10 | Add information about Order delivery date and delivery comment to the payment extension corresponding to the customer's current cart | {{base_url}}/rest/V1/bsscommerce/osc/deliveryinfo | PUT |
| 10.1 | Add information about Order delivery date and delivery comment to the payment extension by GUEST | {{ api_base }}/V1/bsscommerce/osc/deliveryinfoguest | PUT |
| 11 | Get information about Order delivery date and delivery comment from Quote | {{base_url}}/rest/V1/bsscommerce/osc/deliveryinfo/cart/:id | GET |
2.5.11.2. GraphQL API
| No | GraphQL API | URLs | Method |
| 1 | Add information about Order delivery date and delivery comment to orders when getting orders via customerOrders default | {{base_url}}/graphql | POST |
| 2 | Add information about Order delivery date and delivery comment to the payment extension | {{base_url}}/graphql | POST |
| 3 | Get information about Order delivery date and delivery comment from Quote | {{base_url}}/graphql | POST |