
1. Overview
Magento 2 Reward Point extension is an effective tool to increase customer interaction with websites, encourage customers to purchase products by giving them reward points to their accounts when they place orders, add reviews, sign up, and so on. These points are used to spend on purchasing products/services right on stores conveniently, which improves customer loyalty and closely tight buyers with your business, leading to a long relationship between stores and customers.
2. How does it work?
As an administrator for a Magento 2 store, you can do some following actions with the module’s functions:
- Create earning rule to determine how the points are earned
- Manage and adjust points for customer accounts
- Specify the exchange rate between points and currency for each customer group
- Track and manage transactions using reward points made by each customer
2.1. Earning rules
Go to Customer ⇒ BSS Reward Points ⇒ Earning Rules.
There are two types of rules you can create depending on your purpose: Add new cart rule (related to products) and Add new custom rule (related to customer behavior). You click the arrow next to the Add New Rule button and select the desired option.
2.1.1. Add a New Cart Rule
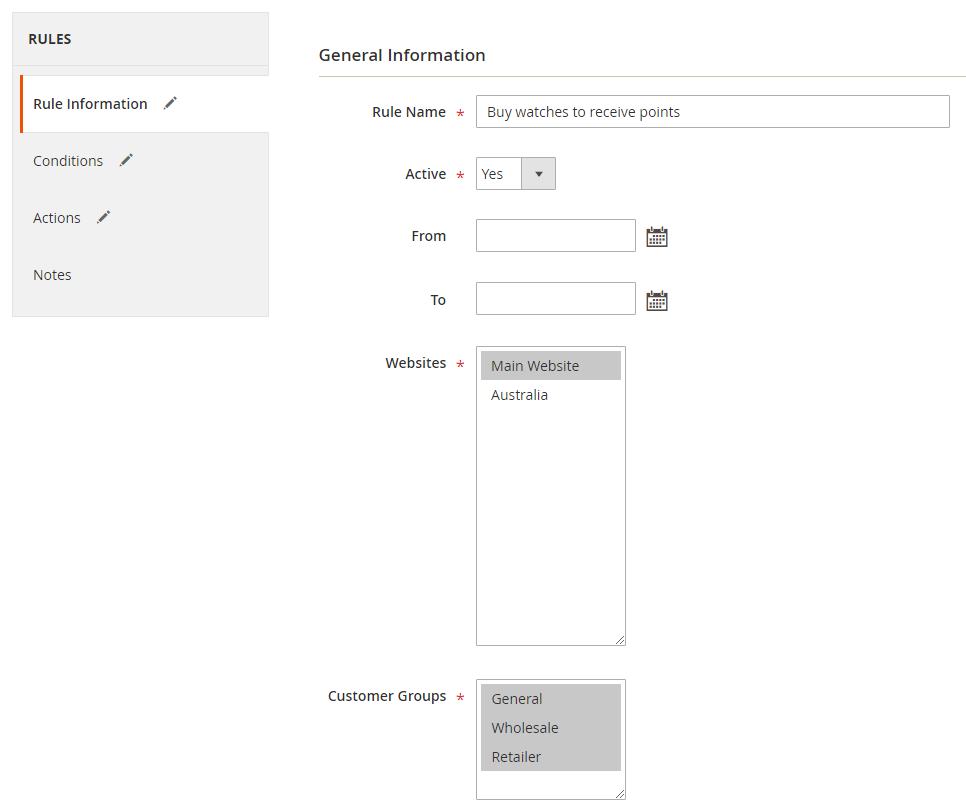
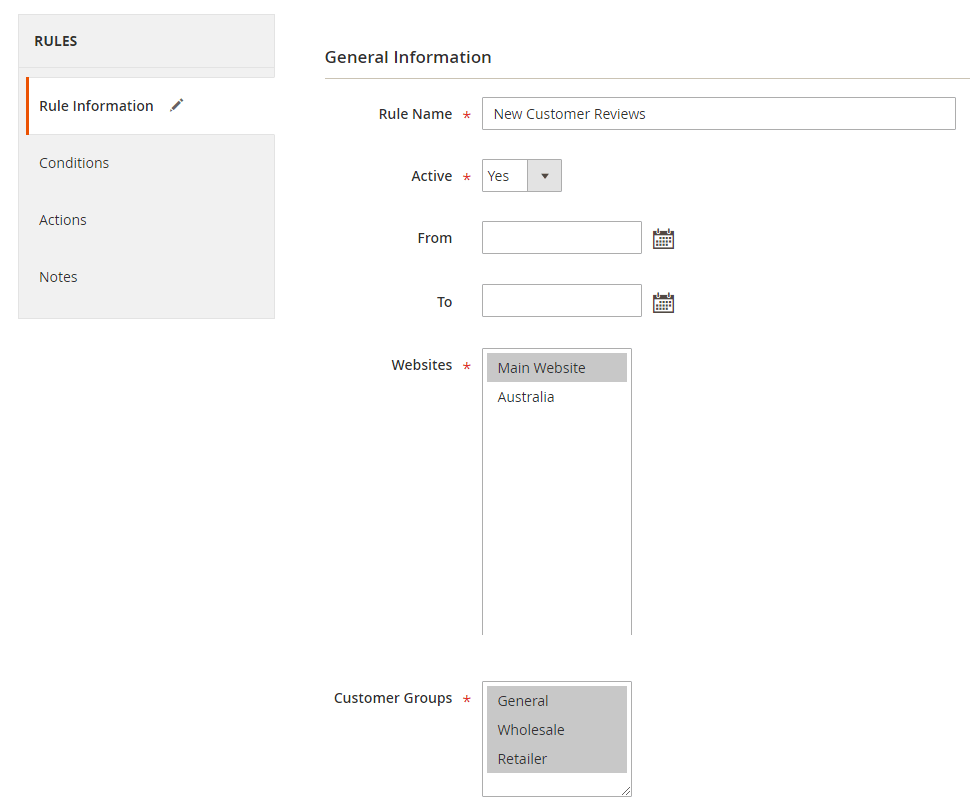
In Rule Information:
- Rule name: enter a name for the new rule. For example, we create a rule as “Buy watches to receive points”.
- Active: set status for the rule.
- From-To: specify a period of time when this rule can be valid.
- Websites: select websites to apply the rule.
- Customer Groups: assign the rule for suitable one or multiple customer groups.
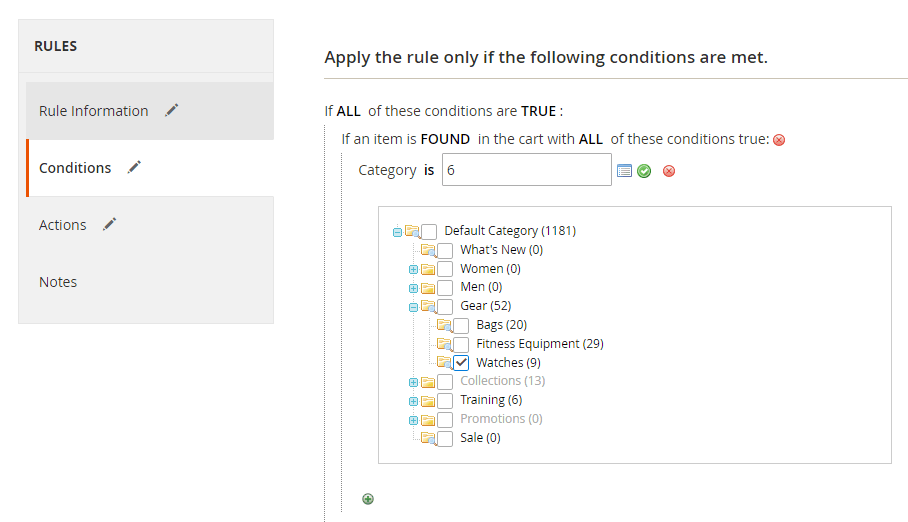
- In Conditions: Based on the specific purpose of the rule, you can set up conditions by selecting from the list.

- In Actions:
For this kind of rule, you can choose to give customers X points or give them X points for Y spent. Then you need to indicate the number of points rewarding for customers after they meet conditions.
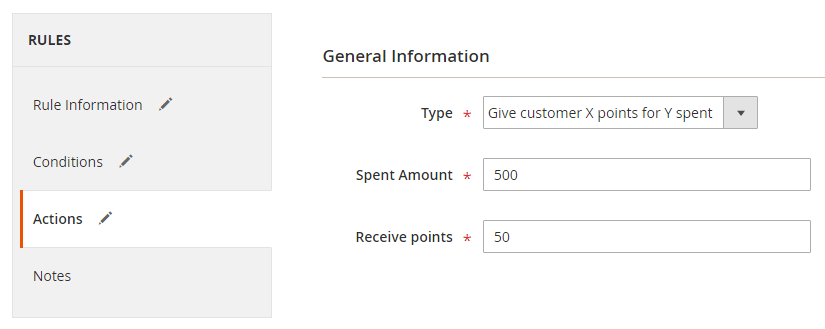
If you select the type as Give customer X points for Y spent, you have to enter a specific amount buyers need to reach and receive X points in the section of Spent Amount.
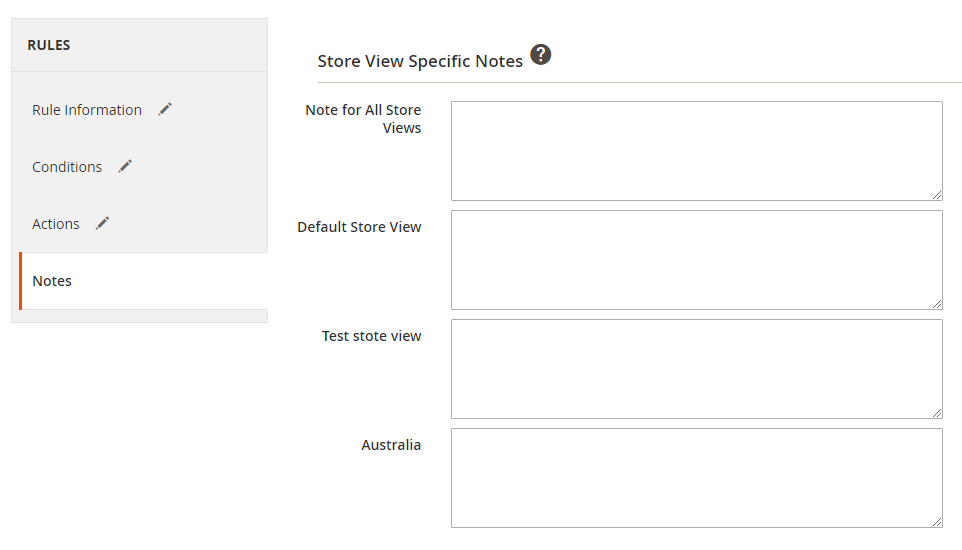
Also, it is easy to add more notes to various store views.
2.1.2. Add a New Custom Rule
You follow similar steps to the process when adding a new cart rule, but the only difference stays in the condition section.
- In Rule Information:
- In Conditions:
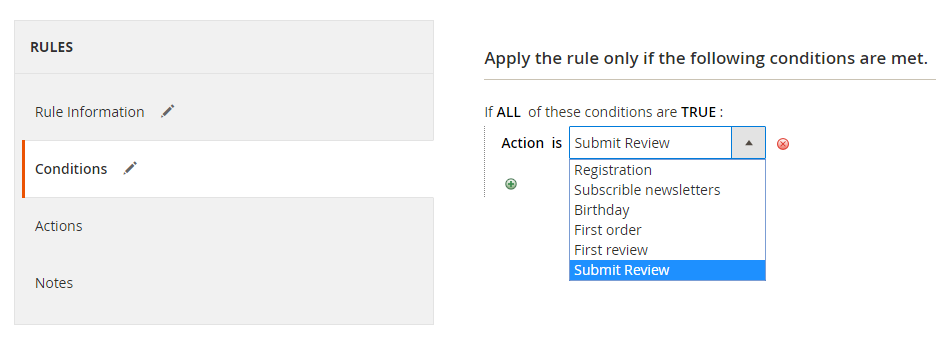
There is a list of engagement activities related to customer behaviors for you to select.
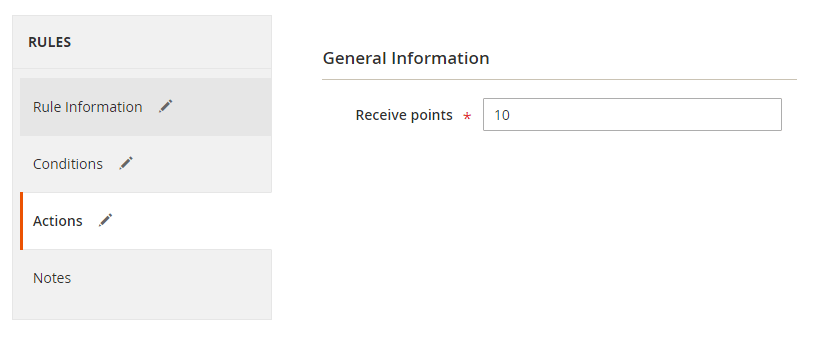
- In Actions:
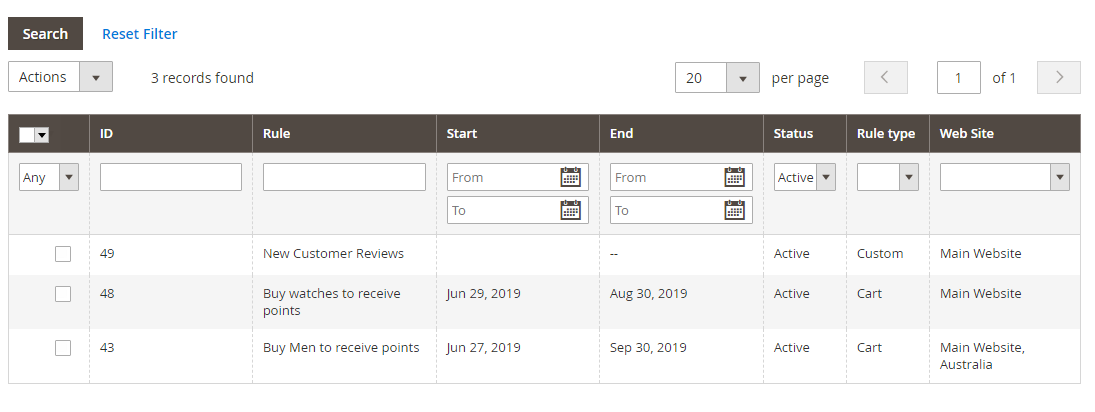
After creating earning rules, you can manage all of them in the grid table:
2.2. Exchange Rates
In this section, the admin determines the exchange rate between points and the base currency so that customers use points to make transactions.
Go to Customer ⇒ BSS Reward Points ⇒ Exchange Rates ⇒ Add New Rate:
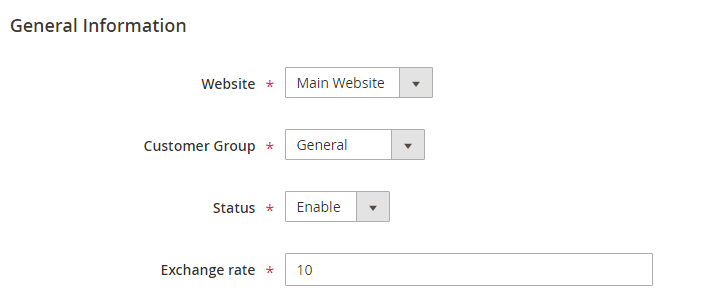
In Website: select a website to apply this rate. Each website can have different exchange rates.
In Customer Group: choose a group whose customers can use points based on this exchange rate. You can add various rates for different customer groups.
In Status: Enable/Disable the rate.
In Exchange rate: specify the number of points to be corresponding to 1 unit of the base currency. For example: 10 means that 10 points = $1 (the default base currency is USD)
*Note: Although you can select All Websites and All Customer Groups to apply this exchange rate, the rates for each website and each customer group has higher priority.
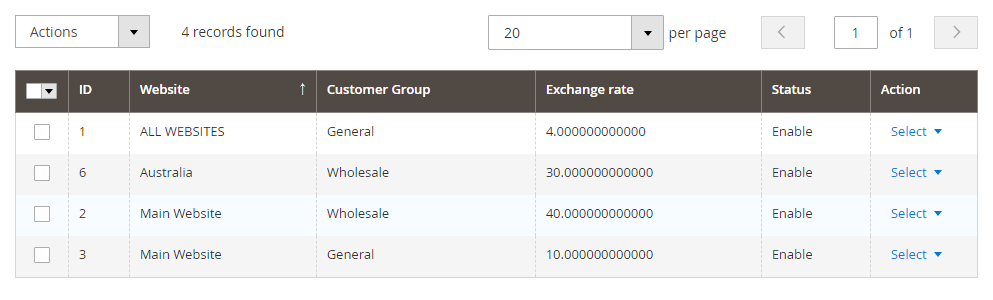
All exchange rates are displayed in the grid for better management as below:
2.3. Transactions
Go to Customer ⇒ BSS Reward Points ⇒ Transactions to track histories of point changes on your website.

In which:
- Changed Point: specify the number of points are received or are reduced from their accounts.
- Balance: total current points in customer account after changes happen.
- Point Expired: update the number of points expiring after a period of time.
2.4. Import and Export Transactions
In case you have a huge amount of transaction data and want to update to the new website, we offer the advanced function to quickly import multiple transactions via a CSV file.
Go to Customer ⇒ BSS Reward Points ⇒ Import/Export Transactions.
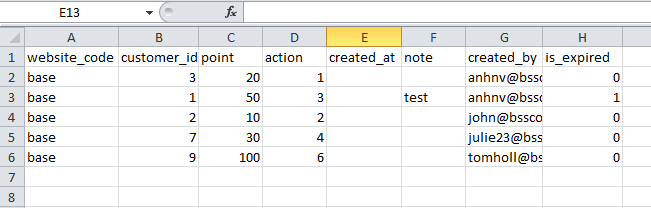
You download the sample CSV file to your computer and complete every information as instructed. Then, upload it and start import data to the system.
*Note:
Besides, it is extremely convenient to export available transactions on your site into a CSV file as well.
2.5. Reward Points reports
Our module offers the reward points report function to help you easily keep track of all earned and spent reward points in your store.
To check the Earned Points Report, go to Customer ⇒ BSS Reward Points ⇒ Earned Points Report.
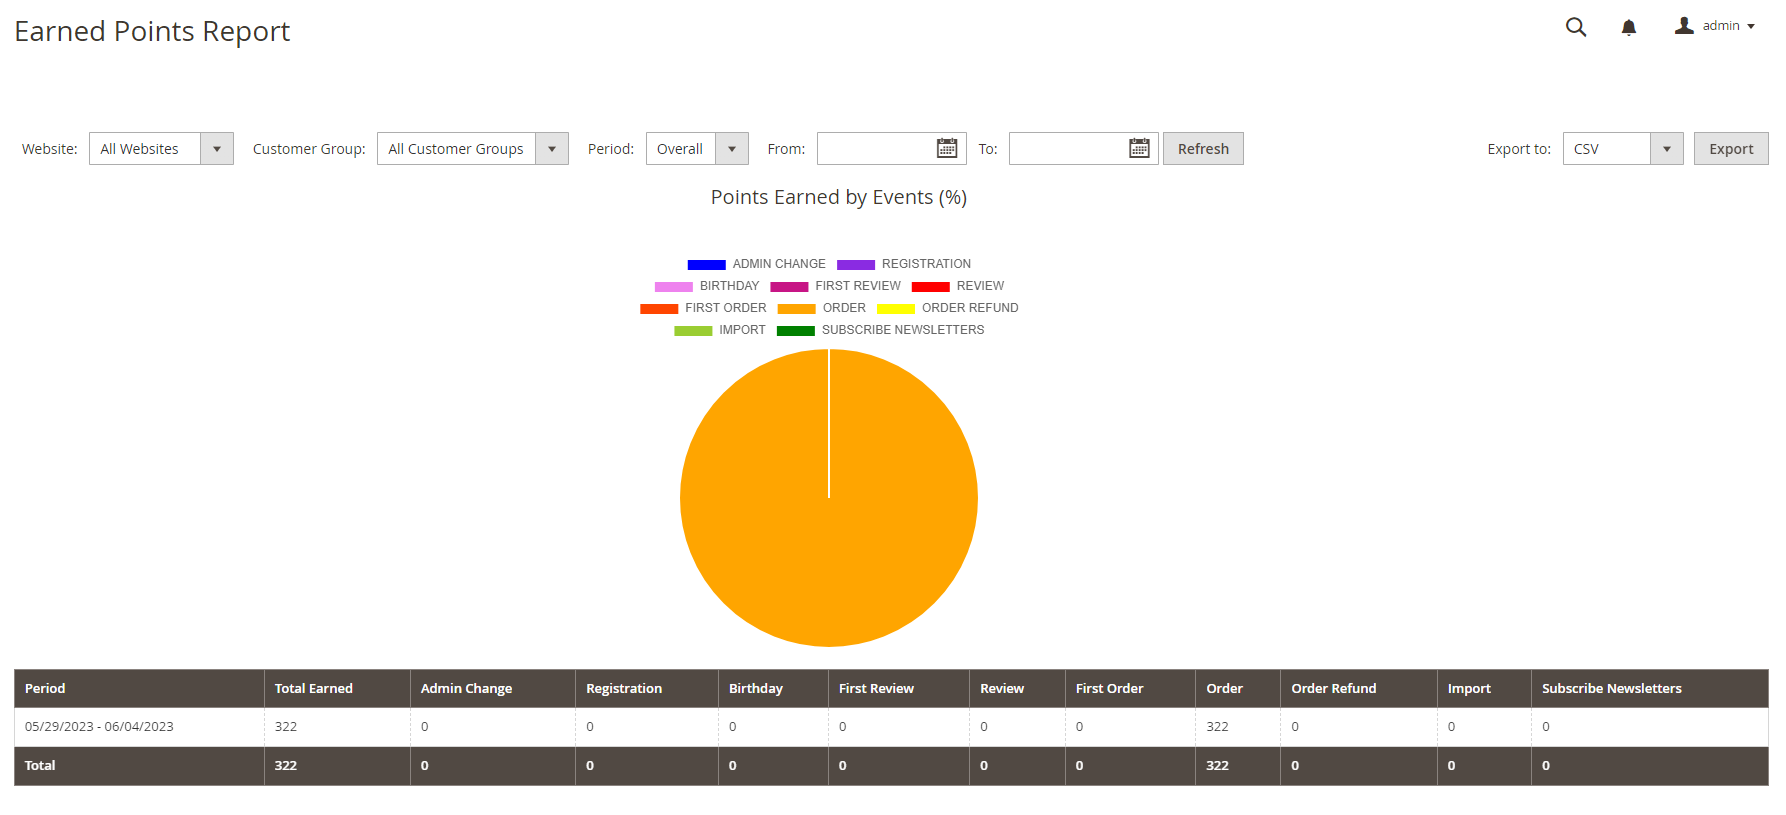
In the report header, you can filter the data based on Websites (all website or a specific website), Customer group (all customer groups or a specific customer group), Period (Day, Week, Month, Year, Overall), and Time (From - To). Click the Refresh button to refresh data after changing the filter.
You can also export this report to a CSV file by clicking the Export button.

Under the header, you will see the Points Earned by Events (%) pie chart. This color pie chart shows the % contribution of each earning events to the total number of points received by the customer. Check the color annotation to find the color of the earning event you want to see and hover over the section with the corresponding color to show the percentage of the earning event.
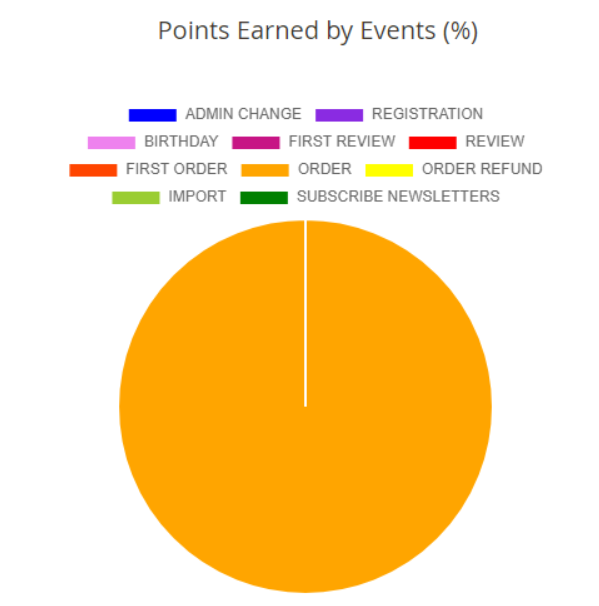
Then in the table grid below shows the following information:
- Period: The survey period that has been configured in the filter bar
- Total Earned: Number of points customer has earned in total
- Number of points customers has earned from each event

To check the Earned Points Report, go to Customer ⇒ BSS Reward Points ⇒ Spent Points Report.
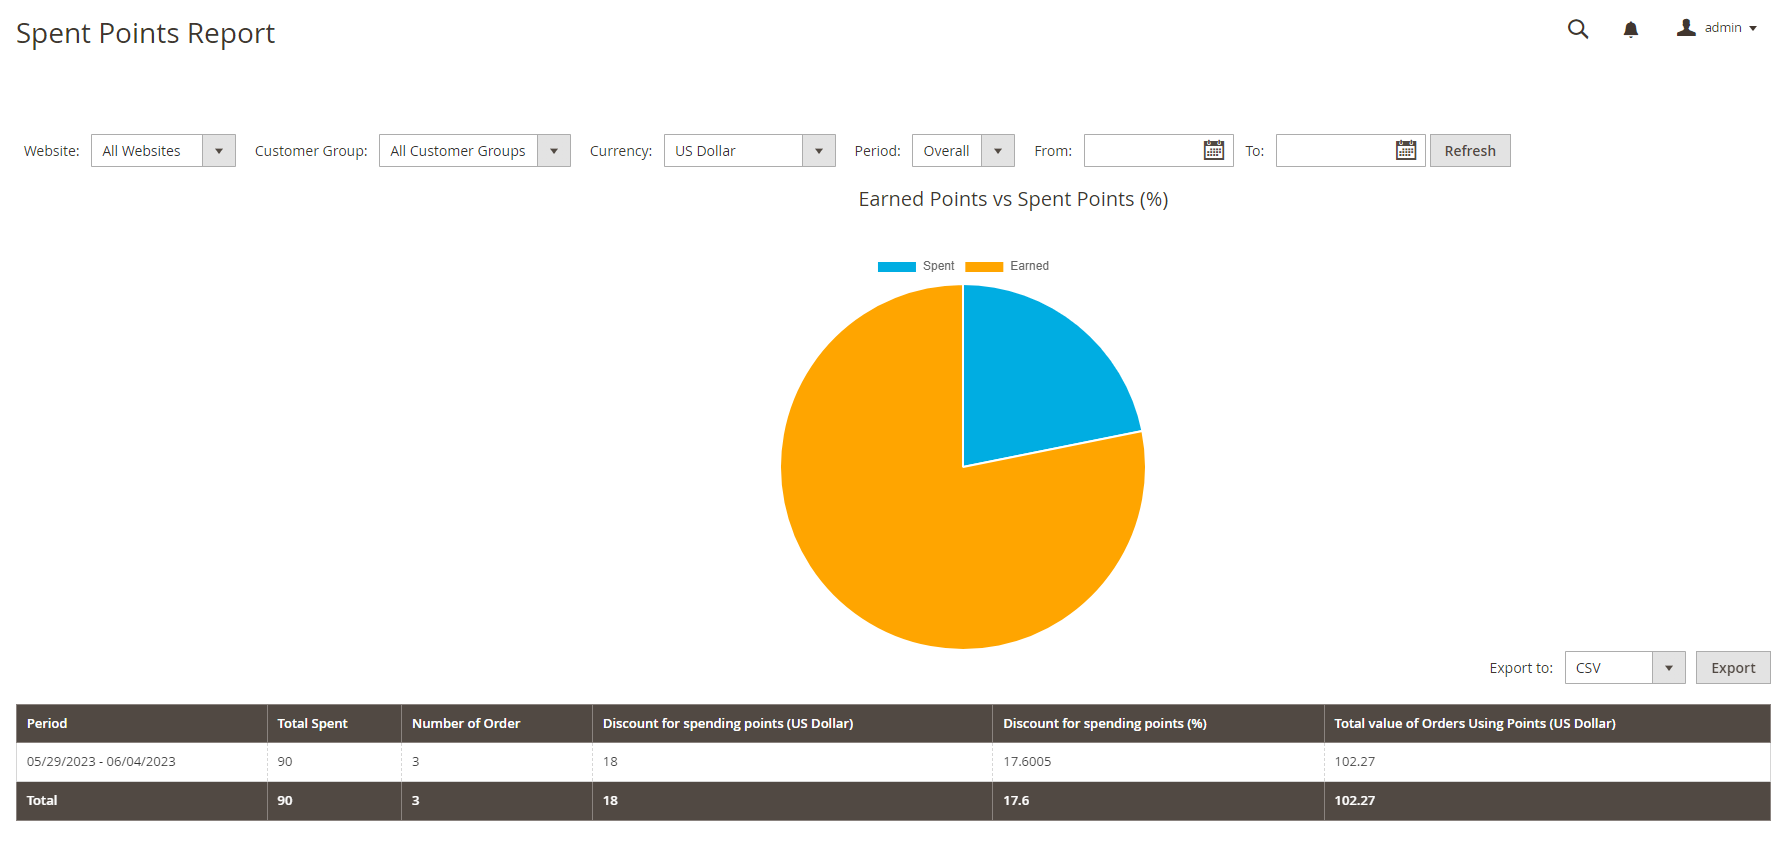
In the report header, you can filter the data based on Websites (all website or a specific website), Customer group (all customer groups or a specific customer group), Currency (choose the displayed currency of the data in the report), Period (Day, Week, Month, Year, Overall), and Time (From - To). Click the Refresh button to refresh data after changing the filter.
*Note: Only currencies that have the currency rates set will appear in the drop-down list of the Currency filter. To configure currency rates, please go to Stores > Currency > Currency Rates or check this blog for a full tutorial.

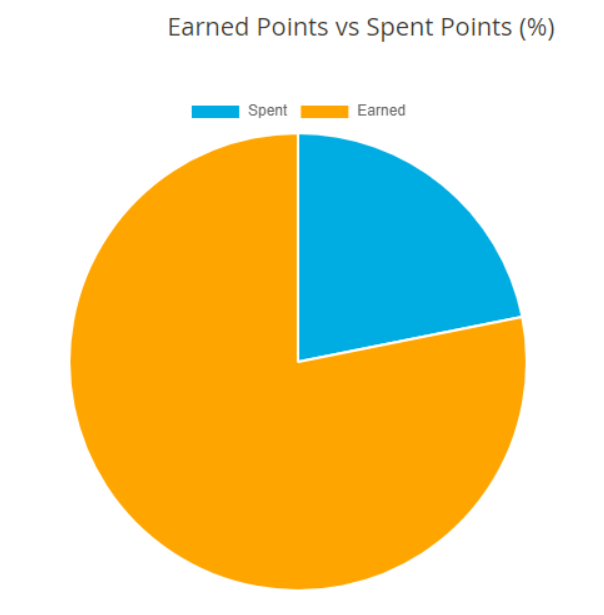
Under the header, you will see the Earned Points vs Spent Points (%) pie chart. This color pie chart compares the ratio of spent points to earned points. Check the color annotation and hover over the section with the corresponding color to show the percentage of the information.
Then in the table grid below shows the following information:
- Period: The survey period that has been configured in the filter bar
- Total Spent: Total spent points customers used
- Number of Orders: Number of orders that customers has spent reward points on
- Discount for spending points (displayed currency): Order value that has been reduced by spending points, display in currency format configured on the filter bar
- Discount for spending points (%): Order value that has been reduced by spending points, display in % format compared to total value of order using points
- Total Value of Order Using Points: Total value of orders that customers has spent reward points on

You can also export this report to a CSV file by clicking the Export button.
2.6. Assign points for each product
In addition to creating earning rules, you can also determine the number of points customers can receive when purchasing a product.
Go to Catalog ⇒ Products and choose a product: Joust Duffle Bag, for example.
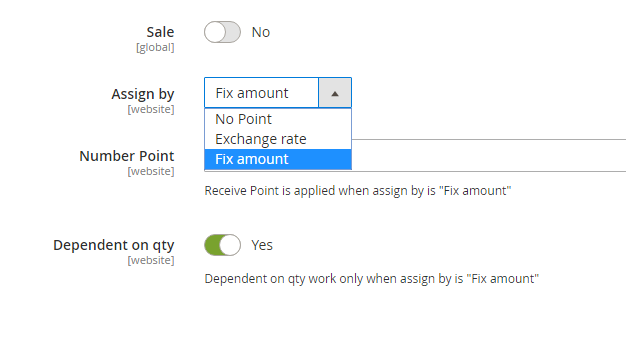
In Assign by:
- No Point: It means customers get no points for this product purchase
- Exchange rate: Customers can get points based on the exchange rate created in the Exchange Rate section.
For example:
Exchange rate: 10 points = $1
Product price= $56
=> The number of points customers have: 56*10=560 points.
- Fix amount: customers get a fixed number of points.
In Number Point: enter the number of points to reward for customers in case you select Fix amount.
In Dependent on qty:
- Choose Yes: Points = X * Qty
- Choose No: Point = X
(X as the number of points).
*Note: You need to take notice in the following case:
Suppose that you assign 5 points for product A in the product edit page.
Also, you create an earning rule which gives customers 10 points when they buy products belonging to category Men. Product A is included in the category Men.
⇒ In this case, customers can get a total of 15 points from both purchase rules.
* Note: For fast implement, you can import and export Reward Points via a CSV file.
To import reward points, you add the additional 3 columns to a CSV file of the default and the system will import products with points based on SKU.
- assign_by: no point/exchange rate/fix amount.
- receive_point: enter a natural number
- dependent_qty: yes/no
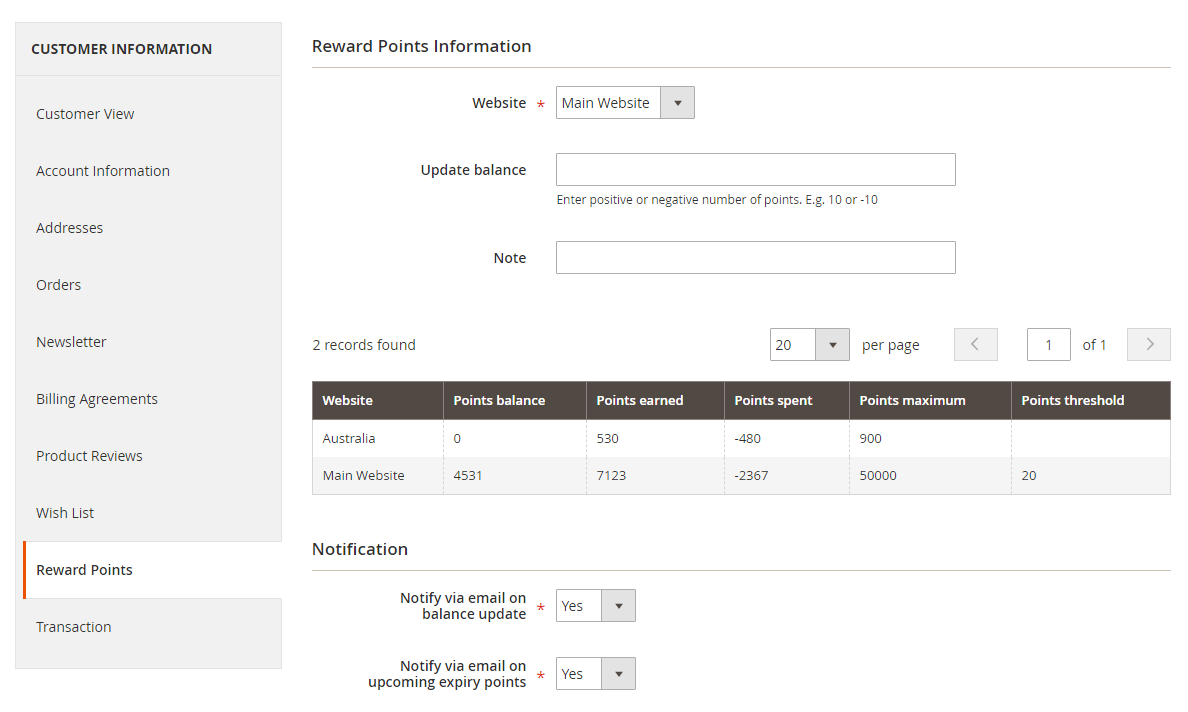
2.7. Manage Reward Points
As a store admin, you are able to track reward points of each customer by navigating to their accounts in the backend.
Go to Customers ⇒ All Customers and select a customer to see details. Reward Points are placed in a separate section for easy management. Detailed information of points
2.8. Module configuration
Go to Store ⇒ Configuration ⇒ BSSCommerce Reward Points to start configuring.
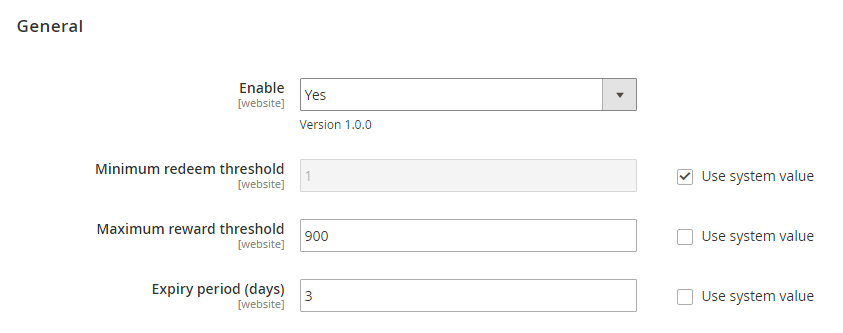
2.8.1. In General
Enable: Set Yes/No to enable/disable the extension
Minimum redeem threshold: the minimum number of points customers need to reach so that they can use these points for transactions.
Maximum reward threshold: the maximum number of points customers can get in their accounts.
Expiry period (days): how long reward points becomes expiry.
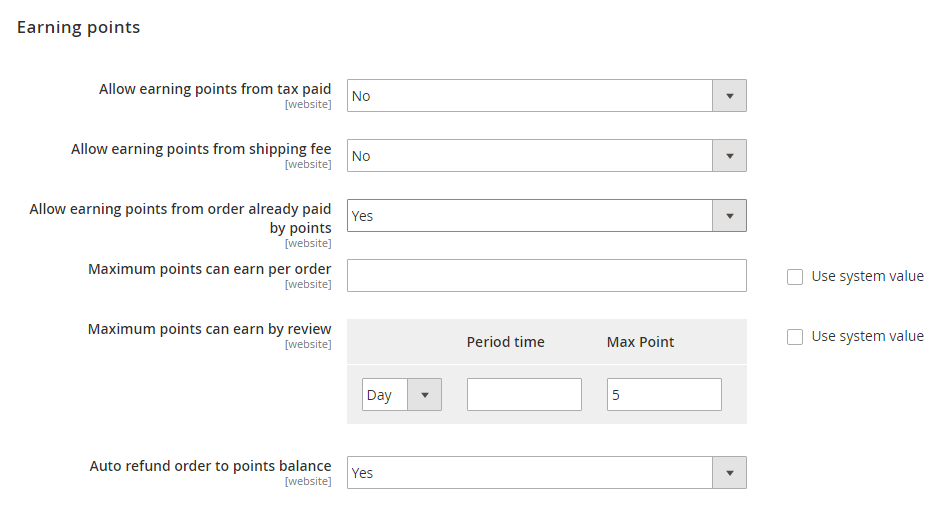
2.8.2. Earning points
Allow earning points from tax paid: customers can (cannot) receive points from tax payment based on exchange rates.
Allow earning points from shipping fee: customers can (cannot) receive points from shipping fee based on exchange rates.
Allow earning points from order already paid by points: set Yes/No to enable/disable giving points for customers who place orders by using available points in their accounts.
Maximum points can earn per order: specify the maximum number of points can be given to customers when they place an order.
Maximum points can earn by review: indicate the maximum number of points customers can receive after writing reviews corresponding to the period of time. This function is used in case you create a “Submit Review” custom rule and desire to separate the points and time writing reviews.
For example: a customer submits reviews right after 1 day of purchase could get more points than another one submits after one week.
- Select Day/Month/Year from the drop-down list.
- Choose a number to indicate a period of time.
- Determine the maximum number of points given to customers.
Auto refund order to point balance: set Yes/No to enable/disable refunding order to the point balance in customer accounts.
If you set Yes, a number of points corresponding to the order value are added to customer accounts. (based on the exchange rate).
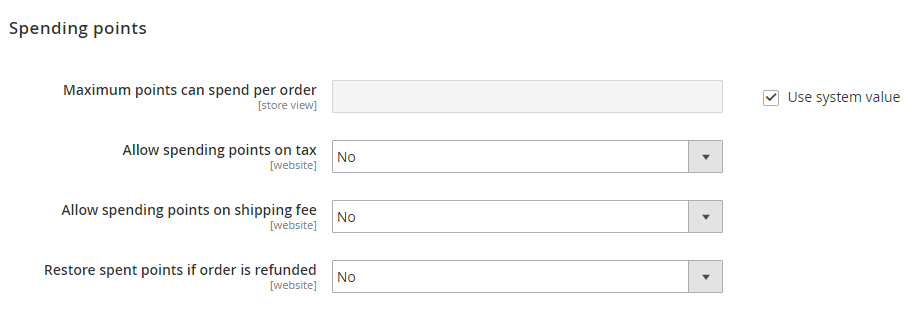
2.8.3. Spending points
Maximum points can spend for order: specify the maximum number of points customers can use for payment.
Allow spending points on tax: Set Yes/No to enable/disable using points to pay for the tax.
Allow spending points on shipping fee: Set Yes/No to enable/disable using points to pay for shipping fees.
Restore spent points if order is refunded: set Yes to allow returning the number of points already used for placing an order in case this order is refunded.
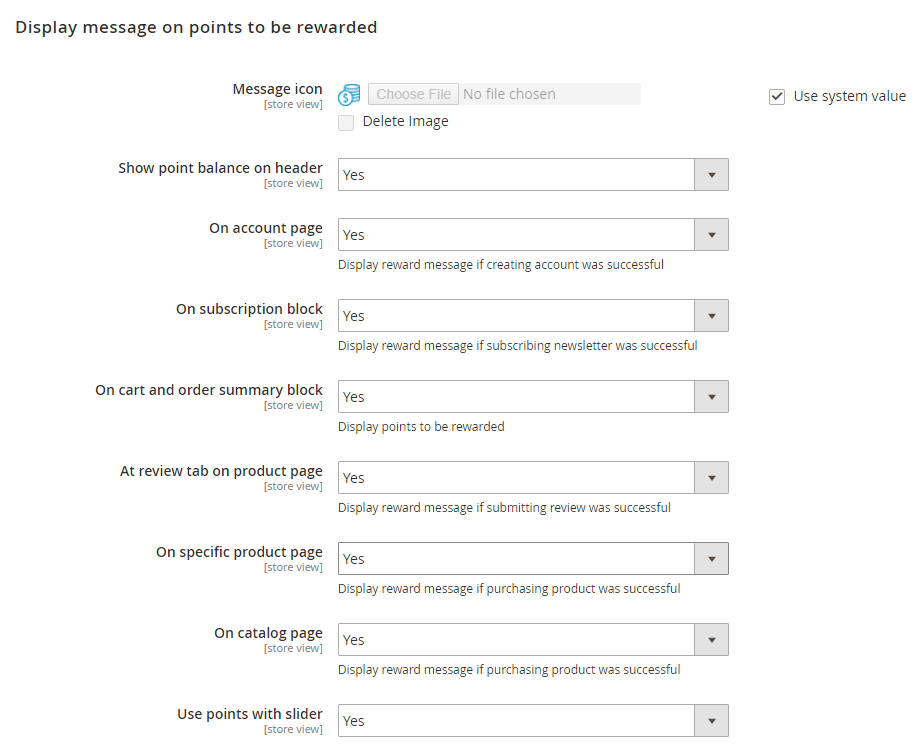
2.8.4. Display message on points to be rewarded
Message icon: upload an icon to symbolize for points.
Show point balance on header: set Yes/No to show/hide point balance on the website header.
On account page: set Yes to display the number of points customers can get after creating an account.
On subscription block: set Yes to show the number of points customers can get after subscribing newsletter.
On Cart and order summary block: set Yes to display the number of points customers can get.
At review tab on product page: set Yes to show the number of points customers can get after submitting a review and the review is approved by the store owner.
On specific product page: set Yes to display the number of points customers can get when purchasing products.
*Note:
- For simple, virtual and downloadable products: display the number of points set up in each product edit page.
- For configurable and grouped products: display the number of points according to each children product.
- For bundle products:
On catalog page: set Yes to show the number of points can be given.
Use points with slider: display a slider of points to determine how many point to spend on the shopping cart or checkout page.
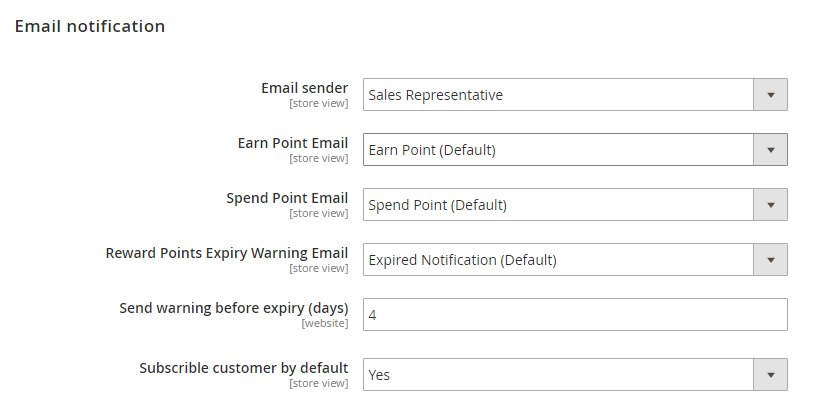
2.8.5. Email Notification
Email sender: select an email as the sender.
Earn point email: select an email template to notify customers about receiving points.
Spend point email: select an email template to notify customers about spending points.
Reward points expiry warning email: select an email template to notify customers about point expiry.
Send warning before expiry (days): before points become expiry, stores need to send a warning to customers before a number of days.
Subscribe customer by default: set Yes/No to
3. How customers use reward points?
When customers complete some actions such as registering, purchasing products, submitting reviews, and so on, they are rewarded points to their accounts. These points can be used for payment during the checkout process or refund the order.
3.1. In the shopping cart
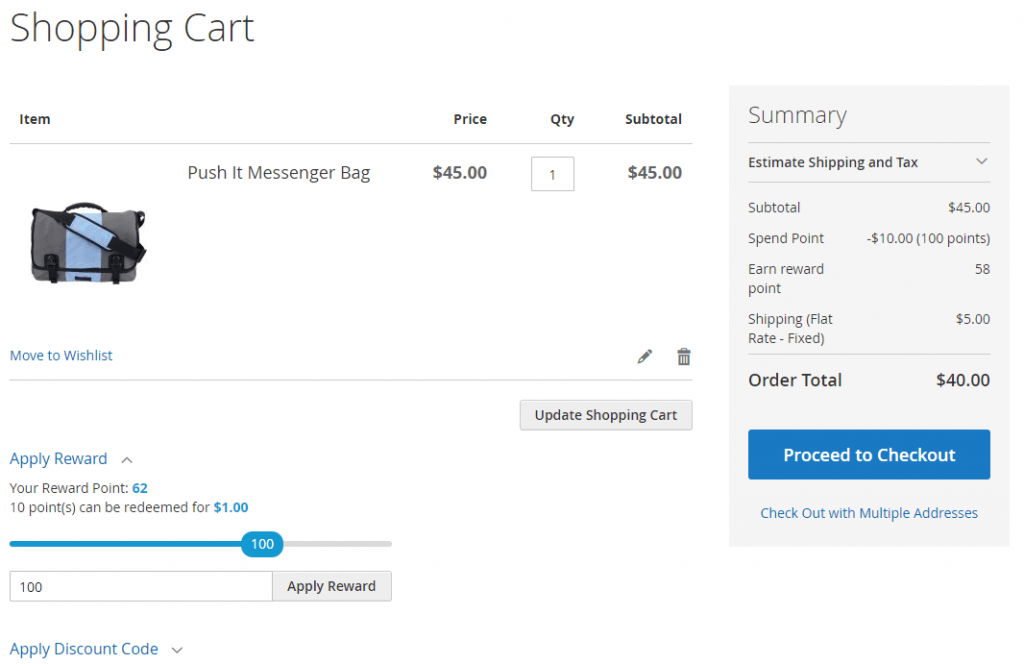
In the shopping cart, there are 2 ways to redeem reward points to receive discount.
- Use slider to determine how many points to redeem.
- Enter a number to specify the number of points.
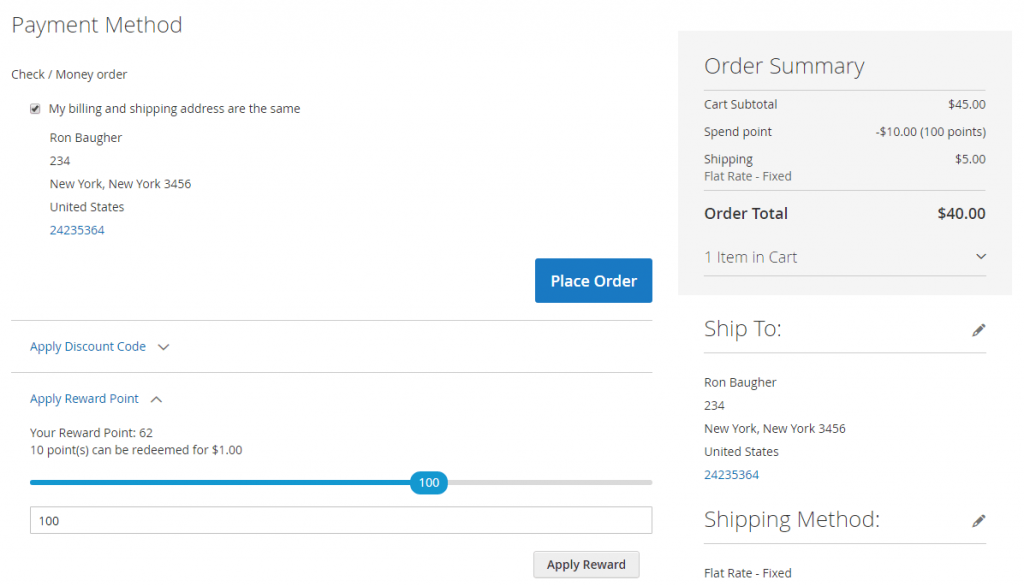
3.2. In the checkout page
3.3. In customer account
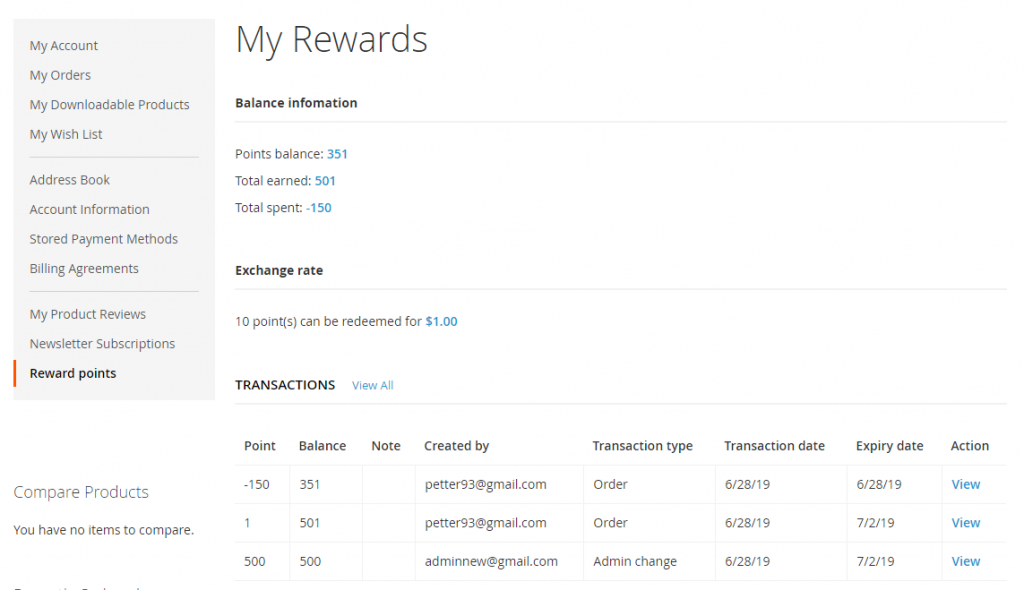
Customers can track point history and transactions using points in separate Reward points section of My Account:
- Point balance.
- Information about exchange rates.
- Transactions: display info about transaction type, point changes, point balance after each transaction, point expiry dates. Customer can click View to know more details of each one.
4. API Support
We provide you lists of Restful API and GraphQL API that our Magento 2 Reward Point extension supports.
*Note:
- Restful API support is included in the main module package (from M2 Reward Point v1.0.3).
- GraphQL API support is included in the GraphQL package, acting as an add-on for anyone who needs to use GraphQL.
4.1. Restful API
| No | API | URL | Method |
| 1 | Get Store Config of the module | {{base_url}}/rest/V1/bsscommerce/rewardpoints/storeconfigs/:storeview | GET |
|
2
|
Get reward point information of each customer via rest api of default
|
{{base_url}}/rest/V1/customers/me |
GET
|
| {{base_url}}/rest/V1/customers/:customerId | |||
| 3 | Get transaction information via customer | {{base_url}}/rest/V1/bsscommerce/rewardpoints/transaction/:customerid | GET |
| 4 | Apply reward point to quote | {{base_url}}/rest/V1/bsscommerce/rewardpoints/:quoteId/applypoint | POST |
| 5 | Apply earn point for quote (earn point is the reward point that customer get after quoting to meet all criteria according to config rule of module) | {{base_url}}/rest/V1/bsscommerce/rewardpoints/:quoteId | POST |
|
6
|
Get reward point information in quote via rest default
|
{{base_url}}/rest/V1/carts/:cartId/totals |
GET
|
| {{base_url}}/rest/V1/carts/mine/totals | |||
| 7 | Give customer point | {{base_url}}/rest/V1/bsscommerce/rewardpoints/newpoint | POST |
4.2. GraphQL API
| No | GraphQl | URL | Method |
| 1 | Get Store Config of the module | {{base_url}}/graphql | POST |
| 2 | Get reward point information via GraphQL customer default | {{base_url}}/graphql | POST |
| 3 | Get transaction information via customer | {{base_url}}/graphql | POST |
| 4 | Apply reward point to quote | {{base_url}}/graphql | POST |
| 5 | Add reward point information to query of products (ProductInterface) | {{base_url}}/graphql | POST |
| 6 | Update Notification | {{base_url}}/graphql | POST |
| 7 | Get rule reward point information which is active | {{base_url}}/graphql | POST |