
1. Overview
Let’s Magento 2 Marketing Combo do its magic and turn out every marketing campaign you have with flying colors. Everything appears on the front end now is customizable at your fingertip with these six modules.
- Free Shipping Bar
- Review Reminder
- Countdown Timer
- Product Label
- Popup
- Promotion Bar
2. How Does It Work?
To enable features of Marketing Combo in your Magento 2 website, please go to
Stores ⇒ Configuration ⇒ BSS COMMERCE
2.1 Magento 2 Free Shipping Bar
Choose Free Shipping Bar under BSS COMMERCE tab,
2.1.1 General Configuration
In Enabled: Choose Yes to enable the module or choose No to disable it. The module can be enabled/disable on Store view level.
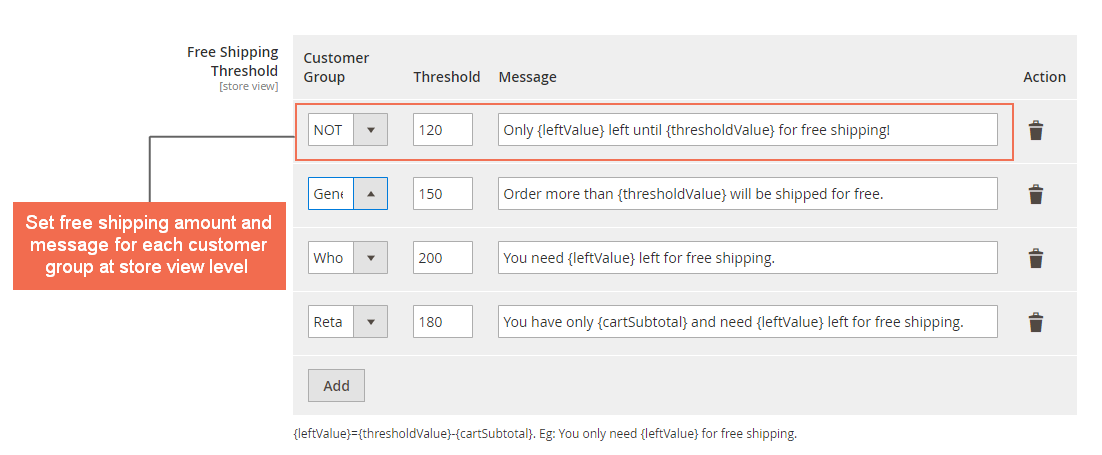
In Free Shipping Threshold: For each Customer Group, choose the minimum amount for free shipping at the Threshold box. In the Message box, set the message displaying in the message bar. You can use these 3 variables: {leftValue}, {thresholdValue} and {cartSubtotal}. Please remind that {leftValue}={thresholdValue}-{cartSubtotal}.
The scope of the settings is Store View. Hence you can customize the message in different languages and the Threshold value at different currencies for each store view.
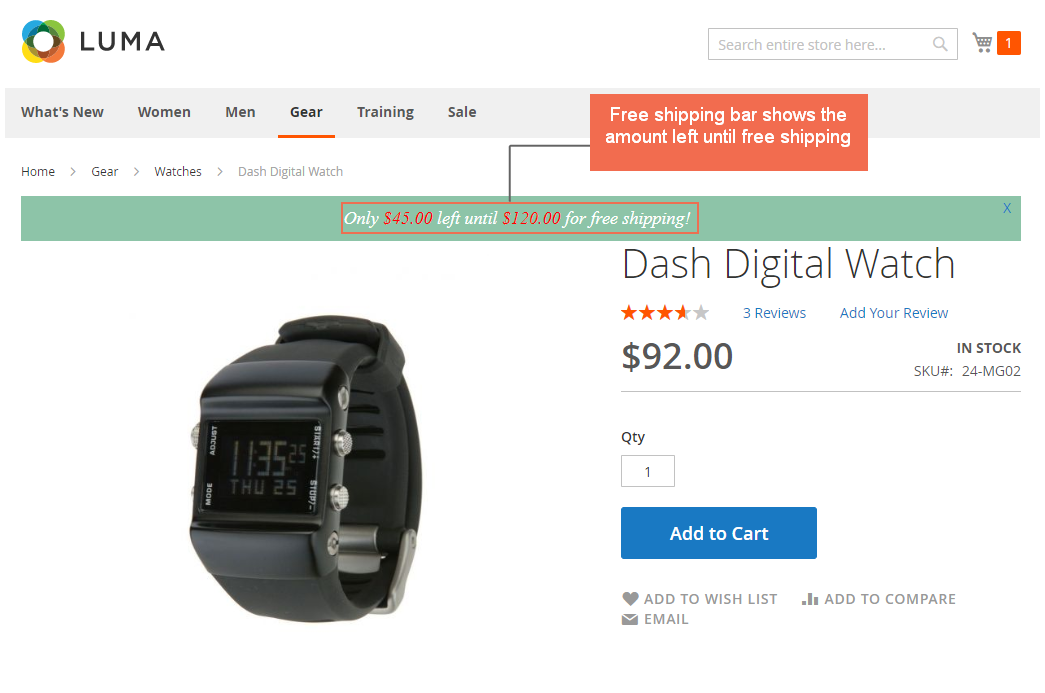
Below is an example of the free shipping bar showing to the not-logged-in customer group.
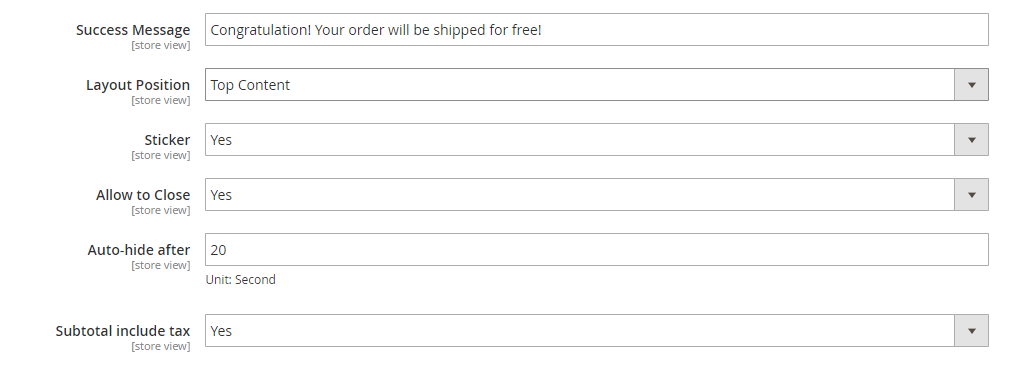
In Success Message: Customize the message showing when a buyer reaches the free shipping minimum amount.
In Layout Position: Choose the position you want to display the free shipping bar. You can choose among Top Content or Top Page.
In Sticker: Choose Yes to keep the free shipping bar showing during the scrolling down of the page, otherwise choose No.
In Allow to Close: Choose Yes to allow buyers to close the free shipping message bar, otherwise choose No.
In Auto-hide after: Choose the period of time (unit: second) after which the message bar will be hidden. If you set the value to 0, the bar will always be shown.
In Auto-hide after: Choose the period of time (unit: second) after which the message bar will be hidden. If you set the value to 0, the bar will always be shown.
In Subtotal Include Tax: Choose Yes to include tax in the subtotal displaying in the free shipping message bar, otherwise choose No.
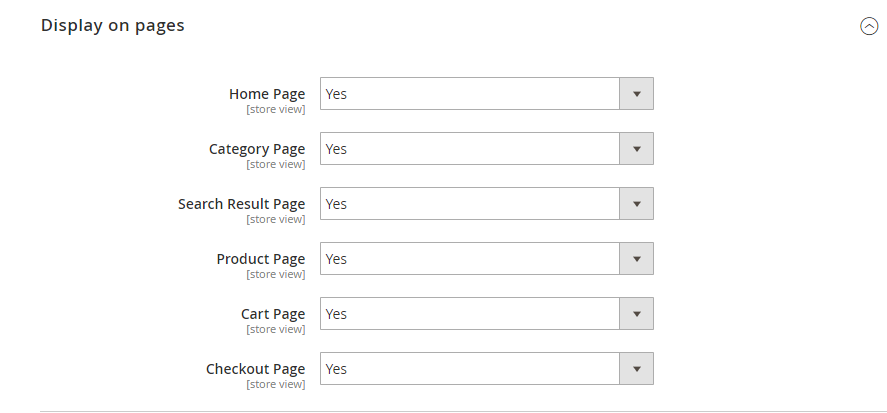
2.2.2 Display on Pages
In Homepage: Choose Yes to display free shipping message bar on the Homepage, otherwise choose No.
In Category Page: Choose Yes to display free shipping message bar on category pages, otherwise choose No.
In Product Page: Choose Yes to display free shipping message bar on product pages, otherwise choose No.
In Cart Page: Choose Yes to display free shipping message bar on shopping cart page, otherwise choose No.
In Checkout Page: Choose Yes to display free shipping message bar on the checkout page, otherwise choose No.
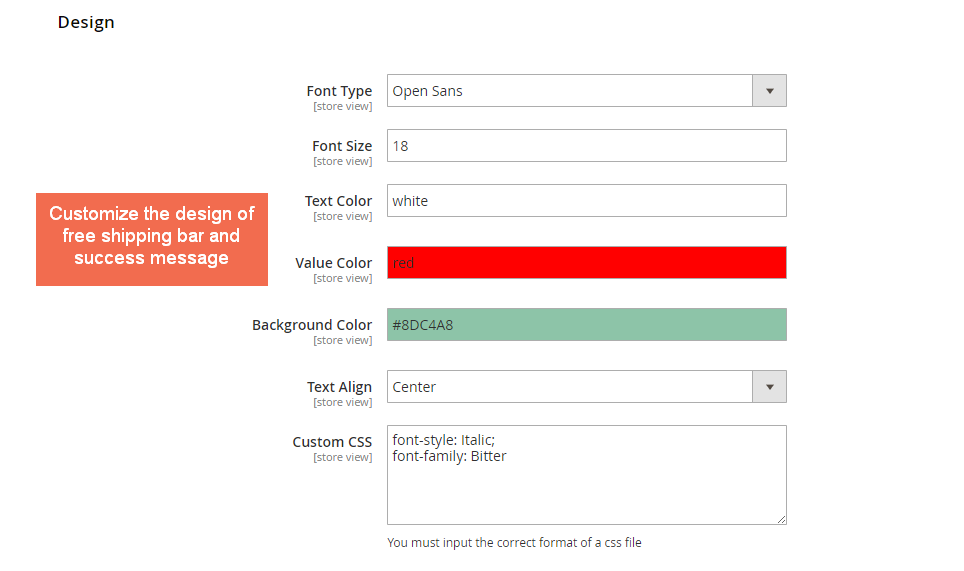
2.3.3 Design Settings
In Font Type: Choose the font type for the text on free shipping message bar.
In Font Size: Choose the font size for the text on free shipping message bar.
In Text Color: Choose the color for the text on free shipping message bar.
In Value Color: Choose the color for the text of {leftValue}, {thresholdValue} and {cartSubtotal} on free shipping message bar.
In Background Color: Choose the color for the background of free shipping message bar.
In Text Align: Choose the align for the text on free shipping message bar.
In Custom CSS: Admin can customize CSS for the text on free shipping message bar. But admin cannot set the width on the Custom CSS option as it may affect the responsive of the message bar.
2.2 Magento 2 Review Reminder
Choose Review Reminder under BSS COMMERCE tab,
2.2.1 General Configs
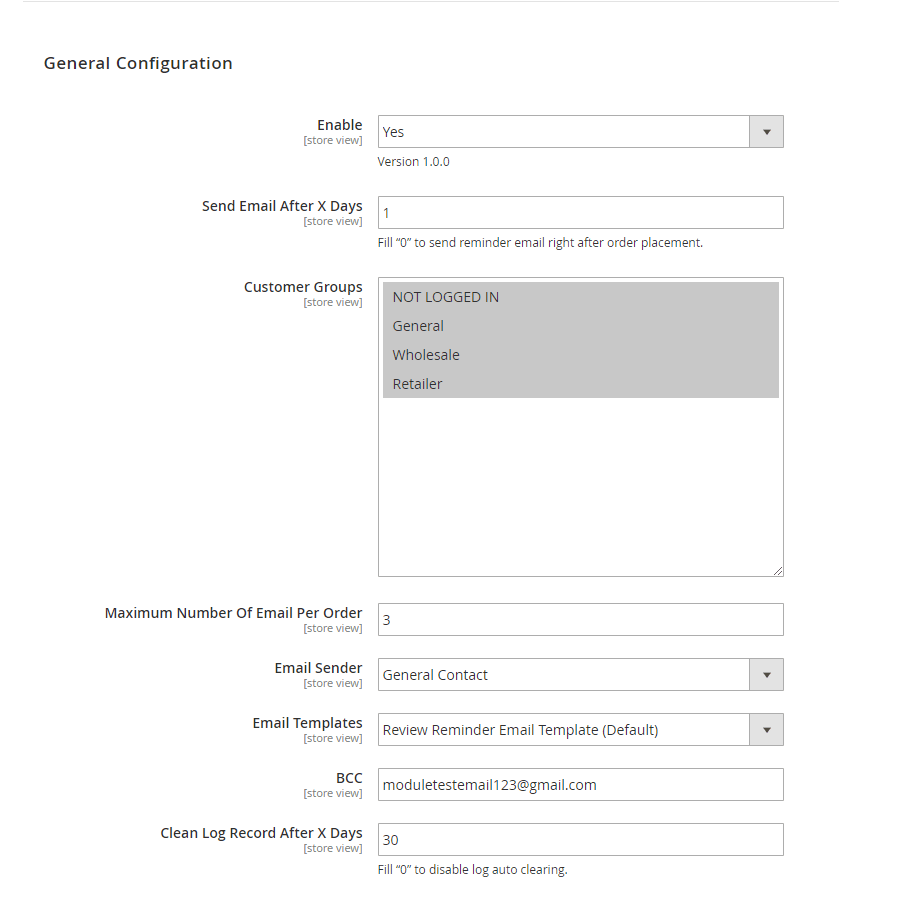
- In Enable, choose Yes to have Magento 2 Review Reminder extension worked on sites, or choose No to disable the module.
- In Send Email After X Days, admins can set the days after which the first review reminder email will be sent. Fill “0”, then the reminder notification is immediately delivered after customers complete their orders.
- In Customer Groups, please select customer group to apply automated reminder emails. Admin can choose multiple groups by holding Ctrl and click.
- In Maximum Number Of Email Per Order, insert a number to configure the limitation of sent emails. Magento 2 Review Reminder extension will stop sending notifications when customers submit reviews for all ordered items or sent counts reach the maximum.
- In Email Sender, choose Sender email to send review reminder emails.
- In Email Templates, one template is selected to apply to reminder notifications.
- In BCC field, insert various emails to send reminder message without customers knowing other recipients.
- In Clear Log Record after X Days, insert a number to automatically remove emails from Review Reminder Logs when it reaches the specific time. Filling “0” means disabling log auto clearing feature.
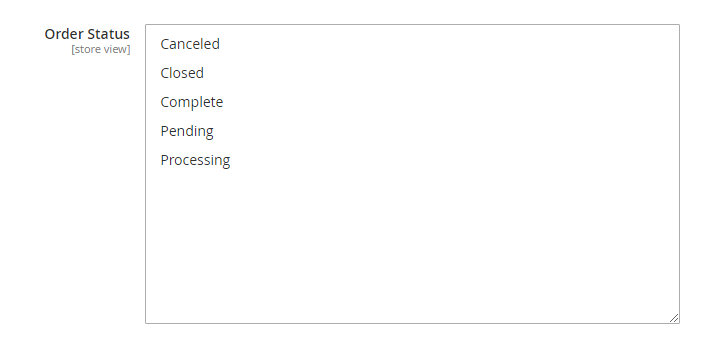
- In Order Status, select Order status that the module will send review reminder emais to customers when their orders have such status.
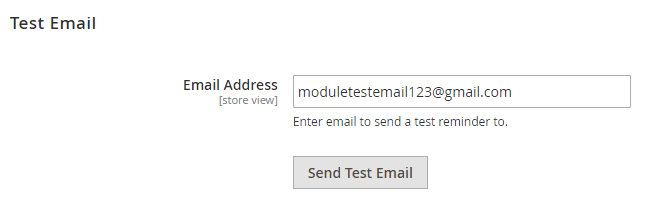
- In Test Email, insert an email to send a test reminder message.
The coupon is one of the most outstanding features making Review Reminder for Magento 2 extension different from other competitors.
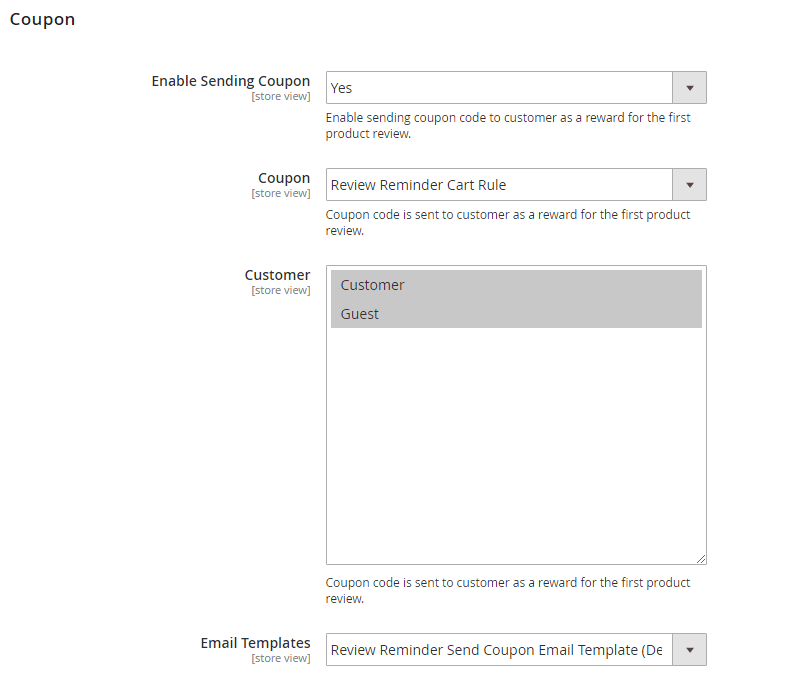
In Enable Sending Coupon: Choose Yes to enable this function. Store owners can send emails with coupon codes to rewarded customers for the first reviews.
- In Coupon, choose Review Reminder Cart Rule to enable rewarded code to be sent in default template as a gift for customers’ first review submission, or choose No to disable this function.
This rule is automatically created when you install this extension. Coupon code is auto-generated with default discount as 10% and no expired date.
After customers submit reviews and store owners approve these reviews, emails including the coupon code are sent to customers.
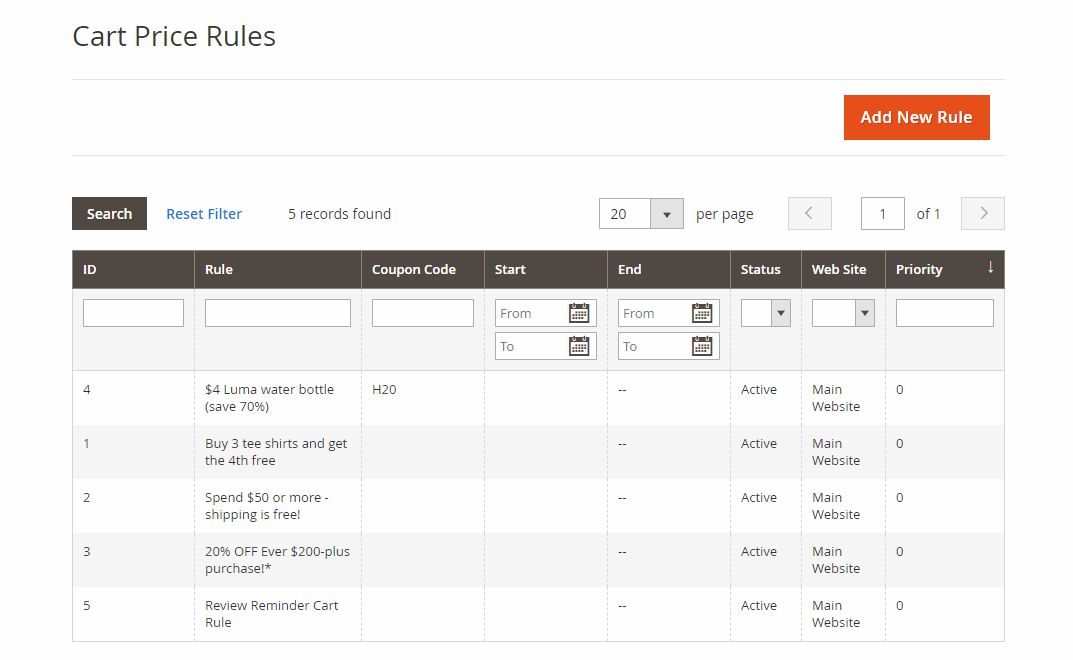
If admins want to add a new coupon rule or change existing rule, please go to Marketing ⇒ Promotions ⇒ Cart Price Rules, click and edit.
- In Customer: Select the type of customers to whom you will send the emails.
*Note: Only customers go to the product page and submit reviews by clicking the product link in the review reminder email, coupon emails can be sent to them.
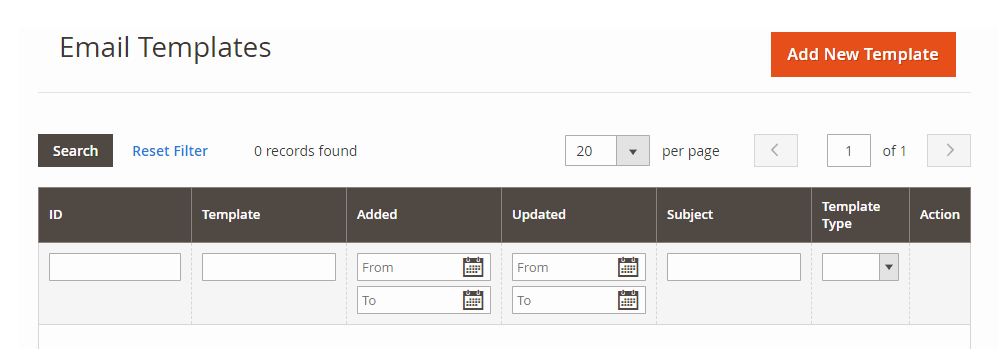
- In Email Templates, we have created Review Reminder Send Coupon Email Template (Default) in advance for admins to apply. For a new email template, admins can follow Marketing ⇒ Communications ⇒ Email Templates and select Add New Template button to open New Template tab.
2.2.2 Review Reminder Logs
Please go to Marketing ⇒ Review Reminder
To make it more convenient for the management of orders and review reminder emails, Magento 2 Review Reminder extension provides admins with Review Reminder Logs. In this grid, admin can track order information, preview, manually send reminder messages, and delete emails from logs.

If admins schedule a specific time in Clear Log Record after X Day of General Configuration, then emails will be automatically removed set days after being included in Review Reminder Logs.
2.3 Magento 2 Countdown Timer
Choose Countdown Timer under BSS COMMERCE tab,
2.3.1 General Configs
2.3.1.1 Enable

In Enable, choose Yes to enable the extension, or No to disable it.
2.3.1.2 Promotion Content
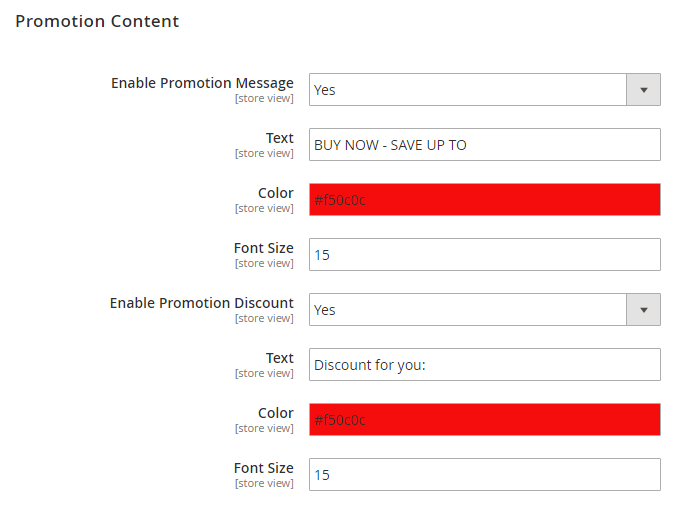
In Enable Promotion Message, choose Yes to enable the promotion message.
In Text, enter text for the promotion message.
In Color, pick a color for the promotion message.
In Font Size, define a font size for the promotion message.
In Enable Promotion Discount, choose Yes to enable the promotion discount.
In Text, enter text for the promotion discount.
In Color, pick a color for the promotion discount.
In Font Size, define a font size for the promotion discount.
*Note: The value of promotion message and promotion discount will be automatically calculated based on the special price.
For example: original price = $100, special price = $75
The promotion message value is: $25
The promotion discount value is: 25%
2.3.1.3 Coming Soon Countdown
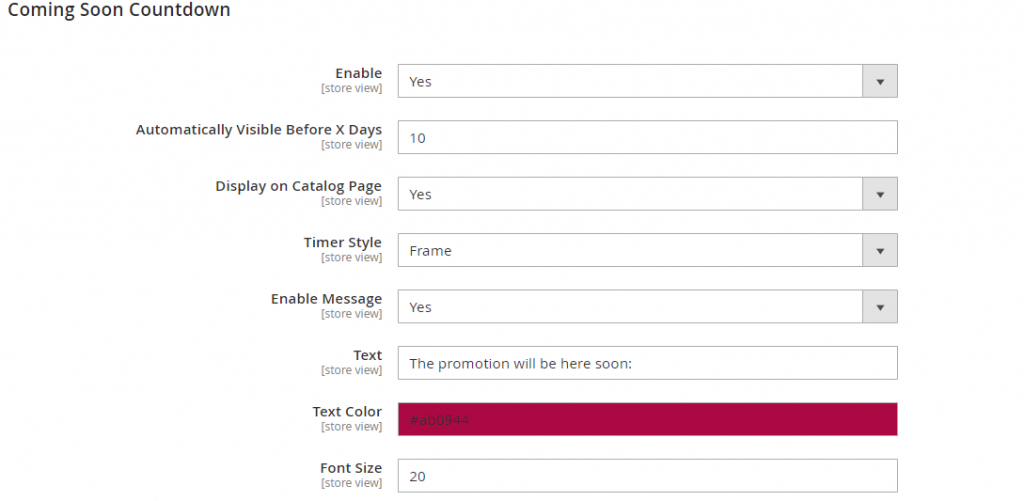
In Enable, choose Yes to enable Coming Soon Countdown. This countdown is used for notifying customers about the upcoming promotion.
In Display X Days Before, enter the number of days that the Coming Soon Countdown is displayed before the starting date of the special price.
For example:
The promotion is valid from May 10 to May 15. Set Display X Days Before = 2
Coming Soon Countdown is displayed on May 8.
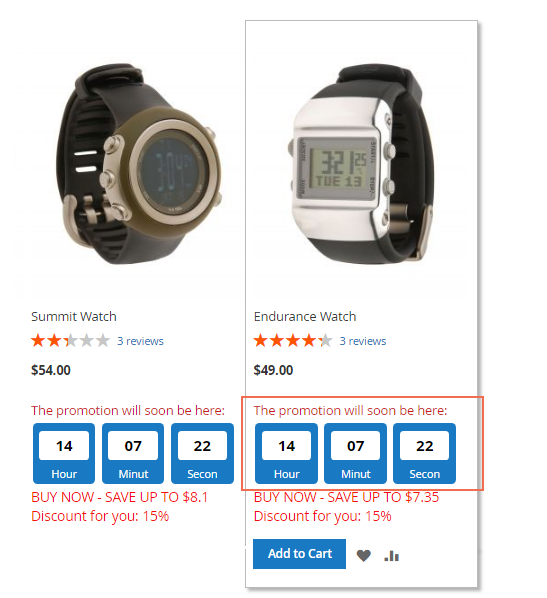
In Display on Catalog Page, choose Yes to enable the Coming Soon Countdown on the catalog page.
In Time Countdown Style, choose one of the 6 following styles: Default, Frame, Square, Circle, Loading, and Draft.
In Use Time Countdown Message, choose Yes to enable the Coming Soon Countdown message.
In Time Countdown Message, fill in the Coming Soon Countdown message.
In Color of Message, select a color for the Coming Soon Countdown message.
In Font Size of Message, define a font size for the Coming Soon Countdown message.
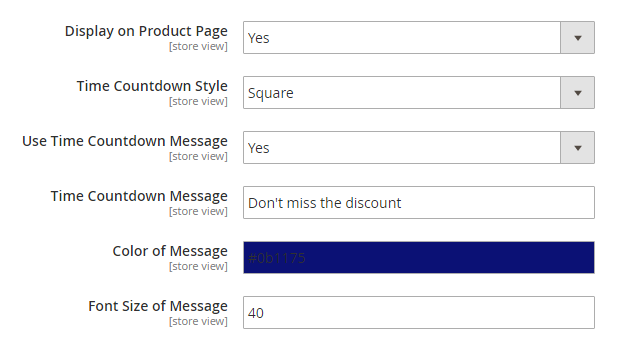
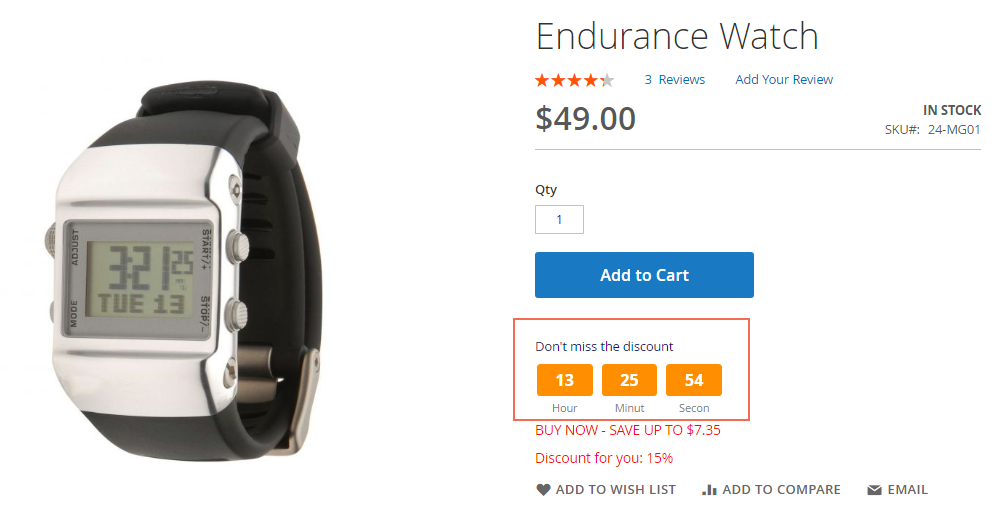
In Display on Product Page, choose Yes to enable the Start Time Countdown on the product page.
All the rest of the config is the same as the setup of Start Time Countdown on the catalog page.
*Note: With the different setup, you can specify different styles, messages and designs for the Start Time Countdown on the product page and catalog page.
For example:
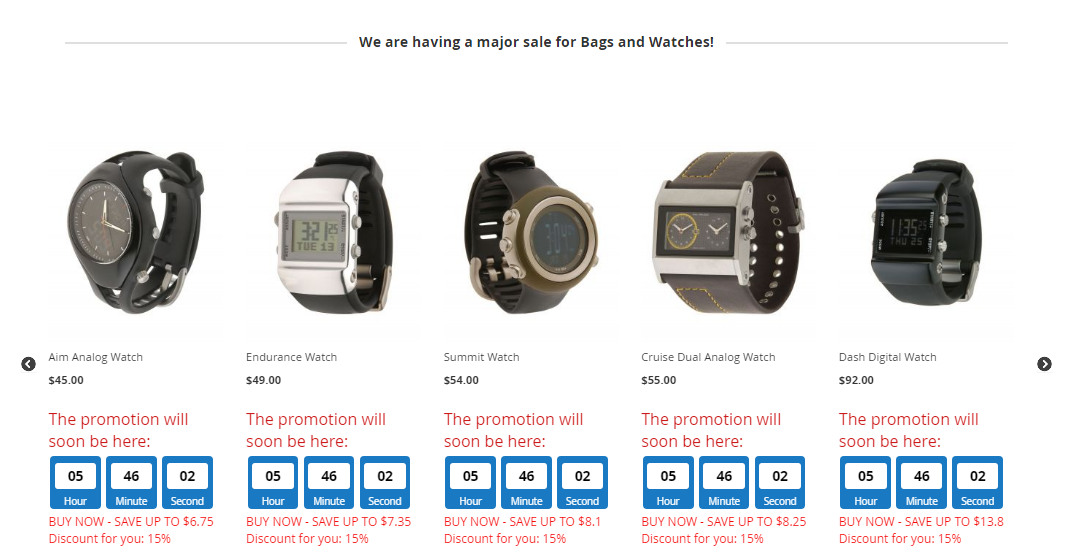
- Start Time Countdown on the catalog page. Style: Frame, Message: The promotion will soon be here.
- Start Time Countdown on the product page. Style: Square, Message: Don’t miss the discount.
2.3.1.4 Promotion Timer
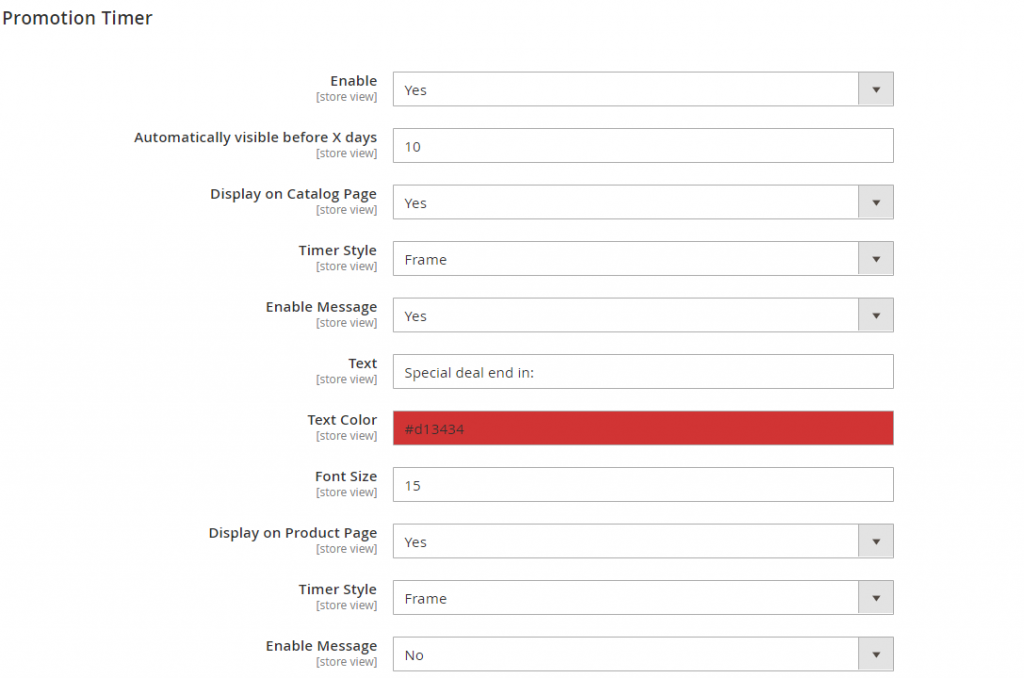
In Promotion Countdown, choose Yes to enable End Time Countdown. This countdown is used for reminding customers of the current promotion.
In Display X Days Before, enter the number of days that the End Time Countdown is displayed before the ending date of the special price.
For example:
The promotion is valid from May 10 to May 15. Set Display X Days Before = 3
Promotion Timer Countdown is displayed on May 12.
In Display on Catalog Page, choose Yes to enable the Promotion Timer Countdown on the catalog page.
In Time Style, choose one of the 6 following styles: Default, Frame, Square, Circle, Loading, Draft.
In Use Time Countdown Message, choose Yes to enable the End Time Countdown message.
In Time Countdown Message, fill in the End Time Countdown message.
In Color of Message, select color for the End Time Countdown message.
In Font Size of Message, define font size for the Start Time Countdown message.
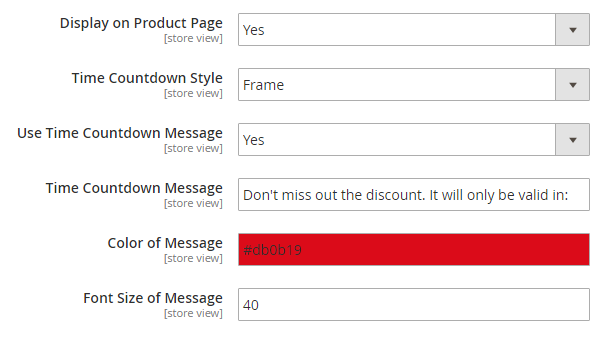
In Display on Product Page, choose Yes to enable the End Time Countdown on product page.
All the rest of config is the same as the setup of End Time Countdown on the catalog page.
2.3.1.5 Search Engine Optimization
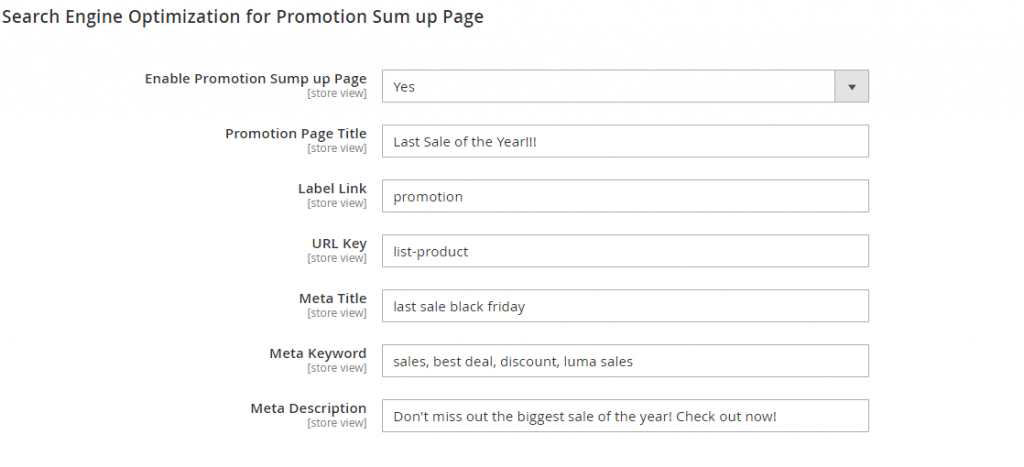
A promotion page is automatically generated to present all discounted products with a countdown timer. This separated page is supported with basic SEO config:
In Promotion Page Title, enter the name placed on the header of the promotion page.
In URL Key, define the URL key for the promotion page.
In Meta Title, fill in meta title for the promotion page. The standard length of the meta title is around 60 characters.
In Meta Keyword, fill in meta keywords for the promotion page.
In Meta Description, fill in the meta description for the promotion page. The standard length of the meta description is around 300 characters.
2.3.2 Set Special Price for Products
Go to Catalog ⇒ Products.
Find the product you want to set special price, click the Edit button to go to the Product Edit Page.
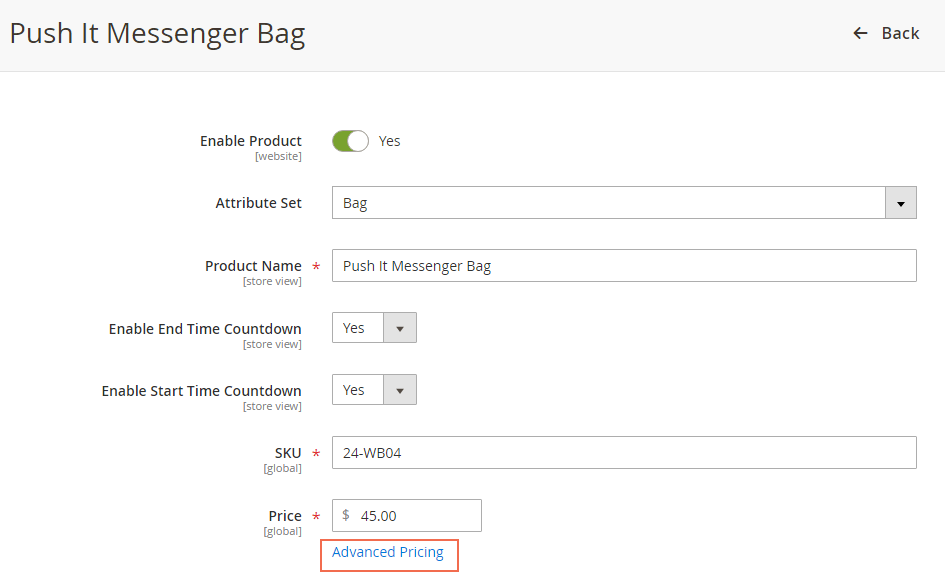
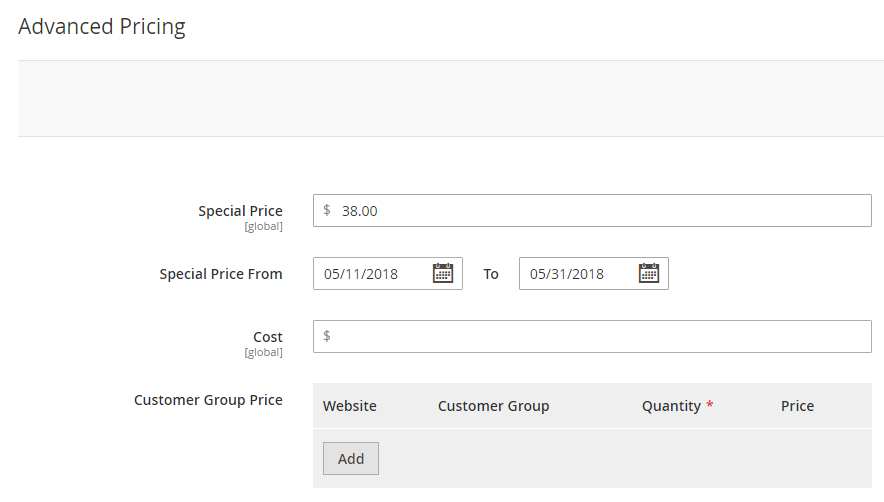
Enter the product special price in Special Price, then set the starting and ending date of the special.
In Enable End Time Countdown, the option is Yes by default. You can select No to disable End Time Countdown for each product.
In Enable Start Time Countdown, the option is Yes by default. You can select No to disable Start Time Countdown for each product.
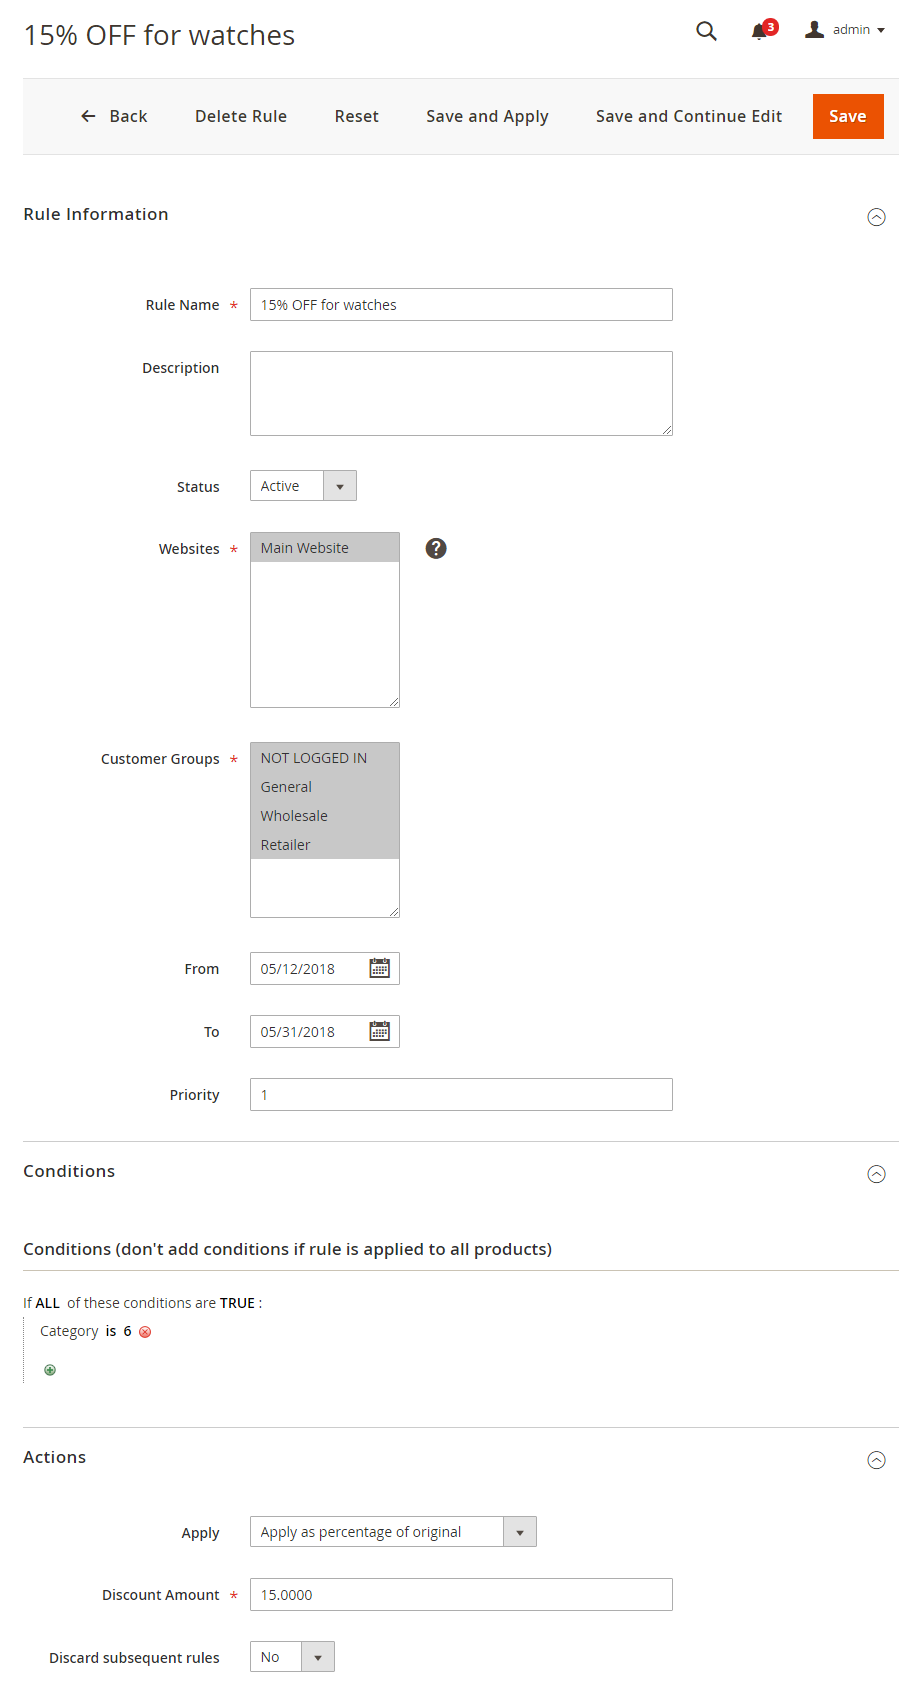
2.3.3 Set Catalog Price Rule
Go to Marketing ⇒ Promotions ⇒ Catalog Price Rule.
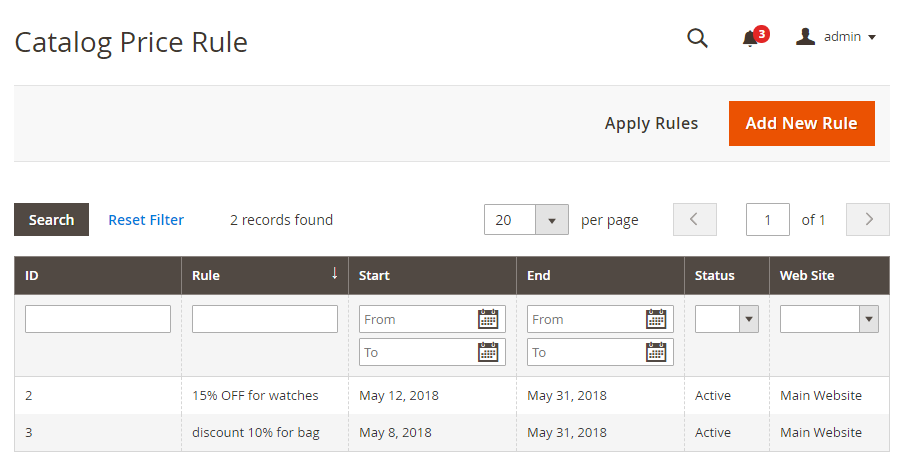
Click Add New Rule button. Then fill in the required fields in Rule Information, Conditions, and Actions.
Follow this example:
*Note: If a product follows both Special price rule and Catalog price rule, the extension will prioritize these 3 situations:
- Countdown will apply catalog price rule or special price depending on which one is in effect.
- With products with both rules and in the valid time, Countdown will be applied for a product with cheaper price.
- With products that are near the valid time, Countdown will be applied for the valid time that is earlier.
2.3.4 Insert Widget for Time Countdown
Go to Content ⇒ Elements ⇒ Widgets.
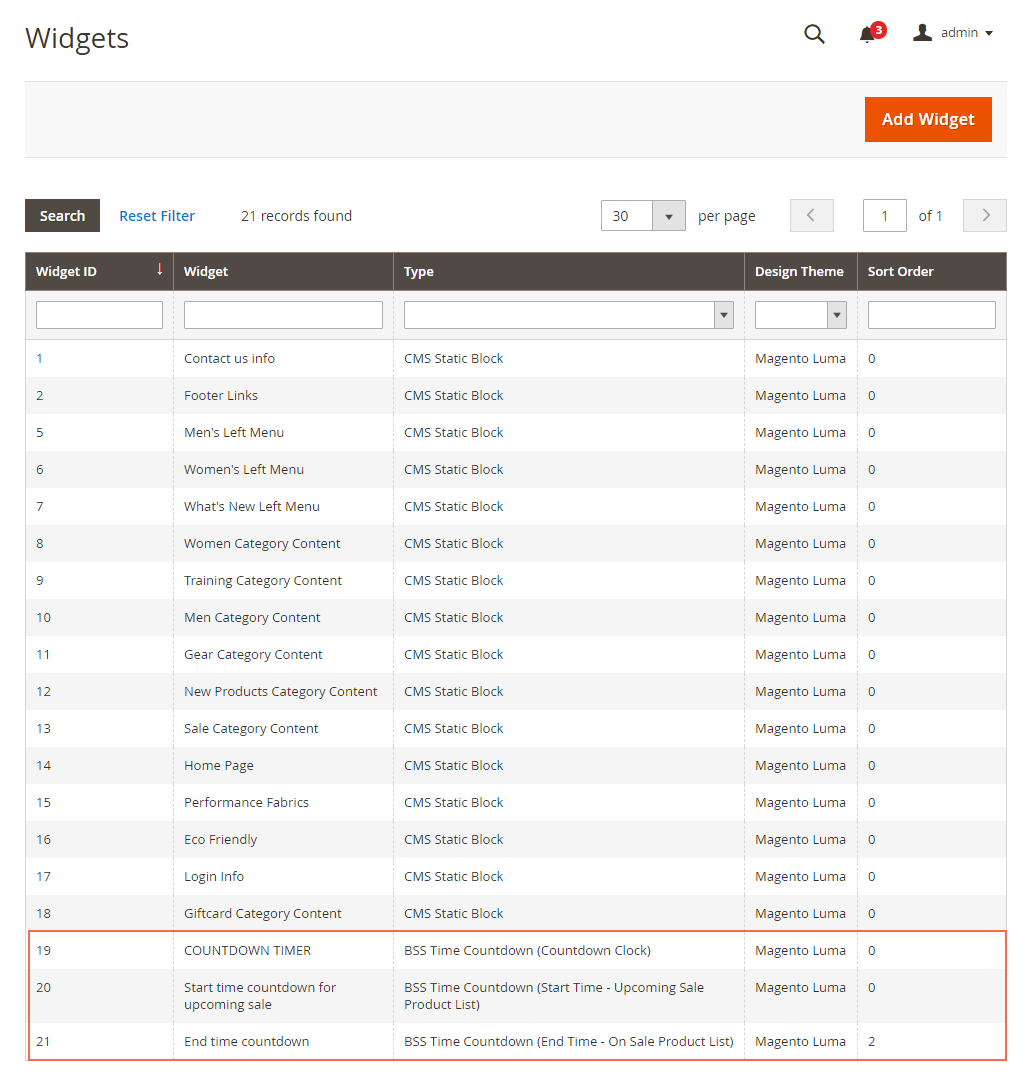
Click Add Widget button to create a new widget.
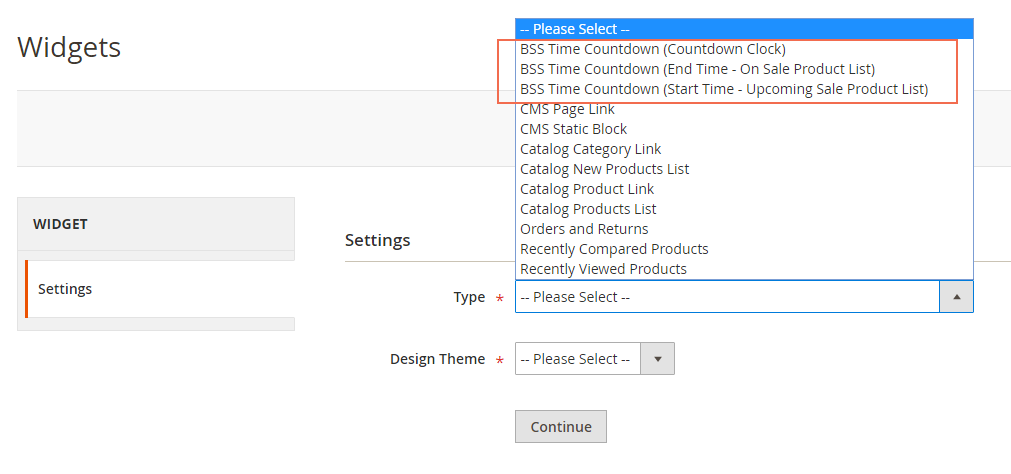
2.3.4.1 Countdown Clock Widget
To create the Countdown Clock Widget, choose BSS Time Countdown (Countdown Clock) in Type.
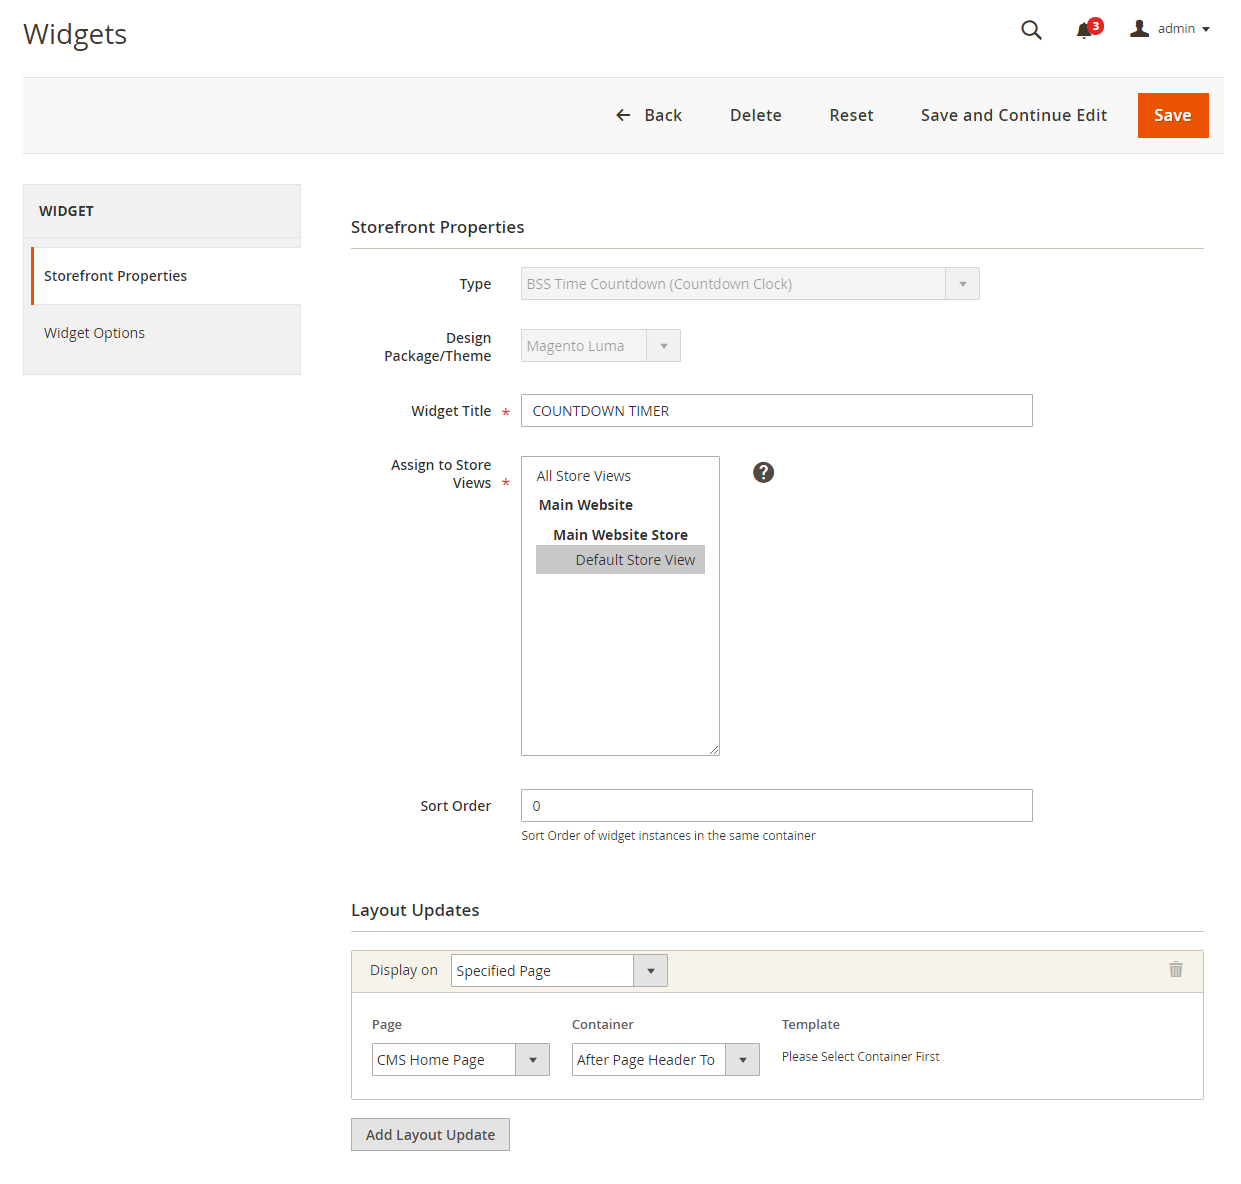
Fill in the required field in Storefront Properties. Follow the example:
In Widget Options, follow this instruction:
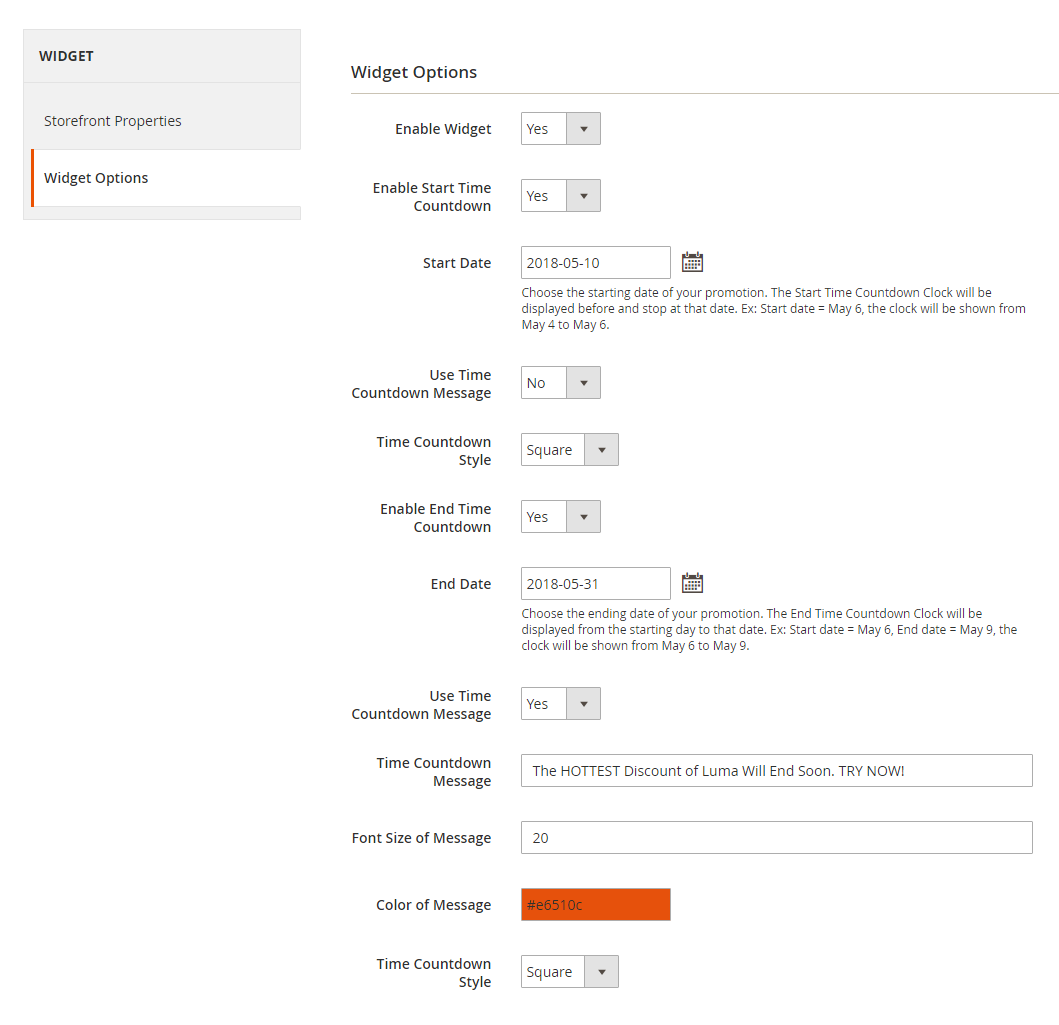
In Enable Widget, choose Yes to activate the widget.
In Enable Start Time, choose Yes to enable the Start Time Countdown Clock.
In Start Date, select the starting date of your promotion.
In Use Time Countdown Message, if choose Yes these 2 following configs will be displayed:
- Time Countdown Message: Enter the message for the Start Time Countdown Clock.
- Color of Message: Choose the color of the Start Time Countdown Clock message.
In Time Countdown Style, choose one of the 2 styles (Default, Square) for the Start Time Countdown Clock.
In Enable End Time, choose Yes to enable the End Time Countdown Clock.
In End Date, select the starting date of your promotion.
In Use Time Countdown Message, if choose Yes these 2 following configs will be displayed:
- Time Countdown Message: Enter the message for the End Time Countdown Clock.
- Color of Message: Choose the color of the End Time Countdown Clock message.
In Time Countdown Style, choose one of the 2 styles (Default, Square) for the End Time Countdown Clock.
This is an example of Countdown Clock Widget:

2.3.4.2 Start Time Countdown Widget – Upcoming Sale Widget
To create the Start Time Countdown Widget, choose BSS Time Countdown (Start Time – Upcoming Sale Product List) in Type.
Fill in the required field in Storefront Properties like the previous part.
To complete Widget Options, follow this instruction:
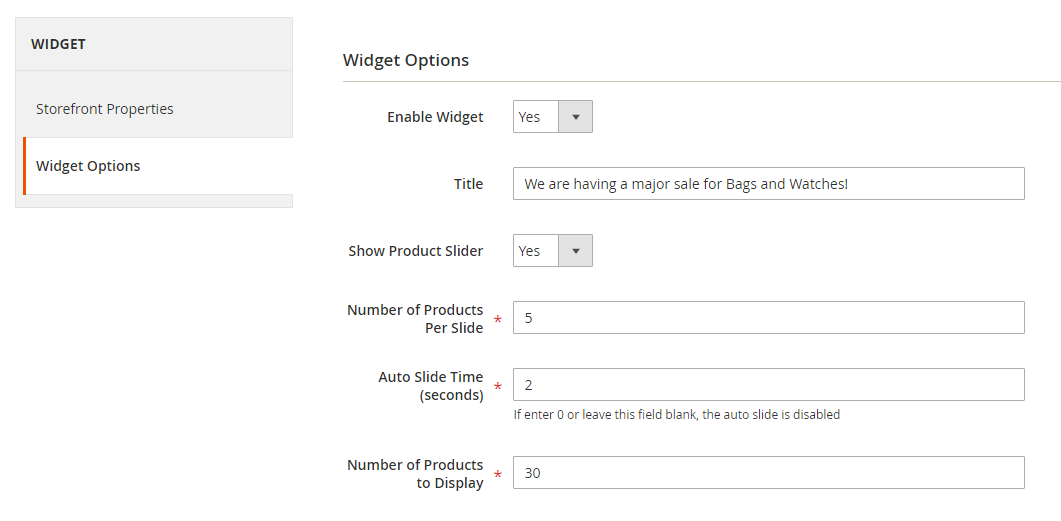
In Enable Widget, choose Yes to enable the widget.
In Title, fill in the title of the widget.
In Show Product Slider, choose Yes to display the discounted products in the slider.
In Number of Products Per Slide, restrict the number of products displayed on each slide.
In Auto Slide Time, decide the period of time each slide is automatically transited.
In Number of Products to Display, limit the number of products to be included in the slider. For example, you can display 30 products in total, and show 5 products per slide.
This is an example of Upcoming Sale Widget:
2.3.4.3 End Time Countdown Widget – On Sale Widget
The setup of On Sale Widget is the same as the Upcoming Sale Widget.
*Note: The Upcoming Sale Widget is calculated from the present time to the Start Time, while the On Sale Widget is calculated from the present time to the End Time.
If you make any change in the Catalog price rule, you need to reindex (reindex: System/Index Management).
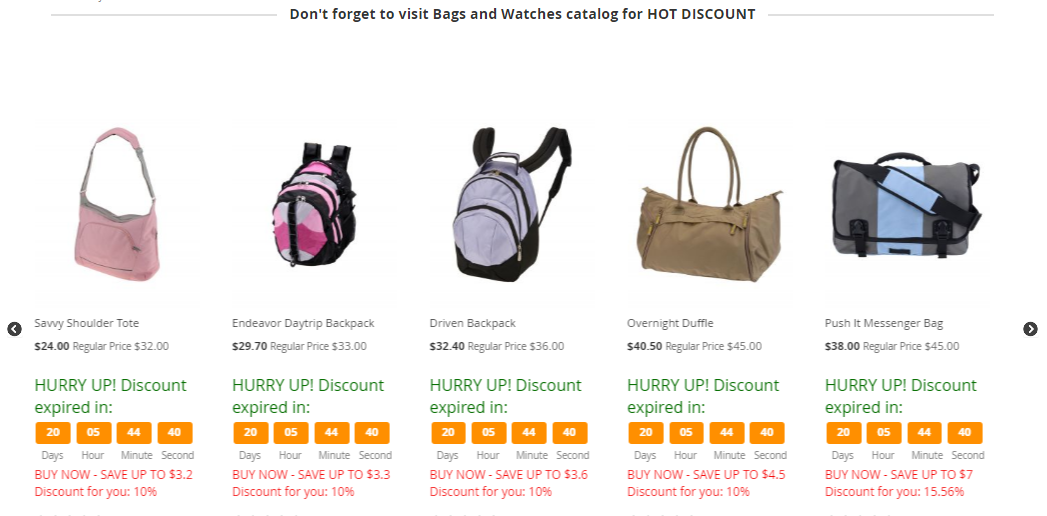
This is an example of On Sale Widget:
2.4 Magento 2 Product Label
Choose Product Label under BSS COMMERCE tab,
2.4.1 General Configuration

In Enable Module: choose Yes to enable the module, or No to disable it.
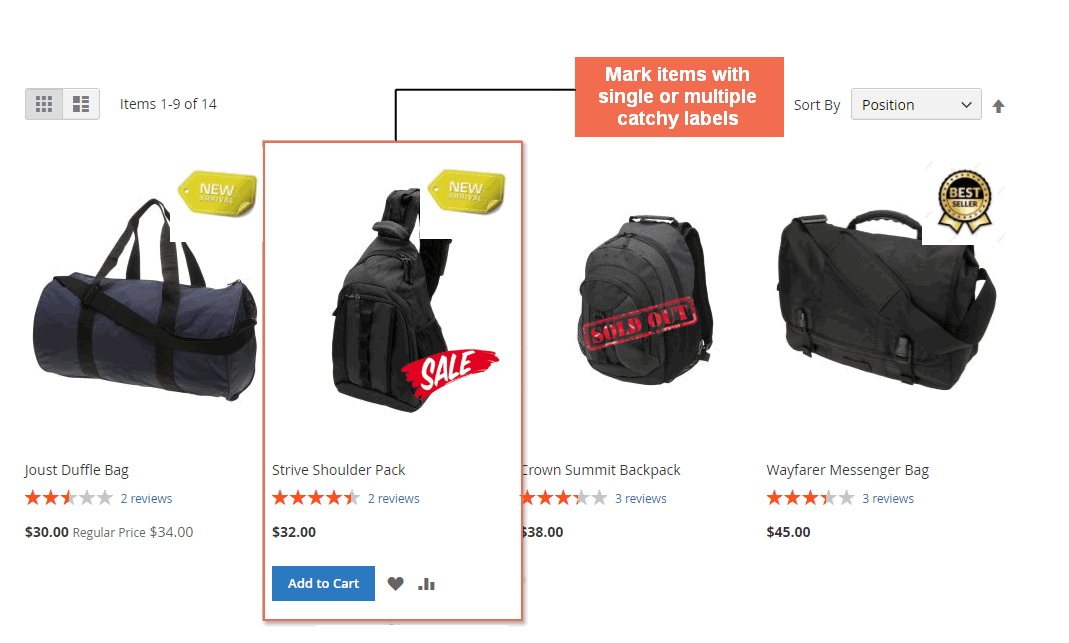
In Display multiple labels on the product: choose Yes to show various labels to the thumbnail image of the product that meets the set conditions. If the admin selects No, the only label with the highest priority will be applied.
In If product is out of stock, only show “Out of stock” label:
- If the admin selects Yes, all out-of-stock products are marked with one label in which “Apply to Out-of-stock Product” is set to Yes.
***Note:
- In case there are various labels set to “Apply to Out-of-stock Product,” the label having the highest priority is used.
- Even when those stock-out products meet the conditions of other labels, only “Out of stock” label will be shown.
- If the admin selects No, out-of-stock products can be marked with various labels.
In Label does not display on:
- Choose any page on which the display of product labels is excluded. Multiple-selection is allowed by holding Ctrl and clicking.
- Skip this field to show labels on all pages: Home Page, Catalog Page, Product Page, Shopping Cart Page, etc.
2.4.2 Product Label Grid
All created product labels are recorded in the grid for further management. Please follow Marketings ⇒ BSSCommerce ⇒ Product Label ⇒ Manage Label.
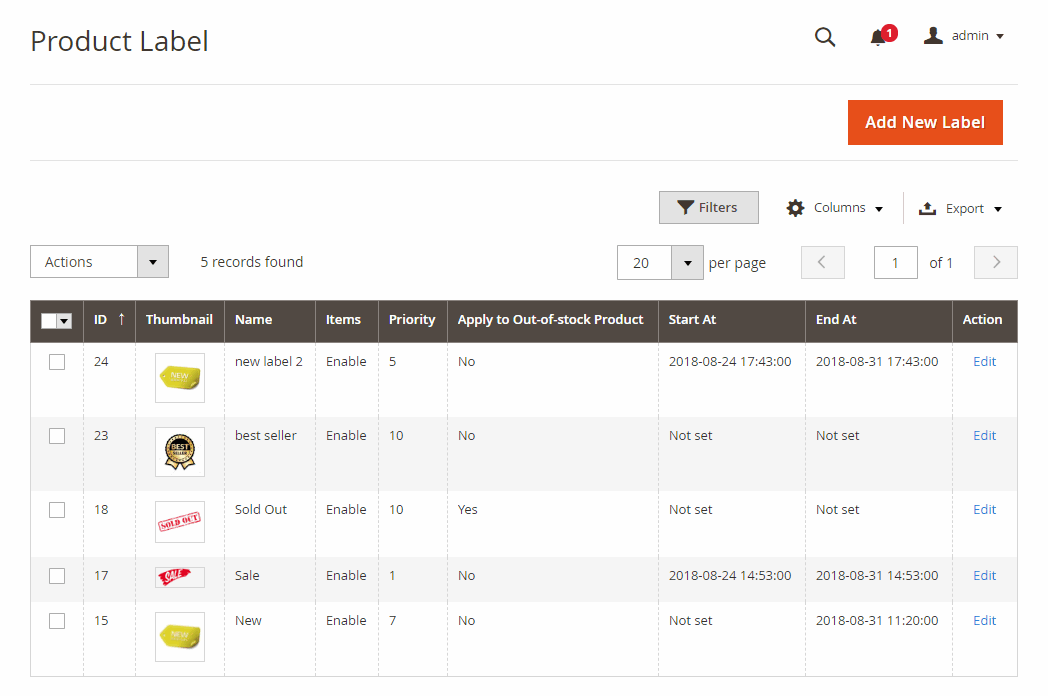
Product Label grid includes label image, label name, label status, priority, display duration, etc.
In Action column, choose Edit to modify the product label thumbnail, re-schedule the label display, or change label condition.
The admin can choose multiple labels and take mass action to delete those selected labels.
2.4.3 Product Label Creation
In Product Label grid, please click on Add New Label to create a new product label.
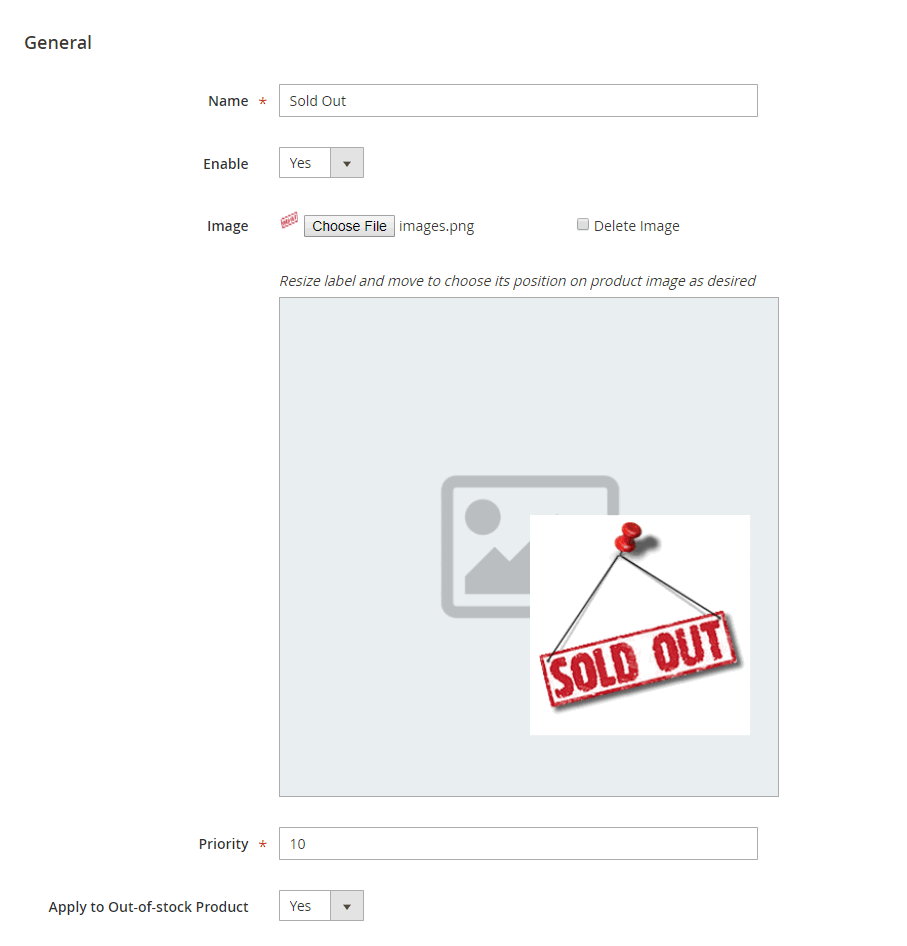
In Name: enter the name of the product label.
In Enable: choose Yes to enable product label, or No to disable it.
In Image: choose button to upload the label prepared beforehand to product thumbnail. To replace the label, click the button and re-upload another image.
Admin can adjust the size and move to locate the label anywhere within the product image.
In Priority: Insert one number to decide the priority of label display when “Display multiple labels on product” is set to No or there are multiple “Out of Stock” labels enabled.
In Apply to Out-of-stock Product:
- Choose Yes to apply the label to all stock-out items. If so, there is no need to set label conditions.
- Choose No to apply the label to products based on label conditions.
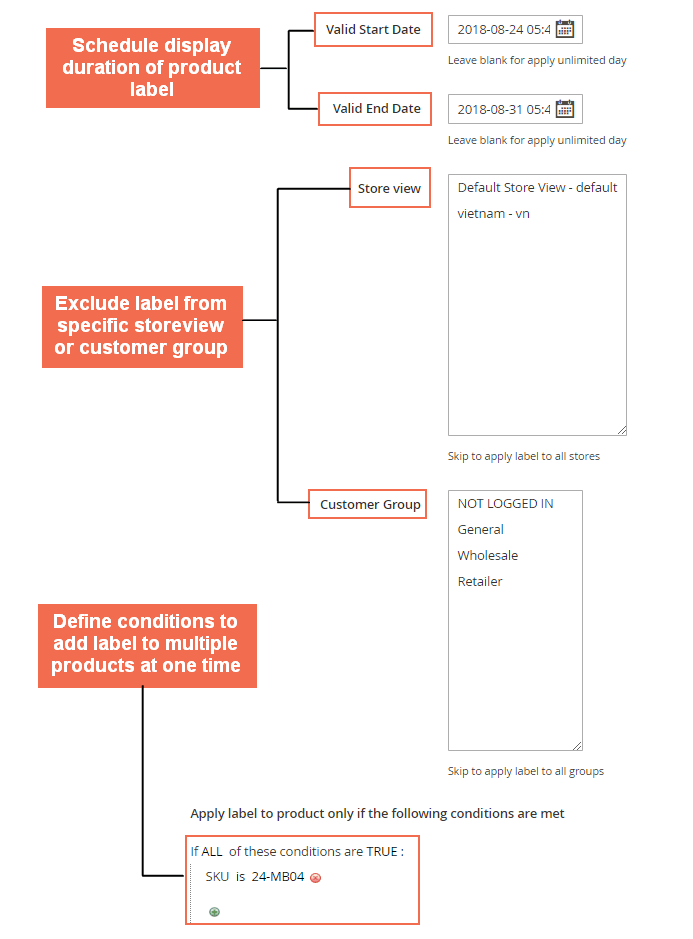
In Valid Start Date: choose date and time to begin the display of label on the product image. Skip this field to apply the label to the ending date.
In Valid End Date: choose date and time to remove the label from the product image. Skip this field to always display the label from its starting date.
In Store view: Choose specific store views that product label is shown. Skip this field to display the label on all store views. Multiple-selection is allowed by holding Ctrl and clicking.
In Customer Group: Choose specific customer groups that product label is shown. Skip this field to display the label for all customer groups. Multiple-selection is allowed by holding Ctrl and clicking.
Similar to setting the Catalog Price Rule, the admin can define flexible conditions to apply the labels to various items.
***Note: Setting no condition means not showing the label on any product image unless “Apply to Out-of-stock Product” is set to Yes.
Remember to Save the label in completing the product label creation.
2.5 Magento 2 Pop Up
Choose Pop-Up under BSS COMMERCE tab,
2.5.1 General Configuration
Please go to Stores ⇒ Configuration ⇒ BSSCommerce ⇒ Pop-up General Configuration.
In Enable, choose Yes to enable the extension, or No to disable it.
2.5.2 Manage Pop-up Grid
Go to Marketing ⇒ BSSCommerce ⇒ Pop-up ⇒ Manage Pop-up.
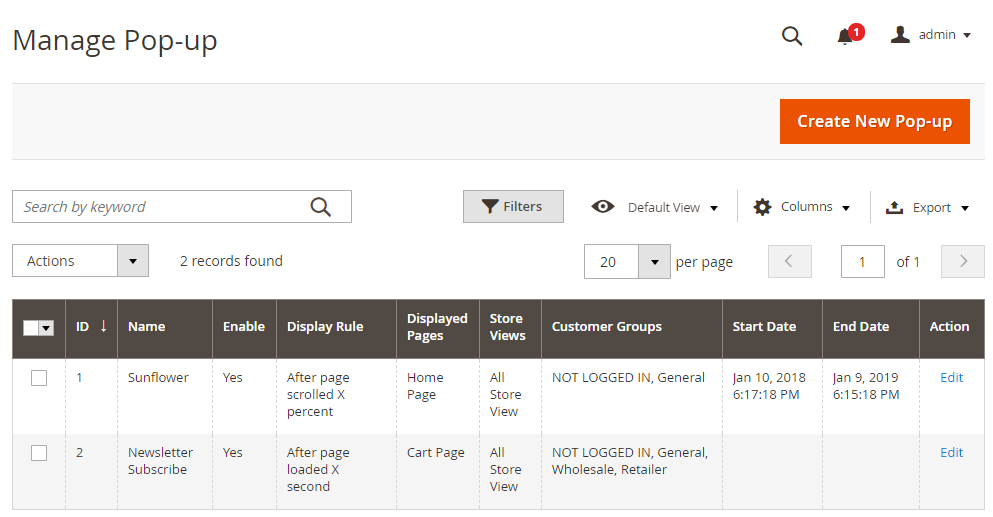
Manage Pop-up grid shows all pop-up you have created with full information, including Pop-up Name, Enable, Display Rule, Displayed Pages, Content, Store Views, Customer Groups, Start Date and End Date. The Manage Pop-up grid works just like standard grid in Magento 2 default with features such as mass action (delete, enable, disable), filter and column display.
2.5.3 How to Create New Pop-up
Please click on the Create New Pop-up button located on the top right of the grid. You will be redirected to the New Pop-up Page, which has 3 tabs:
- General
- Display Rule
- Content and Design
There are 4 buttons to support creating a new pop-up:
- Back
- Reset
- Save and Continue
- Save Pop-up
2.5.3.1 General
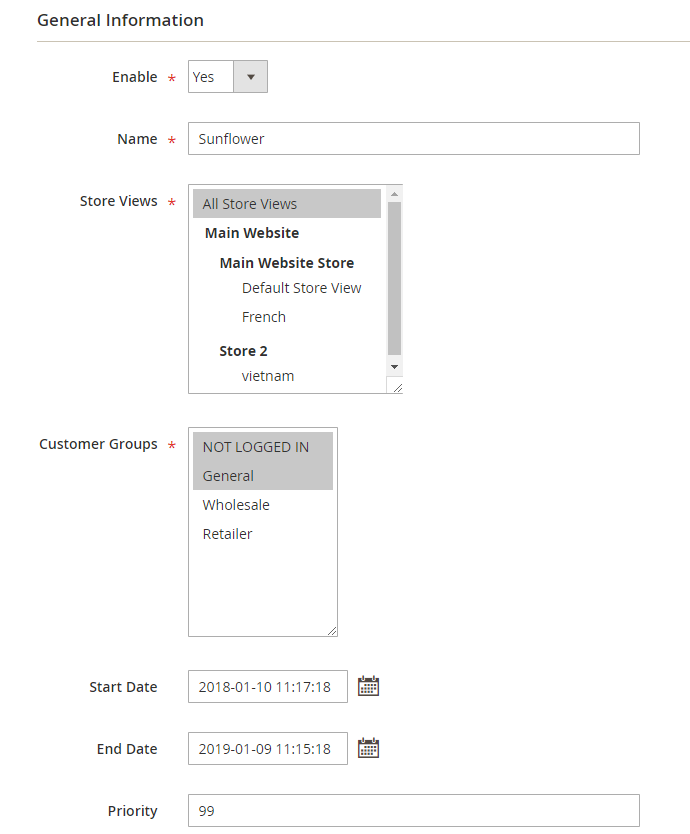
In Enable, choose Yes to enable the new pop-up.
In Name, enter the pop-up’s name.
In Store Views, select which store views to display the pop-up.
In Customer Groups, choose the customer groups to view pop-up.
In Start Date, select a date in the calendar view to begin showing the pop-up.
In End Date, select a date in the calendar view to stop displaying the pop-up.
In Priority, enter a number to decide the priority of the pop-up when multiple pop-ups are created on a page.
2.5.3.2 Display Rule
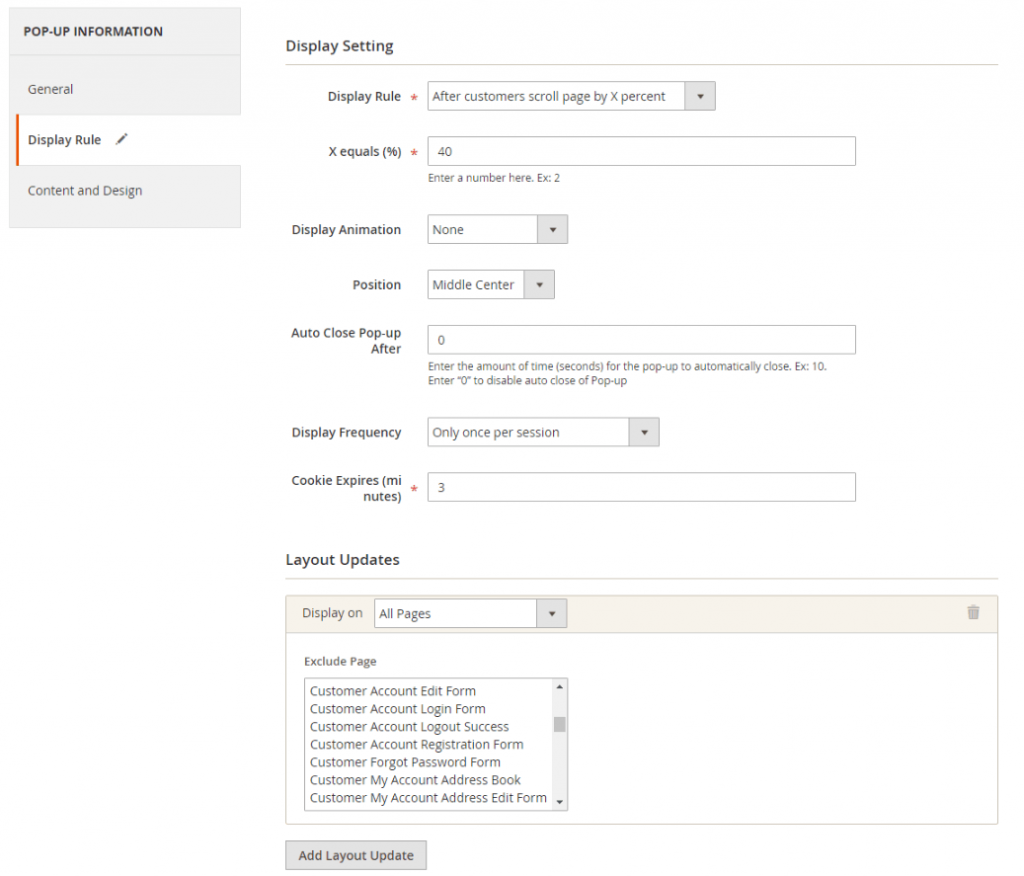
In Display Rule, choose one of the four following conditions to set conditions for displaying the pop-up:
- After customers spend X seconds on the page.
- After customers scroll page by X percent.
- After customers view X pages.
- Immediately when customers visit the page.
In X equals, enter a number to decide the value of X.
In Display Animation, choose one of the six following options to set display effects for the pop-up:
- Zoom
- Horizontal Move
- Move from Top
- 3D Unfold
- Zoom-out
- None
In Position, select the position to display the pop-up on the page.
- Top Left
- Top Center
- Top Right
- Middle Left
- Middle Center
- Middle Right
In Auto Close Pop-up After, enter the amount of time (seconds) for the pop-up to automatically close. Ex: 10. Enter “0” to disable auto close of Pop-up
In Display Frequency, determine the frequency of pop-up display by selecting one of the following options:
- When all conditions are satisfied: the pop-up appears if the above rules are executed.
- Only once: the pop-up only appears once.
- Only once per session: the pop-up appears once in a session. If you choose this option, you need to set Cookie Expires.
For example, if you choose Display Frequency as “Only once per session” and set the 2 minutes for the Cookie Expires, the pop-up is displayed when the conditions are satisfied, then it won’t be shown in the next 2 minutes (until the session ends or the cookie expires).
In Layout Updates:
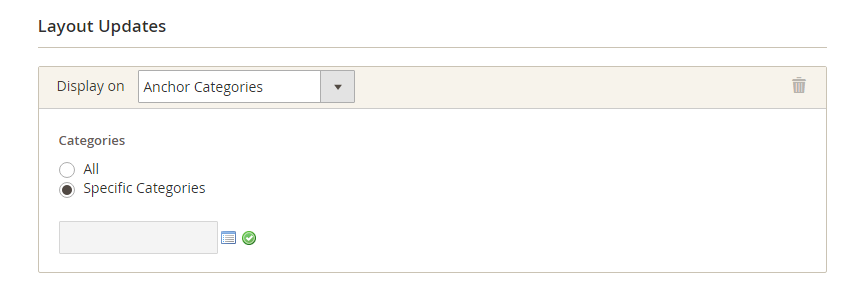
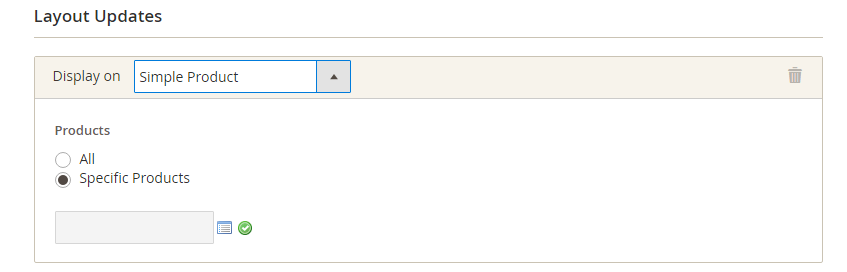
In Display on, select pages to show the pop-up, including the following types of pages:
- Category Pages
- Product Pages
- Generic Pages
When you choose each type of page, you can select all pages or specific pages depending on your demand.
For example:
+ Category page:
+ Product page:
+ All pages:
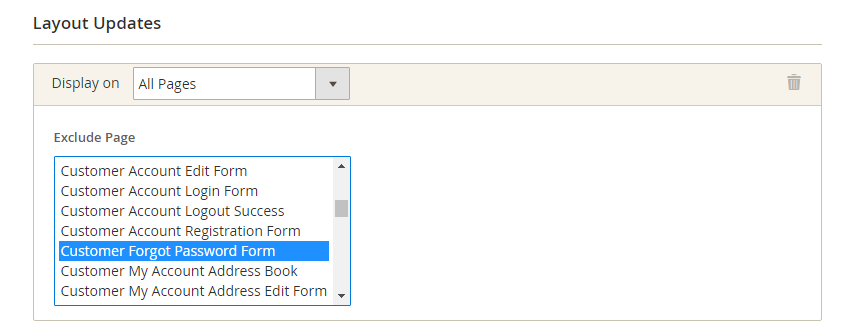
(you can exclude specific pages from displaying a popup when you select the option as All pages)
Furthermore, it is easy to add more layout updates to show popup in more pages by clicking the button.
2.5.3.3. Content And Design
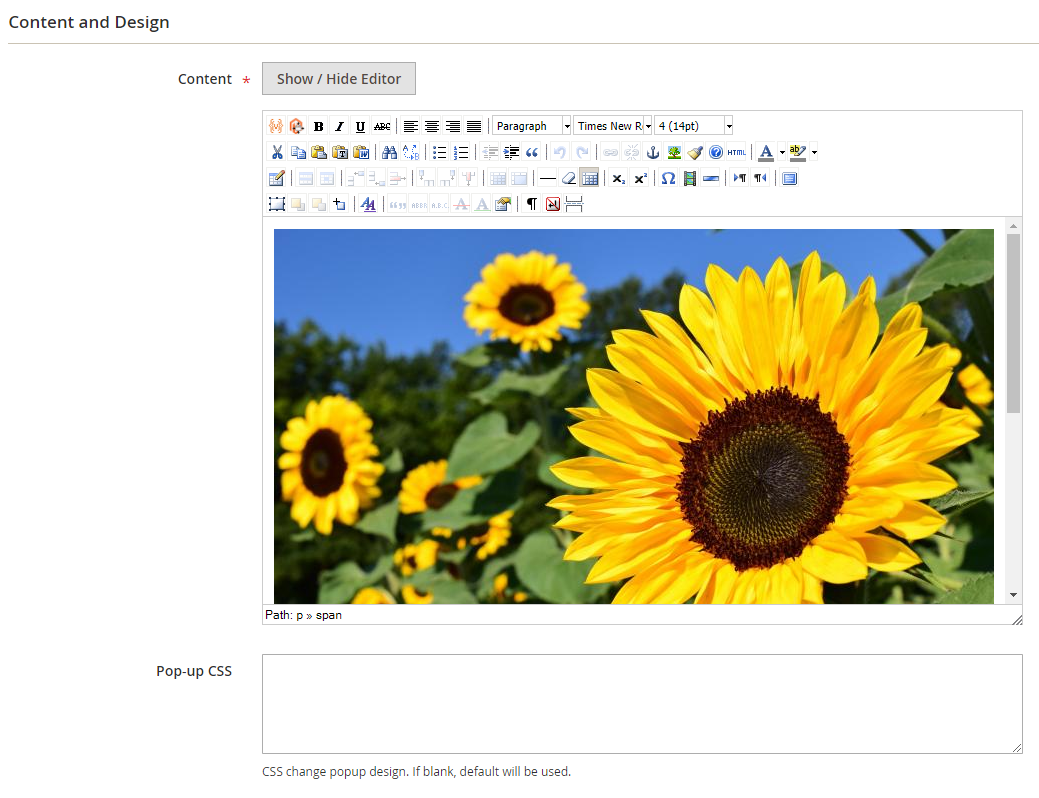
In Content, use the WYSIWYG editor to create content for the pop-up.

You can use this tool to insert widget, image or video for the pop-up’s content.
In Pop-up CSS, use CSS to change the design of the pop-up. If leaving blank, the default pop-up will be applied.
2.6 Magento 2 Promotion Bar
Choose Promotion Bar under BSS COMMERCE tab,
2.6.1 General Config
Go to Stores ⇒ Configuration ⇒ BSSCommerce ⇒ Promotion Bar.
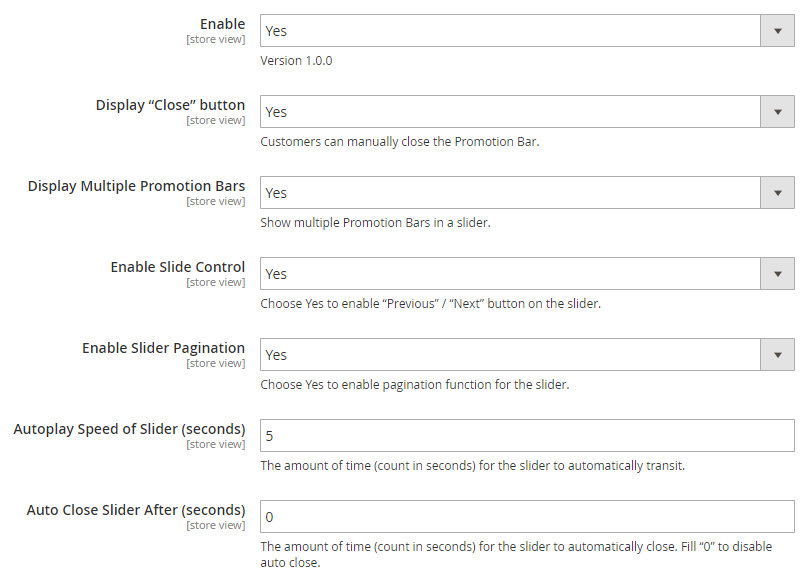
In Enable, choose Yes to enable the extension, or No to disable it.
In Display “Close” Button, choose Yes to show the “Close” button in the top right position of the promo banner. Customers can manually close the bar with that button.
In Display Multiple Promotion Bars, If select Yes, banners set with the same position on the page will be shown in a slider. Please, use the same resolution images for the best results.
In Enable Slide Control, select Yes to show the “Previous” and “Next” button on the slider.
In Enable Slider Pagination, choose Yes to enable pagination function for the slider.
In Autoplay Speed of Slider, decide the amount to time for the slider to automatically transit. Count in seconds.
In Auto Close Slider After, decide the amount to time for the slider to automatically close. Count in seconds. Enter 0 to disable the auto-close function.
2.6.2 Manage Promotion Bar
Go to Marketing ⇒ BSSCommerce ⇒ Promotion Bar ⇒ Manage Promotion Bar.
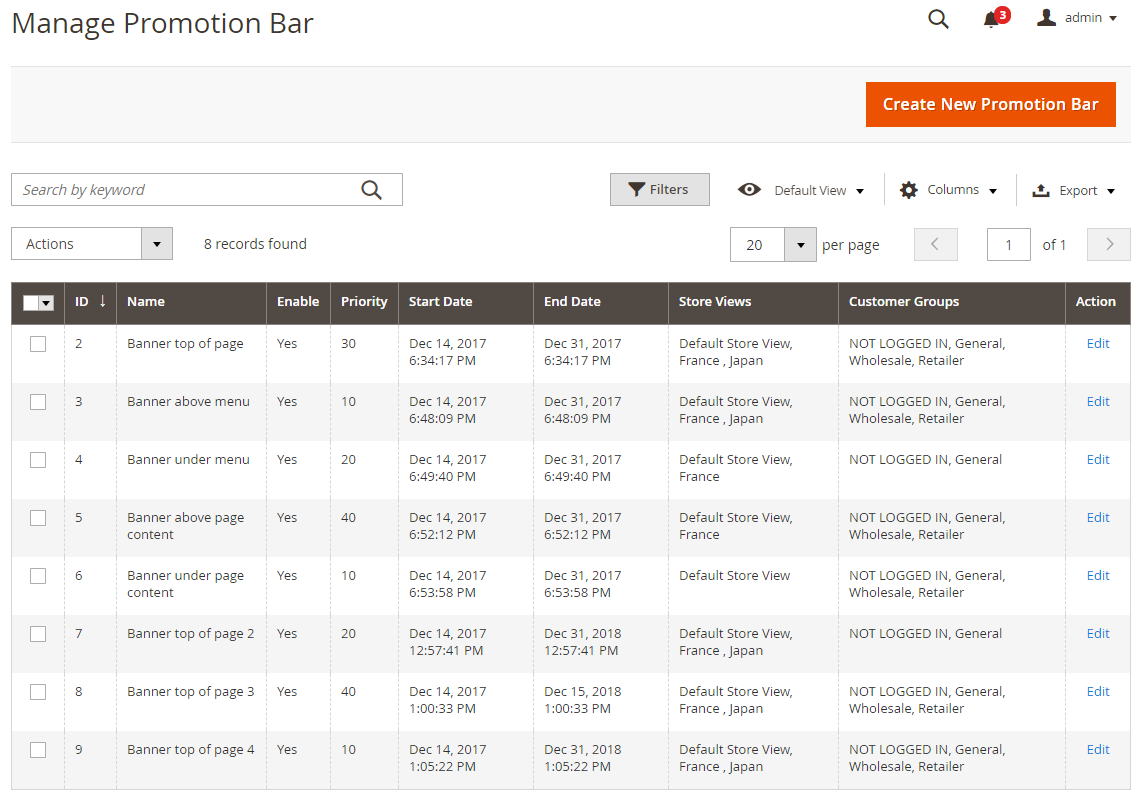
The Manage Promotion Bar grid is developed as the standard of Magento 2 default grid. You can create a new banner, set up and manage all promotion bars here.
After clicking on the Create New Promotion Bar button, you will be redirected to New Promotion Bar Page. There 3 main sections: General, Display Rule, and Content and Design.
2.6.2.1 General
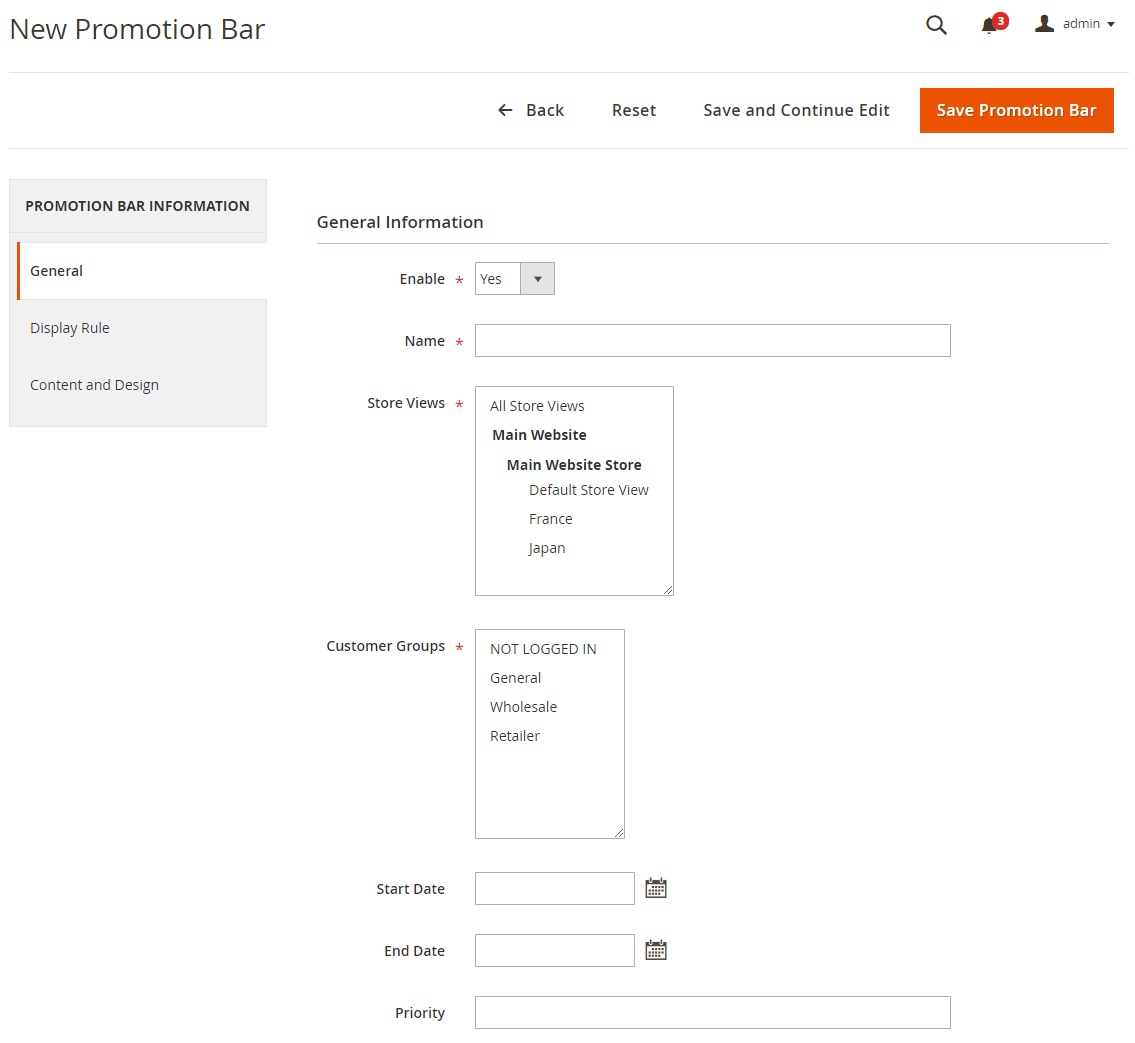
In Enable, choose Yes to enable the new promotion bar, or No to disable it.
In Name, enter the name for the new promotion bar.
In Store Views, choose one or multiple store views where your new promotion banner should be displayed.
In Customer Groups, select which customer groups you want to display the new promotion bar.
In Start Date, use the calendar view to easily choose the starting date to display the new promotion bar. Please enter in yyyy-mm-dd hh:mm:ss or yyyy-mm-dd format. For example:
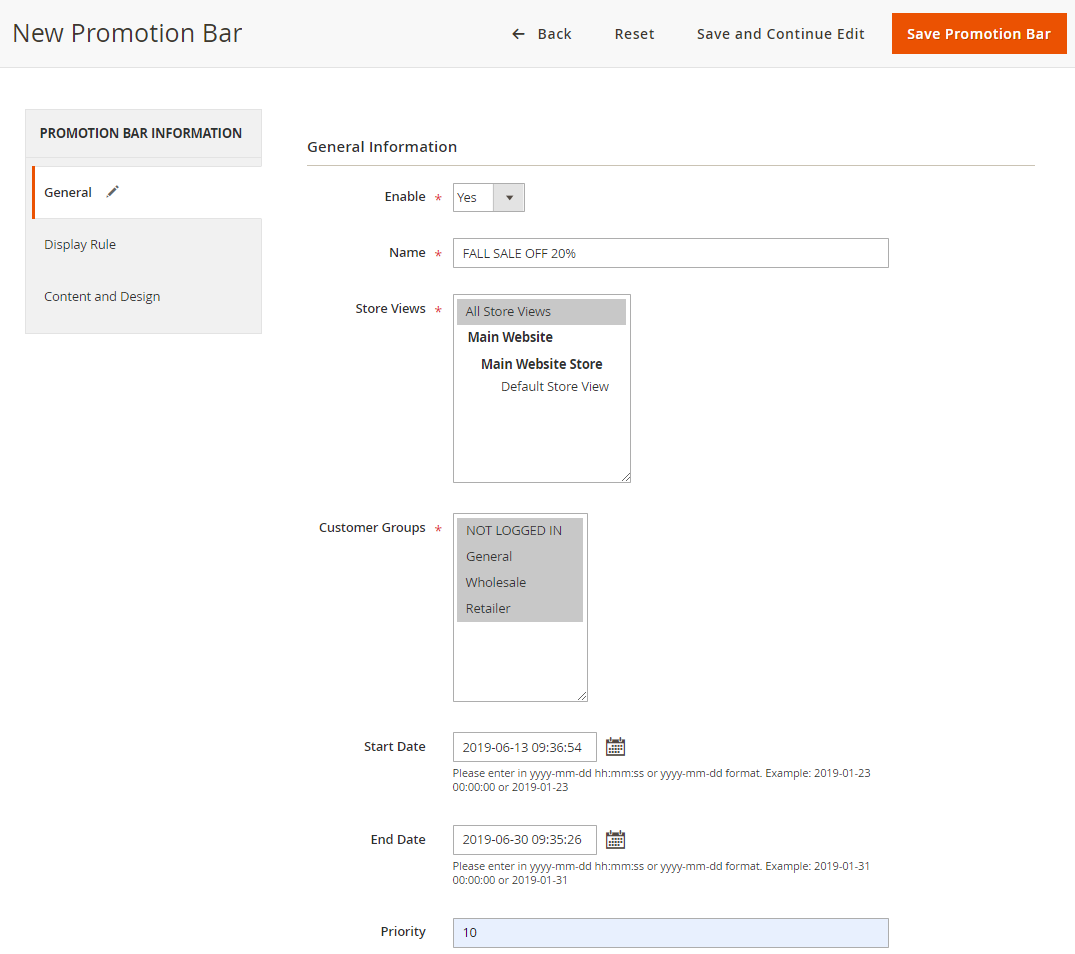
In End Date, choose the expiring date to remove the new promotion bar. Please enter in yyyy-mm-dd hh:mm:ss or yyyy-mm-dd format.
In Priority, enter a number to set the priority of the new promotion bar. Please don’t leave this field blank.
The value of this field decides which promotion bar is prioritized in case when you choose NO in “Display multiple promotion Bars” in Configuration part, it will show only one banner with the highest priority among various created promo banners at the same place.
2.6.2.2 Display Rule
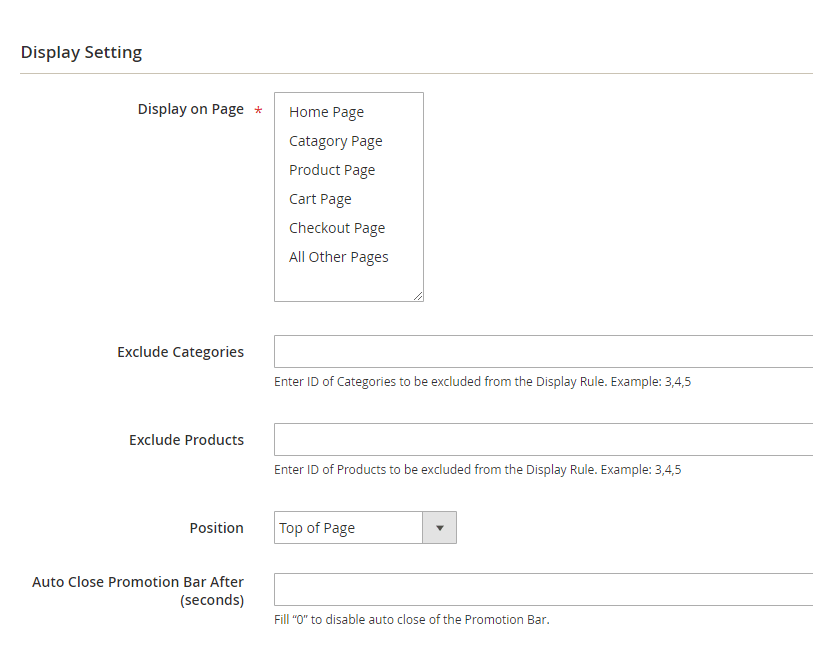
In Display on Page, select which page to display the new promotion bar.
In Exclude Categories, enter the ID of categories to be excluded from the Display Rule. For example: 3,4,5. The promotion banner will be hidden on each category page specified.
In Exclude Products, enter the ID of products to be excluded from the Display Rule. For example: 3,4,5. The promotion banner will be hidden on each product page specified.
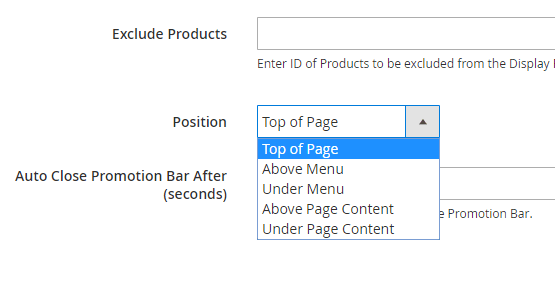
In Position, choose one of the 5 following options to set the position of the new promotion page.
In Auto Close Promotion Bar After, decide the amount to time for the new promotion bar to automatically close. Count in seconds. Enter 0 to disable the auto-close function.
2.6.2.3 Content And Design
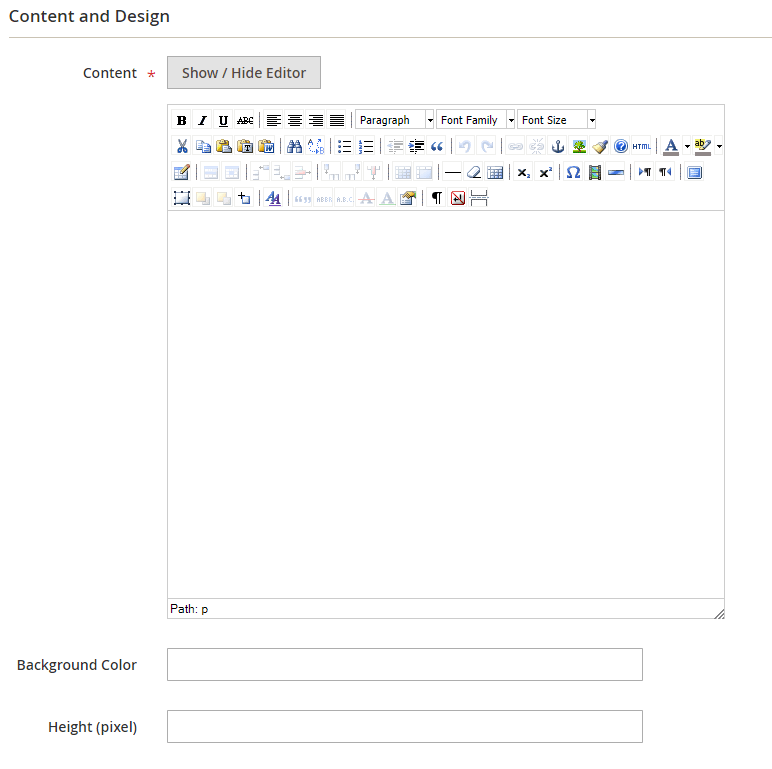
In Content, use the WYSIWYG editor to enter text, upload pictures and edit content for the new promotion bar. Remember that you can choose only one picture per bar.
In Background Color, use the color picker to choose the background color. For example:

In Height, enter a number (count in pixel) to set the height of the new promotion bar.
Click Save Promotion Bar button to save all configurations.