1. Overview
Magento 2 Affiliate extension allows you to create and run various affiliate programs in your store. The affiliate programs help build a huge community to promote your products and you can gain more orders.
2. How Does It Work?
Please go to Stores ⇒ Configuration ⇒ BSSCOMMERCE ⇒ Affiliate to configure the module.
2.1 General Settings
- In Enable Affiliate Pro: Choose Yes to enable the module, No to disable it.
2.1.1 New Affiliate
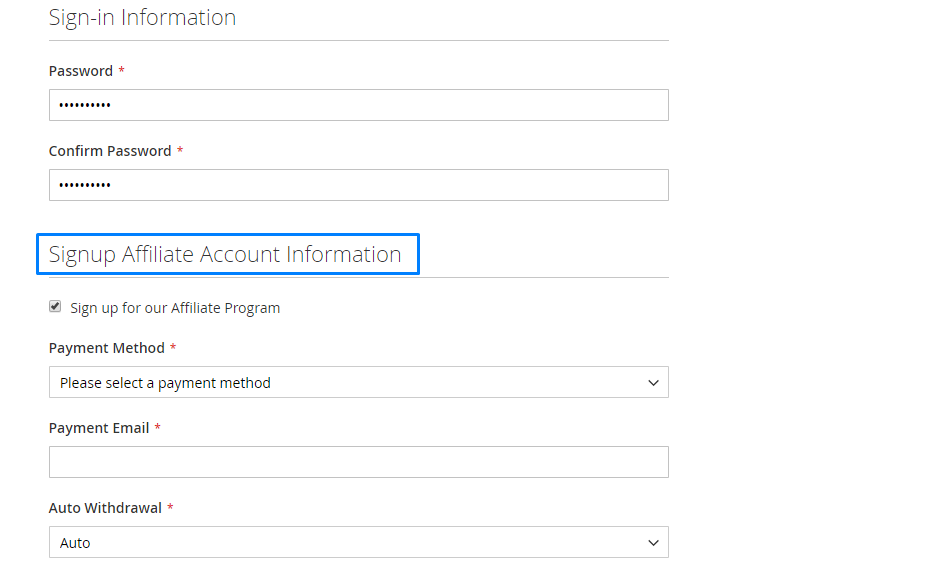
- In Auto sign up new registered customers to Affiliate Program: If you choose Yes, new customers will be assigned as an affiliate automatically and the affiliate registration form will not be shown on Create account page. To disable this feature, choose No.
- In Extend default customer registration form to allow sign up box for Affiliate program: Choose Yes to display the Affiliate signup on the Registration Page. To disable this feature, choose No.
*Note: If there are already other extensions overwriting the registration page, please be aware that some conflict possibilities may happen.
-
In Enable customer to voluntarily sign up for affiliate program on default customer registration form: Select among 3 options (Disable, Enable - signup checkbox, Enable - signup form).
-
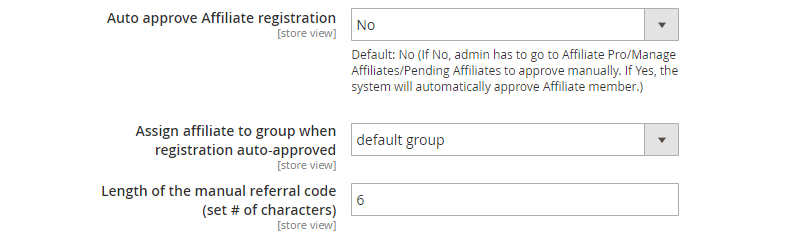
In Auto approve Affiliate registration: Choose Yes to automatically approve the affiliate registration. If choose No, you need to go to Affiliate Pro⇒Manage Members⇒ Pending Members to approve the registration manually.
-
In Assign affiliate to group when registration auto-approved: If you enable affiliate registrations automatical approved, the affiliates will belong to the group that you assign here.
-
In Length of the manual referral code (set # of characters): Enter the number of characters of the referral code.
2.1.2 Customers
-
In Show manual affiliate referral code field on extended customer registration form: Choose Yes to display the referral code box on the account registration page. To disable this feature, choose No.
-
In Extend shopping cart page to allow Affiliates to enter credit: Choose Yes to overwrite the shopping cart page. Otherwise, choose No.
-
In Show manual referral code block on extended shopping cart page: Select Yes to allow customers to insert the referral code at shopping cart page. To disable this feature, choose No.
-
In Reassign customer to new affiliate when they use new manual referral code: If you choose Yes, when a customer enters a new referral code, the system will change the parent affiliate of this customer to a new Affiliate who has that new referral code and update referral information. Otherwise, choose No.
-
-
In Do not display 'Share this page' link on following pages: List the page that you don’t want customers to share. The selected page will not have the Share this page option in the footer.
-
2.2 Manage Affiliate Commission and Customer Discount
-
In Program Executing Priority: Choose one of 3 options (By maximum commission, By maximum discount, By priority)
- In Calculate affiliate Discount with Tax: Choose Yes for customers to get Discount with Base Price of Product incl Tax. Selecting No means that customers get Discount with Base Price of Product excl Tax. (Only use with Discount by Percent which set up in Programs)
-
In Calculate affiliate commission: Choose between Before discount and After discount. This feature allows you to calculate affiliate discounts and commissions before or after Magento default discount.
-
In Include taxes when calculating Affiliate commission: Choose Yes if you want to count affiliate commission and discount with tax. Otherwise, choose No.
-
In Apply discount and commission for affiliates when they purchase themselves: Choose Yes to allow affiliates to receive discount and commission when they purchase products from store. Otherwise, choose No.
-
In Add commission to account balance when order status is: Select an order status. When an order reaches that status, the commission will be added to Affiliate account balance. The Default is Complete.
-
In Auto-subtract commission in case of customer refund: Select Yes to automatically subtract commissin when the order is refunded. Otherwise, select No.
-
In Reverse commission from account balance when order status is: Select an order status. Then, when the order within the affiliate commission is changed to this status, the system will automatically subtract the commission that has been added before from the affiliate balance.
-
In Hold commission in a number of days: Enter the number of days to hold back the affiliate’s commission.
-
In Commission for referral visitor: You can set the amount of commission for referral visitor.
-
In Commission for referral sign-up: You can set the amount of commission for referral sign-up. When a visitor goes to your store and sign-up an account via the link of Affiliate A then Affiliate A will get the commission.
-
In Commission for referral subscribe: Set the amount of commission for referral subscription (signup for newsletters).
2.3 Manage Affiliate Withdrawal Requests
-
In Enable Affiliate Withdrawal: Select Yes to enable affiliate withdrawal. Otherwise, select No.
-
In Payment Method: Click on “Add payment method” to add payment methods on your site, fill in information for Payment Method Code (paypal, moneybookers, banktransfer,check), Payment Method Title, Payment Processing Fee. In the Payment Processing Fee, insert an amount of money as the Payment Processing Fee for every withdrawal (X: fixed fee amount or Y%: by percentage of withdraw amount). For each payment method, admin can set different payment processing fee. In the Enable Frontend field, select ‘Yes’ to show or select ‘No’ to hide the payment method on the frontend.
-
In Minimum Withdrawal Amount and Maximum Withdrawal Amount: Enter the minimum and maximum amount of money that affiliates can withdraw.
-
In Withdrawal Period: Choose a time period for withdrawal either weekly or monthly.
-
In Withdrawal processing day: It will show up the weekly day or monthly dates for selecting, depending on your option in the above Withdrawal Period. This is applied to the automatic withdrawal option.
2.4 Affiliate - Customer Invitation
-
In Use Affiliate's email address when sending invitations to friends in 'My invitations' or with link on product and category pages: Select Yes to show affiliate emails when an affiliate sends an invitation to friends. If you choose No, the system will use the value of the Email Sender (who reply emails will be sent to if the affiliate does NOT use their own email return address above) field.
-
In Email Template For Recipients: You can manage email templates that are used by an affiliate to invite friends.
-
In 'Referred but unregistered Customer' Cookie to expire in (set # of days): Enter a number of days. This will be the valid period for referral links. The period starts from the time that a customer clicks on the referral link. When an affiliate invites a customer and this customer clicks on the referral link, in the valid period, he/she will be recorded as referred by this affiliate for the next visits or purchases.
2.5 Affiliate - Widget
-
-
In Widget width: Enter the width of Widget
-
In Widget title: Enter the title for widget, the title will be shown on widget at the frontend.
-
In Widget product quantity: Specify the quantity of products displayed on widget.
-
2.6 Affiliate - Paypal
In this section, you will enter the information about Paypal Bussiness. When an affiliate requests withdrawal by Paypal method, he/she can withdraw from this Paypal account.
-
In Enable Automatic Withdraw By Paypal: Choose Yes to enable this feature. Otherwise choose No.
- In API Username, API Password, API Signature, API Endpoint, Paypal Notification Subject, Paypal Notification Note: Enter the information of Paypal.
- In Paypal Balance Minimum: Enter a minimum balance. When the balance is lower than this number, an email will be sent to the email in bellow setting.
- In Notification Email When Paypal Account Balance Is Low: Choose an email to receive notification when Paypal Balance is lower than the minimum number.
2.7 Admin Email Notification Template
In Admin Notification Template, you can manage notification emails for the administrations.
-
-
In Email Sender (who reply emails will be sent to): Choose an email sender.
-
In Notify Admin when New Affiliate signs up: Select to get notifications of new affiliate.
-
In Send New Affiliate Request To: Enter email addresses separated by coma.
-
2.8 Affiliate Email Notification Templates
These fields allow the admin to choose email senders and email templates for referral. Sample templates are available (choose default ones).
You can view and edit sample templates by going to app\locale\en_US\template\email\mw_affiliate
The affiliate system will notify Affiliate members about account status.
The affiliate system will notify Affiliate members about balance changes, withdrawals and programs.
3. Manage Affiliates
To manage affiliate members, please go to Affiliate Pro ⇒ Manage Affiliate This menu includes 5 sections: Active Affiliate, Pending Affiliates, Manage Affiliate Groups, Manage Websites and All customers.
3.1 Active Affiliates
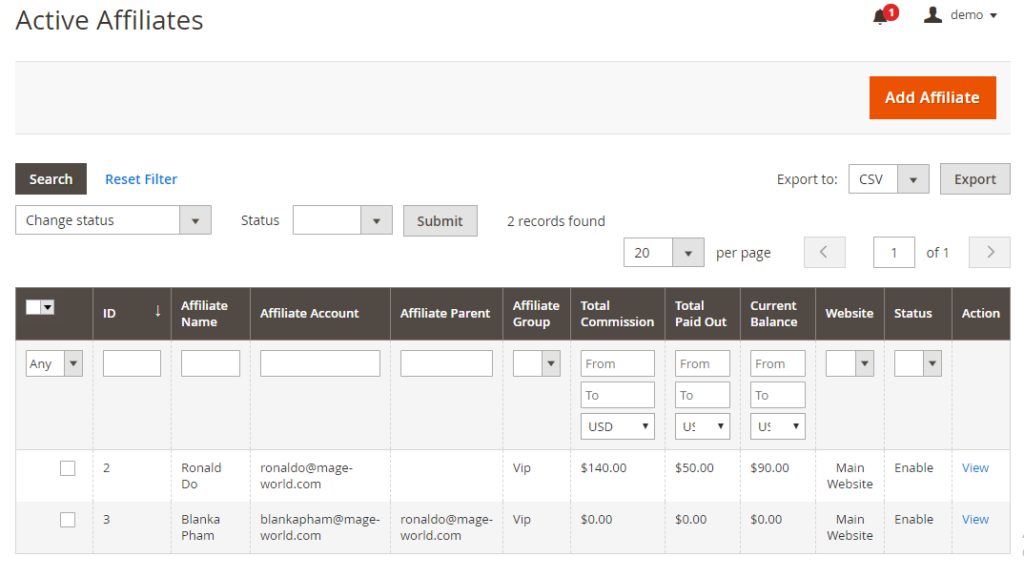
All active affiliates will be listed under Active Affiliates section.
Please click on each affiliate to view details.
The administrator can lock affiliate accounts here by disabling it via action box. If an affiliate account is locked, he will no longer receive commission and discount as well as use affiliate functions till this account is unlocked.
3.2 View an active affiliate
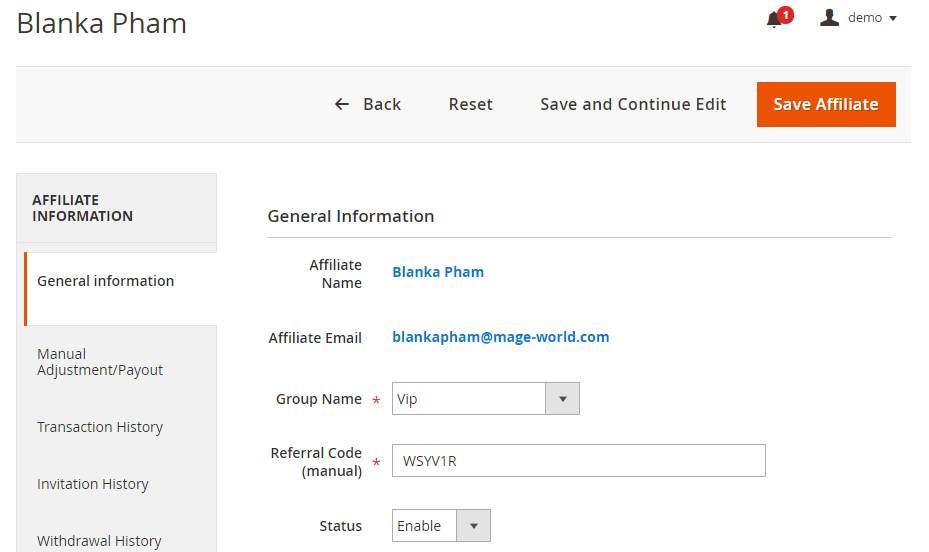
After clicking on the detail affiliate page, under Affiliate Information, you can find all information of that affiliates such as general, credit balance, history of credit, invitation, withdrawal, and so on.
In General Information, the information of affiliate account, payment method, referral code, affiliate parent, payment method, withdrawal notice email, withdrawal method and reports current balance, total amount of received commission and total amount paid out are stored.
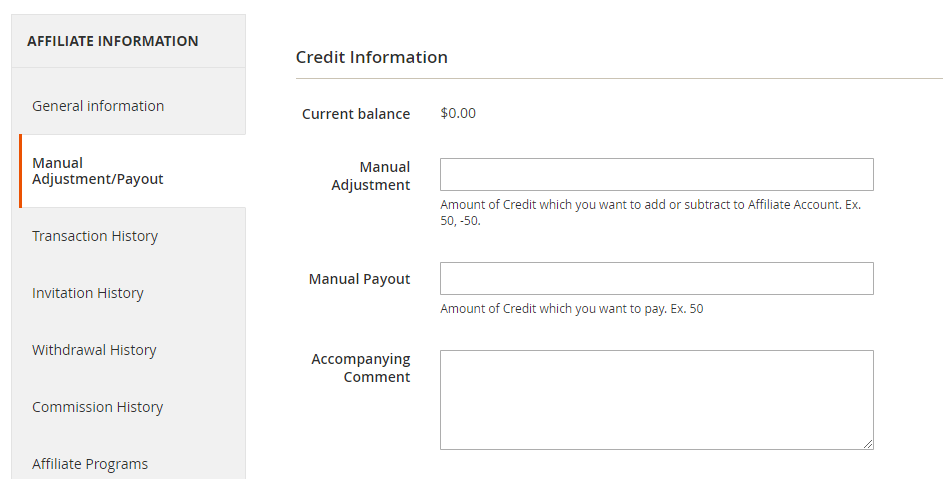
3.3 Manual Adjustment/Payout
In Manual Adjustment section, admin can add or subtract affiliate balance manually. In Manual Payout, enter an amount of money. This amount will be taken as a completed withdrawal of the affiliate. This feature is used when admins wants to pay directly for the affiliate and the system will update affiliate’s current balance and the Total Paid Out field in the General Information tab.
3.4 Transaction History
Transaction History tab shows a list which includes the information of Transaction Time, Type of Transactions, Transaction Detail, Amount (Add or subtract credit for each event) and Balance.
![]()
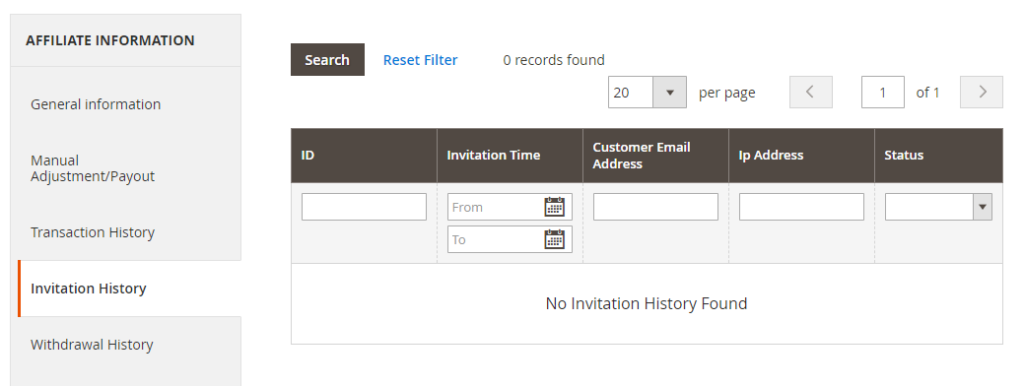
3.5 Invitation History
Invitation History shows details about Invitation Time, Customer Email Address, IP Address, Status (type of referral).
3.6 Invitation History
Withdrawal History show transactions of withdrawal including Withdrawal Time, Withdrawal Amount, Payment Processing Fee, Net Amount (After calculating payment processing fee) and Status (pending or complete). For each withdrawal transaction, you can use Actions box to change its status.
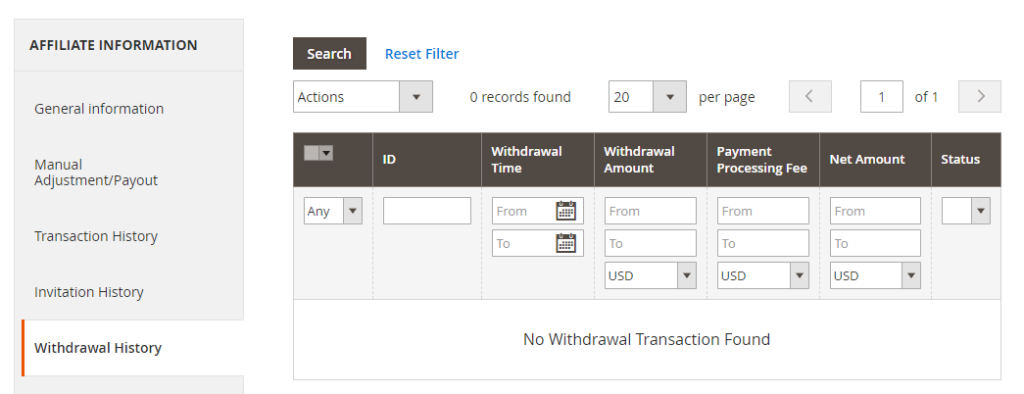
3.7 Withdrawal History
Withdrawal History show transactions of withdrawal including Withdrawal Time, Withdrawal Amount, Payment Processing Fee, Net Amount (After calculating payment processing fee) and Status (pending or complete). For each withdrawal transaction, you can use Actions box to change its status.

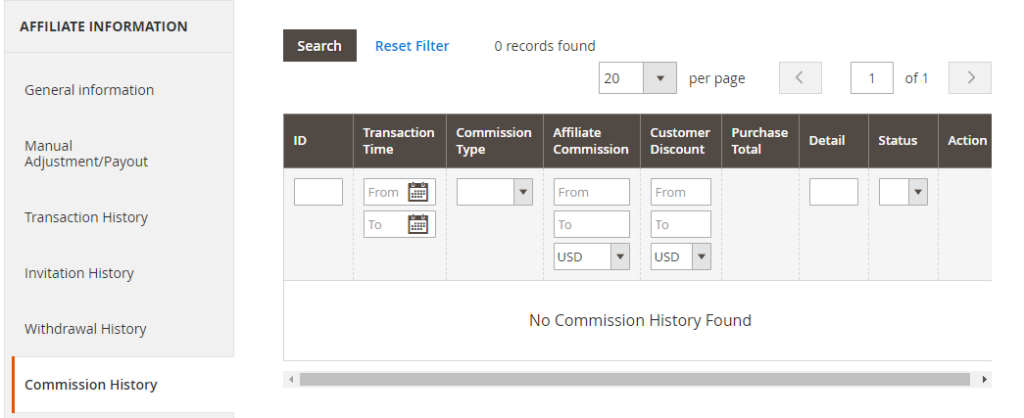
3.8 Commission History
Commission History tab lists all transactions related to affiliate’s commission.
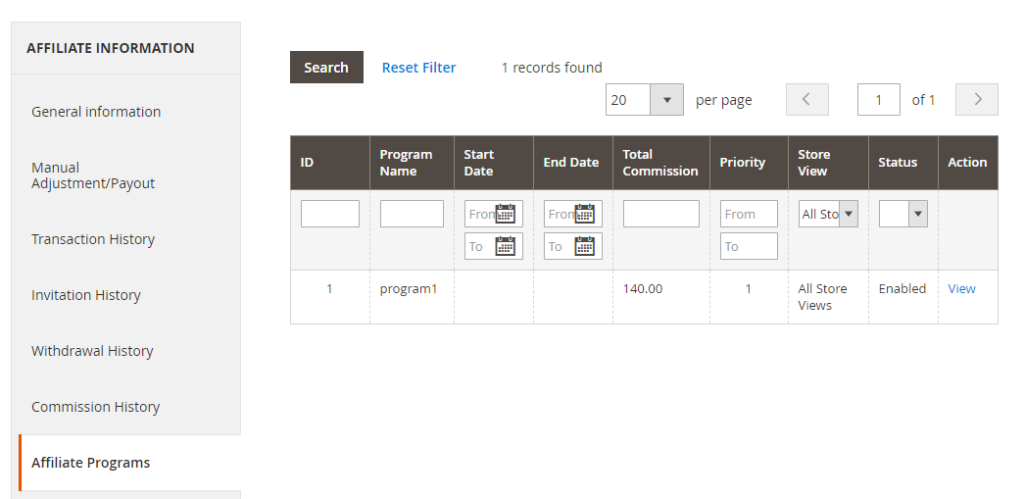
3.9 Affiliate Programs
In Affiliate Programs, all programs that affiliate joined in will be shown, however only 1 affiliate program with highest priority is applied for this affiliate.
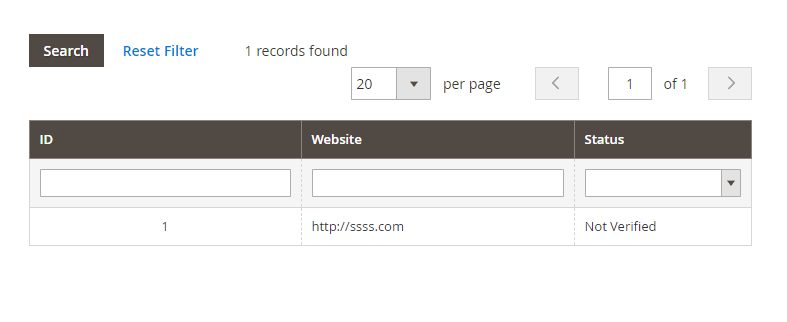
3.10 Affiliate Websites
Affiliate Websites shows the information of Affiliate’s website.
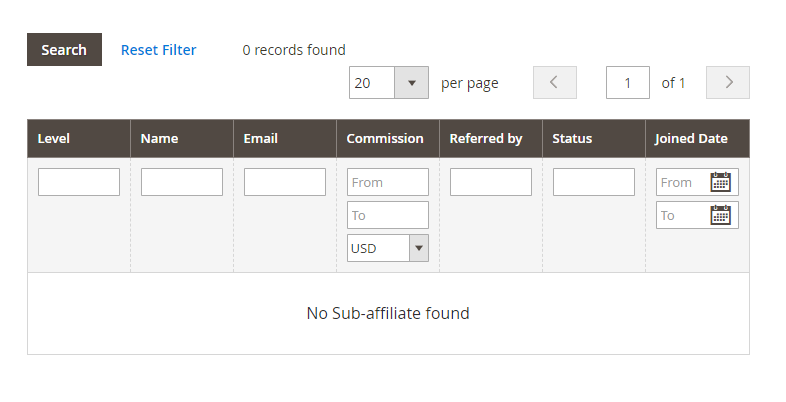
3.10 Affiliate Network
Affiliate Network lists all sub-levels of Affiliate.
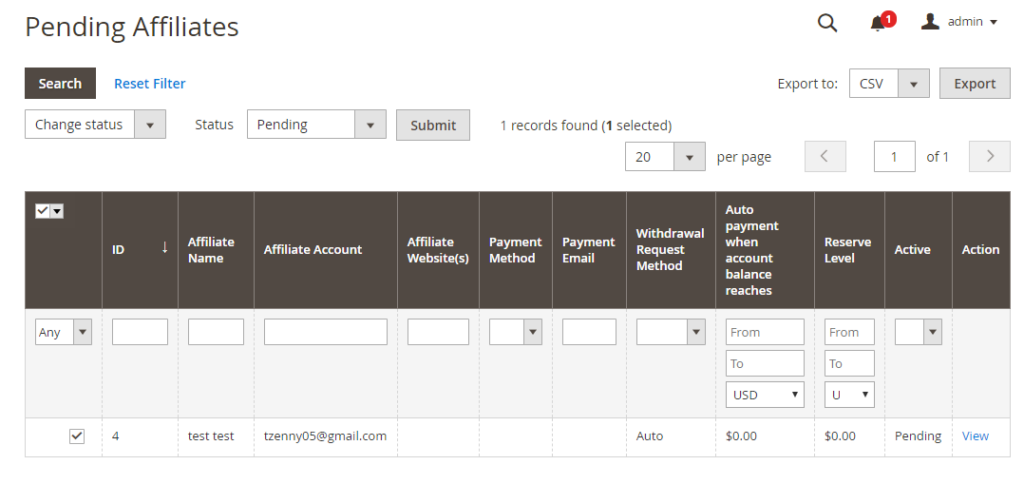
3.11 Pending Affiliates
If you do not select automatically approve the affiliate registration (in Configuration), when a customer signs up for the affiliate system, his/her information will be listed in this page. Then, the administrator can choose to approve or not pending members by selecting members and changing their status at the Actions box (from Pending to Approved or Not Approved).
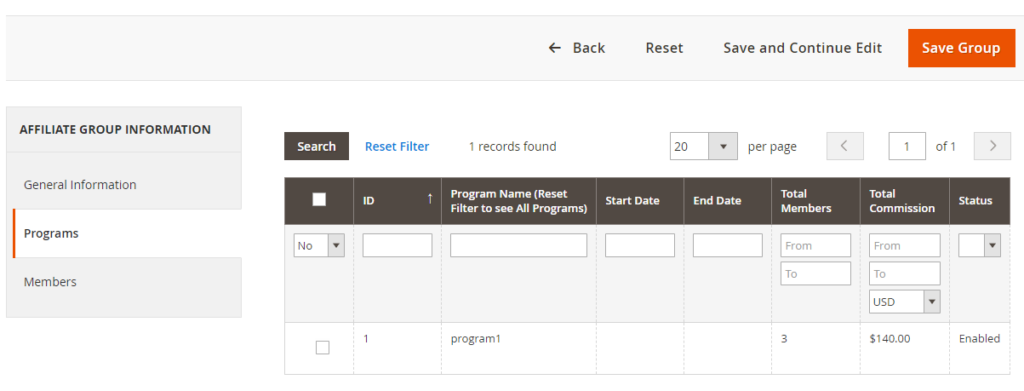
3.12 Manage Affiliate Groups
In this section, you will have all the affiliate group listed. Admin can Delete group(s) via Action box or Export group to CSV.
To add a new group, follow as below:
After clicking on Add Group, you will see the affiliate group information page with 3 sections: general information, programs and members.
3.12.1 General information
- In Group Name: Write a name for the group.
- In Maximum number of days affiliate will earn commission from new referral: Set a number of days you want.
- In Maximum numbers of orders affiliate will earn commission from new referral: Specify a number of orders. Insert 0 if there is no limitation.
- In Maximum commission affiliate will earn from each referral: Specify an amount of money. Insert 0 if there is no limitation.
For example, if you choose $50, consider the case that Affiliate A invites customer B. The customer B places orders that brings the affiliate A an amount of commission. If this amount reaches $50, the Affiliate A will not receive any more commission from customer B’s next orders.
3.12.1 Programs
3.12.1 Members
In Members: Pick members for the group.
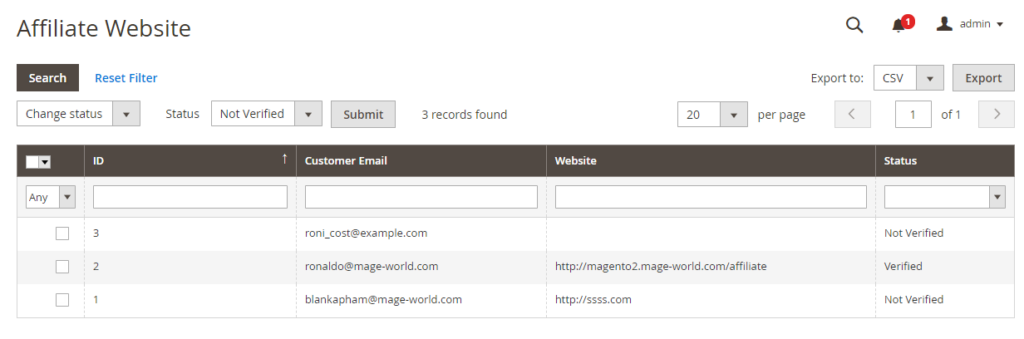
3.13 Manage Websites
Under this section, you can see details about all affiliate websites including: Customer Email, Website and Status.
Via Action box, you can Delete or Change Status (Verified or Not Verified). Moreover, all websites can be Exported to CSV or XML
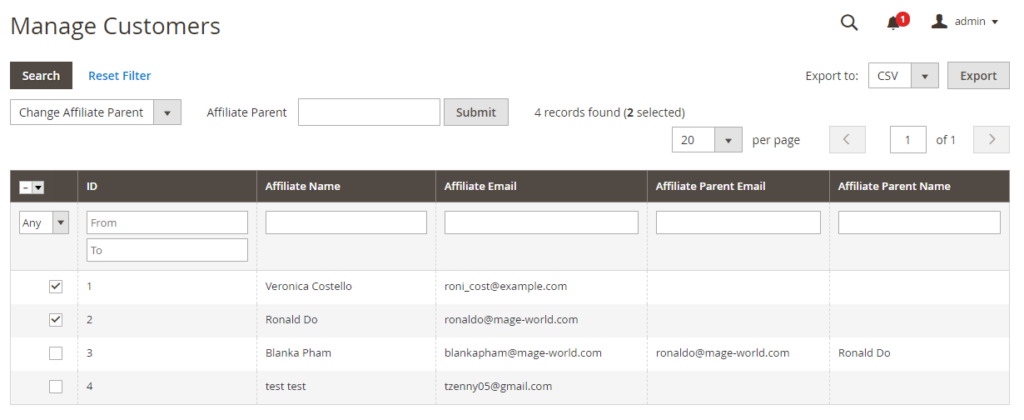
3.14 All Customers
Customers section list all customers on your site. You can change the affiliate parent here, applying for both general customers and affiliates. Select customers, choose to Change Affiliate parent at the Actions box, insert the affiliate parent’s email to the Affiliate parent field, and click Submit.
Note that: If you enable the Reassign affiliate when customer enters new referral code field (in configuration), from the frontend page, when an affiliate inserts a new referral code at the shopping cart page, his affiliate parent will be updated.
Moreover, all customers can be Exported to CSV or XML.
3.15 Manage Withdrawals
To manage affiliate withdrawals, please go to Affiliate Pro ⇒ Manage Withdrawals This menu includes 2 sections: All Withdrawals, Pending Withdrawals.
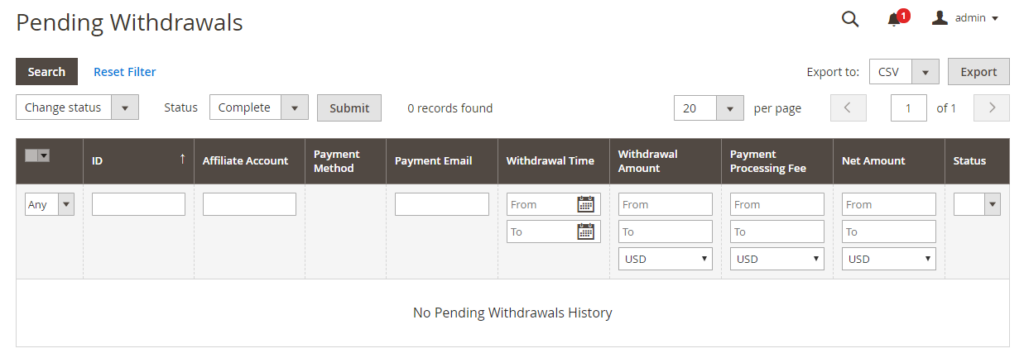
3.15.1 Pending Withdrawals
At this sections, all details of pending withdrawals are shown. They are: Affiliate Account, Payment Method, Payment Email, Withdrawal Time, Withdrawal Amount, Payment Processing Fee, Net Amount and Status
Admis can Change Status of withdrawals (Canceled or Complete) via Actions box and Export to CSV or XML all withdrawals.
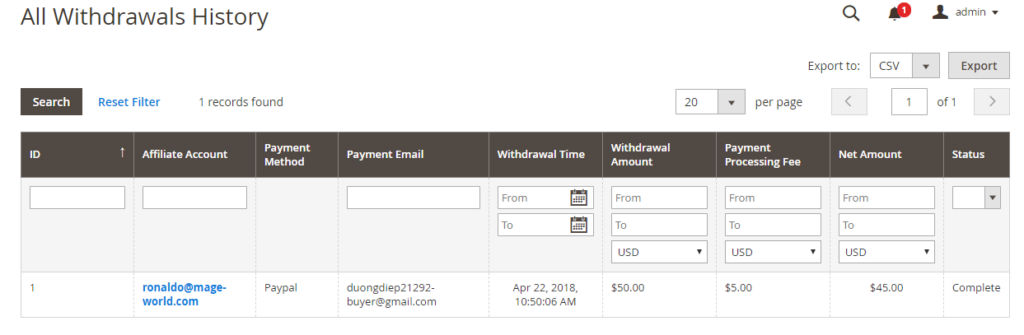
3.15.2 All Withdrawals
At this sections, all details of pending withdrawals are shown. They are: Affiliate Account, Payment Method, Payment Email, Withdrawal Time, Withdrawal Amount, Payment Processing Fee, Net Amount and Status.
3.16 View All Transactions
To manage transactions, please go to Affiliate Pro ⇒ View All Transactions This menu includes 2 sections: Commision History, Transaction History.
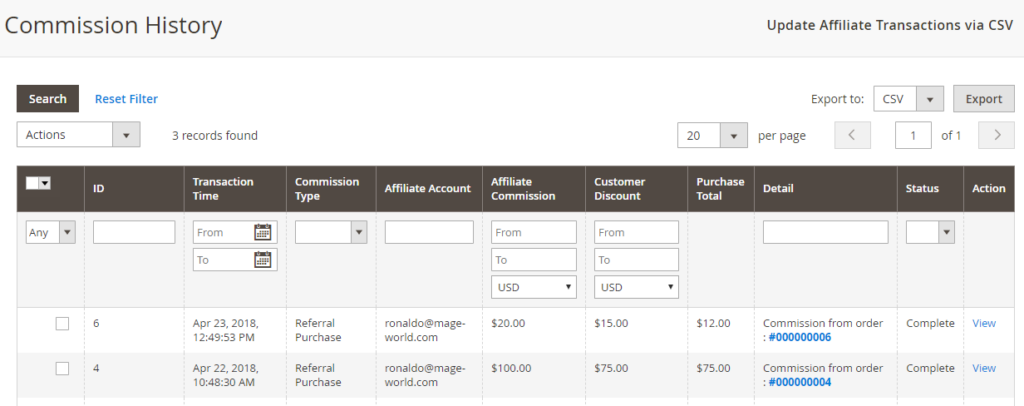
3.16.1 Commision History
At this sections, Affiliate commission and discount statistics are shown. They are: Transaction Time, Commission Type, Affiliate Account, Affiliate Commission, Customer Discount, Purchase Total, Detail, Status.
Click on View to see details
Admis can Change Status of commission of orders (commission status, not related to the order status) via Actions box or via CSV.
3.16.2 Transaction History
The Transaction History lists all information that relates to balance change (including Time, Affiliate Email, Transaction Type, Amount, Balance).
![]()
3.17 Manage Programs
To manage programs, please go to Affiliate Pro ⇒ Manage Programs ⇒ Manage Programs
In Manage Programs section, you are able to create marketing campaigns that decide the commission and discount rule.
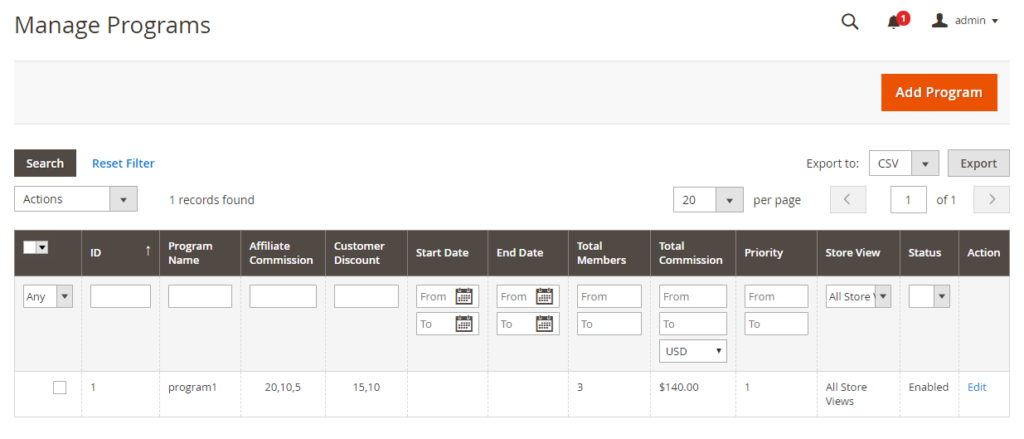
To add a new program, click on Add Program. After that, set up more details of the program: general information, conditions, actions, assigned Affiliate groups and program transactions as follow:
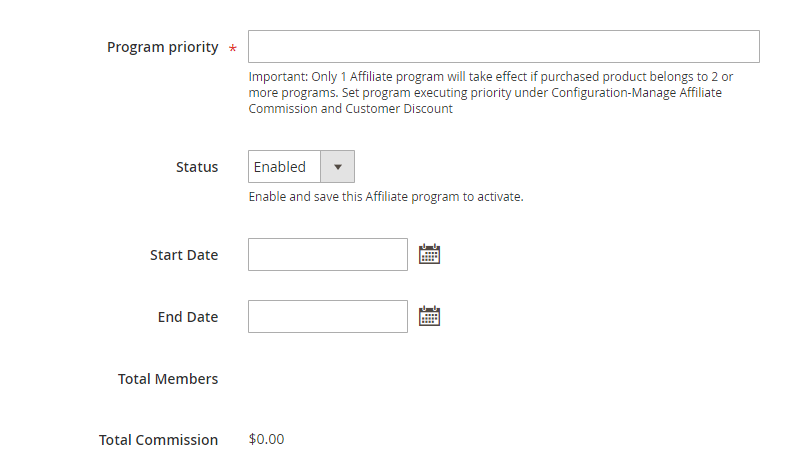
3.17.1 Program Details
- In Notify affiliate via email: Tick on the checkbox to notify affiliates of the program. Specify Program Name, Description, Store view, Priority for the program.
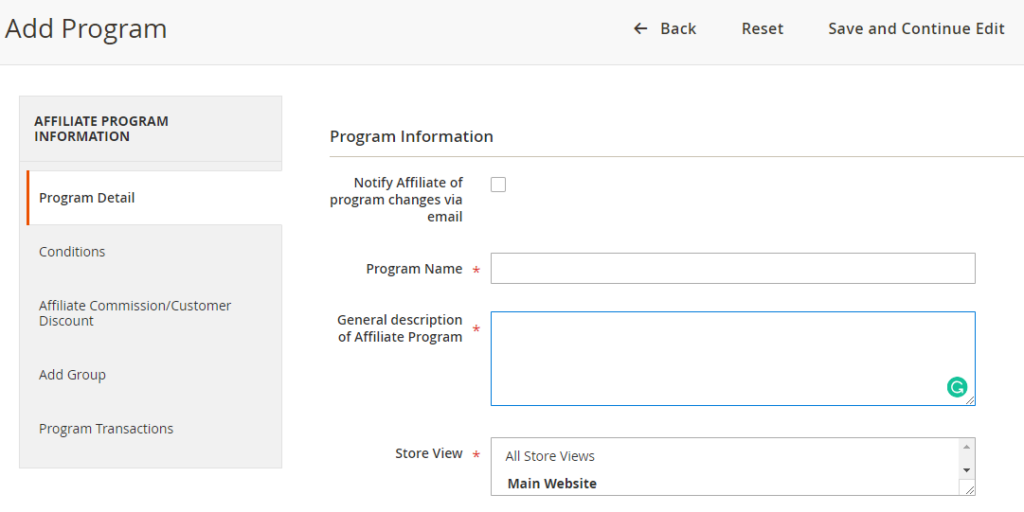
- In Status: Select Enabled to activate the program.
- In Start Date and End Date: Choose the active time for the program. The system will auto-close the program when it reaches the expiration date.
- In Total Members: The number of affiliates of the program will be shown.
- The Total Commission shows the total amount of the commission.
-
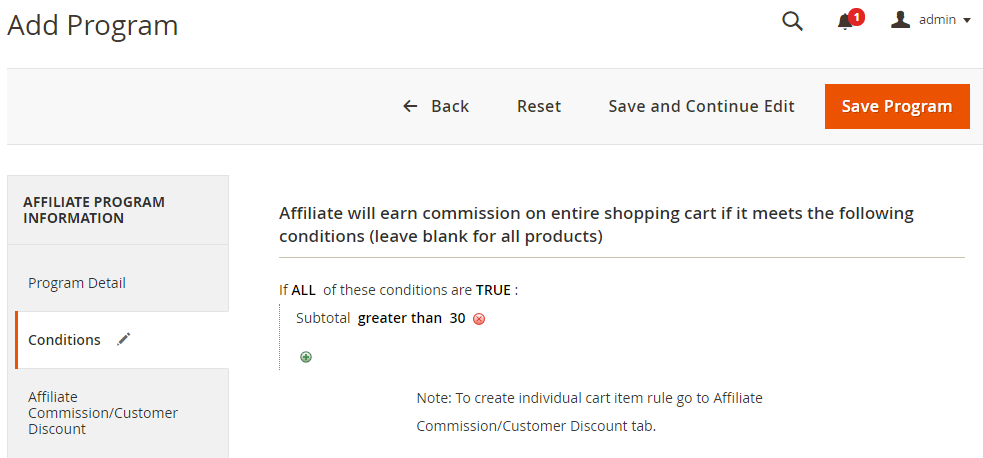
In Conditions: You can set rules for the program, which are the same as Magento shopping cart rules.
-
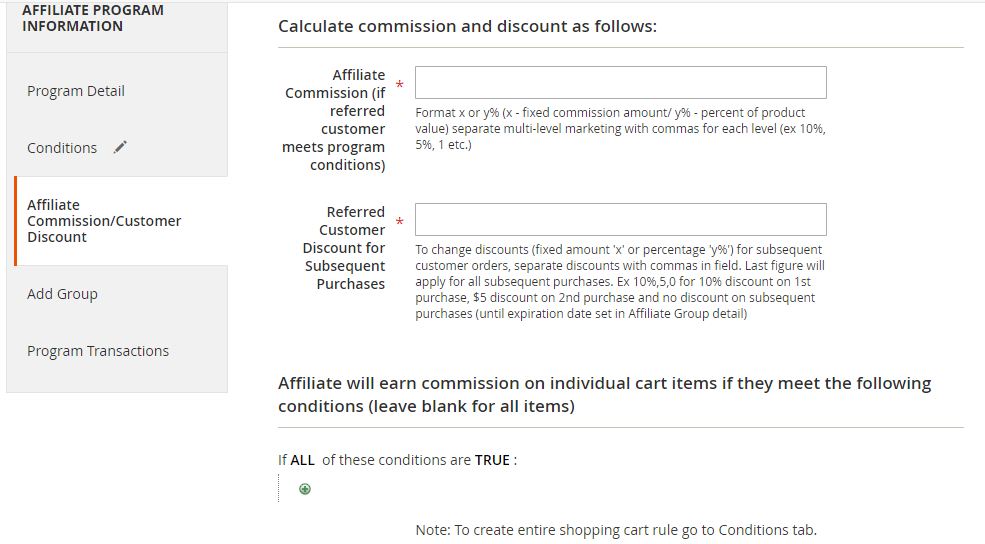
In Affiliate Commission/ Customer Discount: Define commission and discount for the program.
In Affiliate Commission, fill in a commision amount for affiliates (if referred customer meets program conditions). The format is x or y% (x - fixed commission amount/ y% - percent of product value) separate multi-level marketing with commas for each level (ex 10%, 5%, 1 etc.)
In Referred Customer Discount for Subsequent Purchases, fill in an amount. To change discounts (fixed amount 'x' or percentage 'y%') for subsequent customer orders, separate discounts with commas in field. Last figure will apply for all subsequent purchases. Ex 10%,5,0 for 10% discount on 1st purchase, $5 discount on 2nd purchase and no discount on subsequent purchases (until expiration date set in Affiliate Group detail)
Under Affiliate will earn commission on individual cart items if they meet the following conditions, you can specify more conditions. In this case, the items in shopping cart have to satisfy conditions at Conditions section and this option.
-
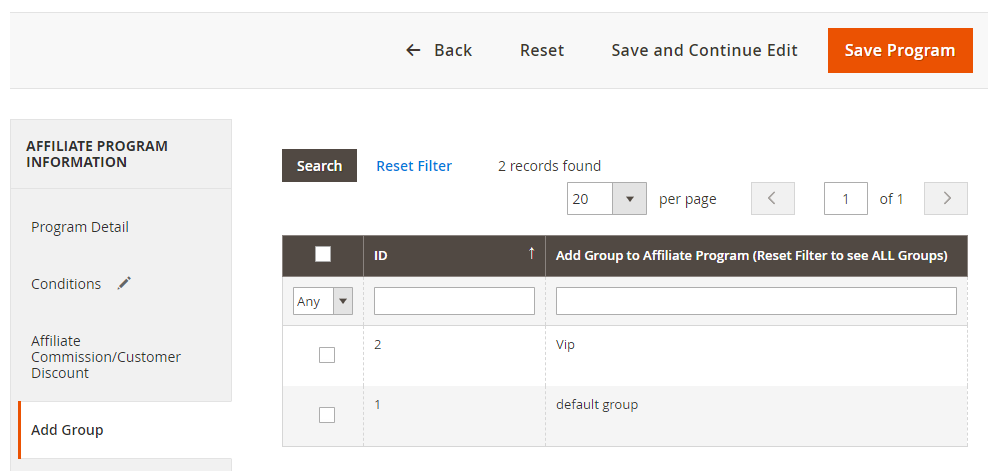
In Add Group, assign the program to specific affiliate groups. Hit Reset filter and select groups.
-
Program Transaction displays a list of transaction information: transaction time, product name, affiliate account (who received commission), order number, product value, product commission, discount and status. If the status is complete, the commission will be added to the affiliate balance.
![]()
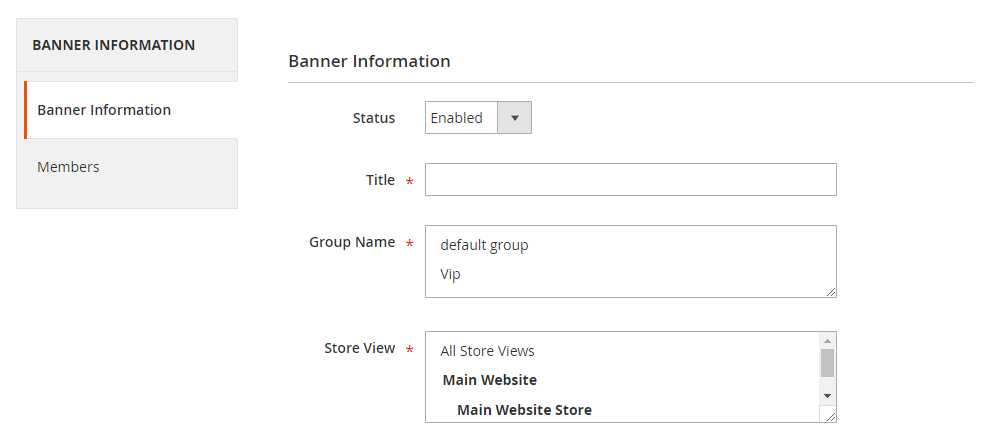
3.18 Manage Banners
To manage banners, please go to Affiliate Pro ⇒ Manage Programs ⇒ Manage Banners. A banner can be visible on specific store views, assigned to specific links and affiliate groups.
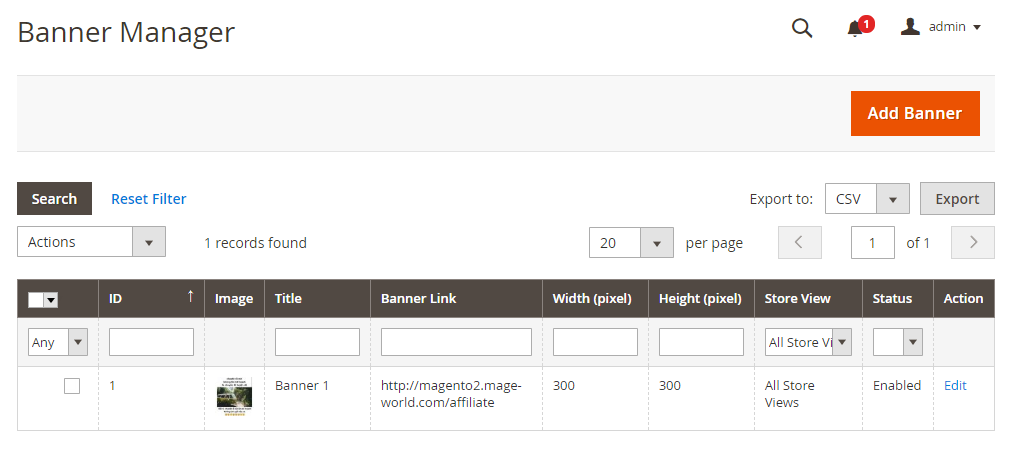
To add a new banner, click on Add Banner. After that, set up more details of the banner: Title, Link, Image, Width, Height. Admin also have to assign specific Store views, Affiliate groups and Members to the banner.
3.19 Report
To view Affiliate statics, please follow Affiliate Pro ⇒ Affiliate Report. This including 4 sections: Overview, Affiliate Invitation, Affiliate Sales, Affiliate Website(s).
3.19.1 Overview
Under Date Range dropdown, you can choose a time range to view the report among: Last 24h, Last week, Last month, Last 7 days, Last 30 days or Custom.
-
Line Chart: Show total sales that are generated by Affiliates, total commission of Affiliates and total amount of discount in the chosen time range.
-
Sales by Programs (Pie Chart): Present percentages of sales by each affiliate program in chosen time range.
-
Commission by Programs (Pie Chart): Present percentages of commission by each affiliate program in chosen time range (for the type of commission come from referrals such as: referral visitor, referral sign-up, referral subscribe, those type of commission will belong to non-program group)
-
Statistics box: Show total sales, total orders, total commission, total withdrawals (withdrawal status is complete), total withdrawal fees, total transactions, average commission per order, average commission per affiliate, average order value and total affiliate.
-
Top Affiliate by Sales box: Show 10 top affiliates who have highest sales.
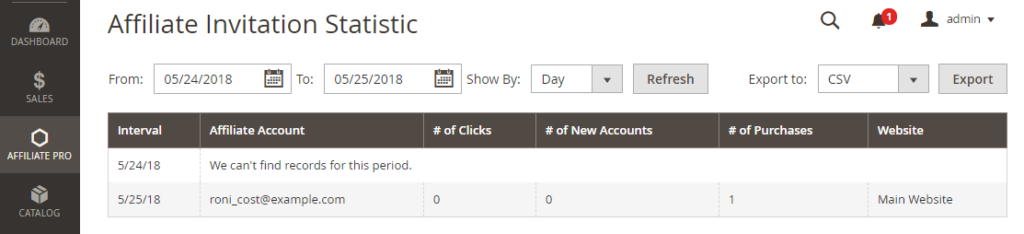
3.19.2 Affiliate Invitation
-
In the From and To fields, use the calendar to specify the time range for report data aggregating.
-
Select type of showing by Day, Month, or Year in dropdown of the Show By field.
-
Click on the Refresh button to view details information about Affiliate Account, # of clicks, # of New accounts, # of purchases and Website
-
Select the CSV or Excel option and click on the Export button to export the report information, in the Export to field.
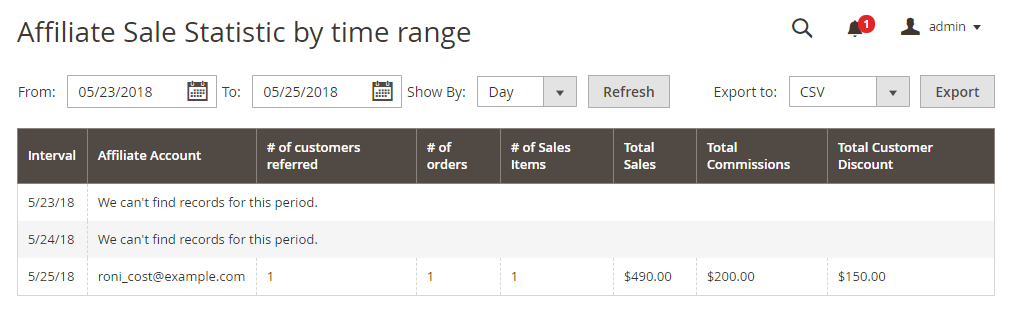
3.19.3 Affiliate Sales
-
In the From and To fields, use the calendar to specify the time range for report data aggregating.
-
Select type of showing by Day, Month, or Year in dropdown of the Show By field.
-
Click on the Refresh button to view details information about Affiliate Account, # of customers referred, # of order, # of sales items, Total Sales, Total Commission, Total Customer Discount
-
Select the CSV or Excel option and click on the Export button to export the report information in the Export to field.
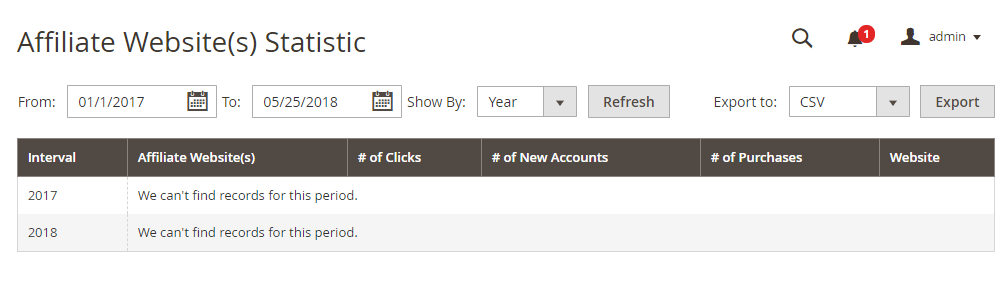
3.19.4 Affiliate Websites
-
In the From and To fields, use the calendar to specify the time range for report data aggregating.
-
Select type of showing by Day, Month, or Year in dropdown of the Show By field.
-
Click on the Refresh button to view details information about Affiliate website, # of clicks, # of new accounts, # of purchases
-
Select the CSV or Excel option and click on the Export button to export the report information in the Export to field.