
1. Overview
Promotion Bar for Magento 2 extension helps you create unlimited notification bars to update your customers on promotional deals as well as important news to grab customers and visitors’ attention
2. How Does It Work?
2.1 General Config
Go to Stores ⇒ Configuration ⇒ BSSCommerce ⇒ Promotion Bar.
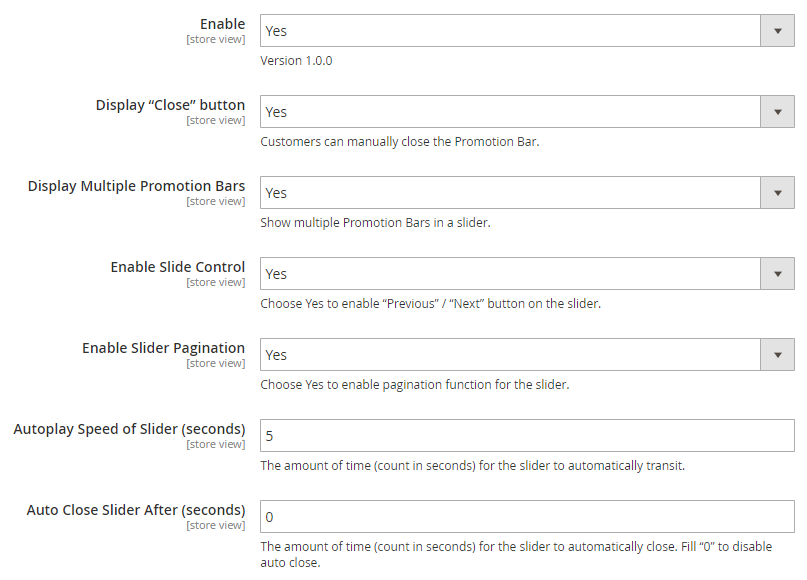
In Enable, choose Yes to enable the extension, or No to disable it.
In Display “Close” Button, choose Yes to show the “Close” button in the top right position of the promo banner. Customers can manually close the bar with that button.
In Display Multiple Promotion Bars, If select Yes, banners set with the same position on the page will be shown in a slider. Please, use the same resolution images for the best results.
In Enable Slide Control, select Yes to show the “Previous” and “Next” button on the slider.
In Enable Slider Pagination, choose Yes to enable pagination function for the slider.
In Autoplay Speed of Slider, decide the amount to time for the slider to automatically transit. Count in seconds.
In Auto Close Slider After, decide the amount to time for the slider to automatically close. Count in seconds. Enter 0 to disable the auto-close function.
2.2 Manage Promotion Bar
Go to Marketing ⇒ BSSCommerce ⇒ Promotion Bar ⇒ Manage Promotion Bar.
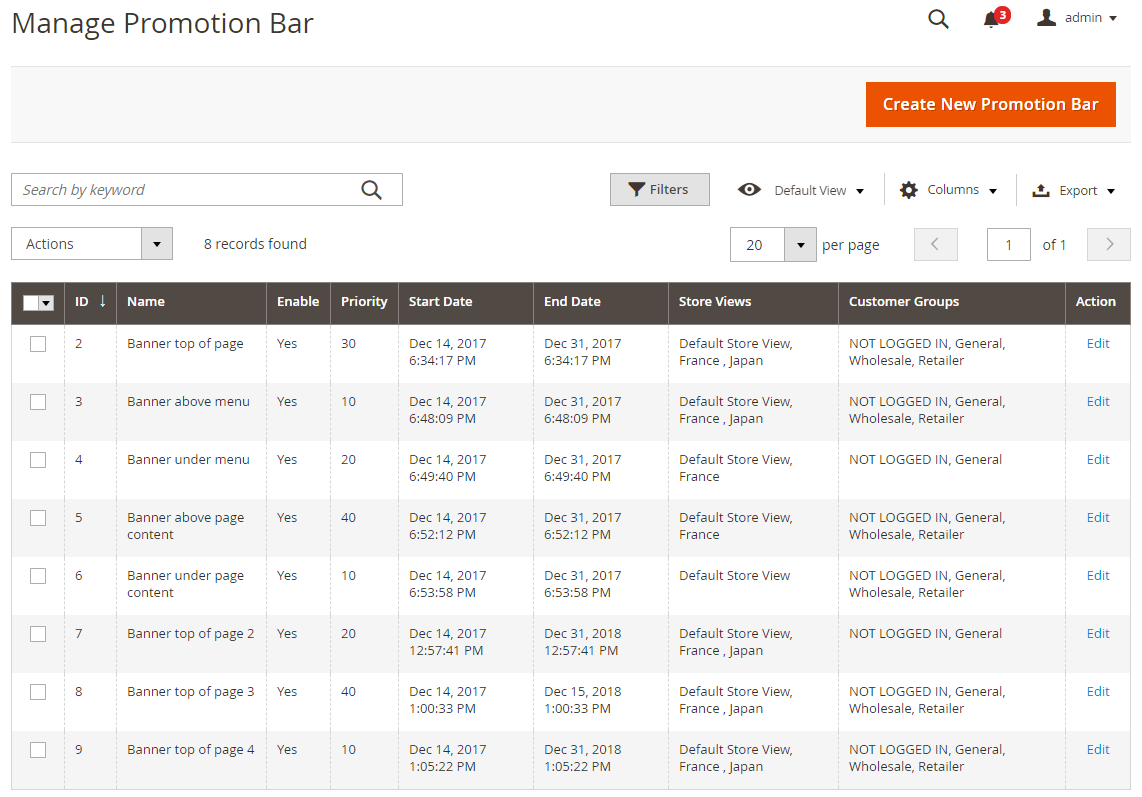
The Manage Promotion Bar grid is developed as the standard of Magento 2 default grid. You can create a new banner, set up and manage all promotion bars here.
After clicking on the Create New Promotion Bar button, you will be redirected to New Promotion Bar Page. There 3 main sections: General, Display Rule, and Content and Design.
2.2.1 General
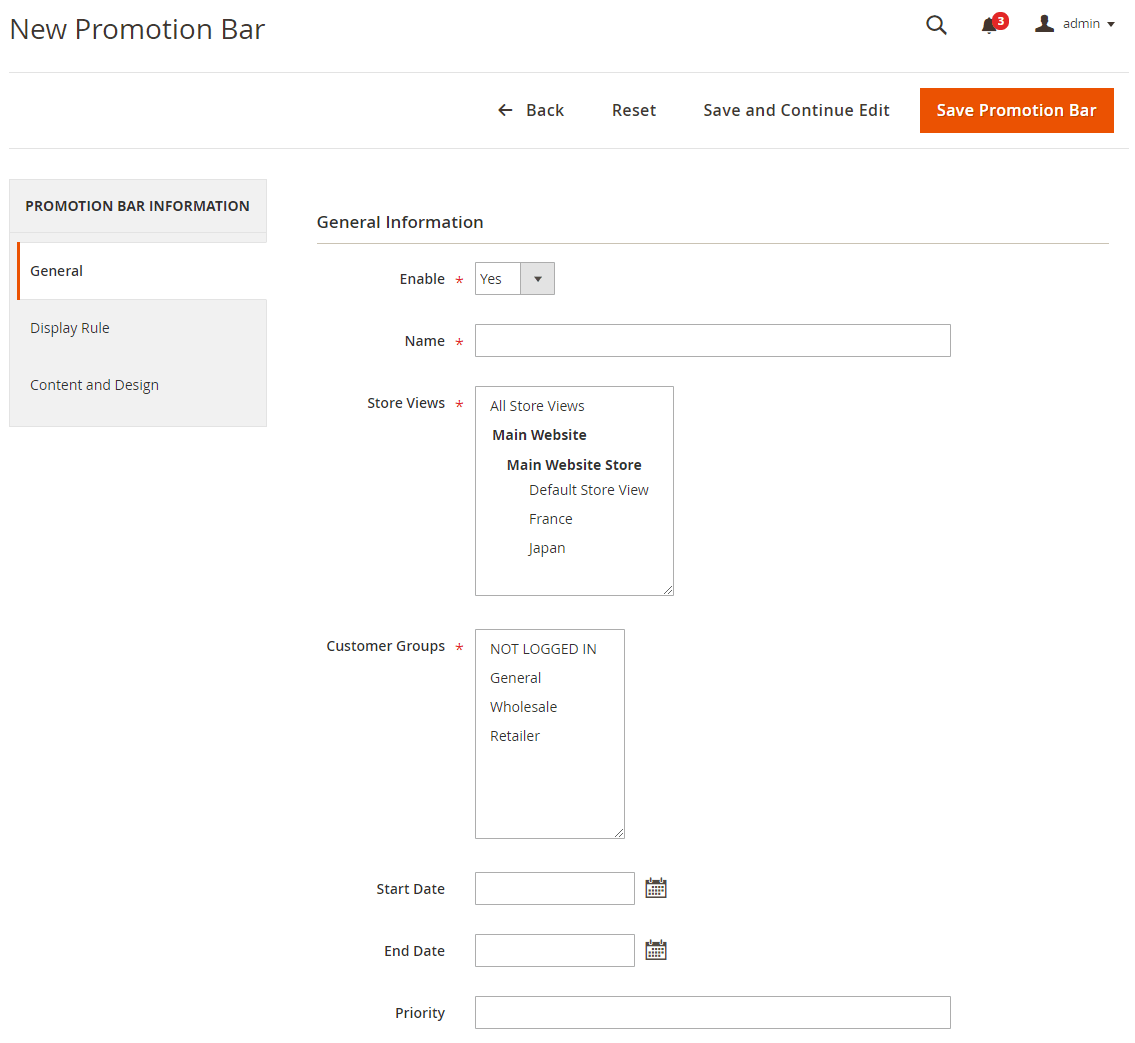
In Enable, choose Yes to enable the new promotion bar, or No to disable it.
In Name, enter the name for the new promotion bar.
In Store Views, choose one or multiple store views where your new promotion banner should be displayed.
In Customer Groups, select which customer groups you want to display the new promotion bar.
In Start Date, use the calendar view to easily choose the starting date to display the new promotion bar. Please enter in yyyy-mm-dd hh:mm:ss or yyyy-mm-dd format. For example:
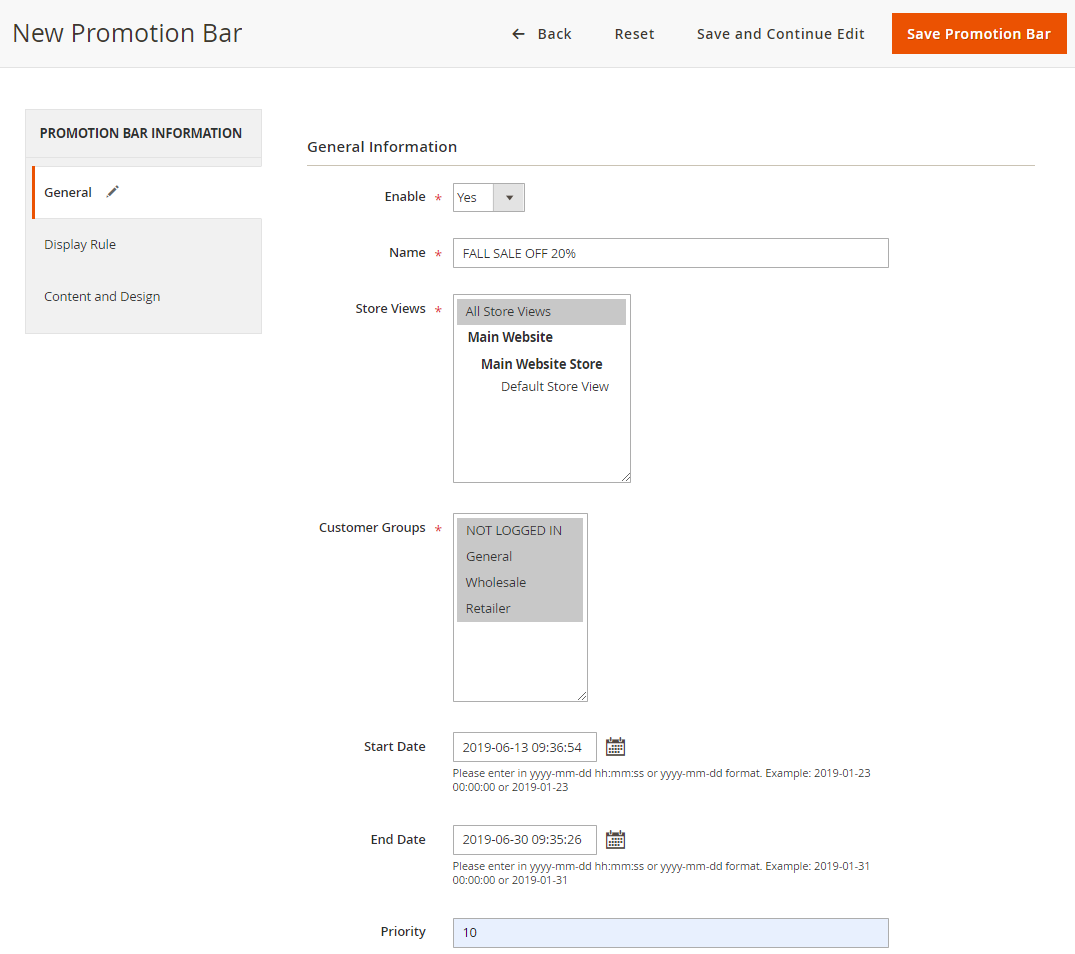
In End Date, choose the expiring date to remove the new promotion bar. Please enter in yyyy-mm-dd hh:mm:ss or yyyy-mm-dd format.
In Priority, enter a number to set the priority of the new promotion bar. Please don’t leave this field blank.
The value of this field decides which promotion bar is prioritized in case when you choose NO in “Display multiple promotion Bars” in Configuration part, it will show only one banner with the highest priority among various created promo banners at the same place.
2.2.2 Display Rule
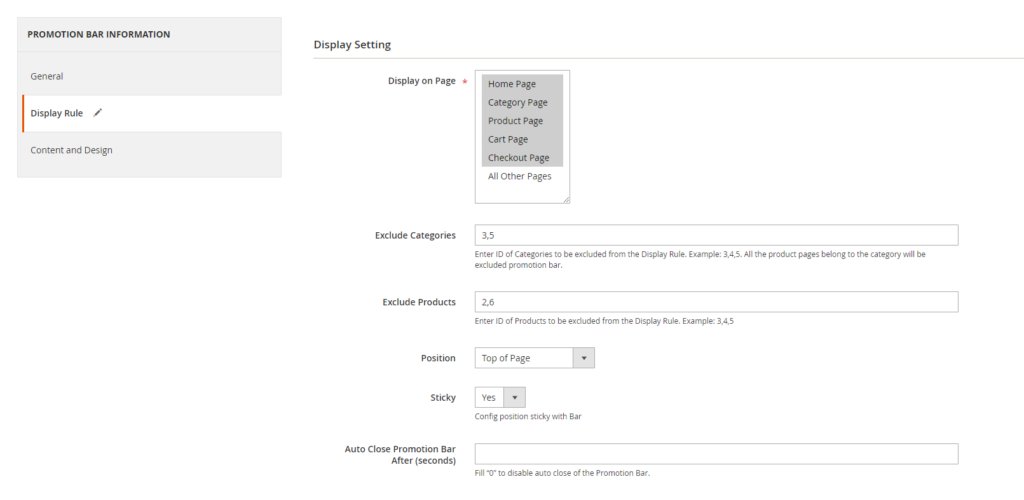
In Display on Page, select which page to display the new promotion bar.
In Exclude Categories, enter the ID of Categories to be excluded from the Display Rule. Example: 3,4,5. All the product pages belonging to the category will be excluded from the promotion bar.
In Exclude Products, enter the ID of products to be excluded from the Display Rule. For example: 3,4,5. The promotion banner will be hidden on each product page specified.
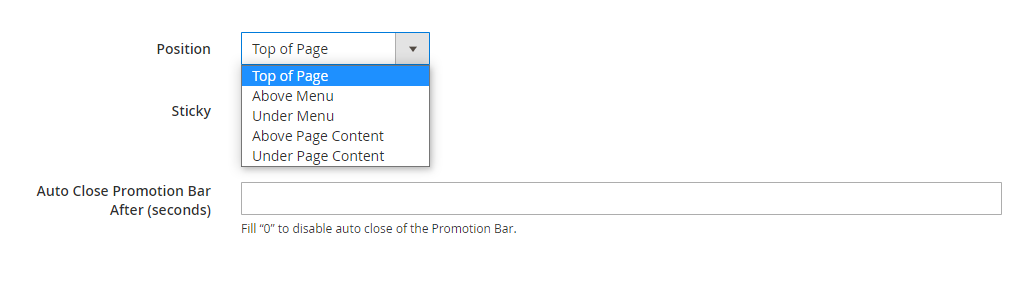
In Position, choose one of the 5 following options to set the position of the new promotion page.
In Sticky Bar, choose Yes to stick the bar on the top/bottom page when the customer scrolls.
- If the bar position is one of these options: Top of page, Above Menu, Under Menu, Above Page Content, the bar is sticky on the top page.
- If the bar position is Under Page Content, the bar is sticky on the bottom page.
- If the config Enable Slider Pagination in the configuration is Yes and config Sticky Bar of one bar is Yes, the slider is sticky even if it includes non-sticky bars.
- If there are many sticky bars at different positions on the page, only the bar at the highest position will be sticky. For example, you have one bar at the top of the page and one at the Above Menu; both are set to stick, but only the bar at the top of the page is sticky.
- If config Display Multiple Promotion Bar is No, display the bar with the highest priority.
In Auto Close Promotion Bar After, decide the amount of time for the new promotion bar to automatically close. Count in seconds. Enter 0 to disable the auto-close function.
2.2.3 Content and Design
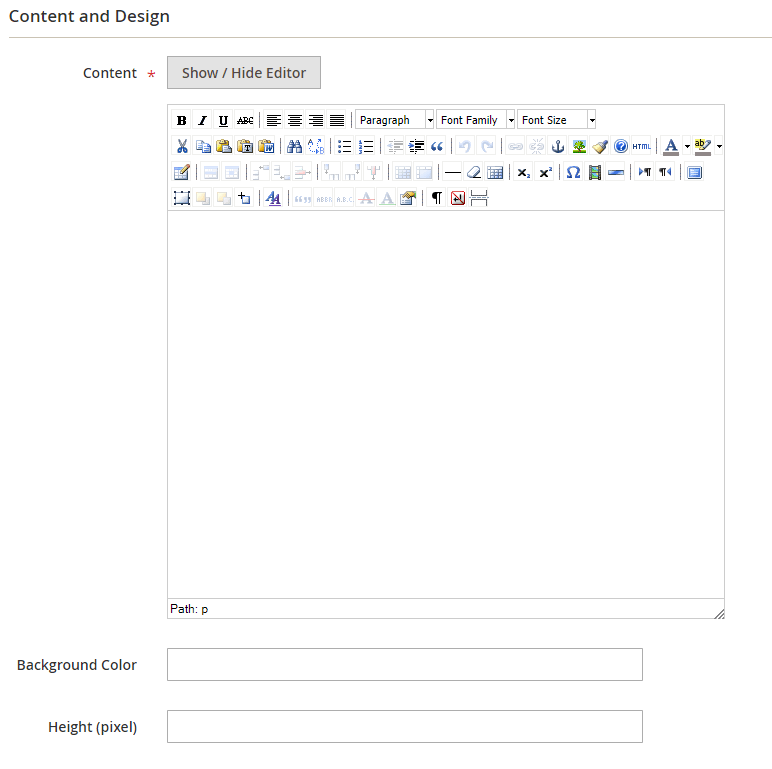
In Content, use the WYSIWYG editor to enter text, upload pictures and edit content for the new promotion bar. Remember that you can choose only one picture per bar.
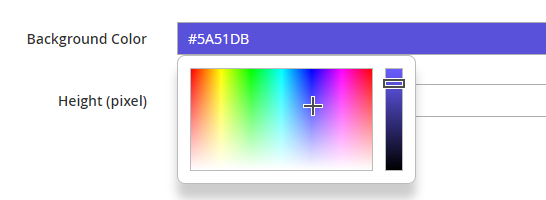
In Background Color, use the color picker to choose the background color. For example:
In Height, enter a number (count in pixel) to set the height of the new promotion bar.
Click Save Promotion Bar button to save all configurations.