
1. Overview
Magento 2 Checkout Suite includes a bundle of checkout extensions, developed to optimize the checkout process in a userfriendly and lighting-fast way.
What to expect in the suite?
2. How Does It Work?
2.1. Magento 2 One Step Checkout
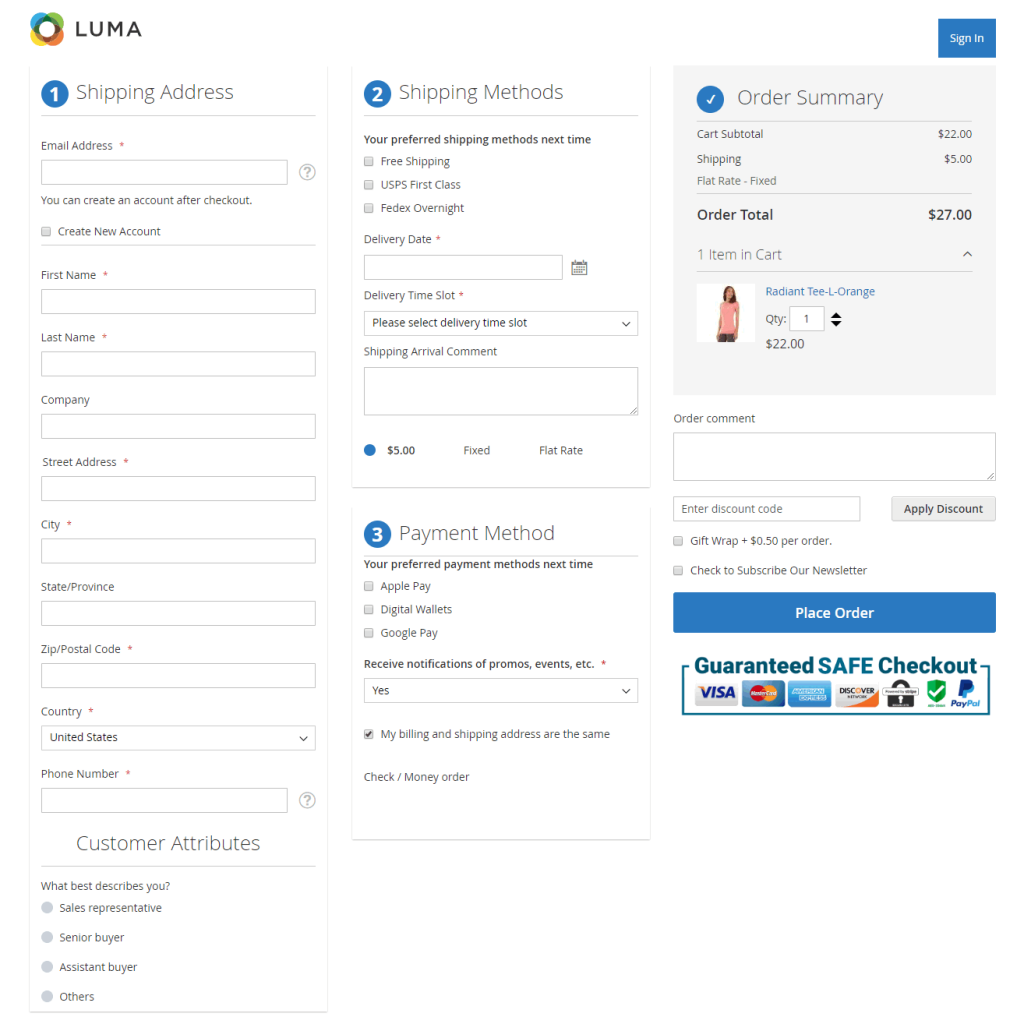
One Step Checkout for Magento 2 extension helps customers to checkout simply and quickly by displaying all elements in 1 page only. They do not need to experience two parts (Shipping Address and Reviews & Payments) as in default Magento 2 but fill all information in one place conveniently. Therefore, the checkout process becomes more user-friendly, which can reduce the abandonment rate and bring a higher conversion rate for online stores.
Please go to Stores ⇒ Configuration ⇒ BSSCOMMERCE ⇒ One Step Checkout.
2.1.1 In General
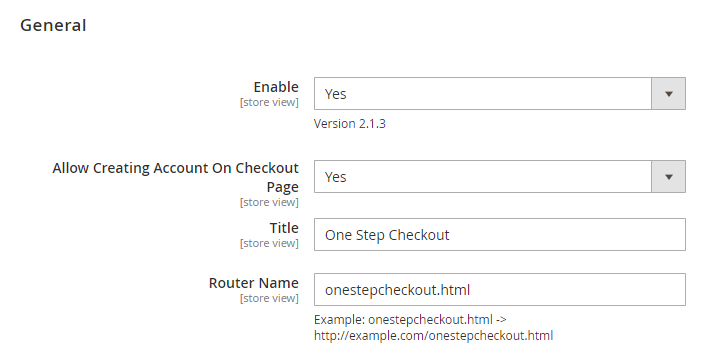
In Enable:
- Choose Yes to enable Magento 2 One Step Checkout extension.
- Choose No to disable this module.
In Allow Creating Account On Checkout Page:
- Choose Yes to allow customers to create their accounts right on the checkout page.
- Choose No to disable this function.
In Title: Write your wanted title for the checkout page.
In Router Name: Choose a URL name for your checkout page.
2.1.2 In Fields Display
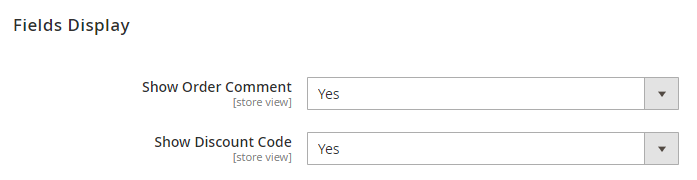
In Show Order Comment:
- Choose Yes to show a text box for customers to leave their comments for orders.
- Choose No to exclude this box from the checkout page
In Show Discount Code:
- Choose Yes to display a discount code box for entering coupon codes.
- Choose No to hide it.
2.1.3 In Newsletter
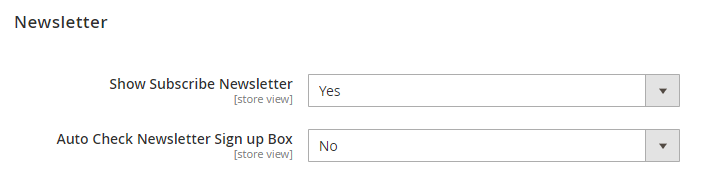
In Show Subscribe Newsletter:
- Choose Yes to allow customers to subscribe to the newsletter on the checkout page.
- Choose No to disable this function.
In Auto Check Newsletter Sign up Box: Choose Yes to automatically tick the Newsletter Sign up box or choose No to uncheck.
2.1.4 In Tracking Address by Google
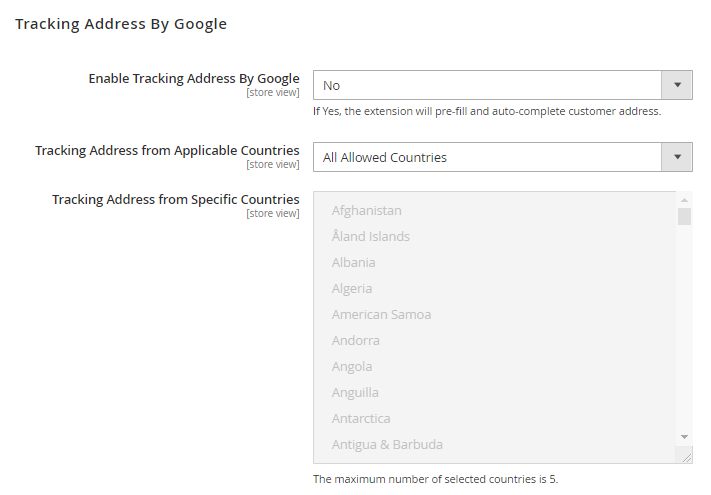
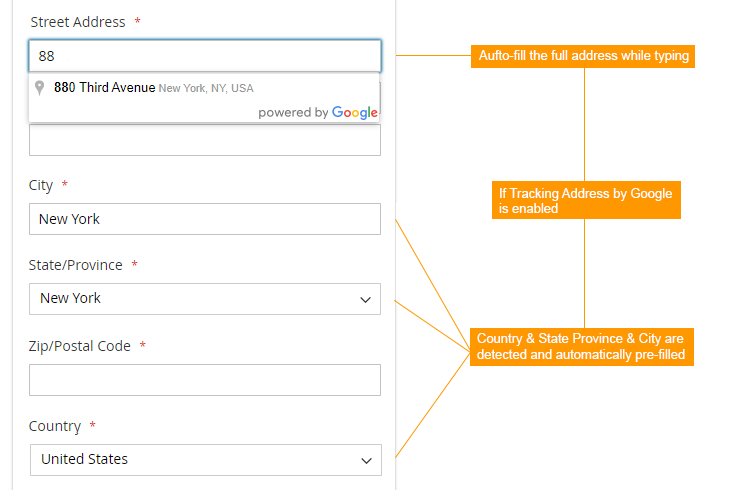
In Enable Tracking Address by Google:
- Choose Yes: Auto-detect and pre-fill customers' country, state/province, city - Google Suggest to autocomplete shipping address while typing.
- Choose No: Customers have to find all street addresses and location information themselves.
In Google API Key: Fill in your API Key. In case you haven’t yet had an API Key, please click the link after this configuration to get it.
In Tracking Address from Applicable Countries: This configuration determines which countries to apply auto-suggesting customer addresses. There are 2 options to select:
- If you choose All Allowed Countries: auto-suggesting address function is applied to every country.
- If you choose Specific Countries: there is a list of countries in Tracking Address from Specific Countries and the maximum number of countries you can select is 5. Moreover, when you choose this option, Google just auto-suggests city name and country, not street name. This is the default function of Google auto-suggest.
*Admin has to work with Google and pay for Google Maps to activate the address autocompleting feature.
2.1.5 In Order Delivery Date
Set up delivery date options by navigating to Order Delivery Date tab under
Stores ⇒ Configuration ⇒ BSSCOMMERCE.
2.1.6 In Gift Message
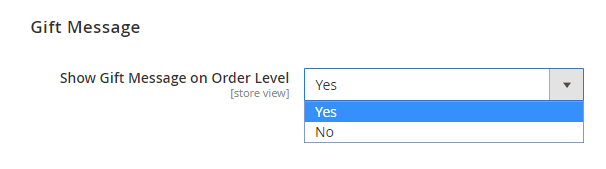
In Show Gift Message on Order Level:
- Choose Yes to allow customers to send a gift message to other people.
- Choose No to disable this function.
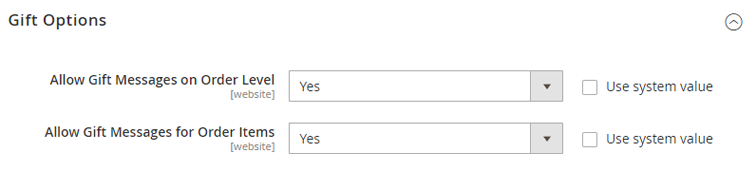
* Gift Message config is applied only when the corresponding default config is enabled. To enable the default config, please go to Stores ⇒ Sales ⇒ Sales ⇒ Gift Options and choose Yes to the suitable gift message level:
In Gift Wrap:
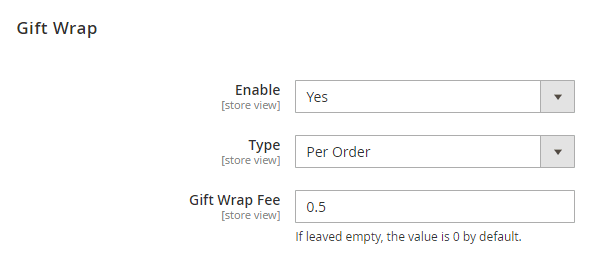
- Choose Yes to allow customers to request a gift wrap for their order.
- Choose No to disable this function.
In Type: This function currently supports gift wrap for each order only, so the value is Per Order by default.
In Gift Wrap Fee: Fill the price for gift wrap service. The entered value is a positive number and automatically rounded to two decimal places. If left empty or filled with a negative number, the value would turn to be 0.
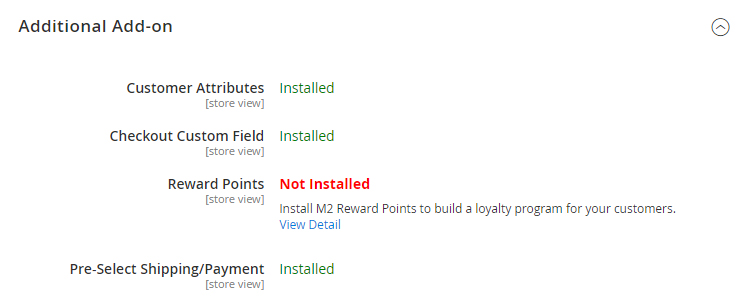
2.1.7 Additional Add-on
M2 One Step Checkout is already compatible with multiple related modules: M2 Customer Attributes, M2 Checkout Custom Field, M2 Reward Points, M2 Pre-Select Shipping/Payment. And we cover all of them in this Checkout Suite.
2.1.8 In Custom Style
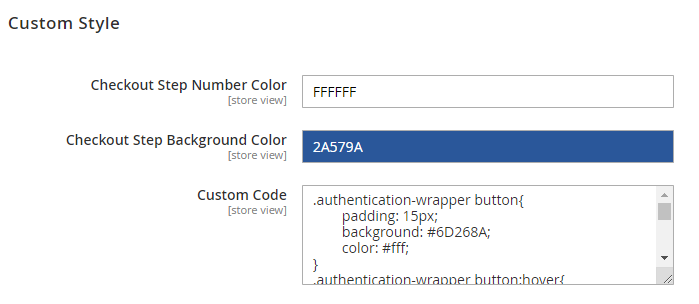
In Checkout Step Number Color: you choose the color for the checkout number steps.
In Checkout Step Background Color: Choose a color for the background of checkout number steps.
In Custom Code: you can add more code to customize about background color for the checkout page, “Sign in” button or text color and so on.
2.1.9 Somes notes
- Notes about custom code
+ Change background of the checkout page, you need to add more code:
body { background-color: #333333;
}
(#33333 is the color code which is corresponding to Black).
+ Change text color of the checkout page, you need to add more code:
body { color: #ffffff;
}
(#fffff is the color code which is corresponding to White).
+ Change Sign in to a button, you add more code:
.authentication-wrapper button{
padding: 15px;
background: #6D268A;
color: #fff;
}
.authentication-wrapper button:hover{
text-decoration: unset;
background: #FF0000;
color: #fff;
}
- Note about configuring payment method
You need to configure all payment methods that default Magento supports.
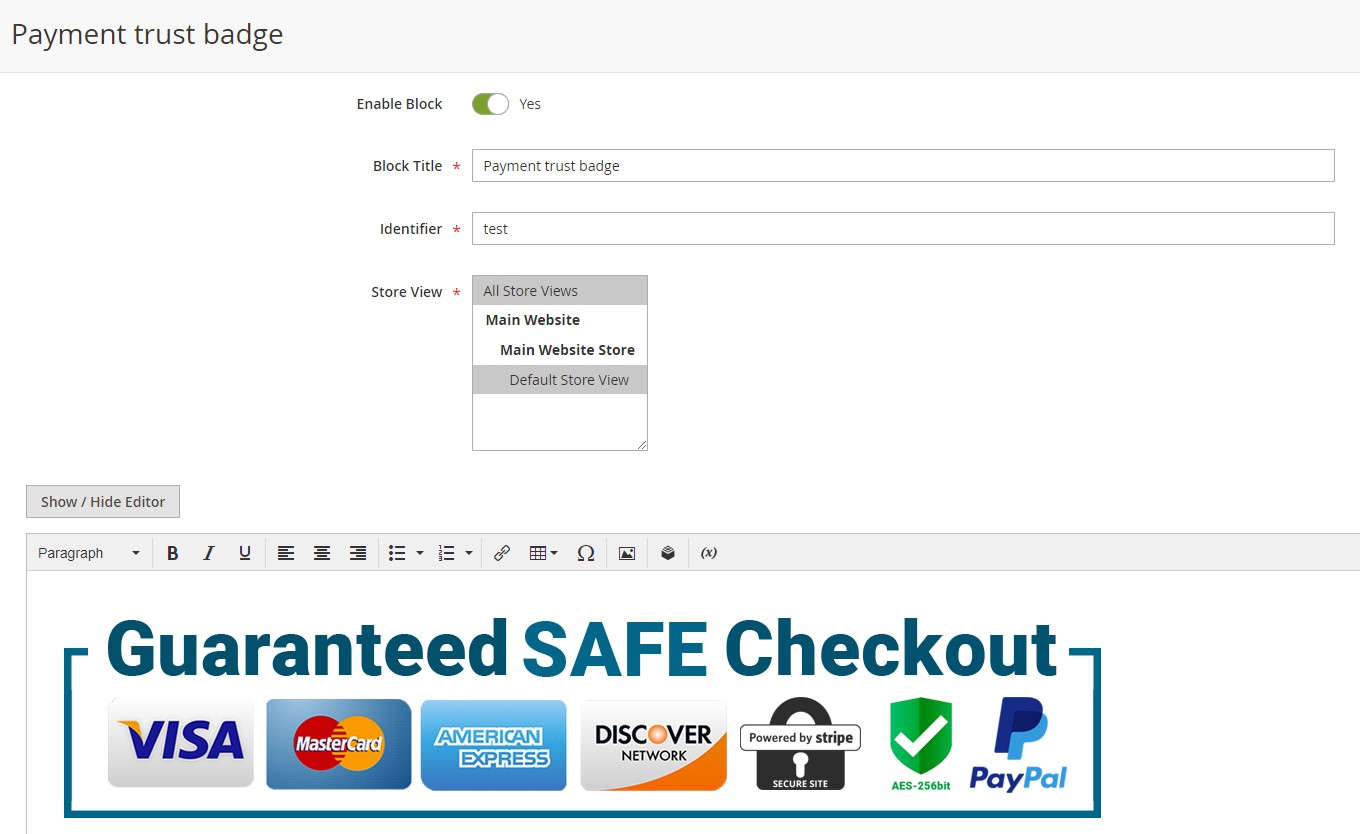
2.1.10. Add Payment Trust Badges
Step 1: Go to Content ⇒ Blocks ⇒ Add New Block to create a new block for payment trust badge.
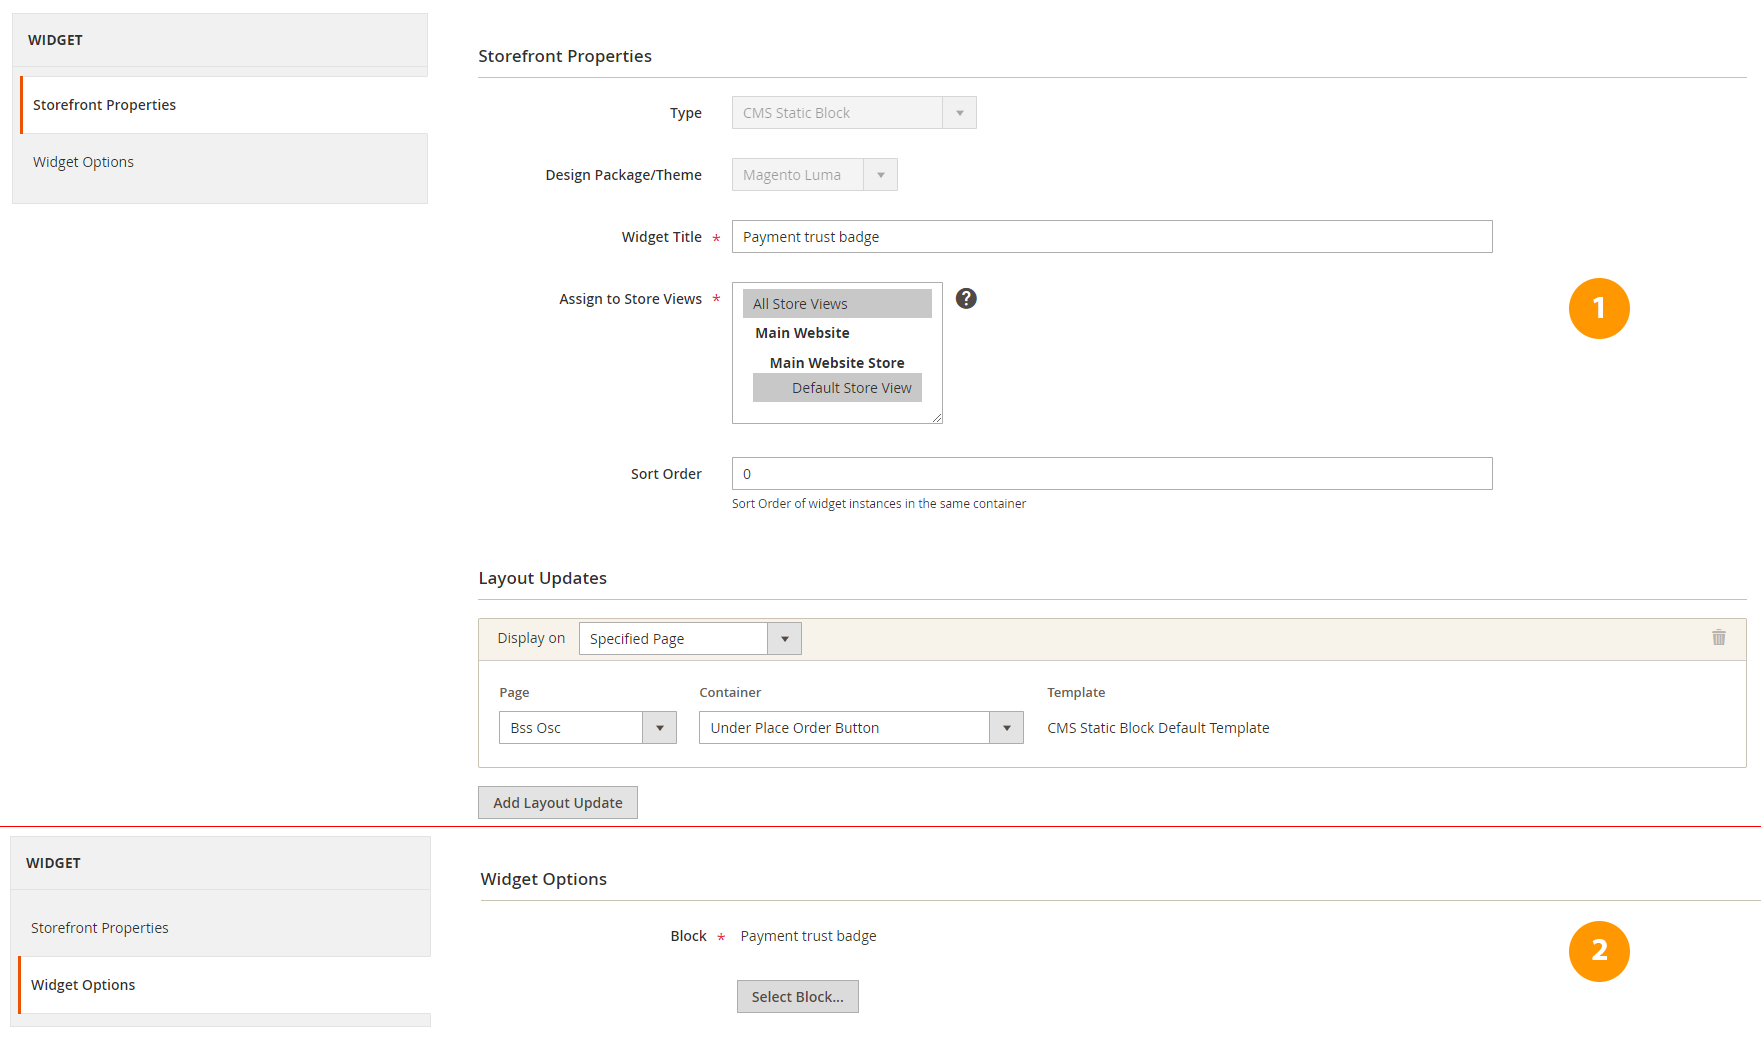
Step 2: Go to Content ⇒ Widgets ⇒ Add Widget to choose a certain place to display the block of payment trust badge.
- Note about adding header/footer for the checkout page: Upload folder bss_onestepcheckout to app/design/frontend/theme_space/theme.
2.2. Magento 2 Customer Attributes
Customer Attributes for Magento 2 extension adds customer attributes to the Registration Form to collect customer information. The value from the custom customer attributes will be displayed on My Account Page and added to Customer Detail Page, Customer Grid as well as Order Detail in the backend, and more importantly, at Checkout.
2.2.1. General configurations
Navigate to Stores ⇒ Configuration ⇒ BSSCommerce ⇒ Customer Attributes.
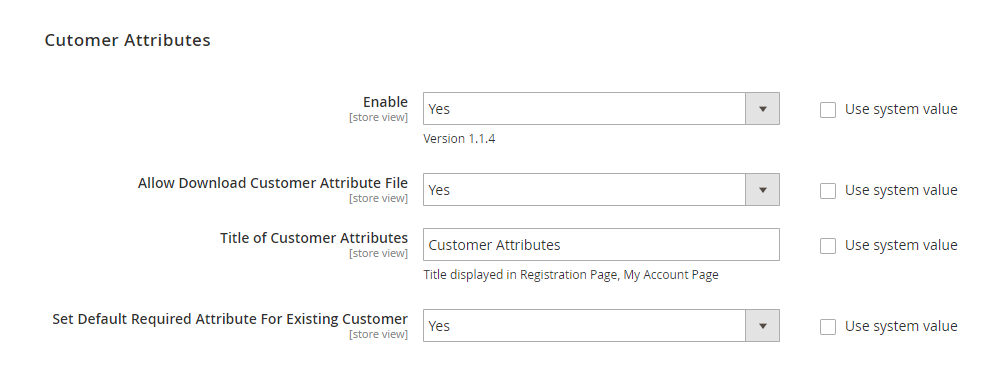
In Enable, choose Yes to enable the extension or No to disable it.
*Note: The Enable config only affects frontend display. Other backend functions aren’t affected by this config.
In Allow Dowload Customer Attribute File: choose Yes to allow downloading the file uploaded to customer attribute or No to restrict downloads.
In Title of Customer Attributes, enter the name for the customer attributes block. This title will be displayed in the Registration Form and My Account Page.
In Set Default Required Attributes for Existing Customer, choose Yes if you want required attributes to be applied for existing customers. Otherwise, choose No.
2.2.2 Create new attributes
Go to Customers ⇒ BSSCommerce ⇒ Customer Attributes.
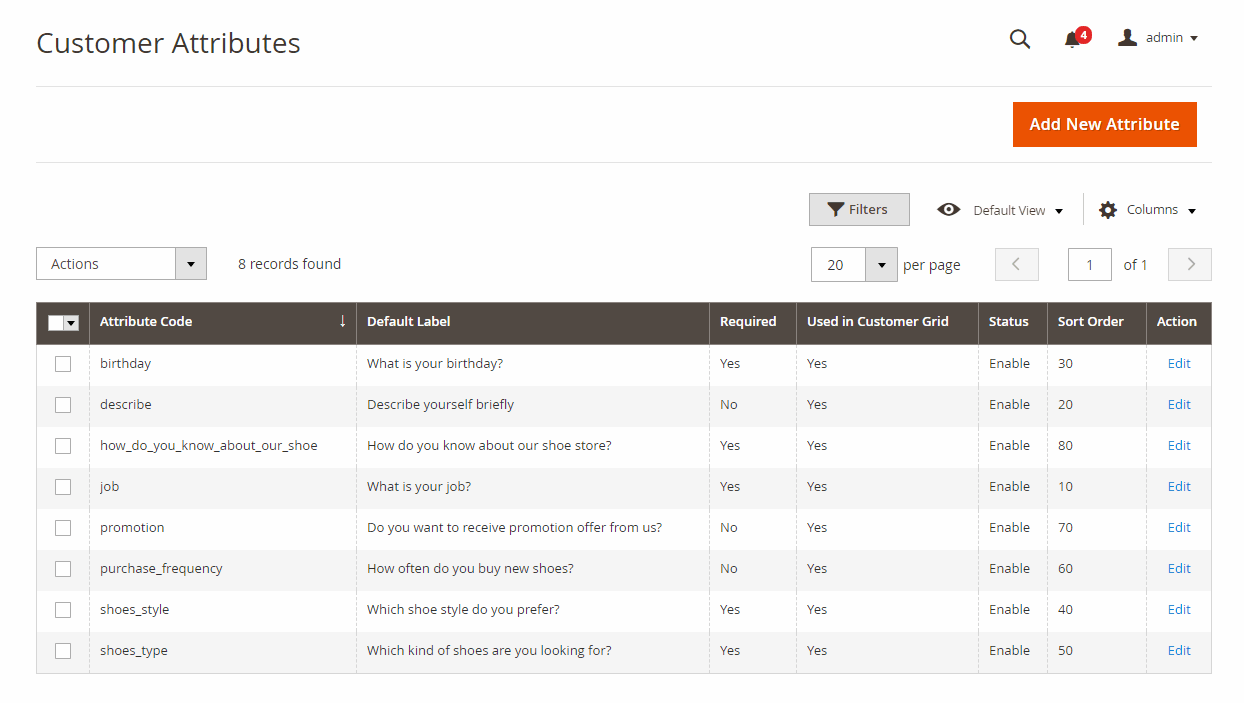
Customer Attributes Grid which displays all customer attributes created by admin. The Customer Attributes Grid is equipped with all functions as a default Magento 2 grid, including filter, column, mass action (delete, update status).
Click Add New Attribute button to create a new customer attribute. Then, you will see 3 tabs: Properties, Manage Labels, and Display Configuration.
2.2.2.1 Properties
Attribute Properties:
In Default Label, enter a name for the customer attribute.
In Input Type, choose 1 of the 9 input types: Text Field, Text Area, Date, Yes/No, Multiple Select, Dropdown, Checkbox and Radio Button, File (Attachment).
*Note:
- If you choose Multiple Select, Dropdown, Checkbox or Radio Button, add options for the customer attribute in Manage Options.
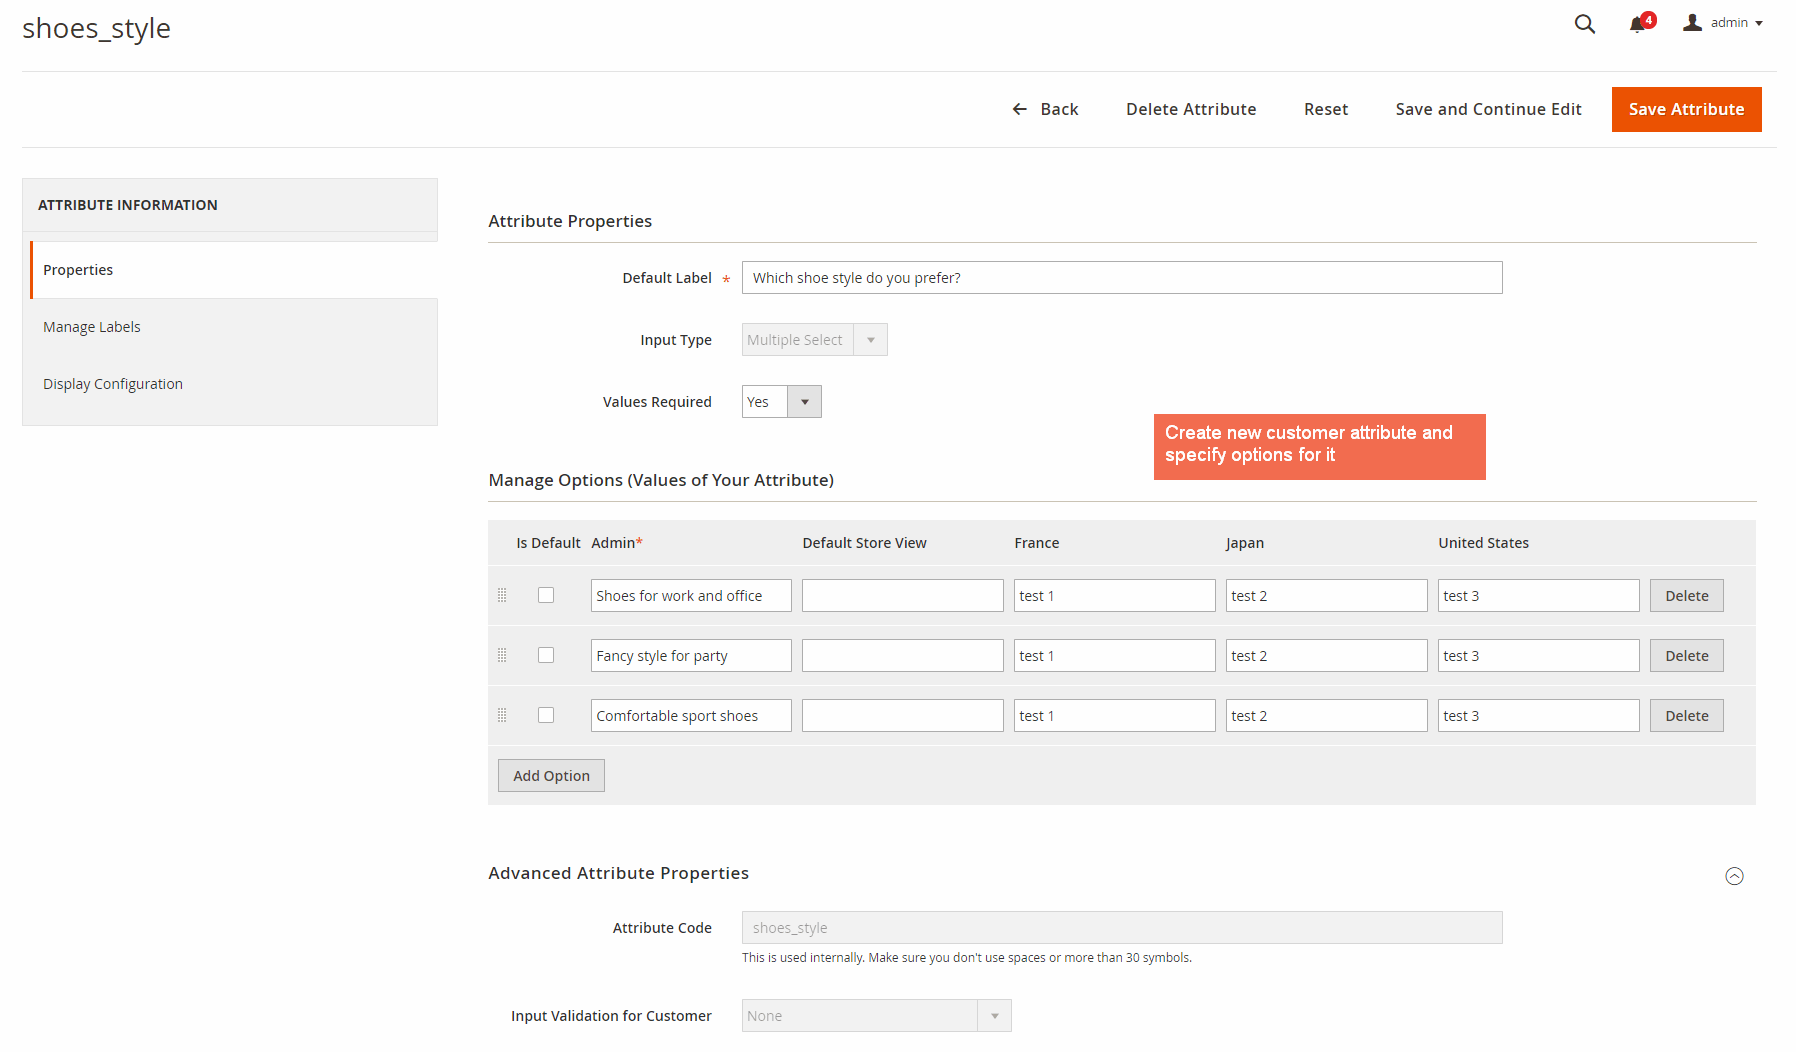
In Values Required, choose Yes to make the customer attribute compulsory to fill in; otherwise, choose No.
Advanced Attribute Properties:
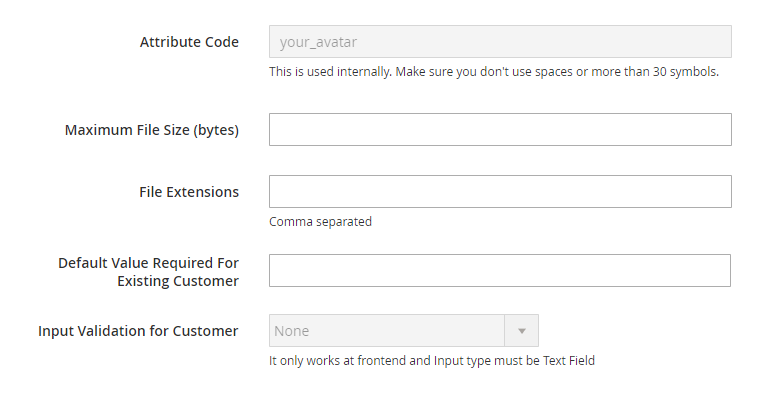
In Attribute Code, enter a code for the customer attribute. No space allowed and no more than 30 symbols.
*Note: In case none value is entered for Attribute Code, the extension will automatically get the value of Default Label as value for this field.
In Maximum File Size (bytes), enter a number to define the largest file size possibly uploaded.
In File Extensions, type allowed file extension that can be uploaded to the customer attribute. Each is separated by a comma.
In Default Value Required for Existing Customer, enter a value if the attribute is set as Required. This field will be only shown when the Values Required is Yes and the Input Type is text field, area, datetime, or file.
In Input Validation for Customer, set a type of data allowed in the field. The available values depend on the Input Type specified.
None—The field has no input validation during data entry.Decimal number—Accepts only decimal number during data entry.Integer Number—Accepts only integer number during data entryEmail—Accepts only an email address during data entry.URL—Accepts only a URL during data entryLetters—Accepts only letters during data entryLetters (a-z, A-Z) or Numbers (0-9)—Accepts any combination of numbers (0-9) and alphabetic characters (a-z, A-Z) during data entry.
2.2.2.2 Manage labels
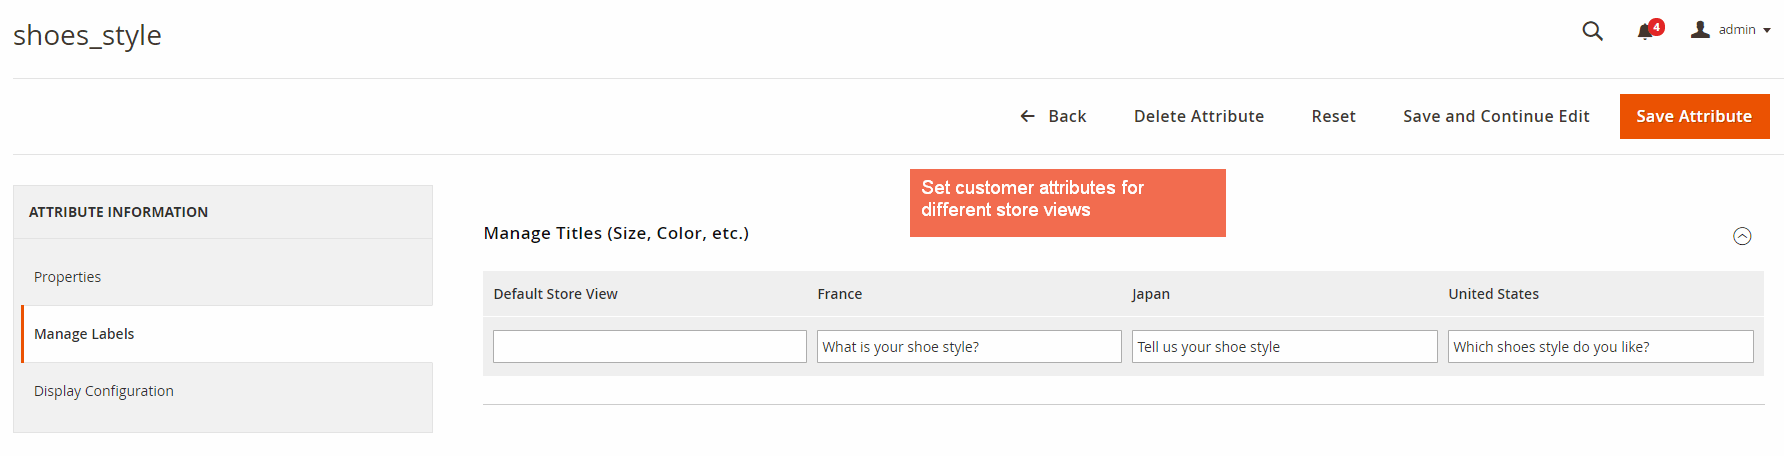
Customer Attributes for Magento 2 extension supports multiple store view, so you can display different customer attribute labels per store view.
2.2.2.3 Display configuration
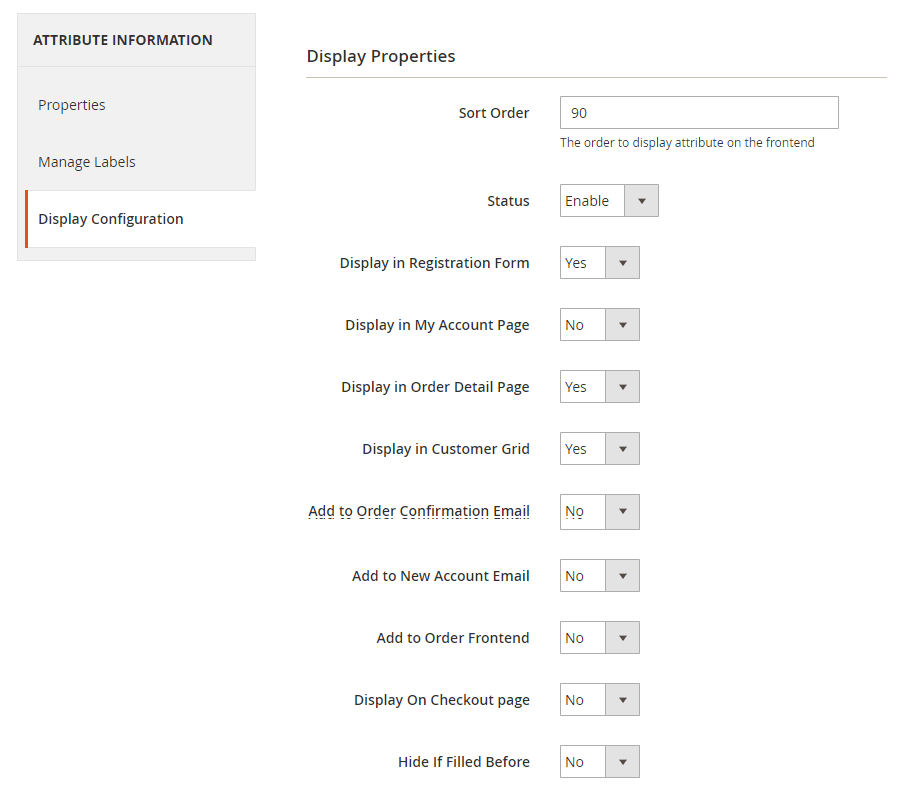
In Sort Order, set the order of appearance for the customer attribute in the Registration form.
*Note: The sort order set here will also decide the order of appearance of the attributes in the backend.
In Status, enable or disable the customer attribute.
In Display in Registration Form, choose Yes to add the customer attribute to Registration Form.
In Display in My Account Page, choose Yes to add the customer attribute to My Account Page.
In Display in Order Detail Page, choose Yes to add the customer attribute to Order Detail Page under Sales of Admin Panel.
In Display in Customer Grid, choose Yes to add the customer attribute to Customer Grid.
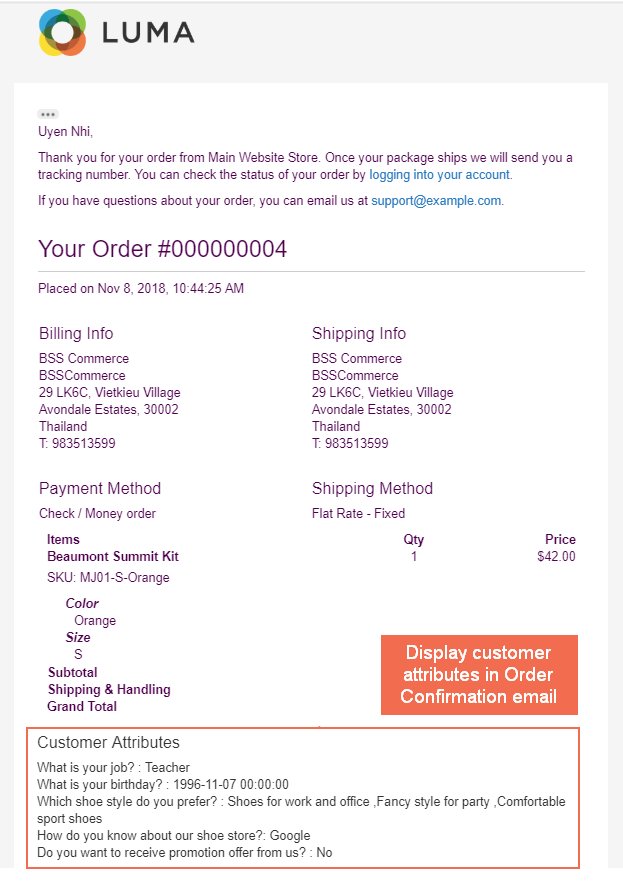
In Add to Order Confirmation Email, choose Yes to display the customer attribute in the Order Confirmation email.
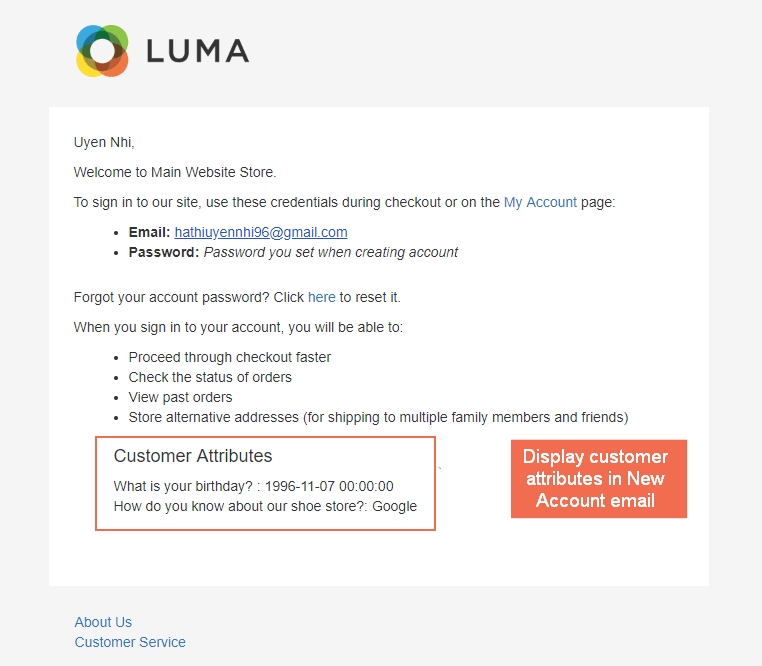
In Add to New Account Email, choose Yes to display the customer attributes in New Account email.
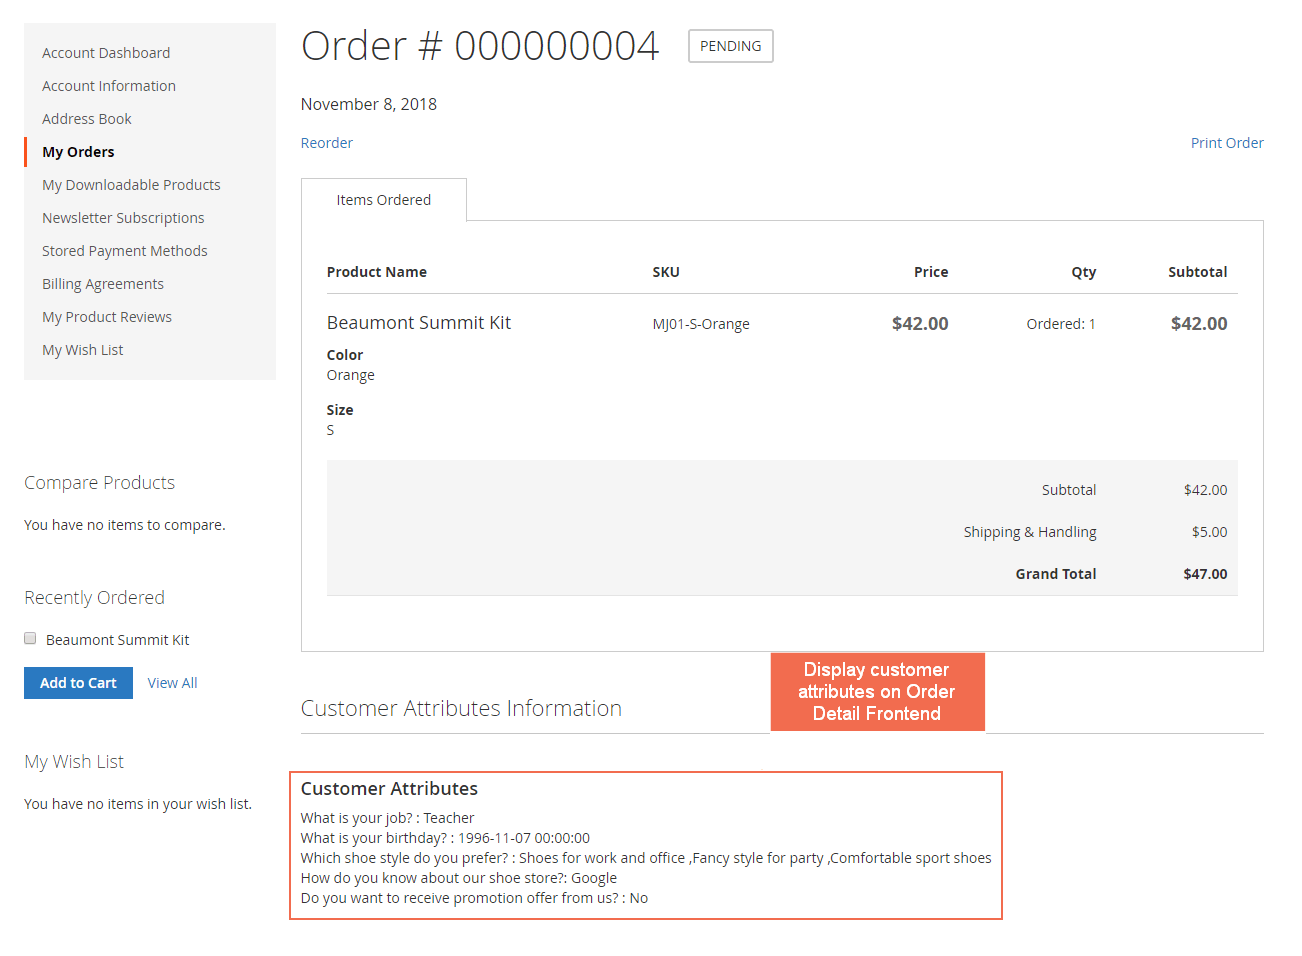
In Add to Order Frontend, choose Yes to display the customer attributes on Order Detail Page under My Account.
*Note: You need to reindex data of Customer Grid whenever you make any change in Display in Customer Grid config.
In Display on Checkout Page, choose Yes to show added customer attributes in the checkout page - under the shipping address or the payment method (with the virtual cart.) All filled information is saved upon order placement.
*Note: Attributes of all input types, except for "File", are supported at the checkout page.
In Hide If Filled Before, choose Yes to hide the customer attributes at the checkout page if they are filled before.
2.2.3 Create a new email template
As above, customer attributes are possibly set to display on Order Confirmation email and New Account email.
First off, you need to create a new template that includes customer attributes variable. Please follow Marketing Email Templates Add New Template.
- New Order Confirmation email template
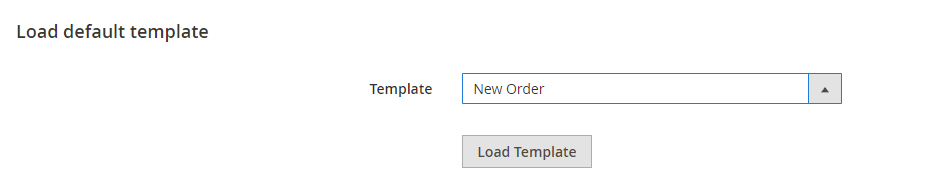
In Template section of Load default template, you can select among various default email templates, for example, New Order. Then, hit on Load template button.
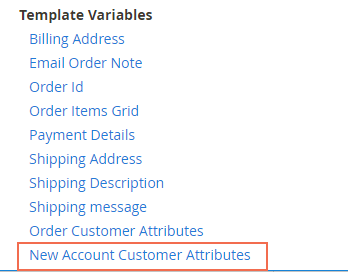
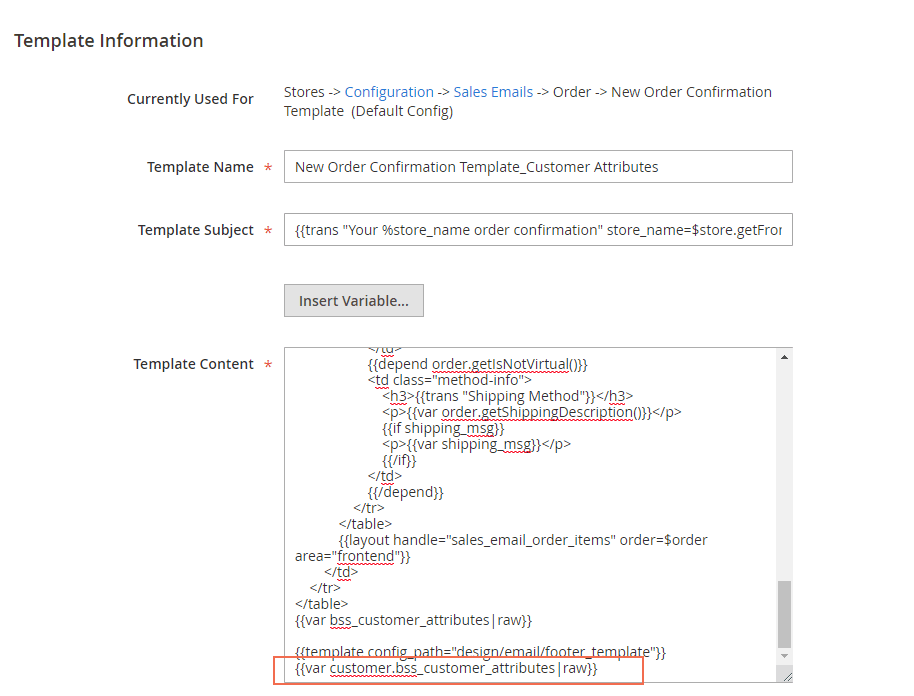
Under Template Information, select Insert Variable… to add customer attributes to new order confirmation template.
Do not forget to enter Template Name and Save the new template.
Secondly, set this new template as the Order Confirmation email by going to Stores Configuration Sales Sales Emails Order.
In New Order Confirmation Template, uncheck Use system value box and choose the newly created email template.
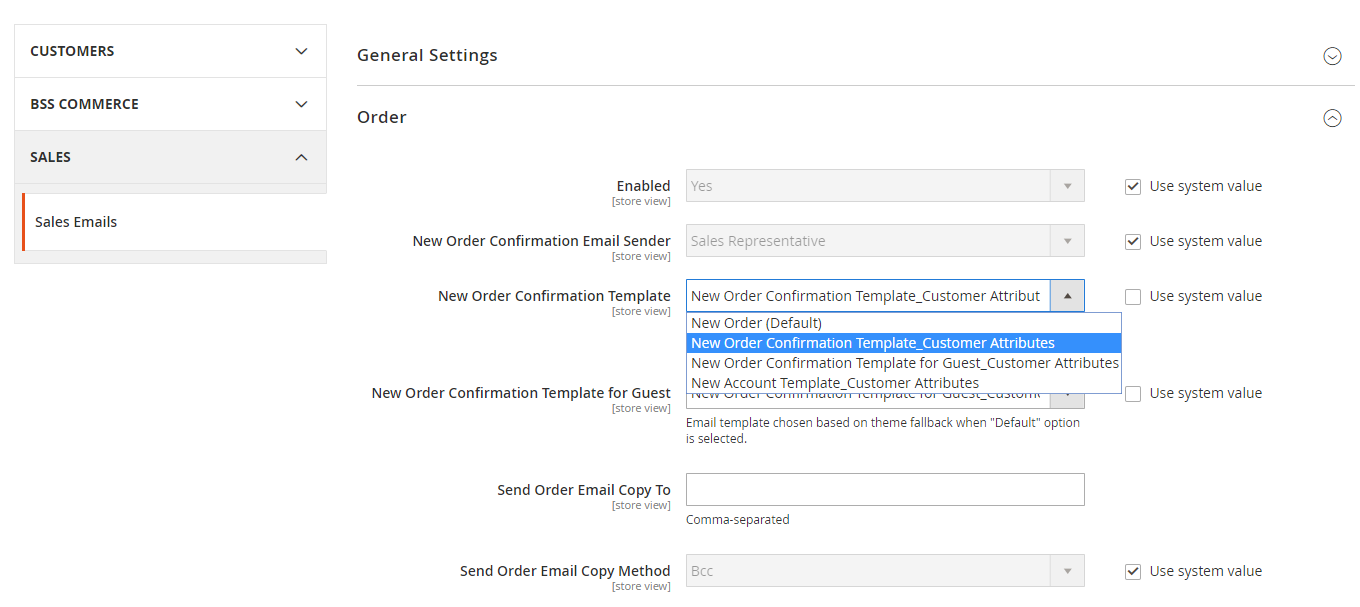
On completing, please Save Config.
- New Account email template
Similarly, you can create a new template with customer attributes for New Account email.
In Template of Load default template section, choose New Account (Default) template and hit Load Template.
Under Template Information, enter Template Name and select Insert Variable… to add customer attributes to New Account template.
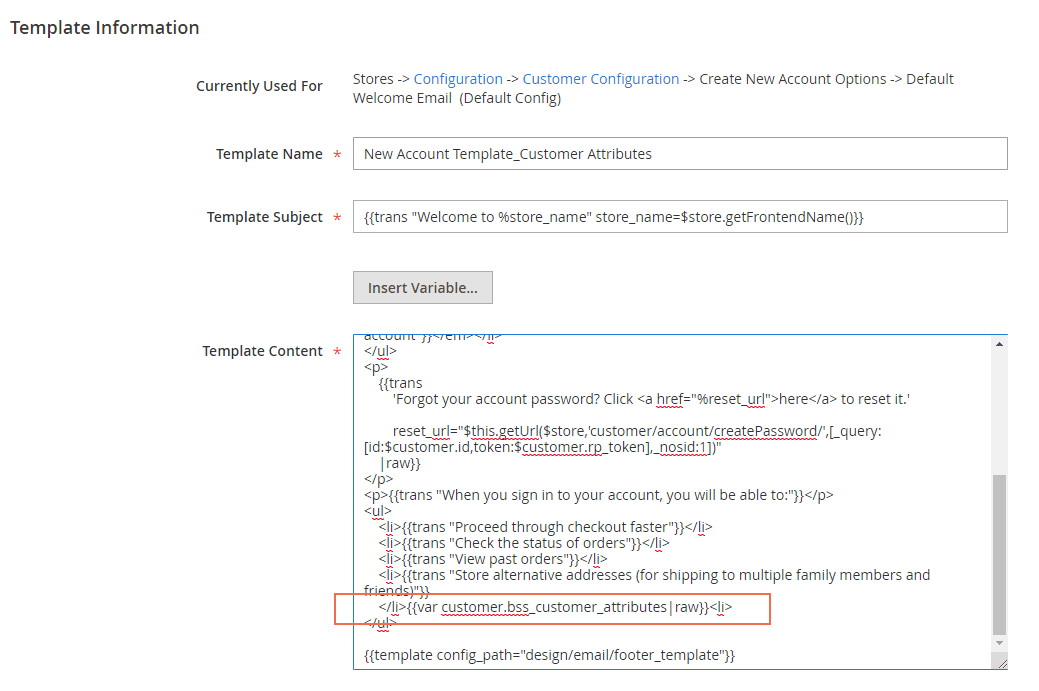
Then, Save Template.
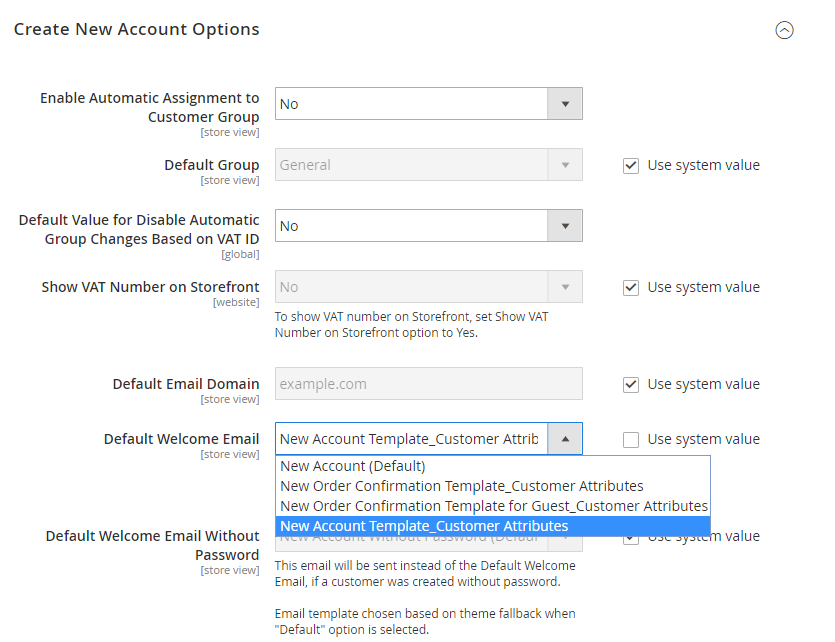
To set this new template as the New Account template, please follow Stores Configuration Customers Customer Configuration and expand Create New Account Options.
In Default Welcome Email, unmark Use system value box. Then choose the newly created template. Save Config to complete the settings.
2.2.4 Display Customer Attributes
2.2.4.1 Frontend
Display customer attributes in Registration Page:
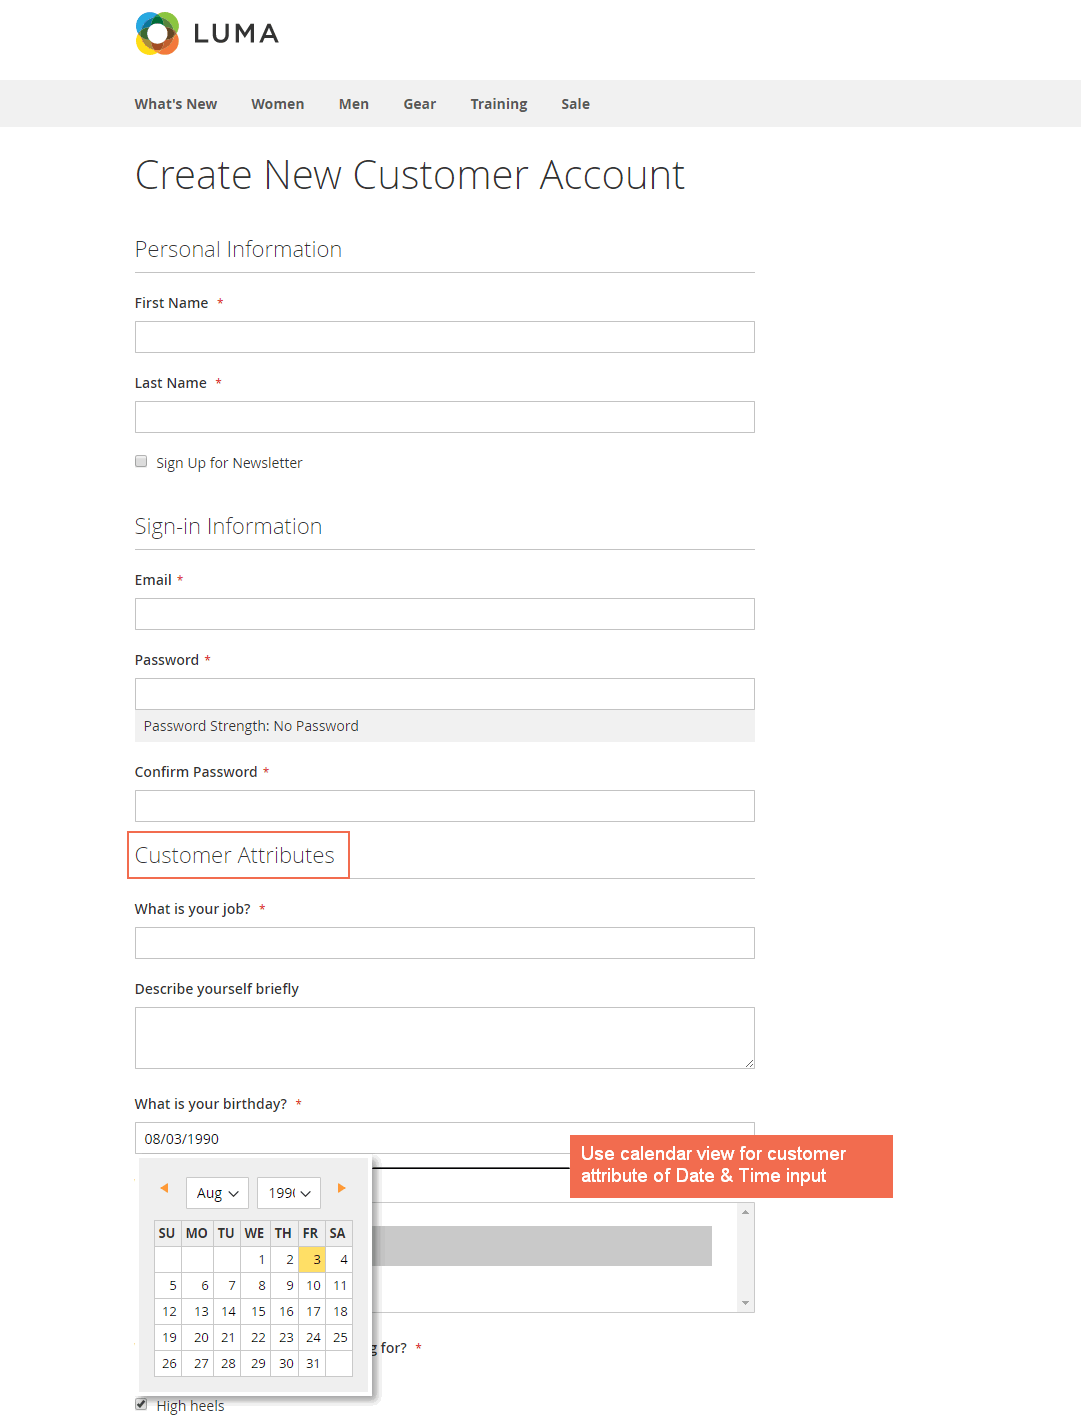
*Note: Customer Attributes for Magento 2 extension only supports checkbox in the frontend while in the backend, the checkbox is displayed in multiple-selection type.
A New Account email will be sent to the register, which includes the customer attributes based on the admin’s configuration.
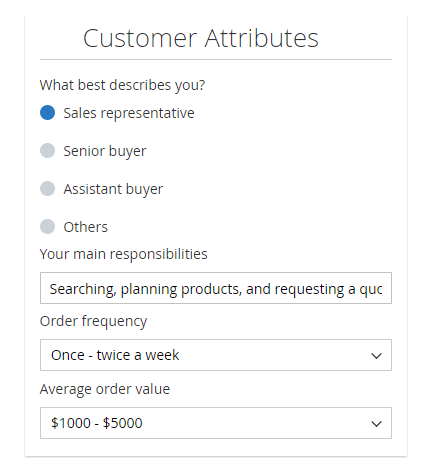
Display Customer Attribute in Account Information of My Account Page:
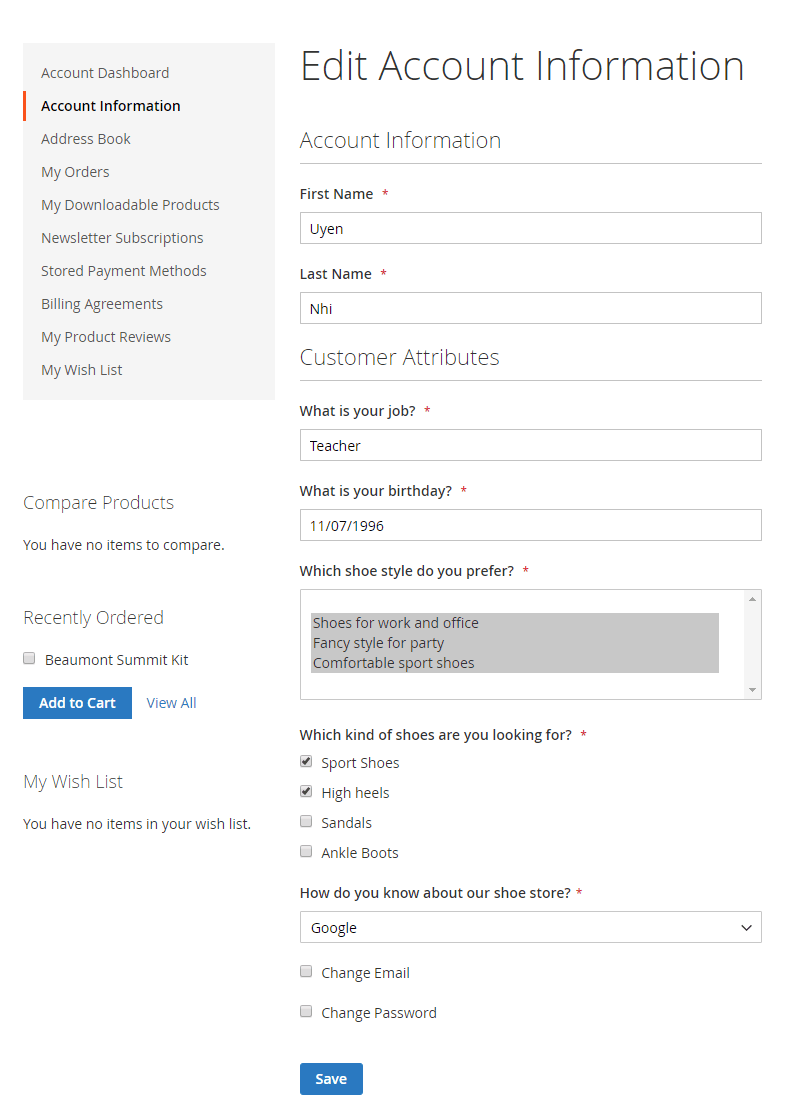
At Checkout Page:
Customer attributes can also be displayed on Order Confirmation email:
And on Order Detail Page under My Account.
2.2.4.2 Backend
Go to Customers ⇒ All Customers.
Display customer attribute in Customer Grid:
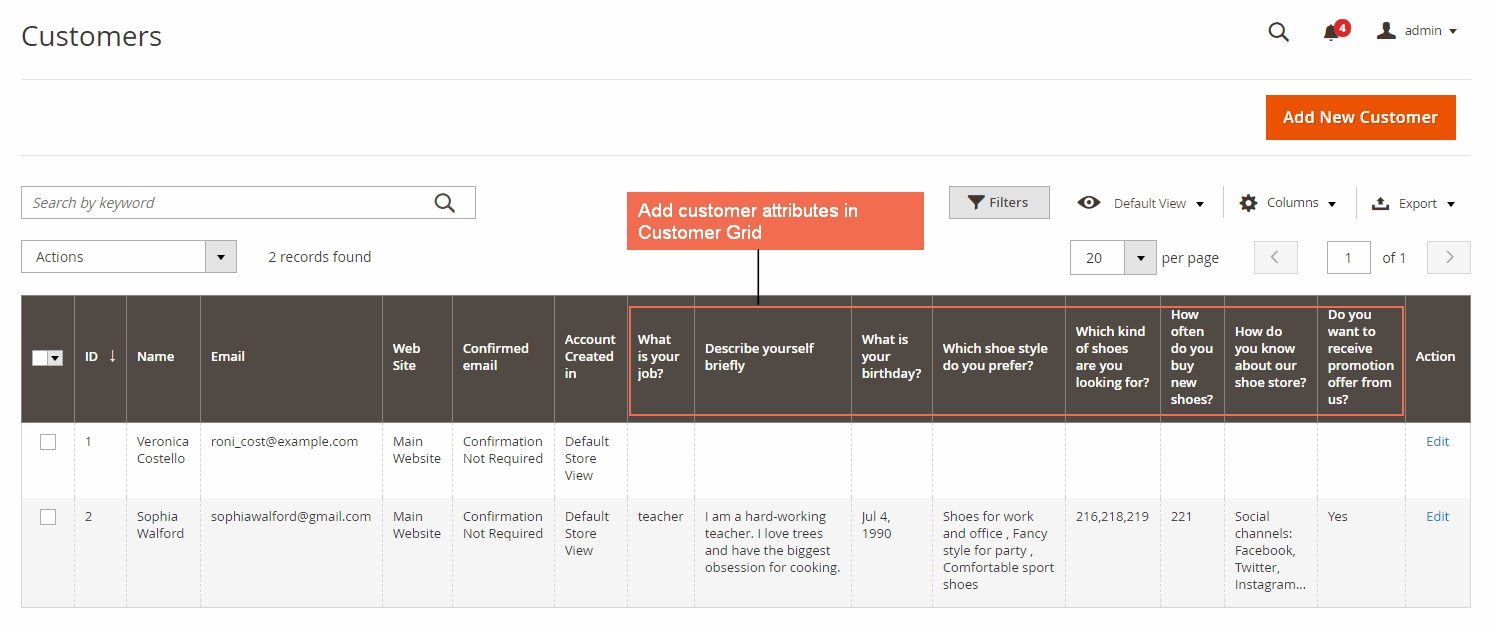
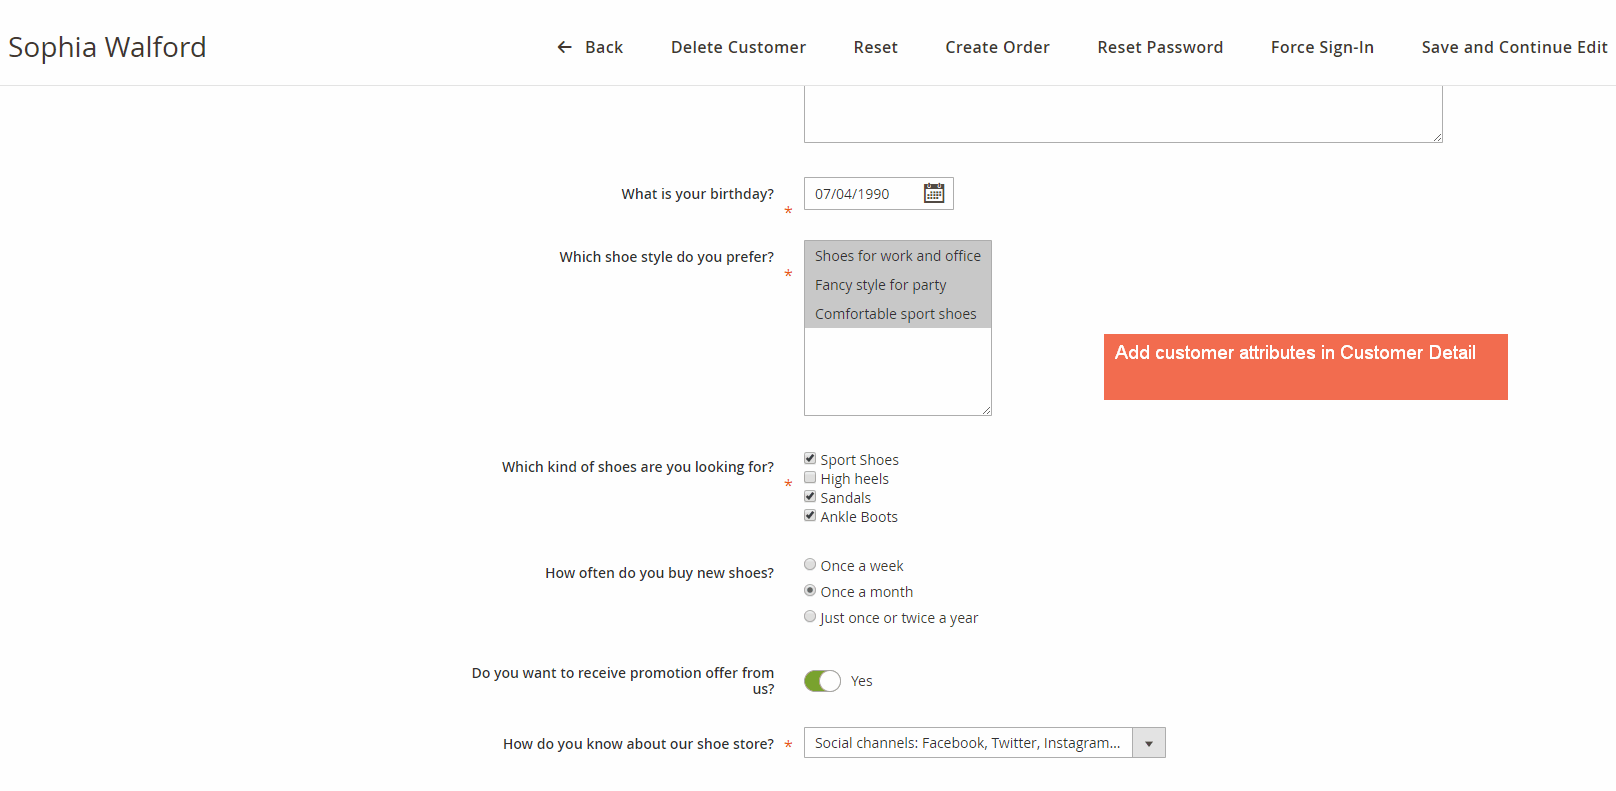
Display customer attribute in Customer Detail Page:
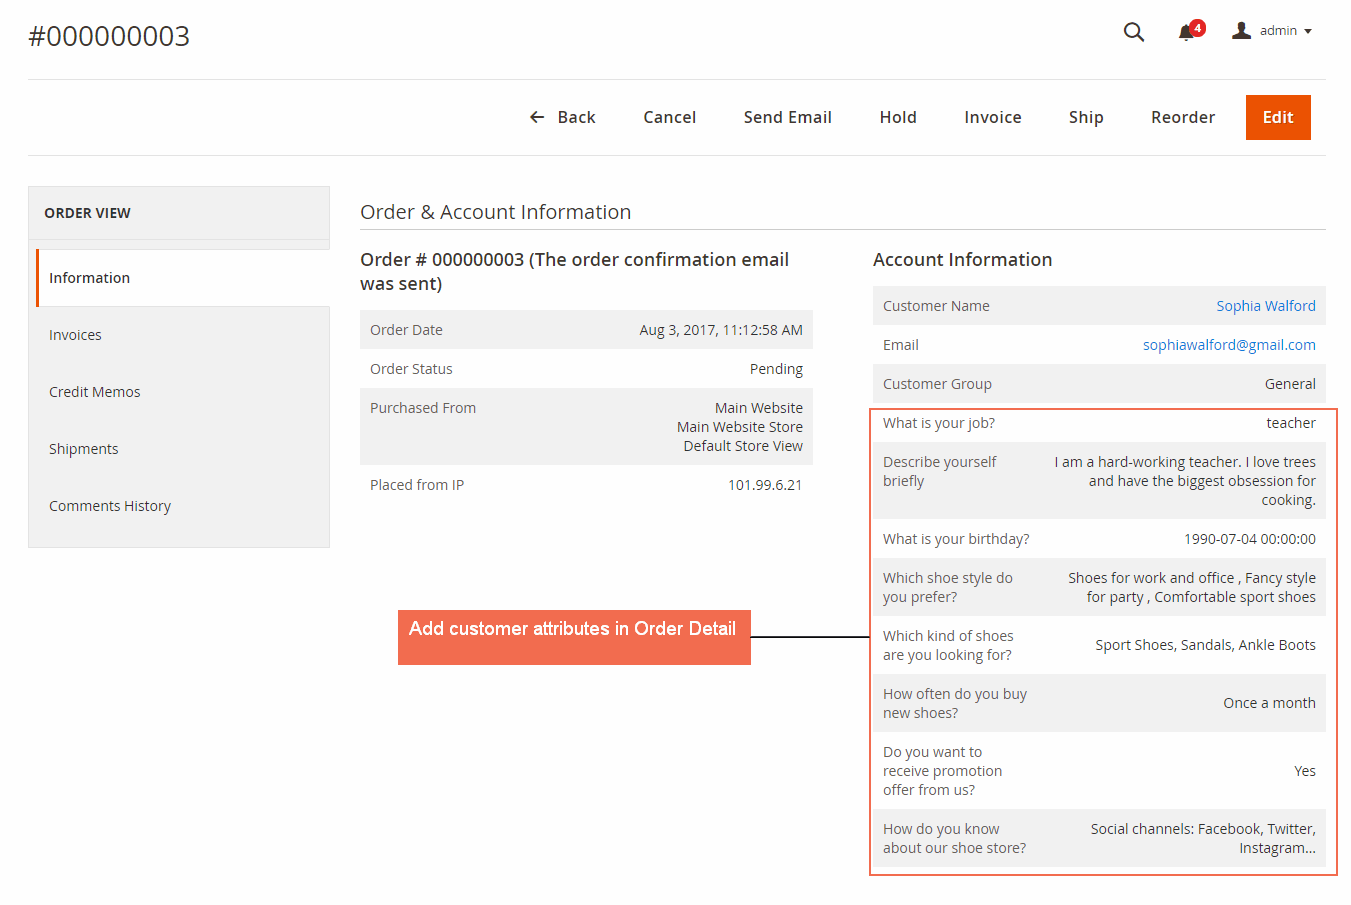
Go to Sales Orders.
Display customer attribute in Order Detail Page:
2.2.5. Import Customer with Attributes
Customer Attributes for Magento 2 extension allows importing customer with the created customer attributes by using the .csv file.
Firstly, prepare the file of customer information with customer attributes to import. All created customer attributes must be included in the import file with each customer attributes code listed in separate columns. Please make sure that all customer attribute codes are the same as attribute codes of existing customer attributes.
For customer attributes with the input type is a checkbox or radio button, use option's ID instead of options' value. For customer attributes with the input type is a dropdown or multiple select, fill in with correct options' value.

Admins can also download the sample file by following System Import.
In Entity Type, choose Custom Main File to import new customers with customer attributes.
In Import Behavior, select one of the following actions:
- Add/Update complex data: New data is added to the existing attributes in the database.
- Delete Entities: Any existing data of entities in the import file is removed from the database of the stores.
- Custom Action: Admins can also override the import behavior by writing a custom option.
In Select file to Import, upload the file prepared earlier. Make sure that the size of the uploaded file is not more than 3M.
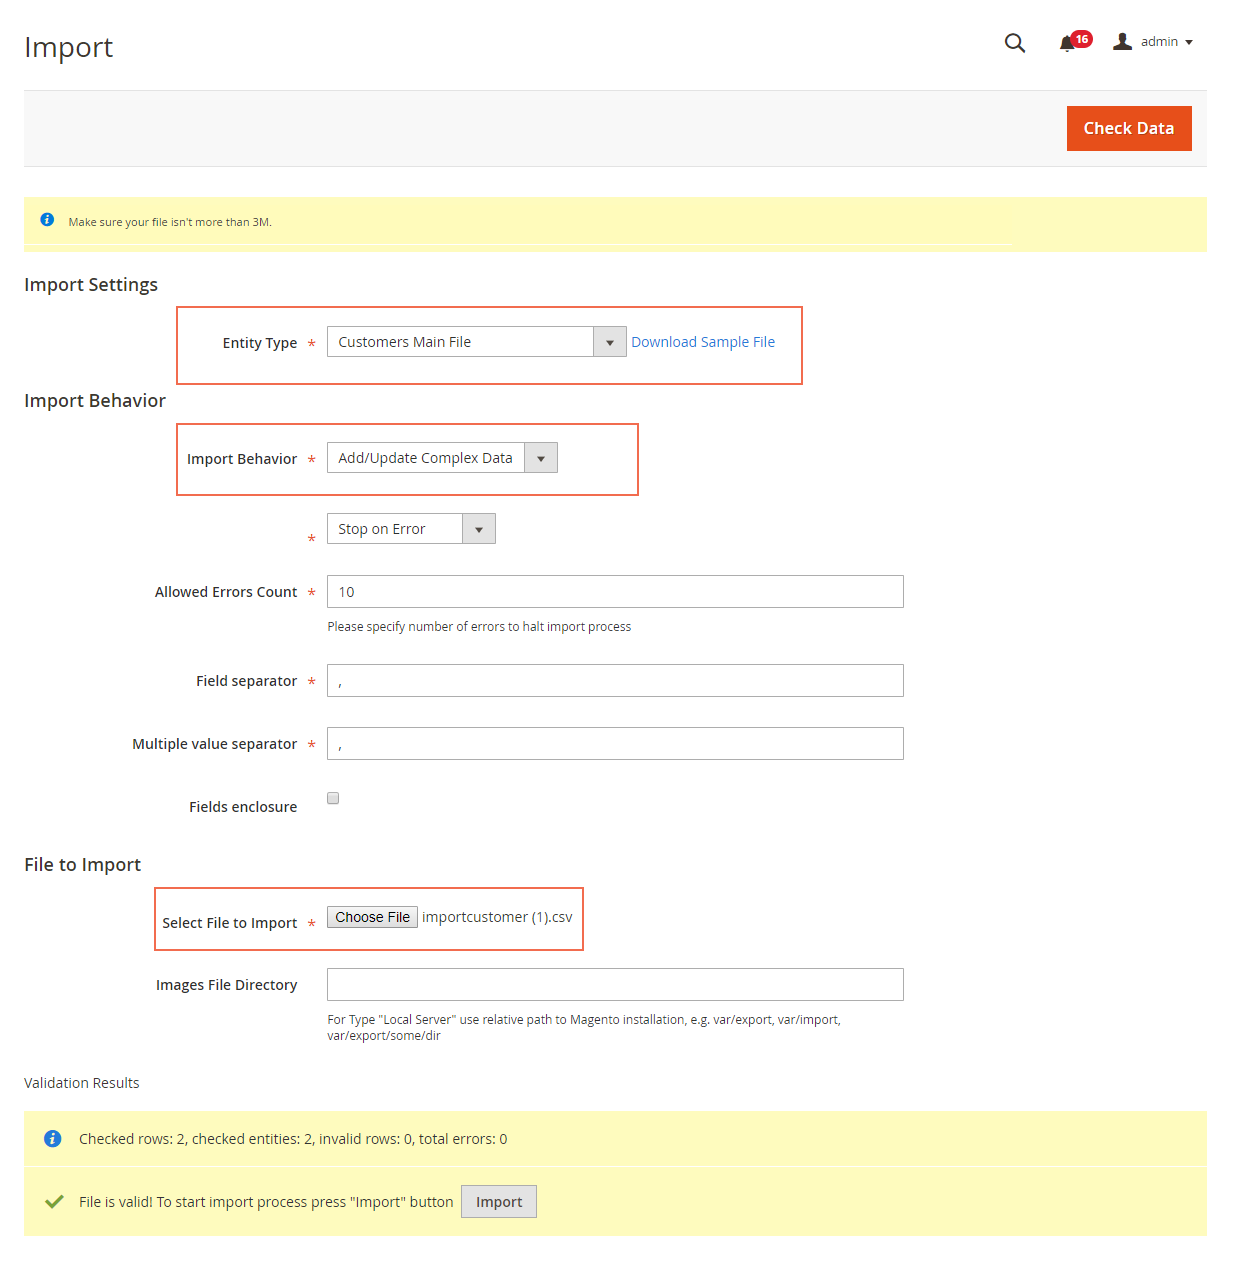
On completing, tap Check Data button in the upper-right corner. Wait for few seconds for the validation to perform.
If the import data is valid, the successful message will be displayed as in the screenshot. Click on Import button to process the import to the end of the data. Otherwise, there is any problem in data, the error message will appear. Just correct the invalid data and re-upload the file.
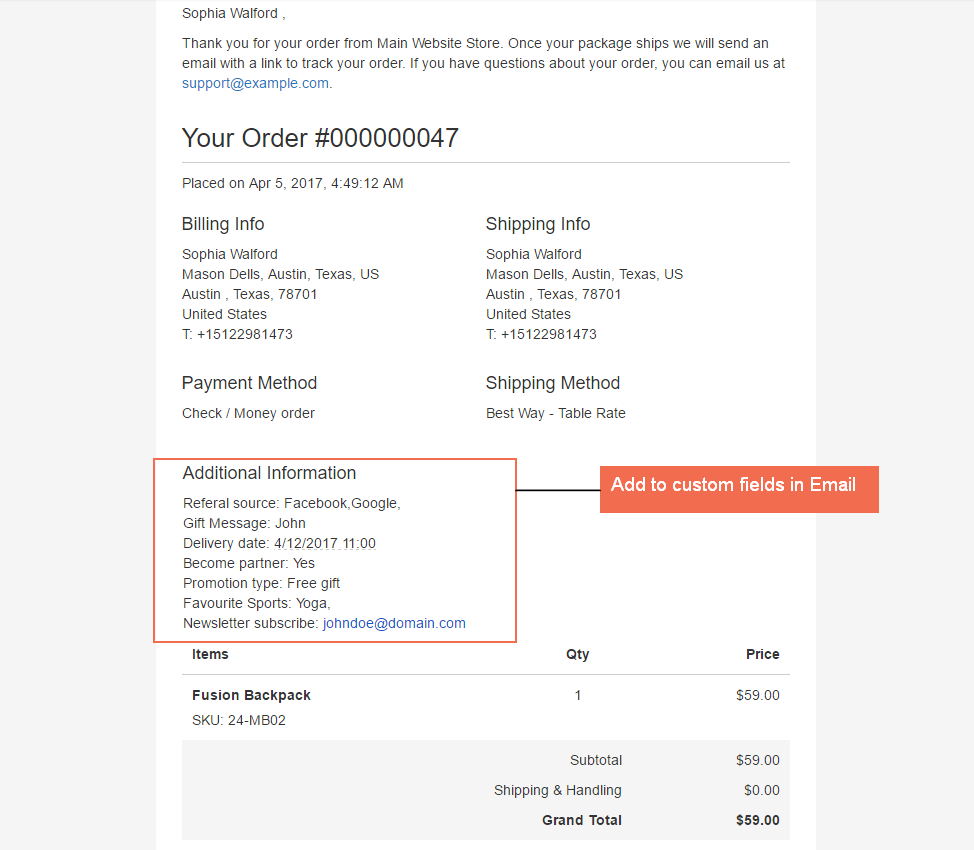
2.3. Magento 2 Checkout Custom Fields
Checkout Custom Field for Magento 2 extension helps admins collect additional information from customers by letting them fill in custom fields during the checkout process. Admin can create these custom fields and include them in Shipping or Review and Payments of the checkout page.
2.3.1. General Configurations
Go to Stores ⇒ Configuration ⇒ BSSCommerce ⇒ Checkout Custom Field.
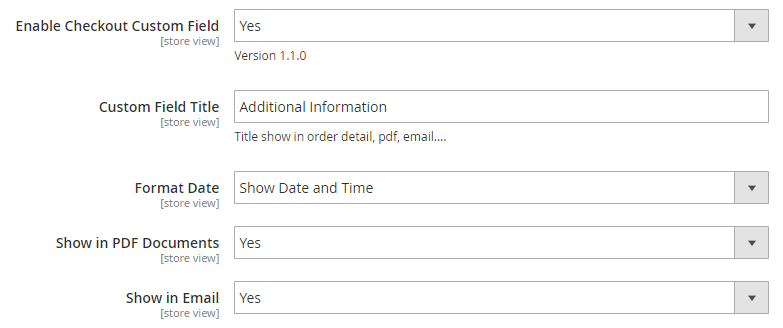
In Enable Checkout Custom Field, choose Yes to enable the extension or No to disable it.
In Custom Field Title, enter the title for custom fields which are displayed in order detail, PDF invoice and email.
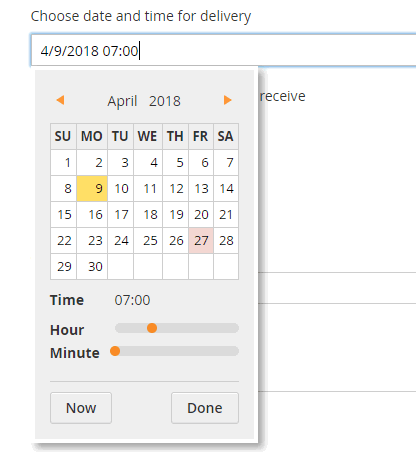
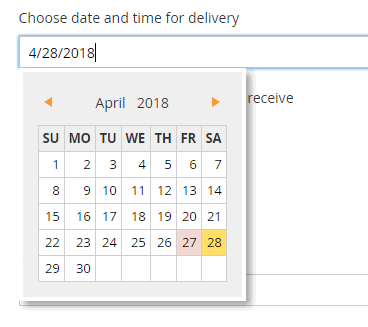
In Format Date, choose the format for the date input type to display on the checkout. There are 2 options:
- Show Date and Time: Both date and time are included in the calendar view.
- Only Date: the Only date is included in the calendar view.
In Show in PDF Documents, choose Yes to include custom fields in PDF documents or NO to exclude them.
In Show in Email, choose Yes to include custom fields in the email sent to customers or NO to exclude them.
2.3.2 Manage custom fields
Go to Sales ⇒ BSSCommerce ⇒ Manage Checkout Custom Fields.
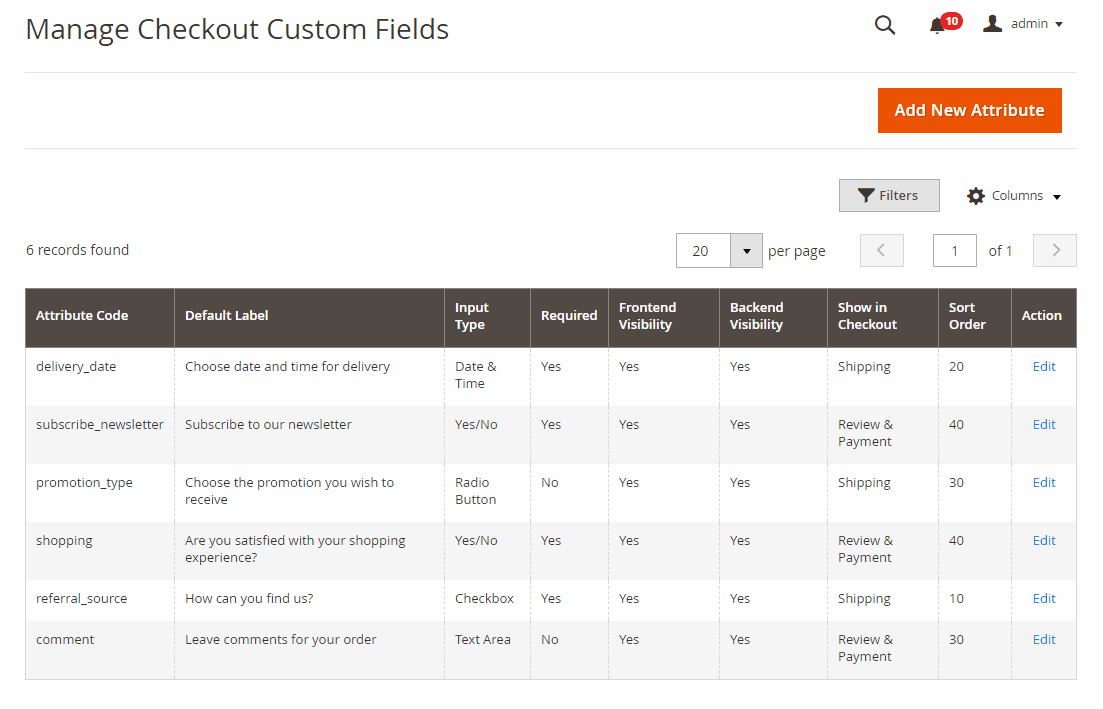
To create a new custom field, click Add New Attribute.
In Attribute Information ⇒ General Information ⇒ Attribute Properties.
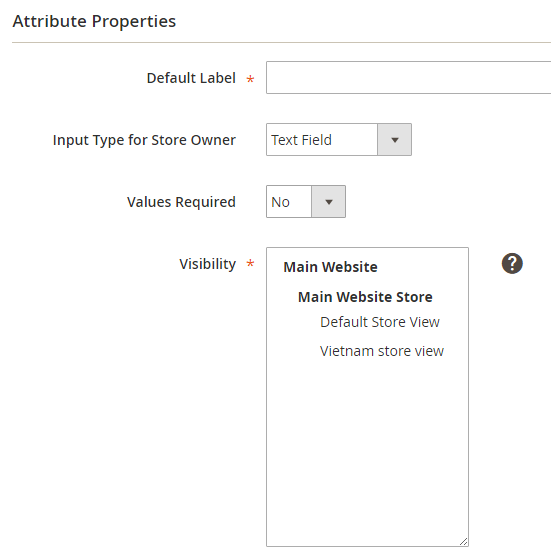
In Default Label, enter the name of the new custom field.
In Input Type for Store Owner, choose one of the following input types for the custom field: Text Field, Text Area, Date & Time, Yes/No, Checkbox, Radio Button, and Dropdown.
In Values Required, choose Yes to make the custom field compulsory to fill in; otherwise, choose No.
In Visibility, select which store view the custom field is available.
In Attribute Information ⇒ General Information ⇒ Advanced Attribute Properties.

In Attribute Code, enter a code for the new custom field. No space allowed and no more than 30 symbols.
In Sort Order, decide the order of displayed custom fields in checkout.
In Default Value, set default value for the custom field so that if customers don’t fill in that field, the default value will be applied.
In Input Validation for Store Owner, choose one of the following input types to be validated for the custom field: Decimal Number, Integer Number, Email, URL, Letters, and Letters (a-z, A-Z) or Numbers (0-9).
In Frontend Visibility, choose Yes to display the field in the frontend; otherwise choose No.
In Backend Visibility, choose Yes to display the field in the backend; otherwise choose No.
In Show in Checkout, display custom field in Shipping Address, Shipping Method or Review & Payments of the checkout page.
In Add to Order Grid, choose Yes to add the custom field to the order grid; otherwise, choose No.
In Add to Order Detail, choose Yes to add the custom field to order detail; otherwise, choose No.
In Add to PDF Documents, choose Yes to add the custom field to PDF documents; otherwise, choose No.
In Add to Email, choose Yes to add the custom field to email; otherwise, choose No.
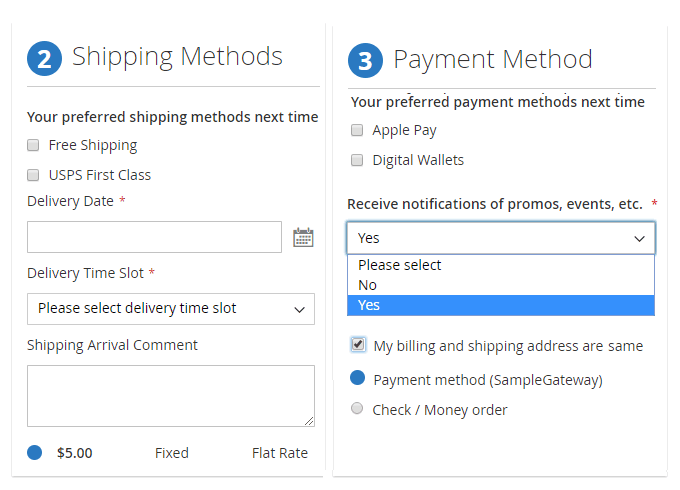
2.3.3. Checkout custom fields at checkout
2.3.4 Orders
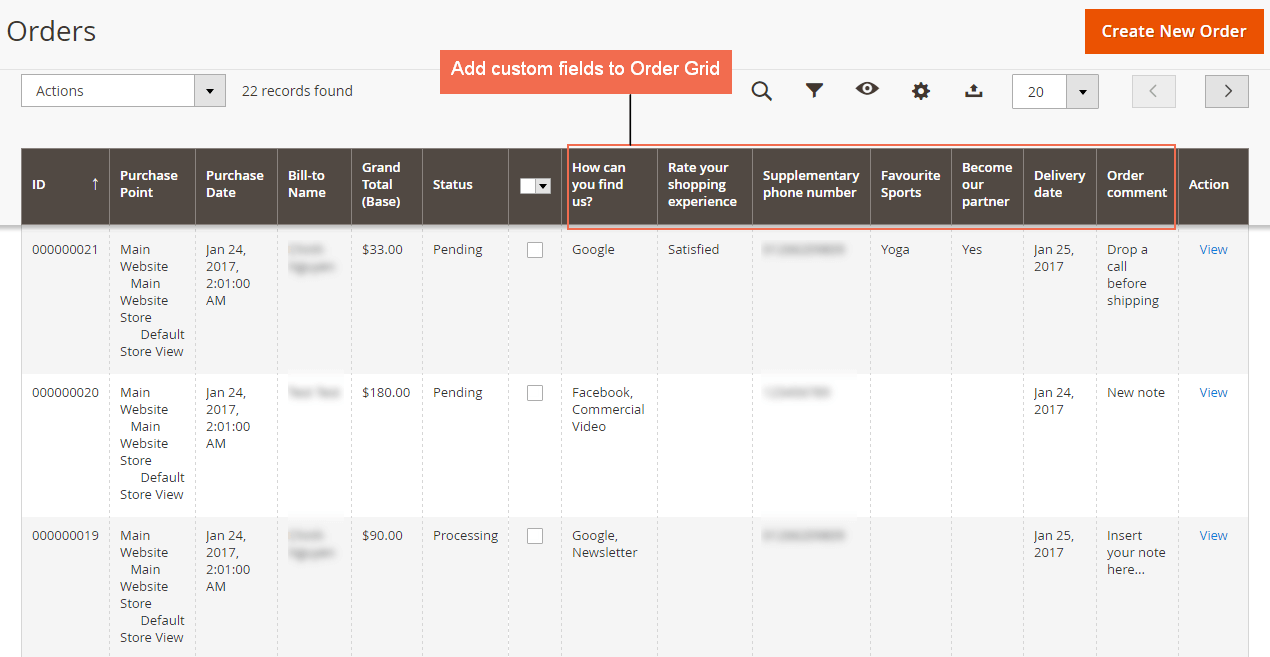
Go to Sales ⇒ Orders.
Custom fields are added to the Order grid.
BSSCommerce Checkout Custom Field for Magento 2 extension also supports you to get order information from API.
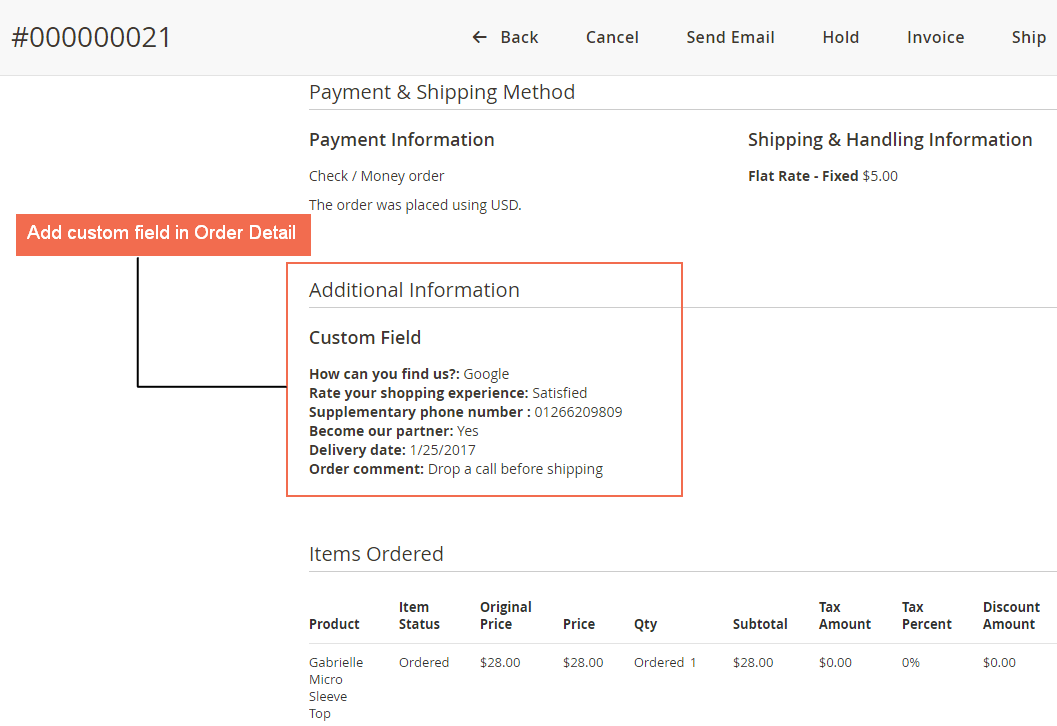
Custom fields are displayed on theOrder Detail page.
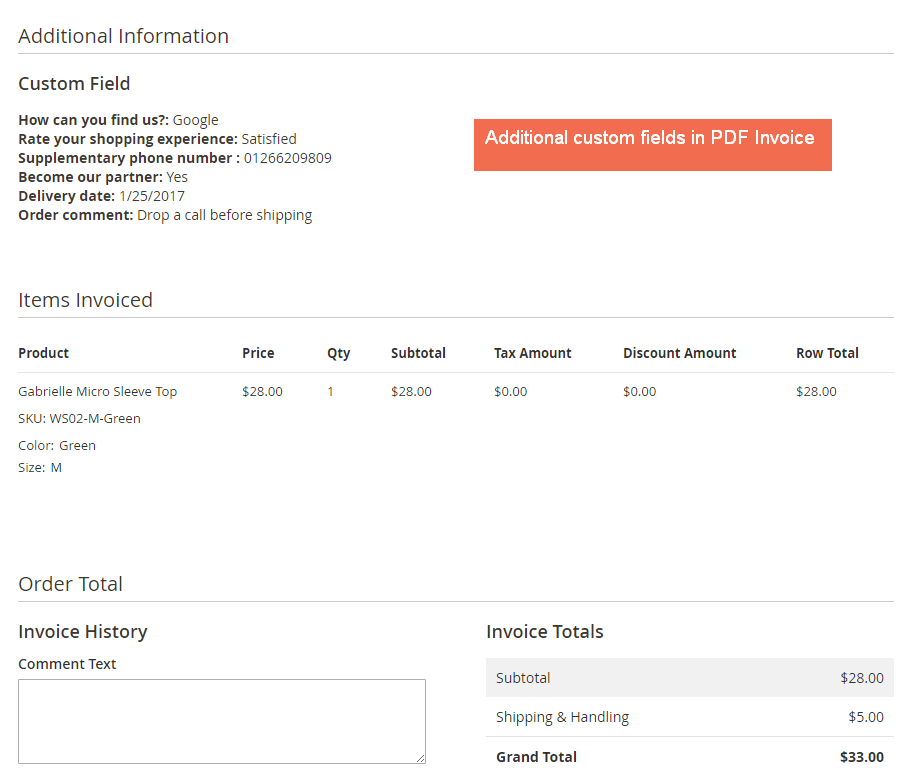
In PDF invoice:
In order to include custom field value in PDF invoice, you need to enable config Show in PDF Documents (see 2.1, page 3), and enable config Add to PDF Documents (see 2.2, page 6) before placing the test order.
Custom fields are displayed in PDF invoice.
2.3.5 Email
Go to Marketing ⇒ Communications ⇒ Email Templates ⇒ Add New Template.
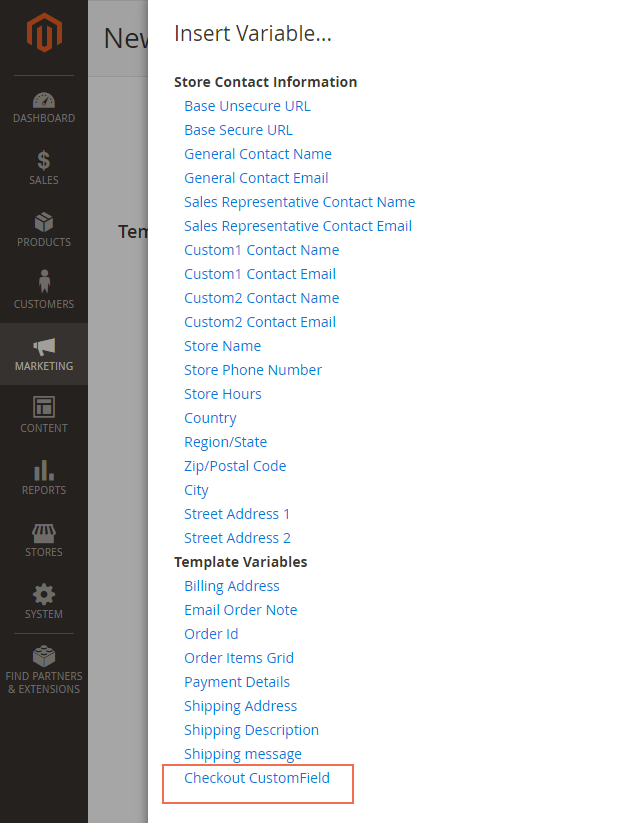
After loading the default template, in Template Information, click Insert Variable.
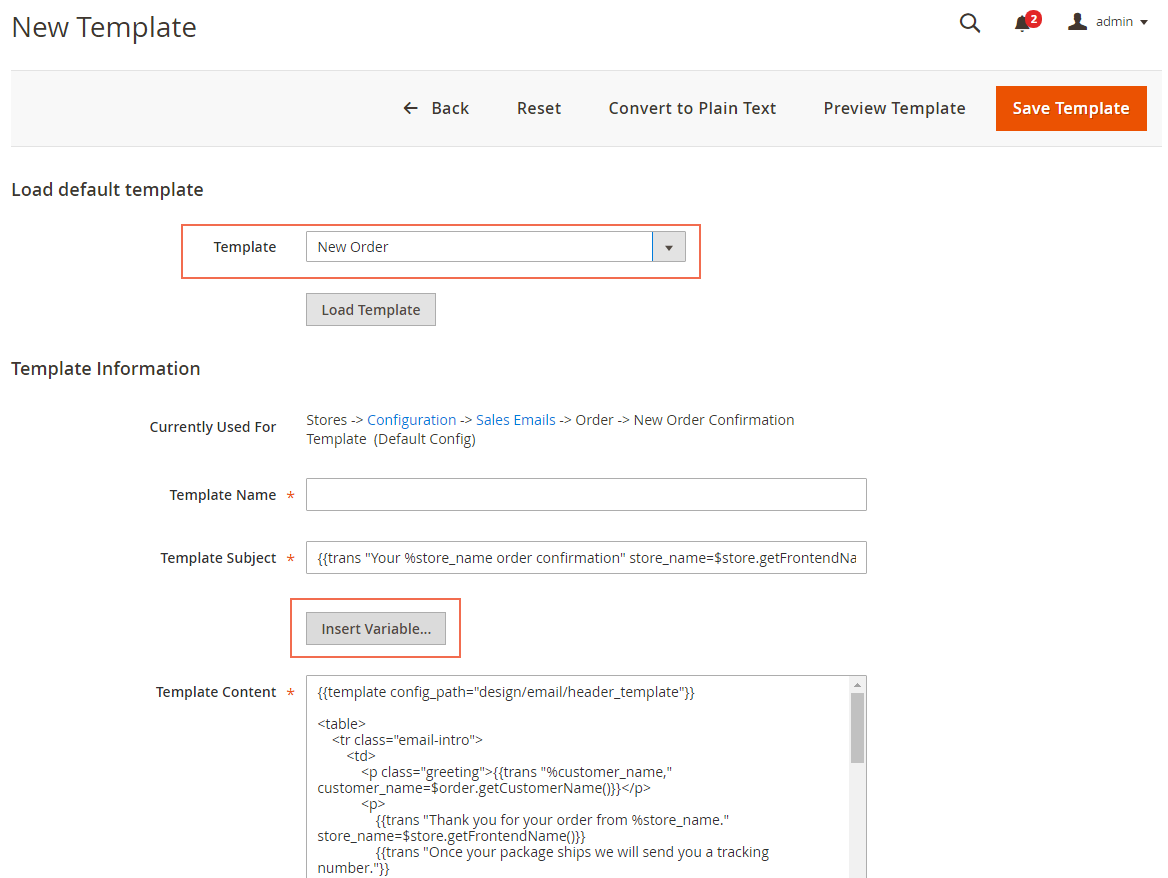
Add the variable Checkout Custom Field to any place in the template content, then click Save Template.
Then go to Stores ⇒ Configuration ⇒ Sales ⇒ Sales Emails.
In Order New Order Confirmation Email Template, choose Email template you have just created.
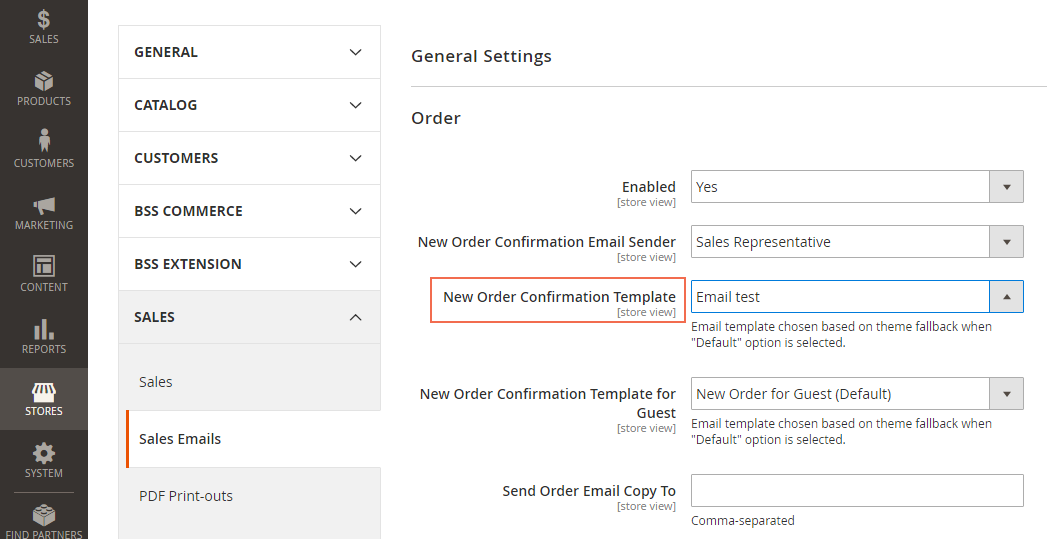
When you send an email to the customer using the new template that has been created, the custom field value will be included.
2.4. Order Delivery Date
With the help of Order Delivery Date for Magento 2 extension, shipment information for every order from your Magento 2 based websites will be more detailed and clearer than ever.
2.4.1 Set up the delivery date
Order Delivery Date for Magento 2 offers store owners an easy way to set up and control advanced delivery time choices for their customers’ orders. In Admin Panel, navigate to the section of this extension: Stores ⇒ Configuration ⇒ BSS Commerce ⇒ Order Delivery Date.
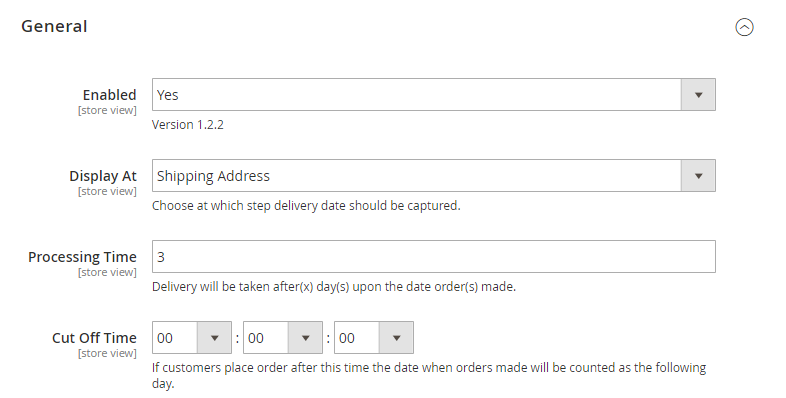
- Enabled: select Yes/No to turn on or off this extension from taking effects.
- Display At: this section lets you decide where the part for customers fill in details about delivery dates will be shown: Shipping method and Shipping Address.
*Note: When using 3rd-party payment methods, customers can modify delivery date/comment when in Review Order tab.
It is required to Update Delivery Date to save changes before selecting Place Order button.
- Processing Time: the number of days from the time an order is placed on the website until when the delivery can begin. If you set it as 1 day, then a customer placing an order today has his options of delivery date start from tomorrow.
- Cut Off Time: set up as a point of time in the day when the order made after that will be counted as being made on the next day.

- Holidays/Exclude Days/Blackout Days: These are the days that are not available for delivery picked in the calendar by admin. They will be faded in the delivery calendar shown for customers and of course, they cannot be selected. Admin can add more unavailable days like that by clicking the button “Add” or delete them by clicking on the trash bin icon under column “Action”. Content for each one may be filled in, the reason for its out-of-options status for instance.
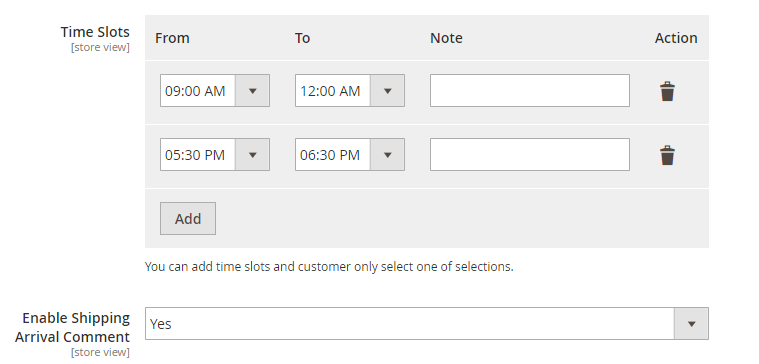
- Time Slots: set up delivery time more exactly by hours in the day. You can also add new time slots or Delete them, and write a note for each one just in a similar way to what you do with Holidays/Exclude Days/Blackout Days before.
- Enable Shipping Arrival Comment: choose Yes if you want to show a comment box for customers. If not, choose No.
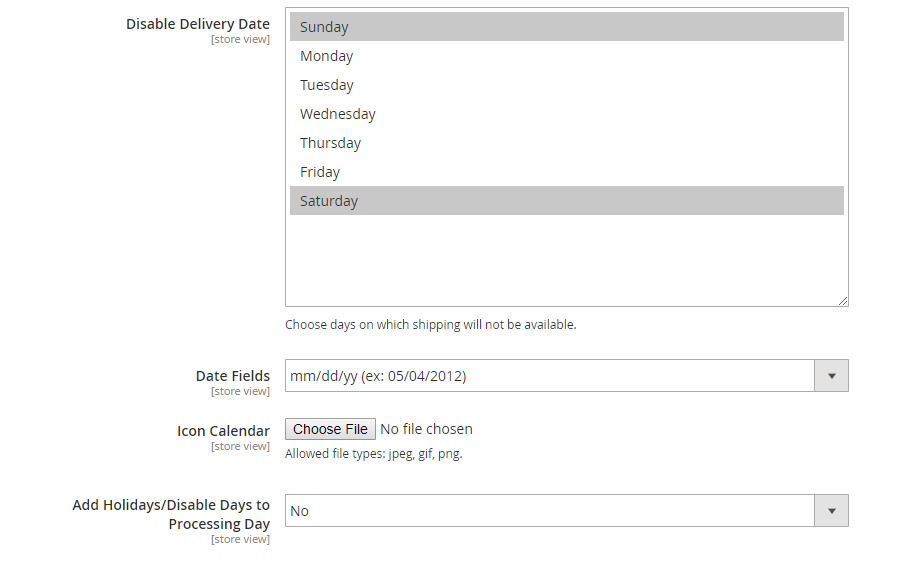
- Disable Delivery Date: you can fix the days in every week that are not available for choosing delivery dates.
- Date Fields: you can choose which format as you want for Delivery Date.
- Icon Calendar: you can choose the icon of the calendar as you wish.
- Add Holiday/Disable Days to Processing Day:
Let’s take an example:
The order date is Monday, June, 4th 2018. Sunday is a disable day while Wednesday, June, 6th 2018 is set as a holiday. The processing time is ten days.
- Yes: Disable Days and Holidays will not be counted as the processing days in delivery time.
Then, the earliest day is June, 16th 2018 since the processing days include 04, 05, 07, 08, 09, 11, 12, 13, 14, 15.
- No: Disable days and holidays will be still counted as process days.
This time, the earliest day is June, 14th 2018 since the processing days include 04, 05, 06, 07, 08, 09, 10, 11, 12, 13.
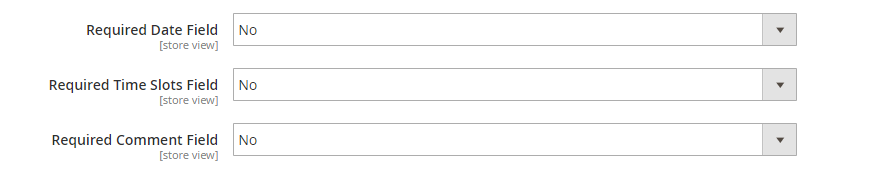
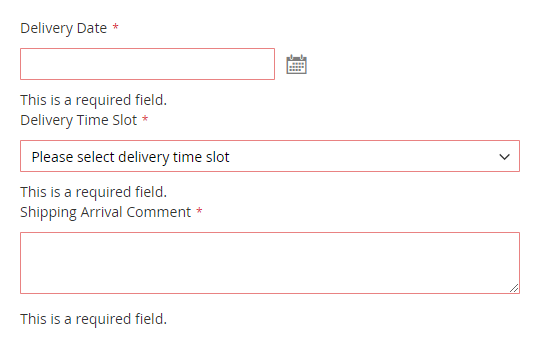
The admin can set Date/Time Slots/Comment field as the required field if wanted.
2.4.2 Insert info to sales emails
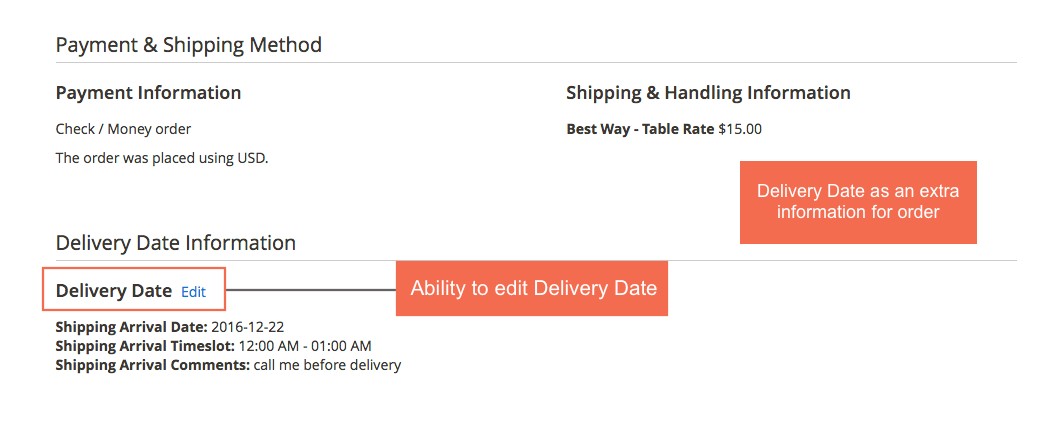
Besides allowing a very detailed timing customization, Order Delivery Date for Magento 2 extension also adds customers’ Delivery Date, Time Slots and Arrival Comments Information directly to Orders/Invoices/Shipments/Credit Memos info in the backend for admin to keep tracking more easily. To check it, from Admin Panel you go to Sales section and choose which one you want to see. Opening every single order/invoice/ shipment/credit memo you will see the added part of this module.
As for Emails, Order Delivery Date for Magento 2 Extension automatically adds Delivery Date, Time slots and Arrival Comments as given by customers into email variables so that when creating an email template, you can use this information if needed. To do so, from Admin Panel you go to Marketing ⇒ Email Templates ⇒ Add new template:
Step 1: Choose a template from the list and tap Load Template to edit the template as wanted.
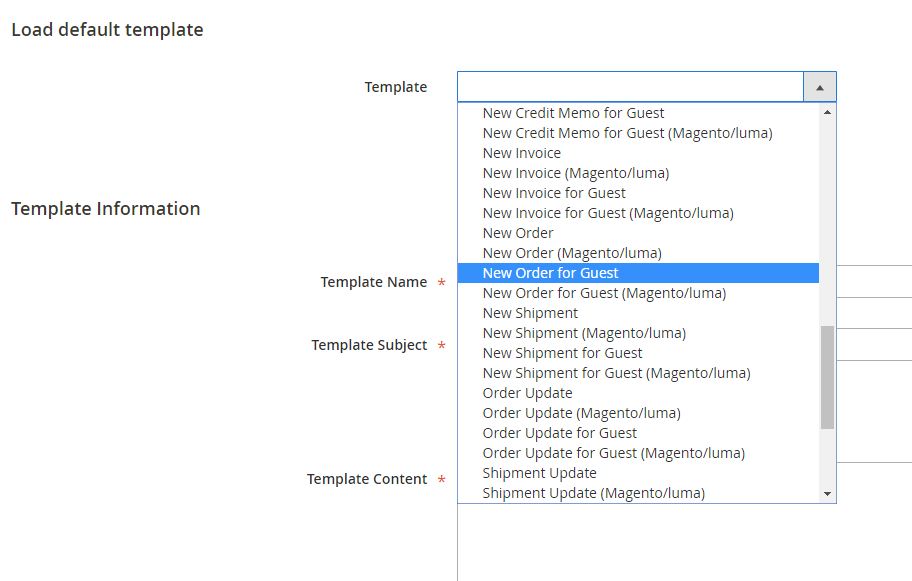
Step 2: Enter Template Name, for example, “New Order for Guest.”
Step 3: Choose where in template content you want to display new variables value and click Insert Variable…
Here is the list of variables you can freely pick from.
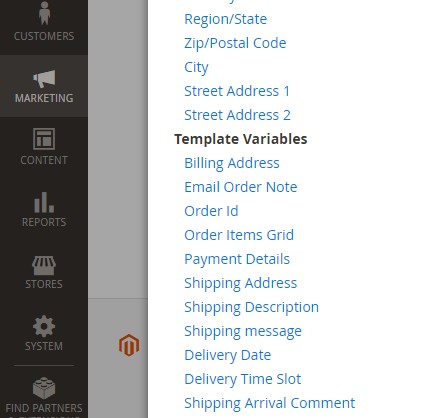
Click on the variable to insert it into the template, as below:
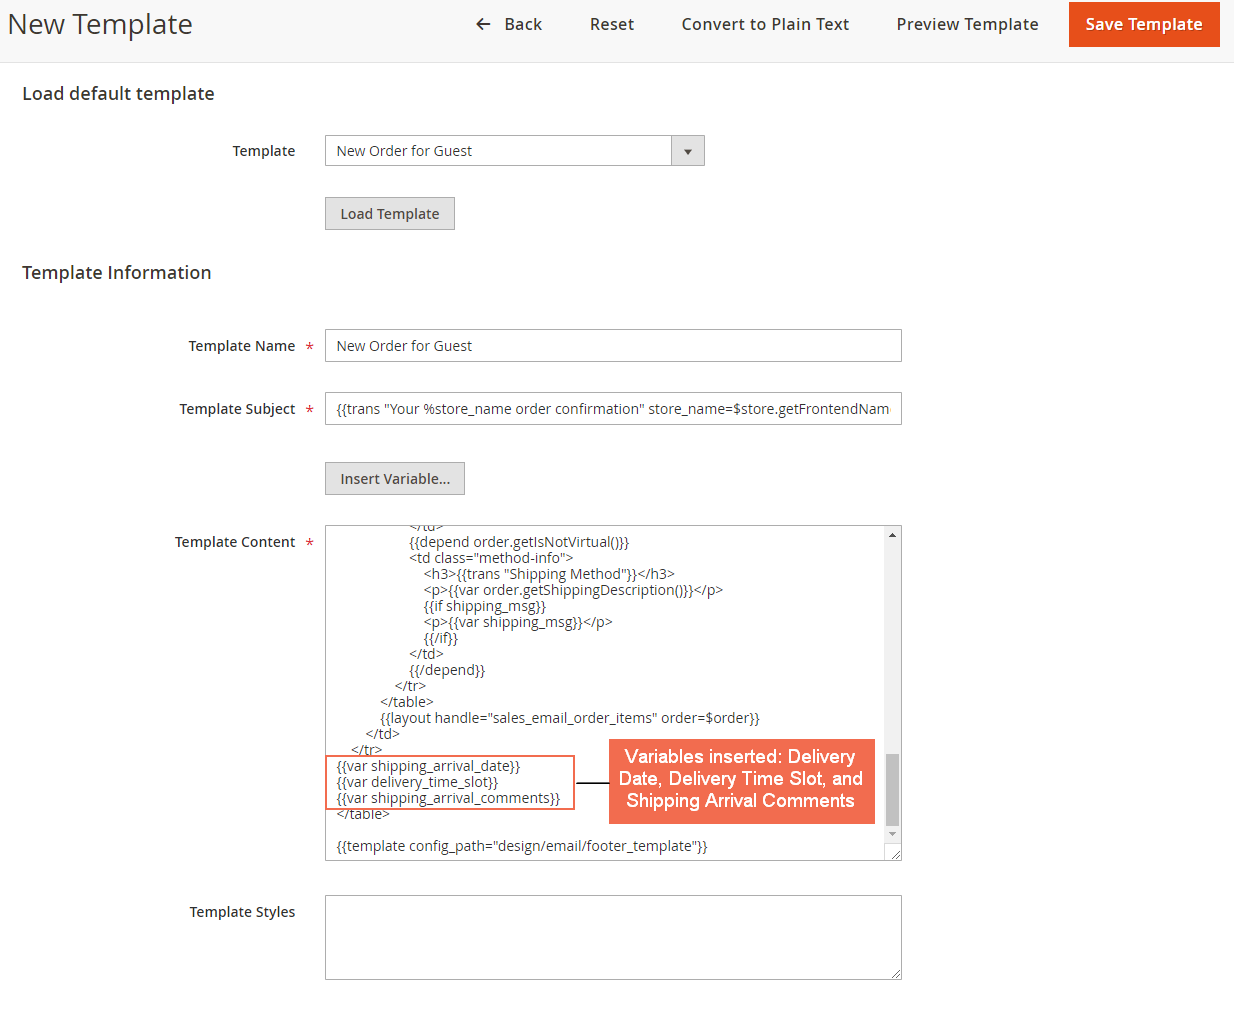
Step 4: Save Template on completing the insert of the variables.
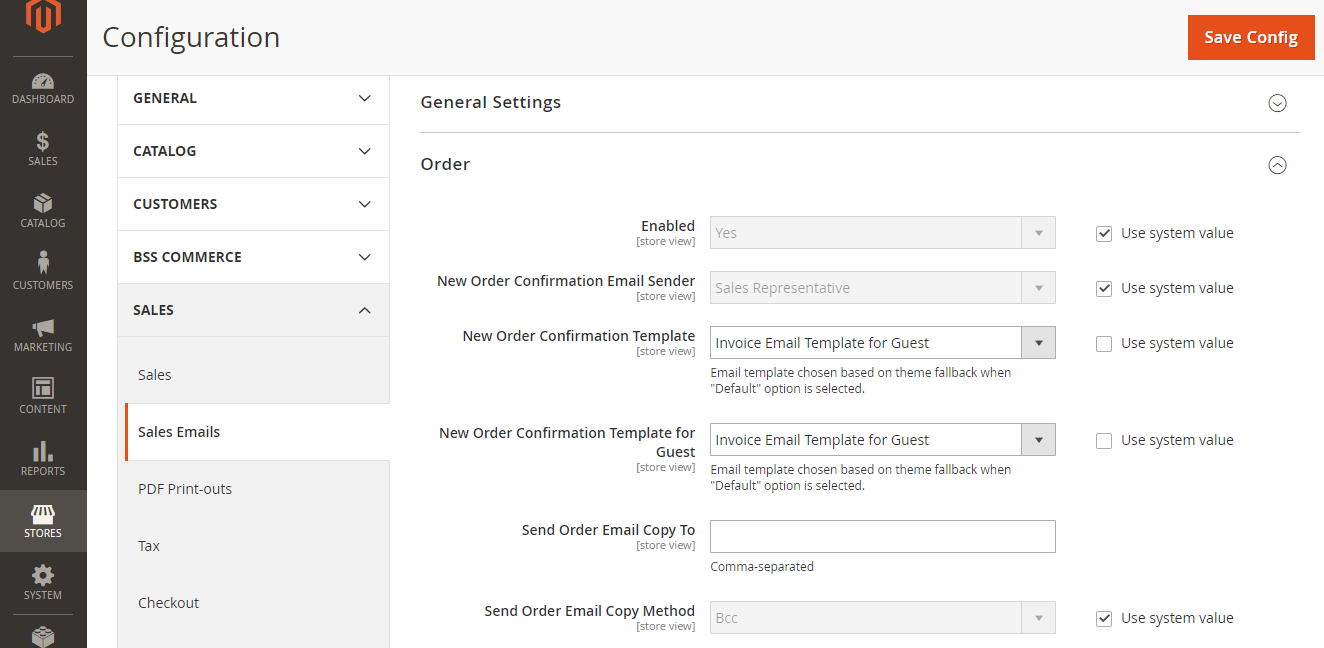
Step 5: Go to Stores ⇒ Configuration ⇒ Sales ⇒ Sales Emails
In New Order Confirmation Template under Order settings, choose the new created email template and Save Config.
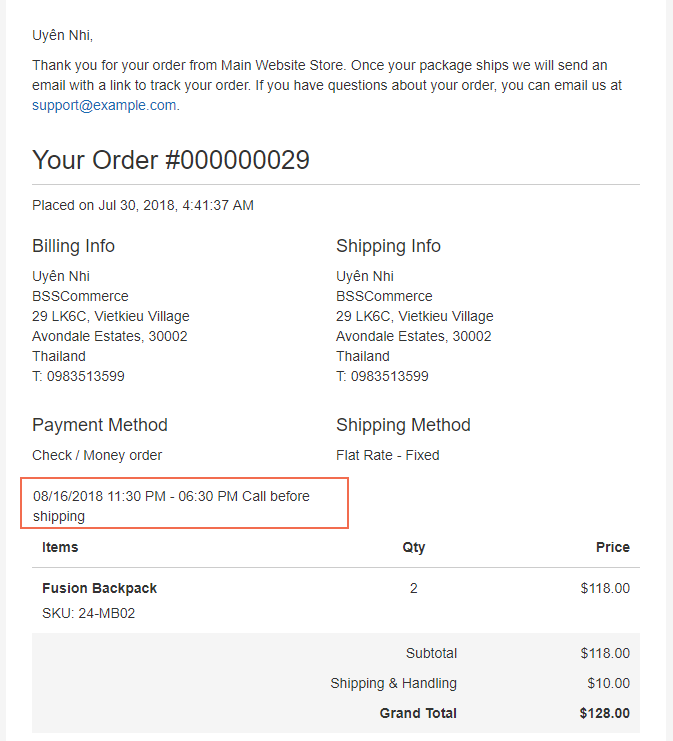
When you continue to send emails to your customers as usual using the templates that were just created, Delivery Date, Delivery Time Slot and Shipping Arrival Comment will be included.
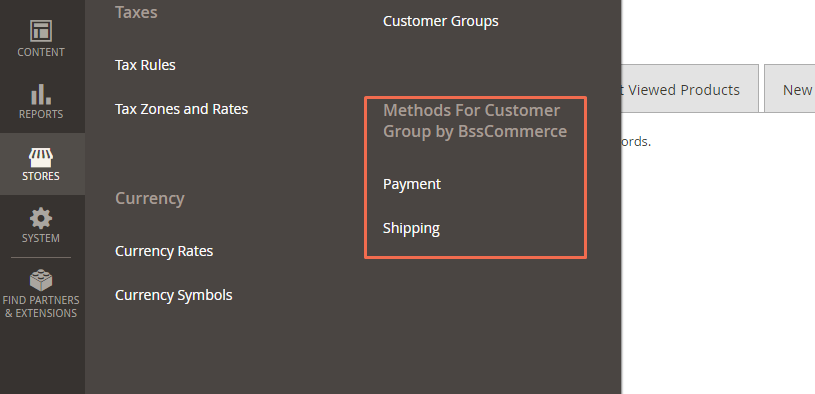
2.5. Shipping/Payment Methods per Customer Group
Please go to STORES ⇒ Methods for Customer Group by BssCommerce ⇒ Payment / Shipping
2.5.1. IN PAYMENT
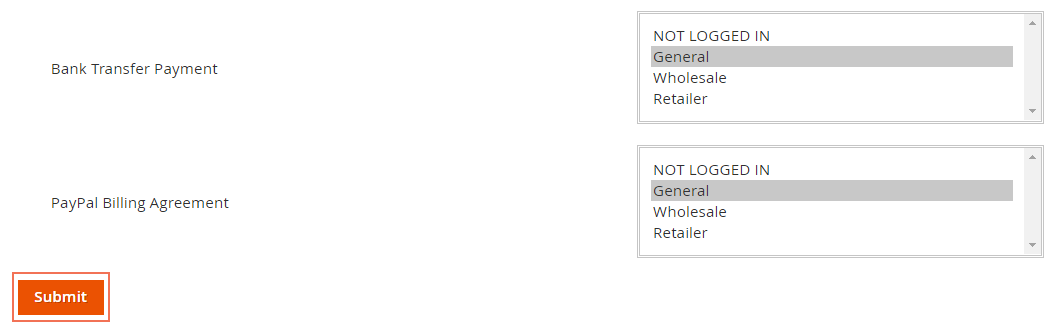
In Payment Methods, choose one or multiple customer groups in each of the enabled payment methods available.
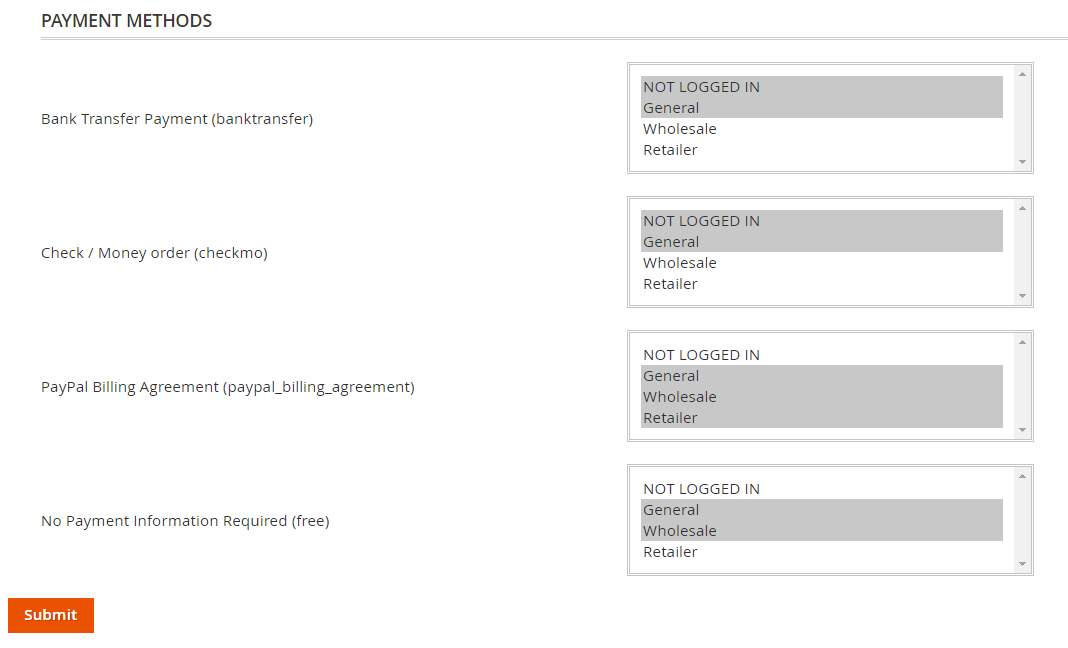
Then, click Submit button to save all figuration.
2.5.2. IN SHIPPING
In Shipping Methods, select one or multiple customer groups in each of the enabled shipping methods available.
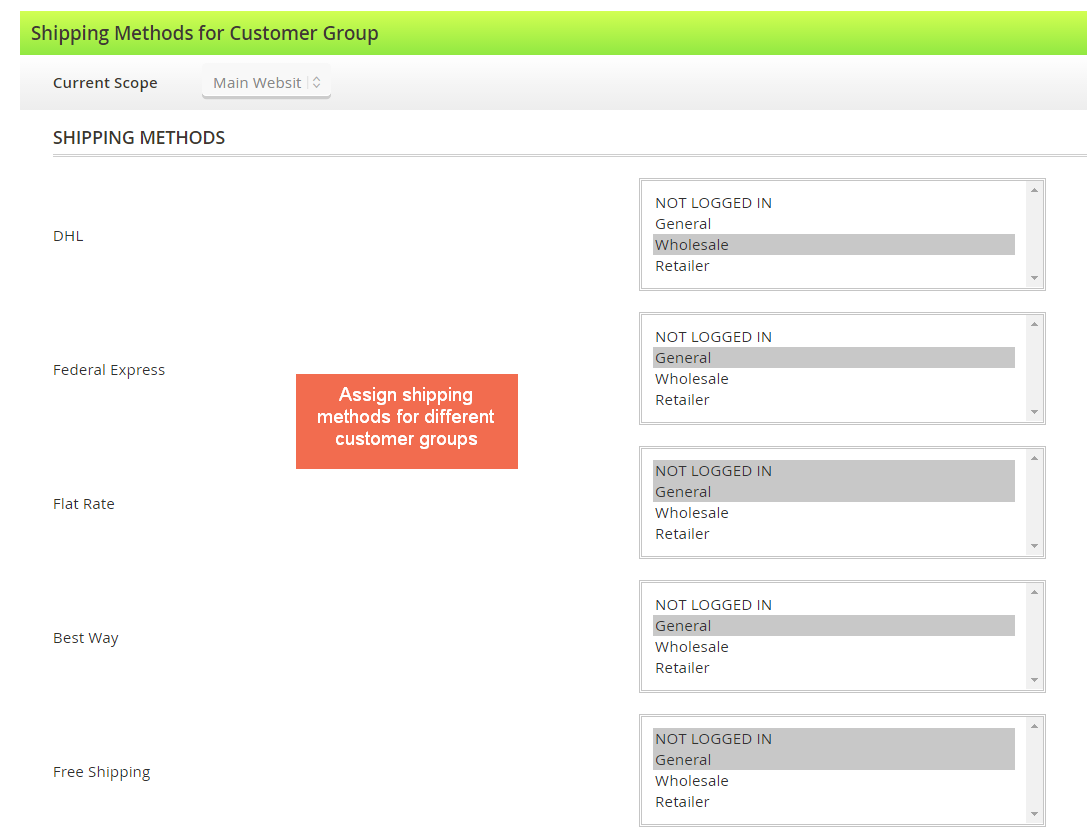
Then, click the Submit button to save all figuration.
2.6. Pre-select Shipping and Payment Methods
Pre-select Shipping/Payment for Magento 2 extension is a simple solution to speed up customers’ purchasing process by pre-filling the shipping method and payment method on the checkout page based on their availability and configured position.
Follow Store ⇒ Configuration ⇒ BSSCommerce ⇒ Pre-select Shipping/Payment.
2.6.1. Auto Shipping Config
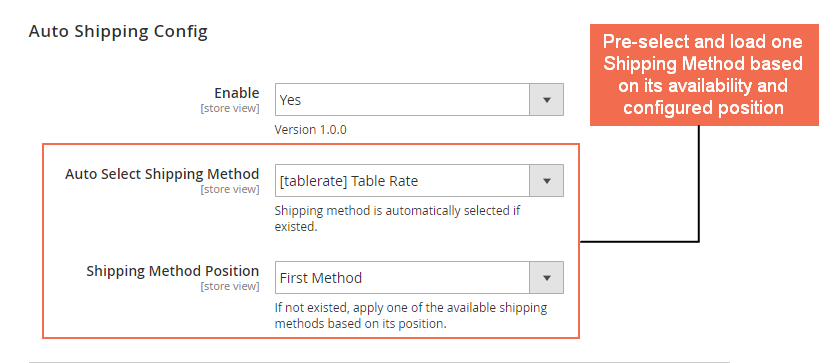
- In Enable, choose Yes to have Auto Shipping Config enabled on the websites; or No to disable this feature.
- In Auto Select Shipping Method: Admins can pick a given shipping method to be automatically filled.
- If admins want to have more methods to select, please go to Store ⇒ Configuration ⇒ Sales ⇒ Shipping Methods and enable needed methods.
- In Shipping Method Position: If the shipping method auto-selected above is not available, one of three following options is applied.

- None: Shipping Method is under customers’ decision as the default Magento 2.
- Last Method: Auto-apply the last shipping method on the checkout page.
- First Method: Auto-apply the first shipping method on the checkout page.
2.6.2. Auto Payment Config

In Enable, choose Yes to have Auto Payment Config enabled on the websites; or No to disable this feature.
In Auto Select Payment Method: Admins can pick a given payment method to be automatically filled.
If admins want to have more methods to select, please go to Store ⇒ Configuration ⇒ Sales ⇒ Payment Methods and enable needed methods.
In Payment Method Position: If the payment method auto-selected above is not available, one of the three following options is applied.

- None: Payment Method is under customers’ decision as the default Magento 2.
- Last Method: Auto-apply the last payment method on the checkout page.
- First Method: Auto-apply the first payment method on the checkout page.
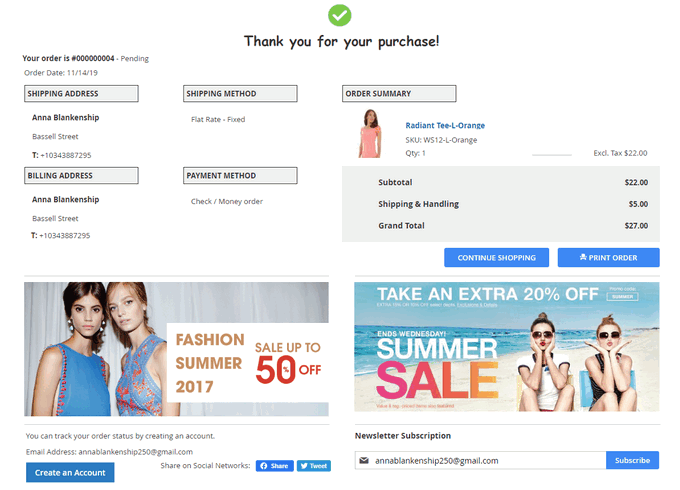
2.7. Checkout Success Page
Magento 2 Checkout Success Page is an extension that allows store owners to customize Checkout Success Page (known as Thank You Page) as they want, display order details and style success page with a thank you message, a coupon code, CMS blocks, suggested products, etc.
Please go to Store ⇒ Configuration ⇒ BSSCommerce ⇒ Checkout Success Page
2.7.1 General

In General, choose Yes to enable the module, No to disable it.
2.7.2 Order Information Section
- In Enable, choose Yes to enable section, or No to disable it
- In Show Order Status, choose Yes to enable order status, or No to disable it
- In Show Product Thumbnail, choose Yes to enable product image, or No to disable it
- In Show Reorder Button, choose Yes to enable, or No to disable it
- In Show Print Button, choose Yes to enable, or No to disable it
Note: Other order information like shipping address, shipping method, payment method, billing address and order summary are set to enable/disable with the whole section.
2.7.3 Thank You Message
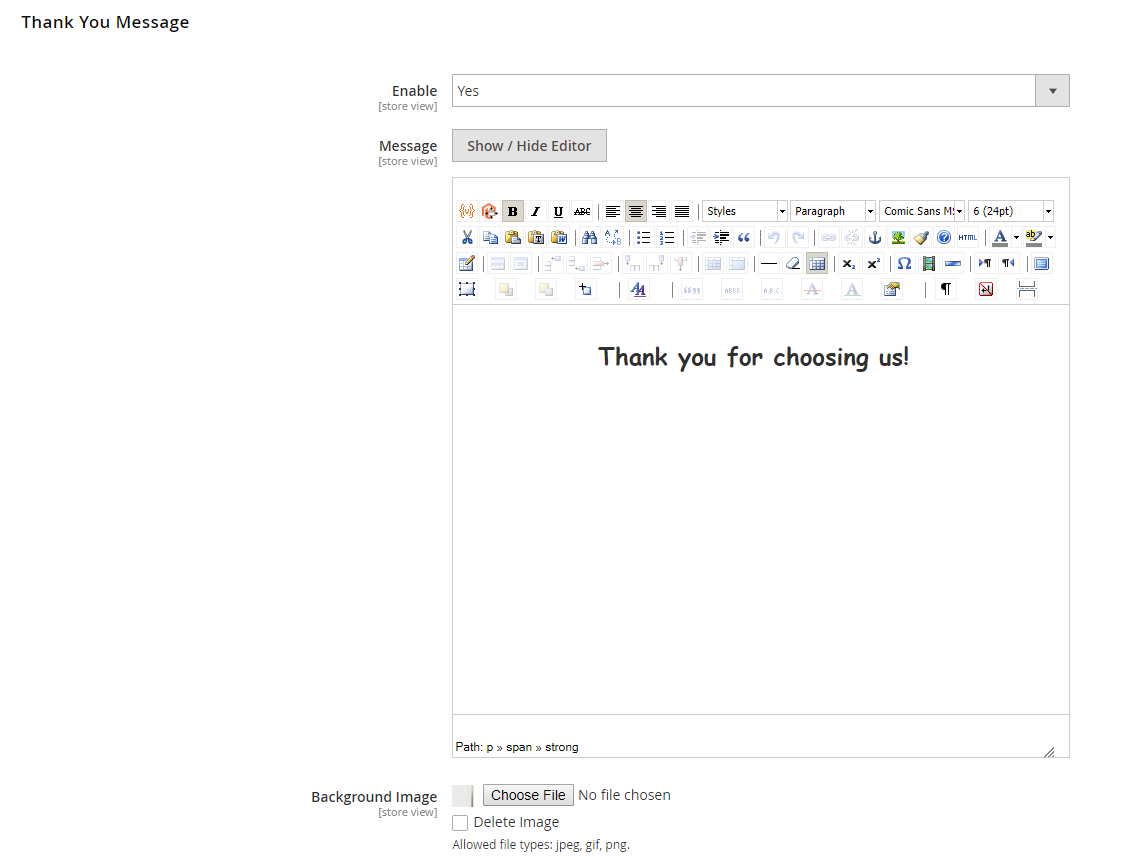
- In Enable, choose Yes to enable Thank you message on the success page, or No to disable it.
- In Message, you can edit the Thank you message.
- In Background Image, insert background image for Thank you message.
Note: In case you don’t add the background image, this module still supports displays the text message well.
2.7.4 Coupon Code Section
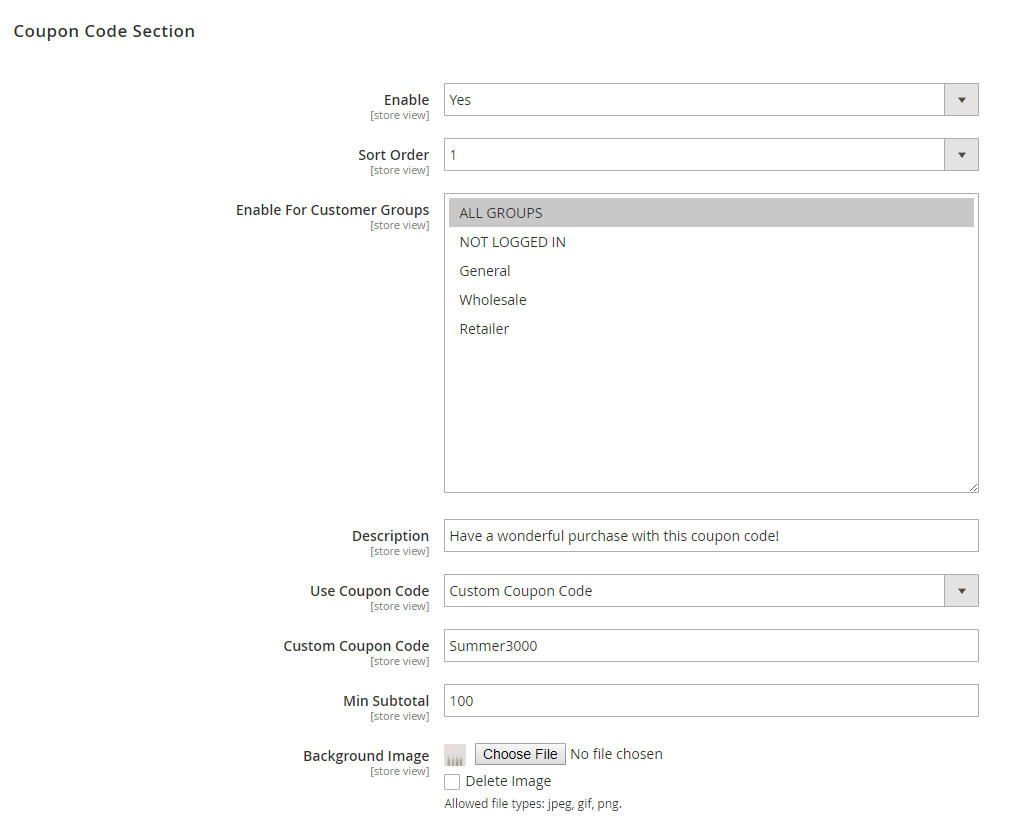
- In Enable, choose Yes to enable coupon code section, or No to disable it.
- In Sort Order, select number (1 to 6) to set the position of this section in the frontend.
- In Enable for Customer Groups, choose customer groups who can see the coupon code.
- In Description, input the description for the coupon code.
- In Use Coupon Code, choose available coupon code in the database or choose “Custom Coupon Code” to enter a coupon code not been in the sale rules database.
Note: The Custom Coupon Code field and Min Subtotal field only appear when you select Custom Coupon Code option.
- In Custom Coupon Code, enter a coupon code. This coupon code can be from the third party extension or from another store.
- In Min Subtotal, set the minimum amount of merchandise that the customer must purchase to qualify for the discount. This feature is valid only for the coupon entered in Custom Coupon Code field above.
- In Background Image, click Choose File button to insert background image for the coupon code.
2.7.5 Social Network Sharing Section
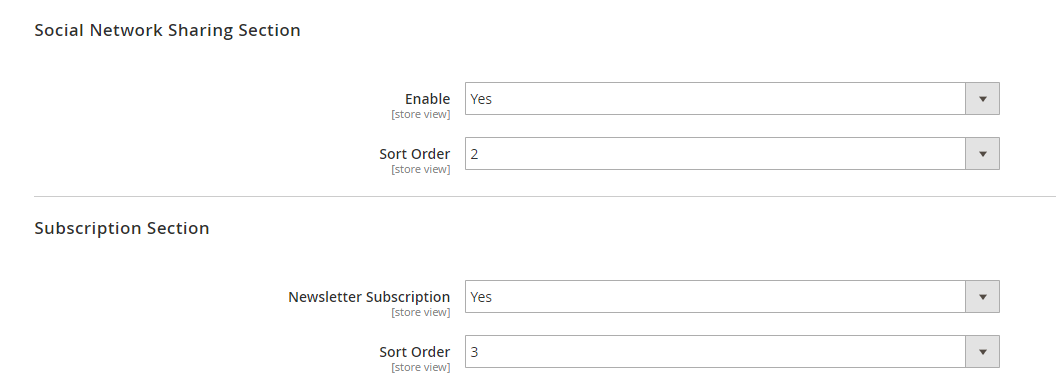
In Enable, choose Yes to enable social networks sharing section, or No to disable it.
In Sort Order, select number (1 to 6) to set the position of this section in the frontend.
Note: this module shares the website homepage on social networks instead of the success page.
2.7.6 Subscription Section

- In Enable, choose Yes to enable subscription section, or No to disable it.
- In Sort Order, select number (1 to 6) to set the position of this section in the frontend.
2.7.7 CMS Block Section
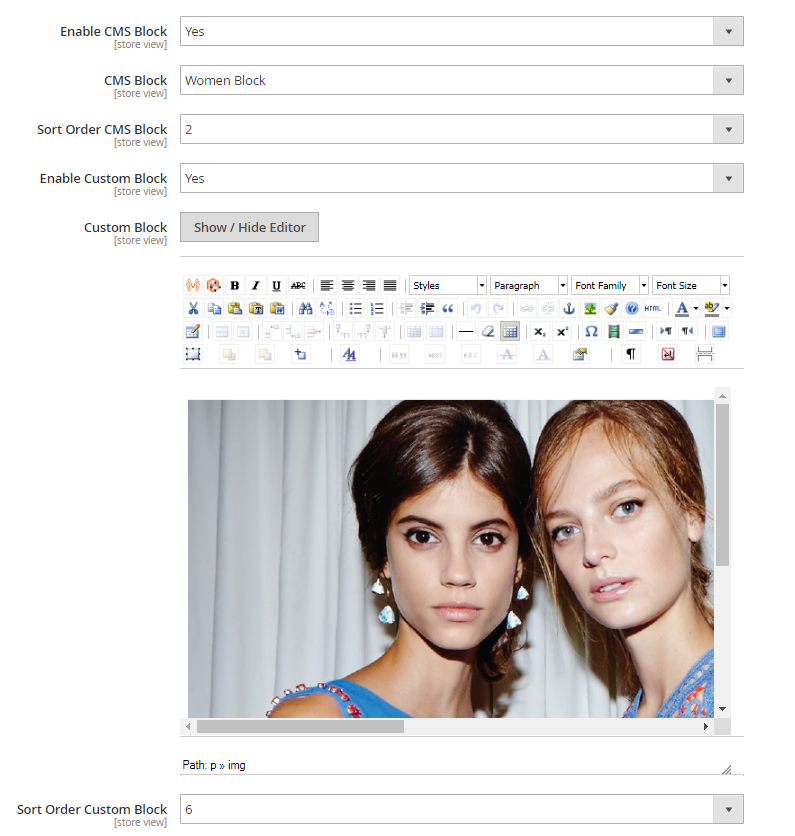
- In Enable CMS Block, choose Yes to enable CMS Block, or No to disable.
- In CMS Block, select available CMS Block in your store.
- In Sort Order CMS Block, select a number (1 to 6) to set the position of sections in the frontend.
- In Enable Custom Block, choose Yes to enable custom Block, or No to disable.
- In Custom Block, edit a new CMS Block.
- In Sort Order Custom Block, select a number (1 to 6) to set the position of sections in the frontend.
2.7.8 Products Suggestion Section
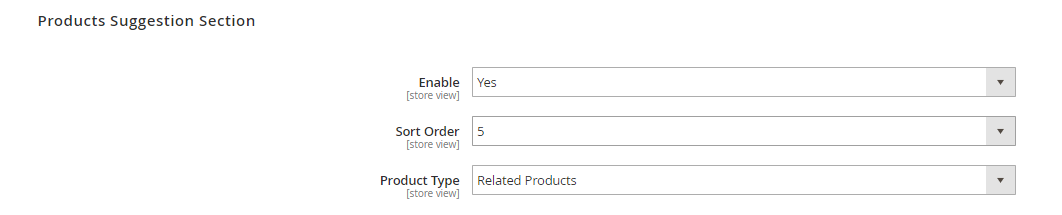
- In Enable, choose Yes to enable social network sharing buttons, or No to disable it.
- In Sort Order, select number (1 to 6) to set the position of this section in the frontend.
- In Product Type, choose Related Products, Cross-sell Products or Up-sell Products to be displayed in success page.
2.7.9 Frontend Preview

- In Order Number, enter order number of an order that you want to watch its success page.
- In Preview Here, click on the link to go to success page in the frontend of that order. In case the order number that you fill in does not exist, the success page of the latest order will be presented when you click on the link.
Note: You need to save config before clicking on the link to preview the success page of the order.
2.7.10 Custom Style
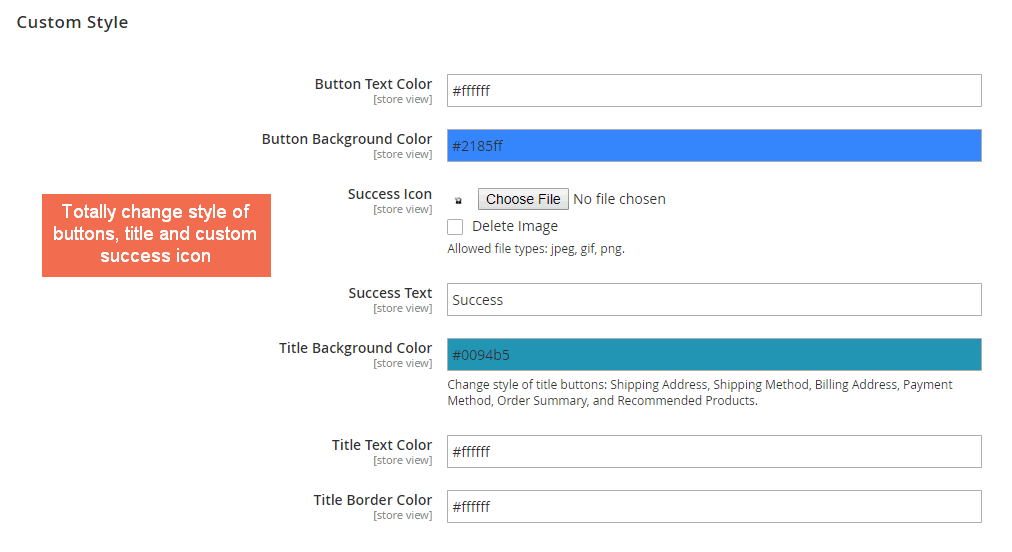
- Change style of buttons: Print order, Re-order, Continue Shopping, and Subscribe.
In Button Text Color, set the color for text in buttons.
In Button Background Color, set the background color for buttons.
- Custom Success title
In Success Icon, upload an icon to be displayed along with the success title
In Success Text, edit a short title for the success page.
- Change the style of title boxes, including Shipping address, Shipping method, Billing address, Payment method, Order summary, and Recommended products.
In Title Background Color, choose the background color for the title box.
In Title Text Color, choose text color
In Title Border Color, choose border color for the title box.
Note:
Because the scope of the module configuration is store view, you can customize the success page for each store view.
After setting, you need to save your configuration then flush cache to start using the module.