
1. Overview
As you know, default Magento does not allow customers to add many products to carts at once in product list pages such as category pages and search result page. This setting of default Magento will complicate their shopping process and waste their time by requesting them to visit each product page separately. Especially, for wholesalers who buy a great variety of products in large quantity, dealing with that complex purchasing procedure is a real challenge.
Understand the difficulties customers are facing, Magento Add Multiple Products to Cart is developed by BSSCommerce to bring better shopping experience for customers. By allowing customers to add multiple items to cart with various quantities at once, this extension enables a quicker order process and helps store owners increase sales, especially when their target customers are wholesalers.
2. How does it work?
Please go to System ⇒ Configuration ⇒ BSSCOMMERCE ⇒ Add Multiple Products to start making configuration.
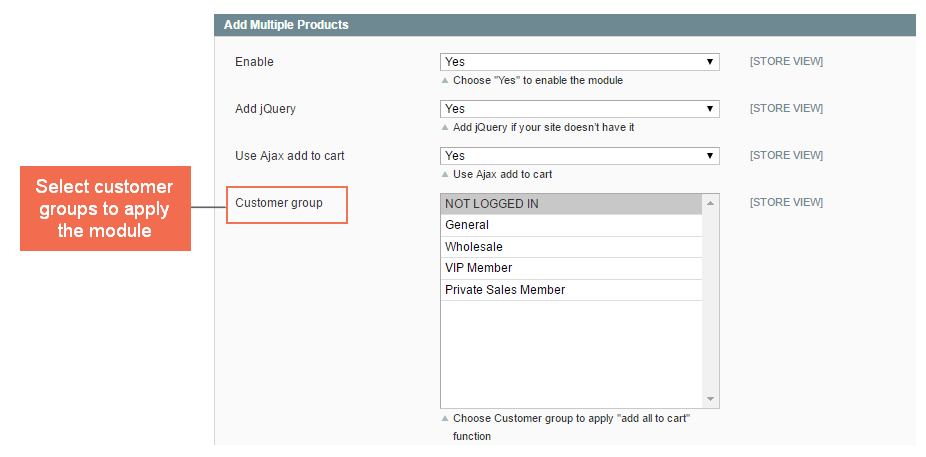
In Enable, choose Yes to enable the module, otherwise choose No.
In Add jQuery, chooseYes to add Library jQuery if your site doesn’t have it, choose No if your site already has it.
In Use Ajax Add to Cart:
- Choose Yes if you allow Ajax pop-up enabling customers to specify options of products with options that they forgot to while adding to cart
- Choose No to disable Ajax pop-up and showing Error Notification at the top of the page instead.
In Customer Group: Choose customer group to apply this module. It means only customers in the selected group can add multiple products to cart.
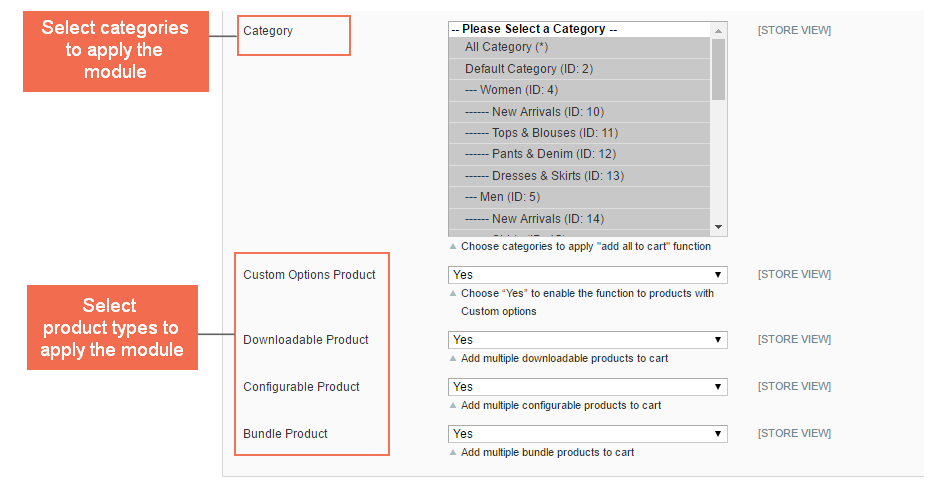
In Category: Select categories that you want to apply this module to. It means that when you choose a category, customers can add multiple products belonging to that category to cart.
In Custom Options Product:
- Choose Yes to enable the function of adding multiple products to cart for products with custom options.
- Choose No to disable this function for products with custom options. There will be no check box and quantity box for this product type in the frontend. Customers cannot add custom options products along with other product types.
Similarly, you can choose product types to apply this module.
In Downloadable Product:
- Choose Yes and customers can add multiple downloadable products to cart.
- Choose No to disable this function for downloadable products and hide check box and quantity box for this product type.
In Configurable Product:
- Choose Yes and customers can add multiple configurable products to cart.
- Choose No to disable this function for configurable products and hide check box and quantity box for this product type.
In Bundle Product:
- Choose Yes and customers can add multiple bundle products to cart.
- Choose No to disable this function for bundle products and hide check box and quantity box for this product type.
Finally, you click Save Config and see changes in the frontend.
Note: This module now works well in both Grid and List view form.
3. Run The Extension on CMS Page
There are 2 ways admin could use Add Multiple Products to Cart function on CMS or StaticPage:
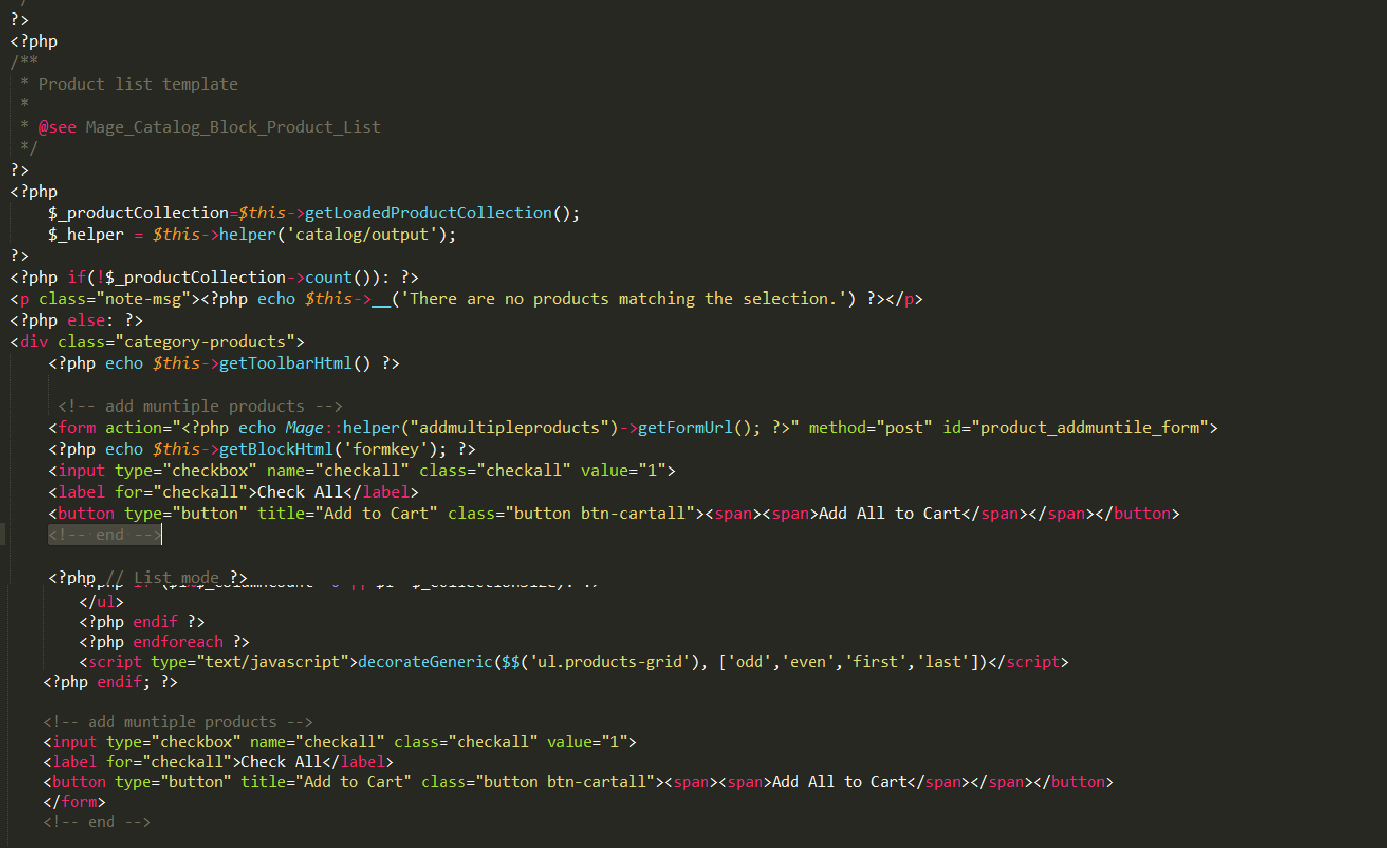
3.1. Customize your product list template
If you have a code file in form of list.phtml, you could bring those products to CMS Page or any page. However, if you want to apply Add Munltiple Product to Cart function, your code file list.phtml has to be formated according to the code file list.phtml of this module.
Step 1: back up file app/design/frontend/base/default/template/bss/addmultipleproducts/catalog/product/list.p html
Step 2: copy file from your theme app/design/frontend/theme/template/catalog/product/list.phtml and paste to path
app/design/frontend/base/default/template/bss/addmultipleproducts/catalog/product/ or
app/design/frontend/theme/template/bss/addmultipleproducts/catalog/product/
in file list
*Note: search the keywords “add multiple products” in the old file to observe the changes (custom part locating in: <!-- add muntiple products --> custom part <!-- end --> )
Step 3: Add from:
<form action="<?php echo Mage::helper("addmultipleproducts")->getFormUrl(); ?>" method="post" id="product_addmuntile_form">
<?php echo $this->getBlockHtml('formkey'); ?>
<input type="checkbox" name="checkall" class="checkall" value="1">
<label for="checkall">Check All</label>
<button type="button" title="Add to Cart" class="button btn- cartall"><span><span>Add All to Cart</span></span></button>
after the tab <div class="category-products">
and add
<input type="checkbox" name="checkall" class="checkall" value="1">
<label for="checkall">Check All</label>
<button type="button" title="Add to Cart" class="button btn- cartall"><span><span>Add All to Cart</span></span></button>
</form>
or only
</form> (if you don’t need the below button)
in prior to the closing tab of <div class="category-products">
Step 4: Add the option: Checkbox + Qty and the button Add To Cart + View in products-list and products-grid
- Add option: Checkbox +Qty
<?php $product = Mage::getModel("catalog/product")->load($_product->getId()) ;?>
<?php if( $_product->isSaleable() && Mage::helper("addmultipleproducts")-
>getProductConfig($product) ) :?>
<?php if($_product->canConfigure() || $product->getOptions()) :?>
<div class="show-option">
<label class="required" for="options"><em>*</em>Select Option</label>
<input type="checkbox" name="show.option" class="show-option-ck" value="<?php echo $_product->getId() ?>"></input>
</div>
<?phpendif ?>
<div id="bss_option<?php echo $_product->getId() ?>" style="display:
none">
<?php echo Mage::helper("addmultipleproducts")-
>getProductOptionsHtml($product);?>
</div>
<div id="bss_<?php echo $_product->getId() ?>" style="margin: 8px 0; clear: both;">
<input type="checkbox" name="cproduct[]" class="cproduct" id="cproduct-<?php echo $_product->getId() ?>" value="<?php echo $_product->getId()
?>">
<input type="text" class="quantity" name="qty_<?php echo $_product-
>getId() ?>" id="qty-<?php echo $_product->getId() ?>" value="1" style="width: 3.2em;">
</div>
<?phpendif ?>
- Add button: Add To Cart + View
<?php if( $_product->isSaleable() && Mage::helper("addmultipleproducts")-
>getProductConfig($product) ) : ?>
<button type="button" title="<?php echo $this->quoteEscape($this-
> ('Add to Cart')) ?>" class="button btn-
cart" onclick="single_add(document.getElementById('qty-<?php echo $_product-
>getId() ?>').value,'<?php echo $_product->getId(); ?>','<?php echo Mage::helper('addmultipleproducts/cart')->getAddUrl($_product); ?>') "><span><span><?php echo $this-> ('Add to Cart') ?></span></span></button>
<?phpelseif($_product->getStockItem() && $_product->getStockItem()-
>getIsInStock()): ?>
<a title="<?php echo $this->quoteEscape($this-> ('View Details')) ?>" class="button" href="<?php echo $_product->getProductUrl() ?>"><?php echo $this-
> ('View Details') ?></a>
<!-- end -->
Step 5: Add script
<script type="text/javascript">jQuery(document).ready(function() {
varvalidate_option = "<?php echo Mage::helper('addmultipleproducts')-
>SystemConfig('validate_option')?>"; jQuery('.checkall').click(function() {
if(jQuery(this).is(":checked")) { jQuery(".checkall").prop( "checked", true );
varlen = document.getElementsByClassName('cproduct').length; vari;
for(i=0;i<(len);i++) { document.getElementsByClassName('cproduct')[i].checked = true;
}
} else {
jQuery(".checkall").prop( "checked", false );
varlen = document.getElementsByClassName('cproduct').length; vari;
for(i=0;i<(len);i++) { document.getElementsByClassName('cproduct')[i].checked = false;
}
}
});
jQuery('.show-option-ck').click(function(){ varproductid = jQuery(this).attr('value'); if(jQuery(this).is(":checked")) {
jQuery('#bss_option'+ productid).css('display','block');
}else{
jQuery('#bss_option'+ productid).css('display','none');
}
})
jQuery('.btn-cartall').click(function() { var error = false;
var error1 = true; jQuery('.cproduct').each(function() {
if(jQuery(this).is(':checked')) { error1 = false;
}
});
if(error1 == true) {
alert("No checkbox selected !");
} else {
jQuery('.quantity').each(function() {
if(jQuery(this).val() < 0 || isNaN(jQuery(this).val()) == true) { alert("Invalid Value !");
jQuery(this).focus(); error = true;
}
});
}
if(error == false && error1 == false) { if (validate_option == 1) {
vardataUrl = "<?php echo $this-
>getBaseUrl().'addmultipleproducts/cart/stopadd'?>";
varaddToCartAllData = jQuery("#product_addmuntile_form").serialize(); jQuery.ajax({
type: 'POST',
url: dataUrl,
data: addToCartAllData, success: function(data){
varjson = data,
obj = JSON.parse(json); if (obj.flag == 1) {
jQuery('#product_addmuntile_form').submit();
}else{ alert(obj.mess);
}
}
});
}else {
jQuery('#product_addmuntile_form').submit();
}
}
});
});
functionsingle_add(qty,proid,url) {
varvalidate_option = "<?php echo Mage::helper('addmultipleproducts')-
>SystemConfig('validate_option')?>"; var error = false;
jQuery('#product_addmuntile_form').attr('action',url); varqty = jQuery('#qty-'+ proid).val();
if(qty< 0 || isNaN(qty) == true) { alert("Invalid Value !"); jQuery('#qty-'+proid).focus(); error = true;
}
if(error == false) {
if (validate_option == 1) {
vardataUrl = "<?php echo $this-
>getBaseUrl().'addmultipleproducts/cart/stopadd'?>" + '?proid=' + proid;
varaddToCartAllData = jQuery("#product_addmuntile_form").serialize(); jQuery.ajax({
type: 'POST', url: dataUrl,
data: addToCartAllData, success: function(data){
varjson = data,
obj = JSON.parse(json); if (obj.flag == 1) {
jQuery('#product_addmuntile_form').submit();
}else{ alert(obj.mess);
}
}
});
}else { jQuery('#product_addmuntile_form').submit();
}
}
}
</script>
Screenshot:

3.2. Use the template of this module
If you do not want to edit your code, then you have to use the template of this module when you create list on CMS page. The simplest way to do this is to add a widget to the CMS page which allows you to specify the template.
For example, if you have a code as
{{block type="catalog/product_list" name="home.catalog.product.list" alias="products_homepage" template="catalog/product/list.phtml"}}
change it into
{{block type="catalog/product_list" name="home.catalog.product.list" alias="products_homepage" template="bss/addmultipleproductscatalog/product/list.phtml"}}
* Note: Comparing the base code versus the code of Add Multiple Products t o Cart module, you will easily identify different parts between two code for later customization.