
1. Overview
Magento 2 SEO Extension by BSSCommerce is the complete SEO package to maximize the effectiveness of Search Engine Optimization for your e-commerce business. This comprehensive SEO extension for Magento 2 includes all crucial tools for great SEO performance, such as Rich snippets, XML sitemap, HTML sitemap, SEO Report, SEO Toolbar, and so on.
2. How Does It Work?
Please go to Store ⇒ Configuration ⇒ BSSCOMMERCE and start configuration.
2.1. In SEO Core
This section allows you to set up general SEO settings for the whole site.
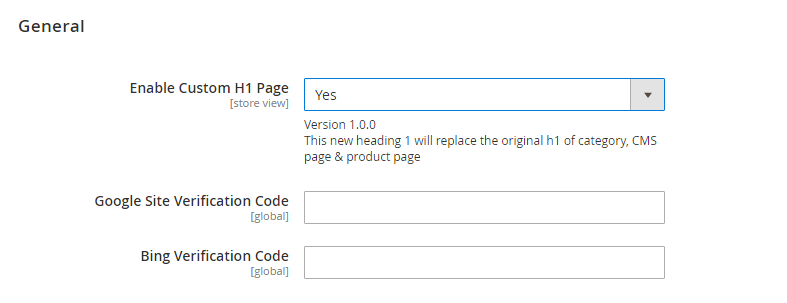
In Enable Custom H1 Page: Choose Yes to enable or No to disable this function.
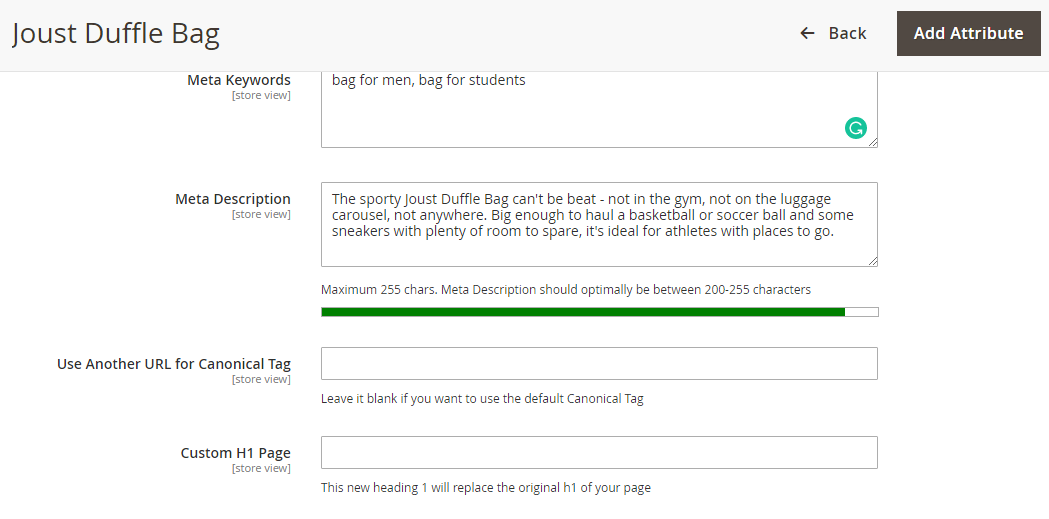
If you choose Yes, the Custom H1 Page field will be enabled in the Search Engine Optimization of each category, CMS, and product edit page.
This feature is very useful for store owners in specific cases.
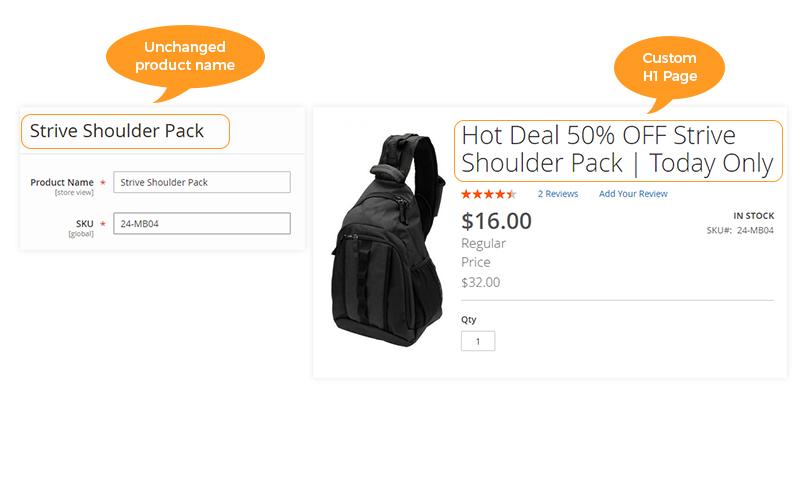
For example, if you run a promotion for product A and want to place an eye-catching Heading 1 without changing the product name (the H1 as the default setting), you can enter a custom H1 like “Hot Deal 50% OFF Strive Shoulder Pack | Today Only”. Customers now see the new heading on the product page, replacing the original heading 1. However, the product name is unchanged and is still displayed on the shopping cart and checkout page.
In Google Site Verification Code: If you are using Google Search Console, you need to enter the code provided by Google. This helps the module to show your site impressions, clicks, CTR,... from Google Search Console.
For example:
- Meta tag provided by Google as below:
<meta name="google-site-verification" content="_rHp4oQoxOfKF8VN85ZiKWEZO_5ThgO8r7HaIKKJ0eI" />
- You enter this code into the field: _rHp4oQoxOfKF8VN85ZiKWEZO_5ThgO8r7HaIKKJ0eI
In Bing Verification Code: Bing also provides a verification code as a meta tag.
For example:
- Meta tag provided by Bing as below:
<meta name="msvalidate.01" content="9FD50240145DBB177642FF639FD4A222" />
- You enter this code into the field: 9FD50240145DBB177642FF639FD4A222
2.2. In Rich Snippets
Magento 2 Rich Snippets adds rich snippets, breadcrumbs, rating, price, review, etc., for products and other information of your Magento 2 store to the search result pages.
In Enable: Choose Yes to enable the feature or choose No to disable it.
2.2.1. Site Structure
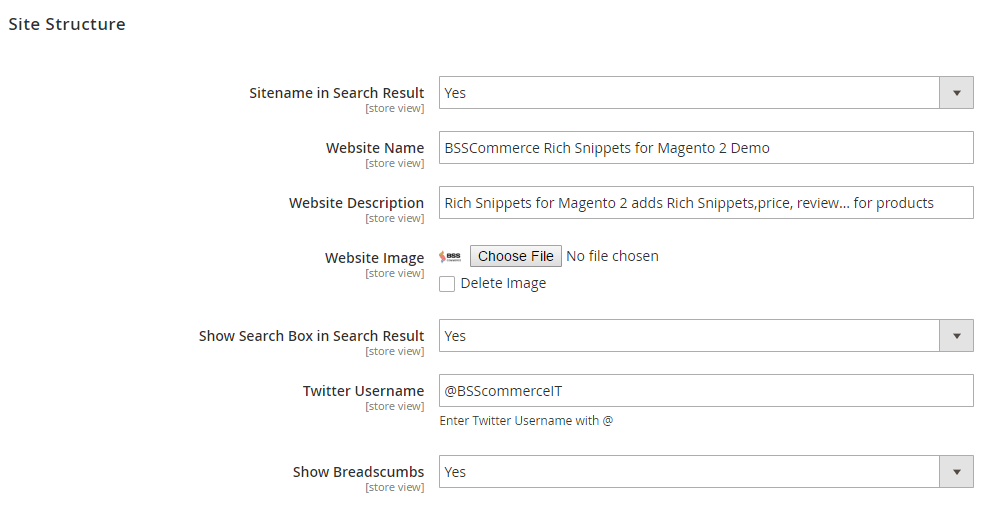
In Sitename in Search Result: Choose Yes to show the website name you assign in the search result. Otherwise, choose No. If you choose No, the Show Search Box in Search Result will be disabled.
In Website Name: Choose the name for your website to be displayed in the search result.
In Website Description: Enter the description to apply to all pages (except for product and category pages).
In Website Image: Choose an image for your website to be displayed when sharing via Open Graph on Facebook and via Twitter Card on Twitter.
In Show Search Box in Search Result: Choose Yes to show a specific search box for your website. Otherwise, choose No.
In Twitter Username: Enter Twitter Username with @ to support Twitter card.
In Show breadcrumbs: Choose Yes to show breadcrumbs (navigation path) of product pages instead of the regular URLs in the search results. Otherwise, choose No.
2.2.2. Local Business
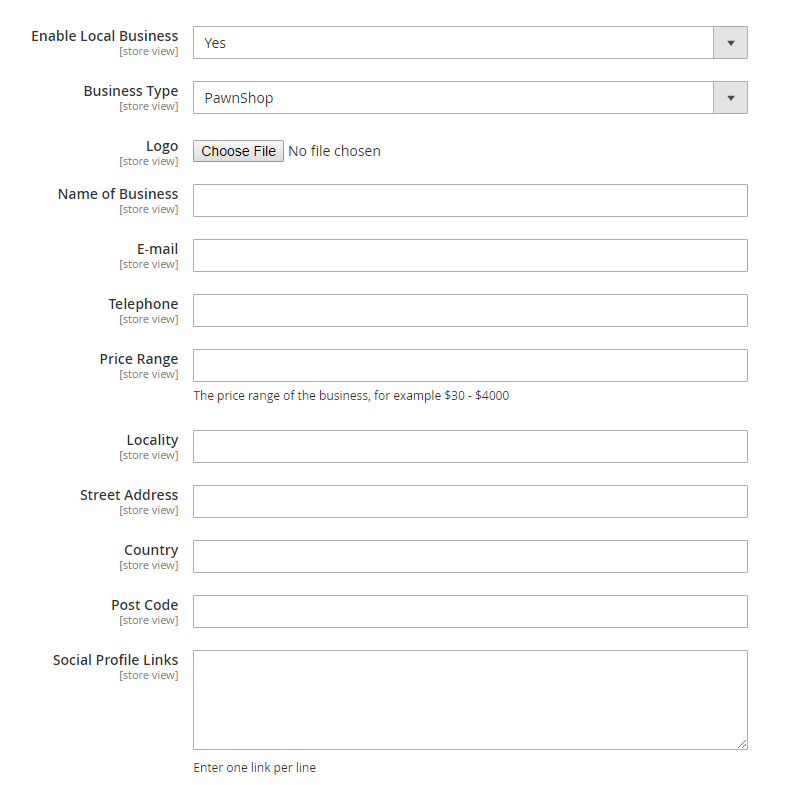
In Enable Local Business: Choose Yes to show the following information about your website in the search result. Otherwise, choose No. If you choose No, all the following settings will be disabled.
In Business Type: Select your suitable business type from the drop-down list.
In Logo: Choose a logo for your business.
In Name of Business: Choose a name for your business to be displayed in the search result.
In Email: Enter your business email.
In Telephone: Enter your business phone.
In Price Range: Enter the price range of your business.
In Locality: Enter the locality of your business.
In Street Address: Enter your business street address.
In Country: Enter the country of your business in two capital letters following ISO 3166-1 alpha-2 country code.
In Post Code: Enter your business postcode.
In Social Profile Links: Enter your business social profile links. Please enter one link per line.
⇒ For more information about these store properties, explore HERE!
2.2.3. Product Options
In Show Name: Choose Yes to show the product name in the search result. Otherwise, choose No. If you choose No, all the following settings will be disabled.
In Show SKU: Choose Yes to show the product SKU in the search result. Otherwise, choose No.
In Show Image: Choose Yes to show the product image in the search result. Otherwise, choose No.
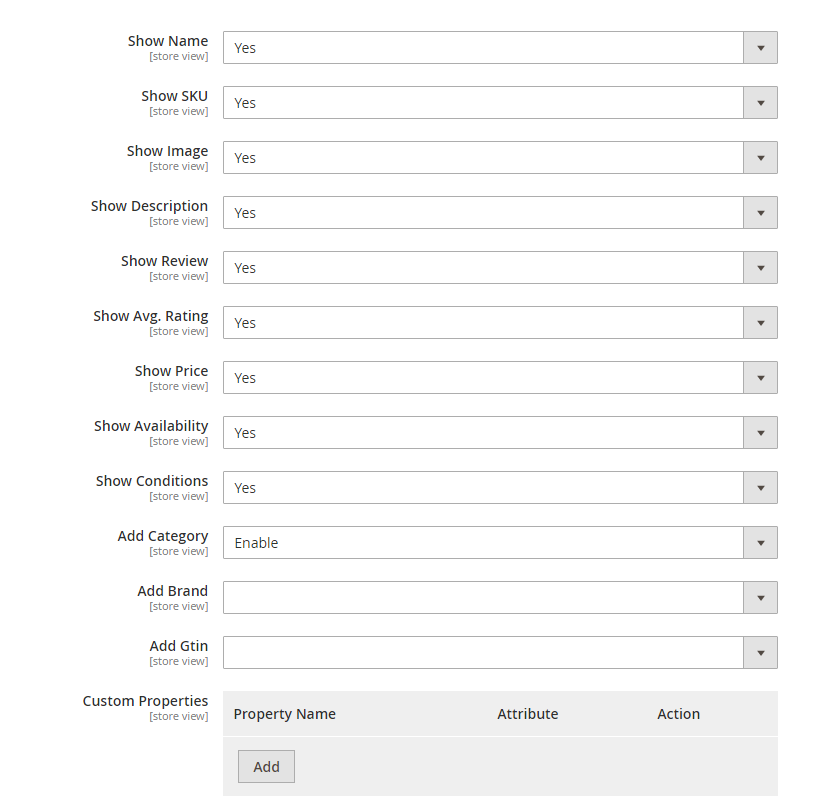
In Show Description: Choose Yes to show the product description in the search result. Otherwise, choose No.
In Show Review: Choose Yes to show the product review in the search result. Otherwise, choose No.
In Show Avg. Rating: Choose Yes to show the average rating of the product in the search result. Otherwise, choose No.
In Show Price: Choose Yes to show the product price in the search result. Otherwise, choose No.
In Show Availability: Choose Yes to show the product availability (in stock/out of stock) in the search result. Otherwise, choose No.
In Show Conditions: Choose Yes to show the New condition of products. We support the New attribute to appear in the search result.
In Add Category: If you choose Enable, the category path is added to the product URL displayed in SERPs.
In Add Brand: Select an attribute code of the brand to appear in the search result.
In Add Gtin: Select a GTIN to display in the search result.
In Custom Properties: Customize any Rich snippet and assign it to an attribute. You need to enter custom properties following the Rich snippet structure. Otherwise, you face issues when checking your website on Google Structured Data Testing Tool.
2.2.4. Category Options
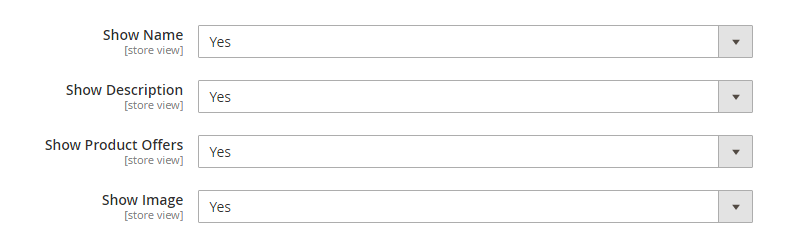
In Show Name: Choose Yes to show the category name in the search result. Otherwise, choose No. If you choose No, all the following settings will be disabled.
In Show Description: Choose Yes to show the category description in the search result. Otherwise, choose No.
In Show Product Offers: Choose Yes to display offers of products in the search result. Otherwise, choose No.
In Show Image: Choose Yes to show the category image in the search result. Otherwise, choose No.
2.2.5. Open Graph
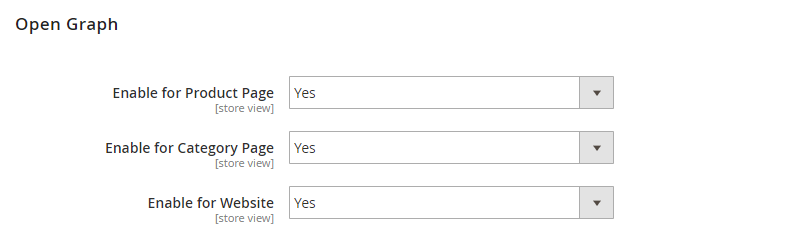
In Enable for Product Page: Choose Yes to enable Open Graph when sharing Product Pages via Facebook. Otherwise, choose No.
In Enable for Category Page: Choose Yes to enable Open Graph when sharing Category Pages via Facebook. Otherwise, choose No.
In Enable for Website: Choose Yes to enable Open Graph when sharing your homepage via Facebook. Otherwise, choose No.
2.2.6. Twitter Card
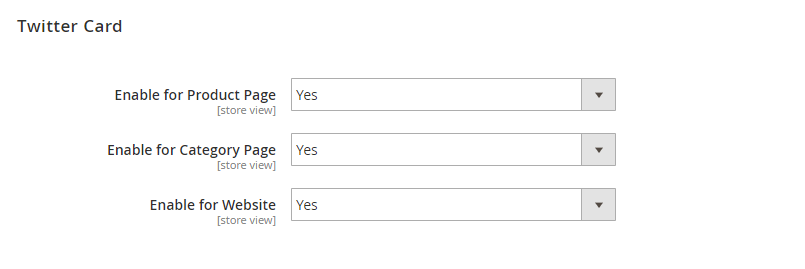
In Enable for Product Page: Choose Yes to enable Twitter Card when sharing Product Pages via Twitter. Otherwise, choose No.
In Enable for Category Page: Choose Yes to enable Twitter Card when sharing Category Pages via Twitter. Otherwise, choose No.
In Enable for Website: Choose Yes to enable Twitter Card when sharing your homepage via Twitter. Otherwise, choose No.
NOTE: After admin have installed and configured the extension, it could take anywhere from a few days up to a month, depending on how regularly Google crawls your site, to show the rich snippets on SERPs. To validate the data added to your rich snippets, you can use tools provided by Google.
2.3. Google XML Sitemap
Magento 2 XML Sitemap generates and splits XML sitemap for Magento 2 store to boost up crawling by search engines.
To configure the XML sitemap for your Magento 2 store, please follow these 2 steps:
- Step 1: Configure the extension settings as your wish at Stores ⇒ Configuration ⇒ BSSCOMMERCE ⇒ Google XML Sitemap.
- Step 2: Create a new XML sitemap at Marketing ⇒ Google XML.
First, we will show you how to configure the feature settings.
2.3.1. General Setting
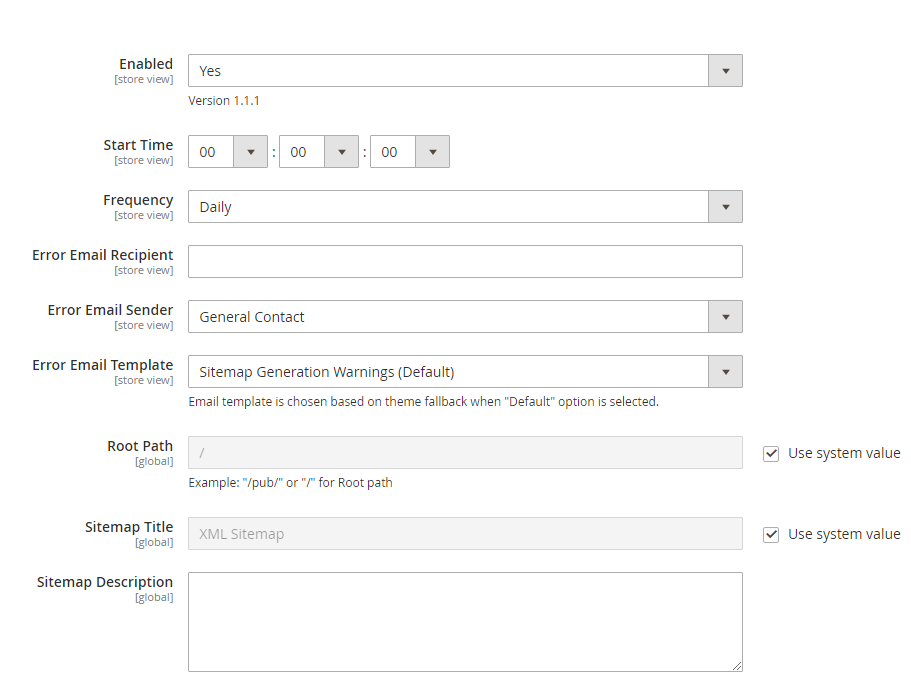
In Enables: Choose Yes to generate an XML Sitemap.
In Frequency: Choose the frequency for the extension to update the sitemap. The options are Daily - Weekly – Monthly.
In Error Email Recipient: Choose the recipient to receive an error email once there is an error.
In Error Email Sender: Choose the name of the sender displayed in the error email.
In Error Email Template: Choose the template for the error email.
In Root Path: Specify a root path for the XML sitemap.
In Sitemap Title: Enter a title for the sitemap.
In Sitemap Description: Enter a description for the sitemap.
2.3.2. Homepage Options
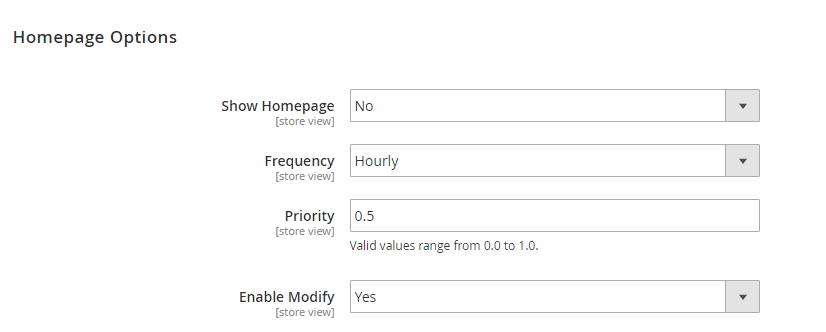
In Show Homepage: Choose Yes to show the homepage in the XML sitemap. Otherwise, choose No to hide it.
In Frequency: Choose the frequency for the search engine crawlers to index the Homepage. The options are: Always - Hourly - Daily - Weekly - Monthly - Yearly - Never.
In Priority: Choose the priority for the search engine crawlers to index the Homepage. Valid values range from 0.0 to 1.0.
In Enable Modify: Choose Yes to show the time of the latest modification of the homepage in the XML sitemap file. Otherwise, choose No to hide it.
2.3.3. Categories Options
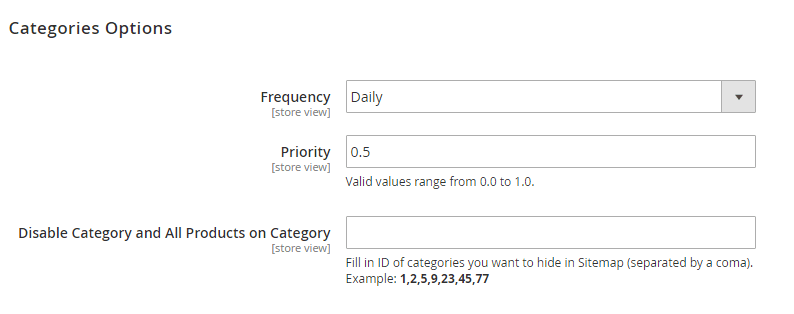
In Frequency: Choose the frequency for the search engine crawlers to index category pages. The options are: Always - Hourly - Daily - Weekly - Monthly - Yearly - Never.
In Priority: Choose the priority for the search engine crawlers to index category pages. Valid values range from 0.0 to 1.0.
In Disable Category and All Products on Category: Fill in the ID of categories you want to hide from the sitemap (separated by a comma). Products in selected categories will not be affected by this setting.
* Note: You can exclude categories from the XML sitemap by configuring it in each category edit page. Once you set Yes for this configuration, the category is listed in the Disable Category and All Products on Category config.

2.3.4. Product Options
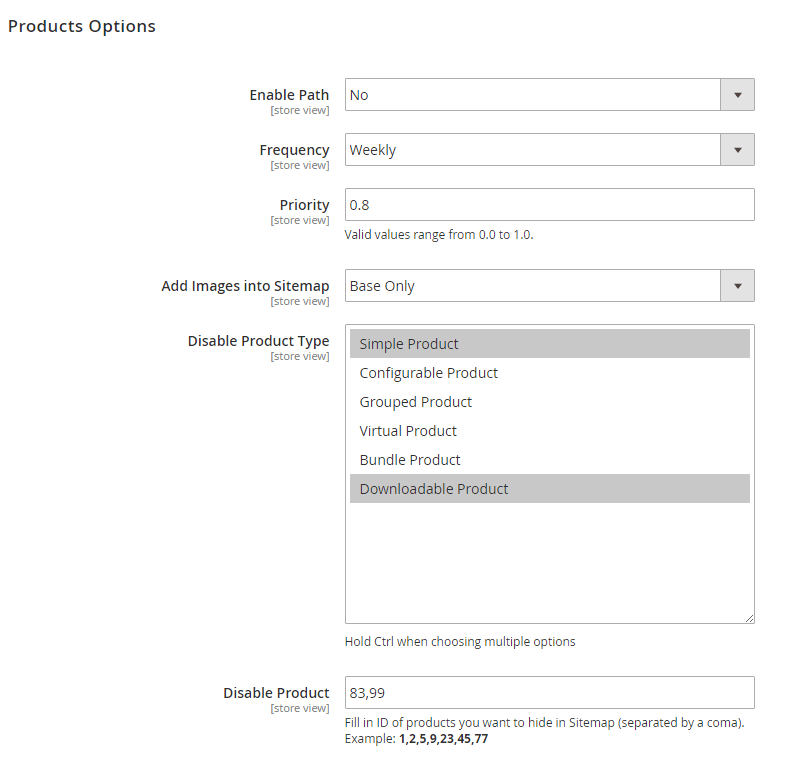
In Enable Path: If you choose Yes, the Use Categories Path for Product URLs config is also enabled. This config is found by going to Stores ⇒ Configuration ⇒ Catalog ⇒ Catalog⇒ Search Engine Optimization ⇒ Use Categories Path for Product URLs.
In Frequency: Choose the frequency for the search engine crawlers to index product pages. The options are: Always - Hourly - Daily - Weekly - Monthly - Yearly - Never.
In Priority: Choose the priority for the search engine crawlers to index product pages. Valid values range from 0.0 to 1.0.
In Add Images to Sitemap: Choose how you want to add the images of products into your XML sitemap. There are 3 options:
- No: Do not add images to the sitemap.
- Base Only: Only add base images of products into the sitemap.
- All: Add all images of products into the sitemap.
In Disable Product Type: You can choose to hide all products belonging to (a) product type(s) from the sitemap.
In Disable Product: Fill in the ID of the products you want to hide from the sitemap (separated by a comma).
* Note: You can exclude products from the XML sitemap by configuring it on each product edit page. Once you set Yes for this configuration, the product is also listed in the Disable Products config.
2.3.5. CMS Page Options
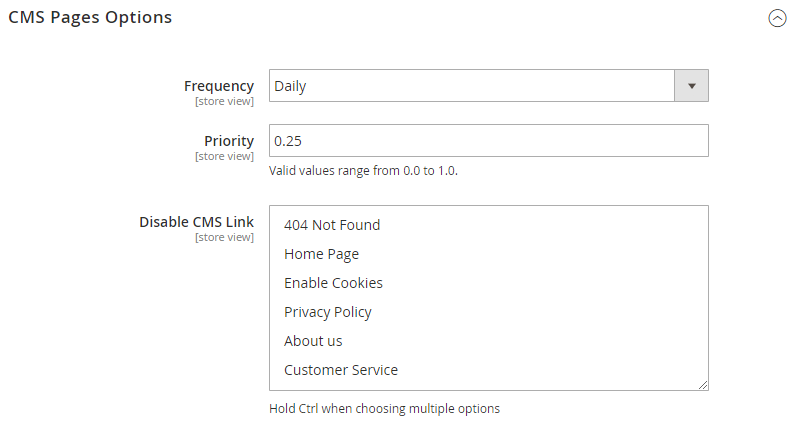
In Frequency: Choose the frequency for the search engine crawlers to index CMS pages. The options are: Always - Hourly - Daily - Weekly - Monthly - Yearly - Never.
In Priority: Choose the priority for the search engine crawlers to index product pages. Valid values range from 0.0 to 1.0.
In Disable CMS Link: Choose CMS links to be disabled from the XML Sitemap.
2.3.6. Additional Link List
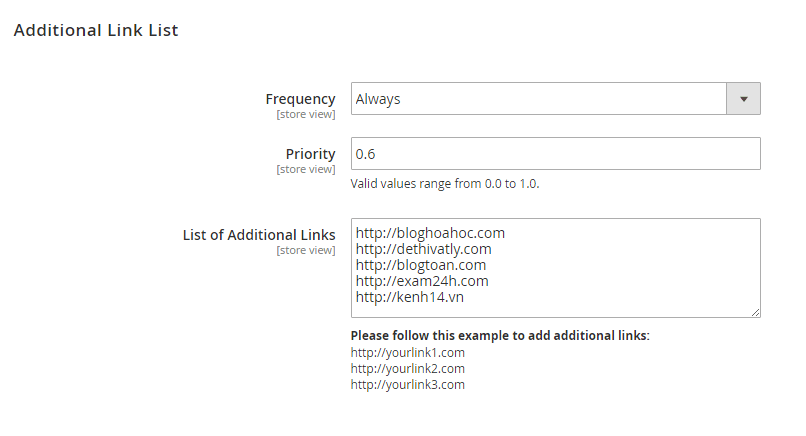
In Frequency: Choose the frequency for the search engine crawlers to index additional links. The options are: Always - Hourly - Daily - Weekly - Monthly - Yearly - Never.
In Priority: Choose the priority for the search engine crawlers to index additional links. Valid values range from 0.0 to 1.0.
In List of Additional Links: Fill in the list of additional links to be shown in the sitemap.
2.3.7. Sitemap File Limit

In Divide Sitemap: There are 4 options for dividing the sitemap:
- None: Do not divide the sitemap.
- Date: Divide the sitemap by the last modified date of the products.
- Category: Divide the sitemap by the products in the same category.
- Manufacture: Divide the sitemap by the products with the same manufacturer. The sitemaps are arranged based on the following sort order:
1: CMS Page Link + Category Link
2: Product Link
3: Additional Link
* Note: Dividing the sitemap still follows the maximum number of URLs per file and maximum file size settings.
In Maximum No of URLs per file: Maximum number of URLs in an XML sitemap file.
In Maximum File Size: Maximum file size in bytes.
2.3.8. Search Engine Submission Settings
In Enable Submission to Robots.txt: Choose Yes to display XML Sitemap URL in Robots.txt file. Otherwise, choose No.
2.3.9. Generate Sitemap
After finishing setting up the extension, the admins will generate a sitemap that will be created following the above settings.
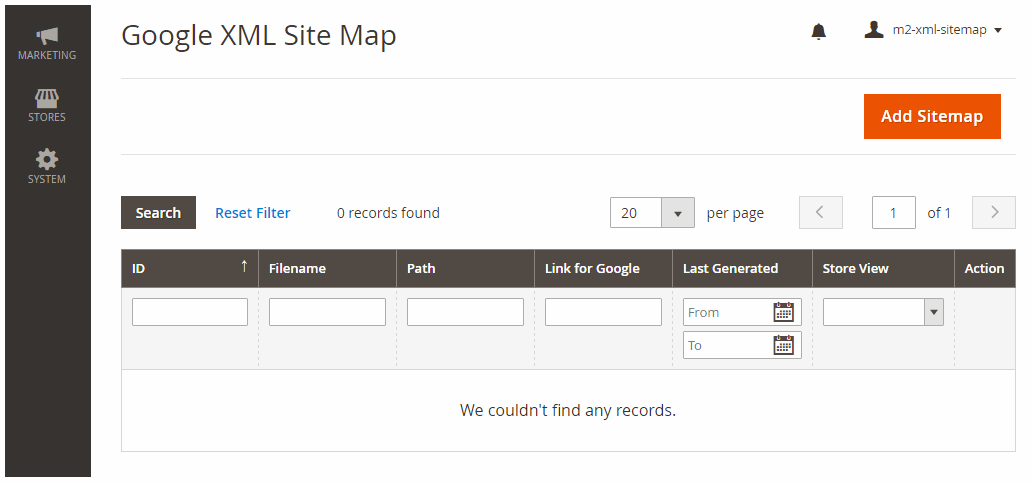
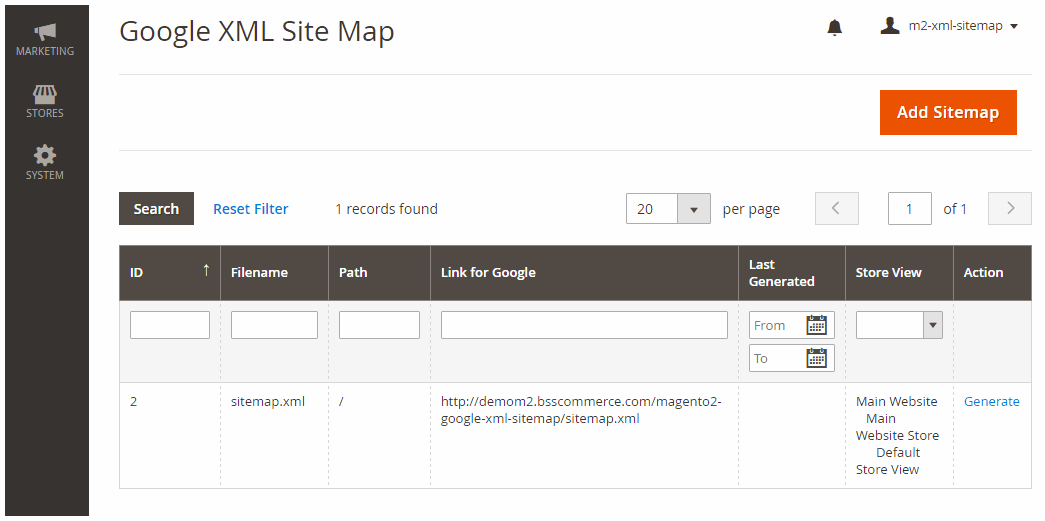
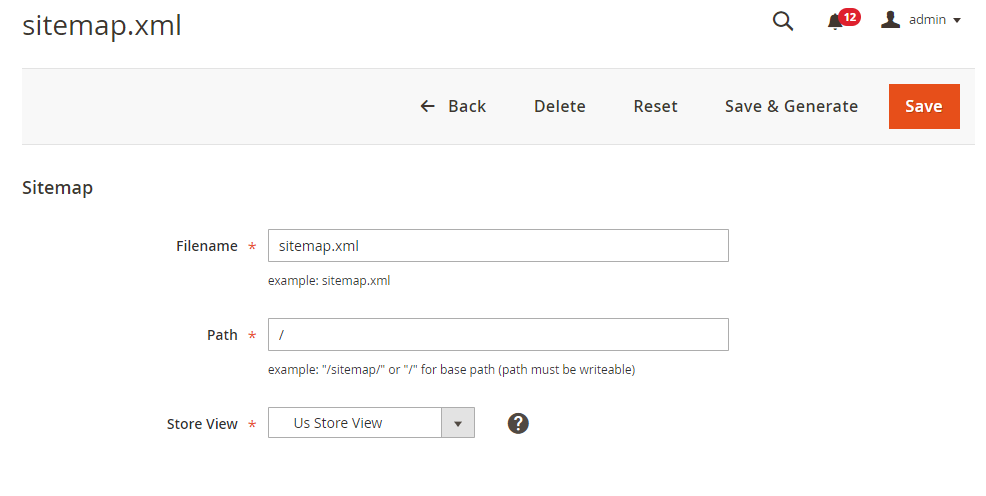
Please go to Marketing ⇒ Google XML Sitemap, and select Add Sitemap to create a new sitemap.
In File Name: Choose a name for the sitemap. The format is nameofthesitemap.xml.
In case you are already using an XML sitemap, there would be 2 options at this point:
- Create a new sitemap with a different name from the old sitemap. You can submit both sitemaps on Google Search Console, and the crawler will read both files.
- Delete the old sitemap, then create a new one with the same name as the old one. The new sitemap following the module setting will be overwritten on the search console and will not affect SEO.
In Path: The default path is “/”. If you want to use a different path, you have to create a new folder at the backend.
Choose Save.
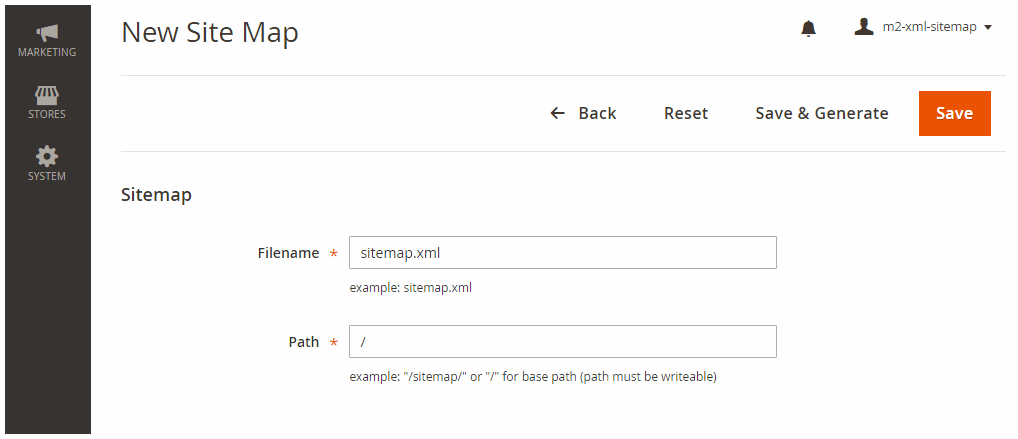
After saving the sitemap, click Generate for the sitemap to be created following the module settings.
2.3.10. Edit and Delete Sitemap
Please go to Marketing ⇒ Google XML Sitemap, and select the sitemap you want to edit or delete.
In the Name, Path and Store View section, you can change the name, path and store view of the XML Sitemap. Click Save and Generate to finish the change.
Click Delete to delete the sitemap.
To reset the sitemap, click Reset and then click Save. Back to the main section, and click Generate to finish.
Note: Before generating the XML sitemap, please Flush Cache. Go to System > Cache Management > Flush Magento Cache.
2.4. In HTML Sitemap
Magento 2 HTML Sitemap helps auto-generate an HTML sitemap to provide your store visitors with a convenient overview of the website and make your store more user-friendly.
2.4.1. General
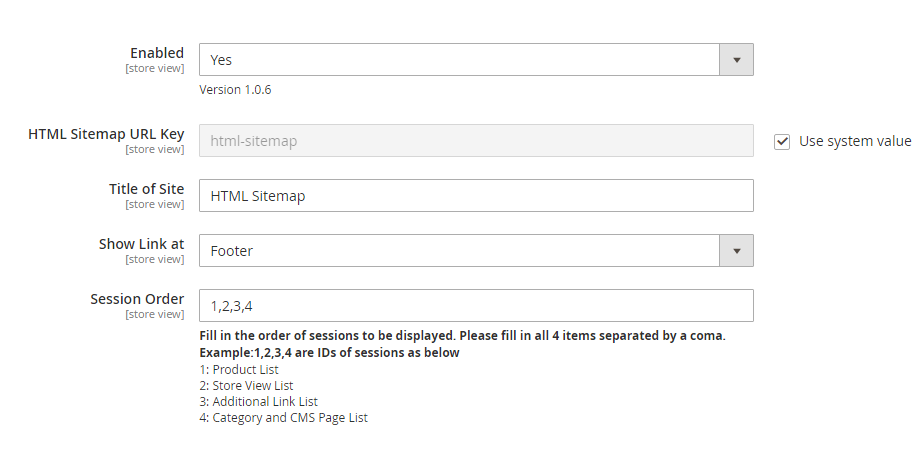
In Enable: Choose Yes to enable the feature. Otherwise, choose No.
In HTML Sitemap URL Key: Enter a URL key for the sitemap.
*Note:
- URLs of the sitemap are different per store:
For example, the URL key of the sitemap in store A is store-a, and the URL key of the sitemap in store B is store-b. When customers access the sitemap of store A, then switch to store B, customers are redirected to the sitemap in store B under the right sitemap URL of store B.
- Enter special characters to the URL key or any spaces:
After saving configs, these special characters or spaces are auto-removed and replaced by the dash(-).
In Title of Site: Choose the title for the sitemap.
In Show Link at: Select Footer or Header where the sitemap link is displayed.
In Session Order: Fill in the order of sessions to be displayed. Please fill in all 4 items separated by a coma. The ID of sessions as below:
- 1: Product List
- 2: Store View List
- 3: Additional Link List
- 4: Category and CMS Page List
2.4.2. Search Engine Optimization
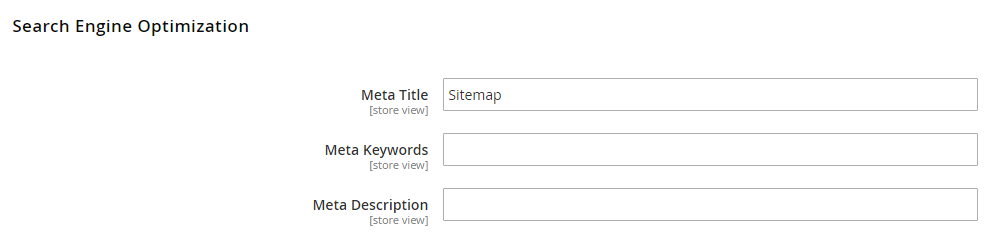
In Meta Title: Choose the meta title for your sitemap.
In Meta Keywords: Choose the meta keywords for your sitemap.
In Meta Description: Write the meta description for your sitemap.
2.4.3. Product List
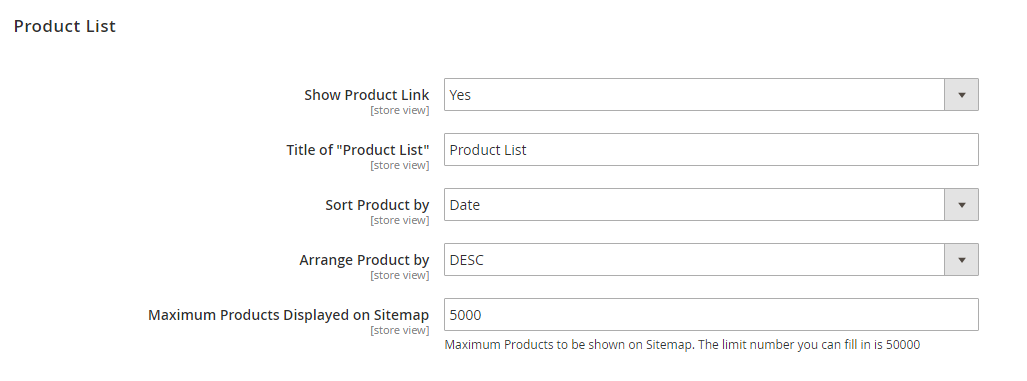
In Show Product Link: Choose Yes to show product links in the sitemap. Otherwise, choose No.
In Title of “Product List”: Choose the title for the product list session in the sitemap.
In Sort Product by: Choose among DESC for descending or ASC for ascending.
In Arrange Product by: Choose Name/Date/Price to sort product links.
In Maximum Products Displayed on Sitemap: Choose the maximum number of product links to be shown. The limit number you can fill in is 50000.
* Note: You can exclude products from the HTML sitemap by configuring it on each product edit page.
2.4.4. Store List

In Show Store View Link: Choose Yes to show store view links in the sitemap. Otherwise, choose No.
In Title of “Store View List”: Choose the title for the store view list session in the sitemap.
2.4.5. Category List
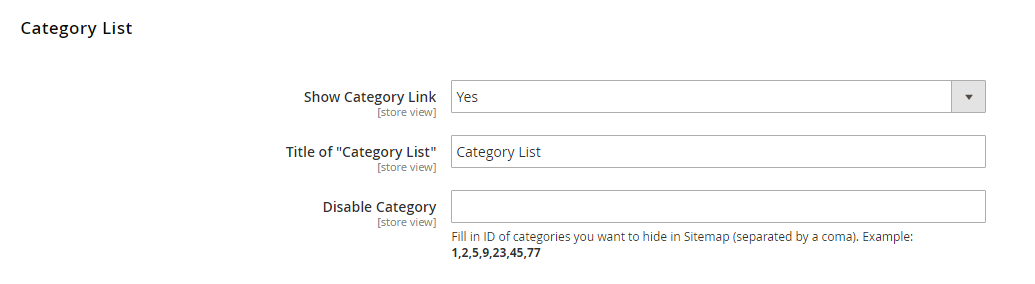
In Show Category Link: Choose Yes to show category links in the sitemap. Otherwise, choose No.
In Title of “Category List”: Choose the title for the category list session in the sitemap.
In Disable Category: Fill in the IDs of categories you want to hide in the sitemap (separated by a comma). For example: 1,2,5,9,23,45,77.
* Note: You can exclude categories from the HTML sitemap by configuring it in each category edit page. Once you set Yes for this configuration, the category is listed in the Disable Category config.
2.4.6. Additional Link List
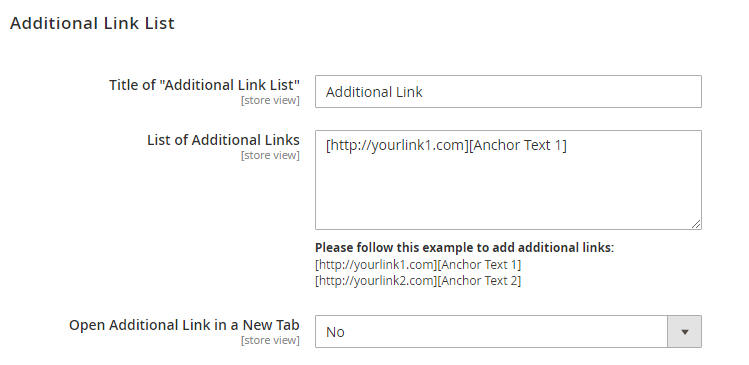
In Title of “Additional Link List”: Choose the title for the additional link list session in the sitemap.
In List of Additional Links: Choose the links and the anchor you want to display for each link. Follow this example: [http://yourlink1.com][Anchor Text 1].
In Open Additional Link in a New Tab: Choose Yes to open additional links in a new tab. Otherwise choose No.
2.4.7. CMS Link List
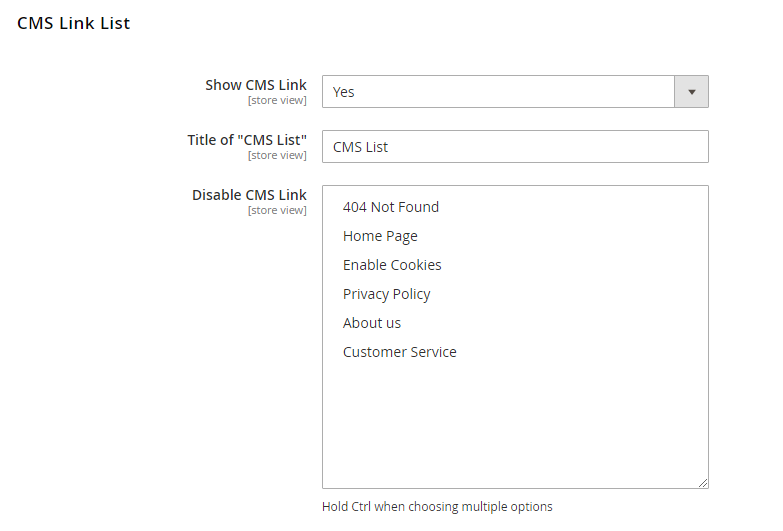
In Show CMS Link: Choose Yes to show CMS links in the sitemap. Otherwise, choose No.
In Title of “CMS List”: Choose the title for the CMS link list session in the sitemap.
In Disable CMS Link: Choose the CMS links you want to hide from the sitemap. Hold Ctrl when choosing multiple options.
2.5. Robots Meta Tag
Magento 2 Robots Meta Tag allow you to give special instructions directly to search engines to control how and if your content appears on Google, Bing and other search engines.
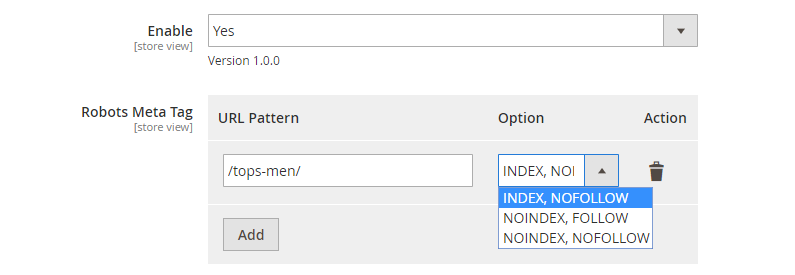
In Enable: Choose Yes to enable the feature or choose No to disable it.
In Robots Meta Tag: Enter URL Pattern based on the following formats.
- With single Category Page or Product Page: enter the URL key. For example, your product page URL is http://yourdomain.com/teton-pullover-hoodie.html. Then URL key is teton-pullover-hoodie.
- With categories or a folder: Enter the path with "/" before and after the path.
For example: You want to set NoIndex and Nofollow for all categories with the "tops-men" URL key. Please enter: /tops-men/
In Option: There are 3 options for you to choose from INDEX, NO FOLLOW – NOINDEX, FOLLOW and, NOINDEX, NOFOLLOW.
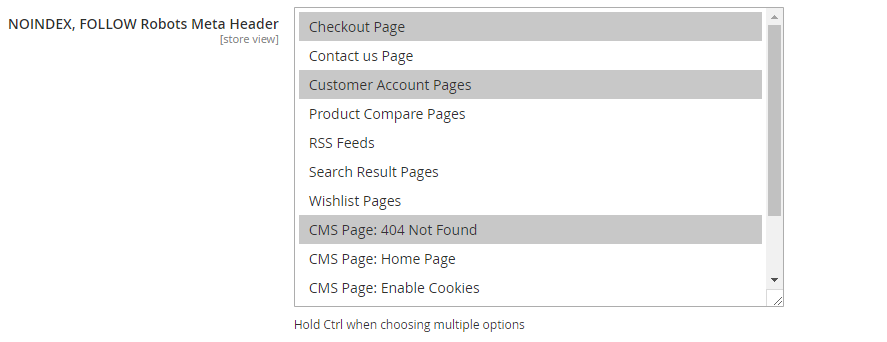
In NOINDEX, FOLLOW Robots Meta Header: Choose pages to set up No Index, Follow Tag.

Edit custom instruction of robots.txt File: enter your custom instruction for the robot.txt file (if any). You can learn how to write a robot.txt file here. If you leave this field blank, the file Robots.txt will run with the default Magento setup.
*Note: You can access this link http://seo-extension.demom2.bsscommerce.com/pub/robots.txt to check the result of your editing custom instructions in the backend.
2.6. Canonical Tag
Magento 2 Canonical Tags helps admins tell the crawlers which is the main URL to assign the search value to among pages with similar content.
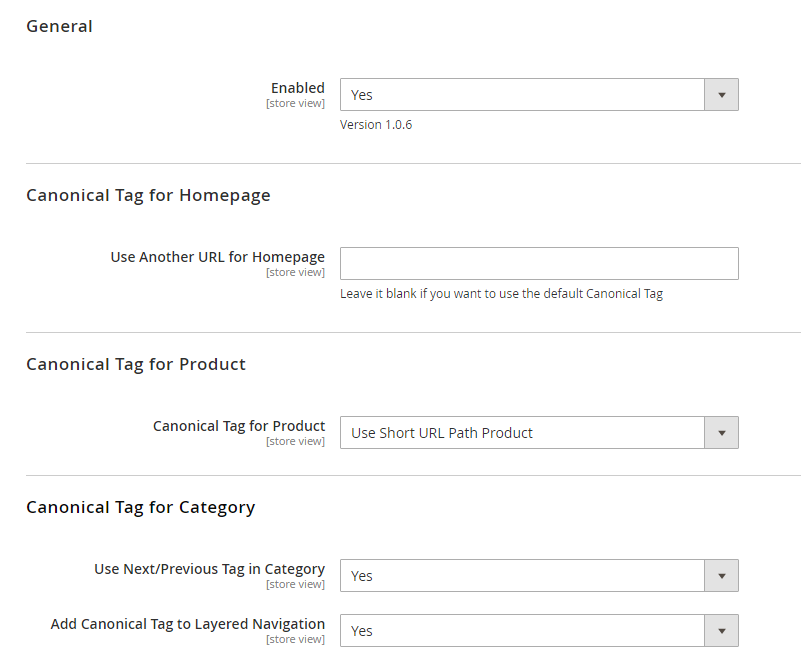
In Enable: Choose Yes to enable the feature or choose No to disable it.
2.6.1. Canonical Tag for Homepage
In Use Another Url for Homepage: Leave it blank if you want to use the default Canonical Tag for Homepage. Fill in the URL path if you want the crawler to read that URL instead of the homepage.
This config is also included in the Search Engine Optimization section of the Homepage edit page.
2.6.2. Canonical Tag for Product
In Canonical for Product: There are 2 available options:
- Use Short Url Path: Set the Canonical Tag on the shortest product URL. Here is an example: http://yourdomain.com/product.html
- Use Long Url Path: Set the Canonical Tag on the longest product URL. If the product belongs to multiple categories at the same category level, the applied category will be the last category in the Categories section on the Catalog management of the product. Take the below image as an example. The applied category will be Jackets.

In the Search Engine Optimization section of each product edit page, you can also specify another URL for the Canonical tag.
2.6.3. Canonical Tag for Category
In Use Next/Previous Tag in Category: Choose Yes to enable canonical for Next/Previous Tag in categories or choose No to disable it.
In Add Canonical Tag to Layered Navigation:
- Choose Yes: Canonical URL is the URL of the original category.
- Choose No: Canonical URL is the URL corresponding to parameters.
In the Search Engine Optimization section of each category edit page, you can also specify another URL for the Canonical tag.
2.7. Advanced Breadcrumbs SEO
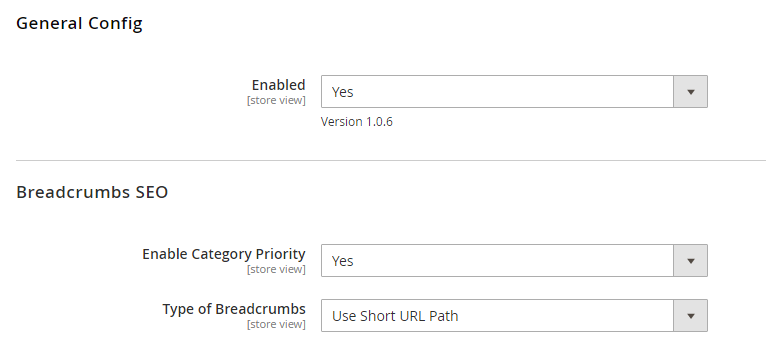
In Enable: Choose Yes to enable the feature or choose No to disable it.
In Type of Breadcrumbs: There are 2 available options:
- Use Long Url Path: Set the breadcrumbs to be the FULL path of a product or a category
- Use Short Url Path: Set the breadcrumbs to be the SHORTENED path of a product or a category. Now, you need to configure Enable Category Priority to show the shortened path (Noted: Type of Breadcrumbs config has higher priority than Enable Category Priority config.)
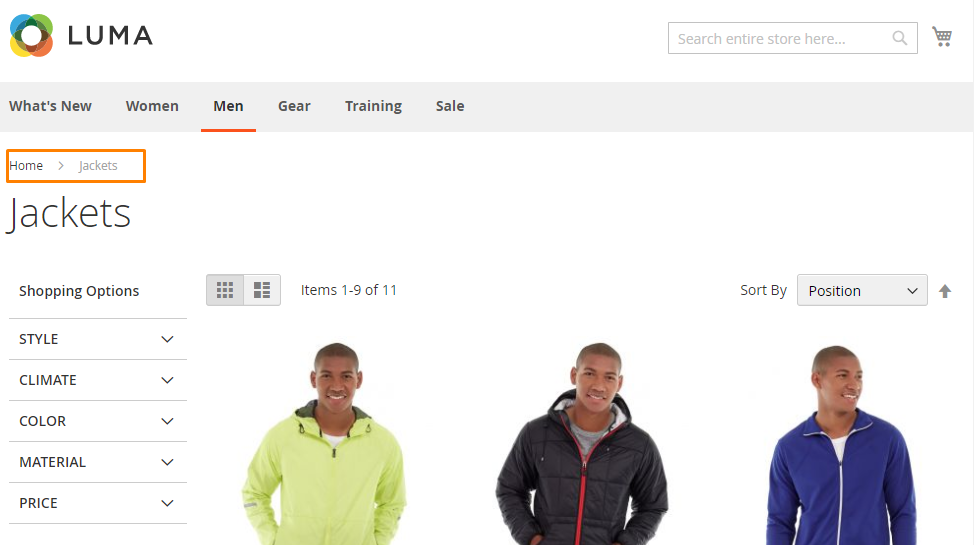
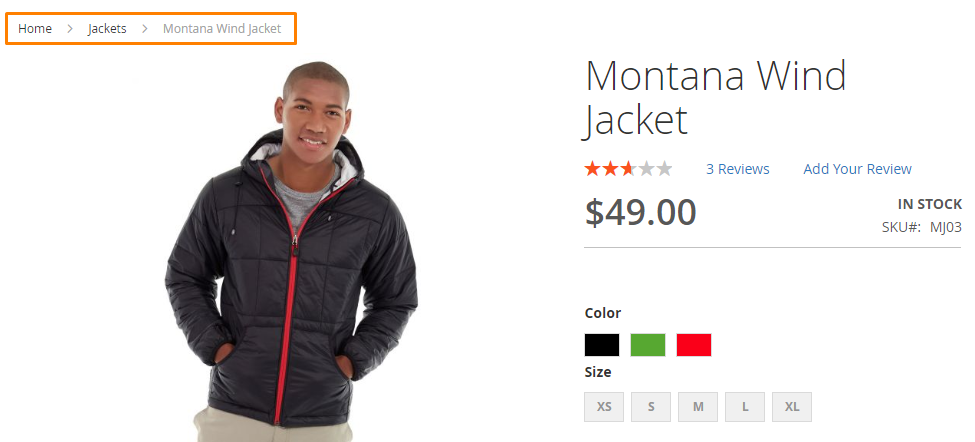
The Breadcrumbs for Product A will be Home ⇒ Jacket ⇒ Product A. You can take a look at the image below.
If the product belongs to multiple categories with the same category level, the applied category will be the last category at the Categories section on Catalog management of the product.
In Enable Category Priority: Choose Yes to enable category priority or No to disable it.
To manage category priority, please go to Marketing ⇒ BSS Commerce SEO ⇒ Advanced Breadcrumbs.
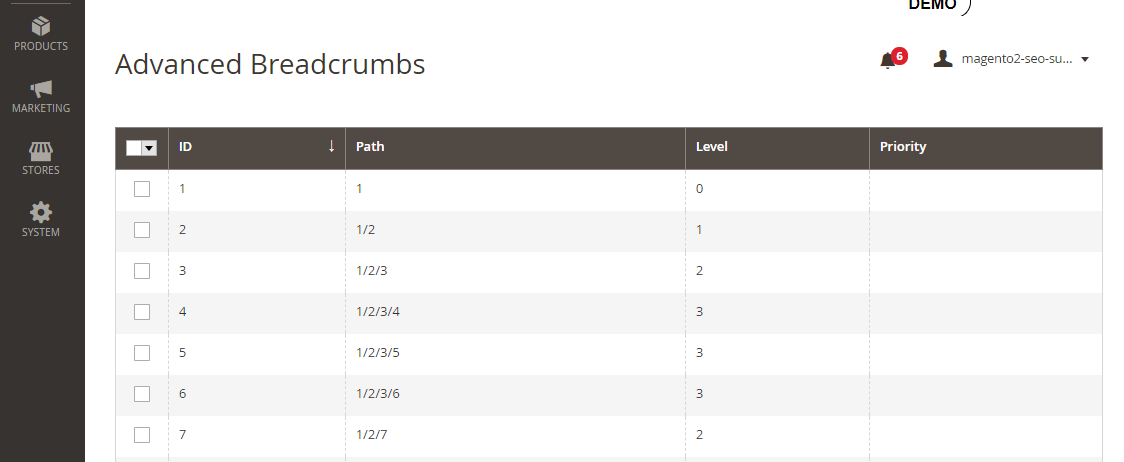
- ID: show the ID of the category. In this section, all available categories of your site will be listed.
- Path: show the path of the category.
- Level: show the category level. Only categories whose category level is greater or equal 2 can be applied breadcrumbs.
- Priority: fill in the ID of the prior category (to prevent your breadcrumb from rendering wrongly, you shouldn't fill the Priority ID with 1 or 2 - any other number is fine.) Take a category with ID= 5 and the path of 1/2/3/5 as an example. If you fill in the priority as 3, Breadcrumbs of category 5 and all of its belonging products will be displayed with breadcrumbs of category 3 as the priority.
- The default table has no priority set up, and the system will automatically show the full breadcrumb path accordingly. Once you edit the value of the priority config, you must enter a number or Cancel to get back to the original value. From here, you can't leave this field empty anymore.
2.8. Redirect 301 SEO
Magento 2 301 Redirects allows creating redirects to take customers to an alternative whenever they access a deleted page to improve user experience.
2.8.1. General
In Enable: Choose Yes to enable the feature or choose No to disable it.
2.8.2. Redirect 301 SEO
This setting only applies to deleted product pages.
Here are examples of deleted product links:
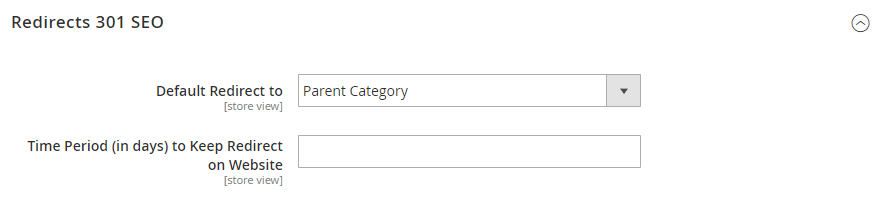
In Default Redirect to: Set the default page for the 301 pages to be redirected to. These are the options for the destination of redirecting: Parent Category, Parent Category with Priority, Homepage, and Other CMS Pages.
- In case of choosing Parent Category, when a product is deleted, the links of that product will be redirected to the nearest parent category of the product.
- In case of choosing Parent Category with Priority, redirects work similarly to the option of Parent Category. However, if the destination category is set up for a priority in ID in Marketing ⇒ BSS Commerce SEO ⇒ Advanced Breadcrumbs, the links of that product will be redirected to this category priority.
- In case the product gets several categories at the same level, the category will be redirected is the last category in the Categories section on Catalog management of the product.
If in Default Redirect to, you choose "Parent Category, Parent Category with Priority" but the product that was assigned to the category no longer exists, then after deleting the product, if users click on the link from the frontend, they will be redirected to the "CMS no router page" of default setting (Stores > Configuration > General > Web > Default Pages):

In Time Period (in days) to Keep Redirect on Website: choose the time period for redirecting to be applied.
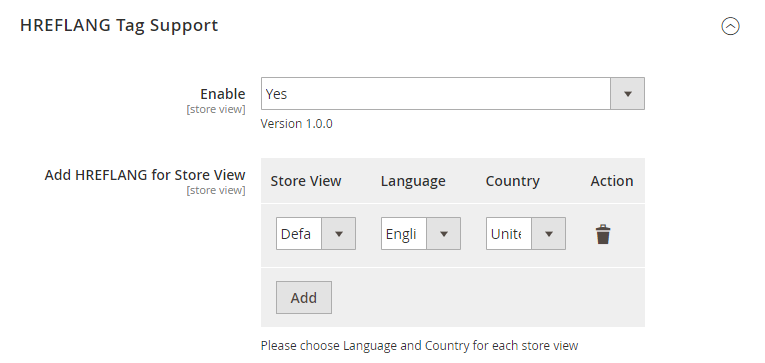
2.9. HREFLANG Tag Support
In Enable: Choose Yes to enable the feature or choose No to disable it.
In Add HREFLANG for Store View: Assign language and country for each store view.
In Enable for Homepage: Choose Yes to enable Hreflang tag for the Homepage or choose No to disable it.
In Enable for Category: Choose Yes to enable the Hreflang tag for Category Pages or choose No to disable it.
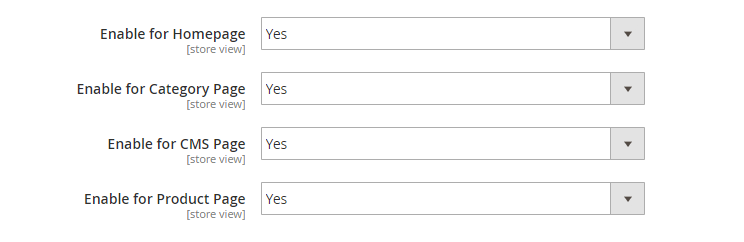
In Enable for CMS Page: Choose Yes to enable Hreflang tag for CMS Pages or choose No to disable it.
In Enable for Product Page: Choose Yes to enable the Hreflang tag for Product Pages or choose No to disable it.
2.10. Meta Tags Template
Magento 2 Meta Tags Template allows you to customize the product and category meta description, meta title, and meta keywords and easily auto-adding it for multiple products.
2.10.1. Feature Settings
In Enable, choose Yes to enable the feature or choose No to disable it.
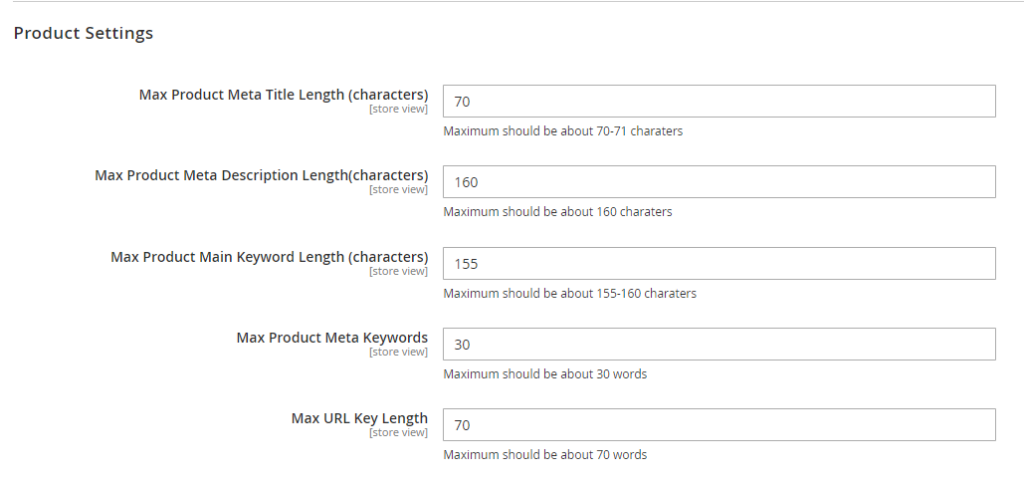
In Product Setting:
- In Max Product Meta Title Length: Choose the maximum number of characters for the product meta title (should be about 70-71 characters).
- In Max Product Meta Description Length: Choose the maximum number of characters for the product meta description (should be about 160 characters).
- In Max Product Main Keyword Length: Choose the maximum number of characters for the product main keyword (should be about 155-160 characters).
- In Max Product Meta Keywords: Choose the maximum number of product meta keywords (should be about 30 words).
- In Max URL Key Length: Choose the maximum number of characters for product URL keys (should be about 70 words).
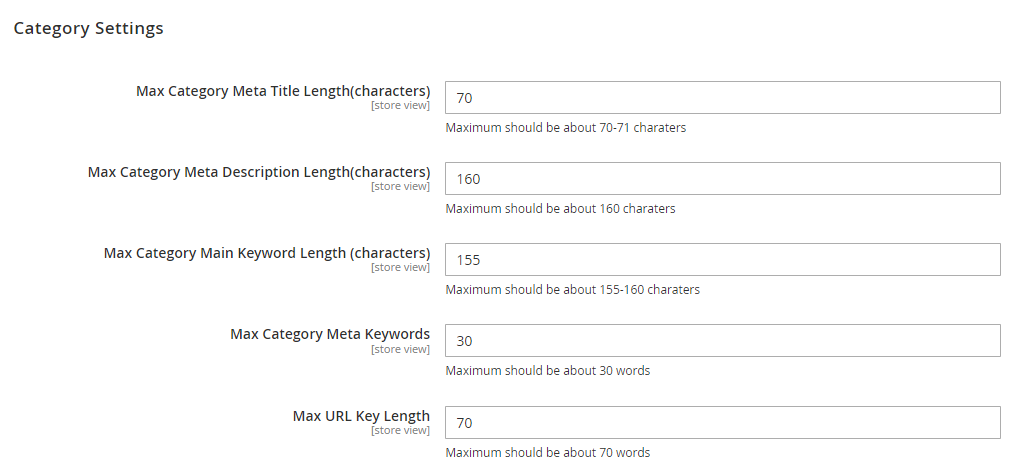
In Category Setting:
- In Max Category Meta Title Length: Choose the maximum number of characters for the category meta title (should be about 70-71 characters).
- In Max Category Meta Description Length: Choose the maximum number of characters for the category meta description (should be about 160 characters).
- In Max Category Main Keyword Length: Choose the maximum number of characters for the category main keyword (should be about 155-160 characters).
- In Max Category Meta Keywords: Choose the maximum number of category meta keywords (should be about 30 words).
- In Max URL Key Length: Choose the maximum number of characters for category URL keys (should be about 70 words).
2.10.2. Generate a Product Meta Template
Please go to Marketing ⇒ BSS Commerce SEO ⇒ Meta Template and start configuration.
Choose Add New to create a new meta template.
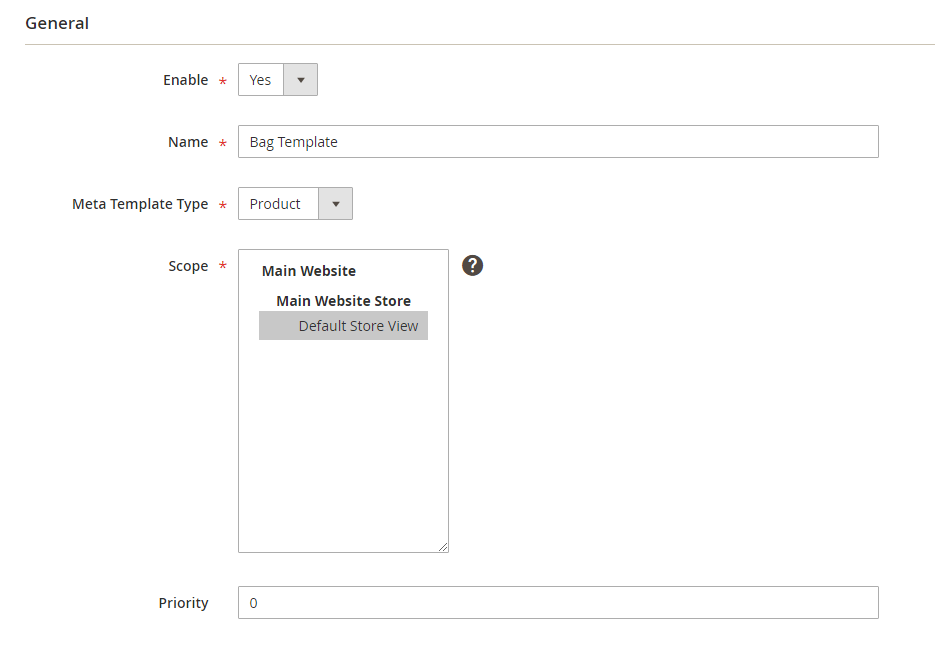
In General:
- In Enable: Choose Yes to enable the template or No to disable it.
- In Name: Choose a name for the template.
- In Meta Template Type: Choose Product.
- In Scope: Choose the scope (store view, website) to apply the template. You can choose multiple store views/websites by holding Ctrl and clicking them.
- In Priority, choose priority for the template. In case the product is under multiple categories with different templates, the priority settings will be considered for the affected meta template to avoid conflict. The smaller number will be prioritized.
In Product Conditions:
You need to set up necessary conditions to determine which products to be applied by the meta tag template.

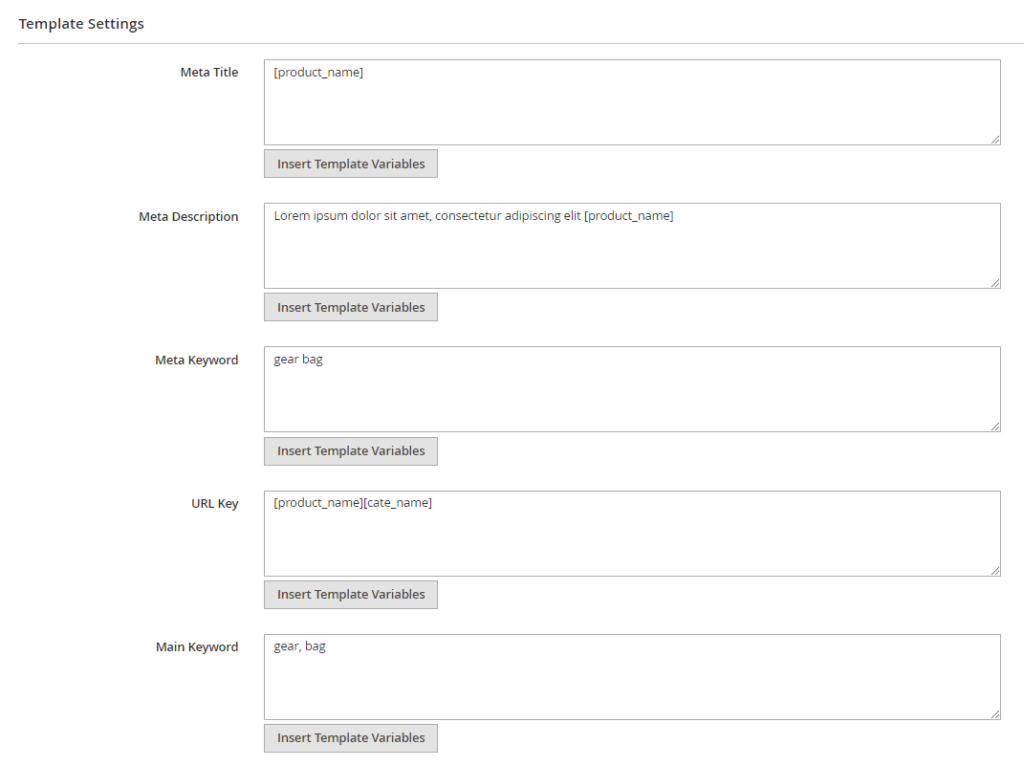
In Template Settings:
- In Meta Title: Write the meta title for products. You can click on Insert Template Variables to choose the variables we provide.
- In Meta Description: Write the meta description for products. You can click on Insert Template Variables to choose the variables we provide.
- In Meta Keyword: Write the meta keywords for products. You can click on Insert Template Variables to choose the variables we provide.
- In Main Keyword: Enter the main keywords for products. You can click on Insert Template Variables to choose the variables we provide.
- In URL Key: Enter a URL key or click on Insert Template Variables to choose the variables we provide.
- In Short Description: Write a short description of the products. In the WYSIWYG editor, the Insert Template Variables will not be shown. Click on Show/Hide Editor to show the regular text area with variables.
- In Description: Write a short description of the products. In the WYSIWYG editor, the Insert Template Variables will not be shown. Click on Show/Hide Editor to show the regular text area with variables.
Finally, you click Save and Generate button and then are redirected to a new Generate Meta Template page. You continue to click Start Generating button and will track the process of generating the product template. You can let the process automatically run and continue to make other configurations in a new tab. Don’t configure on the same tab while the process is happening.
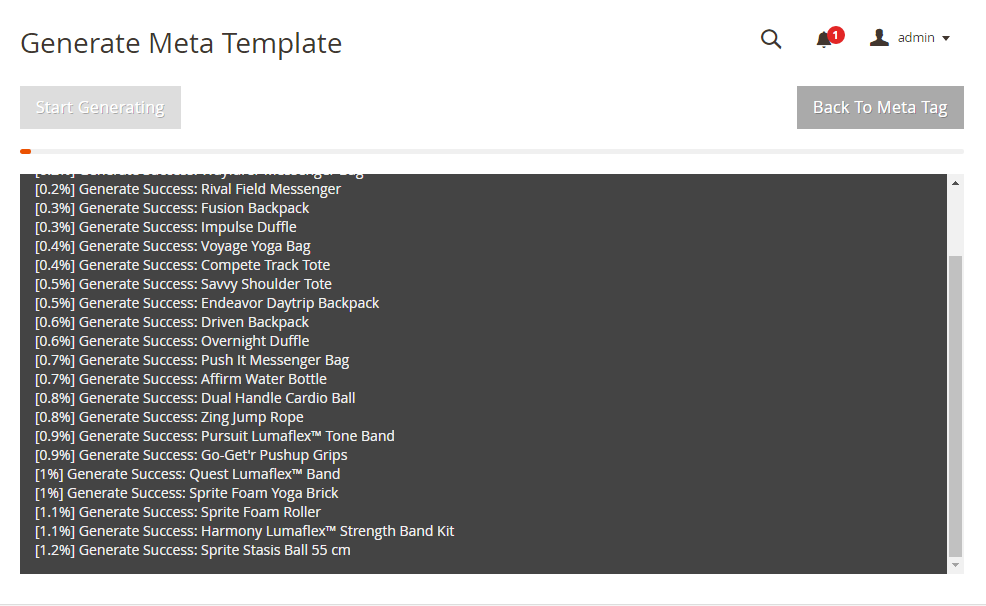
After this process is finished, you can check the results on the Search Engine Optimization of each product edit page.
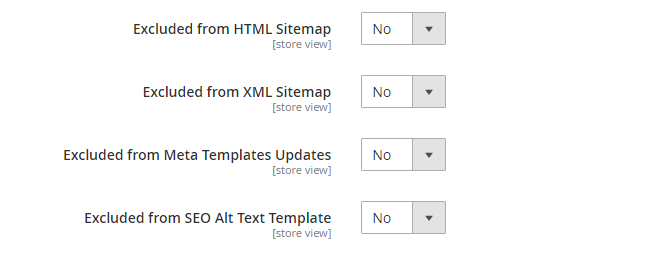
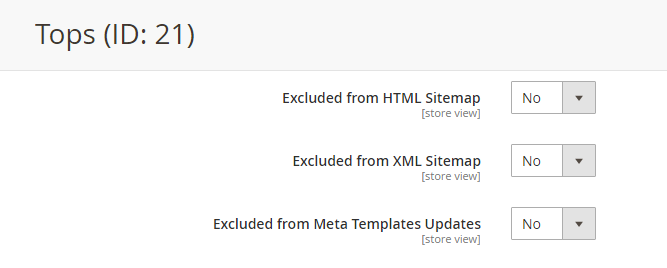
*Note 1: In the Search Engine Optimization of each product edit page, you can exclude the product from Meta Templates Updates.
*Note 2: After saving all templates to a store view: when a new product is created, the template with the highest priority will be applied.
2.10.3. Generate a Category Meta Template
Please go to Marketing ⇒ BSS Commerce SEO ⇒ Meta Template.
Choose Add New to create a new meta template.
In General:
- In Enable: Choose Yes to enable the template or No to disable it.
- In Name: Choose a name for the template.
- In Meta Template Type: Choose Category
- In Scope: Choose the scope (store view, website) to apply the template. You can choose multiple store views/websites by holding Ctrl and clicking them.
- In Priority choose priority for the template. In case the category is under multiple categories with different templates, the priority settings will be considered for the affected meta template to avoid conflict. The smaller number will be prioritized.
In Category Choose:
- Choose the category to apply the template. You can choose multiple categories by holding Ctrl and clicking them.
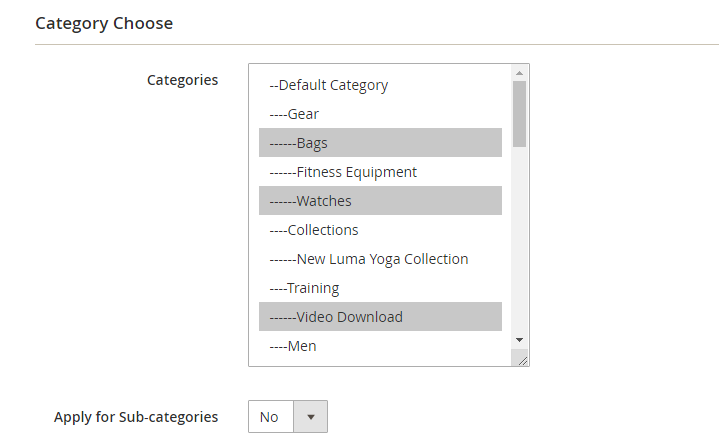
- In Apply for Sub-categories: Choose Yes to apply the template for sub-categories. Otherwise, choose No.
In Template Settings:
- In Meta Title: Write the meta title for categories. You can click on Insert Template Variables to choose the variables we provide.
- In Meta Description: Write the meta description for categories. You can click on Insert Template Variables to choose the variables we provide.
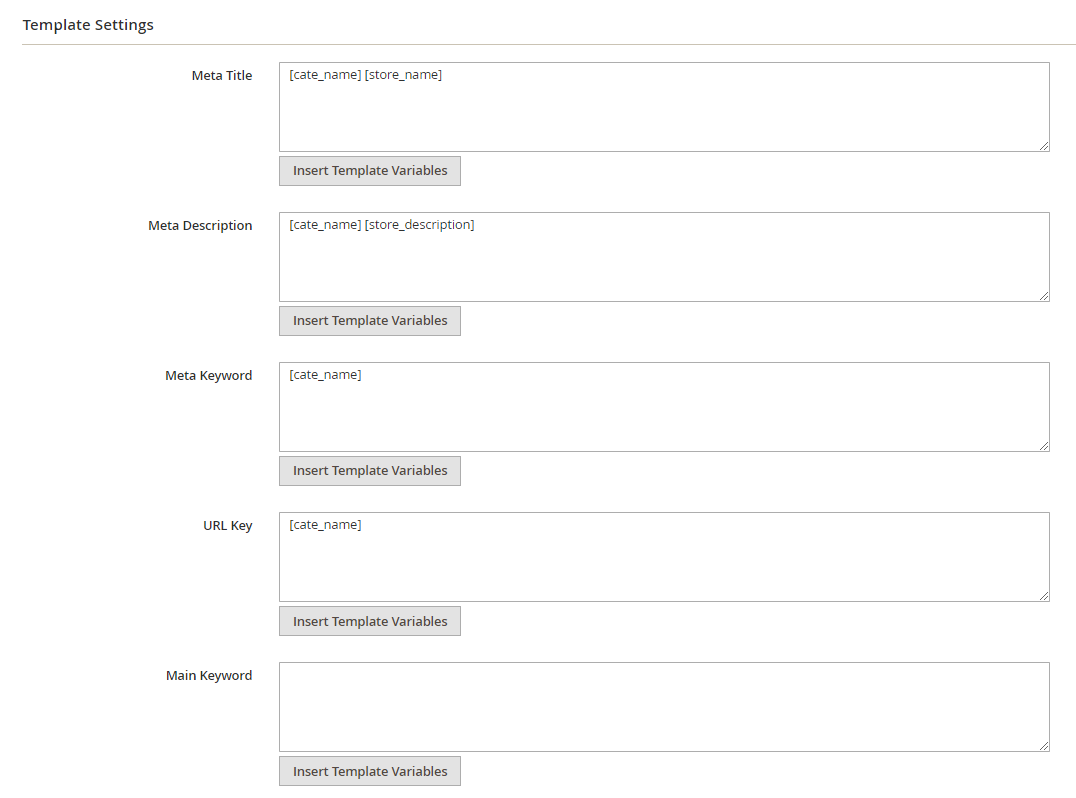
- In Meta Keyword: Write the meta keywords for categories. You can click on Insert Template Variables to choose the variables we provide.
- In Main Keyword: Enter the main keywords for categories. You can click on Insert Template Variables to choose the variables we provide.
- In URL Key: Enter a URL key or click on Insert Template Variables to choose the variables we provide.
- In Description: Write a short description of the categories. In the WYSIWYG editor, the Insert Template Variables will not be shown. Click on Show/Hide Editor to show the regular text area with variables.
Lastly, click Save and Generate and do similarly as you start generating the product meta template.
*Note: In the Search Engine Optimization of each category page, you can exclude the category from Meta Templates Updates.
2.11. SEO ALT Text
Magento 2 SEO ALT Text enables adding alternative text to images to help screen-reading tools describe images to visually impaired readers and allows search engines to better crawl and rank your website.
2.11.1. Configurations
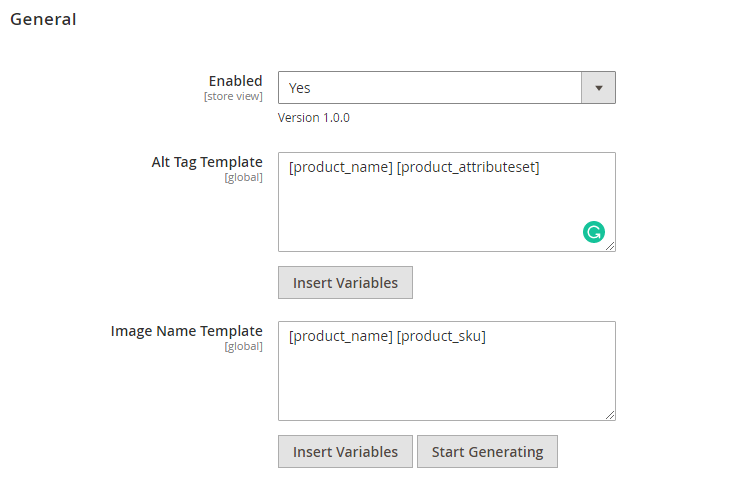
In Enable: Choose Yes to enable the feature or choose No to disable it.
In Alt Tag Template: Write Alt text template for images. You can click on Insert Template Variables to choose the variables we provide.
In Image Name Template: Write the name template for images. You can click on Insert Template Variables to choose the variables we provide.
Then you click Generate button to be redirected to a new page, then start generating both templates. You can track the process in this page conveniently.
*Note: In the Search Engine Optimization of each product edit page, you can exclude the product from SEO Alt Text Template.
2.11.2. Manage images and edit ALT for each image
Please go to Marketing ⇒ BSS Commerce SEO ⇒ SEO ALt Text.
This grid shows all product images on your website and you can easily filter wanted images.
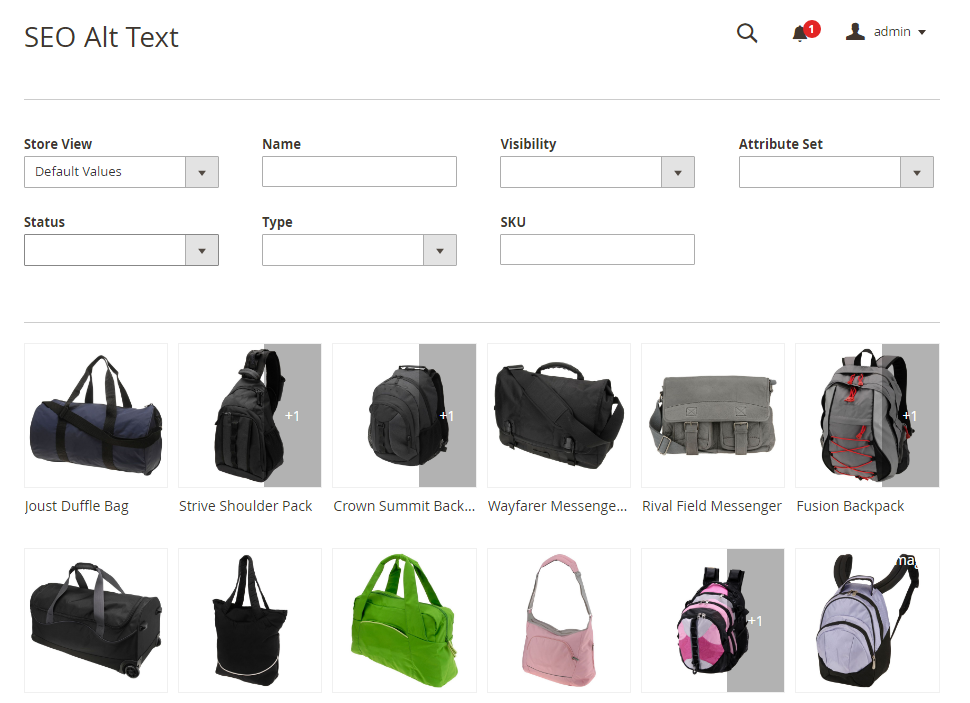
When you click an image, you are able to edit the image file name and alt text, then save config within the grid.
*Note:
- Enter the right format for image names without any special characters and under .jpg, .jpeg, .png, .gif, .bmp.
- After generating all images, you need to run command: php bin/magento catalog:images:resize to resize and show image in the frontend.
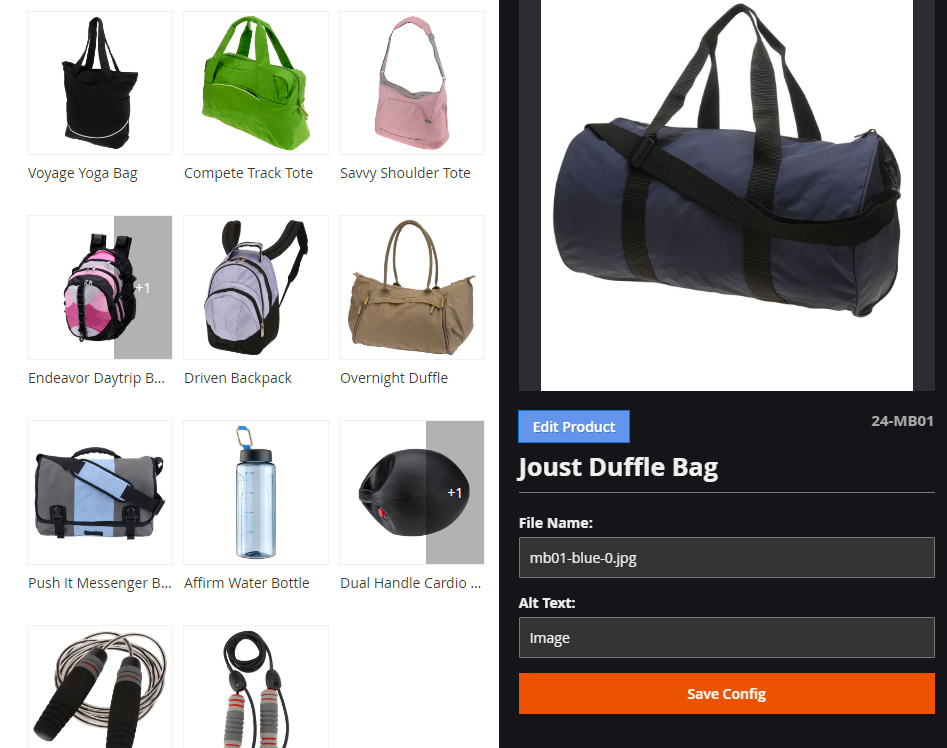
For product with many images, click on the product and every image is shown for you to edit.
2.12. SEO External Links
Mageno 2 SEO external link allows you to auto-mark external links as NO FOLLOW so that Google doesn’t crawl these links anymore.
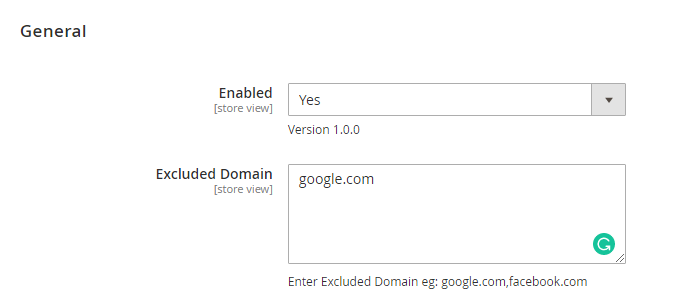
In Enable: Choose Yes to enable the feature or choose No to disable it.
In Excluded Domain: List domains you want to not apply this function.
2.13. SEO Toolbar
The Magento 2 SEO Toolbar is an extremely helpful tool that gives you an overview of the results of your SEO performance on the frontend.
In Enable: Choose Yes to enable the feature or choose No to disable it.
Then you click Start Check button to see an SEO analysis for homepage on the frontend.
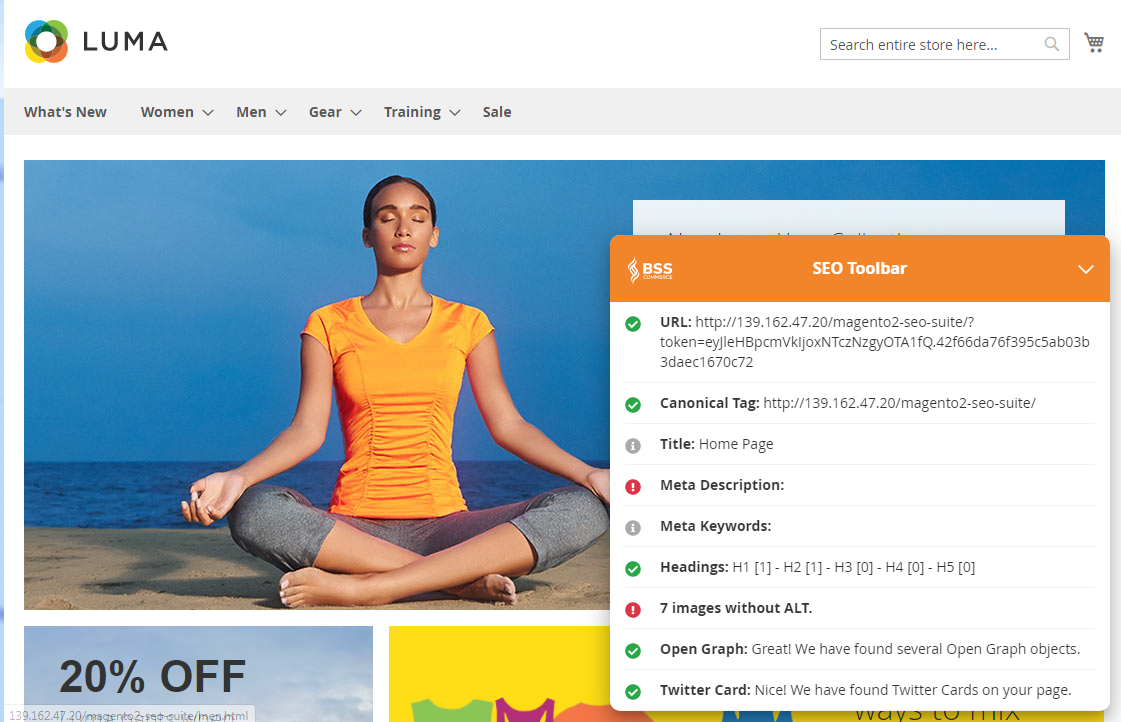
This toolbar tells you which SEO factors meet requirements, and which ones are not good enough and need to be checked again.
When you navigate to other pages, the toolbar appears to give an SEO analysis for these pages.
2.14. SEO Report
The Magento 2 SEO Report is an extremely helpful tool that helps you check the current SEO situation of your page on the backend.
2.14.1 Configurations
View the SEO Report Configurations Tutorial Video here!
In Enable: Choose Yes to enable the feature or choose No to disable it.
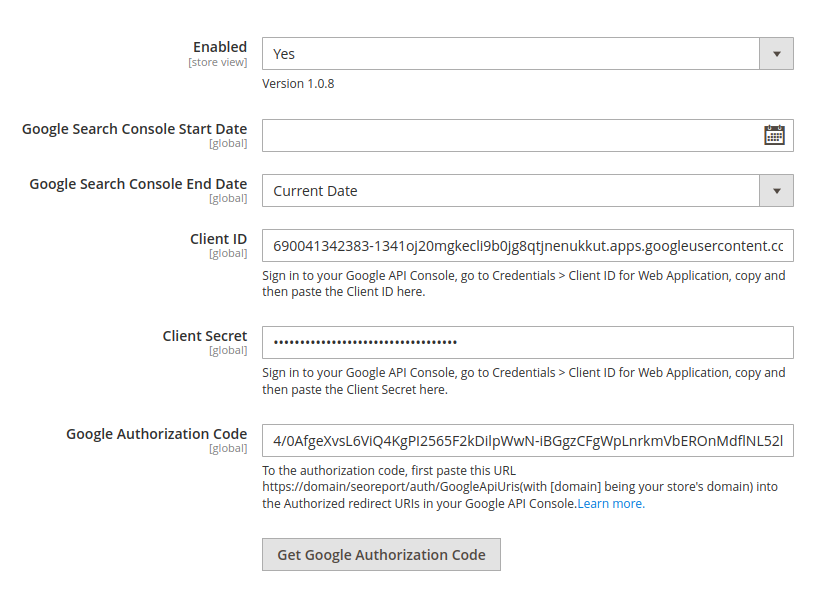
In Google Search Console Start Date: Enter a start date to check data on Google Search Console.
In Google Search Console End Date: Select an end date
- Current date: Data is checked from the start date to the current time you are checking.
- Custom date: You can select any date as you want.
In Client ID: Sign in to your Google API Console, go to Credentials > Client ID for Web Application, copy and then paste the Client ID in the field.
In Client Secret: Sign in to your Google API Console, go to Credentials > Client ID for Web Application, copy and then paste the Client Secret in the field.
In Google Authorization Code: Click the Get Google Authorization Code button to get the code, copy then paste the code into the field.
2.14.2. SEO report & SEO Audit in edit pages
After completing configurations, you navigate to a product, category or CMS edit page to check how SEO report and SEO Audit performs.
- SEO Report
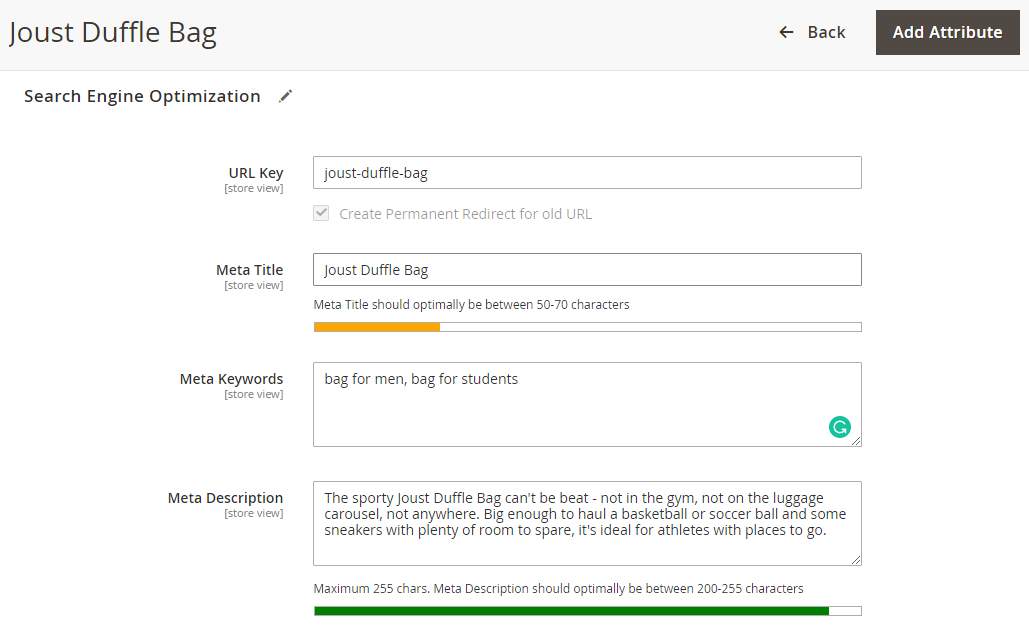
In Meta Title and Meta Description: display a color bar to notify admins about how valid title and description are, according to the number of characters.
In Main Keyword: Enter the main keyword and it is used to for SEO Audit and Google Search Console.
- SEO Audit
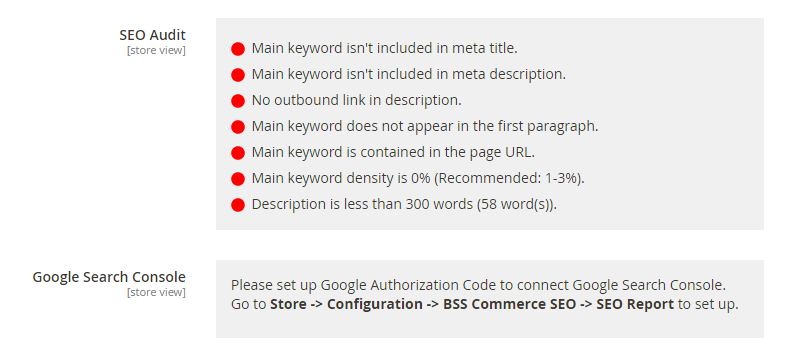
In SEO Audit: The module gives you a list of messages to notify about:
+ The usage of main keyword in meta title, meta description, product description, and URL
+ Main keyword density
+ The current situation of description
+ Outbound links
In Google Search Console: You need to set up Google Authorization Code to connect Google Search Console, then complete settings in the SEO Report Config.
A grid is displayed to tell you such information as below:
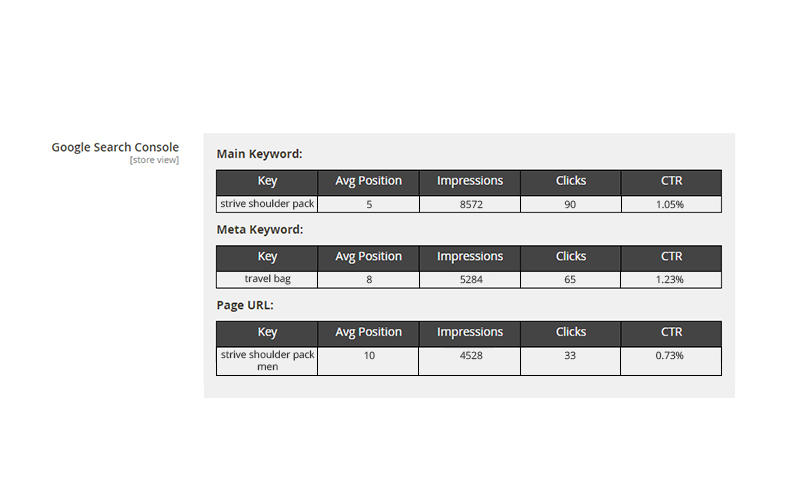
The module checks 3 factors in this section: Main keyword, Meta keyword and Page URL. Through connecting Google Search Console, the admin will know the details of each key including Average position, Impressions, Clicks and CTR.
*Note: URLs of product, category or CMS pages are used to query on Google Search Console. These URLs meet configs on the Canonical Tag module.
2.14.3. SEO Report Dashboard
Please go to Marketing ⇒ BSS Commerce SEO ⇒ SEO Report.
This grid displays all important SEO information of page URLs on the website.
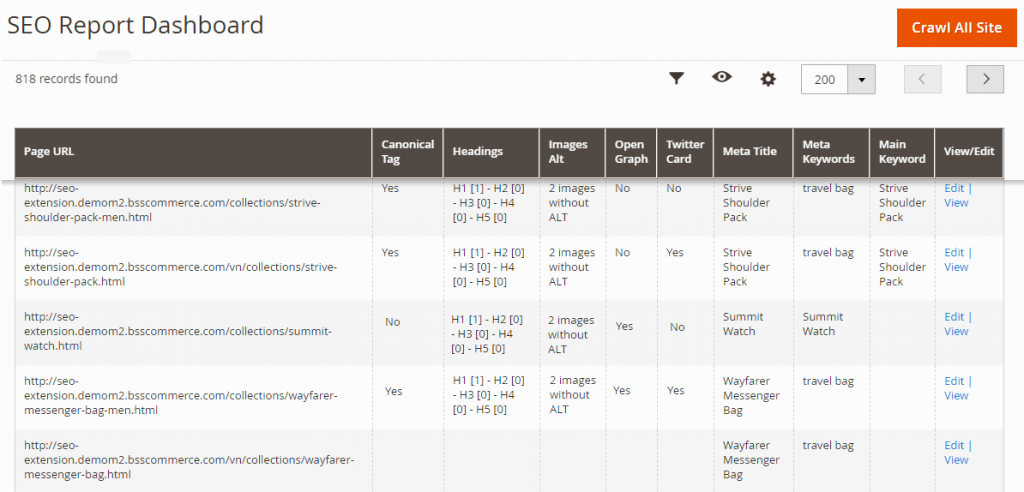
If you click Crawl All Site button, you are redirected to the Crawl SEO report page. The module carries out crawling data for websites which have just set up this module. This process only needs to be done once because new products are automatically updated.
You tap Crawl All site button to start the data crawling process. There are 2 Crawl status:
- Success: the URL can be accessed from the frontend (even 404).
- False: Lost of Internet connection can be a cause for False status. As a consequence, the crawling process is not finished.
*Note:
- Data of meta title, meta description, meta keyword and main keyword is updated according to the real time.
- Data of Headings, Images, Open Graph, Twitter Card is updated once a day when admins edit products/categories.
- During the crawling process, you can open a new tab to make other configurations.
- The process will stop when you click Back to SEO Report button.