1. Overview
Magento Checkout Success Page extension allows admin to tweak the success page or also called “thank you page” for better sales conversion. The Success page, which appears when customer’s order process is accomplished, is often forgotten by many Magento users. Interestingly, this page can be of much value when admin know how to make use of it properly. Our Checkout Success Page Extension is designed with the hope to help you utilize the success page to empower your sale.
2. How Does It Work?
Please navigate to System ⇒ Configuration ⇒ BSS COMMERCE ⇒ Checkout Success Page.
There are 6 sections for admin to continue configuring the extension: General, Order Information Section, Newsletter Subscription Section, Cross Sell Block Section, CMS Block Section, Social Network Sharing Section.
2.1 General settings

In Enable, choose Yes to enable the extension or No to disable it.
2.2 Order information section

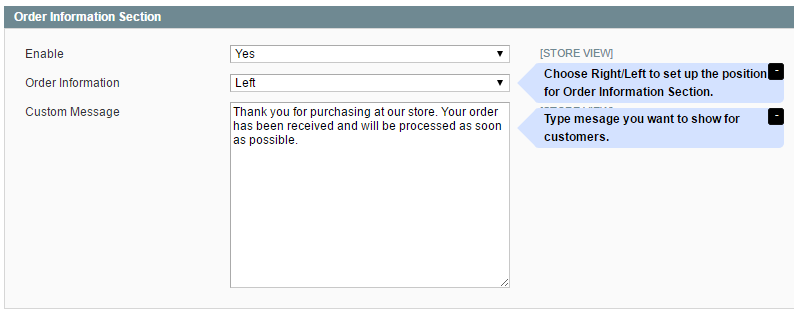
In Enable, choose Yes to enable appearing order’s detail information on the Checkout Success page. Otherwise, choose No.
In Order Information, decide the position of order information: left or right.
In Custom Message, enter the thank you message you want to show on the Checkout Success Page.
2.3 Newsletter subscription section

In Enable, choose Yes to enable newsletter subscription section on Checkout Success page. Otherwise, choose No.
In Sort Order, enter a number to set the position of the section on the Checkout Success page. (E.g: if you insert “1” ⇒ it will appear on the first position on the page).
2.4 Suggest product block section

In Enable, choose Yes to enable suggested product block on Checkout Success page. Otherwise, choose No.
In Select Block, select which product block to display on the page: related block, up-sell block, cross-sell block, and random.
In Sort Order, enter an ordinal number to set the position of the section on the Checkout Success page.
In Number of products displayed, enter the number of products you want to display on the thank you page.
2.5 CMS block section

In Enable, choose Yes to enable suggested product block on Checkout Success page. Otherwise, choose No.
In Sort Order Mid and CMS Block Mid, choose the type of CMS block for CMS Block Mid and set its position.
In Sort Order Bottom and CMS Block Bottom, choose the type of CMS block for CMS Block Bottom and set its position.
2.6 Social network sharing section

In Enable, choose Yes to enable social sharing section on Checkout Success page. Otherwise, choose No.
In Sort Order, enter a number to set the position of the section on the Checkout Success page.
In Sharing Button Style, set style of social sharing buttons: Large icons, Small icons, Small icons with a title.
2.7 Coupon code

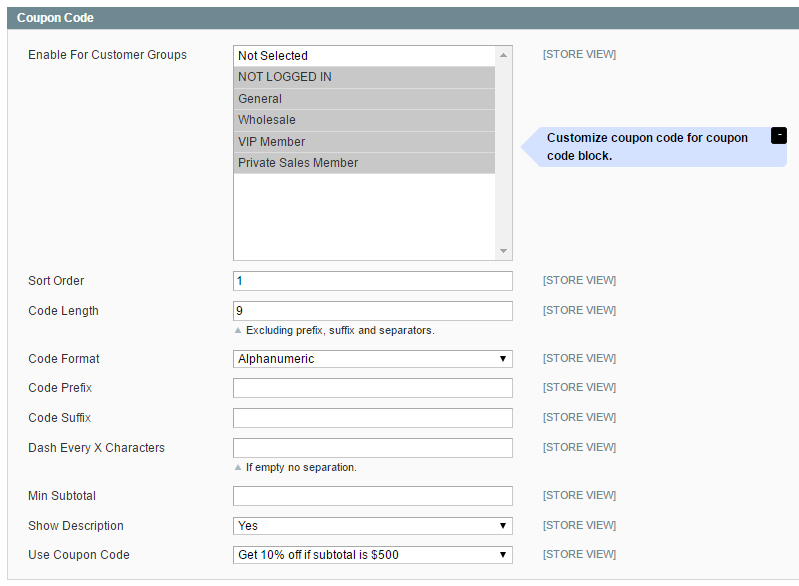
In Enable For Customer Group, select which customer groups to apply the coupon code.
In Sort Order, enter a number to set the position of the section on the Checkout Success page.
In Code Length, decide the length of coupon code.
In Code Format, choose the format of code: Alphanumeric, Numeric, or Alphabetical.
Configure other settings for the code in Code Prefix, Code Suffix, Dash Every X Characters, Min subtotal.
In Show Description, choose Yes to show the description of the code.
In Use Coupon Code, choose a code to show on the Checkout Success Page.
2.8 Preview section

In this section, you can check the preview of the Thank You page after finishing the configuration.
2.9 Style

In this section, you can customize the design of the Checkout Success page as wish in Title Color, Background Color Heading, Google Fonts, Font Size Heading.
