
1. Overview
Customer Attributes for Magento 2 extension adds customer attributes to the Registration Form to collect customer information. The value from the custom customer attributes will be displayed on My Account Page and added to Customer Detail Page, Customer Grid as well as Order Detail in the backend, and at Checkout.
2. How Does It Work?
2.1 General config
Go to Stores ⇒ Configuration ⇒ BSSCommerce ⇒ Customer Attributes.
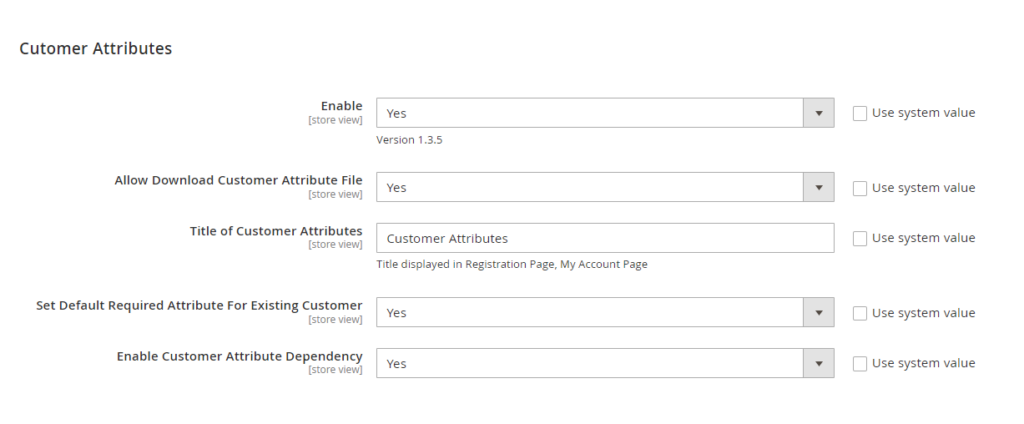
In Enable, choose Yes to enable the extension or No to disable it.
*Note: The Enable config only affects frontend display. Other backend functions aren’t affected by this config.
In Allow Dowload Customer Attribute File: choose Yes to allow downloading the file uploaded to customer attribute or No to restrict downloads.
In Title of Customer Attributes, enter the name for the customer attributes block. This title will be displayed in Registration Form and My Account Page.
In Set Default Required Attributes for Existing Customer, choose Yes if you want required attributes to be applied for existing customers. Otherwise, choose No.
In Enable Customer Attribute Dependency, YES means you turn on the dependent attribute function. On the other hand, NO refers to turning off this feature.
2.2 Create new customer attributes
Go to Customers ⇒ BSSCommerce ⇒ Customer Attributes.
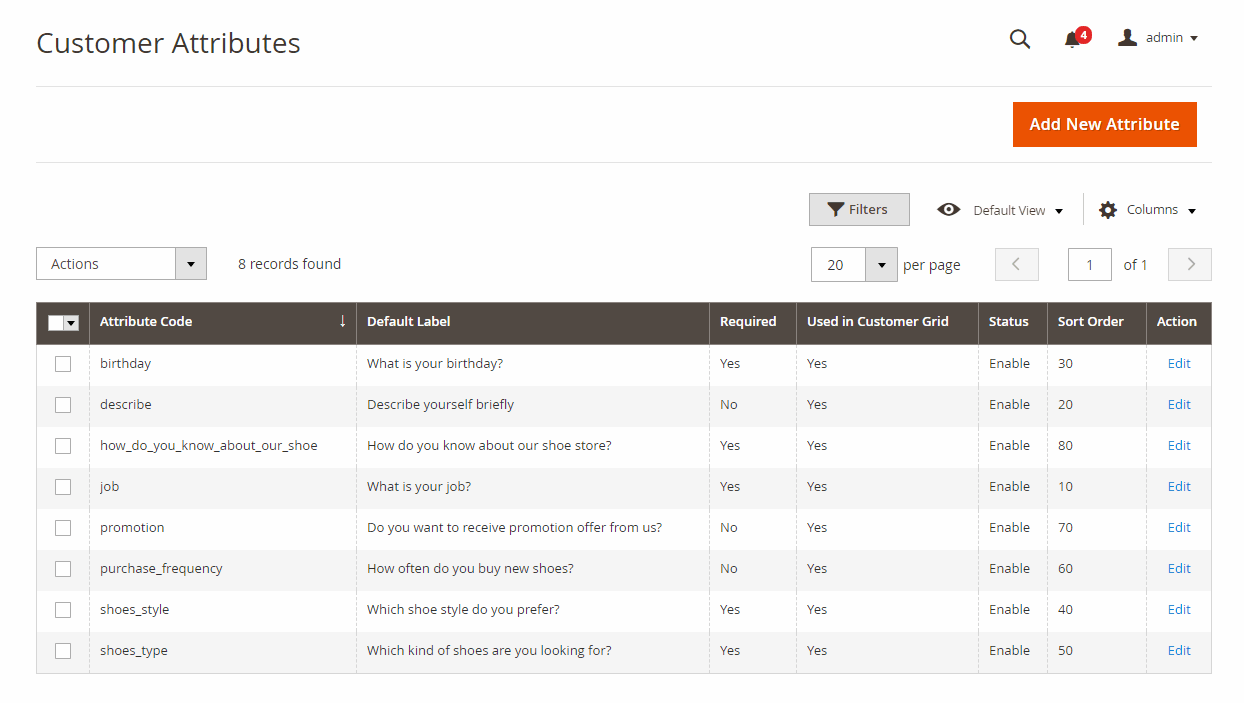
Customer Attributes Grid which displays all customer attributes created by admin. The Customer Attributes Grid is equipped with all functions like a default Magento 2 grid, including filter, column, mass action (delete, update status).
Click Add New Attribute button to create a new customer attribute. Then, you will see 4 tabs: Properties, Manage Labels, Display Configuration, and Manage Relation.
Later, you can also remove Magento 2 customer attributes, as wished.
2.2.1 Properties
Attribute Properties:
In Default Label, enter a name for the customer attribute.
In Input Type, choose 1 of the 9 input types: Text Field, Text Area, Date, Yes/No, Multiple Select, Dropdown, Checkbox and Radio Button, File (Attachment).
*Note:
- If you choose Multiple Select, Dropdown, Checkbox or Radio Button, add options for the customer attribute in Manage Options.
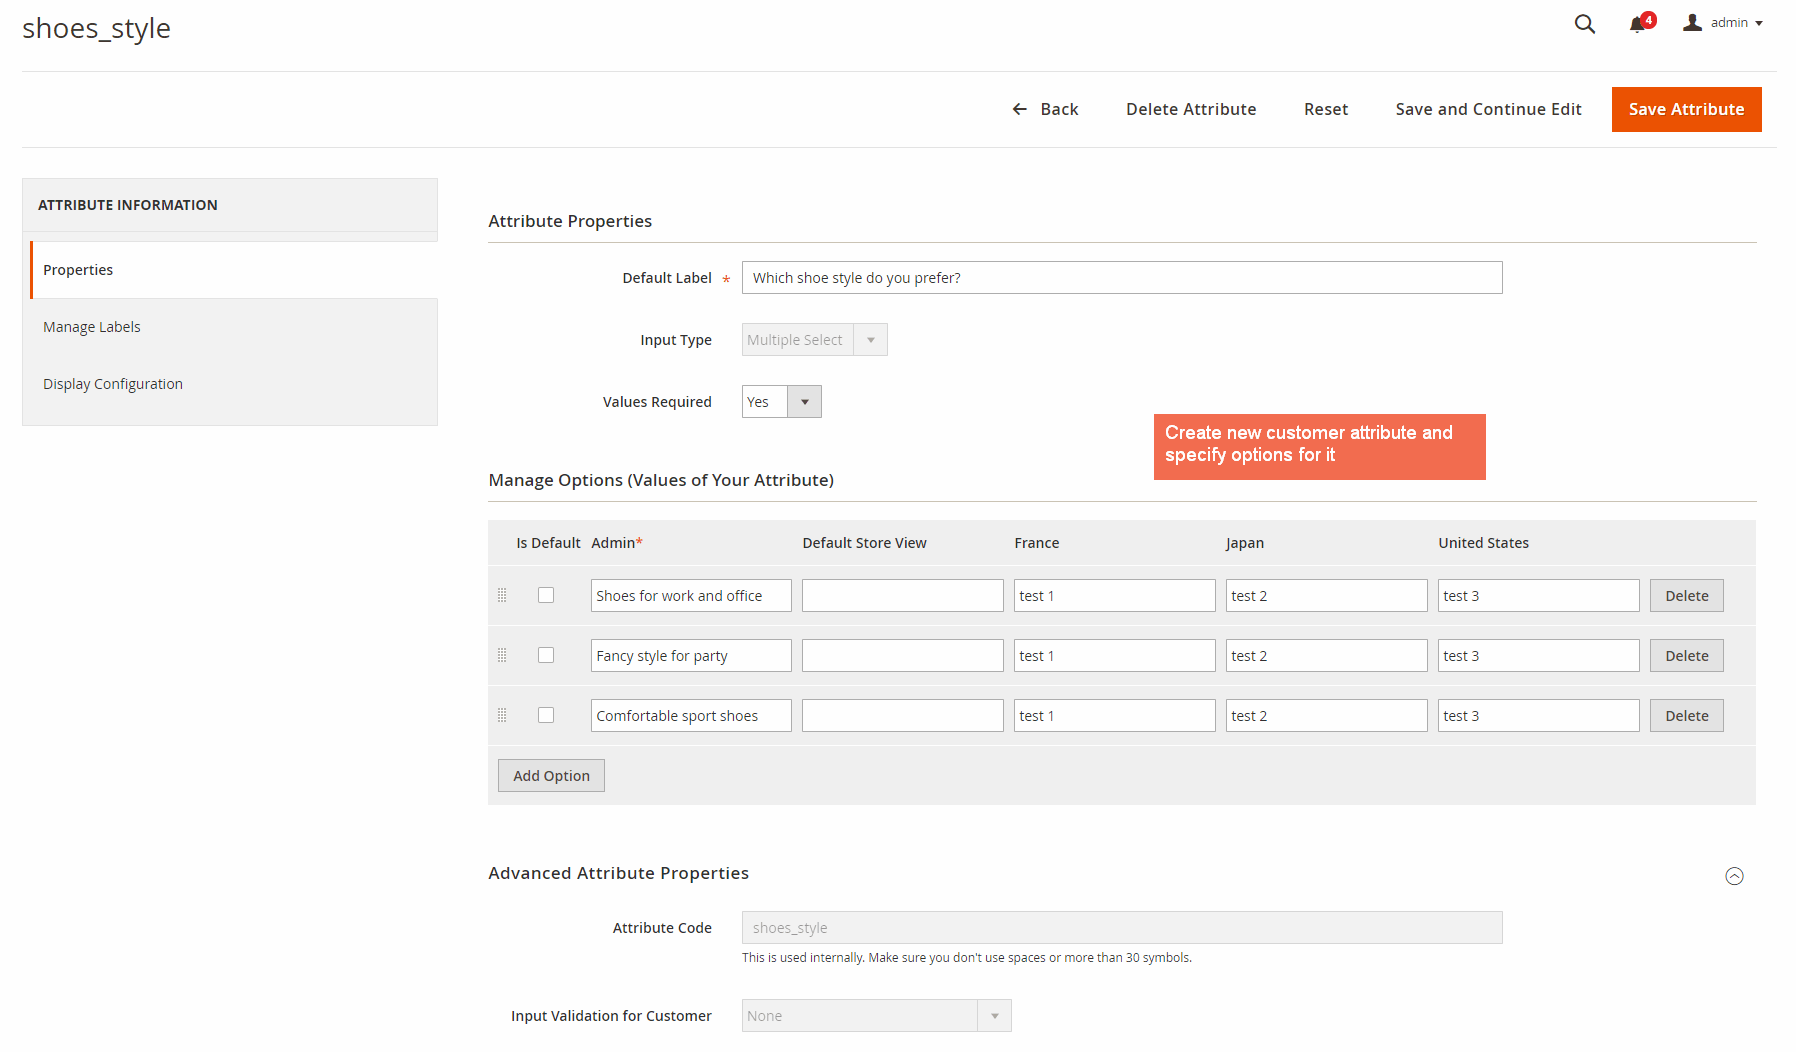
In Values Required, choose Yes to make the customer attribute compulsory to fill in; otherwise, choose No.
Advanced Attribute Properties:
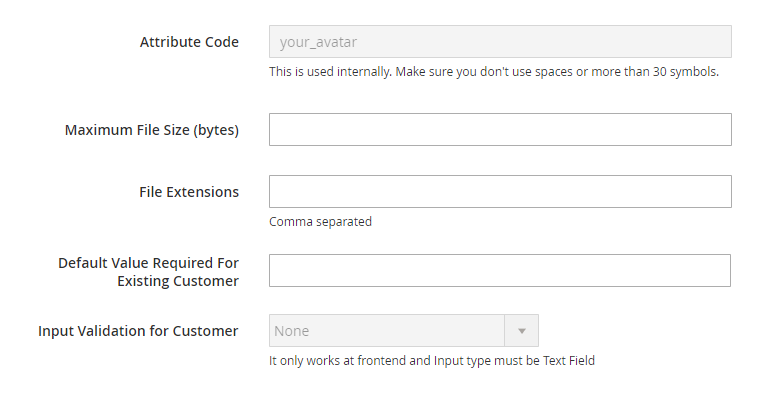
In Attribute Code, enter a code for the customer attribute. No space allowed and no more than 30 symbols.
*Note: In case none value is entered for Attribute Code, the extension will automatically get the value of Default Label as value for this field.
In Maximum File Size (bytes), enter a number to define the largest file size possibly uploaded.
In File Extensions, type allowed file extension that can be uploaded to the customer attribute. Each is separated by a comma.
In Default Value Required for Existing Customer, enter a value if the attribute is set as Required. This field will be only shown when the Values Required is Yes and the Input Type is text field, area, datetime, or file.
In Input Validation for Customer, set a type of data allowed in the field. The available values depend on the Input Type specified.
None—The field has no input validation during data entry.Decimal number—Accepts only decimal number during data entry.Integer Number—Accepts only integer number during data entryEmail—Accepts only an email address during data entry.URL—Accepts only a URL during data entryLetters—Accepts only letters during data entryLetters (a-z, A-Z) or Numbers (0-9)—Accepts any combination of numbers (0-9) and alphabetic characters (a-z, A-Z) during data entry.
2.2.2 Manage labels
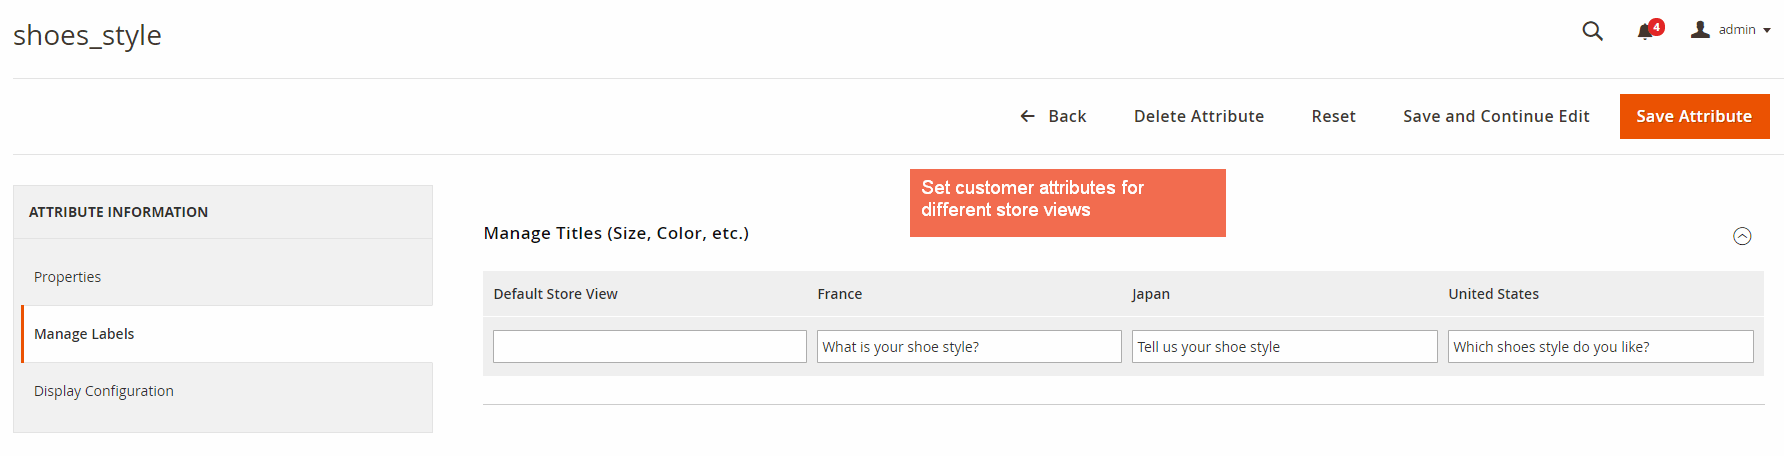
Customer Attributes for Magento 2 extension supports multiple store view, so you can display different customer attribute labels per store view.
2.2.3 Display configuration
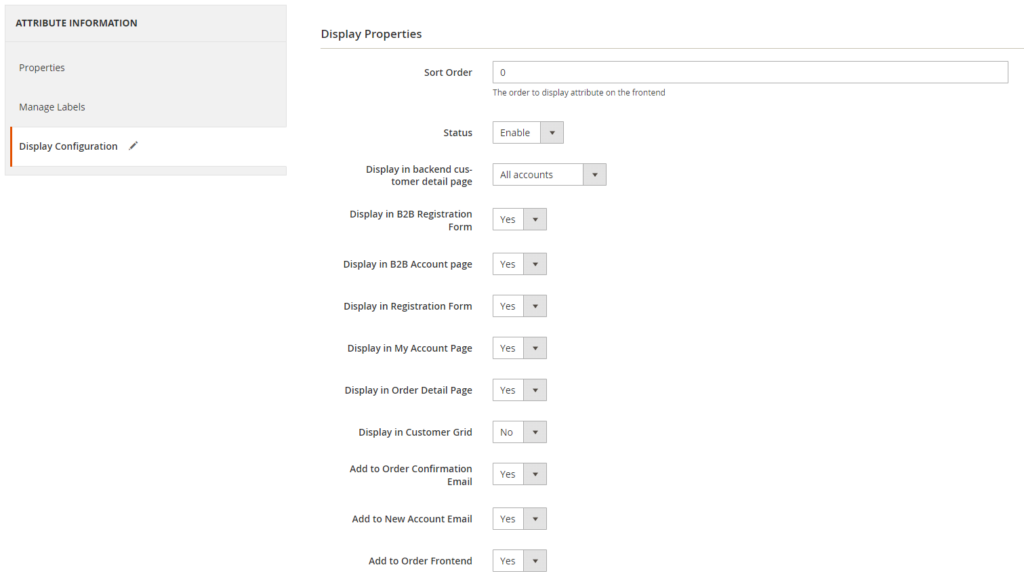
In Sort Order, set the order of appearance for the customer attribute in the Registration form.
*Note: The sort order set here will also decide the order of appearance of the attributes in the backend.
In Status, enable or disable the customer attribute.
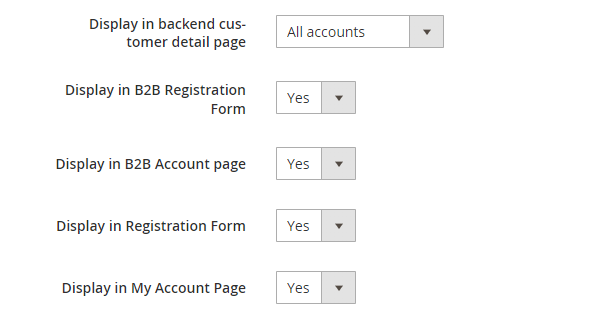
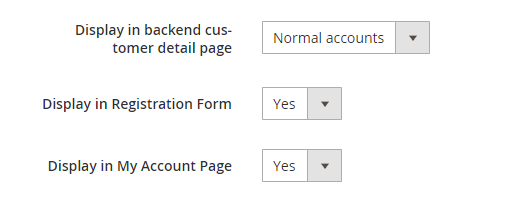
In Display in backend customer detail page, choose which customer group you want to display the customer attribute for. There are 3 options to choose:
- All accounts: If you choose this option, a list of depending configs will show up (Display in B2B Registration Form, Display in B2B Account page, Display in Registration Form, Display in My Account Page). Choose Yes/No to each depending config to display/hide the customer attribute on the according page.
- Normal accounts: If you choose this option, a list of depending configs will show up (Display in Registration Form, Display in My Account Page). Choose Yes/No to each depending config to display/hide the customer attribute on the according page.
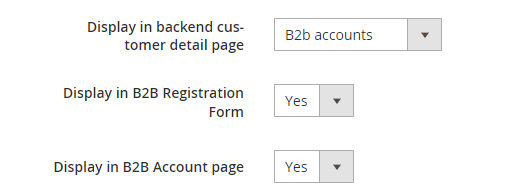
- B2B accounts: If you choose this option, a list of depending configs will show up (Display in B2B Registration Form, Display in B2B Account page). Choose Yes/No to each depending config to display/hide the customer attribute on the according page.
*Note: The Display in backend customer detail page config is an additional function that only enables when you install both BSS's Magento 2 Customer Attributes & Magento 2 B2B Registration Form.
In Display in Registration Form, choose Yes to add the customer attribute to Registration Form.
In Display in My Account Page, choose Yes to add the customer attribute to My Account Page.
In Display in Order Detail Page, choose Yes to add the customer attribute to Order Detail Page under Sales of Admin Panel.
In Display in Customer Grid, choose Yes to add the customer attribute to Customer Grid.
In Add to Order Confirmation Email, choose Yes to display the customer attribute in the Order Confirmation email.
In Add to New Account Email, choose Yes to display the customer attributes in New Account email.
In Add to Order Frontend, choose Yes to display the customer attributes on Order Detail Page under My Account.
*Note: You need to reindex data of Customer Grid whenever you make any change in Display in Customer Grid config.
In Display on Checkout Page, choose Yes to show added customer attributes in the checkout page - under the shipping address or the payment method (with the virtual cart.) All filled information is saved upon order placement.
*Note: Attributes of all input types, except for "File", are supported at the checkout page.
In Hide If Filled Before, choose Yes to hide the customer attributes at the checkout page if they are filled before.
In Show Attribute in, choose where to show the attribute in the registration form, among Customer Attribute Section, Sign-in Information Section, and Personal Information.
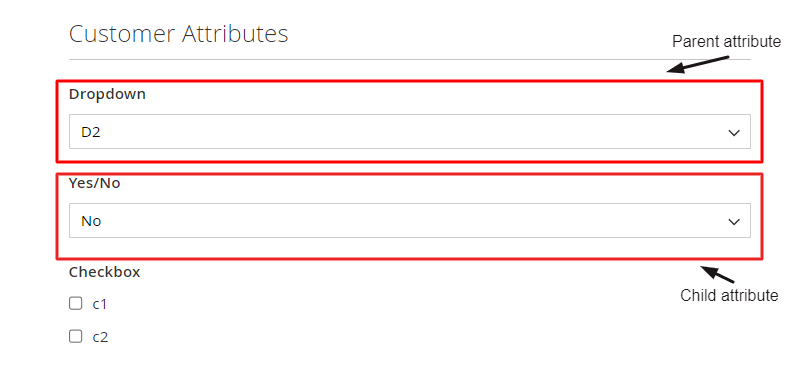
2.2.4. Manage Relation
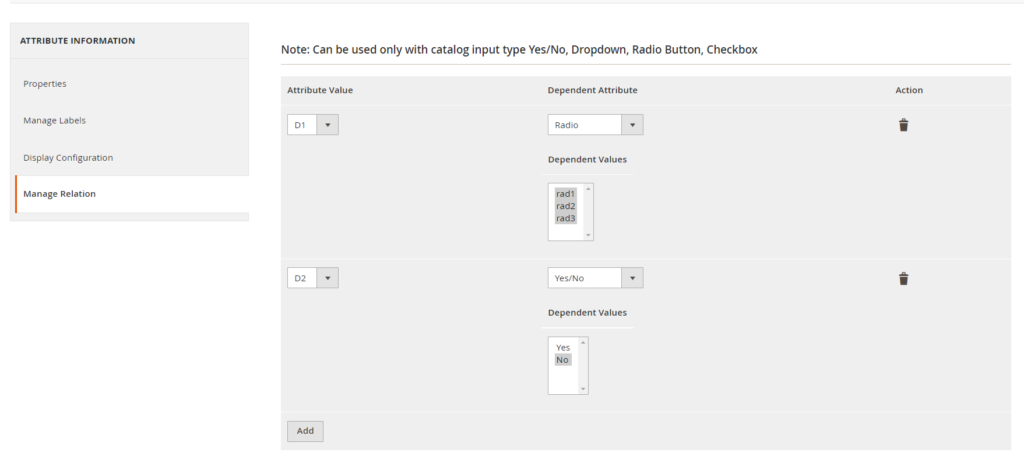
Then, with Manage Relation, you can set up dependent attributes with catalog input type Yes/No, Dropdown, Radio Button, and Checkbox.
Attribute Value—The value of parent attributes.Dependent Attribute— The child attribute.Dependent Value— The value of child attribute.Action—Delete newly created attribute relation.Add— Add new attribute relation.
Three display options must be considered: Display at registration form, Display On Checkout page, and Display in B2B Registration Form.
- If the you enable parent attribute but disable the child attribute, the child attribute will not display even when the parent attribute is selected.
- On the contrary, both parent and child attributes will not be displayed.
Regardless of these three options above, other display settings show separately following each parent and child attributes.
*Note:
- In case there are duplicate relations, the module allows to Save and use the duplicate result.
- With Customer Attribute, the Dependent Attribute column will only display and allow to select typical Customer Attributes, yet not display Customer Address Attribute.
2.3. Create a new customer address attribute
Go to Customers ⇒ BSSCommerce ⇒ Customer Address Attributes.
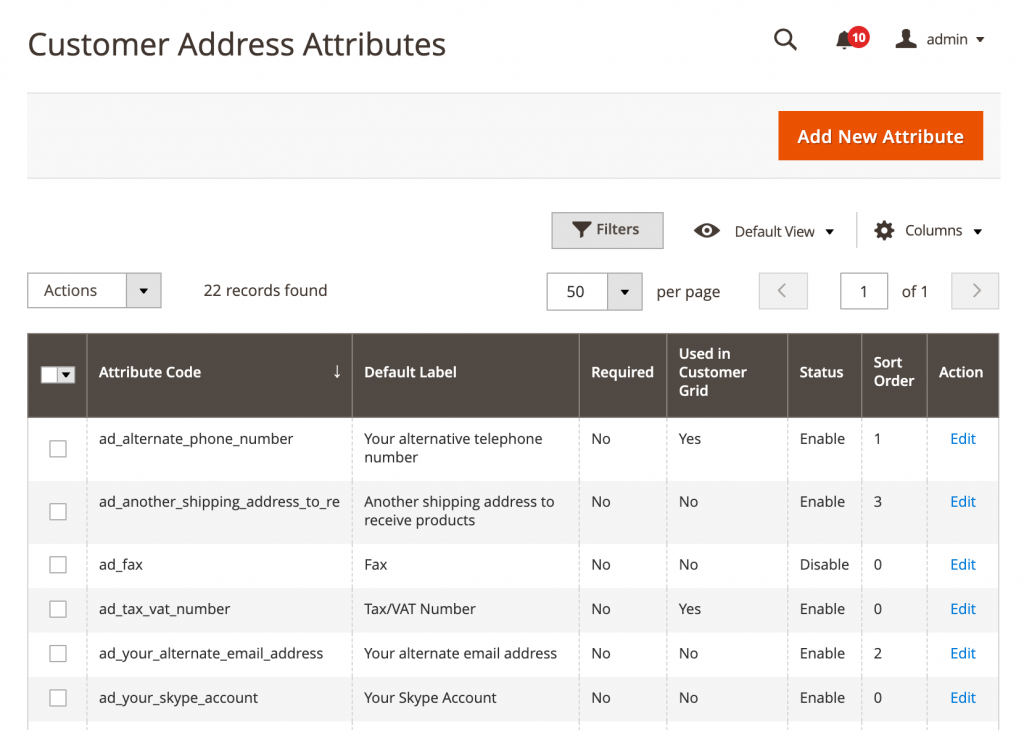
Click Add New Attribute button to create a new customer address attribute.
Like adding customer attributes in the section 2.2, there are also 3 tabs: Properties, Manage Labels, Display Configuration, and Manage Relation.
In each tab, you do the same steps as creating customer attributes to fill information in each field.
In Display Configuration tab, you set Yes/No to decide whether to show customer address attributes in these positions or not.
In the Manage Relation section, it will be similar to Customer Attribute.
2.4 Create a new email template
As above, customer attributes are possibly set to display on Order Confirmation email and New Account email.
First off, you need to create a new template which includes customer attributes variable. Please follow Marketing Email Templates Add New Template.
- New Order Confirmation email template
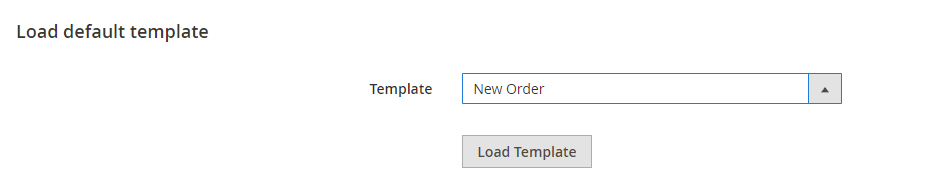
In Template section of Load default template, you can select among various default email templates, for example, New Order. Then, hit on Load template button.
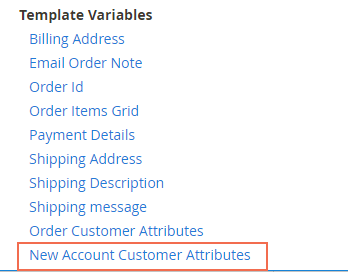
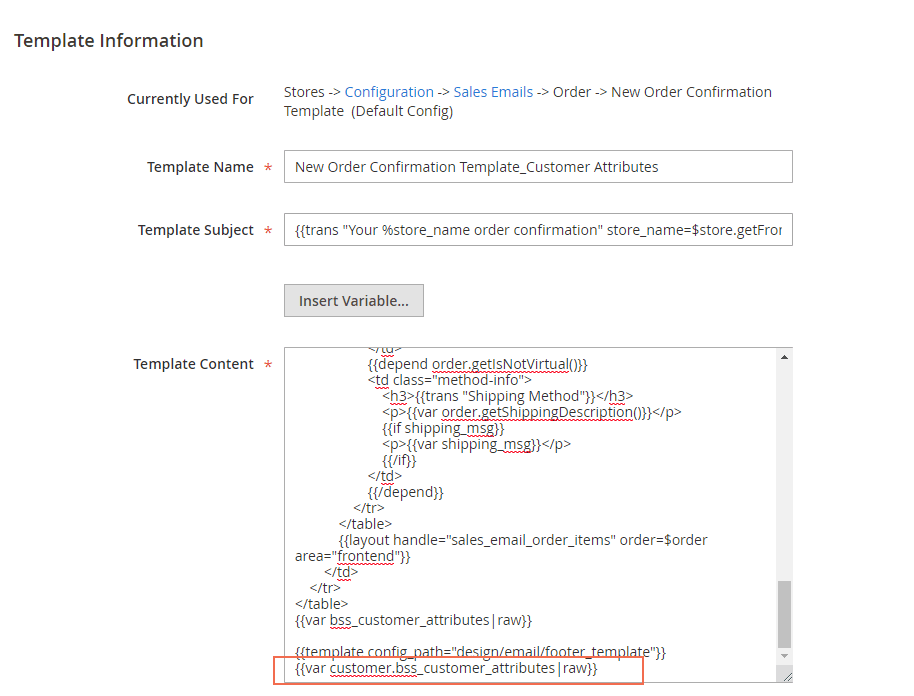
Under Template Information, select Insert Variable… to add customer attributes to new order confirmation template.
Do not forget to enter Template Name and Save the new template.
Secondly, set this new template as the Order Confirmation email by going to Stores Configuration Sales Sales Emails Order.
In New Order Confirmation Template, uncheck Use system value box and choose the newly created email template.
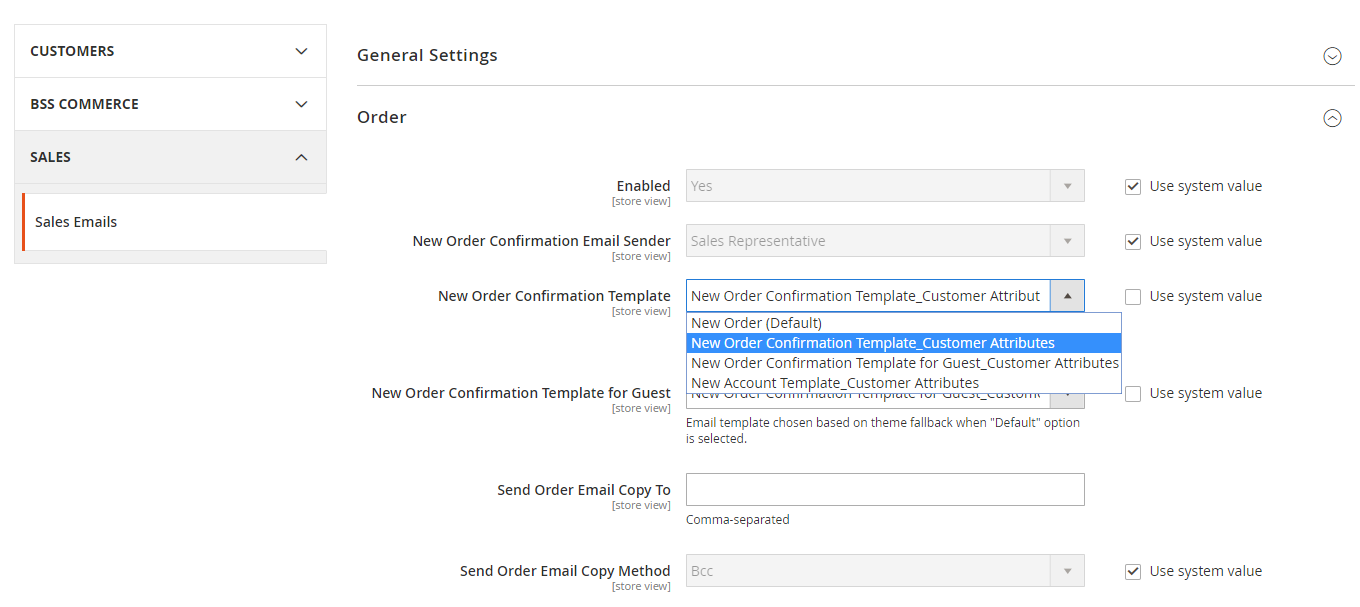
On completing, please Save Config.
- New Account email template
Similarly, you can create a new template with customer attributes for New Account email.
In Template of Load default template section, choose New Account (Default) template and hit Load Template.
Under Template Information, enter Template Name and select Insert Variable… to add customer attributes to New Account template.
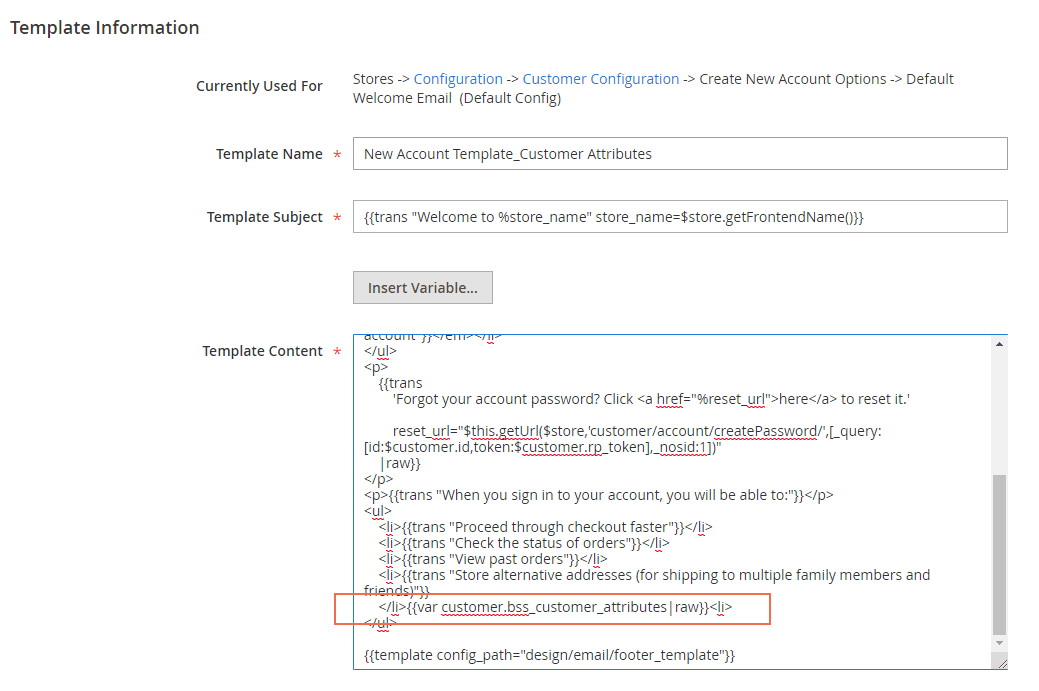
Then, Save Template.
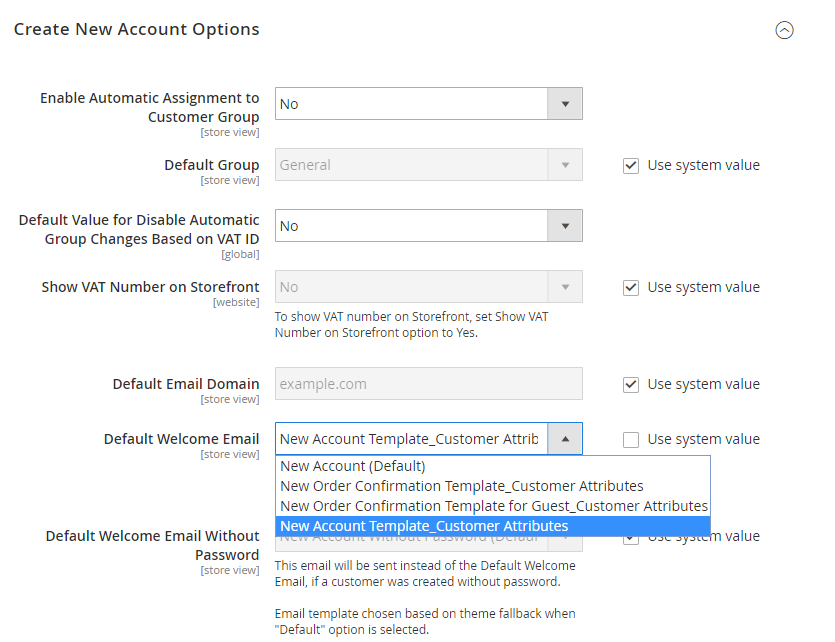
To set this new template as the New Account template, please follow Stores Configuration Customers Customer Configuration and expand Create New Account Options.
In Default Welcome Email, unmark Use system value box. Then choose the newly created template. Save Config to complete the settings.
2.5 Display Customer Attributes
2.5.1 Frontend
Display customer attributes on Registration Page:
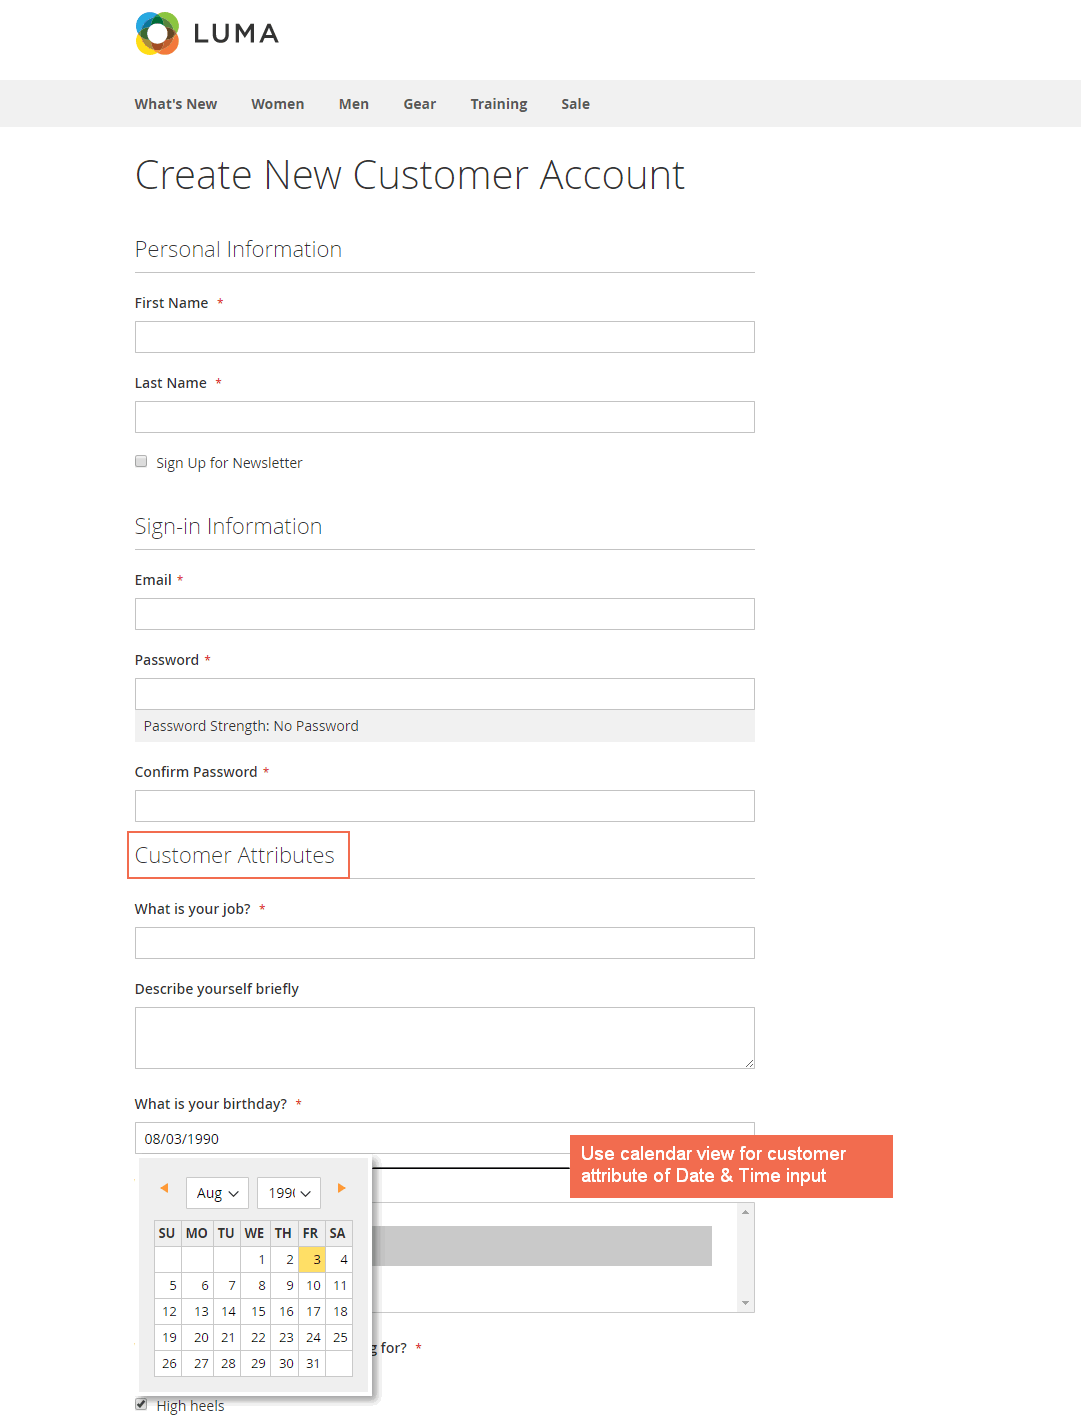
*Note: Customer Attributes for Magento 2 extension only supports checkbox in the frontend while in the backend, the checkbox is displayed in multiple-selection type.
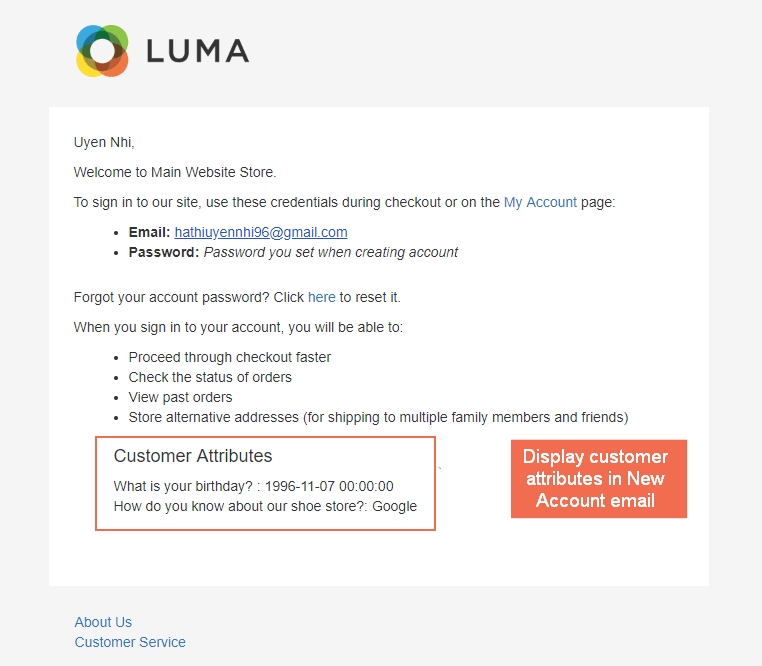
A New Account email will be sent to the register, which includes the customer attributes based on the admin’s configuration.
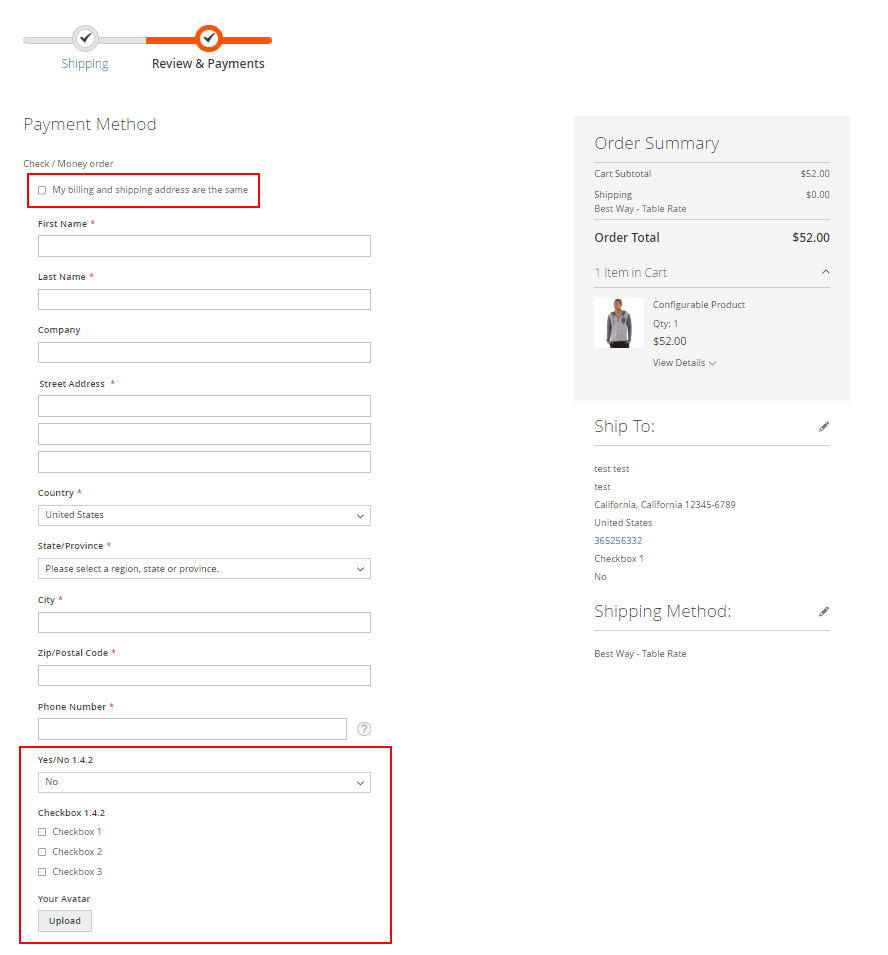
Display customer attributes on Checkout Page:
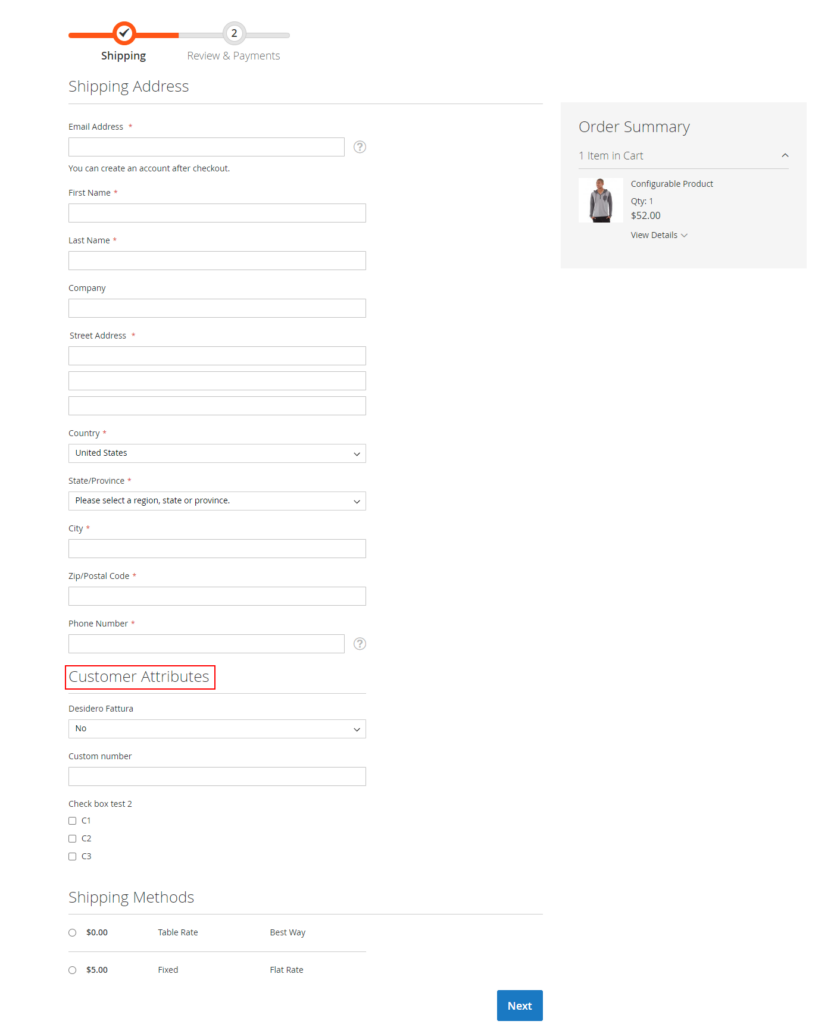
*Note: If the customer unchecks the option My billing and shipping address are the same in the payment step, all the customer address attributes will display once again when they create a new billing address for each payment method.
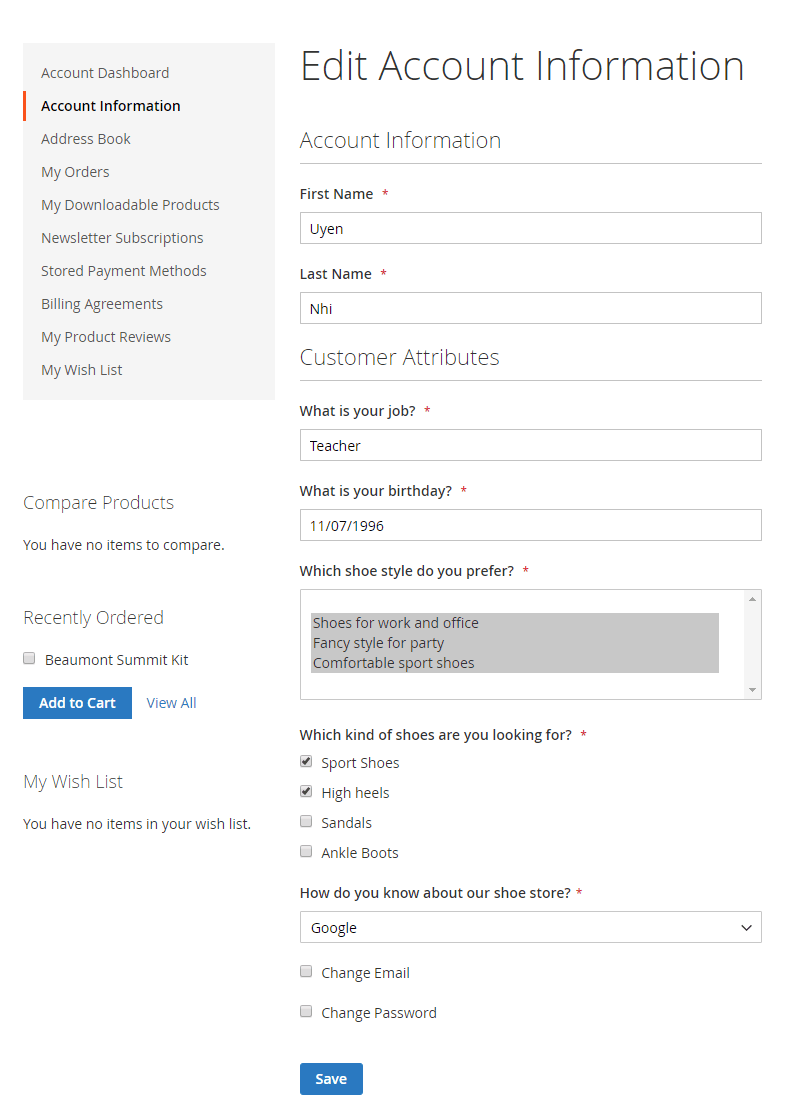
Display Customer Attribute in Account Information of My Account Page:
At Checkout page: You can display both customer attributes and customer attribute address on this page.
Customer attributes and customer address attributes can also be displayed on Order Confirmation email:
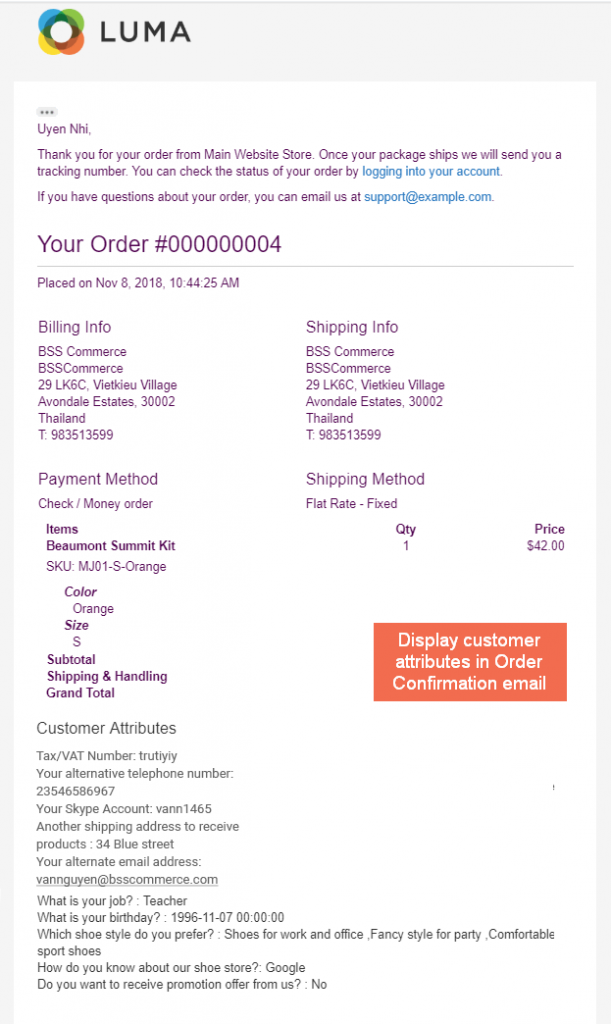
And on Order Detail Page under My Account.
Regarding the Dependent Attribute function, child attributes will only appear when the customer fills in a specific value in the parent attribute.
2.5.2 Backend
Go to Customers ⇒ All Customers.
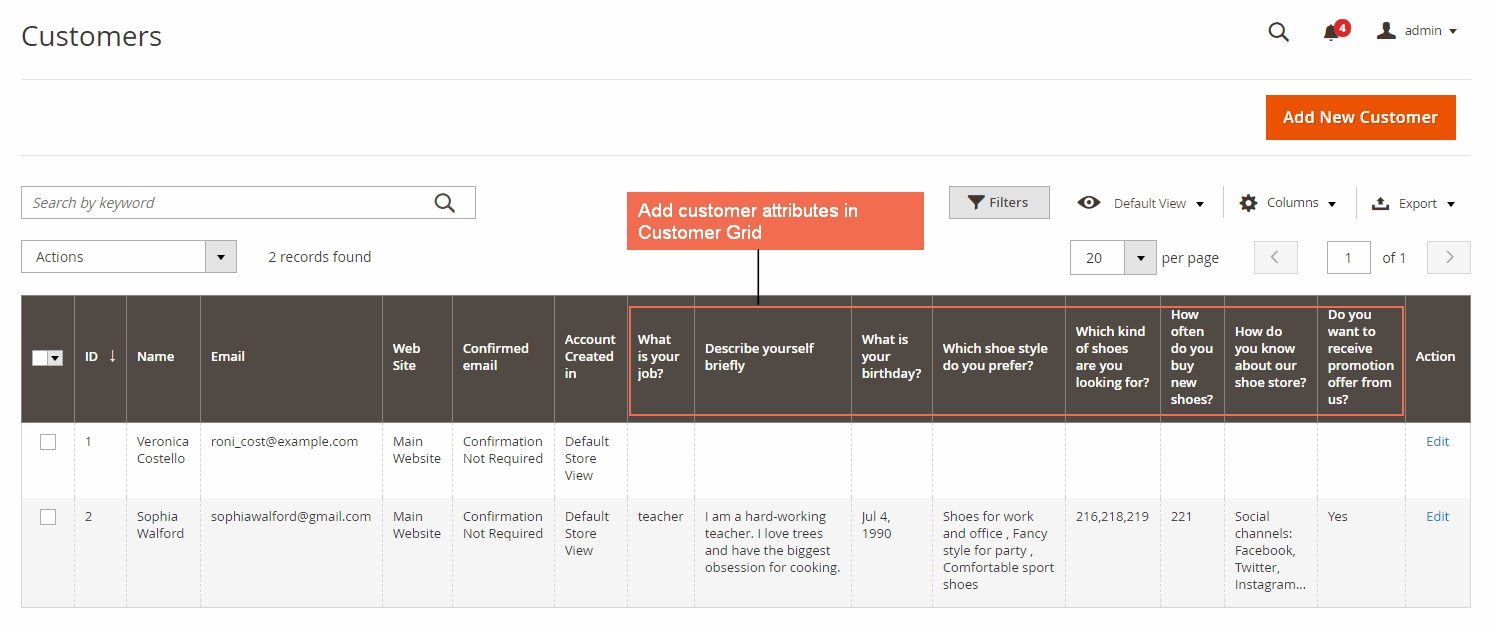
Display customer attributes in Customer Grid:
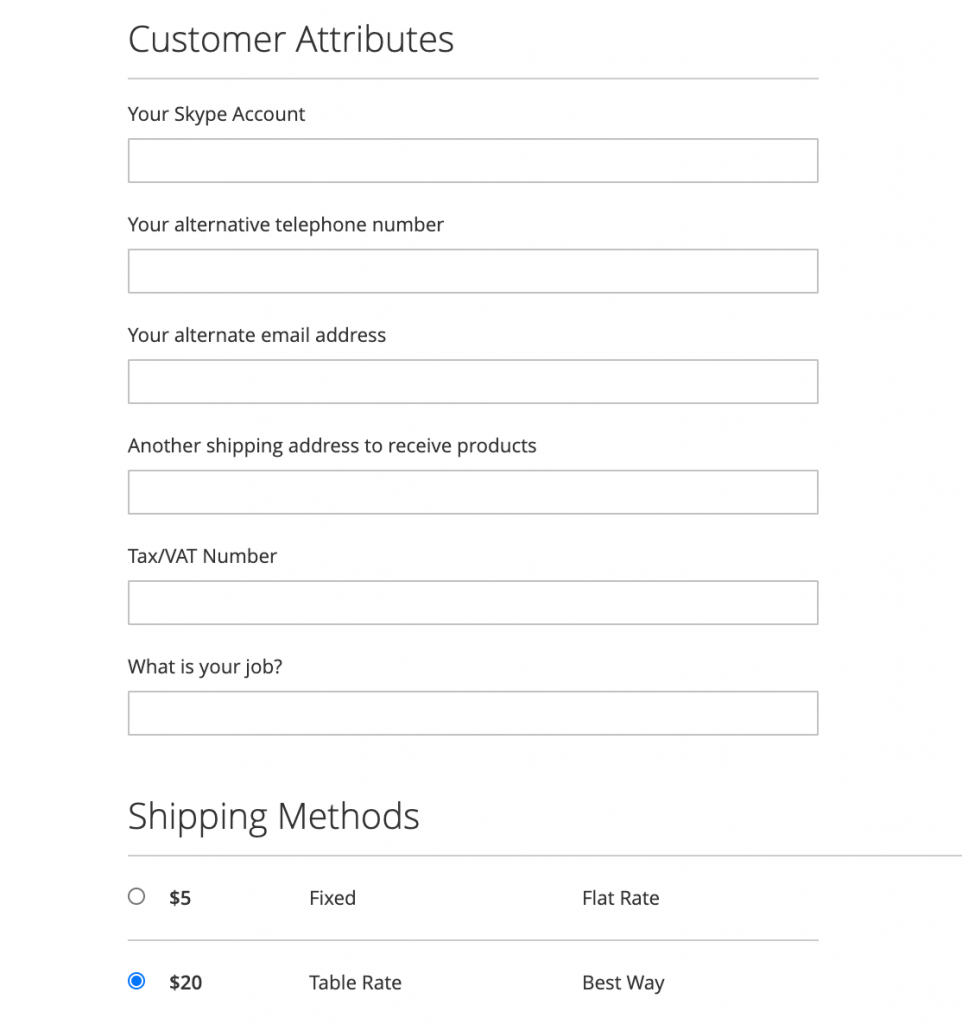
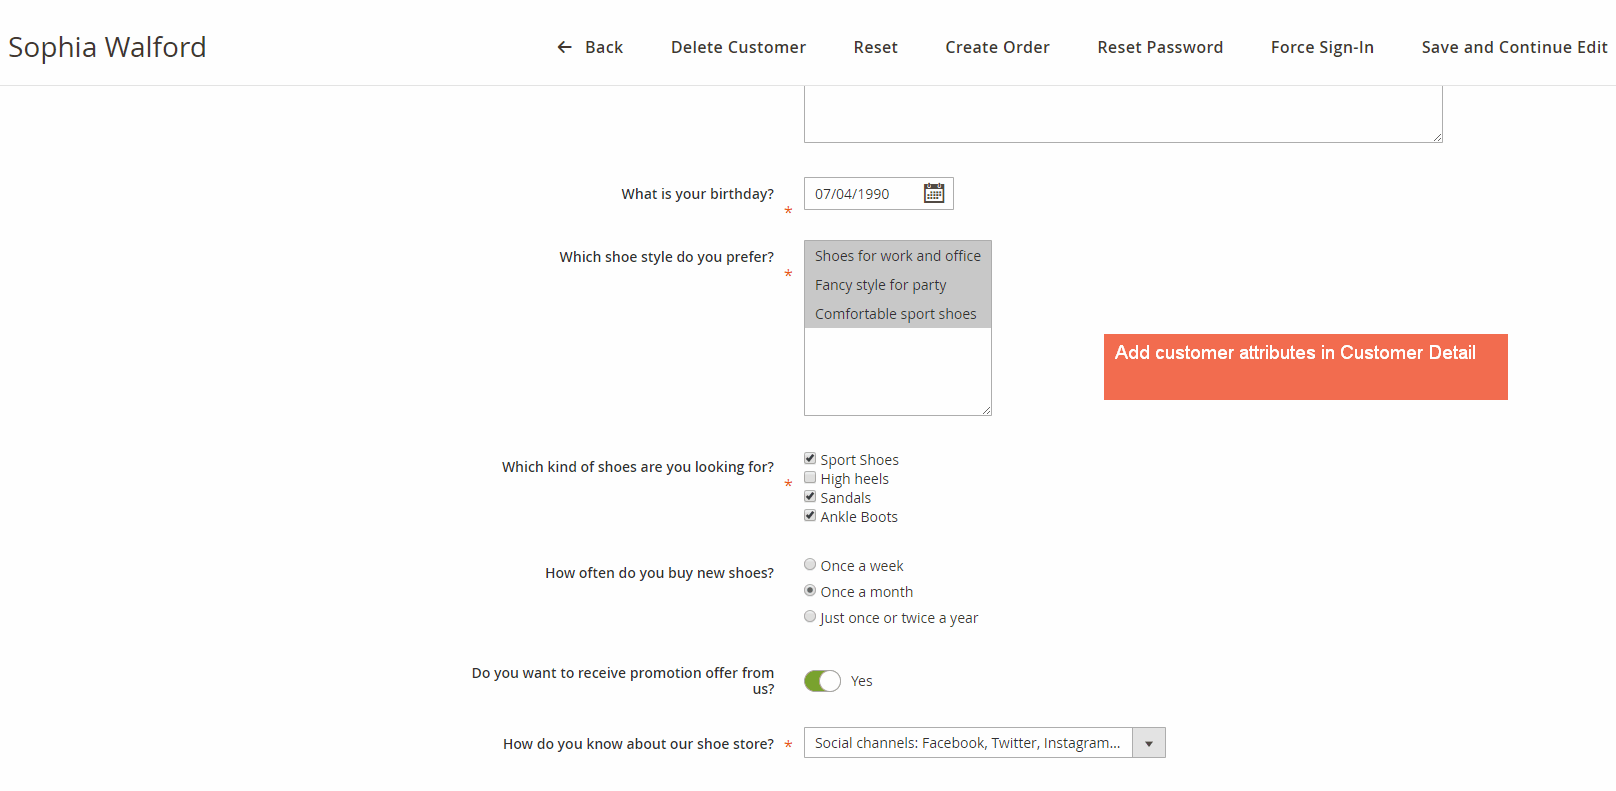
Display customer attributes in Customer Detail Page:
Go to Sales Orders.
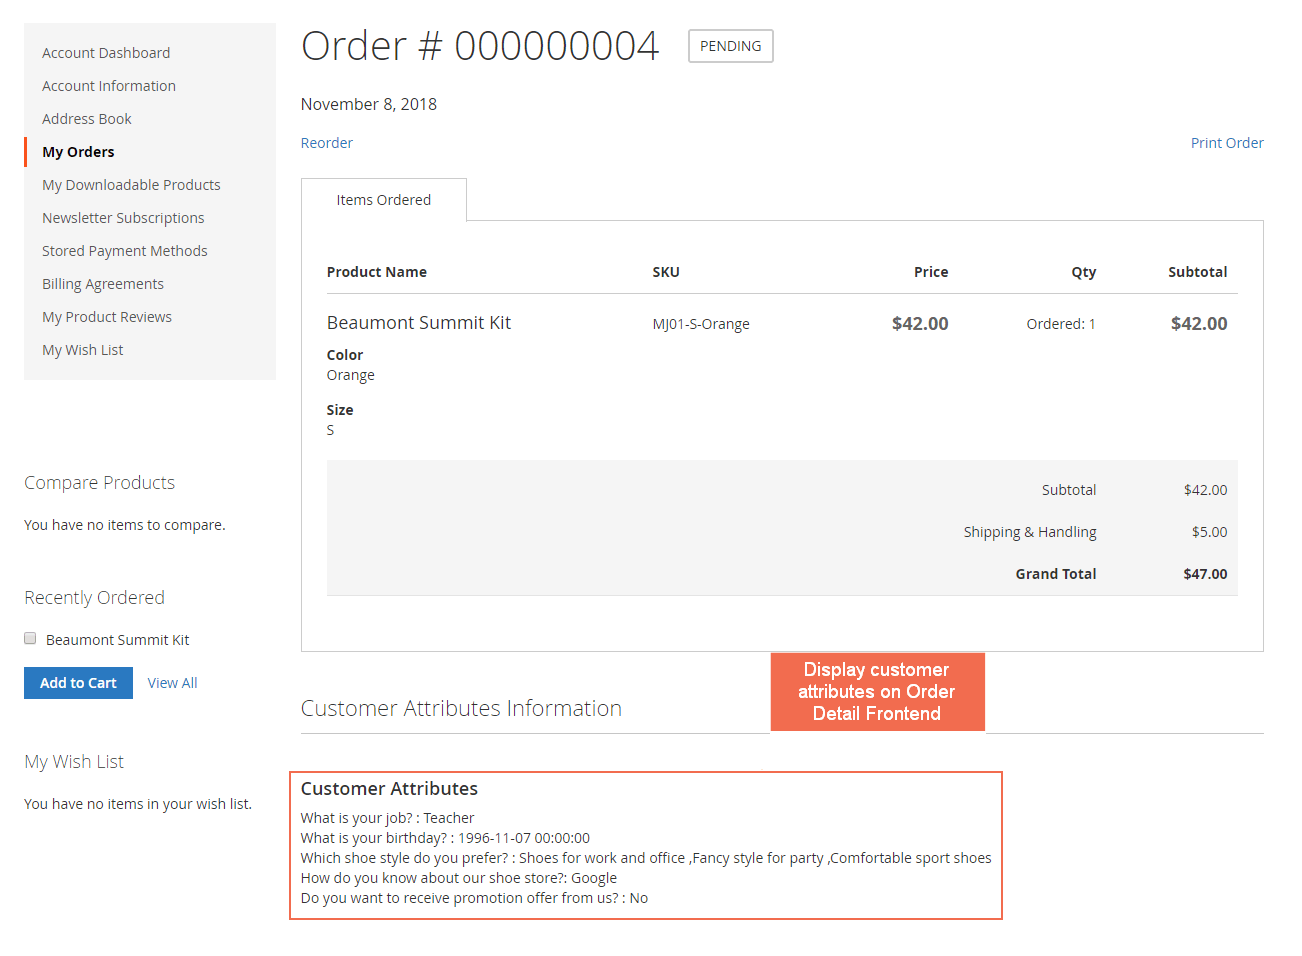
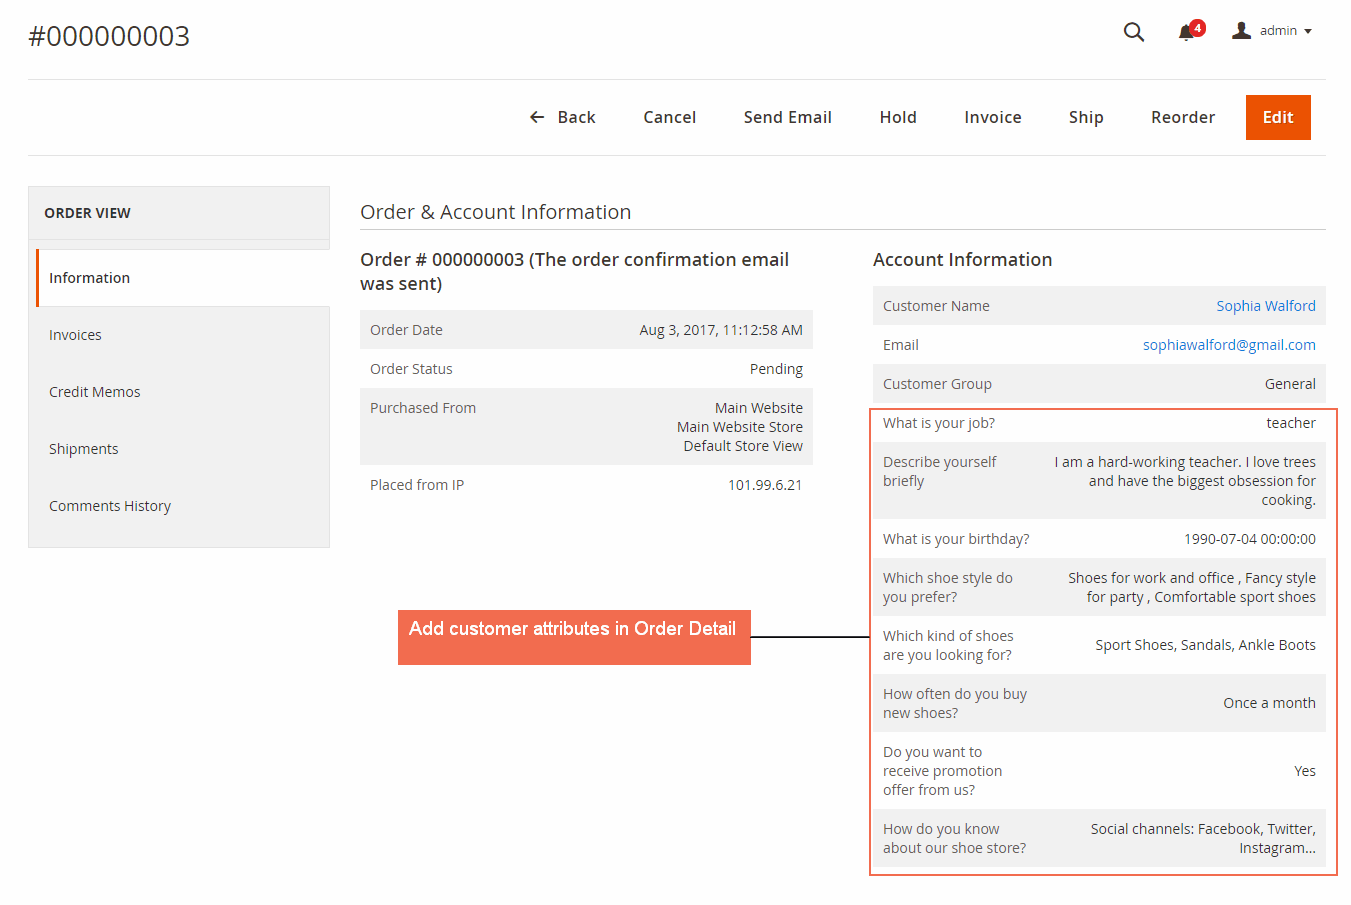
Display customer attribute in Order Detail Page:
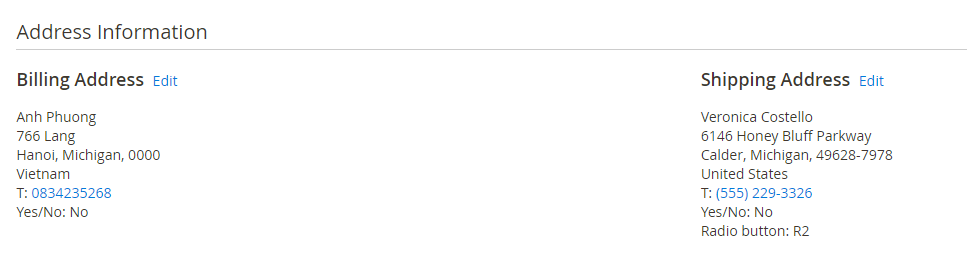
Display customer address attribute in Address Information:
2.6. Import Customer with Attributes
Customer Attributes for Magento 2 extension allows importing customer with the created customer attributes by using the .csv file.
Firstly, prepare the file of customer information with customer attributes to import. All created customer attributes must be included in the import file with each customer attributes code listed in separate columns. Please make sure that all customer attribute codes are the same as attribute codes of existing customer attributes.
For customer attributes with the input type is a checkbox or radio button, use option's ID instead of options' value. For customer attributes with the input type is a dropdown or multiple select, fill in with correct options' value.

Admins can also download the sample file by following System Import.
In Entity Type, choose Custom Main File to import new customers with customer attributes.
In Import Behavior, select one of the following actions:
- Add/Update complex data: New data is added to the existing attributes in the database.
- Delete Entities: Any existing data of entities in the import file is removed from the database of the stores.
- Custom Action: Admins can also override the import behavior by writing a custom option.
In Select file to Import, upload the file prepared earlier. Make sure that the size of the uploaded file is not more than 3M.
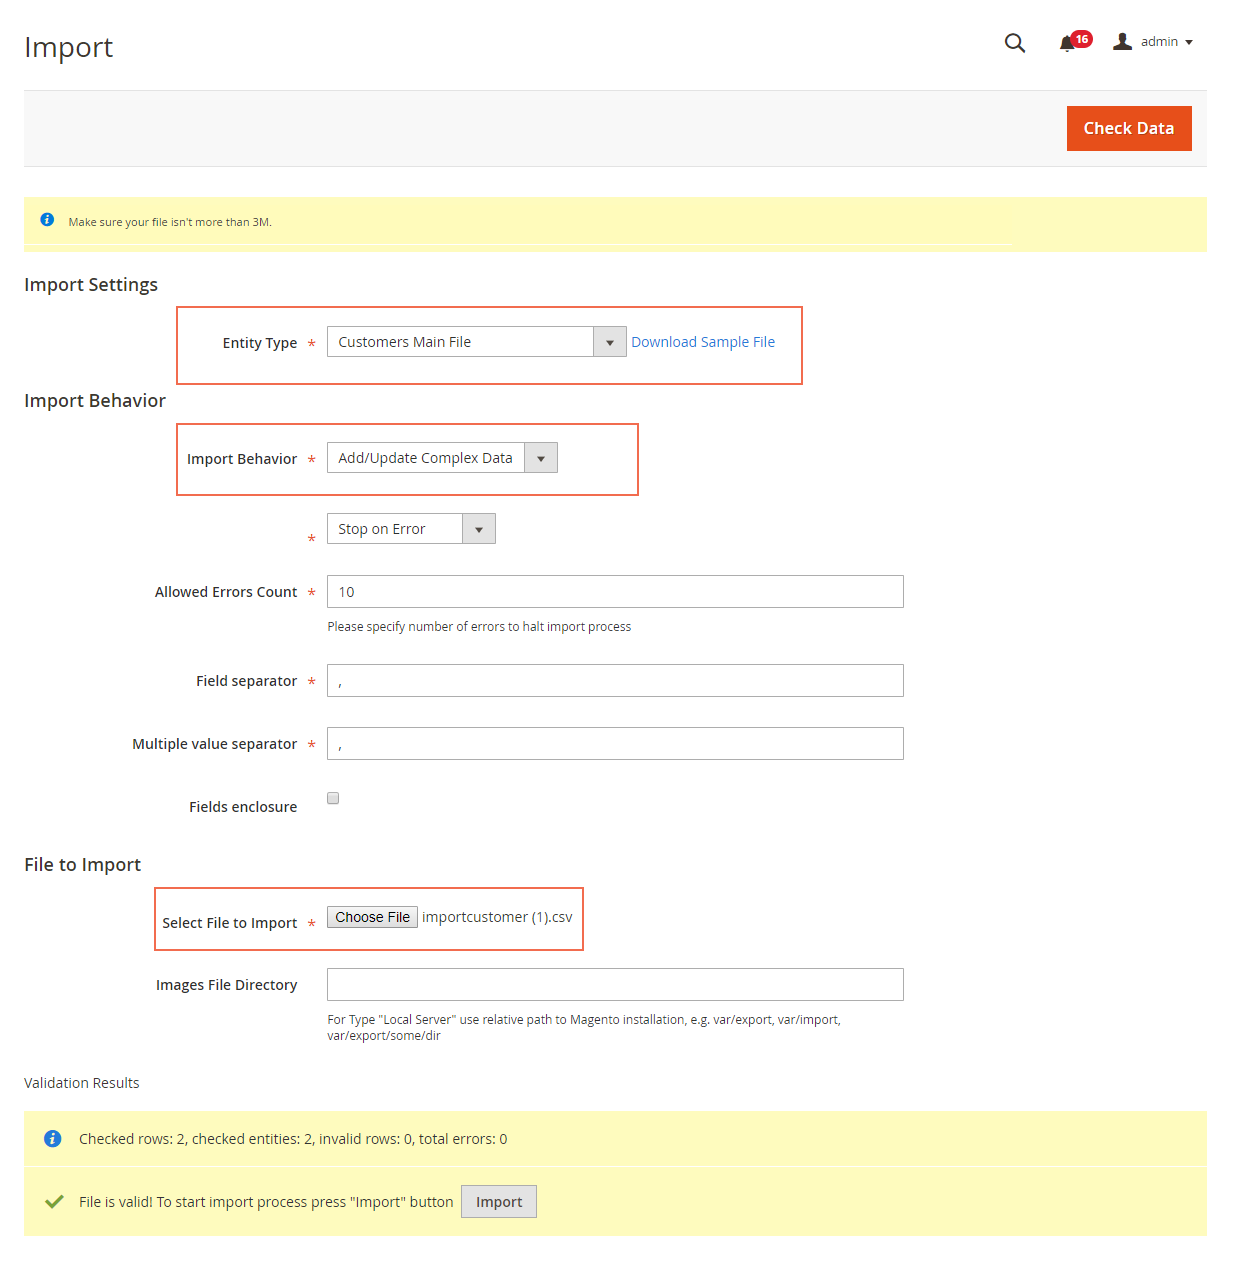
On completing, tap Check Data button in the upper-right corner. Wait for few seconds for the validation to perform.
If the import data is valid, the successful message will be displayed as in the screenshot. Click on Import button to process the import to the end of the data. Otherwise, there is any problem in data, the error message will appear. Just correct the invalid data and re-upload the file.
2.7. Notes for Disabling/Deleting the Extension
Please pay attention to:
- Disable the customer attributes created by the extension when disabling it
- Also, delete the customer attributes created by the extension should you want to delete it
This clearance is important because disabling/deleting the extension might interfere with the performance of orders or customer accounts. For example, a required customer attribute may disrupt the checkout/registration process if the extension is no longer working.